C-Hopetree CHTFLADDESW User manual

PLEASE READ CAREFULLY AND RETAIN FOR FUTURE REFERENCE
Ladder Desk - Single
BEFORE YOU START
•
Check you have all the listed parts before you start assembling.
•
In the event of missing or damaged parts, contact our customer support team.
•
We suggest assembling on a soft surface such as a drop sheet or rug to avoid scratching.
•
Assembly will be made easier if two people work together.
PARTS LIST
Item Picture Qty Description
A1
A2
B1
B2
1Lower Right Side Frame
Lower Left Side Frame
1
1Upper Right Side Rear Strut
Upper Left Side Rear Strut
1
1CHTFLADDESWv2019
IMPORTANT INFORMATION
•
Never use power tools to assemble this product.
•
Clean only with a soft damp cloth, do not use abrasive cleaning products.
•
Do not place hot items directly on any laminate surfaces.
•
Take care when placing objects on the shelves or tabletops as the surface can be scratched.
• Maximum safe top shelf load 15lbs/7kgs.
• Maximum safe shelf load 30lbs/14kgs.
• This product contains small parts and sharp points, keep away from children and pets until assembly is
complete.
• Do not sit or stand on the product under any circumstances.
• Serious or fatal crushing injuries can occur from furniture tip-over accidents. To prevent this product from
tipping over it should be permanently fixed to a wall. Fixing devices for the wall are NOT included with this
product as different wall materials require different fixing devices. You should use a fixing device suitable
for the walls in your home. For advice on suitable fixing devices contact your local specialized hardware or
DIY shop.
• When using this product basic common-sense safety precautions should be followed to reduce the risk of
personal injury and/or damage to the product.
SAFETY WARNING

ASSEMBLY INSTRUCTIONS
2CHTFLADDESWv2019
H
I
Joining Bracket
8
4
Flat Head Hex Bolt - M6*12mm
1
Hex Wrench - M6
2
M6
M6
Flat Head Hex Bolt - M6*25mm
J
K
1
Hex Wrench - M5
L
12 Flat Washer - M6
M5*40
M6
M5
M6*12
G
Laminate Rear Brace (Upper and Lower)
2
M6*25
C1 Upper Right Side Front Strut
1
C2 Upper Left Side Front Strut
1
DLaminate Desktop
1
ELaminate Shelf
1
F
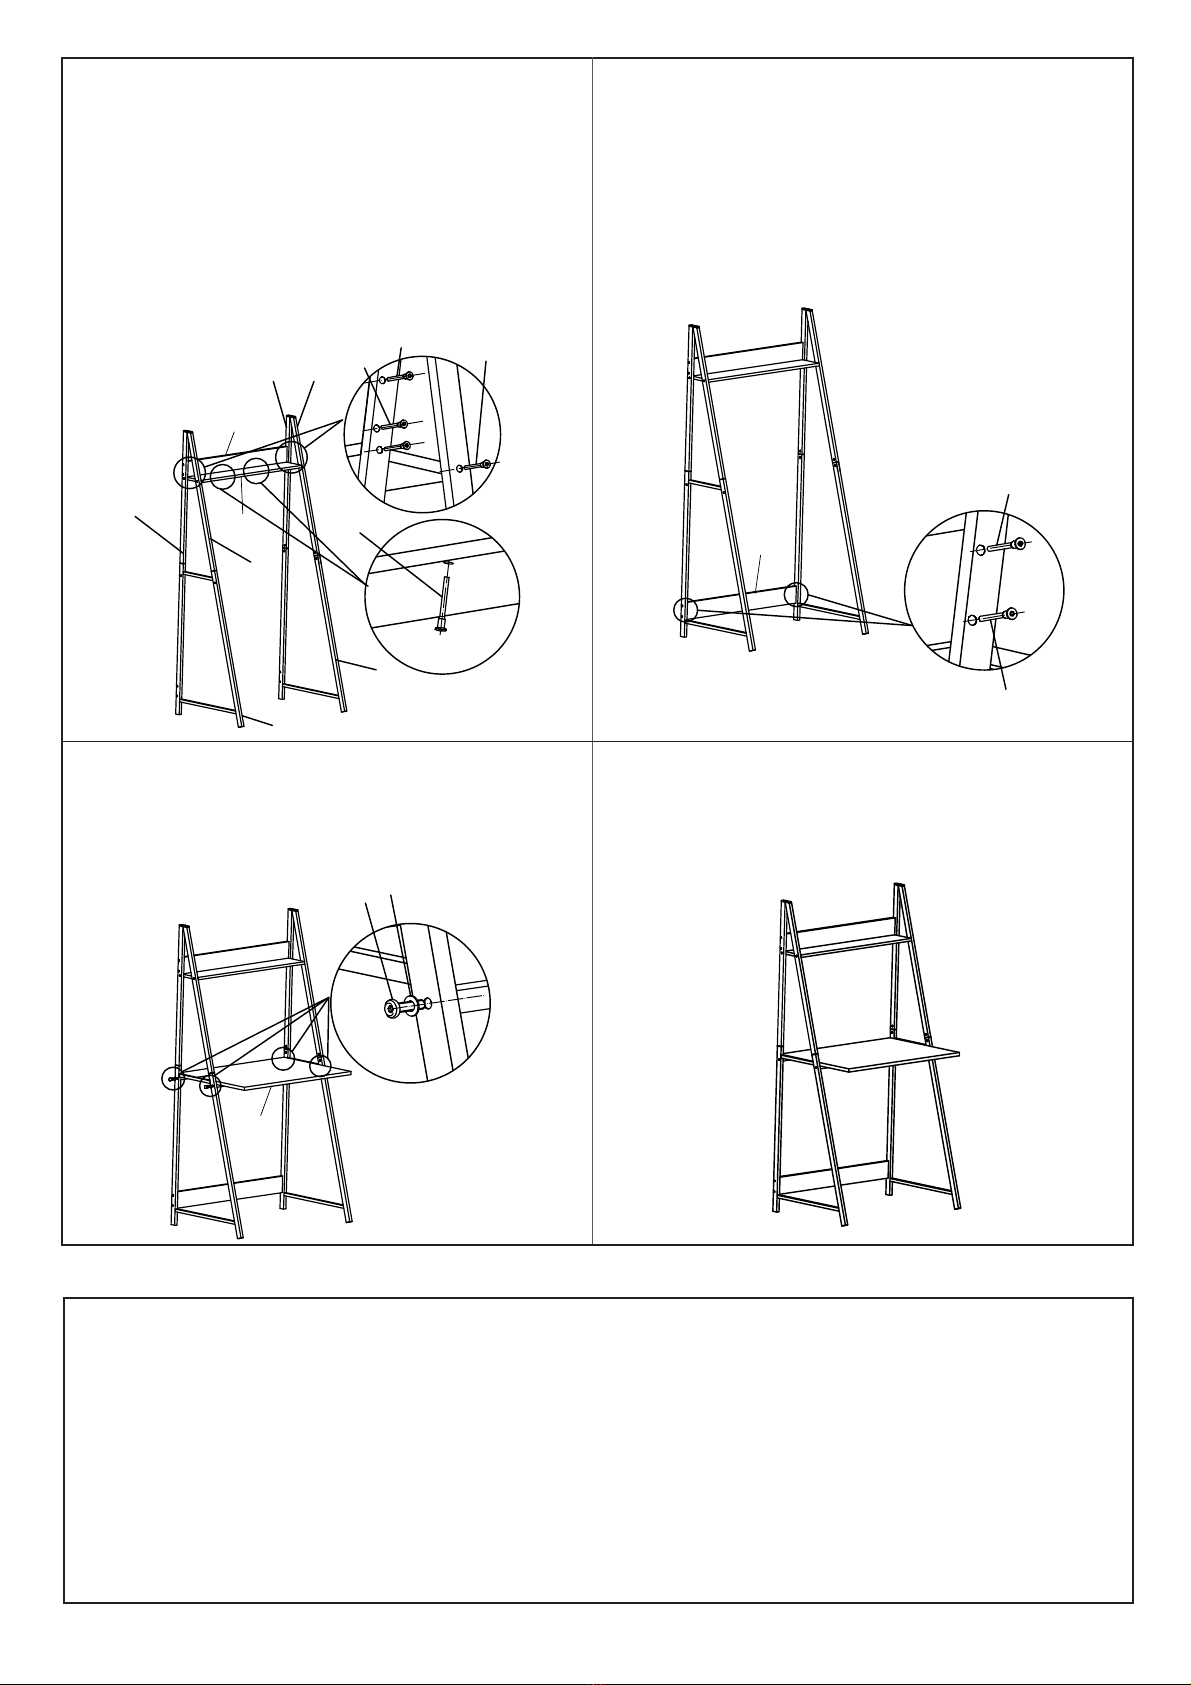
Take the lower right side frame (A1) making sure
the plastic leg connectors are pointing upwards and
join the upper right side rear strut (B1), and the
upper right side front strut (C1) over the plastic
blocks in the lower right side frame. Secure with
12mm M6 bolts and M6 washers. Finger tighten
only at this stage. Repeat this step for the left side.
Step 1 Step 2 (At this stage a second pair of hands
will be very helpful.)
Fix the joining brackets (G) to the top of the left and
right side frames using parts H and J (12mm M6
bolts and M6 washers). Finger tighten only at this
stage.
M
N
16
14
Plastic Hex Bolt Head Cover - M6
Firmit Connecting Screw - M5*40mm
A1-A2
B1-B2 C1-C2
HJ
G
H
J
CUSTOMER SUPPORT
For all service related inquiries including missing or damaged parts and assembly issues please email
guarantee that we will fix the problem to your complete satisfaction.
Your complete satisfaction matters to us, so if our product hasn’t met or exceeded your expectations, or if
you are having any difficulty with assembly, missing or damaged parts, please email our customer support
team directly, let us know the full details of the issue (attaching clear pictures to your email will always help
us to better understand exactly what the problem is). We do ask that you reach out to our customer support
team directly before leaving any negative review or feedback on Amazon.
Step 3 Step 4
Take the remaining laminate rear brace (F) and
align the holes in the shelf with the holes in the
lower rear side frames as shown. Fix using 40mm
M5 firmit screws as shown. Finger tighten only at
this stage.
3CHTFLADDESWv2019
Take the laminate shelf (E) and align the holes in
the shelf ends with the holes in the side frames as
shown. Fix using 40mm M5 firmit screws as shown.
Finger tighten only at this stage. Now align the
holes in the ends of the laminate rear brace with the
2 holes in each of the upper rear legs of the
assembled side frames and the two holes in the
laminate shelf (E). Fix using 40mm M5 firmit screws
as shown. Finger tighten only at this stage.
Step 5
Take the laminate desktop and align the holes in the
desktop with the holes in the side frames as shown.
Fix using 25mm M6 bolts and M6 washers as
shown. Finger tighten only at this stage.
L
L
L
L
F
E
C1
B1
A1
A2
B2
C2
L
L
F
D
IJ
Step 6
Tighten all the bolts using the correct size hex
wrench supplied. Cover M6 bolt heads with plastic
bolt head covers (K) if desired.
Other C-Hopetree Indoor Furnishing manuals


Popular Indoor Furnishing manuals by other brands

Mayer
Mayer 2475 quick start guide

Studio Designs
Studio Designs Paws & Purrs 61009 Assembly instructions

Evan furniture
Evan furniture PERUGIA V1 Assembly instruction

Furniture of America
Furniture of America CM3479PC-2PK Assembly instructions

Forte
Forte GNTB012 Assembling Instruction

DMTrade
DMTrade SPE-201 installation guide

Furniture of America
Furniture of America CM3552WC-PC-2PK Assembly instructions

Blanco
Blanco BLANCOWAVE 510-881 Specification sheet

LINSY HOME
LINSY HOME LS209P2-A Assembly instructions

urmet domus
urmet domus Yokis MVR500ER manual

Monarch Specialties
Monarch Specialties I 1601 Assembly instructions

SEI
SEI CK8773R0BP Assembly instructions


