caddytrek R2 S-Series User manual

R2 S-Series
User Manual
SS-7031-UD Rev. 1.02

IMPORTANT SAFETY INFORMATION
CAUTION
To prevent risk of fire or battery explosion, keep away from ignition
sources, heat and flame. Avoid mechanical or electrical abuse.
Risks for fires and explosions can be reduced by following these tips:
Only use the battery that is designed for the device.
Only use charging cords that come with the device.
Keep batteries at room temperature.
Do not charge near anything that could possibly catch fire.
Do not store in direct sunlight or anything flammable.
Keep them in hot vehicles.
If your lithium-ion battery has any of the following signs, stop using it
immediately, keep it away from flammable materials, and call 702-982-
6598 immediately.
Strange odor
Leaking
Change in color or shape
Excessive overheating
Strange noises
Lithium-Ion batteries operate without any problems most of the time but
because they store so much power, they can also explode or catch fire
when they are used carelessly or improperly. It is important to be aware of
the potential dangers of lithium ion batteries and follow good battery
safety tips to prevent fires or explosions.
This symbol is to alert you to important safety
information about the CaddyTrek Lithium-Ion battery.
Please read carefully.

Table of Contents
Section Page No.
I. Getting Started 1-2
Contents of Box 1
Adjusting the 5th Wheel 1
Removing the Battery 1
Frame Lock 1
Charging the Battery 2
Checking Battery Power Levels 2
Using the Battery Chargers 2
II. Unit Operation 3-7
Components Box Info 3
Powering Up the CaddyTrek 3
Using the Handset 4
Handset Battery and Charger 4
Additional Handset Commands 5
Recalibrating Handset 5
Handset Pairing and Re-Synching 6
Handset Checks 6
Standby Mode 7
Manual Push Mode 7
Remote Control 7
Obstacle Avoidance 7
III. Precautions 8
IV. Maintenance 9-11
V. Warranty Registration 12
VI. Firmware Update / Download 13-15
VII. Frequently Asked Questions 16-17
VIII. Warranty and Return Policies 18-19
IX. Specifications 20

I. GETTING STARTED
What’s included in the box?
The CaddyTrek is shipped with the following items:
Main Battery
Main Battery Charger
Handset
Handset Battery
Handset Battery Charger
USB “Firmware Cable”
Note: The firmware cable is used when updating firmware as needed.
Adjusting the 5th. Wheel Removing the battery
* Pull pin to adjust outward * Pull pin and pull battery outward
Frame Hinge Locked Frame Hinge Unlocked
Notice the direction of the knob when locked and unlocked.
Pg. 1

I. GETTING STARTED
Charging the Battery
Charge the main battery and handset for at least 8 hours before using.
Checking battery level
To check the battery level, press the RED button on the battery.
3-green lights: The battery is fully charged.
2-green lights: The battery is 50-75% charged (recommend charging)
1-green light: The battery is less than 50% charged (must be charged)
1-red light: Needs charging (dead)
Using the Battery Charger
1. Plug the battery charger into the main battery’s charging port.
2. Plug the other end of battery charger into a power outlet.
3. The indicator light should turn RED to indicate battery is charging.
4. If the charge indicator light does NOT turn RED:
a. Leave the charger plugged into the battery.
b. Unplug the charger from outlet, wait 5 seconds then plug it back in.
c. Within 3 seconds the indicator light should now turn RED.
6. Let the battery charge over-night or for a minimum of 8 hours.
7. Check the battery charge level again.
8. If the indicator light is GREEN, the battery is charged.
a. Unplug the charger from the battery.
b. Carefully reinsert the battery back into the unit and begin use.
9. If the indicator light is not GREEN, call customer support.
Pg. 2

II. UNIT OPERATION
Unit Information
Powering up the unit
1. Power on the unit.
2. Position yourself behind the large wheels, then power on the handset.
3. You will hear 2 short beeps once communication is established.
4. Unit will power on in Standby Mode (SB) with LED light flashing.
Pg. 3
Battery power level indicator
Charging Port
Serial Number
Power Button
Speaker
Power Button

II. UNIT OPERATION
Handset battery and charger
The handset comes with a Lithium Ion 4.2V battery and battery charger.
The battery takes about 2 hours for a full charge and will last about 30
hours.
Using the Handset
Press the Forward, Reverse, Left or Right directional buttons to move
the unit in the desired direction.
To accelerate the unit to its maximum speed, hold down the Forward
button or press repeatedly.
To slow down the unit to a stop while moving forward, repeatedly press
the Reverse or Stop button.
Once stopped, pressing once more will reverse the unit.
Pg. 4

II. UNIT OPERATION
Additional Handset Commands
Note: All codes must be done from (SB) mode. The unit powers up in (SB)
mode and returns to (SB) mode upon exiting any other mode.
1. Mute the handset:
a. Press: DOWN, DOWN, DOWN, DOWN, DOWN, DOWN, DOWN, STOP
b. Repeat steps to disengage
2. Free the wheels while unit is on:
a. Press: UP, UP, UP, UP, UP, UP, UP, STOP
b. To disengage, press STOP
3. Check the handset battery charge level:
a. Turn on the handset
b. Press and hold the STOP button for 2-3 seconds
c. Read LED light indicators left to right
i. 4 green lights = 100% charged
j. 3 green lights = 75% charged
k. 2 green lights = 50% charged
l. 1 green light = 25% charged
4. Recalibrate Handset
If the unit veers to the left or to the right, you may need to recalibrate.
a. Turn unit on.
b. While in SB mode, press left right, left right, and then stop. You’ll
hear two beeps.
Pg. 5

II. UNIT OPERATION
Handset Pairing and Re-Synching
There may be times when the handset will lose connection to the unit,
usually after either replacing the handset or battery with either a new or
replacement one.
Should the handset and unit lose connection with each other, they will
need to be re-synched.
1. TURN OFF the unit and the Handset.
2. TURN ON the unit…within 5 seconds, TURN ON the handset.
3. Immediately press and hold the STOP button while repeatedly pressing
the UP button.
4. When you hear beeps from handset, you have successfully re-synced
your handset with your unit.
5. Your handset will then revert to Stand By (SB) Mode.
PLEASE NOTE: The entire re-synching process should only take about 10
seconds. It may be necessary to restart the process if too much time elapses
between turning on the unit and the handset.
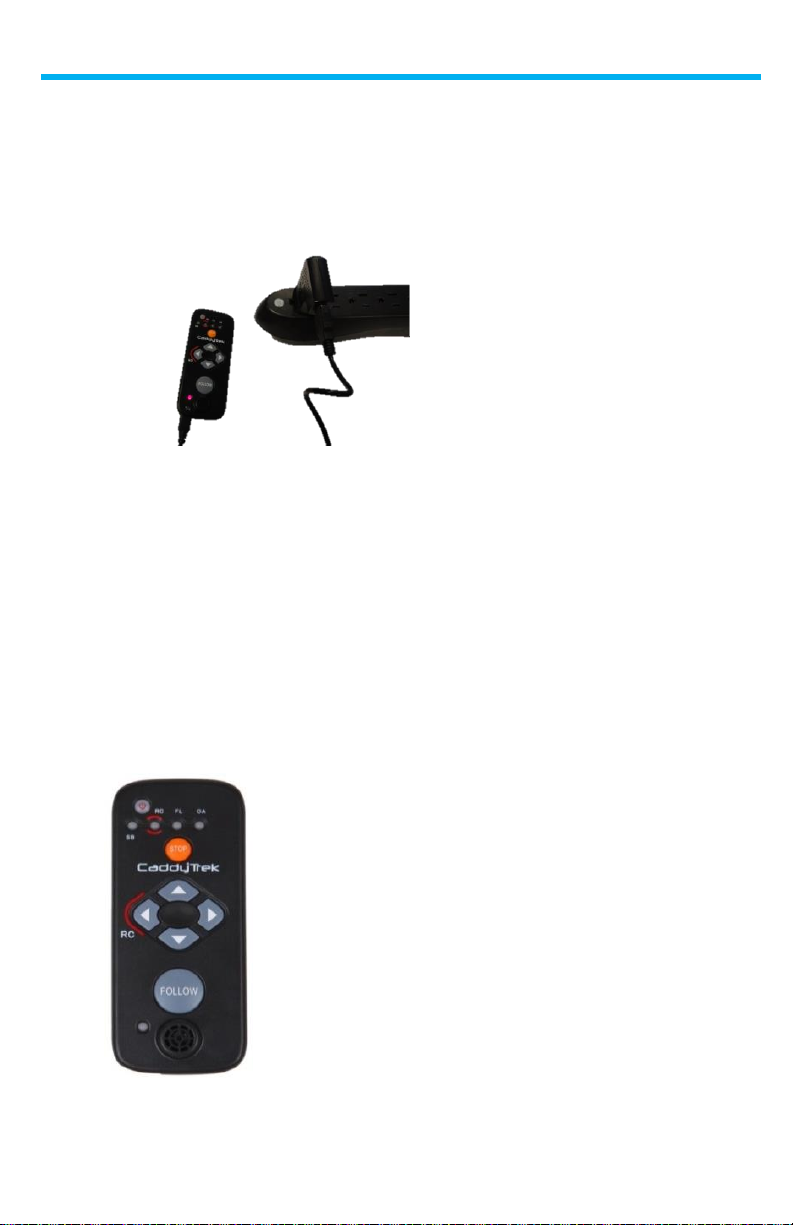
Handset Checks
Check for the overall tactile feel of handset buttons. Are they stuck,
loose, or normal?
Remove the handset battery, and re-insert it. Upon re-inserting the
handset battery, you should hear a long beep sound signifying that
both the handset and handset battery are functioning.
When charging your handset battery, the LED indicator should be red
for charging and green for when charging is complete.
The LED indicator switches to green when you remove the handset
battery while the handset is still plugged in.
When powering on your handset you should hear a long beep sound.
Shortly afterwards, you should hear 2 short beeps that signifies
handset pairing.
To check handset battery levels, hold the orange STOP button.
Pg. 6

II. UNIT OPERATION
Standby (SB) Mode
SB mode is a starting point for all other modes. When the unit is turned on,
the unit will automatically enter into SB mode and wait for further
instruction from the user.
While in SB mode:
1. The wheels will be locked.
2. The unit will automatically sync with the handset.
3. You should not push the unit.
Manual Push Mode (use on level ground)
1. Make sure the unit and the handset are powered off.
2. Guide the unit with the push bar.
3. The unit will not automatically brake when the power is off, so use
caution on hills and steep slopes.
Remote Control (RC) Mode
1. Power on the unit.
2. Position yourself behind the large wheels (chest facing the unit).
3. Hold down the “Left” directional button until the handset emits a short
beep and the RC light will turn on.
4. To stop the unit, press the STOP button once.
5. Push STOP twice to go back to SB mode
Obstacle Avoidance (OA)
The unit is shipped with this feature off.
1. Turn on OA
a. Turn on handset
b. While in SB mode, PRESS and
HOLD the down directional button until you hear two short beeps.
2. Turn off OA
a. Turn on handset
b. While in SB mode, PRESS and HOLD the down directional button
until you hear four short beeps.
Note: The OA and RC light will light up when OA is in use.
Pg. 7

III. PRECAUTIONS
Wide Open Spaces
CaddyTrek is designed for use in wide open spaces only. Do not operate
CaddyTrek in enclosed or confined areas.
Abnormal or erratic behavior can be caused by radio frequency signals
interference Wi-Fi or similar electronic signals.
The CaddyTrek uses RF and Ultrasound signals to communicate back and
forth from the CaddyTrek to the remote handset. On occasion the user
may experience interference with the communication of the unit.
When encountering interference, use Push mode.
Signal Interference
Be aware of the following:
Overhead power lines
Radio and cell phone towers
Nearby airports or air bases
WI-FI or similar electronic signals
In the Parking Lot
Use either RC or Push mode when in parking lot to navigate around cars or
other obstacles that can cause the signal to bounce.
Obstacles
User needs to be aware of obstacles and how they can affect the
Ultrasound signals. Use caution and move slowly around obstacles.
When in doubt use Push mode.
Do’s and Don’ts
DO: Use caution when operating the unit on steep slopes and side hills.
DON’T: Direct the unit towards other people, bunkers, or other carts
DO: Walk slowly and guide the unit carefully to clear hazardous areas
DO: Secure unit when transporting
Pg. 8

IV. MAINTENANCE
Introduction
This chapter is designed to educate users on how to keep their CaddyTrek
unit in ideal operating condition.
Though the frequency to perform maintenance tasks are recommended, it
may be necessary to perform certain procedures more or less frequently
depending on use. Owners must use their best judgement in maintaining
their CaddyTrek.
Tools and Materials
3 mm wrench and needle nose pliers
4, 5 and 6 mm hex wrench
Phillips and flathead screwdriver
Cleaning solution or water
Bearing lubricant
Brush and Rags
Caster Wheel Assembly Maintenance
The Caster Wheel Assembly requires a high level
of maintenance. Dirt and grass often get stuck in
or around the caster wheel and caster wheel fork.
If you let it accumulate, it will weaken the caster
wheel.
After a day out on the golf course, before storing
your unit, lightly brush the dirt and grass off the
assembly.
1. Cleaning
It is common for grass and dirt to collect in
the caster fork area. Remove the caster
wheel, brush away the dirt and grass that
has accumulated, then wipe with a damp
rag so that the caster wheel may spin freely
and unhindered.
Pg. 9

IV. MAINTENANCE
2. Lubrication
Spray a silicon bearing lubricant directly on the caster wheel bearing to
prevent it from seizing. It is recommended to remove the caster wheel to
apply the lubricant, so do this while you are cleaning the wheel. Just be
sure to wipe the bearing clean before applying lubricant.
3. Tension
Adjust the caster wheel’s tension with the 6 mm hex wrench. We recommend
you adjust the caster wheel tension so that it will spin a total of five
revolutions per spin.
Do not over tighten the caster wheel as
this may cause damage and misalign the
bearing. A caster wheel that is too tight
will demand more power from the motors,
which in turn will drain the battery at a
quicker rate.
Motor Wheel Assemblies
1. Use a flat head screwdriver to remove large clumps of grass that are
caught in the treads of the motor wheels.
2. Once the large clumps are removed, brush off the remaining dirt and
grass with a cloth.
Pg. 10

IV. MAINTENANCE
Handset
1. Practice cleanliness with your handset. A damp cloth
works best for cleaning. Keep your handset free from
dirt, moisture and impacts.
2. Unmaintained handsets can cause your unit to
become unresponsive to commands or behave
strangely. Test and press each button for a tactile feel
and make sure it is operational. Check all modes for
functionality.
Storage
Although the unit is made to withstand
tough conditions, we recommend that the
unit be stored in a clean, dry environment.
If leaving the unit at your club, ask that the
unit be stored inside or with the regular
drivable cart fleet. Proper storage insures
the safety and condition of the unit when
not in use.
Wet Conditions
You may use your unit under light rain
conditions, as the internal electronic
components are protected by a weather
resistant seal. However, we DO NOT
suggest using under a heavy down pour as
a precaution. This could lead to corrosion
in other areas of the cart. Also, if the unit
goes off into a lake or water hazard area,
and is completely submerged, DO NOT USE! There could be serious damage
to the electronics and you should wait enough time to ensure the cart is
completely dried out.
Pg. 11

V. WARRANTY REGISTRATION
How to Register Your Unit (change photo)
1. Locate your serial number (see photo on page 1).
2. Log on to www.caddytrek.com
3. Click on the “Support” tab
4. Click on the drop down box and select “warranty registration.”
5. User Profile
a. Fill in the following fields:
i. Address 1
ii. City and State
iii. Zip and Country
iv. Serial Number
v. Purchase Date and Location
vi. Comments (if applicable)
b. Click on “Submit”
Pg. 12

VI. FIRMWARE UPDATE
What is a Firmware Update? When new software and/or new features are
added to the CaddyTrek R2 and S-Series, you can install them on your unit
by using a firmware cable (included with unit at time of purchase).
1. System Requirements
This program application can only
be installed on the following
programs:
Vista
Windows 7
Windows 8
Windows 10
2. Connect the USB cable to the USB port on unit.
3. Connecting to the handset
a. Take the back cover off handset and remove battery (Fig. B).
b. Connect the smaller input to the handset (Fig. C).
Note: Sometimes it’s helpful to use a small pen like object to properly secure
the cable to the handset
c. Insert the USB cable connector to the USB port on the host PC (Fig D).
Pg. 13
Top
Insert
cable
here
Fig. A
Image B.1
Fig. B
Fig. C
Fig. D
Fig. A

VI. FIRMWARE UPDATE
4. Update the Firmware
a. Power on the unit BEFORE continuing.
b. From host PC, click on the file named "CTII_Programming.exe."
The dialogue should look like this:
Note: If you receive a warning message “Windows protected your pc”, it’s OK. Click
on “more info” and then click on “open file anyways”.
c. Turn off the unit.
d. Click the Program button and within 5 SECONDS, power on the unit.
If you do not power on the unit within 5 seconds you will get an
error. It’s OK, just close the error box and start again.
e. While transferring you will see the following:
f. When the upload is complete you will see the following.
Pg. 14

VI. FIRMWARE UPDATE
5. Finishing Up
a. Turn off the Unit.
b. Unplug all of the cables and put away the firmware cable.
c. Power on the unit and within 5 SECONDS power on the handset.
d. Then hold down the STOP button and while holding the STOP
button press the UP directional button 4 times.
e. The handset will beep twice and only the light under Standby
(SB) will be flashing.
Changing the RF (Radio Frequency) Signal
If you experience signal interference it’s probably because of nearby cell
phone towers or the location of your golf course.
If you are experiencing signal interference, you can change the signal band.
Start with Yellow first, then Gray, then Pink.
To change the RF signal, follow these steps:
Turn CaddyTrek on
Click on desired RF signal (Yellow first)
You will hear a beep beep
Turn CaddyTrek off and on
The RF signal is now set
Pg. 15

VII. FREQUENTLY ASKED QUESTIONS
What is Obstacle Avoidance (OA)?
OA stands for “Obstacle Avoidance.” This mode detects and avoids hitting
objects such as curbs, bushes and people walking in its path.
It is not meant to stop the unit and it is not used to avoid trees. When the
cart is interrupted, simply go around the obstacle.
How fast will the unit move?
CaddyTrek can travel up to 4 mph. The unit will start off slowly, however,
you can speed the unit by pressing and holding down the forward
directional button on the handset.
How many holes of golf can I play on one full charge of the battery?
CaddyTrek can be used for up to forty two (42) holes depending on the
golfer and the course being played. We recommend charging the battery
after a full round of golf to always ensure it can be used for maximum play.
What happens if it rains and my CaddyTrek gets wet?
The main battery and the rear wheel motors are enclosed and encased in a
protective weather resistant housing to eliminate exposure to rain.
However, if the cart goes into a lake or water hazard, depending on the
amount of time submerged in water, there could potentially be problems to
the internal electronics. Call our support department at 702-982-6598 x2.
Will the unit avoid obstacles and avoid collisions?
The user should take all precautions to avoid bunkers, people, and bodies of
water. Refer to Obstacle Avoidance section on page 7.
Can I purchase an additional battery or handset?
Additional batteries and other parts can be purchased through our website
at www.caddytrek.com.
Note: when purchasing additional handset, you will need to have your serial
number of the unit.
Pg. 16

VII. FREQUENTLY ASKED QUESTIONS
Who can I contact about any issues concerning my cart?
For technical problems with your cart, contact customer service at 702-
982-6598 x2 or x4. You can also email us at support@caddytrek.com.
How often should I charge my cart?
Charge after a full round or when indicator lights are flashing with two
green lights. When not using, store battery at a 75% charge level.
Both my unit and handset are powered up, but I can’t engage any of the
modes, what do I do?
You need to re-synch the handset to the unit. Power off the unit and the
handset. Remove the battery from the handset and wait 5-10 seconds then
reinsert the battery into handset. Power back on the unit, wait 5-10
seconds, then power on the handset. Your cart and handset should now
sync automatically. If not, hold down the “Stop” button and press the “Up”
button multiple times until the handset beeps. Syncing is signified by two
short beeps coming from the handset.
Why won’t my handset power on? I pressed the power button.
Press and hold the power button on the handset firmly for 2-3 seconds.
Why won’t my cart turn on? I pressed the power button.
Assure that you have completely pressed down the power button on the
unit until it beeps and the intermittent green LED light is visible, and the
wheels are locked. Also, make sure the battery is fully inserted into unit
and that it is fully charged.
My handset is beeping three long beeps and won’t stop. What do I do?
This is a low charge level indicator. Charge your handset battery.
What do I do in the event I lose control of my cart?
Whenever you are in doubt, PRESS STOP. Press the STOP button multiple
times to revert to Standby Mode. This will lock the motors and stop the
unit immediately. Practice this exercise before use.
Pg. 17
Other manuals for R2 S-Series
3
Table of contents
Other caddytrek Golf Car manuals
Popular Golf Car manuals by other brands

Club Car
Club Car Onward 4 Passenger Operator's manual

Cushman
Cushman 632904 Service manual

Club Car
Club Car Onward HP 2-Passenger Electric Operator's manual

Club Car
Club Car Villager Homologated LSV manual

American Landmaster
American Landmaster 36V 200 Series Service manual

Star EV
Star EV Roadster 2+2-AC Owner's manual and service guide