Cadero CB6-SBG001-A User manual

CB6-SBG001-A
•FOR PROPANE ONLY.
•IF A REPLACEMENT IS NECESSARY, PLEASE CONTACT EITHER OUR CUSTOMER SERVICE
DEPARTMENT OR YOUR LOCAL DEALER.
•THE USE OF UNAUTHORISED PARTS CAN CREATE UNSAFE CONDITIONS AND
ENVIRONMENT.
•FOR OUTDOOR USE ONLY.
•READ THE MANUAL CAREFULLY BEFORE ASSEMBLY AND USE.
•ACCESSIBLE PARTS MAY BE VERY HOT. PLEASE KEEP YOUNG CHILDREN AND PETS AWAY.
•PLEASE RETAIN THESE INSTRUCTIONS FOR FUTURE REFERENCE.
•PLEASE REMOVE ANY PACKAGING BEFORE ASSEMBLY AND USE.
•PLEASE READ THE CARE AND WARRANTY INSTRUCTIONS CAREFULLY BEFORE USE.
USER MANUAL FOR GAS BARBECUE GRILL

2
WARNING
! !
CAUTION
! !
DANGER
! !
WARNING
! !
CAUTION
! !
DANGER
! !
Safety Symbols
The symbols and boxes shown below explain what
each heading means. Read and follow all of the
messages found throughout the manual.
Indicates an imminently hazardous situation which,
if not avoided, will result in death or serious injury.
Be alert to the possibility of serious bodily injury if
the instructions are not followed. Be sure to read
and carefully follow all of the messages.
Indicates a potentially hazardous situation. If not
avoided, may result in minor or moderate injury.
1. Do not store or use gasoline or
other flammable liquids or vapors in
vicinity of this or any other
appliance.
2. An LP cylinder that is not
connected for use should not be
stored in the vicinity of this or any
other appliance.
Combustion by-products produced
when using this product contain
chemicals known to the State of
California to cause cancer, birth
defects, and other reproductive harm.
WARNING
! !
CAUTION
! !
DANGER
! !
For residential use only. Do not use
for commercial cooking.
WARNING
! !
CAUTION
! !
DANGER
! !
If you smell gas:
1. Shut off gas to the appliance.
2. Extinguish any open flame.
3. Open the lid
4. If odor continues, keep away from
the appliance and immediately call
your gas supplier or your fire
department.
WARNING
! !
CAUTION
! !
DANGER
! !
WARNING
! !
CAUTION
! !
DANGER
! !
WARNING
! !
CAUTION
! !
DANGER
! !

3
EIGHT BURNERS GAS BARBECUE GRILL PARTS LIST
YTITNAUQNOITPIRCSED
Cooking Grate . . . . . . . . . . . . . . . . . . . . . . . . . . . . . . . . . . . . . . . . . . . . . . . . . . . . . . . . .
Flame Tamer . . . . . . . . . . . . . . . . . . . . . . . . . . . . . . . . . . . . . . . . . . . . . . . . . . . . . . . . . .6
Swing-away Warming Rack . . . . . . . . . . . . . . . . . . . . . . . . . . . . . . . . . . . . . . . . . . . . . . . .1
Firebox Assembly . . . . . . . . . . . . . . . . . . . . . . . . . . . . . . . . . . . . . . . . . . . . . . . . . . . . . . .1
Side Shelf Assembly . . . . . . . . . . . . . . . . . . . . . . . . . . . . . . . . . . . . . . . . . . . . . . . . . . . . .2
Cabinet Top Plate . . . . . . . . . . . . . . . . . . . . . . . . . . . . . . . . . . . . . . . . . . . . . . . . . . . . . . .1
Cabinet Side Plate-Left Assembly . . . . . . . . . . . . . . . . . . . . . . . . . . . . . . . . . . . . . . . . . .1
Cabinet Side Plate-Right Assembly . . . . . . . . . . . . . . . . . . . . . . . . . . . . . . . . . . . . . . . . . .1
Cabinet Inside Plate - Left . . . . . . . . . . . . . . . . . . . . . . . . . . . . . . . . . . . . . . . . . . . . . . . . .1
Cabinet Inside Plate - Right. . . . . . . . . . . . . . . . . . . . . . . . . . . . . . . . . . . . . . . . . . . . . . . . 1
Cabinet Rear Plate. . . . . . . . . . . . . . . . . . . . . . . . . . . . . . . . . . . . . . . . . . . . . . . . . . . . . . . 1
Cabinet Door Plate - Left Assembly . . . . . . . . . . . . . . . . . . . . . . . . . . . . . . . . . . . . . . . . .1
Cabinet Door Plate - Right Assembly. . . . . . . . . . . . . . . . . . . . . . . . . . . . . . . . . . . . . . . . .1
Drawer Assembly . . . . . . . . . . . . . . . . . . . . . . . . . . . . . . . . . . . . . . . . . . . . . . . . . . . . . . . .2
Base Plate Assembly. . . . . . . . . . . . . . . . . . . . . . . . . . . . . . . . . . . . . . . . . . . . . . . . . . . . . 1
Gas Tank Supporter Assembly . . . . . . . . . . . . . . . . . . . . . . . . . . . . . . . . . . . . . . . . . . . . . .1
.3

ASSEMBLY STEPS
Tighten the
screws
1
2
Sharp edges! Wear gloves if necessary
CAUTION
! !
4
M6X15 4PCS

(1)
(3)
(2)
3
4
5
Flame Tamer
Instruction for replacing burners (if burners need to be replaced)

5
6
6
Place cooking grates (No. 2) into main body. Grate wires running front to
back should be toward the top side of square tubes at each end.
No. 2

7
7
AA Battery
(Battery is not provided)

8
1. Never fill the cylinder beyond 80%
full. An overfilled cylinder (liquid
propane LP) tank is hazardous
due to possible propane being
released from the safety relief
valve.
2. Do not store a spare LP cylinder
under or near this barbeque grill or
in an enclosed area.
3. If the information in Steps 1 and 2
are not followed exactly, a fire
causing death or serious injury may
occur.
4. The safety relief valve on the LP
tank could activate, releasing
propane and cause an intense fire
with risk of property damage,
serious injury or death.
5. If you see, smell or hear escaping
gas, immediately get away from the
LP tank and call your fire
department.
6. All spare LP tanks must have safety
caps installed on the tank outlet.
CAUTION
! !
DANGER
! !
GENERAL INSTALLATION
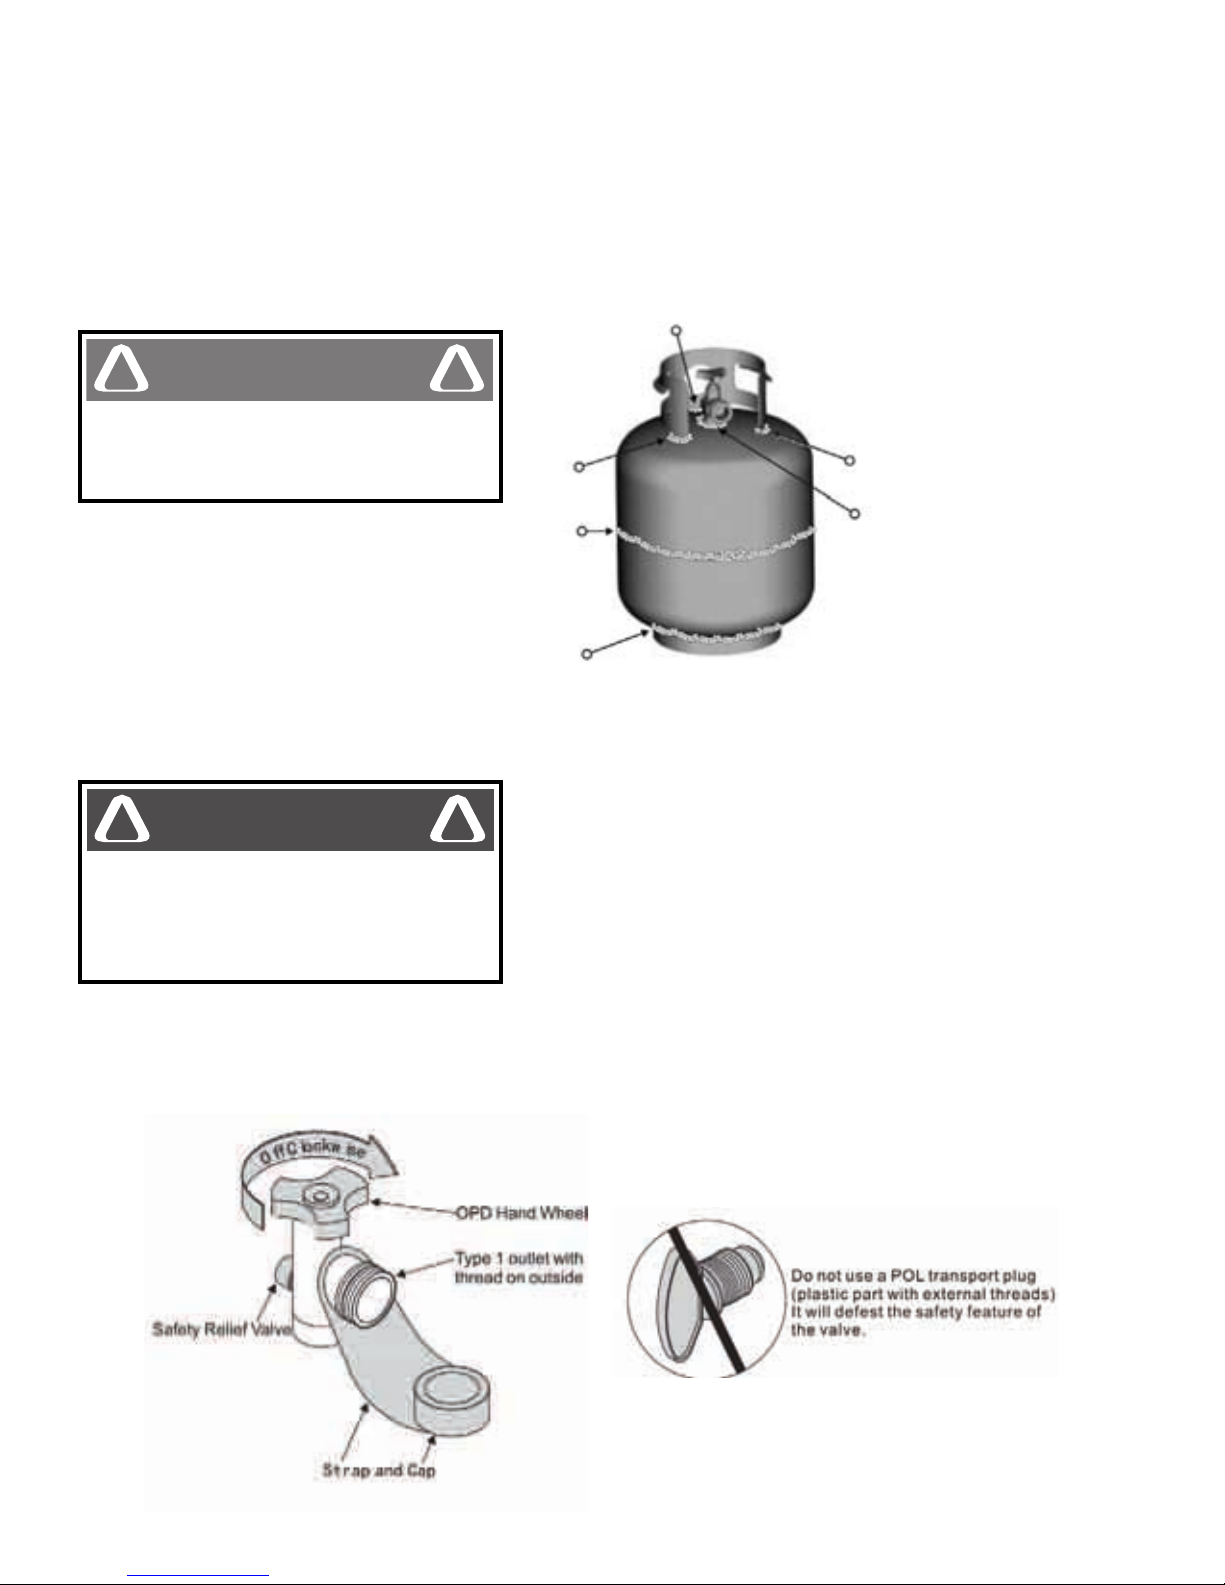
LP Tank Removal, Transport and Storage
TURN OFF all control knobs and LP tank valve. Turn coupling
nut counter-clockwise by hand only. DO NOT use tools to dis-
connect. Loosen tank screw beneath bottom shelf, then lift LP
tank up and out of cart. Install safety cap onto LP tank valve.
Always use cap and strap supplied with valve. Failure to use
safety cap as directed may result in serious personal injury and/or
property damage.
Adisconnected LP tank in storage or being transported must
have a safety cap installed (as shown). DO NOT storean LP tank
in enclosed spaces such as carport, garage, porch, covered patio
or other building. NEVER leave an LP tank inside a vehicle which
may become overheated by the sun.
DO NOT store an LP tank in an area where children play.
The LP tank used with your grill must meet the following
requirements:
Use LP tanks only with these required measurements:
12” (30.5cm) diameter x 18” (45.7cm) tall
with 20 lb 9 kg.) capacity maximum.
LP tank valve must have:
(1) Type 1 outlet compatible with regulator or grill
(2) Safety relief valve
The LP tank must be constructed and marked in accordance with
the specifications required for LP cylinders.
Place dust cap on cylinder valve outlet whenever the cylinder is
not in use. Only install the type of dust cap on the cylinder valve
outlet that is provided with the cylinder valve. Other types of caps
or plugs may result in leakage of propane.

9
The LP tank must be provided with a listed overfilling prevention device.
LP tank must be arranged with vapor withdrawal and include a collar to protect LP tank valve.
LP (Liquified Petroleum Gas)
LP gas is odorless and colorless when produced. For your safety, LP gas has been given an
odor so that it can be smelled.
LP gas is highly flammable and may ignite unexpectedly when mixed with air.
LP Tank Filling
Use only licensed or experienced dealer.
LP dealer must purge new tank before filling.
Dealer should NEVER fill LP tank more than 80% of LP tank volume. Volume of propane in tank
will vary by temperature.
Afrosty regulator indicates gas overfill. Immediately close LP tank valve and call local LP gas
dealer for assistance.
DO NOT release liquid propane (LP) into the atmosphere. This is a hazardous practice.
Always keep LP tanks in an upright position during use, transit or storage.
Leak test LP tanks BEFORE connecting to grill.
LP TANK LEAK TEST
For your safety:
Leak test must be repeated each time when LP tank is exchanged or refilled.
DO NOT SMOKE during leak test.
DO NOT use an open flame to check for gas leaks.

10
The grill must be tested outdoors in a well-ventilated area, away from ignition sources such as gas fired
or electrical appliances. During leak test, keep grill away from open flames or sparks.
Use a clean paintbrush and a 50/50 mild soap and water solution. Brush soapy solution onto areas
indicated by arrows in figure below.
Connecting Regulator to the LP Tank
1. LP tank must be properly secured onto grill.
2. Turn all control knobs, including side burner to the
OFF position.
3. TurnLP tank OFF by turning hand-wheel clockwise
to a stop.
4. Remove the protective cap from LP tank valve.
Always use cap and strap supplied with valve.
If growing bubbles appear, DO NOT
use or move the LP tank. Contact an
LP gas supplier or your firedepart-
ment.
WARNING
! !
CAUTION
! !
DANGER
! !
DO NOT use chemical household
cleaning agents. Damage to gas train
components can result.
WARNING
! !
CAUTION
! !
DANGER
! !

11
5. Hold regulator and insert nipple into LP tank valve. Hand-tighten the coupling nut, holding regulator
in a straight line wtih the LP tank valve so as not to cross-thread the connection.
6. Turn the coupling nut clockwise and tighten to a full stop. The regulator will seal on the back-check
feature in the LP tank valve, resulting in some resistance. An additional one-half to three-quarter turn
is required to complete the connection. Tighten by hand only. Do not use tools.
7. The cylinder should be kept vertical
with ground. If the cylinder is tilted,
it is dangerous and may cause gas
to leak.
NOTE:
If you CANNOT complete the connection, disconnect regulator and repeat Steps 5 and 6. If you are
still unable to complete the connection, DO NOT use this regulator.
Nipple has to be
centered in the
LP tank valve.
WRONG
Hold coupling nut and regulator
as shown for proper connection
to LP tank valve.
CORRECT
WARNING
! !
CAUTION
! !
DANGER
! !
DO NOT insert any foreign objects into the valve outlet. You may damage the valve and cause a leak. Leaking
propane may result in an explosion, fire and cause severe personal injury or death.
NEVER attempt to attach this grill to the self-contained LP gas system of a camper trailer or motor home.
DO NOT use grill until leak-tested.
If a leak is detected at any time, STOP and CALL the fire department.
If you cannot stop a gas leak, immediately CLOSE LP tank valve and call LP gas supplier or your fire department.

12
LEAK TESTING VALUES,
HOSE AND REGULATOR
1. Turn all grill control knobs to OFF
2. Be sure regulator is tightly connected to LP tank.
3. Completely open LP tank valve by turning hand wheel
counter-clockwise. If you hear a sound, turn gas off
immediately. It could mean there is a major leak. Correct before proceeding.
4. Brush soapy solution onto areas circled above.
5. If “rowing” bubbles appear, there is a leak. Close LP tank valve immediately and retighten
connections. IF LEAKS CANNOT BE STOPPED, DO NOT TRY TO REPAIR.
Call for replacement parts or order new parts.
6. Always close LP tank valve after performing leak test by turning head wheel closkwise.
7. The pressure regulator and hose assembly supplied with this appliance must be used. Replacement
pressure regulator and hose assemblies must be specified by the appliance manufacture.
WARNING
! !
CAUTION
! !
DANGER
! !
For safe use of your grill and to avoid serious injury:
DO NOT let children operate or play near grill.
DO NOT block holes in bottom or back of grill.
Check burner flames regularly.
Use grill in well-ventilated space. NEVER use in enclosed spaces such as carport, garage, porch,
covered patio, or under an overhead structure of any kind.
DO NOT use charcoal or ceramic briquets in a gas grill (unless briquets are supplied with your grill.)

13
Use grill at least 3 ft. from any wall or surface. Maintain 10
ft. clearance to objects that can catch fire or sources of
ignition such as pilot lights on water heaters, live electrical
appliances, etc.
APARTMENT DWELLERS:
Check with management to learn the requirements and fire
codes for using an LP gas grill in your apartment complex.
If allowed, use outside on the ground floor with a three-foot
clearance from walls. DO NOT use on or under balconies.
NEVER attempt to light burner with lid closed. A buildup of
non-ignited gas inside a closed grill is hazardous.
NEVER operate grill with LP tank out of correct position specified in assembly instructions.
Always close LP tank valve and remove coupling nut before moving LP tank from specified
operation position.
SAFETY TIPS
Before opening LP tank valve, check the coupling nut for tightness.
When grill is not in use, turnoffall control knobs and LP tank valve and close lid.
NEVER move grill while in operation or while still hot.
Use long-handled barbeque utensils and oven mitts to avoid burns and splatters.
Maximum load for side burner and side shelf is 10 pounds.
The grease tray must be attached to grease clip and emptied after after each use. DO NOT remove
grease cup until grill has completely cooled.
If you notice grease or other hot material dripping from grill onto valve, hose or regulator, turn off
propane gas supply at once. Determine the cause, correct it, then clean and inspect valve, hose and
regulator before continuing. Perform a leak test.
Keep ventilation openings in cylinder enclosure (grill cart) free and clear of debris.
The regulator may make a humming or whistling noise during operation. This will not affect safety or
use of grill.
If you have a grill problem, see the “Troubleshooting Section”

14
IGNITER LIGHTING
DO NOT lean over grill while lighting.
1. OPEN LID. Turn on gas at LP tank.
2. Make sure all control knobs are in the
OFF position.
3. Select the burner to be lit. Push and turn the
control knob of that burner to High.
4. Press the electronic igniter and hold for
3-5 seconds to light burner.
5. If burner does NOT ignite in 5 seconds, turn
control knobs OFF, wait 5 minutes to allow gas
to dissipate and repeat lighting procedure.
6. To turn off, turn control knobs clockwise until it
locks in OFF position.
If burner does NOT light, turn knobs to
OFF,wait 5 minutes and try again. If the
burner does NOT ignite with the valve
open, gas will continue to flow out of the
burner and could accidentally ignite with
the risk of injury.
WARNING
! !
CAUTION
! !
DANGER
! !
WARNING
! !
CAUTION
! !
DANGER
! !
Putting out grease fires by closing the lid is not possible. Grills are well ventilated for safety reasons.
DO NOT use water on a grease fire. Personal injury may result. If a grease fire develops, turn knobs
and LP tank off.
DO NOT leave grill unattended while preheating or burning off food residue on High. If grill has not
been regularly cleaned, a grease fire can occur that may damage the product.

15
LIGHTING THE ROTISSERIE BURNER
1. Read and follow all of the warnings and instructions in Owner’s Manual before lighting.
2. Open grill hood before lighting rotisserie burner
3. Make sure control knob is in the “OFF” position
4. Push and turn the control knob to the high position. Continue to push in control knob while press-
ing electronic igniter for no less than 5 seconds.
5. Once burner is lit, continue to push and hold control knob for 30 seconds.
6. If ignition does not occur in 5 seconds, turn control knob to OFF, wait 5 minutes to allow gas to dis-
sipate and repeat lighting procedure.
7. To turn off, turn control knob clockwise until it locks in the OFF position.
MATCH-LIGHTING
DO NOT lean over grill while lighting
1. OPEN LID. Turn on gas at LP tank.
2. Place a long lit match or a long lighter into the light-
ing hole on right side of the grill.
3. Push in and turn far right burner knob to High. Be
sureburner lights up and stays lit.
4. Light adjacent burners in sequence by pushing
knobs in and turning to High.
BURNER FLAME CHECK
At least once each year, remove cooking grates, light burner, rotate knobs from High to Low. You
should always see a smaller flame in Low position than in High position. Always check flame prior to
each use. Performflame check on main burner and side burner.If only low flame is seen, refer to
“Suddon Drop or Low Flame” in the Troubleshooting section of this manual.
TURNING GRILL OFF
Turn all knobs to OFF position. Turn LP tank off by turning hand-wheel clockwise to a full stop.

16
IGNITER CHECK
Turn gas off at LP tank. Press and hold electronic igniter button. A click should be heard and a spark
seen each time between burner and electrodes. See Troubleshooting section if there is no click or
spark.
VALVE CHECK
Important: Make sure gas is off at LP tank before checking valves, and knobs are in Off position. To
check valves, first push in knobs and release, knobs should spring back. If knobs DO NOT spring
back, replace valve assembly before using grill. Turn knobs to Low position then turn back back to Off
position. Valves should turn smoothly.
HOSE CHECK
Before each use, check to see if hoses are cut or worn. Replace damaged hose before using grill. Use
only valve/hose/regulator specified by manufacturer.
Keep fuel supply hose away from any heated surfaces.
GENERAL GRILL CLEANING
Unit should be turned off and cool to clean. DO NOT mistake brown or black accumulation of
grease and smoke for paint. Interiors of gas grills arenot painted at the factory(and should NEVER
be painted). Apply a strong solution of detergent and water or use a grill cleaner with scrub brush on
insides of grill lid and bottom. Rinse and allow to completely air dry. DO NOT apply a caustic
grill/oven cleaner to surfaces.
Plastic parts: Wash with warm soapy water and wipe dry.
DO NOT use abrasive cleaners, degreasers or a concentrated grill cleaner on plastic parts. Damage
to and failure of parts can result.
Porcelain surfaces: Because of glass-like composition, most residue can be wiped away with baking
soda/water solution or specially formulated cleaner. Use non-abrasive scouring powder for stubborn
stains.
Painted surfaces: Wash with mild detergent or non-abrasive cleaner and warm soapy water. Wipe
dry with a soft non-abrasive cloth.
Stainless steel surfacess: Tomaintain your grill’shigh quality appearance, wash with mild detergent
and warm soapy water and wipe dry with a soft non-abrasive cloth after each use.

17
NATURAL HAZARD SPIDERS
FACT:Sometimes spiders and other insects climb into the grill tubes
attached to the burners. The spiders spin webs, build nests and lay eggs.
The webs or nests can be very small, but they are very strong and can block
the flow of gas. Clean burners prior to use after storing, at the beginning of
grilling season, or after a period of one month not being used.
“Spider guards” are placed on the air intakes in an effort to reduce this problem, but they will not elimi-
nate it! An obstruction can results in a “flashback” (a fire in the burner tubes). The grill may still light,
but the obstruction does not allow full gas flow to the burners.
STORING YOUR GRILL
1. Clean cooking grates
2. Store in dry location
3. When LP tank is connected to grill, storeoutdoors in a well-ventilated space and out of reach
of children
4. Cover grill if stored outdoors.
5. Storegrill indoors ONLYif LP tank is turned offand disconnected and the LP tank is removed
from grill and stored outdoors.
6. When removing grill from storage, follow “Cleaning the Burner Assemsbly” instructions before
starting the grill.
CLEANING THE BURNER ASSEMBLY
Follow these instructions to clean and/or replace parts of burner assembly or if you have trouble
igniting the grill.
1. Turn gas off at control knobs and LP tank.
2. Remove cooking grates, grease tray and grease cup.
3. Remove cotter pins from beneath each burner “foot” using a screwdriver or needle nose pliers.
4. Carefully lift each burner up and away from valve openings. (We suggest three ways to clean
the burner tubes. Use the one easiest for you)
A. Bend a stiff wire (a lightweight coat hanger works well) into a small
hook. Run the hook through each burner tube and burner several times.
B. Use a narrow bottle brush with a flexible handle (DO NOT use a brass wire brush), run
the brush through each burner tube and burner several times.
C. Wear eye protection: use an air hose to force air into the burner tube and out the air
ports. Check each port to make sure air comes out of each hole. If not, then use
Step A or B.

18
CLEANING THE BURNER ASSEMBLY (continued)
5. Brush entire outer surface of burner with a wire brush to remove food residue and dirt.
6. Clean any blocked ports with a stiff wire such as an open paper clip.
7. Check burner for damage. Due to normal wear and corrosion, some holes may become enlarged.
If any large cracks or holes are found, replace burner.
8. Carefully replace burners.
9. Replace cotter pin beneath each burner.
10. Replace grease tray, grease cup, and cooking grates.
INDIRECT COOKING
Poultry and large cuts of meat cook slowly to perfection on the grill by indirect heat. The heat from
selected burners circulates gently throughout the grill, cooking meat or poultry without the touch of a
direct flame. This method greatly reduces flare-ups when cooking extra fatty cuts because there is no
direct flame to ignite the fats and juices that drip during cooking.
INDIRECT COOKING INSTRUCTIONS
•Always cook with the lid closed
•Due to weather conditions, cooking times may vary. During cold and windy conditions, the
temperature setting may need to be increased to insure sufficient cooking temperatures.
ELECTRICAL GROUNDING INSTRUCTIONS
The outdoor cooking gas appliance is equipped with a three-prong (grounding) plug for your protec-
tion against shock hazardand should be plugged directly into a properly grounded three-prong
receptacle. DO NOT cut or remove the grounding prong from this plug.
WARNING
! !
CAUTION
! !
DANGER
! !
1-Burner Cooking
Cook with direct or indirect heat.
Best for smaller meals or foods.
Consumes less fuel.
2-Burner Cooking
Great indirect cooking on low.
Produces slow,even heating. Ideal for
slow roasting and baking.

19
FOOD SAFETY
Food safety is a very important part of enjoying the outdoor cooking experience. To keep food safe
from harmful bacteria, follow these steps:
• Clean: Wash hands, utensils and surfaces with hot soapy water before and after handling
raw meat and poultry.
• Separate: Separate raw meats and poultry from ready-to-eat foods to avoid cross
contamination. Use a clean platter and utensils when removing cooked foods.
• Cook: Cook meat and poultry thoroughly to kill bacteria. Use a thermometer to ensure
proper internal food termperatures.
• Chill: Refrigerate prepared food and leftovers promptly.
HOW TO TELL IF MEAT IS GRILLED THOROUGHLY
Meat and poultry cooked on a grill often brown very fast on the outside. Use a meat thermometer
to be surefood has reached a safe internal temperature, and cut into food to check for visual signs
of doneness.
Whole poultry should reach 180 F; breasts, 170 F. Juices should run clear and flesh should not
be pink.
Hamburgers made of any ground meat or poultry should reach 160 F, and be brown in the middle
with no pink juices. Beef, veal and lamb steaks, roasts and chops can be cooked to 145F.
All cuts of pork should reach 160 F.
NEVER partially grill meat or poultry and finish cooking later. Cook food completely to
destroy harmful bacterial.
When reheating takeout foods or fully cooked meats like hot dogs, grill to 165 F, or until
steaming hot.

20
PROBLEM
Burner(s) will not
light using ignitor.
Burner(s) will not
match light
Sudden drop in gas
flow or low flame.
POSSIBLE CAUSE
Wire and/or electrode covered with
cooking residue.
Electrode cracked or broken “sparks
at crack”.
Electrode tip not in proper position.
Wires are loose or disconnected.
Wires are shorting (sparking) between
ignitor and electrode.
Dead battery.
No gas flow.
Coupling nut and regulator not fully
connected.
Obstruction of gas flow.
Disengagement of burner to valve.
Is grille assembled correctly?
Out of gas.
Excess flow valve tripped.
PREVENTION/SOLUTION
Clean wire and/or electrode with
rubbing alcohol and clean swab.
Replace electrode(s).
Reconnect wires or replace elec-
trode/wire assembly.
Replace ignitor wire/electrode
assembly.
Replace with a new AA battery.
Check to see if LP tank is empty. If
LP tank is not empty, refer to
“Sudden Drop in Gas Flow”
Turn the coupling nut about one-half
to three-quarters additional turn until
solid stop. Tighten by hand only -
do not use tools.
Clear burner tube(s).
Re-engage burner and valve.
Check steps in assembly instruc-
tions.
Check for gas in LP tank.
Turn off knobs, wait 30 seconds
and light grill. If flames are still low,
turn off knobs and LP tank valve.
Disconnect regulator. Reconnect
regulator and leak test. Turn on LP
tank valve, wait 30 seconds and
then light grill.
TROUBLESHOOTING
Table of contents
Other Cadero Grill manuals