Cake Makka User manual

Makka
Quick Start Guide

We are extremely flattered that you have chosen to ride a CAKE electric
motorbike. It’s our obligation to do the best we can to serve you with
product, information, service and spare parts for an eortless experience.
Our ambition is to develop uncompromising high-performance motorbikes.
CAKE’s mission is to inspire people, contributing to speeding up the journey
towards a zero-emission society, combining excitement with responsibility.
To optimize the performance and benefits for an lightweight electric motor-
bike. Established with an electric drivetrain, establishing a new category,
we needed to start from scratch. Every little detail, hard and software has
been engineered, designed and chiseled for perfection while considering
the perspectives of sustainability.
Use this quick start guide to get to know your vehicle and take your first
Makka ride. Also, make sure to read the safety instructions. A full
Makka manual will be available on ridecake.com shortly.
Explore with Respect
Stefan Ytterborn Founder & CEO
Hello &
Welcome!

Table of contentsTable of content
1. Introduction
1.1 Makka bike
1.2 Handlebar controls
1.3 Display
2. Safety
2.1 Intended use
2.2 Warnings
3. Unboxing and installing
4. Preparing for the first ride
4.1 Downloading the Ride CAKE App
4.2 Getting started
5. Riding
5.1 Accelerating
5.1 Stopping
5.2 Activating the steering lock
6. Handling the battery
6.1 Battery SOC Indication
6.2 Charging the battery
6.3 Battery care
6.4 Removing the battery
6.5 Attaching the battery
7. Troubleshooting
The vehicle does not power on
The vehicle is powered on but does not drive when engaging the
throttle.
The key card does not work
The battery will not charge
8. Contact and Support

1. Introduction
1.1 Makka bike
A
B
C
D
E
G
F
H
I
J
K
L
A. Front turn signal x 2
B. Side view mirror left
C. Headlight
D. Side view mirror right
E. Battery
F. Saddle height clamp
G. Rear turn signal x 2
H. Tail light
I. Licence plate bracket
J. Rear fenders with reflectors x 2
K. Side-stand
L. Battery connector

1.2 Handlebar controls
A. Head/taillight button
B. Turning lights button
C. Rear brake
D. Steering lock key
E. Display
F. Front brake
G. Right hand throttle
H. Start button
1.3 Display
A. Odometer
B. Speedometer
C. Time
D. Head/tail lights
E. Turn signals
F. Battery level
G. Ride mode
H. Key card symbol
( at start-up )
AB
C
D
EF
H G
A
B
C
D E
F
G
H

2. Safety
Carefully read the quick guide before you use the vehicle. Save the
instructions and keep them near the vehicle.
2.1 Intended use
• Only use the vehicle and the battery for its intended use.
• Ensure the vehicle is registered and insured in accordance with applicable
laws.
• Do not use the vehicle if you are not fit to ride due to alcohol, drugs, or
medicine.
• Do not use the vehicle if you are physically or mentally impaired.
• Always wear a helmet.
• Follow the local trac rules and regulations.
2.2 Warnings
!WARNING! A damaged vehicle may cause personal injury.
• Do not use the vehicle or the battery if it requires service.
• Do not use a damaged battery, as it is highly flammable. A
damaged battery may self-ignite.
• After a fall or an accident, ensure there are no damages to the
vehicle or battery. If in doubt, contact CAKE Service & support:
ridecake.com/en/service-support.
!WARNING! Tampering with the vehicle may cause personal
injury.
• Do not modify the vehicle.
• Do not open the battery.
!WARNING! Forgetting to power o may cause personal injury.
• The vehicle is completely silent when powered on but at a
standstill. If the throttle is accidentally twisted the vehicle will move
and may cause injury. Do not forget to power o.
!CAUTION! Hot parts may cause personal injury.
• Stay clear of vehicle parts that are hot after usage.

3. Unboxing and installing
The delivery from CAKE includes:
• 1x Preassembled CAKE Makka
• 1x Battery charger
• 1x Toolset
• 2x Side-view mirrors
• 2x Reflectors
• 2x Key for steering lock and battery lock
• 2x Grey key card for activating the vehicle
• 1x White master key card: required to reset a new grey key card if one is
lost.
Note! Do not keep the white master key with the vehicle. Keep it
safe.
1. Unbox according to How to unbox the Makka on ridecake.com/en/
makka-manuals-and-videos.
2. Check that the handlebar, wheels, and saddle are properly fastened.
3. Charge the battery, see ”6.2 Charging the battery”. During transport, the
battery is discharged.
4. Mount the side-view mirrors.
a) Place the washer between the handlebar and the nut.
b) Tighten the nut with the toolset wrench.
5. Mount the license plate in accordance with applicable law.
6. Mandatory in the US, voluntary in the rest of the world: Stick the
reflectors to the side of the rear fender.
7. Recycle packaging in accordance with local laws and regulations.

4. Preparing for the first ride
4.1 Downloading the Ride CAKE App
This is not mandatory, but necessary for some vehicle features.
1. In App Store, download the Ride CAKE App.
2. Log in and select ride mode 2.
3. Make the settings of your choice, i.e. increasing the motor power and/or
decreasing the max speed.
4.2 Getting started
1. Plug the battery cable into the battery. The locking mechanism makes a
clicking sound, then use the strap to secure it in place.
2. If needed, adjust the saddle height.
a) Flip the saddle height lever backward.
b) Hold the nut located opposite the saddle height lever.
c) Rotate the saddle height lever counterclockwise until the saddle is
loose.
d) Adjust the saddle height.
e) Hold the nut and rotate the saddle height lever clockwise.
f) Tighten the nut.
g) Flip the saddle height lever forward to lock it.
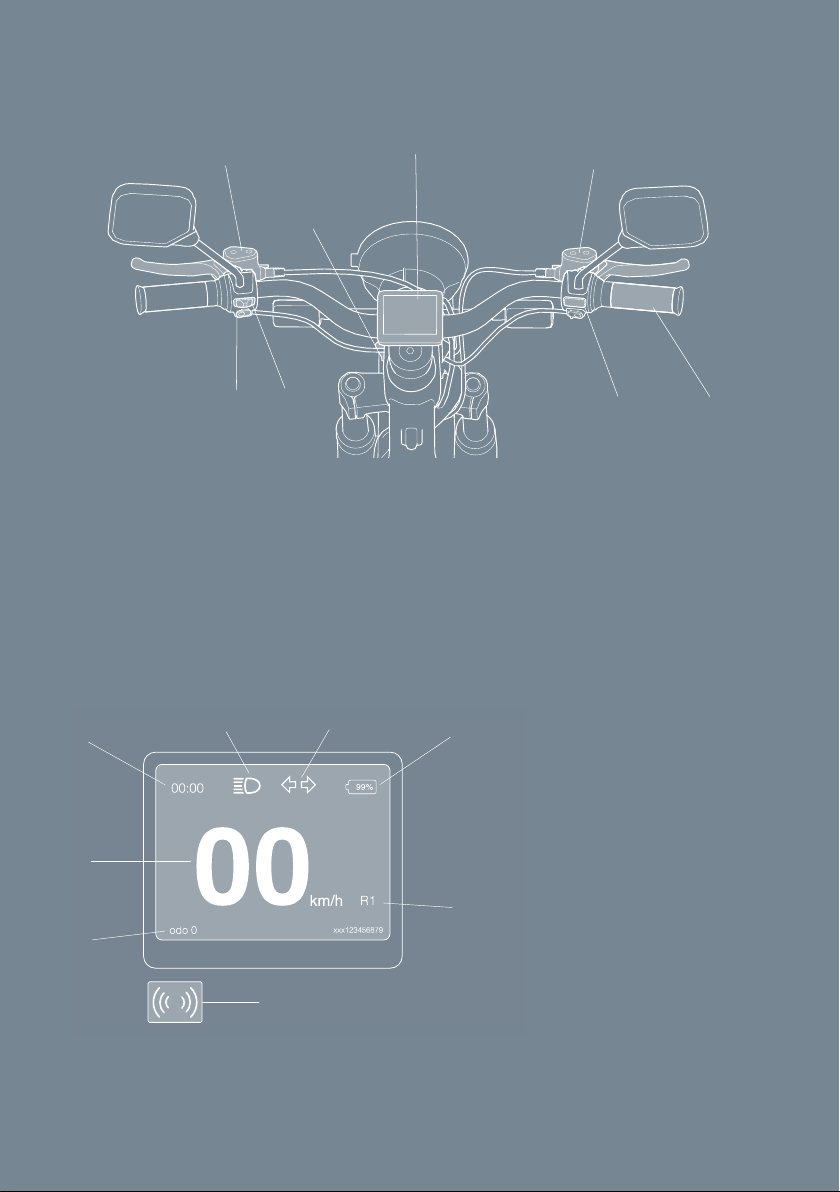
3. Press and hold the start button for 2 seconds. The key card symbol is
shown pulsating on the display.
a) Place the key card on the key card symbol => Headlights and
taillights light up. The vehicle is activated and unlocked.
4. Release the side-stand. On the display, a dot in the right corner
disappears.
5. If desired, change ride mode by pushing the start button.
Note: This requires that you have downloaded the Ride CAKE app.
6. Get ready for your first Makka ride!

5. Riding
5.1 Accelerating
!CAUTION! Risk of personal injury. When riding for the first time;
get a feel for the vehicle and ride slowly.
• To accelerate, use the right-hand throttle.
5.1 Stopping
1. Use the brakes to slow down and stop. Apply more pressure on the front
brake, and less on the rear.
2. When the vehicle has come to a complete standstill, push and hold the
start button for 3 seconds. => ”Explore with respect” briefly shows on
the display. Headlights and taillights are turned o. => The vehicle is
deactivated and locked.
3. Park the vehicle using the side-stand.
5.2 Activating the steering lock
CAKE recommends you activate the steering lock to prevent theft.
1. Turn the handlebar to the left.
2. Put the key in the keyhole and lock. => The handlebar is locked.
Note: The key may be lost or stolen. Never leave the key in the ste-
ering lock keyhole.

6. Handling the battery
6.1 Battery SOC Indication
The battery has 4 LEDs indicating the state of charge (SOC).
4/4 100-75%
3/4 75-50%
2/4 50-25%
1/4 25-5%
0/4 5-0%
6.2 Charging the battery
!DANGER! Risk of electric shock. Do not open the battery. Do not
tamper with the battery.
!WARNING! Fire hazard. A damaged battery may self-ignite. Do
not use a damaged battery, as it is highly flammable.
The battery can either be charged while attached to the vehicle or be
removed and charged elsewhere.
The battery is either connected to the vehicle or to the charger. It cannot be
connected to both simultaneously.
1. Remove the battery cable from the battery; press the yellow button, then
pull the cable upwards.
2. Plug the battery charger cable into the battery. The lock mechanism
makes a clicking sound.
3. Plug the charger into the socket. => The charger light is a steady red. A
red blinking light indicates that something is wrong, see ”The battery will
not charge”.
4. Wait until the charger light is a steady green. => The battery is fully
charged.
5. Unplug the charger from the socket.
6. Unplug the charger from the battery: press the yellow button, then pull
the cable upwards.
7. Plug the battery cable into the battery. The locking mechanism makes a
clicking sound.

6.3 Battery care
1. Disconnect the battery connector if the bike will not be used for more
than 2 weeks.
2. Fully charge the battery before riding, if the bike has not been used for
more than 2 weeks.
6.4 Removing the battery
1. Remove the battery cable from the battery.
2. Use the key to unlock the battery from the battery holder.
3. Loosen the velcro strap and carefully remove the battery.
Note: Humidity may enter through the inlet and permanently damage
the battery. When the battery is not connected to the vehicle or to
the charger; do not store it outdoors.
6.5 Attaching the battery
1. Place the battery in the battery holder.
2. Fasten the velcro strap over the battery handle.
3. Use the key to lock the battery to the battery holder.
4. Attach the battery cable.

7. Troubleshooting
The vehicle does not power on
1. Check that the battery cable is connected, see ”4.2 Getting started” .
2. Check that the battery is charged by pressing the battery state-of-charge
button on the battery. To charge the battery, see ”6.2 Charging the
battery”.
The vehicle is powered on but does not drive when engaging the throttle.
1. Check that the side-stand is folded up. A white dot on the display
indicates that the side-stand is down.
2. Check that there are no error symbols on the display.
3. Check that the battery is charged by pressing the battery state-of-charge
button on the battery. To charge the battery, see ”6.2 Charging the
battery”.
The key card does not work
1. After pressing the start button, ensure the display shows the key card
symbol, see ”4.2 Getting started”.
2. Ensure you place the key card on the key card symbol on the display.
3. If the problem persists, reprogram the key card using the white master
key according to the following:
a) Push and hold the start button. => The key card symbol is shown.
b) Place the white master key on the key card symbol. => The vehicle is
deactivated and locked.
c) Push and hold the start button. => The key card symbol and 1 is
shown.
d) Place the white master key on the key card symbol. => The key card
symbol and 2 is shown.
e) Place a grey key card on the key card symbol. => The key card
symbol and 3 is shown.
f) Place the second grey key card on the key card symbol. => The
display shuts down. The reprogramming is done. The vehicle can be
started.

The battery will not charge
!WARNING! Risk of electric shock. If the problem persists, contact
CAKE Service & support. Do not attempt to solve the problem in
any other way!
A red blinking light on the charger indicates that something is wrong. Try
the following procedure:
1. Unplug the charger from the socket.
2. Unplug the charger cable from the battery.
3. Replug the charger cable to the battery.
4. Replug the charger into the socket.
8. Contact and Support
If you have any problems or questions regarding the vehicle, send an email to
For general questions and information, get in contact with us at
www.ridecake.com
CAKE 0 Emission AB
Hammarby Fabriksväg 43
120 33 Stockholm
Sweden
This manual is constantly being updated.
Please make sure that you have the latest one on
www.ridecake.com/manuals
Other manuals for Makka
1
Table of contents
Other Cake Motorcycle manuals