Calflame LTR20091039 User manual


Copyright 2008-2009 LMS, Inc. All rights re-
served. Duplication without written consent
is strictly prohibited.
Cal Flame ® is a registered trademark.
Due to continuous improvement programs,
all models, operation, and/or specications
are subject to change without prior notice.
LTR20091039, Rev. A
3/16/09
CONTACT INFORMATION
For customer service, please contact
your authorized dealer immediately. If
you need additional information and/or
assistance, please contact:
Customer Service Department
1462 East Ninth Street
Pomona, CA 91766
Toll Free: 1-800-CAL-SPAS
Fax: 1-909-629-3890
www.calspas.com
Installation / Assembly
Leak Testing Procedure.............................5
Gas Requirements and Connection ...................6
LP Gas ..........................................6
Natural Gas ......................................8
Installing the Transformer ..........................9
Installing the Bricks and Rack ......................10
Operating Your Pizza Oven
Electronically Lighting the Oven.....................11
Manually Lighting the Oven ........................12
Basic Operation ..................................13
Turning on and off the Lights and Fan ................13
Safety Considerations .............................14
Cleaning and Maintenance
After Use Care ...................................15
Drip Pan ........................................15
Burner .........................................16
Care of Stainless Steel ............................16
Covering Your Pizza Oven ..........................16
Appendix
Troubleshooting .................................17
Replacement Cover ...............................19
Warranty .......................................20
Save these instructions!

Safety Instructions
1
2009 Pizza Cart
LTR20091039, Rev. A
www. c a l s p a s . c o m
Placement and Location
The C• al Flame pizza oven is designed for outdoor use
only.
Never locate this appliance in an enclosed room, under a sealed•
overhead structure, or in any type of enclosed area such as a ga-
rage, shed, or breezeway. Keep clear of trees and shrubs.
Do not place the pizza oven under or near windows or vents that•
can be opened into your home.
The Cal Flame pizza oven is not intended for installation in or on•
recreational vehicles or boats.
Maintain sufcient distance as to not overheat any overhead com-•
bustible material such as a patio cover.
The area surrounding your pizza oven should be kept clean and•
free from ammable liquids and other combustible materials such
as mops, rags or brooms, as well as solvents, cleaning uids, and
gasoline.
Do not use the pizza oven, pizza caddy, or area surrounding the•
pizza oven as a storage area for ammable or plastic items. Do not
store the liquid propane (LP) cylinder in the vicinity of this or any
other appliance when it is not being used.
Do not attempt to move the stainless steel cart while it is h• ot or
in use.
It is extremely important to lock all caster wheels, even on at •
surfaces.
Operation
To prevent re and smoke damage, remove all packaging material •
before operating.
Do not use the pizza oven for oth• er than intended use.
Safety Instructions
WARNING: Improper installation, adjustment, al-
teration, service or maintenance can cause injury or
property damage. Read the installation, operating and
maintenance instructions thoroughly before installing or
servicing this equipment.

2
Safety Instructions
2009 Pizza Cart
LTR20091039, Rev. A
www. c a l s p a s . c o m
In the event that the burner goes out, turn the burner knob to the•
full OFF position, fully open the oven door and let it air out. Do
not attempt to use the pizza oven until the gas has had time to
dissipate.
Never use the pizza oven if the drip pan is not properly installed.•
Drip pan should be pushed in all the way. Fire or explosion can
result from an improperly installed drip pan.
Never use the pizza oven in windy conditions. If used in a consis-•
tently windy area a windbreak will be required. Always adhere to
the specied clearances listed in this manual.
Never line the pizza oven with aluminum foil.•
Do not install or operate your pizza oven in such a manner that•
the cross ventilation openings are blocked. Fresh air must be able
to pass though installed vents to safeguard against residual gas
accumulation. Failure to allow proper ventilation may cause re or
explosion.
When handling LP gas line and connectors, do not allow them to•
come in contact with any metal surfaces of the cart or cabinet. Do
not drop LP connectors.
Do not use fuel such as charcoal briquettes or wood in the pizza •
oven.
Gas source to the pizza oven must be regulated. Do not operate•
the pizza oven if the regulator has been removed. Fire or explosion
can occur.
When using the pizza oven, do not touch the rack, bricks, or im-•
mediate surroundings as these areas become extremely hot and
can cause burns. Use handles or knobs.
Only use dry pot holders and do not use a towel or other bulky•
cloth in place of pot holders. Moist or damp pot holders used on
hot surfaces can cause burns.
Do not reach over your pizza oven or any other surfaces when hot•
or in use.
It is dangerous to use this product in any manner other than for•
what it is designed for.
Do not use charcoal in a gas burning product.•
Do not heat sealed containers such as cans or jars in or on the•
pizza oven. Explosion may result resulting in injury or death.

Safety Instructions
3
2009 Pizza Cart
LTR20091039, Rev. A
www. c a l s p a s . c o m
Never put combustible material such as paper, cloth, or ammable •
liquids inside or on your pizza oven at any time. Do not use the
pizza oven to store ammable materials.
Never allow temperature to ex• ceed 500° F.
Maintenance and Repair
Unless specically recommended in this manual, do not repair or •
replace any part of the pizza oven. A qualied technician should
perform all service. Any repairs made by a non-LMS approved deal-
er technician will void your warranty.
Storage
When your pizza oven is not in use, turn off the gas at the supply•
cylinder.
Storage of a pizza oven caddy indoors is permissible only if the•
supply cylinder is disconnected and removed.
Precautions Regarding Children
Never leave children unattended in the area where the pizza oven•
is being used. Close supervision of children is necessary when any
appliance is use near children.
Do not store items of interest to children around or below the pizza•
oven or caddy.
Never allow children to sit or stand on any part of the pizza oven•
or caddy.

4
Installation / Assembly
2009 Pizza Cart
LTR20091039, Rev. A
www. c a l s p a s . c o m
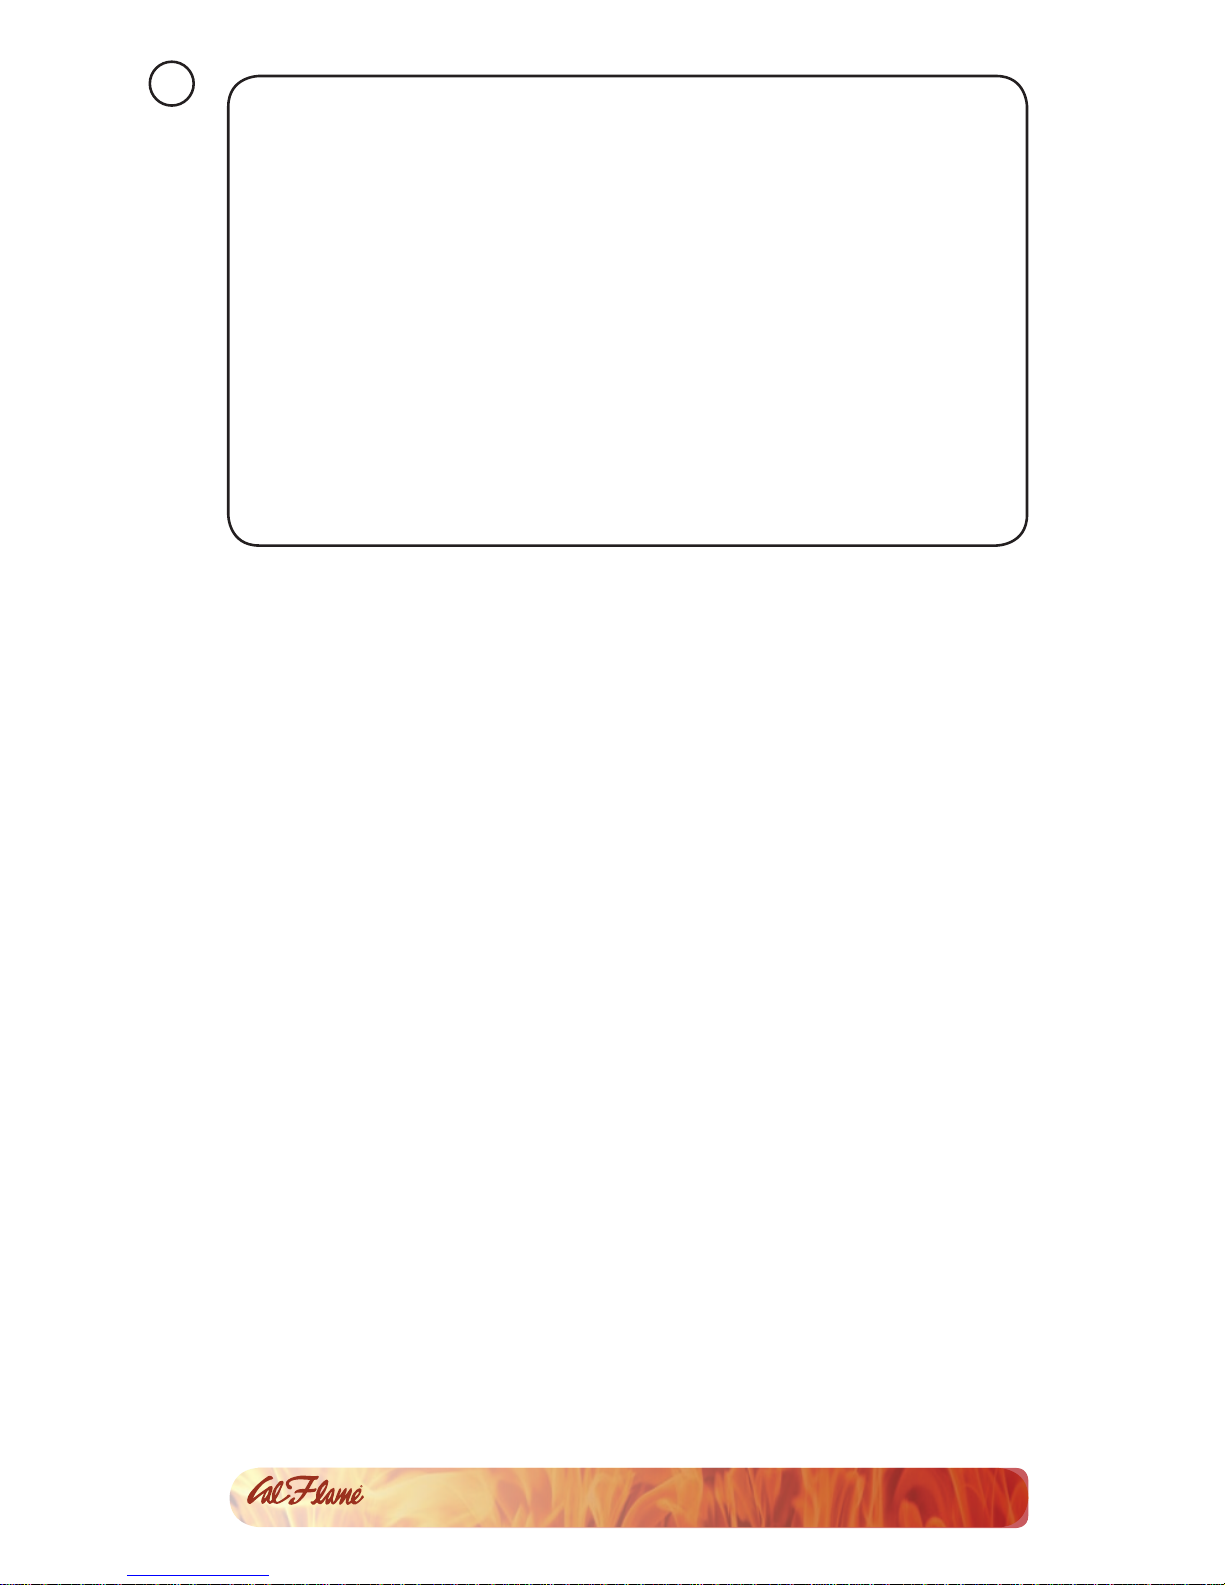
Most cities and counties require permits for exterior construction and
electrical circuits. In addition, some communities have codes requiring
residential barriers such as fencing and/or self-closing gates on prop-
erty to prevent unsupervised access to the property by children under
the age of ve. Your dealer can provide information on which permits
may be required and how to obtain them prior to the delivery of your
equipment.
We recommend the installation, adjustment and service of your new
pizza oven be performed by LMS qualied installers and service techni-
cians to ensure proper operation and prevent accidents.
When planning the location of your Cal Flame pizza oven, consider ac-
cess to gas lines. The location with the shortest gas line run is recom-
mended.
When determining a suitable location, consider factors such as expo-
sure to wind, proximity to trafc paths, and windows that open into
the home.
Locate your pizza oven only in a well-ventilated area and only on a
solid, at foundation (e.g. deck or cement slab). Do NOT place stain-
less steel carts on dirt or grass.
We recommend that a licensed contractor install your Cal Flame™ pizza
oven. Installation must conform to local codes, or in the absence of
local codes, with either the National Fuel Gas Code, ANSI Z223.1
/ NFPA54, Natural Gas and Propane Installation Code, CSA
B149.1, or Propane Storage and Handling Code, B149.2), as
applicable.
Before installing a built-in pizza oven in an enclosure, copy all product
information such as model number, serial number and type of fuel (e.g.
natural gas or LP) and store information in a safe place. This informa-
tion is located on a plate located behind the pizza oven on the right
side of the chassis. There is an area on the back cover of this manual
where you can write down this information.
Installation / Assembly

Installation / Assembly
5
2009 Pizza Cart
LTR20091039, Rev. A
www. c a l s p a s . c o m
Leak Testing Procedure
Perform a leak test at least once a year whether the gas supply cyl-
inder has been disconnected or not. In addition, whenever the gas
cylinder is connected to the regulator or whenever any part of the
gas system is disconnected or replaced, perform a leak test.
As a safety precaution, remember to always leak test your pizza oven
outdoors in a well-ventilated area. Never smoke or permit sources of
ignition in the area while doing a leak test. Do not use a ame, such
as a lighted match to test for leaks. Use a solution of soapy water.
Prepare a leak testing solution of soapy water by mixing in a
1.
spray bottle one part liquid soap to one part water.
Make sure all the control knobs are in the OFF position.2.
Turn on the gas.3.
On natural gas systems, turn the main feed valve to the pizza
oven.
On LP systems, turn the cylinder valve knob counter clockwise
one turn to open.
Apply the leak-testing solution by spraying it on joints of the gas4.
delivery system. Blowing bubbles in the soap solution indicates
that a leak is present.
Stop a leak by tightening the loose joint or by replacing the5.
faulty part with a replacement part recommended by the manu-
facturer. Do not attempt to repair the cylinder valve if it is dam-
aged. The cylinder must be replaced.
Turn all control knobs back to the full OFF position.6.
If you are unable to stop a leak:
Turn all control knobs back to the full OFF position.1.
Shut off the gas supply to the pizza oven and release pressure2.
in the hose and manifold by pushing in and turning any of the
control valves one quarter turn counter-clockwise.
On LP systems, remove the cylinder from the pizza oven.3.
Call an authorized gas appliance service technician or an LP gas4.
dealer.
Do not use the appliance until the leak is corrected.

6
Installation / Assembly
2009 Pizza Cart
LTR20091039, Rev. A
www. c a l s p a s . c o m
Gas Requirements and Connection
IMPORTANT: Cal Flame™ pizza ovens are manufactured to operate
on liquid propane (LP) but can be converted to natural gas (NG). To
verify the oven’s operating fuel, check the serial number label in the
back of the chassis. Either LP or NG will be marked on the operating
tab, indicating the proper operating fuel.
Always check the rating plate to make sure the gas supply you are
hooking up to is the gas type the pizza oven is manufactured for.
If you do not have an updated ller valve on your existing propane
tank, you will need to purchase one at your local hardware store.
Without it you will not be able to attach your tank to your Cal Flame™
pizza oven or rell the tank at your local propane rell station.
LP Gas
Tank Requirements
Maximum line pressure for plumbed-in propane is 14” WC (3.5 kPa).
Minimum line pressure for propane is 11” WC.
The pizza oven must be used with the gas pressure regulator. The
regulator will control and maintain a uniform gas pressure in the mani-
fold. The burner orices have been sized for the gas pressure delivered
by the regulator.
WARNING: Attempting to operate the pizza oven unit without the gas
regulator installed could cause an explosion and possible death.
CylinderSpecication
Any LP gas supply cylinder used with this pizza oven must be con-
structed and marked in accordance with either:
Specications for LP-Gas Cylinders• of the U.S. Department
of Transportation, or
National Standard of Canada,• CAN/CSA-B339, Cylinders,
Spheres and Tubes for Transportation of Dangerous
Goods; and Commission.
The LP cylinder must be approximately 12 inches in diameter and 18
inches high. The maximum fuel capacity is 20 lbs. of propane, or 5
gallons. Full cylinder weight should be approximately 38 lbs. (43.7 lbs.
nominal water capacity.) Never ll the cylinder beyond 80% full.

Installation / Assembly
7
2009 Pizza Cart
LTR20091039, Rev. A
www. c a l s p a s . c o m
LP Gas Hook Up
Vent the enclosure for an LP gas cylindar with openings at the level of
the cylinder valve and at the oor level.
Ensure one side of the enclosure is completely open.
For enclosures that have four sides, complete with a top and bottom:
At least two ventilation openings at cylinder valve less than•
one square inch per pound (7.1 cm²/kg) of stored fuel capacity and
not less than a total free area of 10 square inches (64.5cm²). If
ventilation openings at oor level are in a sidewall, there shall be
at least two openings. The bottom of the openings shall be at oor
level and the upper edge no more than 5 inches (127 mm) above
the oor. The openings shall be equally sized, spaced at 180º (3.14
rad) and unobstructed.
Every opening shall have minimum dimensions so as to permit the•
entrance of a 1/8 inch (3.2 mm) diameter rod.
Transporting and Storing LP Gas
Place the dust cap on the cylinder valve outlet whenever the cylinder is
not in use. Only install the type of dust cap on the cylinder valve outlet
that is provided with the cylinder valve. Other types of caps or plugs
may result in leakage of propane.
Transport only one cylinder at a time. Ensure the cylinder is secured in
an upright position with the control valve turned off and the dust cap
in place. Store cylinders outdoors and out of reach of children. Do not
store cylinders in a building, garage, or any other enclosed area.

8
Installation / Assembly
2009 Pizza Cart
LTR20091039, Rev. A
www. c a l s p a s . c o m
Natural Gas
Warning: All pizza ovens use LP unless they are converted to natural
gas. Do not connect natural gas to an unconverted pizza oven!
Requirements
Always check the rating plate to make sure the gas supply you are
hooking up to is the gas type the pizza oven is manufactured for.
IMPORTANT: Never connect the pizza oven to an unregulated gas sup-
ply.
The installation of this appliance must conform with local codes or,
in the absence of local codes, to the national fuel gas code, ANSI
Z223.1a-1998. Installation in Canada must be in accordance with the
standard CAN/CGA-B149.2, Propane Installation Code.
A licensed contractor or local gas company representative must per-
form all natural gas connections.
Ensure that the service supplying the pizza oven is tted with a shut
off valve conveniently positioned near the pizza oven and giving ease
of access.
The pizza oven and its individual shutoff valve must be disconnected
from the gas supply piping system during any pressure testing of that
system at test pressure in excess of 0.5 psi (3.5 kPa).
Your pizza oven for use with natural gas comes equipped with its own
regulator that MUST NOT be removed. If this regulator needs to be re-
placed, use only the type specied by Cal Flame™ for this appliance.
Connection
Remove the rear panel from the pizza oven to gain access to the1.
regulator and gas connection point.
Connect a suitable ex connector to the regulator.2.
Check the controls to ensure all control valves are in the full OFF3.
position.
Turn on the main gas supply and check all connections for leaks4.
using soapy water as described in the leak testing procedure sec-
tion.
Warning: If you see bubbles in the soapy solution at any of the connec-
tions, turn off the gas supply and tighten the connection. If tightening
the connection does not seal the leak, it may be necessary to replace
the ex hose.

Installation / Assembly
9
2009 Pizza Cart
LTR20091039, Rev. A
www. c a l s p a s . c o m
Installing the Transformer
All grills with electrical
components such as lights or
a convection fan will require
the transformer to be installed
and plugged in before you can
use it. This needs to be done
before the grill is inserted
in the island or modular cart.
When the transformer is
attached to the grill chassis,
use care in placing the grill
in the island cutout to avoid
hitting the transformer.
Remove the transformer1.
and the metal screws from
the plastic bag.
Place the grill on a sturdy2.
surface and tilt it back to
show the underside of the
grill.
Using the metal screws,3.
attach the transformer to
the left side of the grill
near the internal electri-
cal connection. Attach the
metal plate to the out-
side surface of the grill as
shown in the figure below.
When you have rmly 4.
tightened the screws and
nuts, connect the plug
from the transformer to
the grill. Screw on the
stainless steel retainer.

10
Installation / Assembly
2009 Pizza Cart
LTR20091039, Rev. A
www. c a l s p a s . c o m
Installing the Bricks and Rack
The pizza oven uses three white bricks for diffusing heat from the
burners.
After you have removed the pizza oven from the box and removed all
packing materials, place the three racks lengthwise on the left and
right ledge above the burner. Then place the three white bricks on
the racks in the same way.
Remove the packing material from the rack and slide it in place on
top of the bricks.

OperatingYour Pizza Oven
11
2009 Pizza Cart
LTR20091039, Rev. A
www. c a l s p a s . c o m
Read all instructions before use.
We recommend you wash your entire pizza oven with soap and water
prior to lighting it for the rst time. Oils are used during the manufac-
turing process and some residual oil may still be on the stainless steel
parts of your pizza oven. Washing will reduce the possibility of discolor-
ation. We also recommend you keep your pizza oven covered when not
in use. This will minimize the amount of dust and dirt that accumulates
on your pizza oven and extend its life.
DANGER
What To Do If You Smell Gas
Shut off gas to the appliance.•
Extinguish any open ame.•
Open lid.•
If odor continues, keep away from the appliance and•
immediately call your gas supplier or your re de-
partment.
Operating Your Pizza Oven
Electronically Lighting the Oven
Push the knob in fully and rotate it about 1/4 turn to the left1.
(counter-clockwise) until you hear a loud click.
Listen for the sound of the gas igniting. If the burner does not2.
light on the rst try, rotate the knob back to the OFF position
and try relighting until the gas ignites.
If the burner does not light after several attempts, turn the con-3.
trol knobs to the OFF position. Wait ve minutes until the gas
clears before attempting to light it again.
Repeat the procedure or try the manual lighting procedure.4.
To shut off the burners, turn the knob to the OFF position. It is5.
normal to hear a popping sound when the burners are turned
off.

12
OperatingYour Pizza Oven
2009 Pizza Cart
LTR20091039, Rev. A
www. c a l s p a s . c o m
Manually Lighting the Oven
Use the match extender that comes with the pizza oven for manu-
ally lighting. Do not use standard matches or cigarette lighters to
perform match lighting procedures. Serious burns can occur and
lighters can explode.
If you have just attempted to light the burner, allow ve minutes 1.
for any accumulated gas to dissipate.
Slide the small access plate located next to the over control.2.
Slide out the drip tray from the pizza oven.3.
Light and insert a long stem match, holding it near the burner4.
ports.
Turn the control knob just past the LIGHT position to HIGH.5.
Listen for the sound of the gas igniting. If the burner does not6.
light after ve seconds, turn the control knob to the OFF posi-
tion. Wait ve minutes until the gas clears before attempting to
light it again.
If the burner does not light after several attempts see Trouble-7.
shooting Guide in the back of this manual.

OperatingYour Pizza Oven
13
2009 Pizza Cart
LTR20091039, Rev. A
www. c a l s p a s . c o m
Turning on and off the Lights and Fan
The ON / OFF switch controlling your halogen light is located at the
control panel on the front lower left side.
Certain models of the Cal Flame grill are equipped with either one or
two halogen light.
Your grill is equipped with a grounded
(3 prong) 120 VAC plug located in the
lower left rear corner of your cart and
must be plugged into a permanent
grounded 120 VAC outlet with a dedi-
cated 15amp GFI breaker. DO NOT
cut or remove the ground prong as
this may result in re, electrical shock
or other personal injury. This electrical
source provides power to the lights.
Basic Operation
Before lighting, make sure the burner control is off. Do not attempt
to light the burner if the smell of gas is present. Check the connec-
tion with a soap and water solution after attaching the hose. For LP
units, make sure there is gas in the tank and it is sitting upright. For
natural gas units, make sure the shut off valve is on.
Make sure the drip tray is in place.1.
Light the oven using the instructions on the next page.2.
Turn the control knob to HIGH and preheat the oven for 15 min-3.
utes. Close the door during the preheat period.
Place the food in the oven and cook to desired completion. Ad-4.
just heat setting if necessary. You may set the control knob to
any position between HIGH and LOW.
Allow the pizza oven to cool and clean the bricks and drip tray5.
after each use.
Do not leave the pizza oven unattended while cooking.

14
OperatingYour Pizza Oven
2009 Pizza Cart
LTR20091039, Rev. A
www. c a l s p a s . c o m
Safety Considerations
Each time you light the pizza oven, check the following:
Inspect the hose before using the pizza oven. If there is exces-•
sive abrasion or wear, or if the hose is cut, it must be replaced
prior to use. If you need a replacement hose, contact your Cal
Flame dealer.
Ensure the area around the pizza oven is clear of ammable •
substances such as gasoline, yard debris, wood, etc.
Ensure there is no blockage of the airow through the vent •
space located below the face of the unit.
When using propane gas, keep the special ventilation openings•
in the enclosure free and clear of debris.
If connected to a propane cylinder, carefully inspect the rubber•
hose attached to the regulator before each use.
Ensure the propane cylinder, regulator, and rubber hose are in-•
stalled in a location not subject to heating above 125º F (51º
C).
Ensure the in-line gas valve or gas cylinder valve is always shut•
OFF when the pizza oven is not in use.

Cleaning and Maintenance
15
2009 Pizza Cart
LTR20091039, Rev. A
www. c a l s p a s . c o m
To ensure safe and proper maintenance, we recommend you
follow these directions carefully.
Clean internal parts regularly as determined by the amount of use
and foods cooked. The entire pizza oven should be cleaned at least
once a year.
In addition, keep the area around your pizza oven clear and free
from combustible materials, gasoline, and other ammable vapors
and liquids. Do not obstruct the ow of combustion and ventilation
air.
If your LP-gas pizza oven is placed in a stationary barbecue island,
keep the access door for the propane cylinder clear of any obstruc-
tion. Ensure the ventilation opening for cylinder enclosure is kept
clear.
Do not perform any maintenance or cleaning while the pizza oven
is still hot.
Cleaning and Maintenance
After Use Care
The easiest way to clean the pizza oven is immediately after cooking is
completed and after turning off the ame.
Remove the rack from the oven and scrub it with a brass bristle brush
and hot soapy water.
Wipe the bricks with a damp soapy cloth and rinse with warm/hot,
clean water. For more stubborn deposits, including oil, grease and wa-
ter-borne deposits, use a multipurpose cream cleanser and apply with
a soft, damp cloth.
Dry with a soft, dry, clean towel if preferred.
Drip Pan
The full width drip pan will collect liquid run-off from the oven. The pan
should be cleaned after every use to avoid the possibility of a grease
re. Be sure to allow the drip pan to cool prior to cleaning. You may
clean the drip pan with a solution of warm soapy water. Make sure to
rinse thoroughly to avoid staining.

16
Cleaning and Maintenance
2009 Pizza Cart
LTR20091039, Rev. A
www. c a l s p a s . c o m
Burner
Spiders and small insects occasionally inhabit or make nests in the
burner tubes, obstructing the gas ow. Sometimes this results in a type
of re in and around the gas tubes called ashback. To reduce the risk
of ashback, this procedure should be followed at least once a month
or when your pizza oven has not been used for an extended period of
time.
IMPORTANT: Prior to starting this procedure, turn OFF all of the gas
control knobs, shut off the fuel supply, and disconnect the fuel line. To
access the burner, remove the racks and bricks from the oven.
Unscrew the Phillips screw holding the burner in place and care-1.
fully lift up and remove the burner.
Use a wire brush to clean the outer surface of the burner to re-2.
move food residue and dirt. Clean any clogged ports with a stiff
wire such as an opened paper clip.
Inspect the burner for damage (cracks and holes). If any damage 3.
is found, replace the burner and discontinue oven usage.
Upon reinstallation, inspect the gas valve orice for cleanliness and 4.
condition and the location of the igniters.
Care of Stainless Steel
Do NOT use wire wool pads, scrappers, harsh abrasive, scoring materi-
als, bleaches, or harsh cleaners on your pizza oven, or allow salt and
vinegar mixtures to remain in contact for a long period of time. This will
cause scratching, scoring, rusting and pitting.
We recommend that you clean stainless steel components with a clean-
er that is approved for stainless steel and only clean when the pizza
oven is cool and in indirect light. Never use steel wool.
Covering Your Pizza Oven
When not in use and after cooling, cover your pizza oven with our full
length, zippered side canvas cover. (See your local Cal Flame dealer for
details.) The cover will help protect your pizza oven from detrimental
effects of weather and environmental pollutants. Never put a cover on
a hot oven. Allow the oven to cool before covering.

Appendix
17
2009 Pizza Cart
LTR20091039, Rev. A
www. c a l s p a s . c o m
Appendix
Troubleshooting
Problem: Smell of gas is present
Solution: Check for loose connections in the gas line. Perform a
leak test following the procedure described in this man-
ual.
Problem: Burner does not ignite
Solution: Use the following procedure with the gure below.
Check the position of the sparker tip. It should be point-
ing forward towards the front of the burner.
Make sure there is a blue spark at the electrode tip
•
to the burner.
Make sure the igniter wire is connected rmly to the •
valve ignition device and the electrode.
Make sure the valve orice is free of any debris, dust •
or grease.
Make sure the valve orice is aligned inside the front •
hole of the burner.
If there is no spark at all, replace the electrode or•
igniter wire.
Note: Turn off the gas at the source while troubleshoot-
ing.
Problem: Obstruction in the gas line
Solution: Remove the fuel line from grill. (Do not smoke or per-
form any maintenance in the vicinity of an open ame.)
Open the gas valve for one second to blow out any de-
bris. Close off the gas valve and reconnect the fuel line
securely.

18
Appendix
2009 Pizza Cart
LTR20091039, Rev. A
www. c a l s p a s . c o m
Problem: Pluggedorice
Solution: Unplug the orice as follows:
Remove cooking grills, ame tamer and grease •
tray.
Remove burners from the bottom of the rebox by •
pulling the cotter pin from beneath the burner peg
using a standard screwdriver or needle nose pliers.
Carefully lift each burner up and away from the gas•
orice.
Remove the orice from the control valve.•
Gently clear any obstruction with a ne wire.•
Reinstall the orice, reinstall the burners over the •
orices, and seat each burner peg into position hole
at the bottom ledge of the rebox.
Replace all cotter pins.•
Replace cooking components and grease collectors.•
If an obstruction is suspected in the control valve, con-
tact your local Cal Flame dealer for assistance.
Problem: Burnertubeismisalignedovertheorice
Solution: Reposition the burner tube so that it is properly seated
over the orice.
Problem: Yellow Flame
Solution: Once the entire burner is operating, check the ame
color to be sure that it is mostly blue. Some yellow at
the tips may be present due to impurities in the fuel. If
the ame is golden or yellow in color, the reason could
be seasoning salts, oil lm, or other foreign matter on
the burner.
This manual suits for next models
1
Table of contents
Other Calflame Oven manuals
Popular Oven manuals by other brands

Parmco
Parmco PPOV-6S-DT-4 Installation and operating instructions

Smeg
Smeg Classica SO6104APN manual

Miele
Miele H 5961 B Operating and installation instructions

Lab companion
Lab companion OV-11 Operation manual

Siemens
Siemens VIVA VVH32C11.0 instruction manual

eka
eka MKF 464 BM Installation and maintenance manual

Bakers Pride
Bakers Pride Cyclone SERIES Installation and operating instructions

AEG
AEG COMPETENCE 5231 B operating instructions

Indesit
Indesit K 3G2/G Instructions for installation and use

Panasonic
Panasonic NN-CS89 quick guide

Frigidaire
Frigidaire FEB27T5D Factory parts catalog

Lang
Lang FCOFL-AT Installation, operation and maintenance instructions