Caliber PS 10 User manual

PS 10
Caliber Head Office
P. O. B o x 77
NL 4260 AB
The Netherlands
Fax: +31 (0)416 69 90 01
E-mail: info@caliber.nl
Internet: www.caliber.nl
Manual
Manuel
Anleitung
Istruzione
Manual
Handledning
Podr∏cznik
Handleiding
PS 10 manual 2 04-03-2003 09:15 Pagina 1

SPECIFICATIONS:
Short circuit protection
Automatic thermal switch-off
Automatic overload switch-off
2 Ampere fuse
Input voltage: 11 to 30V DC (negative value)
(Suitable for both private vehicles as well as for trucks)
Exit voltage: Adjustable to 1.5V, 3V, 4.5V, 6V, 7.5V, 9V, 12V at an input
voltage of 16V or more.
Output current: Max. 1800mA
1500mA for constant use at all output voltages.
Dimensions: length x width 100 x 40mm
Length cable: 1.5 meter
Weight: 100 gram-s
PREPARATION:
Remove the batteries from the portable device that you wish to connect.
Settings:
Determine the correct voltage, one can often find this on the device
or the original adapter.
Set the correct voltage on the Car Power Adapter with a screwdriver.
Make sure that the point of the arrow points towards the correct vol-
tage.
Now determine the polarity of the device to be connected; this could
be centre positive (+) or centre negative (-). This is often displayed
using the following symbols:
For centre positive:
For centre negative:
When your device is centre positive (+), then install the connector as
follows:
When your device is centre negative (-), then install the connector as
follows:
Place the adapter in the cigarette lighter plug, and check whether the
“power-on” LED illuminates green.
Check the correct polarity and the correct voltage of your device
once more as an incorrect setting can seriously damage the device.
Connect your device and turn it on as usual.
TROUBLESHOOTING
-“Power-on” LED does not light up
Possible causes:
•The cigarette lighter plug does not receive any DC voltage.
• Check if the cigarette lighter works by igniting it.
•Check if the cigarette lighter plus is connected properly.
• The metal parts of the plug do not make contact.
•Check the spring action of the metal parts.
•Carefully turn the plug until the LED lights up.
•The fuse has to be replaced.
•Open the plug by turning it counter clockwise in order to get to
the fuse.
-“Power-on” LED does light up, but the device does not work
Possible causes:
•Check whether the device is switched on.
•Check the polarity and the voltage.
•Check whether the adapter and your device are properly connected.
WARNING!
Improper use of this adapter can seriously damage your equipment.
Do not use if you are uncertain as to the correct voltage and correct
polarity. Do not use if your device needs a constant input higher than
1500mA. Do not cover the device during use. Make sure that the
adapter is not connected when starting the car. Prolonged use without
the motor running can cause an empty battery.
+
-
+
-
-
TIP
+TIP
12
ENGLISH
ENGLISH
PS 10 manual 2 04-03-2003 09:15 Pagina 2

SPÉCIFICATIONS:
Protection contre les courts-circuits
Mise hors circuit thermique automatique
Mise hors circuit automatique en cas de surcharge
Fusible 2 ampères
Te nsion d’entrée : 11 à 30 V CC (prise de masse négative)
(Convient tout autant aux voitures personnelles qu’aux camions)
Tension de sortie : réglable à 1.5V, 3V, 4.5V, 6V, 7.5V, 9V, 12V avec une
tension d’entrée de 16V ou plus.
Intensité du courant de sortie : max. 1800mA
1500mA pour une utilisation constante avec toutes les tensions de
sortie.
Dimensions : longueur x largeur 100 x 40mm
Longueur du cordon : 1,5 mètre
Poids : 100 grammes-
PRÉCAUTION :
Enlevez les piles de l’appareil portable que vous souhaitez brancher.
Réglages :
Déterminez le bon voltage (on le retrouve souvent sur l’appareil ou
sur l’adaptateur original).
Réglez le bon voltage sur l’adaptateur d’alimentation de voiture à l’ai-
de d’un tournevis.Veillez à ce que la pointe de la flèche indique le vol-
tage adéquat.
Déterminez maintenant la polarité de l’appareil à brancher : celle-ci
peut être centre positif (+) ou centre négatif (-). Elle est souvent indi-
quée à l’aide des symboles suivants :
Pour centre positif:
Pour centre négatif:
Si votre appareil est centre positif (+), placez le connecteur comme
suit :
Si votre appareil est centre négatif (-), placez le connecteur comme
suit :
Branchez l’adaptateur dans la prise allume-cigares et vérifiez que le
voyant LED “power-on” vert s’allume.Vérifiez à nouveau que la pola-
rité et le voltage de votre appareil sont bien réglés, car un mauvais
réglage peut gravement endommager votre appareil.
Branchez maintenant votre appareil et allumez-le comme d’habitude.
RÉSOLUTION DES PROBLÈMES
- Le voyant LED “Power-on” ne s’allume pas
Causes possibles :
•Il n’y a pas de tension CC à la prise allume-cigares.
•Vérifiez que la prise allume-cigares fonctionne bien.
•Vérifiez que la prise allume-cigares est bien fixée.
•Les parties métalliques de la prise n’entrent pas en contact.
•Vérifiez la suspension des parties métalliques.
•Tournez prudemment la prise jusqu’à ce que le voyant LED s’allume.
•Le fusible doit être remplacé.
•Tournez la prise dans le sens inverse des aiguilles d’une montre
pour l’ouvrir et atteindre le fusible.
- Le voyant LED“Power-on” est bien allumé,mais l’appareil ne fonctionne pas.
Causes possibles :
•Vérifiez que l’appareil est bien allumé
•Vérifiez la polarité et le voltage
•Vérifiez que l’adaptateur est correctement relié à votre appareil.
ATTENTION !
Une mauvaise utilisation de cet adaptateur peut sérieusement end-
ommager votre appareil. Ne l’utilisez pas lorsque vous n’êtes pas sûr
du bon voltage et de la bonne polarité. Ne l’utilisez pas lorsque votre
appareil nécessite une tension constante supérieure à 1500mA. Ne
couvrez pas l’appareil durant l’utilisation.Veillez à ce que l’adaptateur
ne soit pas branché durant le démarrage de la voiture. Une utilisation
prolongée sur un moteur à l’arrêt peut mettre la batterie complète-
ment à plat.
+
-
+
-
-
TIP
+TIP
34
FRANCAIS
FRANCAIS
PS 10 manual 2 04-03-2003 09:15 Pagina 3

TECHNISCHE SPEZIFIKATIONEN:
Kurzschlussschutz
Überhitzungsschutz (automatische Abschaltvorrichtung)
Schutz vor Überbelastung (automatische Abschaltvorrichtung)
2 Ampere Sicherung
Eingangsspannung: 11 bis 30 Vdc (negativ)
(Geeignet für Personen- und Lastwagen)
Ausgangsspannung: Einstellbar auf 1.5V, 3V, 4.5V, 6V, 7.5V, 9V, 12V bei
einer Eingangsspannung von 16V oder mehr.
Ausgangsstromstärke: Max. 1800mA
1500mA für konstanten Gebrauch bei allen Ausgangsspannungen.
Abmessung: Länge x Breite 100 x 40mm
Kabellänge: 1,5 Meter
Gewicht: 100 Gramm
VORBEREITUNG:
Nehmen Sie die Batterien aus dem tragbaren Gerät, das Sie anschlie-
ßen möchten.
EINSTELLUNG:
Bestimmen Sie die korrekte Spannung. Diese ist oft auf dem Gerät
oder dem originalen Adapter zu finden.
Stellen Sie die richtige Spannung am Stromadapter ein, indem Sie
einen Schraubenzieher zur Hilfe nehmen. Stellen Sie sicher, dass die
Pfeilspitze auf die richtige Spannung zeigt.
Bestimmen Sie nun die Polarität des anzuschließenden Gerätes. Diese
kann im Inneren positiv (+) oder negativ (-) sein. Häufig ist dies durch
folgende Symbole angegeben:
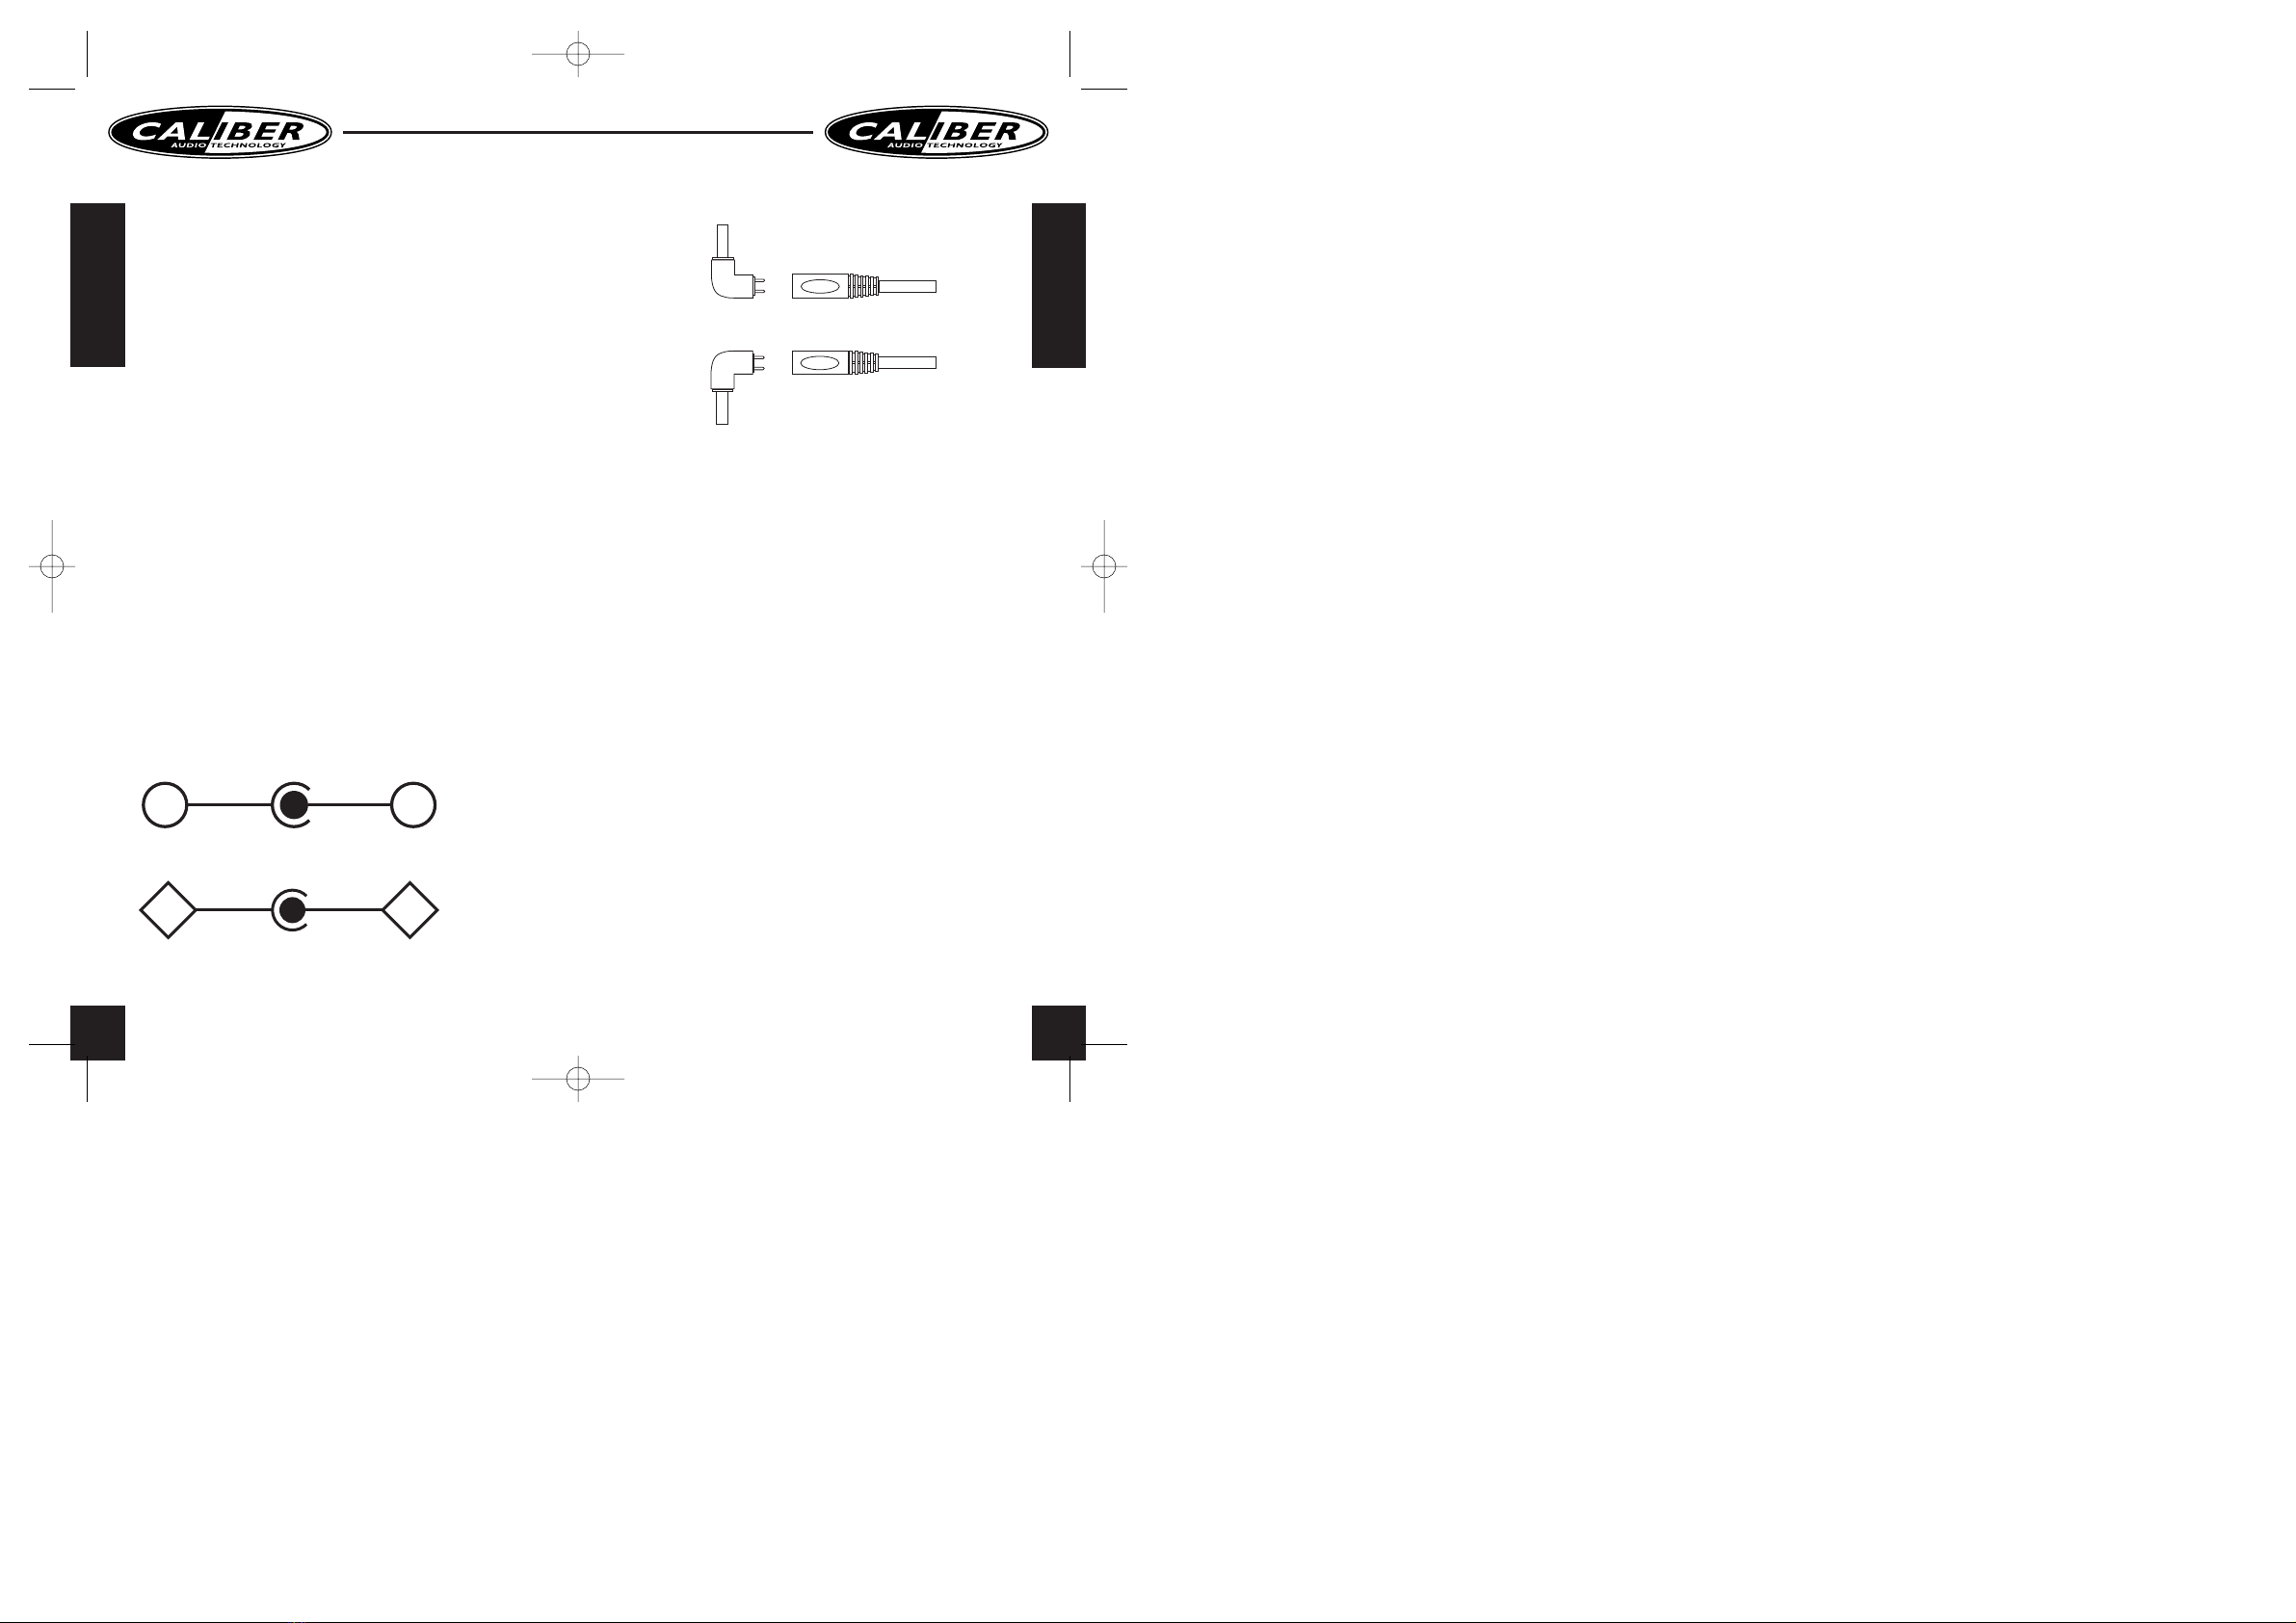
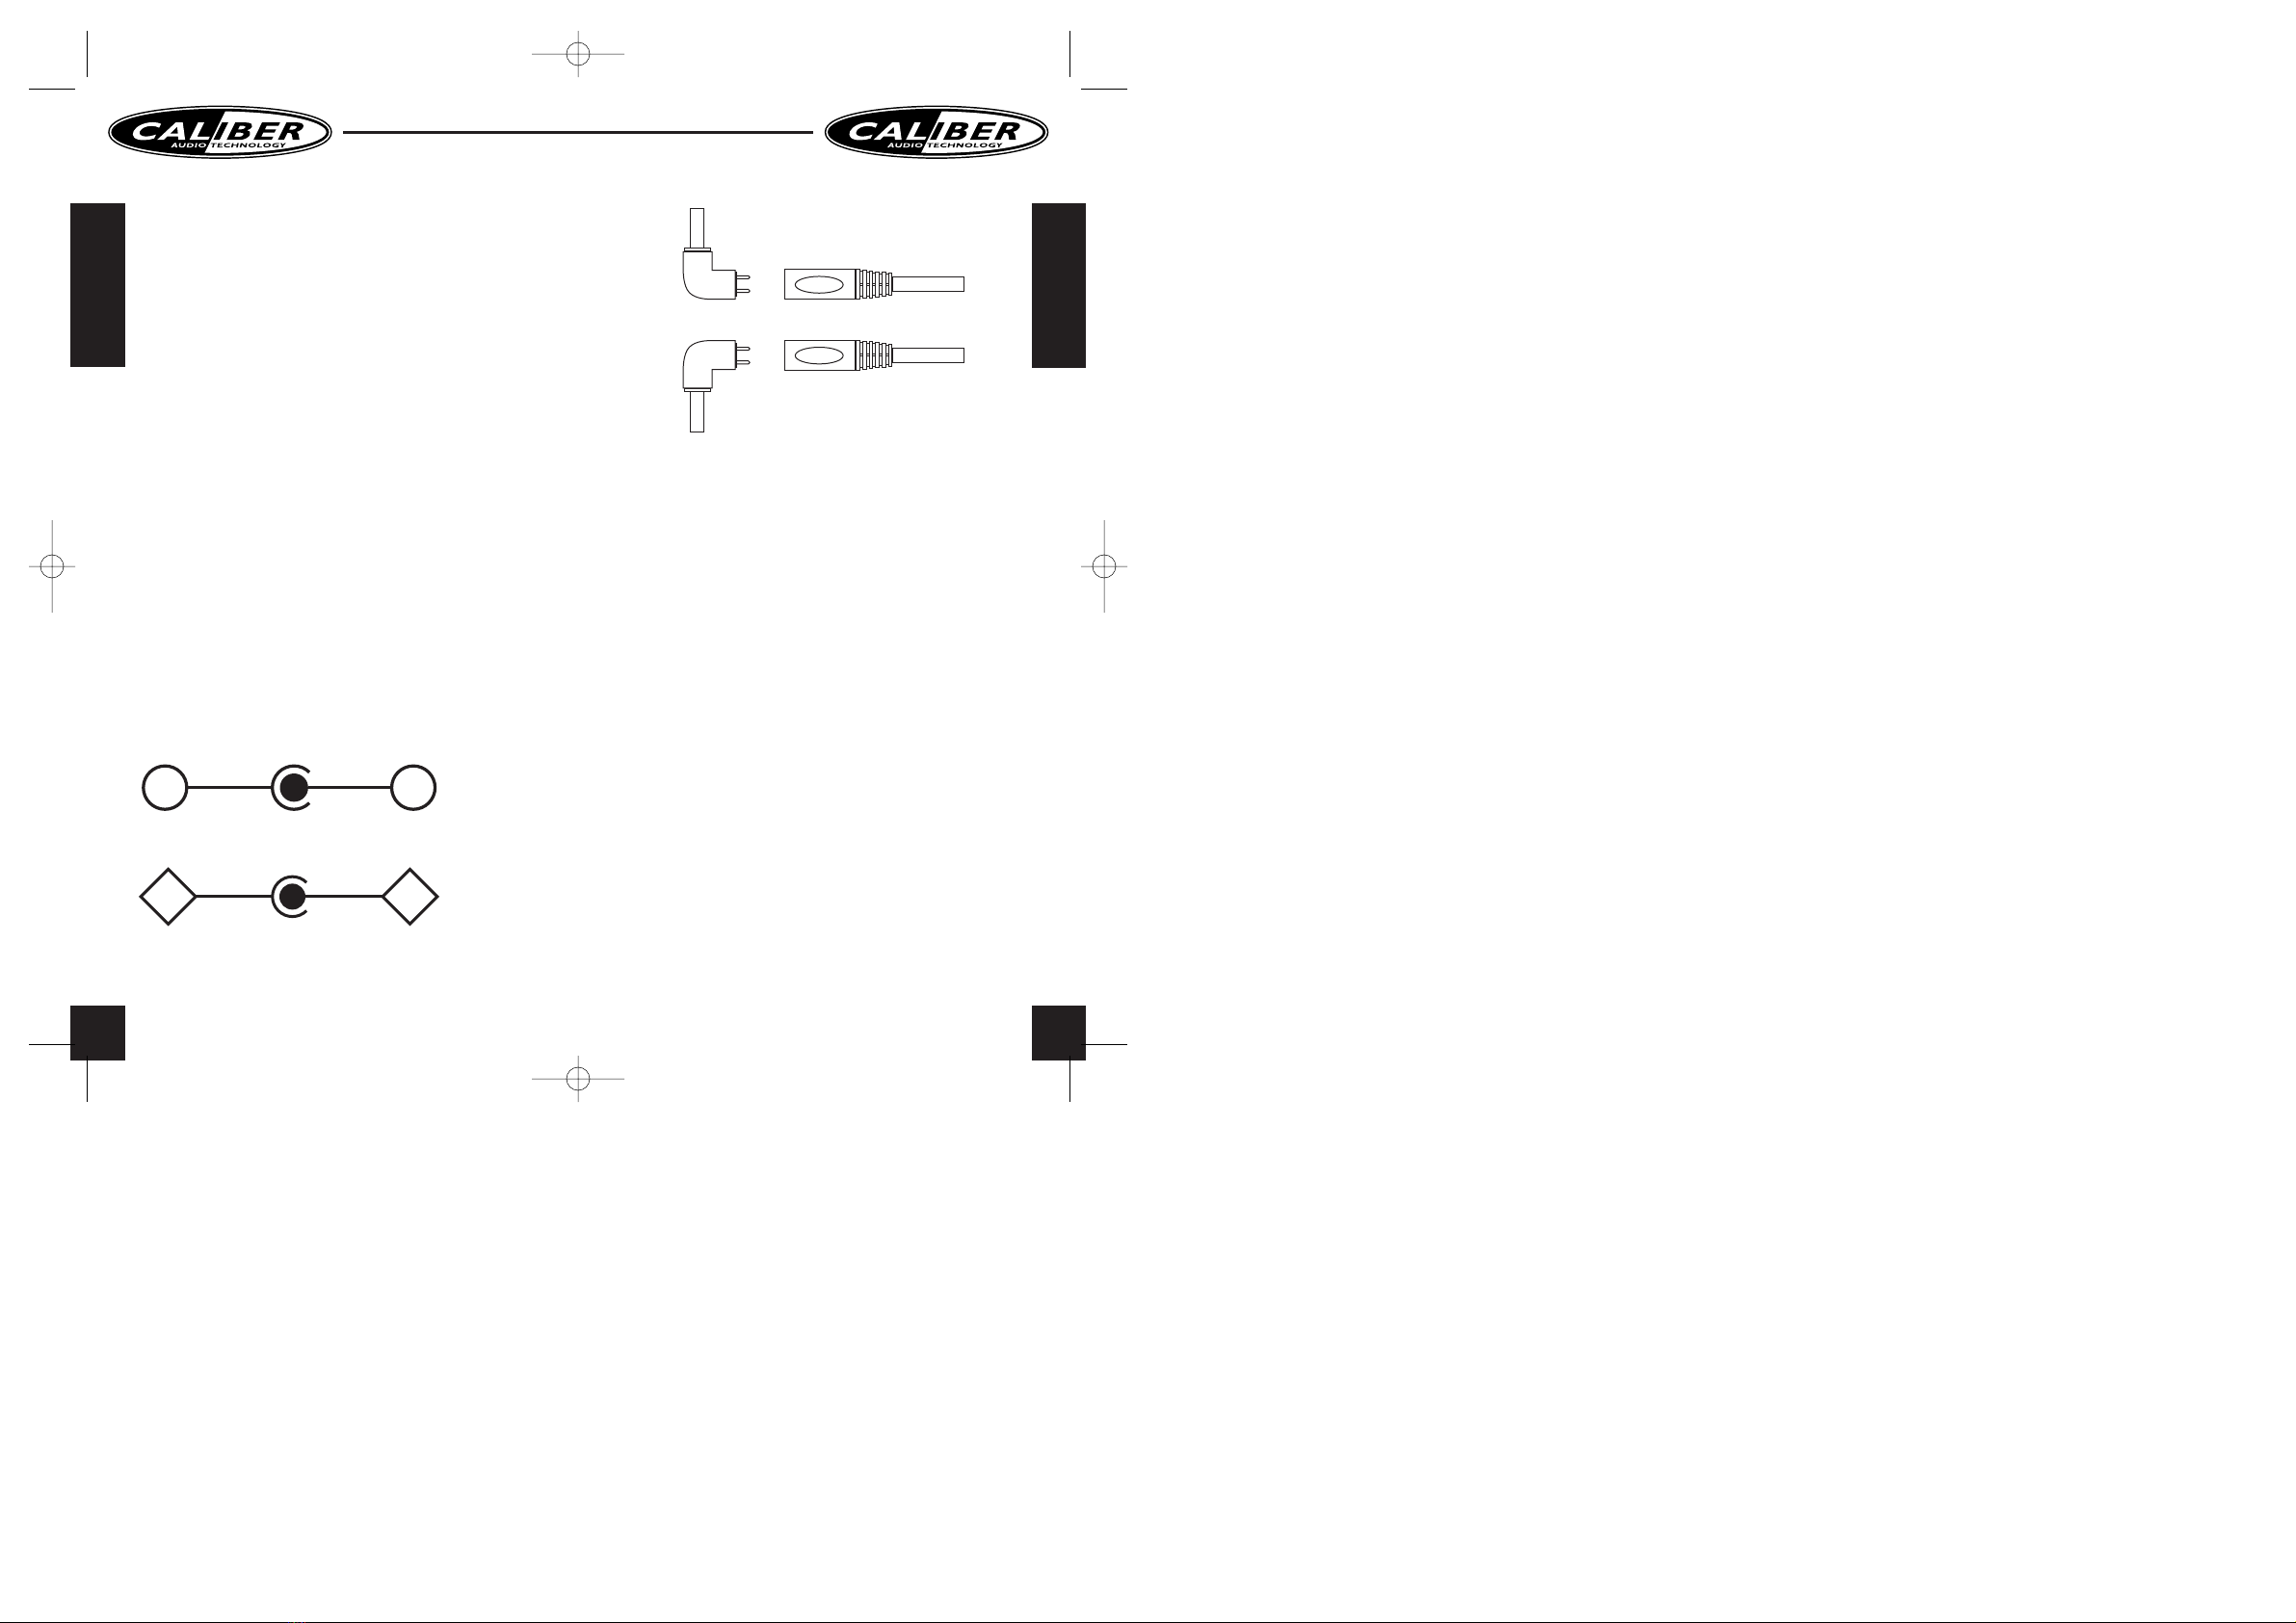
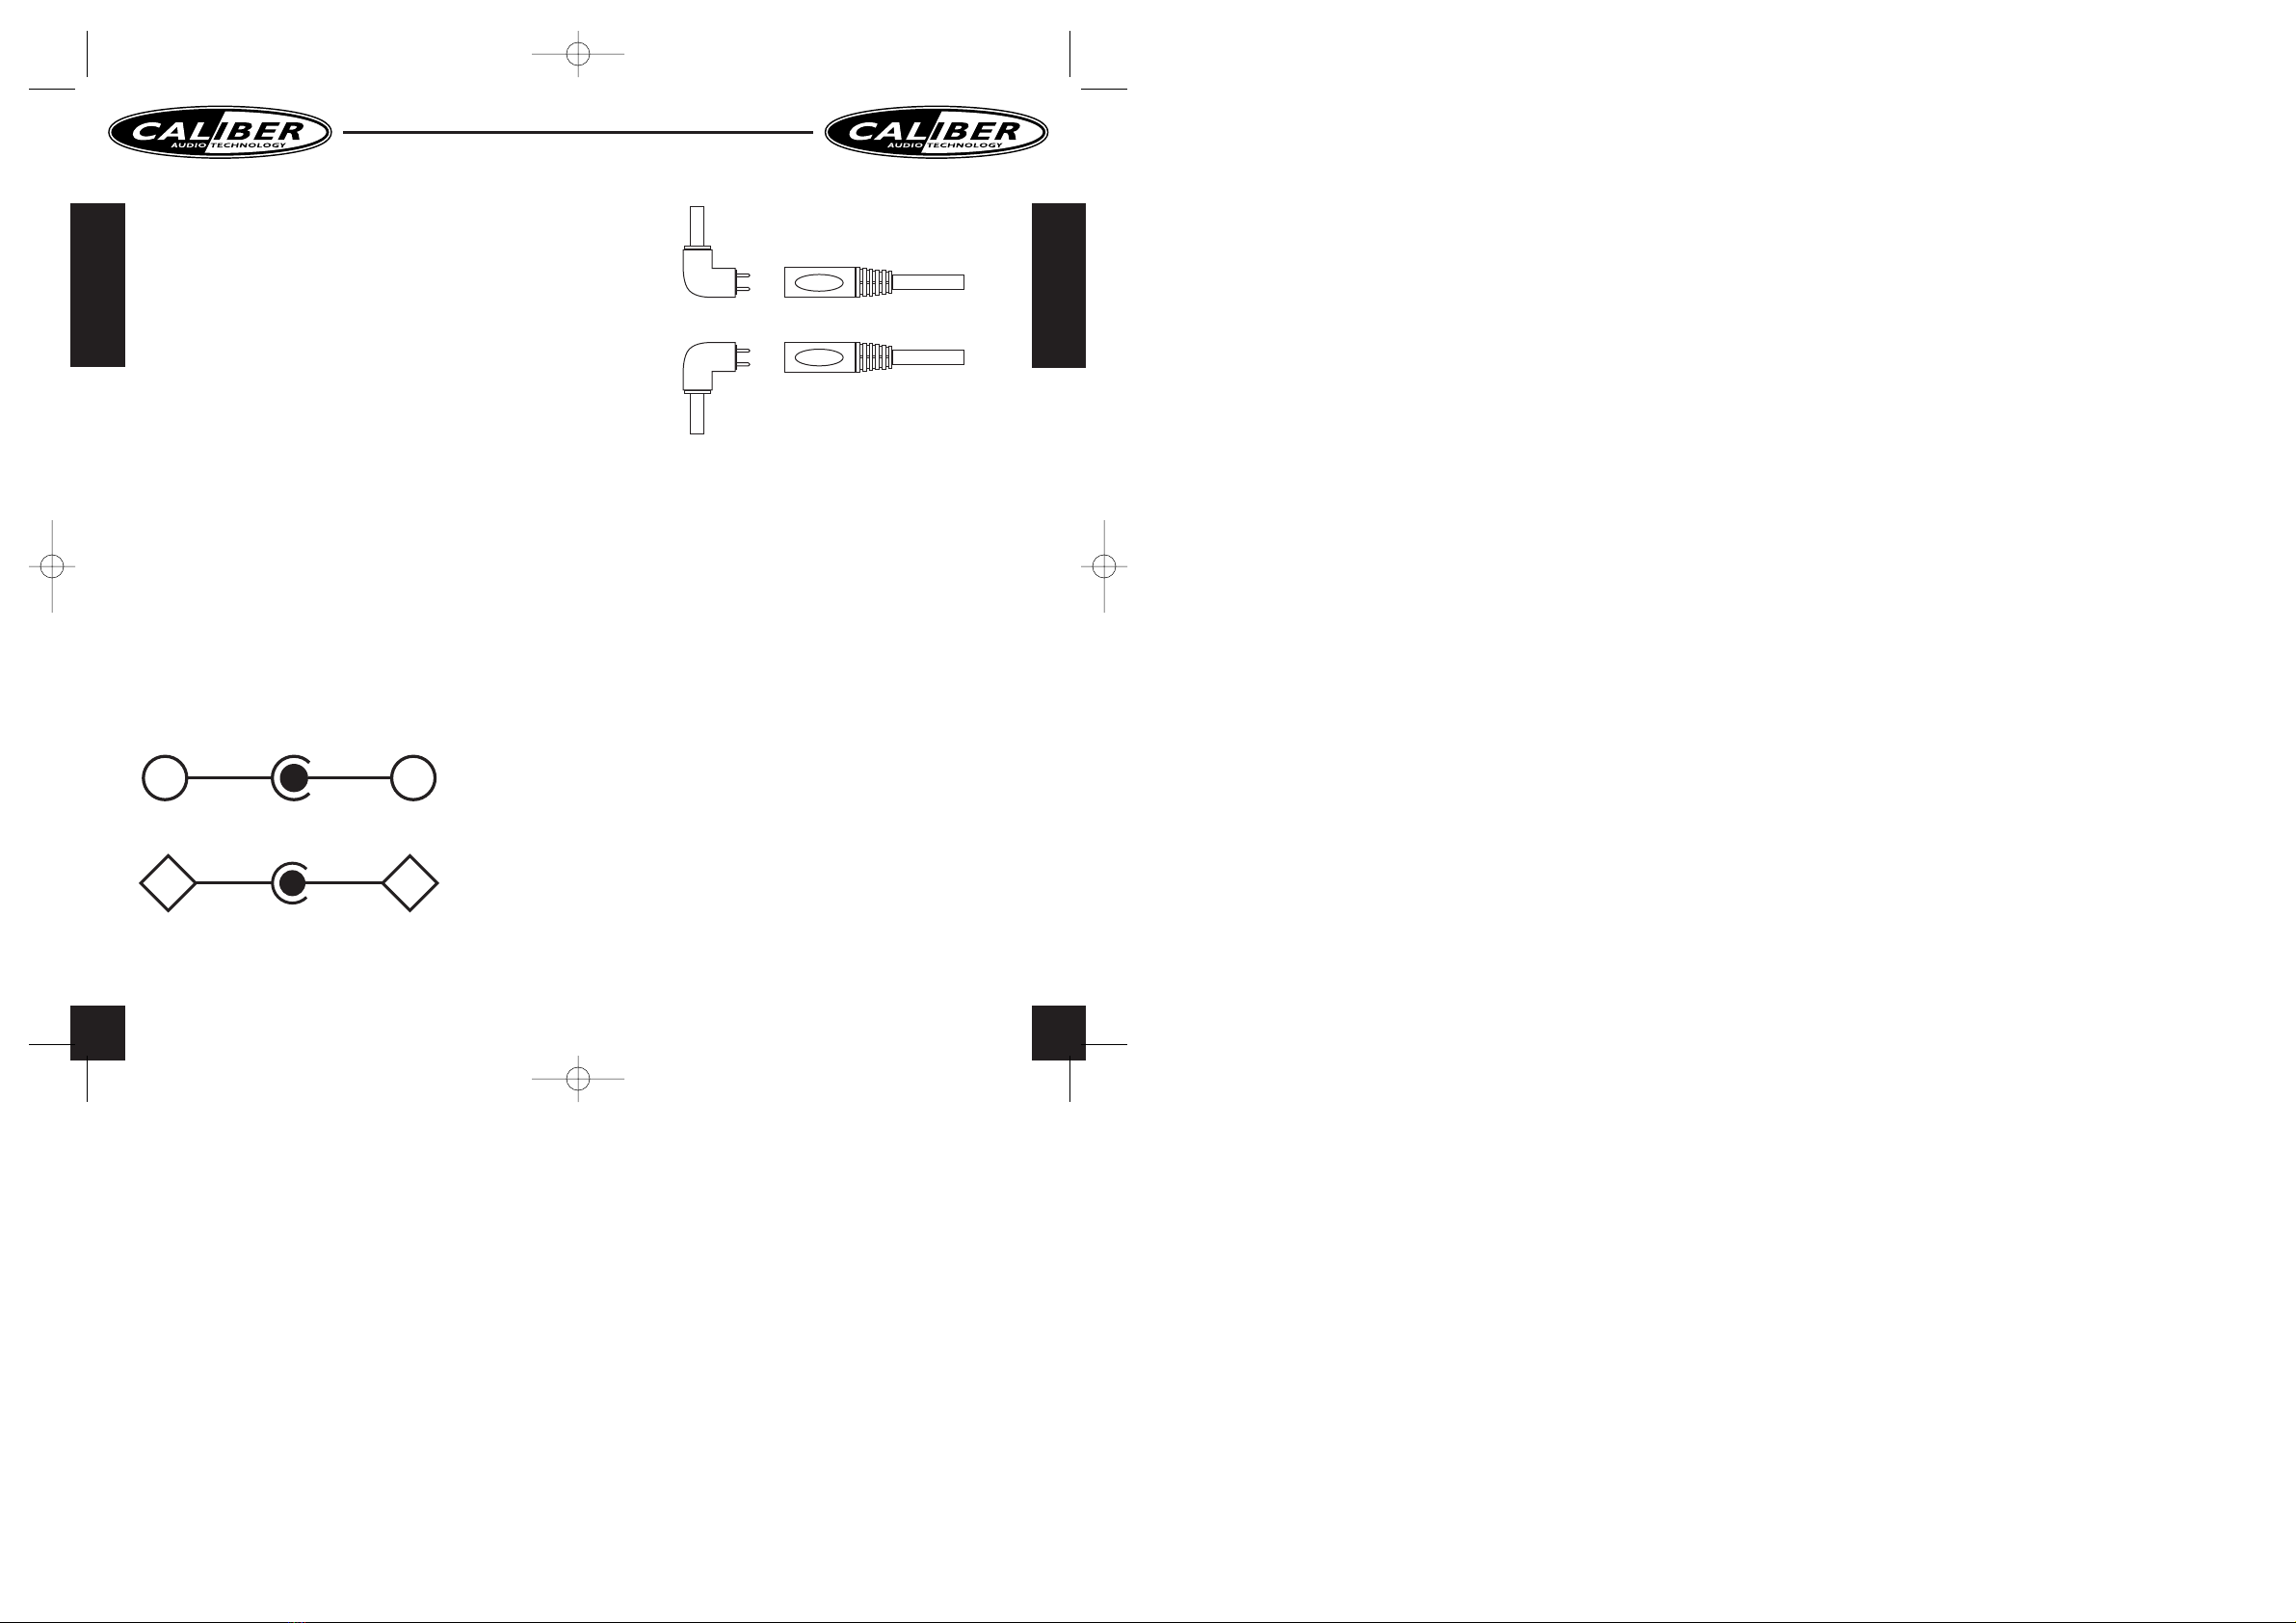
Für positiven Innenpol:
Für negativen Innenpol:
Wenn Ihr Gerät einen positiven Innenpol hat (+), positionieren Sie
den Konnektor folgendermaßen:
Hat Ihr Gerät einen negativen Innenpol (-), positionieren Sie den
Konnektor folgendermaßen:
Stecken Sie den Adapter in die Zigarettenanzünderbuchse und kon-
trollieren Sie, ob die “power-on” Leuchtdiode grün aufleuchtet. Über-
prüfen Sie nun nochmals die richtige Polarität und die richtige
Spannung Ihres Gerätes, da eine verkehrte Einstellung ernsthaften
Schaden an Ihrem Gerät zur Folge haben kann.
Schließen Sie jetzt Ihr Gerät an und schalten Sie dieses entsprechend ein.
PROBLEMLÖSUNGEN
-“Power-on” Leuchtdiode leuchtet nicht. Mögliche Ursachen:
•Es ist keine DC-Spannung auf der Zigarettenanzünderbuchse.
•Kontrollieren Sie mit dem Zigarettenanzünder ob diese funktioniert.
•Kontrollieren Sie ob die Zigarettenanzünderbuchse fest sitzt.
•An den Metallteilen der Buchse entsteht kein Kontakt.
•Kontrollieren Sie die Andruckfedern der entsprechenden Teile.
•Drehen Sie die Buchse vorsichtig, bis die Leuchtdiode leuchtet.
•Die Sicherung muss ausgetauscht werden.
•Drehen Sie die Buchse gegen den Uhrzeigersinn auf, um an die
Sicherung zu kommen.
-“Power-on” Leuchtdiode leuchtet, aber das Gerät funktioniert nicht.
Mögliche Ursachen:
•Kontrollieren Sie, ob das Gerät eingeschaltet ist.
•Kontrollieren Sie Polarität und Spannung.
•Kontrollieren Sie ob dieVerbindung zwischen dem Adapter und
Ihrem Gerät richtig angeschlossen ist.
WARNUNG!
Unsachgemäßer Gebrauch dieses Adapters kann Ihr Gerät schwer
beschädigen. Er darf nicht benutzt werden, wenn Sie die richtige
Polarität und Spannung nicht genau wissen. Er darf auch nicht ver-
wendet werden, wenn Ihr Gerät einen höheren konstanten Input
nötig hat als 1500mA. Das Gerät während des Gebrauchs nicht
abdecken.Tragen Sie Sorge, dass der Adapter nicht angeschlossen ist,
wenn dasAuto gestartet wird.Längerer Gebrauch bei nicht laufendem
Motor kann eine leere Batterie zur Folge haben.
+
-
+
-
-
TIP
+TIP
56
DEUTSCH
DEUTSCH
PS 10 manual 2 04-03-2003 09:15 Pagina 4

SPECIFICHE:
Protezione contro cortocircuito
Spegnimento automatico per surriscaldamento
Spegnimento automatico per sovraccarico
Fusibile 2 Ampere
Te nsione in entrata: da 11 a 30 VDC (terra negativo)
(Adatto sia a mezzi trasporto persone sia a mezzi trasporto cose)
Tensione in uscita: regolabile a 1.5 V, 3 V, 4.5 V, 6 V, 7.5 V, 9 V, 12 V per
una tensione in entrata uguale o maggiore a 16V.
Intensità della corrente d’uscita: max. 1800mA
1500mA per uso costante valido per tutte le tensioni in uscita.
Misure: lunghezza x larghezza 100 mm x 40 mm
Lunghezza del cavo: 1,5 metri
Peso: 100 grammi
PRIMA DELL’ISTALLAZIONE:
Togliere le batterie dall’apparecchio che si vuole collegare al trasfor-
matore.
ISTALLAZIONE:
Determinare l’esatto voltaggio, spesso indicato sull’apparecchio oppu-
re sul trasformatore originale.
Inserire l’esatto voltaggio sul trasformatore per auto utilizzando un
cacciavite.Assicurarsi che il puntatore di livello indichi l’esatto voltag-
gio.
Determinare ora la polarità dell’apparecchio da collegare; la polarità
può essere centro positiva (+) oppure centro negativa (-). La polarità
è solitamente indicata con i seguenti simboli:
centro positiva:
centro negativa:
Se l’apparecchio ha una polarità centro positiva (+) posizionare il con-
nettore come segue:
Se l’apparecchio ha una polarità centro negativa (-) posizionare il con-
nettore come segue:
Inserire il trasformatore nella presa dell’accendisigari e controllare
che il LED “acceso (power-on)” si illumini dando una luce verde.
Controllare nuovamente la giusta polarità e l’esatto voltaggio dell’ap-
parecchio, in quanto un’errata istallazione potrebbe danneggiare seri-
amente l’apparecchio.
Collegare a questo l’apparecchio ed accenderlo normalmente.
SOLUZIONE DEI PROBLEMI
Il LED “acceso (power-on)” non si illumina
Cause possibili:
•Non c’è tensione DC nella presa dell’accendisigari.
•Controllare che l’accendisigari sia funzionante.
•Controllare che la presa sia ben collegata all’accendisigari.
•Le parti metalliche della presa non fanno contatto.
•Controllare la parte molleggiante delle parti metalliche.
•Ruotare la presa con attenzione finché il LED si illumina.
•Il fusibile deve essere sostituito.
•Svitare la presa in senso antiorario per raggiungere il fusibile.
Il LED “acceso (power-on)” si illumina ma l’apparecchio non funziona.
Cause possibili:
•Controllare che l’apparecchio sia acceso.
•Controllare la polarità ed il voltaggio.
•Controllare la corretta connessione tra il trasformatore e l’appa-
recchio.
ATTENZIONE!
Un errato utilizzo del trasformatore può danneggiare seriamente l’ap-
parecchio. Non utilizzare se non si è sicuri della giusta polarità e dell’-
esatto voltaggio. Non utilizzare se l’apparecchio necessita di un entra-
ta costante superiore ai 1500mA. Non coprire l’apparecchio durante
l’utilizzo.Assicurarsi che il trasformatore non sia collegato al momen-
to dell’accensione dell’autovettura. Un lungo utilizzo a motore spento
può provocare lo scaricamento della batteria dell’automobile.
+
-
+
-
-
TIP
+TIP
78
ITALIANO
ITALIANO
PS 10 manual 2 04-03-2003 09:15 Pagina 5

ESPECIFICACIONES:
Protección contra cortocircuito
Apagado térmico automático
Apagado automático por sobrecarga
Fusible de 2 amperios
Tensión de entrada: 11 a 30V DC (tierra negativa)
(Apropiado tanto para automóviles particulares como para vehículos
de carga)
Tensión de salida: ajustable a 1.5V, 3V, 4.5V, 6V, 7.5V, 9V, 12V con tensi-
ón de entrada de 16V o superior.
Corriente de salida: máx. 1800 mA
1500mA para uso constante con todas las tensiones de salida.
Dimensiones: longitud x ancho 100 x 40mm
Longitud cable: 1,5 metros
Peso: 100 gramos-
PREPARATIVOS:
Retire las baterías del aparato portátil que usted desea conectar.
CONFIGURACIÓN:
Determine el voltaje correcto, el cual figura sobre el aparato o sobre
el adaptador original.
Ajuste el voltaje correcto del adaptador de alimentación para auto-
móvil con, por ejemplo, un desatornillador. Cuide de que la flecha esté
dirigida hacia el voltaje correcto.
A continuación, determine la polaridad del aparato a conectar, que
puede ser centro positiva (+) o centro negativa. La polaridad puede
estar indicada con los símbolos siguientes:
Centro positiva:
Centro negativa:
Si su aparato es centro positivo (+), posicione el conector como sigue:
Si su aparato es centro negativo (-), posicione el conector como sigue:
Enchufe el adaptador al conector para encendedor y controle si el
LED indicador de encendido se ilumina de color verde.
Revise de nuevo la polaridad y el voltaje correctos de su aparato. Un
ajuste indebido podría dañar gravemente su aparato.
Enchufe su aparato y enciéndalo de la forma acostumbrada.
REPARACIÓN DE FALLOS:
-El LED de encendido no alumbra
Causas posibles:
•No hay tensión DC en el conector para encendedor.
•Compruebe si funciona con el encendedor.
•Revise si el conector para encendedor está colocado correctamente
•Las piezas metálicas del conector no hacen contacto.
•Revise el muelleo de las piezas metálicas.
•Gire con cuidado el conector hasta que se ilumine el LED.
•Es necesario reemplazar el fusible.
•Gire el conector contra el sentido de la agujas del reloj para acceder
al fusible.
- El LED de encendido sí alumbra, sin embargo el aparato no funciona.
Causas posibles:
•Controle si el aparato está encendido
•Controle la polaridad y el voltaje
•Controle si el adaptador y su aparato están bien conectados entre sí.
¡ADVERTENCIA!
El uso indebido de este adaptador podría dañar seriamente su apara-
to. No lo utilice si no está seguro del voltaje y polaridad correctos.
No lo utilice si necesita una corriente constante mayor que 1500mA.
No cubra el aparato durante el funcionamiento. Evite que el adapta-
dor esté conectado durante el encendido del automóvil. El uso pro-
longado con el motor apagado puede vaciar el acumulador.
+
-
+
-
-
TIP
+TIP
910
ESPAÑOL
ESPAÑOL
PS 10 manual 2 04-03-2003 09:15 Pagina 6

ESPECIFICAÇÕES:
Protecção contra curto-circuitos
Desactivação automática de sobrecarga térmica
Desactivação automática de excesso de carga
Fusível de 2 Amperes
Tensão de entrada: 11 a 30 Vdc (massa negativa)
(Adequado tanto para carros como para camiões)
Tensão de saída:Ajustável para 1,5V, 3V, 4,5V, 6V, 7,5V, 9V, 12V com ten-
são de entrada de 16V ou mais.
Intensidade eléctrica de saída: Máx. 1800mA
1500mA para utilização constante com todas as tensões de saída.
Dimensão: comprimento x largura 100 x 40mm
Comprimento do cabo: 1,5 metro
Peso: 100 gramas-
PREPARAÇÃO:
Remova as pilhas do aparelho portátil que deseja conectar.
AJUSTES:
Determine a voltagem correcta, que geralmente está indicada no apa-
relho ou no próprio adaptador.
Ajuste a voltagem correcta no adaptador Car Power por meio de uma
chave de fenda. Assegure-se de que a ponta da seta está indicando a
voltagem correcta.
Determine agora a polaridade do aparelho a ser conectado; esta pode
ser positiva central (+) ou negativa central (-). Esta é geralmente indi-
cada com os seguintes símbolos:
Para positiva central:
Para negativa central:
Se o seu aparelho é positivo central (+), ligue o conector como segue:
Se o seu aparelho é negativo central (-), ligue o conector como segue:
Insira o adaptador na tomada do isqueiro, e verifique se o indicador
LED “power-on” acende-se.
Verifique novamente se a polaridade e a voltagem do seu aparelho
estão correctas. Um ajuste incorrecto pode causar danos graves ao
seu aparelho.
Conecte agora o seu aparelho e ligue-o como de hábito.
SOLUÇÃO DE PROBLEMAS
- Indicador LED “Power-on” LED não acende
Causas possíveis:
•Não há tensão DC na tomada do isqueiro.
•Verifique o seu funcionamento inserindo o isqueiro.
•Verifique se a tomada do isqueiro está bem fixa.
•As partes metálicas da tomada não fazem contacto.
•Verifique a tensão de flexão das partes metálicas.
•Rode a tomada com cuidado, até que o indicador LED se acende.
•Ofusível tem de ser substituído.
•Rode a tomada para a esquerda, abrindo-a, para acessar e trocar
o fusível.
- O indicador LED “Power-on” acende mas o aparelho não funciona.
Causas possíveis:
•Verifique se o aparelho está ligado.
•Verifique a polaridade e a voltagem.
•Verifique se a conexão entre o adaptador e o aparelho está correcta.
AVISO!
A utilização incorrecta deste adaptador pode causar danos graves ao
seu aparelho. Não o utilize se não estiver seguro acerca da voltagem
e da polaridade correctas. Não o utilize se o seu aparelho necessita
de entrada constante superior a 1500mA. Não cubra o aparelho
durante a sua utilização. Certifique-se de que o adaptador não está
conectado quando ligar o carro.A sua utilização por longo tempo com
o motor parado pode descarregar a bateria do carro.
+
-
+
-
-
TIP
+TIP
11 12
PORTUGUÊS
PORTUGUÊS
PS 10 manual 2 04-03-2003 09:15 Pagina 7

SPECIFIKATIONER:
Kortslutningsskydd
Automatisk termisk avstängning
Automatisk avstängning vid överbelastning
2 Ampere säkring
Ingängsspänning: 11 till 30 Vdc (negativ jord)
(Lämpad för både person- och lastbilar)
Utgångsspänning Kan ställas in på 1.5V, 3V, 4.5V, 6V, 7.5V, 9V, 12V vid en
ingångsspänning på 16V eller mer.
Utgående strömstyrka: Max. 1800mA
1500mA för kontinuerlig drift vid alla utgångsspänningar.
Dimensioner: längd x bredd 100 x 40mm
Längd sladd: 1,5 meter
Vikt: 100 gram-
FÖRBEREDELSER:
Tag ut batterierna ur den bärbara apparaten som du vill ansluta.
INSTÄLLNINGAR:
Fastställ rätt spänning, denna står oftast på apparaten eller på dess
egen adapter.
Ställ in späningen på din Car Power adapter med en skruvmejsel. Se
till att pilen pekar på rätt spänning.
Fastställ nu polariteten hos apparaten som ska anslutas, den kan vara
centerpositiv (+) eller centernegativ (-). Detta anges ofta med följan-
de symboler:
För centerpositiv:
För centernegativ:
Placera kontakten så här om apparaten är centerpositiv (+):
Placera kontakten så här om apparaten är centernegativ (-):
Sätt adaptern i cigarretändaruttaget och kontrollera att lysdioden
”power on” lyser grönt.
Kontrollera nu än en gång att du har rätt spänning och polaritet för
din apparat, med en felaktig inställning kan apparaten ta allvarlig skada.
Nu kan du ansluta apparaten och koppla in den på vanligt sätt.
PROBLEMLÖSNING
-Lysdioden “Power-on” lyser ej
Möjliga orsaker
•Cigarettändaruttaget saknar DC-spänning.
•Kontrollera med cigarettändaren om den fungerar.
•Kontrollera att cigarettändaruttaget sitter fast ordentligt.
•Uttagets metalldelar gör ingen kontakt.
•Kontrollera metalldelarnas fjädring.
•Vrid kontakten försiktigt tills lysdioden tänds.
•Säkringen måste bytas ut.
•Öppna uttaget genom att vrida motsols för att komma åt säkringen.
-Lysdioden “Power-on” lyser, men apparaten fungerar inte.
Möjliga orsaker
•Kontrollera att apparaten är inkopplad.
•Kontrollera polaritet och spänning.
•Kontrollera att apparaten är ordentligt kopplad till adaptern.
VARNING!
Felaktigt bruk av denna adapter kan allvarligft skada din apparatur.
Använd den inte om du inte är säker på att du vet spänningen och
polariteten.Använd den inte om apparaten kräver en högre kontinu-
erlig matning än 1500 mA.Täck inte över apparaten under bruk.Se till
att adaptern inte är ansluten medan du startar bilen. Långvarigt bruk
med stillastående motor kan tömma batteriet.
+
-
+
-
-
TIP
+TIP
13 14
SVENSK
SVENSK
PS 10 manual 2 04-03-2003 09:15 Pagina 8

DANE TECHNICZNE:
Ochrona przed zwarciem
Automatyczny wyłącznik termiczny
Automatyczny wyłącznik w razie przeciążenia
2-amperowy bezpiecznik
Napięcie wejściowe: 11 do 30 V prądu stałego (uziemiony biegun
ujemny)
(odpowiedni do samochodów osobowych i ciężarowych)
Napięcie wyjściowe: Możliwość ustawienia na 1,5V, 3V, 4,5V, 6V, 7.5V,
9V, 12V dla napięcia wejściowego 16V lub więcej.
Moc prądu wyjściowego: Maks. 1800 mA
1500 mA do stałego używania dla wszystkich napięć wyjściowych.
Wymiary: długość x szerokość 100 x 40 mm
Długość sznura: 1,5 metra
Ciężar: 100 gramów
PRZYGOTOWANIE:
Wyjmij baterie z urządzenia przenośnego, które ma być podłączone.
USTAWIENIA:
Określ właściwe napięcie. Zwykle można je odczytać na urządzeniu
lub na oryginalnym zasilaczu.
Używając śrubokręta, ustaw odpowiednie napięcie na zasilaczu samo-
chodowym. Upewnij się, że koniec strzałki wskazuje właściwe zasila-
nie.
Określ następnie polaryzację podłączanego urządzenia – może to być
polaryzacja dodatnia (+) lub ujemna (-). Często jest to oznaczone
następującymi symbolami:
Polaryzacja dodatnia:
Polaryzacja ujemna:
W przypadku urządzenia o polaryzacji dodatniej (+) umieść złączkę w
następujący sposób:
W przypadku urządzenia o polaryzacji ujemnej (-) umieść złączkę w
następujący sposób:
Podłącz zasilacz do gniazda zapalniczki i sprawdź, czy zaświeci się zielona
kontrolka „włączony”. Raz jeszcze sprawdź wymaganą polaryzację i
napięcie swojego urządzenia, ponieważ niewłaściwe ustawienie może
spowodować poważne uszkodzenie urządzenia.
Podłącz urządzenie i włącz je w zwykły sposób.
ROZWIňZYWANIE PROBLEMÓW
- Kontrolka „włączony” nie świeci się.
•Możliwe przyczyny:
•Brak napięcia prądu stałego w gnieździe zapalniczki.
•Sprawdź, czy gniazdo zapalniczki działa.
•Sprawdź, czy wtyk jest dobrze wciśnięty do gniazda zapalniczki.
•Metalowe elementy wtyku nie dotykają styków.
•Sprawdź sprężynowanie metalowych elementów.
•Obróć ostrożnie wtyk, aż kontrolka się zaświeci.
•Bezpiecznik wymaga wymiany.
•Obracając w lewo rozkręć wtyk, aby dostać się do bezpiecznika.
- Kontrolka „włączony” świeci się, ale urządzenie nie działa.
Możliwe przyczyny:
•Sprawdź, czy urządzenie jest włączone.
•Sprawdź polaryzację i napięcie.
•Sprawdź połączenie między zasilaczem i urządzeniem.
OSTRZEżENIE!
Niewłaściwe użytkowanie zasilacza może prowadzić do poważnych
uszkodzeń urządzenia.Nie należy go używać w przypadku wątpliwości
odnośnie właściwego napięcia i polaryzacji. Nie należy używać zasilac-
za, jeśli urządzenie wymaga stałego zasilania prądem wejściowym
wyższym niż 1500 mA. Podczas pracy urządzenia nie wolno niczym
przykrywać. Upewnij się, że zasilacz nie jest podłączony podczas uru-
chamiania samochodu. Długotrwałe użytkowanie przy wyłączonym sil-
niku może spowodować rozładowanie akumulatora.
+
-
+
-
-
TIP
+TIP
15 16
POLSKI
POLSKI
PS 10 manual 2 04-03-2003 09:15 Pagina 9

SPECIFICATIES:
Bescherming tegen kortsluiting
Automatische thermische uitschakeling
Automatische overbelasting uitschakeling
2 Ampere zekering
Ingangsspanning: 11 tot 30 Vdc (negatieve aarde)
(Geschikt voor zowel personenwagen als vrachtwagen)
Uitgangsspanning: Instelbaar op 1.5V, 3V, 4.5V, 6V, 7.5V, 9V, 12V bij een
ingangsspanning van 16V of meer.
Uitgangs stroomsterkte: Max. 1800mA
1500mA voor constant gebruik bij alle uitgangsspanningen.
Afmetingen: lengte x breedte 100 x 40mm
Lengte snoer: 1,5 meter
Gewicht: 100 gram-
VOORBEREIDING:
Verwijder de batterijen uit het draagbare apparaat dat u aan wilt sluiten.
INSTELLINGEN:
Bepaal het juiste voltage, dit is vaak terug te vinden op het apparaat of
op de originele adapter.
Stel het juiste voltage in op de Car Power adapter mbv een schroe-
vendraaier. Zorg dat de punt van de pijl naar het juiste voltage wijst.
Bepaal nu de polariteit van het aan te sluiten apparaat, dit kan center
positief (+) of center negatief (-) zijn. Dit is vaak aangegeven met de
volgende symbolen:
Voor center positief:
Voor center negatief:
Is uw apparaat center positief (+) plaats dan de connector als volgt:
Is uw apparaat center negatief (-) plaats dan de connector als volgt:
Plaats de adapter in de sigarette-aanstekerplug, en controleer of de
“power-on” LED groen oplicht.
Contoleer nu nogmaals dejuiste polariteit en het juiste voltage van uw
apparaat, aangezien een verkeerde instelling uw apparaat ernstig kan
beschadigen.
Sluit nu uw apparaat aan, en zet deze aan zoals gebruikelijk.
PROBLEMEN OPLOSSEN
-“Power-on” LED brandt niet
Mogelijke oorzaken:
•Er staat geen DC-spanning op de sigarette-aanstekerplug.
•Controleer met de sigarette-aansteker of deze wel werkt.
•Controleer of de sigarette-aanstekerplug goed vast zit.
•De metalen delen van de plug maken geen contact.
•Controleer de vering van de metalen onderdelen.
•Draai de plug voorzichtig, totdat de LED gaat branden.
•De zekering moet vervangen worden.
•Draai de plug tegen de klok in open om bij de zekering te komen.
-“Power-on” LED brandt wel, maar het apparaat werkt niet.
Mogelijke oorzaken:
•Controleer of het apparaat aan staat
•Controleer de polariteit en het voltage
•Controleer of de verbinding tussen de adapter en uw apparaat
goed is.
WAARSCHUWING!
Onjuist gebruik van deze adapter kan uw apparatuur zwaar beschadi-
gen. Niet gebruiken wanneer u niet zeker bent van het juiste voltage
en de juiste polariteit. Niet gebruiken wanneer uw apparaat een hoge-
re constante input nodig heeft dan 1500mA. Het apparaat niet bedek-
ken tijdens gebruik.Zorg dat de adapter niet aangesloten is tijdens het
starten van de auto. Langdurig gebruik bij een niet-lopende motor kan
een lege accu tot gevolg hebben.
+
-
+
-
-
TIP
+TIP
17 18
NEDERLANDS
NEDERLANDS
PS 10 manual 2 04-03-2003 09:15 Pagina 10
Table of contents
Languages:
Popular Adapter manuals by other brands

Grandstream Networks
Grandstream Networks HT704 quick start guide

Cirronet
Cirronet CR-HN50 quick start guide

Abocom
Abocom UFT128 Specification sheet

Tektronix
Tektronix Keithley CS-633 quick start guide

VidaBox
VidaBox VidaCharger Ultra VB VCHR U 48V ADPT installation guide

Bosch
Bosch Flasher LT user manual