Callaway Golf Eclipse User manual

ECLIPSE GOLF GPS


INTRODUCTION
The Callaway ECLIPSE Golf GPS delivers
elite performance on the course in a versatile
and unique design. Hit more greens and limit
penalty strokes by knowing precise distances
to the front, center, and back of the green,
along with distances to hazards & doglegs.
Conveniently clips on belt, bag, or detach the
clip and carry in your pocket. The ECLIPSE’s
unique design allows for ultimate versatility.
SPECIFICATIONS
2INTRODUCTION
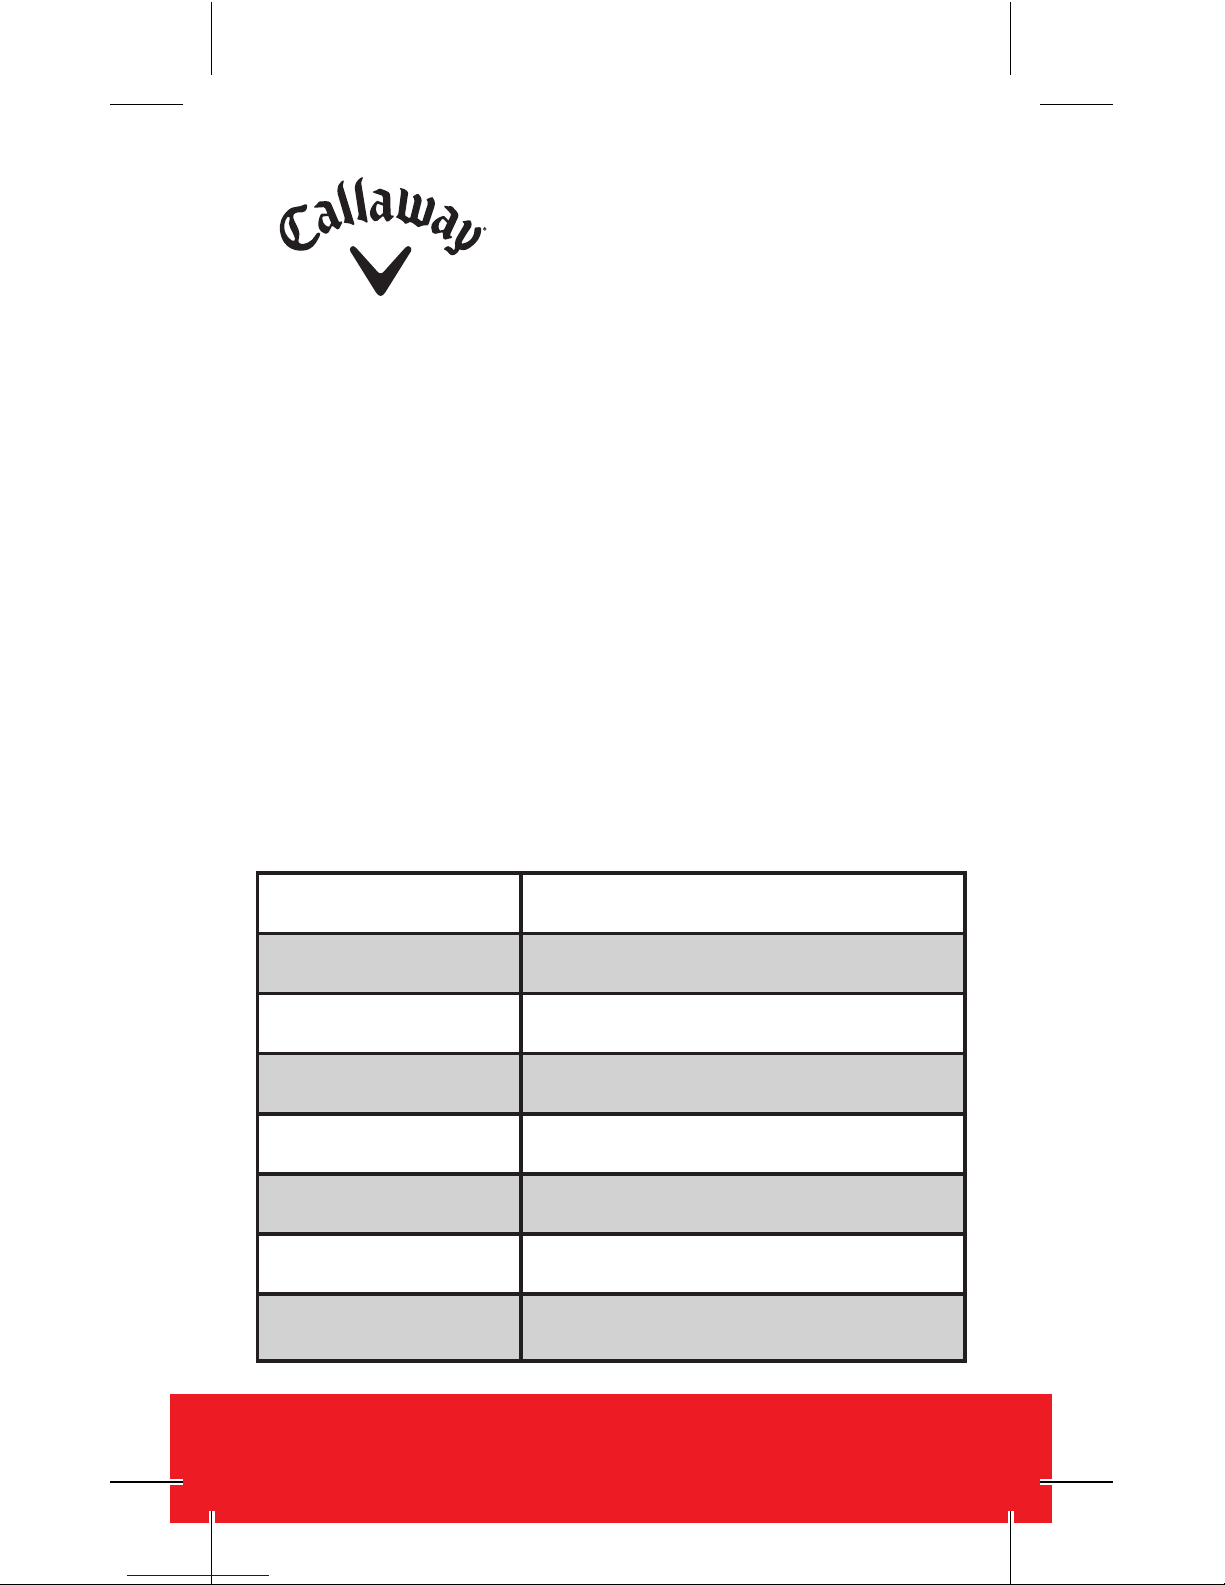
Product Callaway ECLIPSE GPS
# of Courses 30,000+
Dimensions 4.25” x 3” x 1.75“ (w/Clip)
Weight 2.08 oz.
Battery 220mAh Lithium Ion Polymer
Battery Life Golf: 9 hours / Time: 45 Days
Display Size 1.28” (128 x128 pixels)
Water Resistant Yes 1ATM Designation

CHARGING
1. Power GPS unit Off. Hold [POWER ] until
screen goes blank. (See unit diagram page 4)
2. Connect Charger Pins on the charger to
the Charging Ports on the unit.
Note: Charger Pins and Charging Ports
must be aligned properly (Easiest to align
while looking at back of unit).
3. Secure Charger Clamp on the charger
around middle button located on opposite
side of the unit.
4. Plug USB cord end into USB port.
5. When connection is
made, unit will power
on and Battery Icon
bars will pulsate
to indicate charging.
Note: Battery Icon bars will stop pulsating
when charging is complete. (2-3 hours)
ENGLISH 3
Product Callaway ECLIPSE GPS
# of Courses 30,000+
Dimensions 4.25” x 3” x 1.75“ (w/Clip)
Weight 2.08 oz.
Battery 220mAh Lithium Ion Polymer
Battery Life Golf: 9 hours / Time: 45 Days
Display Size 1.28” (128 x128 pixels)
Water Resistant Yes 1ATM Designation
CHARGING PINS
CHARGER CLAMP
CHARGING PORTS

ECLIPSE DIAGRAM
A. [POWER ]- Power On/Off / Backlight On/Off
B. Charging Ports
C. [UP ]- Scroll Up
D. [OK ]- Toggle Screens and Select Options,
Hold to access Main Menu.
E. [DOWN ]- Scoll Down
F. Removable Clip
4HOW TO USE

ENGLISH 5
DISPLAY DIAGRAM
A. Distance to the Center of Green
B. Distance to the Back of Green
C. Distance to the Front of Green
D. Dog Leg
E. Water
F. Sand Trap
PLAY MODE
HAZARD MODE

REVERSING CLIP
1. To remove Clip, PRESS and HOLD down
Tab (on back of clip) then PULL Clip away
from device.
2. Rotate unit 180 degrees.
(Belt attachment use)
3. To Attach Clip, PRESS and HOLD down
tab and insert Clip into Clip Socket until it
clicks and locks into place.
6HOW TO USE
CLIP SOCKET
(Arial View)
CLIP TAB
BACK VIEW
CLIP SOCKET
CLIP SOCKET
BACK VIEW

ENGLISH 7
TIME MODE
1. PRESS [OK ]button to toggle between
Analog or Digital Time Display.
2. PRESS [POWER ]button to turn Backlight
On/Off.
3. To set time and date, see Settings. (Pg. 14)
4. HOLD [OK ]button to access Main Menu.
AT GOLF COURSE
1. From Time Screen, HOLD [OK ]button to
access Main Menu.
2. PRESS [OK ]button to select Play Golf.
3. Device will begin searching for satellite
signal (HOLD [OK ]button to cancel).
4. Once satellite connection is established,
the nearest golf courses will be listed. Use
[UP/DOWN ]buttons to scroll to desired
course, PRESS [OK ]button to select course.
12
6
9 3
PlayGolf
Odometer
Settin gs
Locating
Satellite s
Auto Course
Searching
Course L ist
Crooked_Pines_Golf_C
Perinton_Golf_&_Count
BLUE_HERON_HILLS
Greystone_Golf_Club
Cobblestone_Creek_Co
PlayGolf
Odometer
Settin gs

8HOW TO USE
PLAY MODE
1. PRESS [OK ]button to toggle between
Green, Hazard, Shot Distance, and
Scorecard Screens.
2. To exit Play Mode at any time,
HOLD [OK ]button.
HAZARD VIEW
Note: If no hazards are
present, screen will be blank.
1. PRESS [OK ]button to access the
Hazard Screen.
2. Only 3 hazards will show at a time. If a hole
has more than 3 hazards, scroll by using
[UP/DOWN ]buttons. (Hazards that are
behind you will not be displayed).
3. PRESS [OK ]button to view next/previous
screen.
Table of contents
Languages:
Other Callaway Golf GPS manuals


