Cambo ACTUS-MV User manual

ACTUS-MV
View Camera’s
INSTRUCTION MANUAL
EN
Please read this manual carefully before using the Actus-MV


1
Thank you for purchasing a Cambo product.
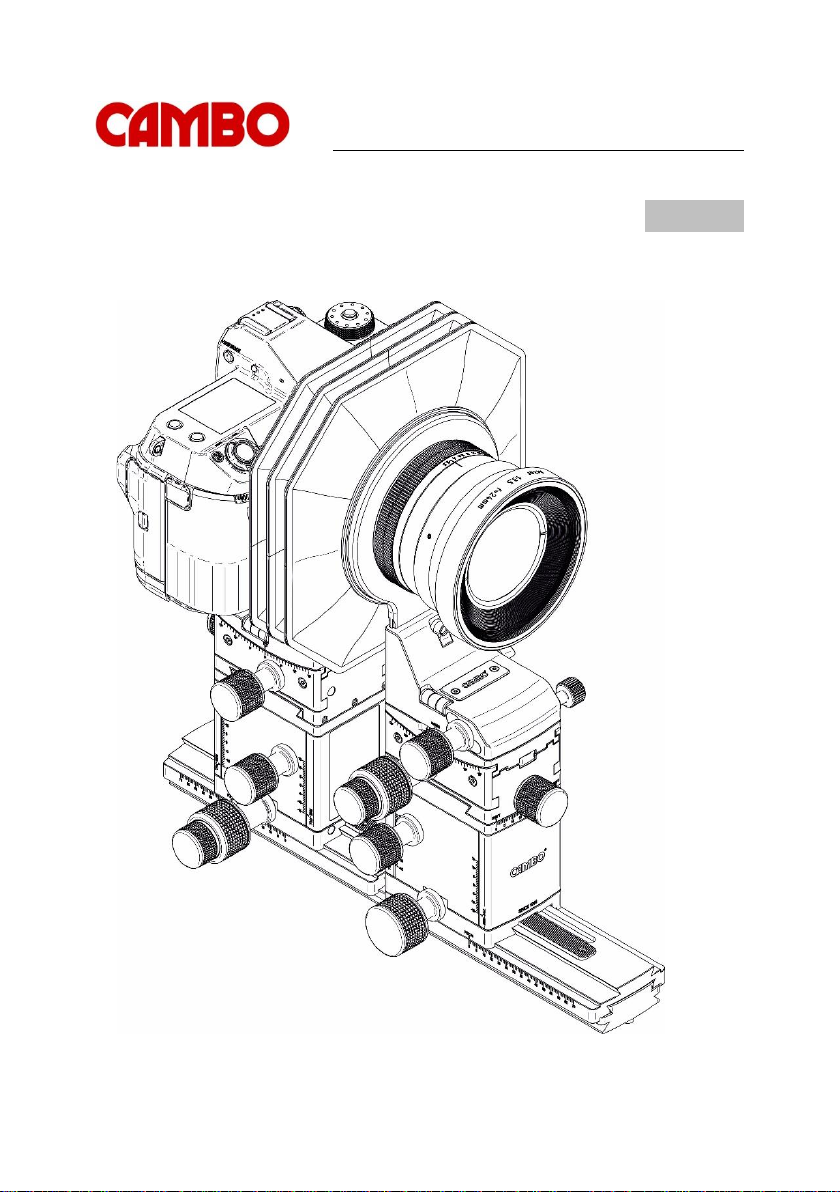
The Actus-MV is a view camera system featuring lateral and vertical
shift, tilt and focus movement on the front and rear standard as well
as swing movement on the front standard. The Actus-MV is
compatible with a wide range of mirrorless and mirror reflex system
cameras.
The geared drives on rise/fall, shift and focus movements enable great
control over perspective, image displacement and high quality
panoramic stitching. Geared tilt and front swing movement enable the
photographer to optimize spatial sharpness. The rear focus and front
tilt movements are fitted with dual speed gearing for maximal
movement control.

2
Inhoud
1Warnings.....................................................................................3
2Key features................................................................................4
3Actus-MV overview.....................................................................5
3.1 Actus-MV controls.......................................................................5
3.2 Interface plate mounting .............................................................8
3.3 Lens panel mounting...................................................................9
3.4 Bellow mounting........................................................................10
3.5 Rail (dis)mounting and features................................................11
3.6 Actus-Mv accessory mount.......................................................13
4Actus-MV system......................................................................14
4.1 Camera options.........................................................................14
4.2 Lens options..............................................................................15
4.3 Various accessories..................................................................15

3
1 Warnings
Due to the modularity of the Actus camera system, many
camera-lens combinations are possible. Please beware of the
possible collision of the rear lens element and the rear
standard and/or the sensor. Please note that Cambo is not
responsible for any damage done to the Actus, lens or
camera, due to improper or careless use.
Before changing the camera orientation form landscape to
portrait or vice-versa, ensure that there is enough clearance
between the camera body and the rear housing of the Actus.
If necessary (this depends on the camera body used) use the
vertical shift to lift the camera to gain more clearance.
Ensure that there is enough clearance between the camera
body and the rear housing of the Actus, before dismounting
the camera body.
(Over)exposure to direct sunlight or heat sources will damage
the leather bellows. Keep/store the leather bellows in a cool,
dry, dust-free and ventilated place.
The Actus uses disc magnets to mount the bellows. These
permanent magnets (magnetism N45) could cause temporary
or permanent damage to equipment
1
sensitive to magnetism
like magnetic cards (credit card, ATM card).
Beware that some combinations of swing, tilt, shift and focus
adjustments can dismount the bellows.
1
Please note that memory cards are not magnetic data carriers and will
therefore not be damaged by static magnetic fields.

4
2 Key features
•High grade CNC milled aluminium body
•High precision laser engraved millimetre/ degree scales
•Durable genuine leather bellows
•70mm telescopic rail extension
•70mm geared focus
2
•40mm horizontal shift (20mm left/ 20mm right)
•30mm vertical shift (15mm up/ 15mm down)
•30º dual ratio geared tilt (+15º/ -15º)
3
•60º swing (30º left/ 30º right)
4
•Friction knobs on all movements
•2-way/ 4-way stitching possibilities
•Zero position click indication
•Interchangeable interface plate, lens panel, rail and bellow
5
•Integrated 3/8” and ¼” tripod mounting (rail)
•Integrated Arca compatible dovetail
•Optional adjustable safety stop to prevent collision of rear
lens element
2
Dual ratio gear on rear standard
3
Dependant on camera, lens and bellow combination
4
Front standard only
5
All toolless interchangeable

5
3 Actus-MV overview
3.1 Actus-MV controls
Figure 1 Actus-MV controls 1

6
A. Rear standard spirit levels
B. Rear shift drive knob
C. Rear tilt drive knob
D. Rear rise/fall drive knob
E. Rear focus drive knob
F. Rear focus fine drive knob (1:5 speed reduction)
G. Interface plate slot
H. Interface plate locking lever
I. Lens panel interface slot
J. Lens panel interface locking lever
K. Accessory mount cover
L. Front standard spirit level
M. Swing drive knob
N. Front tilt drive knob
O. Front tilt fine drive knob (1:5 speed reduction)
P. Front rise/fall drive knob
Q. Front focus knob
R. Front shift knob

7
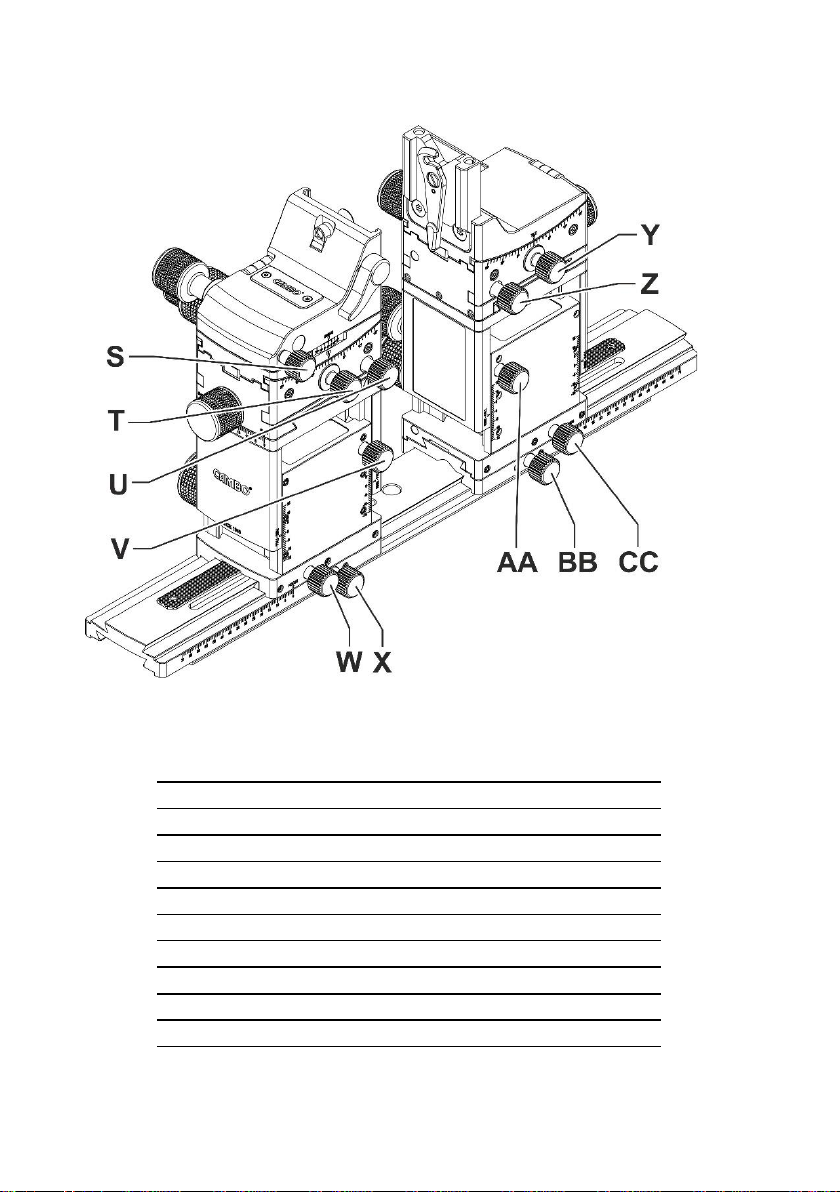
Figure 2 Actus-MV controls 2
S. Swing friction knob
T. Front tilt friction knob
U. Front shift friction knob
V. Front rise/fall friction knob
W. Front geared focus friction knob
X. Front telescopic rail extension friction knob
Y. Rear tilt friction knob
Z. Rear shift friction knob
AA.Rear rise/fall friction knob
BB.Rear telescopic rail extension friction knob
CC.Rear geared focus friction knob

8
3.2 Interface plate mounting
The Actus-MV uses standardized ACMV interface plates for mounting
various mirrorless and DSLR camera bodies as well as digital backs.
6
To mount the interface plates please perform the following steps.
Figure 3 Mounting the interface plate
1. Completely open the locking lever to the right
2. Slide the interface plate in the designated slot
3. Firmly push the locking lever left to fixate the interface plate
6
Actus-G range interchangeable and dedicated bayonet holders share the
same interface and can also be fitted to the Actus-MV. Note these do
cause a limitation to the rise/fall range

9
3.3 Lens panel mounting
The Actus-MV is fitted with the standardized lens panel mount which
is used over the full range of Actus view cameras. To mount a lens
panel to the Actus-MV please perform the following steps.
Figure 4 Mounting the lens panel
1. Flip the lens panel locking lever completely up
2. Push back the locking screw (if necessary)
3. Slide the lens panel in the designated slot
4. Push the lens panel locking lever completely down

10
3.4 Bellow mounting
The Actus-MV uses the same bellows which are used over the full
range of the Actus view cameras. To correctly mount the bellow please
follow the steps listed below.
Figure 5 Mounting the bellow
1. Move the front and rear standard apart
2. Align the indication screw [A] with the cavity in the lens panel.
Apply the front of the bellow to the magnetic interface of the
lens panel.
3. Apply the rear of the bellow to the magnetic interface of the
camera mount.

11
3.5 Rail (dis)mounting and features
The Actus-MV comes with the standard 290mm rail assembly. In the
face of portability the Actus-MV is fitted with a toolless removable rail.
To remove or exchange the rail please follow the steps listed below.
Figure 6 Dismounting the rail
1. Slide the front and rear standard to the maximum extend of
the telescopic rail.
2. Use the focus drive knobs to slide the front and rear standard
in such way the dismounting pin [3] becomes visible through
the telescopic rail.
3. Use a narrow tool, for example a pencil, to press the spring
loaded pin and pull the front or rear standard towards the end
of the rail.
4. To re mount the front and rear standard, make sure to align
the angled area with the spring loaded pin.

12
The Actus-MV has several built in features. The bottom of the rail is
an Arca compatible dovetail which makes it able to be fitted on most
common quick release tripod heads. Further features are listed
below.
Figure 7 Actus-MV rail features
A. Spring loaded telescopic rail end stops
B. Removable M3 Arca rail safety stop screws
C. Threaded M3 hole for end stop screw storage
D. 4x M4 accessory mounting holes
E. 3/8” threaded tripod mounting hole
F. ¼”threaded tripod mounting hole

13
3.6 Actus-Mv accessory mount
The Actus-MV is fitted with accessory mounts on the bottom of the rail
and underneath the Cambo logo plate on the front standard. To
remove the Cambo logo plate use the supplied T6 torx key and
unscrew the two m2x4 T6 screws.
The two M2 thread holes now are available for mounting accessories,
for example the ACMV-350 Compendium.
Figure 8 Actus-MV accessory mount

14
4 Actus-MV system
4.1 Camera options
The Actus-MV is part of the Actus family and shares many accessories
with its siblings. Interface plates with the ACMV prefix are designated
mounts for use on the Actus-MV system. Actus-G interface plates are
also usable on the Actus-MV, just note that these will affect on the rise
and fall range of the Actus-MV
Current ACMV Camera interface plates are:
Code:
Name:
Description:
9910086E
ACMV-86E
Interchangeable bayonet camera interface plate
99100861
ACMV-861
Dedicated Leica SL interface plate
99100862
ACMV-862
Dedicated Fuji GFX-50 interface plate
99100863
ACMV-863
Dedicated Fuji GFX-100 interface plate
99100864
ACMV-864
Dedicated Nikon-Z interface plate
99100989
ACDB-989
Interchangeable DB Module for SLW adapters
99100990
ACDB-990
Dedicated Rotating DB Module for PhaseOne IQ
99100991
ACDB-991
Dedicated Rotating DB Module for Hasselblad HV
Note that Camera options for the Actus systems are constantly
updated as camera manufactures launch new camera models. To find
the most up to date list of Actus-MV camera options please visit our
website, your local distributer or contact the Cambo sales department.

15
4.2 Lens options
The Actus-MV mechanically accepts all Actus Lens panels. Note that
the usability of any lens on the Actus-MV depends on the lens +
camera combination. Determining factor is the flange focal distance of
the lens and the mount to sensor distance of the camera. To determine
if your desired lens + camera combination is possible please visit our
website, your local dealer or contact the Cambo sales department for
the most up to date information.
4.3 Various accessories
All dedicated accessories for the Actus-MV share the “ACMV”prefix
in the product name. Apart from the dedicated accessories many of
the existing Actus family accessories are suitable for the Actus-MV.
For a complete list of Actus-MV accessories please visit our website,
your local dealer or contact the Cambo sales department.

16

Cambo Fotografische Industrie B.V.
Cambo R&D April 2022
This instruction manual is prepared with care, although no responsibility, financial or otherwise, is accepted
for any consequences related the information stated in this instruction manual. All specifications in this
instruction manual are subject to change without notice.
For more information please visit the Cambo web site: www.cambo.com
Table of contents
Other Cambo Digital Camera manuals