CAMMHD DSJ-W4 User manual

CAMMHD
Mini Portable Camera
DSJ-W4 Product Manual
VER1.0

- 1 -
Charge the computer or
read the data
1. Prompt before use
This is a camera with a built-in lithium battery.
Before first use, charge the camera, about an hour.
Note:
Please use our company's data cable for charging first,
although other data cables can also be charged, you may
face a situation where the red light does not turn off after
the product is completely charge.
This product supports recording while charging.
Charging status: red light is always on
Fully charged state: red light is off.
Charging the charger

- 2 -
Charging indicator: the red light is always on--
loading--
Charging indicator: the red light is off, the light blue is on--
full charge--
Format micro TF card
When using for the first time, please read the memory card with
a card reader on the computer, click the removable disk, format,
and then format the memory card to FAT32-32KB.
* The camera can support up to 64GB TF memory card.
* If it is less than 64G, format it on the computer directly, if it is
more than 64G, you need to download third-party software and
format it as "FAT32-32KB".

- 3 -
2. Make use of suggestions
1.Description of function keys
Lens
Seeing
Record button / indicator
Camera /
motion detection button
TF card slot
USB interface
Power / video button

- 4 -
2. Install the micro TF card
Simple operation: the text on the memory card
faces the back of the product, insert it directly into
the card slot and press it with your finger.
M6 screw hole
Magnet
Magnet
Rear clip
Microphone
Reset hole

- 5 -
3. How to use the product
The main function:
a.Video recording
b. Individual registration
c. photograph
d. motion detection
e. Hidden light
Record mode indicator: blue;
While recording: the blue light flashes slowly;
Record mode indicator: yellow;
recording: yellow light flashes slowly;
Photo mode indicator: yellow;
during the photo: the yellow light flashes for 5 seconds.
a. Use the "Video" function:
Long press the "Start / Video button" for 2 seconds to turn
on, short press the "Start / Video button", the blue light
flashes slowly to start recording; Short press the "Start /
Video button" again to stop recording, the blue light will
stay on.
The video file is automatically saved in sections, 5 minutes

- 6 -
during a period; If you need to turn off, please press and
hold the power button to turn off.
b. Use the "One-time registration" function:
Long press "Start / Video button" for 2 seconds to power on,
short press "record button", yellow light flash slowly to start
recording; Short press the "record button" again to stop
recording, the blue light will stay on.
Separate recording files are automatically saved in sections,
one section per hour;
If you need to turn off, please press and hold the power
button to turn off.
c. Use the "photography" function :
Long press "Power / Video Key" for 2 seconds to turn on the
phone, short press "Photography" button to start taking

- 7 -
photos. The yellow light will flash after 5 seconds to
complete the photo; the blue light will stay on.
The taken photo is automatically saved, short press to take
one photo at a time.
d. Use the "motion detection" function:
Press and hold the "power / video button" for 2 seconds to
turn on, and hold the "photography button" for 3 seconds.
The blue light flashes slowly and the file continues to record
for one minute. When there is an object passing near the
camera, it will continue to record; When there is no passing
object, the camera will be at 1 The video will stop after 5
minutes, and the blue light will stay on.

- 8 -
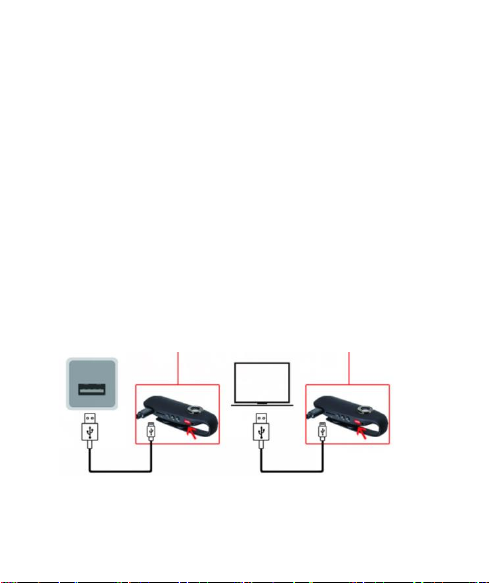
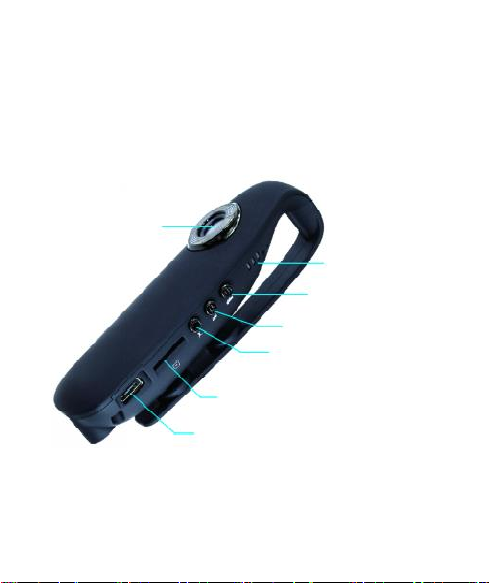
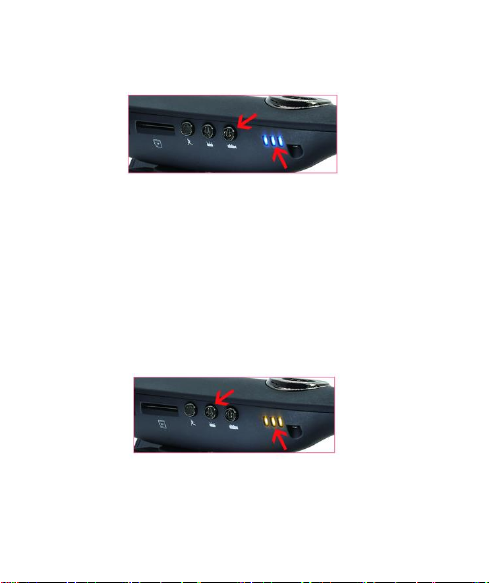
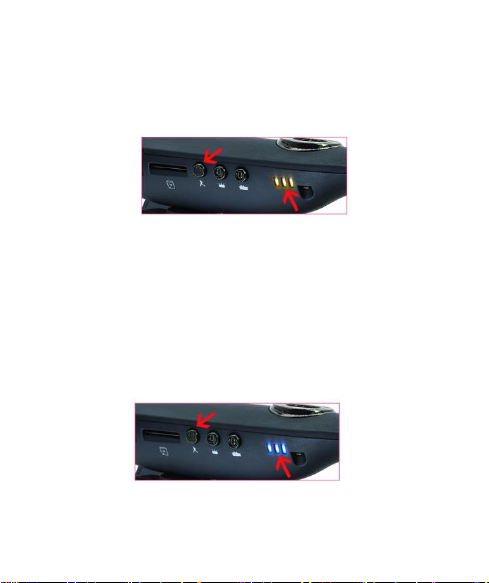
e. Use the "hide indicator light" function:
When the camera is working, if you need to turn off the
blinking light, press and hold for 3 seconds.
The "record button" indicator goes out; If you need to turn
on the flashing light, press and hold again for 3 seconds;
The "record button" can turn the flashing indicator back on;
this operation will not affect the working state of the camera
in operation.
Advice:
1.When the battery is too low, the indicator light will flash
quickly, it will automatically stop recording or recording,
automatically save the file, and turn off.
2. There is no card when booting up, the blue light will keep
blinking.
3. The machine will automatically turn off after 3 minutes of
inactivity (no recording / recording state).

- 9 -
3.Product description
a. Camera reset operation:
When the camera is frozen and cannot be turned off.
As shown in the figure: Press the needle vertically and press
the reset button into the reset hole to complete the forced
shutdown.
b. Overview of camera functions
This product has strong absorption of iron, can be adsorbed
and fixed on iron objects, and has clip function.

- 10 -
With strong magnet

- 11 -
4.Camera time and resolution
settings
Please insert the camera into the TF card and connect it to
the computer via the data cable. After about 8 seconds, after
the computer recognizes the removable disk, click to open
the removable disk;
Edit and rename the file name "Settime" to "settings". After
deleting the contents of the file, enter the Arabic numerals
"zero spaces one space one" (011) to save the text file and
exit. Register the camera again to finish
Settings, the "Settings" text document will disappear.
This product default setting 011
When the first number is set to 0, the resolution of the video
file is 1280 * 720 and the number of frames is 30.
When the first number is set to 1, the resolution of the video
file is 1920 * 1080 and the number of frames is 30.
When the second number is set to 0, the loop recording
function is disabled. When the TF card recording files are full,
the machine will stop recording.

- 12 -
When the second number is set to 1, turn on the loop
recording function. Once the TF card recording files are full,
the new recording file will overwrite the original recording
file and the machine will continue recording.
When the third number is set to 0, the recording video does
not display the recording time watermark.
The third number is set to 1: The year / month / day of the
recording video display time: minute: second:
About the recording time watermark setting method:
Once the machine is loaded with TF card, it will still be in the
TF card after the first recording; the root directory will always
automatically generate a“settime”text file, and it will display
20180421,1828: 08 after opening;
If you need to set 12/24/2020 23:59:59, edit the number and
save the text file. After disconnecting the computer, record
again and the camera recording time watermark is changed.
The "settime" text document will not disappear.
5.Safety tips
Please follow the following basic safety precautions when
using your device.

- 13 -
1. This product uses lithium batteries. Please avoid direct
sunlight for a long time when using this product.
The high temperature radiant heat source is not suitable for
use in high humidity and dusty environment during the
delivery period.
2. Please charge the product before using the product if it is
stored for a long time.
3. Do not disassemble the machine or repair it yourself.

- 14 -
6.Product parameters

CAMMHD
Nanjing Aichewu Smart Technology Co., Ltd
Address: 89 Sheng Li Road
Jiangning District, China
Email: CAMMHD-ServiceTeam@outlook.com
Table of contents
Other CAMMHD Digital Camera manuals
Popular Digital Camera manuals by other brands

Panasonic
Panasonic Lumix DMC-S3 Basic owner's manual

Sony
Sony Cyber-shot DSC-H200 instruction & operation manual

Pentax
Pentax 33WR - Optio 3.2MP All-Weather Digital... Connection manual

LEXIBOOK
LEXIBOOK DJ030 Series instruction manual

Marshall Amplification
Marshall Amplification CV420-18X user manual

Siqura
Siqura XCU-F Installation supplement