Campbell Hausfeld tl052089 User manual

REMINDER: Keep your dated proof of purchase for warranty purposes! Attach it to this manual or file it for safekeeping.
Operating Instructions TL052089
Please read and save these instructions. Read carefully before attempting to assemble, install, operate or maintain the product described.
Protect yourself and others by observing all safety information. Failure to comply with instructions could result in personal injury and/or
property damage! Retain instructions for future reference.
Description
Air powered die grinders are designed
for grinding, polishing, deburring and
smoothing sharp edges. This tool may
be used with carbide burrs. Different
collets are available which serve as
adapters for virtually all standard
grinding accessories. In addition, this
tool may also be used for gasket
removal and weld grinding. Angled
heads allow access to tight or difficult
to reach areas. Front exhaust models
direct air away from user’s face.
Safety Guidelines
CALIFORNIA PROPOSITION 65
You can
create
dust when you cut, sand, drill
or grind materials such as
wood, paint, metal, concrete,
cement, or other masonry. This dust
often contains chemicals known to
cause cancer, birth defects, or other
reproductive harm. Wear protective
gear.
This manual contains information that
is very important to know and
understand. This information is
provided for SAFETY AND TO PREVENT
EQUIPMENT PROBLEMS. To help
recognize this information, observe the
following symbols.
Danger alerts you
to a hazard that
WILL result in death or serious injury
Warning alerts you
to a hazard that
COULD result in death or serious injury.
Caution alerts you
to a hazard that
MAY result in minor injury.
Notice alerts you
to important
information that will help you prevent
damage to equipment.
General Safety
Information
Unpacking
When unpacking this product, carefully
inspect for any damage that may have
occurred during transit.
This product is part of a high pressure
system and the following safety
precautions must be followed at all
times along with any other existing
safety rules.
1. Read all manuals included
with this product carefully.
Be thoroughly familiar
with the controls and the
proper use of the equipment.
2. Only persons well acquainted with
these rules of safe operation should
be allowed to use the air tool.
Do not exceed the
maximum oper-
ating pressure of the air tool (90 psi).
This can reduce the life of the tool.
3. Do not exceed any pressure rating
of any component in the system.
Maximum operating pressure of 90
psi is measured at the tool inlet
while the tool is running. The
pressure drop between the
compressor and tool needs to be
compensated for at the compressor.
4. Disconnect the air tool from air
supply before changing tools or
attachments, servicing and during
non-operation.
Safety glasses and ear
protection must be worn
during operation.
5. Do not wear loose fitting clothing,
scarves, neck ties or jewelry when
operating any tool. Loose clothing
or jewelry may become caught in
moving parts and result in serious
personal injury.
IN738000AV 1/12
6. Do not depress trigger when
connecting the air supply hose.
7. Always use attachments designed
for use with air powered tools. Do
not use damaged or worn
attachments.
8. Never trigger the tool when not
applied to a work object.
Attachments must be securely
attached. Loose attachments can
cause serious injury.
9. Protect air lines from damage or
puncture.
10. Never point an air tool at oneself or
any other person. Serious injury
could occur.
11. Check air hoses for weak or worn
condition before each use. Make
sure all connections are secure.
Release all pressure from the
system before attempting to
install, service, relocate or
perform any maintenance.
12. Keep all nuts, bolts and screws tight
and ensure equipment is in safe
working condition.
13. Do not put hands near or under
moving parts.
14. Always secure workpiece in a vise or
clamp. Do not place hands on the
back cylinder when operating the
tool.
15. Do not use a cut-off disc mandrel on
this tool unless a safety guard is in
place.
Do not misuse this
product. Excessive
exposure to vibration, work in
awkward positions, and repetitive
work motions can cause injury to hands
and arms. Stop using any tool if
discomfort, numbness, tingling, or pain
occur, and consult a physician.
MANUAL
Air Die Grinders
For parts, product & service information
visit www.chpower.com
© 2012 Campbell Hausfeld/Scott Fetzer
See Warranty on page 4 for important information about commercial use of this product.
REGISTER YOUR PRODUCT ONLINE NOW! http://www.chpower.net/reg

2
Assembly
SYSTEM SETUP
PLEASE REFER TO AIR TOOL AND SPRAY
GUN SET-UP (IN170102AV) FOR AIR
SYSTEM HOOK-UP INSTRUCTIONS.
Use of a whip hose
prevents accidental
triggering of tool when pressurized air
is connected to system.
Using fittings or air hoses which are
too small can create a pressure drop
which will result in a loss of power in
tool.
NOTE: Do not install a quick coupler
set between tool and whip hose.
AIR TOOL SETUP
ALL MODELS
Ensure tool is not connected to air
supply then place tool upside down on
workbench.
Never carry a tool
by the hose or pull
hose to move tool or a compressor.
Keep hoses away from heat, oil and
sharp edges. Replace any hose that is
damaged, weak or worn.
Pre-Operation
LUBRICATION
Air tools require lubrication through-
out the life of the tool. Proper
lubrication is the owner’s responsibility.
Use Campbell Hausfeld airtool oil (Part
No. ST127000AV) to lubricate, clean
and inhibit rust in one step. Failure to
lubricate and maintain air tool properly
will dramatically shorten the life of the
tool and will void the warranty.
This air tool
requires
lubrication before initial use and
before and after each additional use.
1. Disconnect tool from air supply.
2. Turn die grinder upside down.
3. While pulling trigger, pour a
teaspoon of Campbell Hausfeld oil
in the air inlet.
Cover exhaust port
with a towel before
applying air pressure. Oil will discharge
through exhaust port during first few
seconds of operation after an airtool
has been lubricated. Failure to cover
exhaust port can result in serious
injury.
4. Release trigger and connect air tool
to air supply. Cover exhaust port
with a towel then run air tool for
20 to 30 seconds. Oil will discharge
from exhaust port when air
pressure is applied. Continue to run
die grinder until no oil is discharg-
ed. Wipe all residual oil off of tool
before use.
Operation
ATTACHMENTS
Disconnect air tool
from air supply
before changing attachments or
serious injury could occur.
1. Insert stem of grinder attachment
into collet opening (See Figure 1).
Make sure stem is fully inserted.
2. Securely tighten collet with
wrenches (supplied with some
models) (See Figures 2 & 3).
Apply one wrench to the collet nut
and the other to the spindle. Turn
the wrench on the collet nut to the
right, simultaneously turning the
other wrench in the opposite
direction. Make sure stem does not
slip out of position.
3. Do the opposite of Step 2 to loosen
and change the grinder attachment.
Make sure attach-
ment stem is fully
inserted into collet opening and collet
is securely tightened. Loose attach-
ments could fly off during operation
and cause serious injury. Only use
attachments rated for a minimum of
25,000 RPM.
Storage
The air tool must be lubricated before
storing. An air motor cannot be oiled
too often.
Disconnect air tool
from air supply
before lubricating.
1. Turn grinder upside down.
2. While pulling trigger pour a
teaspoon of Campbell Hausfeld oil
in air inlet.
Cover exhaust port
with a towel before
applying air pressure. Oil will discharge
through exhaust port during first few
seconds of operation after an airtool
has been lubricated. Failure to cover
exhaust port can result in serious
injury.
3. Connect die grinder to air supply
and cover exhaust port with a
towel. Run die grinder for only 2 to
3 seconds because more oil needs to
remain in the air tool when storing.
Technical Service
For information regarding the
operation or repair of this product,
please call 1-800-543-6400.
Replacement Parts
Information
For information regarding where to
order replacement parts, call toll free
1-800-543-6400. Please provide the
following information:
•Modelnumber
•Stamped-incode
•Partnumberanddescription
Address parts correspondence to:
Campbell Hausfeld
Attn: Parts Department
100 Production Drive
Harrison, Ohio 45030 U.S.A.
Operating Instructions
www.chpower.com
Figure 2 - Wrenches
Figure 1 Collet
Nut
Grinder
Attachment
Figure 3
To Tighten
Collet Turn
Wrench To The
Right
Always Turn This
Wrench In The
Opposite
Direction

Troubleshooting Chart
Symptom Possible Cause(s) Corrective Action
Tool runs slowly or will not
operate
Moisture blowing out of tool
Excessive vibration
1. Grit or gum in tool
2. No oil in tool
3. Low air pressure
4. Air hose leaks
5. Pressure drops
6. Regulator adjusted
wrong
7. Worn ball bearing in
motor or in angle
head
1. Water in tank
2. Water in the air
lines/hoses
1. Damaged stone or
burr
2. Collet shaft bent
1. Flush the tool with Campbell Hausfeld air tool oil, gum
solvent, or an equal mixture of SAE 10 motor oil and
kerosene. If Campbell Hausfeld oil is not used, lubricate
the tool after cleaning
2. Lubricate the tool according to lubrication instructions in
Pre-Operation section
3. Adjust the compressor regulator to tool maximum while
the tool is running free
4. Tighten and seal hose fittings if leaks are found
5. Be sure hose is properly sized. Long hoses or tools using
large volumes of air may require a hose with an I.D. of
1/2 inch or larger depending on total hose length
6. Adjust regulator with slotted screwdriver to maximum
speed
7. Remove and inspect bearing for rust, dirt, grit or worn
race. Clean and regrease bearing with bearing grease or
replace bearing
1. Drain tank (See air compressor manual). Oil tool and run
until no water is evident. Oil tool again and run 1-2
seconds
2a. Install a water separator/filter (PA2121). NOTE: Separators
work properly only when air steam is cool Locate
separator/filter as far as possible from compressor
2b. Install an air dryer
2c. Anytime water enters the tool, the tool should be oiled
immediately
1. Replace with new stone or burr
2. Replace shaft or collet
3
TL052089
www.chpower.com

Operating Instructions
www.chpower.com
4
Limited Warranty
1. DURATION: From the date of purchase by the original purchaser as follows: One (1) Year.
2. WHO GIVES THIS WARRANTY (WARRANTOR): Campbell Hausfeld / Scott Fetzer Company, 100 Production Drive, Harrison,
Ohio, 45030, Telephone: (800) 543-6400.
3. WHO RECEIVES THIS WARRANTY (PURCHASER): The original purchaser (other than for purposes of resale) of the Campbell
Hausfeld product.
4. WHAT PRODUCTS ARE COVERED BY THIS WARRANTY: This Campbell Hausfeld air tool.
5. WHAT IS COVERED UNDER THIS WARRANTY: Substantial defects in material and workmanship which occur within the
duration of the warranty period with the exceptions below.
6. WHAT IS NOT COVERED UNDER THIS WARRANTY:
A. Implied warranties, including those of merchantability and FITNESS FOR A PARTICULAR PURPOSE ARE LIMITED FROM
THE DATE OF ORIGINAL PURCHASE AS STATED IN THE DURATION. If this product is used for commercial, industrial
or rental purposes, the warranty will apply for ninety (90) days from the date of purchase. Some States do not allow
limitation on how long an implied warranty lasts, so the above limitations may not apply to you.
B. ANY INCIDENTAL, INDIRECT, OR CONSEQUENTIAL LOSS, DAMAGE, OR EXPENSE THAT MAY RESULT FROM ANY
DEFECT, FAILURE, OR MALFUNCTION OF THE CAMPBELL HAUSFELD PRODUCT. Some States do not allow the exclusion
or limitation of incidental or consequential damages, so the above limitation or exclusion may not apply to you.
C. Any failure that results from an accident, purchaser’s abuse, neglect or failure to operate products in accordance with
instructions provided in the owner’s manual(s) supplied with product. Accident, purchaser's abuse, neglect or failure
to operate products in accordance with instructions shall also include the removal or alteration of any safety devices.
If such safety devices are removed or altered, this warranty is void.
D. Normal adjustments which are explained in the owner’s manual(s) provided with the product.
E. Items or service that are normally required to maintain the product.
7. RESPONSIBILITIES OF WARRANTOR UNDER THIS WARRANTY: Repair or replace, at Warrantor’s option, products or
components which are defective, have malfunctioned and/or failed to conform within the duration of the specific warranty
period.
8. RESPONSIBILITIES OF PURCHASER UNDER THIS WARRANTY:
A. Provide dated proof of purchase and maintenance records.
B. Call Campbell Hausfeld (800) 543-6400 to obtain your warranty service options. Freight costs must be borne by the
purchaser.
C. Use reasonable care in the operation and maintenance of the products as described in the owner’s manual(s).
9. WHEN WARRANTOR WILL PERFORM REPAIR OR REPLACEMENT UNDER THIS WARRANTY: Repair or replacement will be
scheduled and serviced according to the normal work flow at the servicing location, and depending on the availability of
replacement parts.
This Limited Warranty applies in the United States, Canada and Mexico only and gives you specific legal rights. You may also
have other rights which vary from state to state or country to country.

Draft
Manual de Instrucciones TL052089
Sírvase leer y guardar estas instrucciones. Lea con cuidado antes de tratar de armar, instalar, manejar o darle servicio al producto descrito en
este manual. Protéjase Ud. y a los demás observando todas las reglas de seguridad. El no seguir las instrucciones podría resultar en heridas y/o
daños a su propiedad. Guarde este manual como referencia.
Descripción
Las rectificadoras neumáticas de
matrices son herramientas diseñadas
rectificar, pulir, eliminar rebabas y
emparejar bordes afilados. Esta
herramienta puede utilizarse con
diferentes boquillas para permitirle el
uso de practicamente todos los
accesorios estándards para rectificar.
Adicionalmente, esta herramienta
puede utilizarse para eliminar
empaques o para rectificar soldaduras.
Los accesorios en ángulo le permiten el
acceso a áreas pequeñas o de acceso
dificil. Los modelos con el orificio de
escape en la parte delantera dirijen el
aire expulsado en dirección opuesta a la
cara del operador.
Medidas de Seguridad
PROPOSICIÓN DE CALIFORNIA 65
Cuando corta lija, taladra o
pule materiales como por
ejemplo madera, pintura,
metal, hormigón, cemento, u otro tipo
de mampostería se puede producir
polvo. Con frecuencia este polvo
contiene productos químicos que se
conocen como causantes de cáncer,
defectos congénitos u otros daños
reproductivos. Use equipo de protección.
Este manual contiene información que
es muy importante que sepa y
comprenda. Esta información se la
suministramos como medida de
SEGURIDAD y para EVITAR PROBLEMAS
CON EL EQUIPO. Debe reconocer los
siguientes símbolos.
Peligro indica un
riesgo que CAUSA
la muerte o daños graves.
Advertencia
indica un riesgo
que PUEDE CAUSER la muerte o
heridas graves.
Precaución indica
un riesgo que
PODRÍA CAUSAR heridas menores.
Aviso indica una
información
importante que ayuda a prevenir
daños al equipo.
Informaciones
Generales de
Seguridad
Desempaque
Al desempacar este producto, revíselo
cuidadosamente para cerciorarse de
que no se dañó durante el transporte.
Este producto forma parte de un
sistema de alta presión y siempre
deben acatarse las siguientes medidas
de seguridad al igual que otras normas
de seguridad existentes.
1. Lea cuidadosamente todos
los manuales incluidos con
el producto. Familiarícese
completamente con los
controles y el uso debido
del equipo.
2. Sólo aquellas personas
completamente familiarizadas con
estas normas de funcionamiento
seguro deben utilizar la
herramienta neumática.
No exceda la
presión máxima
de funcionamiento de la herramienta
neumática (6,21 bar). Ésto reduciría
la duración de la herramienta.
3. No exceda las presiones
especificadas para ninguno de los
componentes del sistema. La
presión máxima de funcionamiento
de 6,21 bar mide en la entrada de
la herramienta, mientras está
funcionando. La baja de presión
entre el compresor y la herramienta
debe compensarse en el compresor.
4. Desconecte la herramienta
neumática del suministro de aire
antes de cambiar la herramienta o
los accesorios, darle servicio y al no
utilizarla.
Siempre utilice lentes de
seguridad y protección para
los oídos para operar la
herramienta.
5. No utilice ropas holgadas,
bufandas, corbatas o joyas para
operar herramientas neumáticas. La
ropas holgadas o joyas podrían
atascarse en las piezas en
movimiento y ocasionarle lesiones
graves.
6. No oprima el gatillo al conectar la
manguera de suministro de aire.
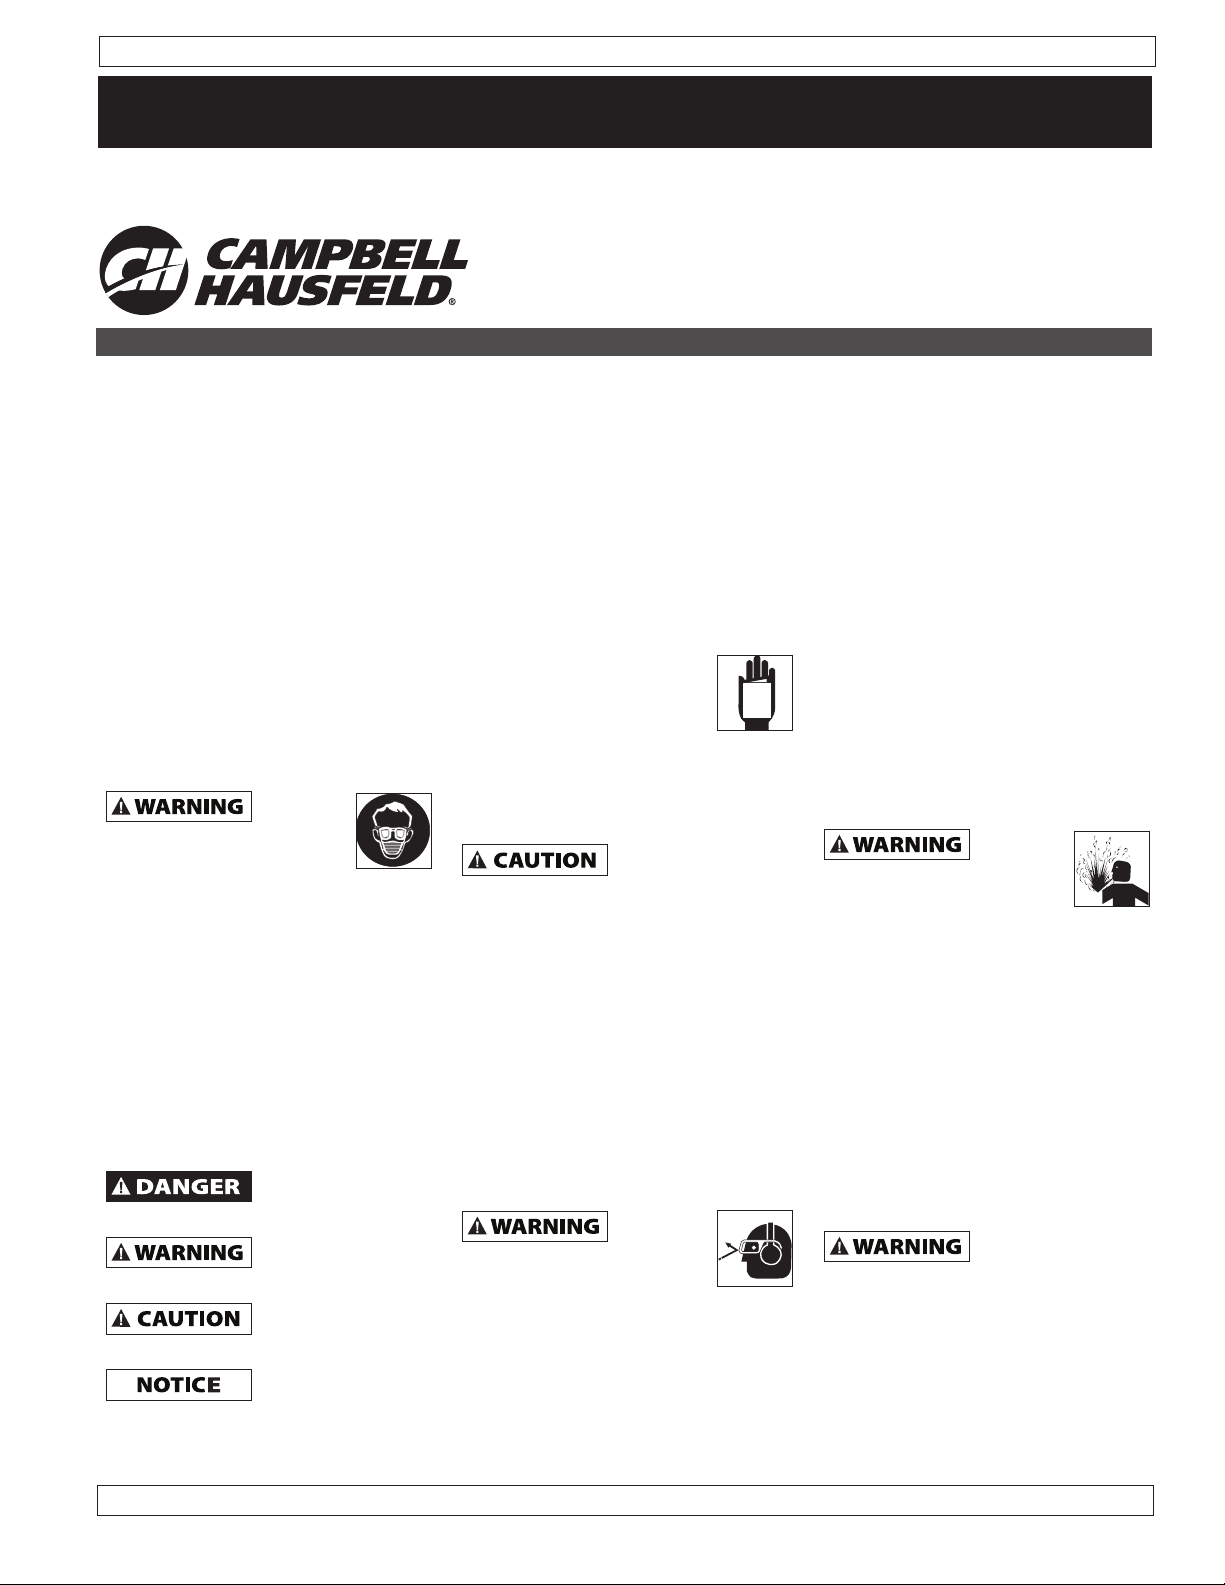
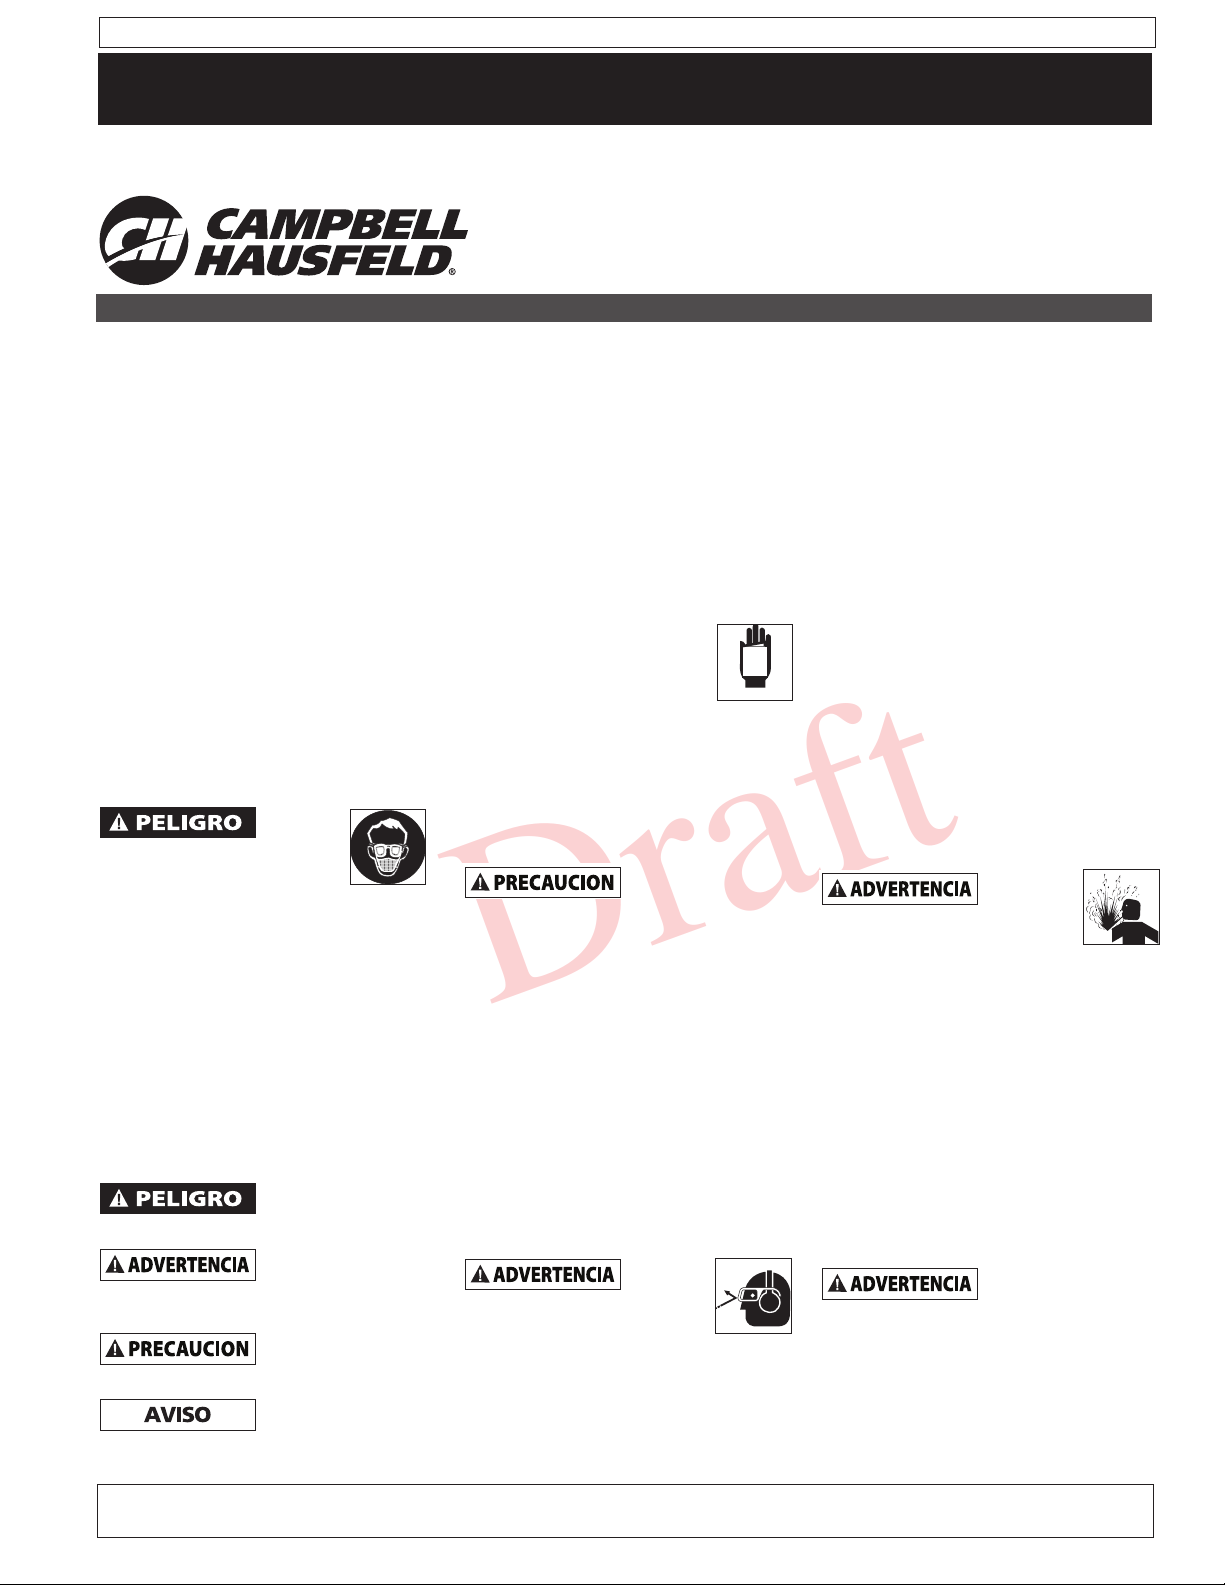
7. Siempre utilice accesorios diseñados
para herramientas neumáticas. No
utilice accesorios dañados o
desgastados.
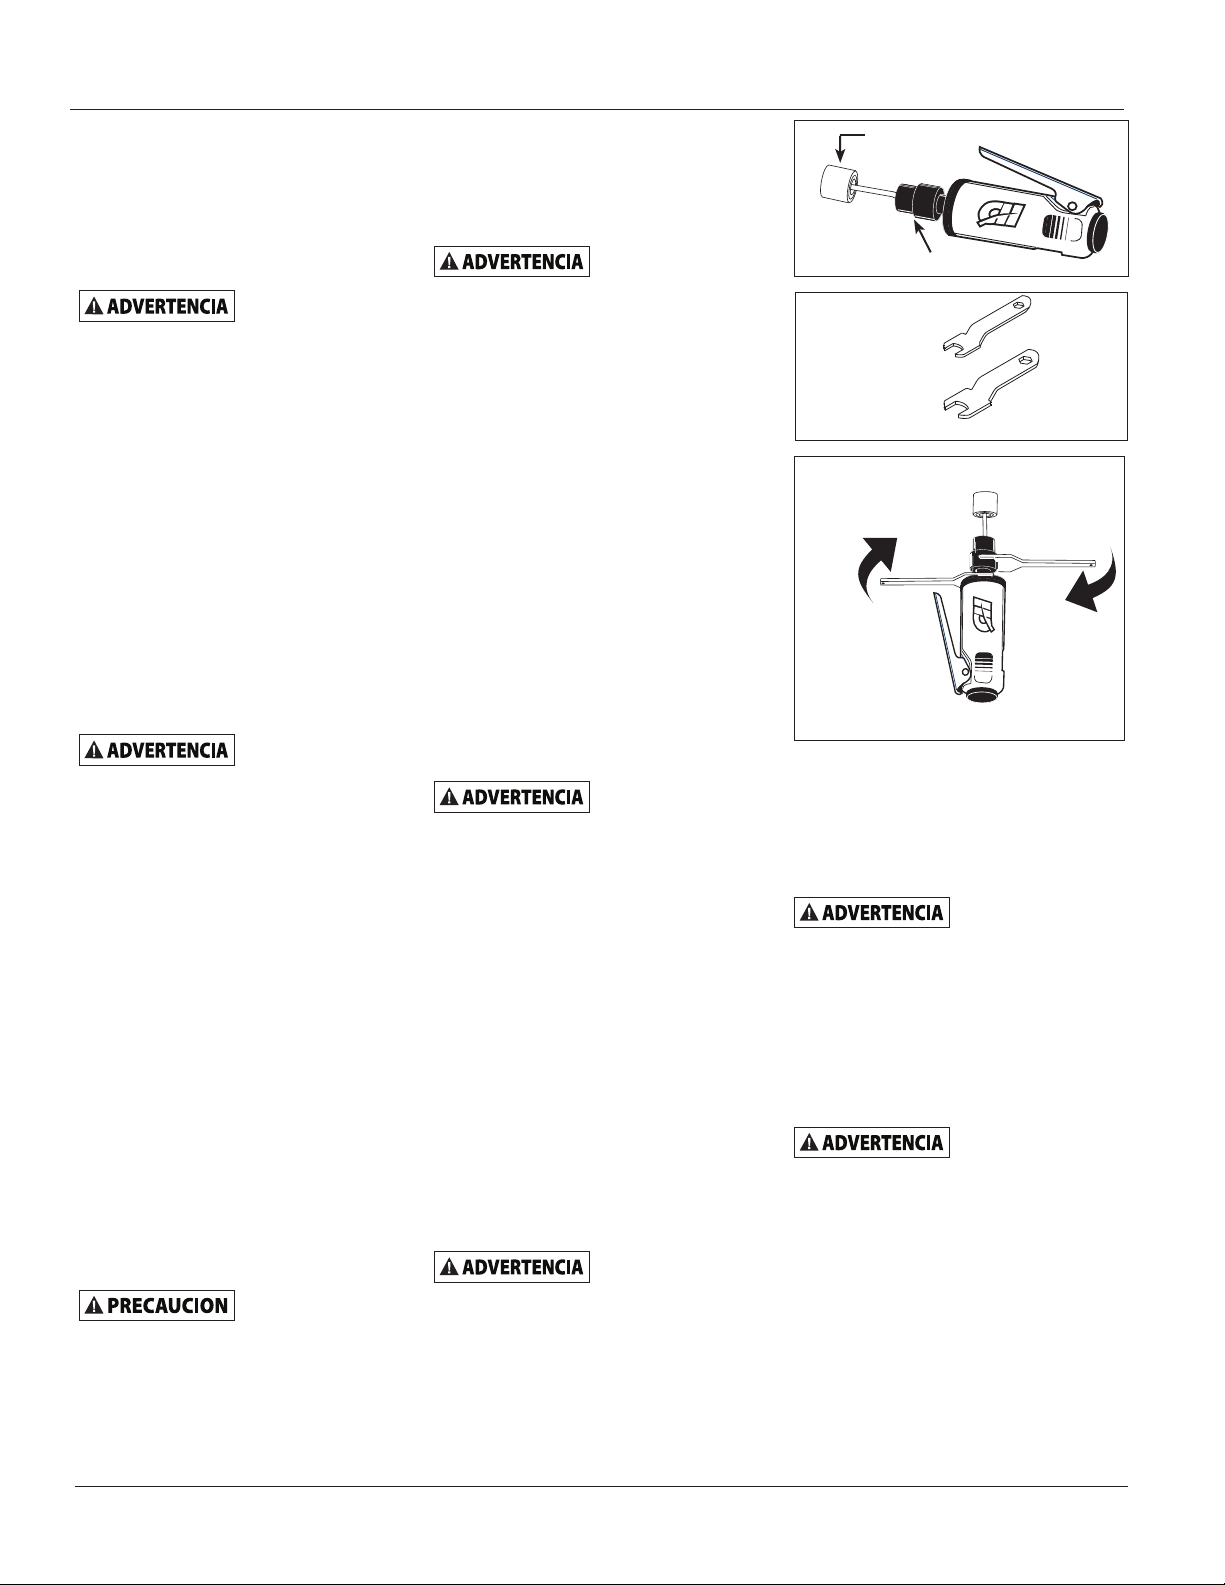
8. Nunca accione la herramienta
cuando no esté sobre el objeto de
trabajo. Los accesorios deben estar
firmemente conectados. Los
accesorios flojos pueden ocasionarle
lesiones graves.
9. Proteja las líneas de aire contra
daños o perforaciones.
10. Nunca apunte la herramienta
neumática hacia usted mismo u otras
personas. Ésto podría ocasionar
lesiones graves.
11. Antes de cada uso, cerciórese de que
la manguera de aire no esté dañada
o desgastada. Igualmente, cerciórese
de que todas las conexiones estén
bien apretadas.
Libere toda la presión del
sistema antes de tratar de
instalar, darle servicio, reubicar
o realizar cualquier mantenimiento.
12. Mantenga las tuercas, pernos y
tornillos bien apretados y cerciórese
de que el equipo esté en buenas
condiciones de funcionamiento.
13. No coloque las manos cerca o
debajo de piezas en movimiento.
14. Siempre asegure la pieza de trabajo con
abrazaderas o una prensa. No coloque
las manos en el cilindro negro mientras
esté operando la herramienta.
15. No use un mandrino para discos de
corte con esta herramienta si no
tiene la guarda colocada en su lugar.
No haga mal uso de
este producto. La
exposición a vibraciones excesivas, el
trabajar en posiciones anormales y los
movimientos repetitivos del trabajo pueden
causar daños a las manos y los brazos. Si
siente incomodidad, pérdida de sensación,
hormigueo o dolor, suspenda el uso de
cualquier herramienta y consulte a un
médico.
IN738000AV 1/12
MANUAL
Rectificadora de
Neumática de Matrices
5 Sp
© 2012 Campbell Hausfeld/Scott Fetzer
Ver la Garantía en página 8 para información importante sobre el uso comercial de este producto.
RECORDATORIO: ¡Guarde su comprobante de compra con fecha para fines de la garantía!
Adjúntela a este manual o archívela en lugar seguro.
¡REGISTRE SU PRODUCTO EN LÍNEA AHORA MISMO! http://www.chpower.net/reg

6 Sp
Manual de Instrucciones
Figura 1
Figura 2 - Llaves
Tuerca de Boquilla
Figura 3
Para Apretar la
Boquilla Gire
la Llave Hacia
la Derecha
Accesorio
para Rectificar
Siempre Gire
esta Llave en
Sentido Opuesto
Ensamblaje
CONFIGURACION DEL SISTEMA
REFIERASE A LA CONFIGURACION DE LA
HERRAMIENTA NEUMATICA Y DE LA
PISTOLA PULVERIZADORA (IN170102AV)
PARA OBTENER LAS INSTRUCCIONES DE
CONEXION DEL SISTEMA NEUMATICO.
Utilice una
manguera flexible
para evitar que la herramienta se accione
accidentalmente al conectarla al sistema
de aire comprimido.
El uso de conectores o mangueras
demasiado pequeños podría ocasionar
bajas de presión que ocasionarían
pérdidas de potencia en la herramienta.
NOTA: No instale un juego de
acopladores rápidos entre la
herramienta y la manguera flexible.
CONFIGURACION DE LA
HERRAMIENTA NEUMATICA
TODOS LOS MODELOS
Cerciórese de que la herramienta no
esté conectada a la fuente de
suministro de aire y coloquela boca
abajo en la mesa de trabajo.
Nunca cargue una
herramienta
neumática por la manguera, ni hale la
manguera para mover la herramienta o
el compresor. Mantenga las mangueras
alejadas de fuentes de calor, aceite u
objetos afilados. Reemplace las
mangueras dañadas, débiles o
desgastadas.
Pre-Funcionamiento
LUBRICACION
Las herramientas neumáticas siempre
requieren lubricación para operar. La
lubricación adecuada es la
responsabilidad del propietario. Utilice
el aceite para herramientas neumáticas
Campbell Hausfeld (ST127000AV) para
lubricar la herramienta, limpiarla e
inhibir el óxido en un solo paso. El no
lubricar la herramienta adecuadamente
ni darle el mantenimiento debido,
reducirá drásticamente su duración y
cancelaría la garantía.
Esta herramienta
neumática
requiere lubricación antes de su uso
inicial y antes y después de cada uso
adicional.
1. Desconecte la herramienta de la
fuente de suministro de aire.
2. Coloque la rectificadora boca abajo.
3. Simultaneamente oprima el gatillo y
vierta una cucharadita de aceite
Campbell Hausfeld en el orificio de
entrada de aire.
Cubra el orificio de
salida con una toalla
antes de aplicar la presión de aire. El
aceite saldrá por este orificio durante
los primeros segundos de
funcionamiento, después que la
herramienta neumática haya sido
lubricada. Si cubre el orificio de salida
podría ocasionarle lesiones graves.
4. Suelte el gatillo y conecte la
herramienta neumática a la fuente
de suminsitro de aire. Cubra el
orificio de salida con una toalla.
Opere la herramienta neumática de
20s a 30s. El aceite saldrá por el
orificio de salida al aplicarle la
presión de aire. Continue operando
la rectificadora de matrices hasta
que no expulse más aceite. Limpie
los residuos de aceite de la
herramienta antes de usarla.
Funcionamiento
ACCESORIOS
Desconecte la
herramienta de la
fuente de suministro de aire antes de
cambiar los accesorios o podría
ocasionarle lesiones graves.
1. Introduzca el extremo del accesorio
para rectificar dentro del orificio de
la boquilla (Vea la Figura 1).
2. Ajuste firmemente el mandil
portapieza con llaves (incluidas
con algunos modelos) (Vea la
Figura 2 & 3). Aplique una llave a
la tuerca del mandril y la otra al eje.
Gire la llave de la tuerca del mandril
hacia la derecha, mientras al mismo
tiempo gira la otra llave en la
dirección opuesta, Asegúrese de que
el vástago no quede posicionado
incorrectamente.
3. Haga lo opuesto del Paso 3 para
aflojar y cambiar el accesorio
rectificador.
Cerciórese de que el
extremo del
accesorio esté completamente
introducido al orificio de la boquilla y
que la boquilla esté bien apretada. Los
accesorios flojos podrían salir volando
durante el funcionamiento y ocasionarle
lesiones graves. Sólo utilice accesorios
diseñados para un mínimo de 416,6 s-1
(25,000 revoluciones por minuto).
Almacenamiento
La herramienta neumática debe
lubricarse antes de almacenarla. Un
motor neumático nunca será lubricado
con mucho frecuencia.
Desconecte la
herramienta
neumática de la fuente de suministro
de aire antes de lubricarla.
1. Coloque la rectificadora boca abajo.
2. Simultaneamente oprima el gatillo y
vierta una cucharadita de aceite
Campbell Hausfeld en el orificio den
entrada de aire.
Cubra el orificio de
salida con una toalla
antes de aplicarle presión de aire. El
aceite saldrá por el orificio de salida
durante los primeros segundos de
operación, después que la herramienta
haya sido lubricada. Si no cubre el
orificio de salida podría ocasionarle
lesiones graves.
3. Conecte la rectificadora de matrices
a la fuente de suministro de aire y
cubra el orificio de salida con una
toalla. Opere la rectificadora de
matrices por sólo 2s a 3s y que la
herramienta neumática necesita más
aceite durante el periodo de
almacenamiento.

Problemas Posibles Causas Acciones a Tomar
La herramienta funciona
lentamente o no funciona
La herramienta expulsa
humedad
Vibración excesiva
1. Hay impurezas en la
herramienta
2. La herramienta no
tiene aceite
3. Baja presión de aire
4. Fugas en la
manguera de aire
5. Baja la presión
6. El regulador está
mal ajustado
7. Los cojinetes de
bolas del motor o la
cabeza angular
están desgastados
1. Hay agua en el
tanque
2. Hay agua en las
líneas/mangueras de
aire
1. La piedra/accesorio
para rectificar está
desgastado
2. El eje de la boquilla
está doblado
1. Limpie la herramienta con aceite para herramientas
neumáticas Campbell Hausfeld, solventes adecuados o
una mezcla de iguales proporciones de aceite para
motores SAE 10 y queroseno. Si no utiliza aceite
Campbell Hausfeld, lubrique la herramienta después de
limpiarla
2. Lubrique la herramienta según las instrucciones de
lubricación en la sección denominada Pre-Operación
3. Ajuste el regulador del compresor al máximo permitido
para la herramienta mientras ésta funciona libremente
4. Apriete y selle las conexiones de la manguera, si consigue
fugas
5. Asegúrese de que el tamaño de la manguera sea el
apropiado. Las mangueras largas o las herramientas que
utilizan grandes volúmenes de aire pueden requerir una
manguera con un D.I. de 12,7 mm (1/2”) o superior, según
la longitud total de la manguera
6. Ajuste el regulador hasta que la herramienta alcance la
velocidad máx
7. Desarme los cojinetes y revise si están oxidados, sucios o
desgastados. Limpie los cojinetes con grasa para cojinetes
o reemplácelos
1. Vacíe el tanque (Vea el manual del compresor de aire).
Lubrique la herramienta y déjela funcionar hasta que no
expulse residuos de agua. Lubrique la herramienta una
vez más y déjela funcionar de 1s a 2s
2a. Instale un separdor/filtro de agua (PA2121). NOTA: Los
separadores funcionan debidamente sólo cuando el flujo
de aire está fresco. Ubique el separador/filtro lo más lejos
posible del compresor
2b. Instale un secador de aire
2c. En cualquier momento que entre agua en la herramienta,
deberá lubricarla inmediatamente
1. Reemplace la piedra o el accesorio para rectificar
2. Reemplace el eje o la boquilla
7 Sp
TL052089
Guía de Diagnóstico de Averías
Servicio Técnico
Para obetener información acerca del
funcionamiento o reparación de este
producto, sírvase llamar al 1-800-543-
6400.
Información Sobre Piezas de
Repuesto
Para obtener información de como
obtener piezas de repuesto en Estados
Unidos, sírvase llamar al 1-800-543-6400.
En el exterior, comuníquese con el
distribuidor de productos Campbell
Hausfeld más cercano a su domicilio.
Suministre la siguiente información:
•Númerodelmodelo
•Códigoestampado
•Númerodepiezaydescripción
Puede escribirnos a:
Campbell Hausfeld
Attn: Parts Department
100 Production Drive
Harrison, Ohio 45030 U.S.A.

Manual de Instrucciones
8 Sp
Garantía Limitada
1 DURACION: A partir de la fecha de compra por el comprador original tal como se especifica a continuación: Un año.
2. QUIEN OTORGA ESTA GARANTIA (EL GARANTE: Campbell Hausfeld / The Scott Fetzer Company 100 Production Drive,
Harrison, Ohio 45030 Teléfono: (800) 543-6400.
3. QUIEN RECIBE ESTA GARANTIA (EL COMPRADOR): El comprador original (que no sea un revendedor) del producto
Campbell Hausfeld.
4. PRODUCTOS CUBIERTOS POR ESTA GARANTIA: Esta herramienta neumática Campbell Hausfeld.
5. COBERTURA DE LA GARANTIA: Defectos importantes en el material y la mano de obra que ocurran durante la duración del
período de garantía con las excepciones que se mencionan a continuación.
6. LO QUE NO ESTA CUBIERTO POR ESTA GARANTIA:
A. Las garantías implícitas, incluyendo aquellas de comercialidad E IDONEIDAD PARA FINES PARTICULARES, ESTAN
LIMITADOS A LO ESPECIFICADO EN EL PARRAFO DE DURACION. Si este producto es empleado para uso comercial,
industrial o para renta, la garantía será aplicable por noventa (90) días a partir de la fecha de compra. En algunos
estados no se permiten limitaciones a la duración de las garantías implícitas, por lo tanto, en tales casos esta limitación
no es aplicable.
B. CUALQUIER PERDIDA DAÑO INCIDENTAL, INDIRECTO O CONSECUENTE QUE PUEDA RESULTAR DE UN DEFECTO, FALLA
O MALFUNCIONAMIENTO DEL PRODUCTO CAMPBELL HAUSFELD. En algunos estados no se permite la exclusión o
limitación de daños incidentales o consecuentes, por lo tanto, en tales casos esta limitación o exclusión no es aplicable
C. Cualquier falla que resulte de un accidente, abuso, negligencia o incumplimiento de las instrucciones de
funcionamiento y uso indicadas en el (los) manual(es) que se adjunta(n) al producto. Dichos accidentes, abusos
por parte del comprador, o falta de operar el producto siguiendo las instrucciones del manual de instrucciones
suministrado también debe incluir la desconexión o modificación de los instrumentos de seguridad. Si dichos
instrumentos de seguridad son desconectados, la garantía quedaría cancelada.
D. Los ajustes normales explicados en el(los) manual(es) suministrado(s) con el producto.
E. Los artículos o servicios que son necesarios normalmente para mantener el product.
7. RESPONSABILIDADES DEL GARANTE BAJO ESTA GARANTIA: Según elija el Garante, la reparación o el reemplazo del
producto o los componentes que estén defectuosos, que hayan funcionado en forma inadecuada y/o que no hayan
cumplido con su función dentro de la duración del período específico de la garantía.
8. RESPONSABILIDADES DEL COMPRADOR BAJO ESTA GARANTIA:
A. Suministrar prueba fechada de compra y la historia de mantenimiento del producto.
B. Llame a Campbell Hausfeld (800) 543-6400 por sus opciones de servicio incluidas en la garantía. Los costos de flete
correrán por cuenta del comprador.
C. Seguir las instrucciones sobre operación y mantenimiento del producto, tal como se indica(n) en el (los) manual(es) del
propietario
9. CUANDO EFECTUARA EL GARANTE LA REPARACION O REEMPLAZO CUBIERTO BAJO ESTA GARANTIA: La reparación o
reemplazo dependerá del flujo normal de trabajo del centro de servicio y de la disponibilidad de repuestos.
Esta garantía limitada es válida sólo en los EE.UU., Canadá y México y otorga derechos legales específicos. Usted también
puede tener otros derechos que varían de un Estado a otro. o de un país a otro.
Table of contents
Languages:
Other Campbell Hausfeld Die Grinder manuals