Camplux JK-5330 User manual

Visit Us: Camplux.com
3330-A Marathon Ct Charleston, SC 29418 1(844) 538-7475
Model No.: JK-5330
Item No.: BBQ-136M
CAMPING STOVE
Instruction For Installation And Use


1
www.camplux.com
Visit Us: Camplux.com
3330-A Marathon Ct Charleston, SC 29418 1(844) 538-7475
If you smell gas:
● Do not attempt to light appliance.
● Make sure appliance is in the off position.
● Extinguish any nearby flame(s).
● Shut off cylinder fuel supply valve if so equipped, or if equipped with a disposable fuel cylinder, disconnect
cylinder.
● Leave the area immediately.
● Allow gas to dissipate 5 minutes.
● If gas smell has dissipated from the area, of the appliance, and fuel supply, follow gas connection
procedures.
● If you smell gas again, follow steps 1-6 and have appliance serviced.
Failure to follow these instructions could result in fire or explosion, which could cause property damage,
personal injury, or death.
DANGER
FIRE OR EXPLOSION HAZARD
Improper installation, use, adjustment, alteration, service or maintenance can cause injury or property
damage.
Refer to this manual. For assistance or additional information consult a qualified installer, service agency or
gas supplier.
WARNING
Do not store or use gasoline or other liquids with flammable vapors in the vicinity of this or any other
appliance.
FOR YOUR SAFETY
CARBON MONOXIDE HAZARO
This appliance can produce carbon monoxide which has
no odor.
Using it in an enclosed space can kill you.
Never use this appliance in an enclosed space such as a
camper, tent , car or home.
DANGER

Visit Us: Camplux.com
3330-A Marathon Ct Charleston, SC 29418 1(844) 538-7475
2
www.camplux.com
● DO NOT use on/in apartment complex balconies or patios, recreational vehicles, campers or boats.
● Propane gas is extremely flammable, follow these instructions:
● DO NOT store or use gasoline or other liquids/aerosols with flammable vapors n the vicinity of this
appliance.
● Always attach or detach propane cylinder outdoors away from flame, pilot lights or other sources of
ignition and only when appliances is cool to touch.
● DO NOT allow the gas hose to come into contact with any hot surfaces. Inspect the hose for damage
such as burns, chafing, and kinks before each use.
● Read and follow all warnings and instructions on or accompanying Propane/Butane gas.
● Always inspect appliance, Propane/Butane cylinder, and its connections for damage, dirt or debris
before attaching Propane/Butane cylinder.
● DO NOT use if either has been damaged or modified.
● Follow directions in the "Gas Leak Testing"section on page 4 of this manual. Never test for gas leaks
with a lit match or open flame. DO NOT operate the stove with a gas leak.
● When transporting, not using, or storing stove always disconnect Propane/Butane gas.
● Propane/Butane cylinder should remain upright to prevent liquid Propane/Butane flare-up.
● DO NOT connect to a remote gas supply such as natural gas or a refillable Propane/Butane cylinder.
● In case of fire, turn gas "OFF" at burner control knobs and use Type 'BC' fire extinguisher or other
appropriate means to extinguish flame.
● Keep hands, face and hair away from burners. Use long matches or long-nosed lighter to light the
burners, DO NOT wear loose clothing or allow long hair to hang freely while lighting or using stove.
● Always snap down legs to form a"V" with the stove base to prevent the stove from becoming
unstable while in use. Use only on a flat surface.
● DO NOT move stove while in use. Avoid touching hot surfaces.
● Properly dispose of all packaging materials.
● Any modification of the appliance maybe dangerous.
● Use protective gloves when handing hot components.
● Gas parts are sealed by the manufactures and must not be altered by user. When changing the gas
container, please keep away from any source of ignition.
● Keep the hose position so as to ensure that it is not subjected to twisting.
● It is vital to replace the hose if it is worn, or damaged.
● The maximum diameter for pot/pan that to be used on the burners is 8.7 in. (220 mm), the minimum
is 3.9 in. (100 mm).
● The cylinder supply system must be arranged to provide for proper fuel withdrawal from the operating
cylinder.
WARNING

Visit Us: Camplux.com
3330-A Marathon Ct Charleston, SC 29418 1(844) 538-7475
3
www.camplux.com
Assembly Instructions
READ ALL SAFETY WARNINGS & ASSEMBLY INSTRUCTIONS CAREFULLY BEFORE ASSEMBLING OR
OPERATING YOUR STOVE.
Inspect contents of the box to ensure all parts are included and undamaged.
Step 1: Put the stove on a flat surface outdoor.
Step 2: Open the lid to stand position.
Step 3: Make sure the burner control knobs are in “OFF” position.
Step 4: Attach regulator assembly to stove fittings. HAND TIGHTEN ONLY. Do not cross-thread connection.
Step 5: Attach propane cylinder to the regulator assembly by turning propane cylinder clockwise. HAND TIGHTEN
ONLY. Do not cross-thread connection.
CAUTION: The cylinder must stay upright. See the diagram on this page.
Step 6: Apply “Gas Leak Testing” as described in this manual.
NOTE: Propane cylinder should be positioned to a minimum of 7.9 in. (200 mm) from the stove.
This appliance shall only be used with the regulator supplied with this appliance.
This appliance shall only be used with a propane gas cylinder certified to DOT 39.
IT MAY BE HAZARDOUS TO ATTEMPT TO FIT OTHER TYPES OF REGULATOR AND GAS CONTAINERS.
ONLY USE IN WELL-VENTILATED AREAS.
7.9 in.
(200 mm)
Cooking grill Notched support arm
Push up
and turn until
tight
Attach
Pull down
and turn until
separated
Detach

Visit Us: Camplux.com
3330-A Marathon Ct Charleston, SC 29418 1(844) 538-7475
4
www.camplux.com
The injector or orifice is well protected by specially designed structure.
Even though it should be cleaned once a year. If the injector hole is blocked and
no gas provided from the injector under normal gas pressure, you can try to use
a thin pin to pierce it open or you’d better contact with the after-sale center.
● Gas leak testing must be performed outdoors in a well ventilated area every time cylinder is
connected to stove.
● Always keep unit away from open flames, sparks or lit cigarettes.
● Never use a flame to check for gas leaks.
WARNING
Gas Leak Testing
Step 1: Assemble stove per "Assembly Instructions" in this manual. Make sure burner control knobs are in
"OFF" position.
Step 2: Prepare a soapy water solution (one part dish washing liquid to three parts water) to test for gas leaks in
the connections. Apply a generous amount of the soapy mixture to the regulator assembly at the regulator,
along entire length of hose, and at the stove fitting (located on the right side of stove).
Step 3: With the burner control knobs in the "OFF" position, check for the bubbles where gas cylinder attaches to
regulator assembly, along entire length of hose, and at stove fitting if soapy mixtures starts bubbling, gas is
leaking through the connections.
Disconnect the gas cylinder, re-tighten the connection that is leaking gas, repeat procedure with soapy
mixture until gas no longer leaks. NEVER USE A FLAME TO CHECK FOR GAS LEAKS.
Step 4: Once all gas leaks have been sealed, WAIT AT LEAST 5 MINUTES FOR GAS FUMES TO DISSIPATE
BEFORE LIGHTING THE BURNERS.
Carefully follow "Operating Instructions" to light the burner and properly operate this unit.
The stove have three burners. Consequently it have three venturies. On each venturie there are two holes acting
as first air inlets. These venturies are protected by the control panel like the above illustration. So normally these
venturies and those air inlets are free from obstacles. Even though, you will have to check these venturies and air
inlets and clean them before every time of using to avoid unexpected obstructing of air supply.
Do not obstructing the flow of combustion
and ventilation air
Control panel
Venturie
Watch for bubbles
Regulator
Stove fitting
Injector hole

Visit Us: Camplux.com
3330-A Marathon Ct Charleston, SC 29418 1(844) 538-7475
5
www.camplux.com
Operating Instructions
READ ALL SAFETY WARNINGS AND INSTRUCTIONS CAREFULLY.
● DO NOT allow gasoline or other flammable vapors or liquids to come in contact with stove while
lighting or at any time during use of stove.
● DO NOT allow the gas hose to come into contact with any hot surfaces. Inspect the hose for damage
such as burns, chafing, and kinks before each use.
WARNING
Step 1: Make sure “Gas Leak Testing” is completed and the burner control knobs are closed and the stove is on a
flat surface away from combustible material. The two side burners are to be ignited by piezo. The middle
grill burner is to be ignited by manual. We suggest to ignite one of the two side burners first.
WARNING
The stove shall not be exposed to flammable vapors or liquids during lighting.
Step 2: Decide which burner to light. Find the right ignition button which ignites this burner. Turn the burner control
knob to BIG FLAME position, then push the ignition button to ignite. If no ignition, push the button again. If
the burner is the middle burner, then no ignition button equipped. You can just ignite it with a long match.
WARNING
If the burner does not light within 5 seconds, close the burner control knob immediately. Wait at least 5 minutes
until gas fumes dissipates before attempting to light burner again.
Step 3: To light the other burners, reduce the flame on the first lit burner and repeat Step 2 to the other burners.
WARNING
If any of the burners does not light within 5 seconds, close the burner control knob immediately. Wait at least 5
minutes until gas fumes dissipates before attempting to light burner again.
WARNING
When you use the middle burner, the baking pan must be in place.
Step 4: Adjust burner flame as necessary by using burner control knob. Close the burner control knobs when the
stove is not in use.
Step 5: After use each time, allow stove to cool completely, then follow instructions in the “After Use Safety” and
"Proper Care and Maintenance" sections of this manual.

Visit Us: Camplux.com
3330-A Marathon Ct Charleston, SC 29418 1(844) 538-7475
6
www.camplux.com
● Always allow the stove to cool completely before handling.
● Always disconnect the gas cylinder from stove when not in use, a safety cap should be placed on the gas
cylinder.
● Detach regulator assembly and store under grill inside stove.
● Never store gas cylinder in an enclosed area like house, garage, etc. Store the gas cylinder outdoors in
well ventilated, shaded area away from any heat source or open flame.
● Fold lid back into their closed position.
Note: Observe flame height and color
when lit. Flame should have a blue
center and yellow tip. Otherwise
something may be wrong.
After-use Safety
The appliance shall be used away from flammable materials.
Clearance to combustibles: top 48 in. (122 cm), sides 24 in. (61 cm).
OFF/SMALL flame
ON/BIG flame
Clockwise to close
The gas supply
Yellow
Blue
Burner
Warning:
When you use the middle burner, the baking pan must be in place.
24 in.
(61 cm)
24 in.
(61 cm)
48 in. (122 cm)
PROPANE
1"-20 UNEF
1 lb
7.9 in. (200 mm)
3.9 in. (98 mm)

Visit Us: Camplux.com
3330-A Marathon Ct Charleston, SC 29418 1(844) 538-7475
7
www.camplux.com
Proper Care & Maintenance
● Do not leave this appliance unattended while the appliance is in operation; keep children and pets away from the
appliance at all times.
● Wash cooking grill with hot, soapy water, rinse well and dry before storing. Wipe remaining exposed parts of
stove with damp cloth. Do not use abrasive materials.
● To protect your stove, the unit must be kept clean and covered at all times when not in use. Cover and store
stove in a protected area away from children and pets.
● After product has been stored and prior to reusing, verify that burners are free from leaves, insects, spider webs,
dirt, etc., as these items can obstruct the flow of combustion air.
● Prior to each use, visually check the burner flame for proper operation as described in this manual.
● DO NOT use if burner/flame is not operating properly.
● This stove requires an unobstructed airflow to operate correctly.
● During use or storage, always keep the stove area clear and free of combustible materials, gasoline and other
flammable vapors and liquids.
NOTE: Due to the intense heat from burner, it is normal for discoloration to occur on stove during the first few uses.
NOTE: Do not allow a build-up of grease or fat to occur, this could inadvertently ignite and cause a fire.
Abnormal Operation
Troubles
Cause
Ignition knob is not turned to MAX
position
Ignition knob malfunction
Clogged nozzle
Cylinder incorrectly installed
Clogged burner holes
Bent or rusty electrode
No gas
Turn the knob completely to MAX
position
Contact local agent to repair
Try to load the cylinder again
correctly
Use a metal brush to clean it
Clean electrode
Replace fuel cylinder
Trouble shooting
Flame extinction
No gas supplied at
“MAX” position
Smell gas at
“O” position
Low flame
Ignition fails

Visit Us: Camplux.com
3330-A Marathon Ct Charleston, SC 29418 1(844) 538-7475
8
www.camplux.com
Model Number
Item No.
Max Output
Product Size
Product Weight
JK-5330
BBQ-136M
Stove: 6600 BTU/Hr x 2, Grill: 7200 BTU/Hr
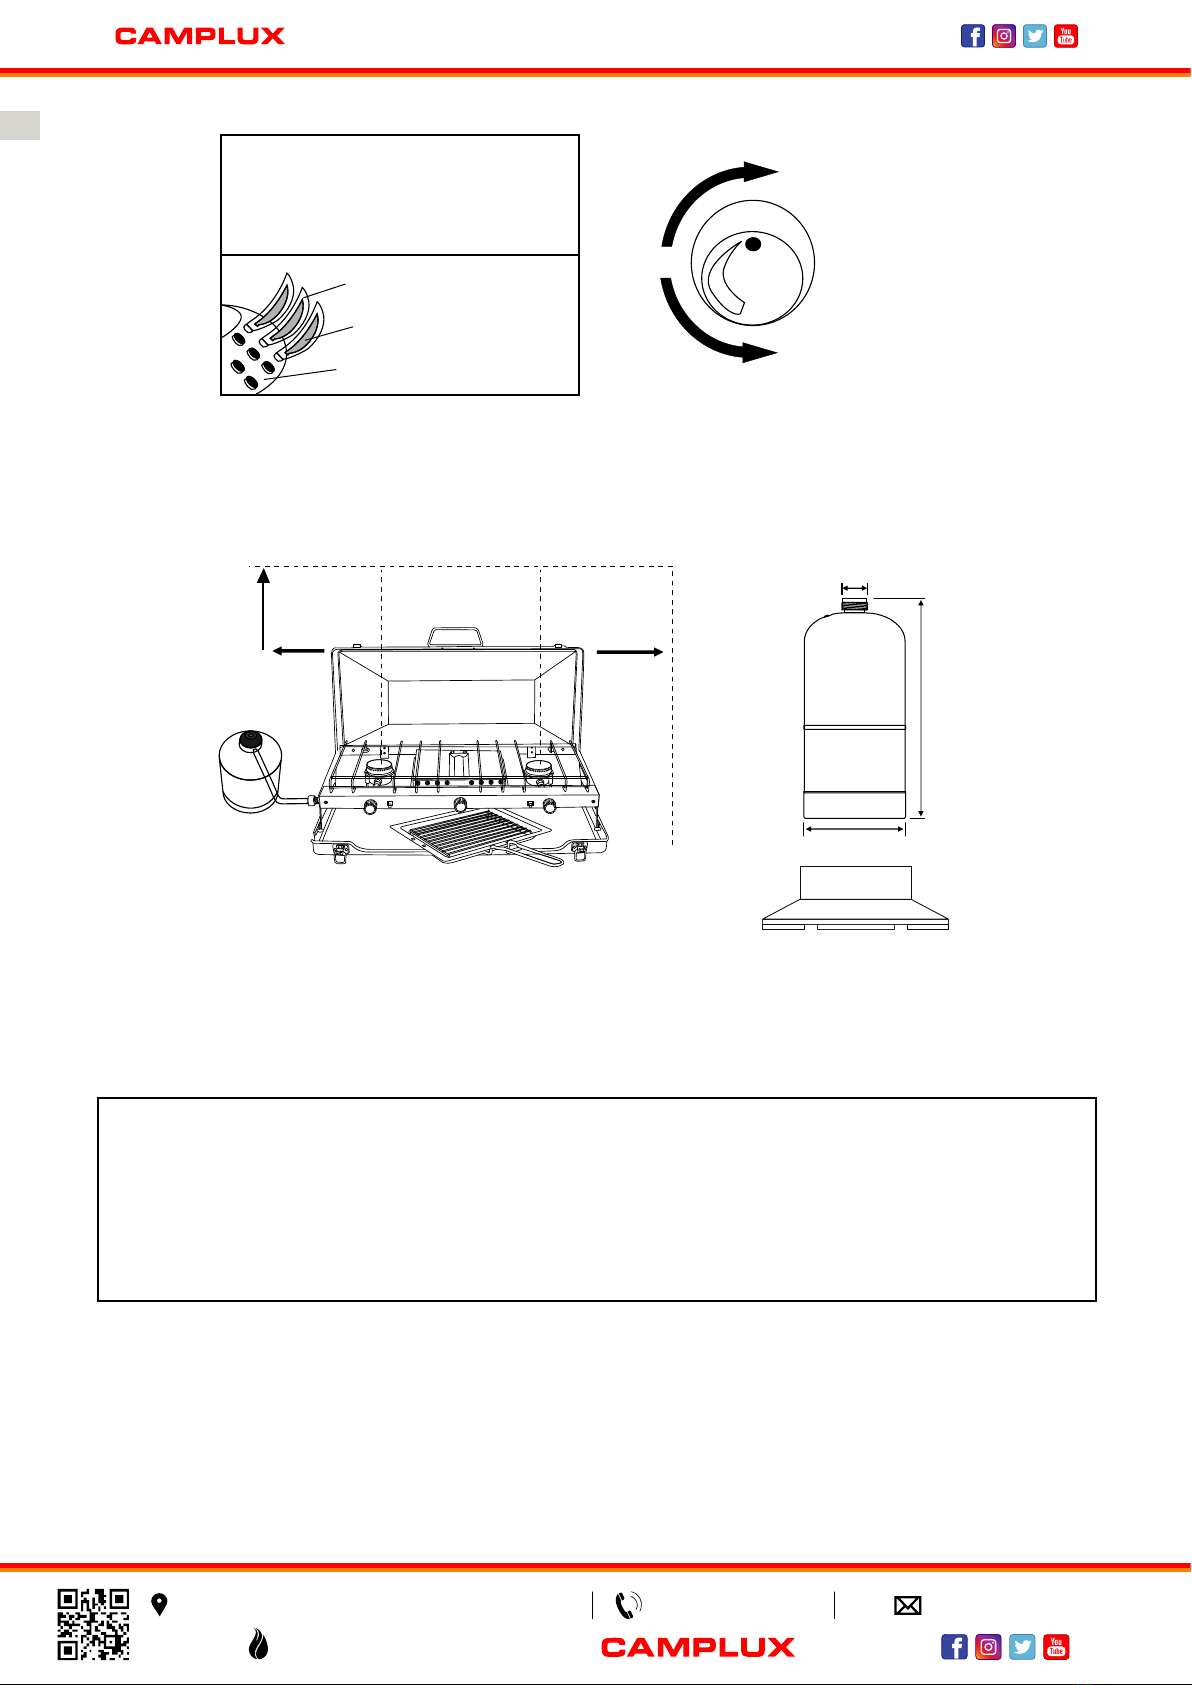
23.4″x12.8″x3.4″/595x325x85 MM
9.9 LB/4.5 KG
Specifications
● Do not connect the stove to a gas cylinder when the valve is open.
● Do not set up the stove when any part of the stove is broken.
● Close the stove when the flame is too high.
● Close the stove when you smell the flavor of gas.
● Close the stove when you see flame on anywhere other than the burners.
● Clean the stove after each time of cooking.
● If any part of the stove is broken, do not try to repair it. What you should do is to ask the after-sale
center for help.
● Always ask the after-sale center to change any part of the stove.
● Do not modify this appliance.
● Using dampened cloth to clean the stove when needed.
● Check that seals between the appliance and the gas container are in place and in good condition
before connecting the gas container.
● Do not use this appliance if it has damaged or worn seals.
● Do not use this appliance if it is leaking, damaged or does not operate properly.
● The appliance is to be operated on a horizontal surface.
● Gas containers shall be changed in a well-ventilated location, preferably outside away from people
and any sources of ignition, such as naked flames, pilot flames, electric heaters/ equipment.
● If there is a leak from your appliance (smell of gas), turn off the control valve, and disconnect gas
cylinder.
● If there is a leak from your appliance (smell of gas) and you cannot stop the gas flow, remove the
appliance to a well-ventilated location away from any ignition source.
● Check for leaks using soapy water. Do not try to detect leaks using a flame.
● This appliance must only be serviced by an authorized person.
● When the stove is in hot, just wait until it gets cool down, other wise you will be burned. If you have to
deal with the stove when it is hot, you will have to have a heat insulating glove to avoid being hurt.
● Storage of the appliance indoors is permissible only if the cylinder is disconnected and removed
from the appliance.
● Warning: Do not move the appliance during operation.
● When the normal flame starts to getting weak and finally distinguishes, it means the gas in the gas
cylinder is used up. You will have to use a new gas cylinder with gas.
WARNING
The LP-gas cylinder(s) used with this stove shall be constructed and marked in accordance with the
specifications for LP-gas cylinders of the U.S. Department of Transportation or Transport Canada, the
Standard for Cylinders, Spheres and Tubes for the Transportation of Dangerous Goods, CAN/CSA
B339.
Only cylinders marked with the proper fuel type approved for the appliance shall be used. The
cylinder supply system be arranged to provide for proper fuel withdrawal from the operating cylinder.
It may be hazardous to attempt to fit other types of gas containers. Do not use the stove in
temperatures below -4 ºF (-20 ºC). Do not store the stove in temperatures below -4 ºF (-20 ºC).


Visit Us: Camplux.com
3330-A Marathon Ct Charleston, SC 29418 1(844) 538-7475
Modèle No.: JK-5330
Numéro d'article: BBQ-136M
RECHAUD DE CAMPING
Instructions pour l’installation et l’utilisation


1
www.camplux.com
Visit Us: Camplux.com
3330-A Marathon Ct Charleston, SC 29418 1(844) 538-7475
Si vous sentez le gaz:
● N'essayez pas d'utiliser des appareils électriques.
● Assurez-vous que l'appareil est en position fermée.
● Éteindre la flamme à proximité).
● Si vous avez une soupape d'alimentation en carburant de cylindre ou si vous avez un cylindre de
carburant jetable, fermez le cylindre.
● Quitter la zone immédiatement.
● Laissez le gaz se dissiper pendant 5 minutes.
● Si l'odeur du gaz s'est dissipée de la zone, de l'équipement et de l'approvisionnement en carburant,
suivez la procédure de connexion du gaz.
● Si vous sentez à nouveau l'odeur du charbon, suivez les étapes 1-6 pour réparer.
Le non-respect de ces instructions peut entraîner un incendie ou une explosion, ce qui peut entraîner des
dommages matériels, des blessures corporelles ou la mort.
AVERTISSEMENT
DANGER D'INCENDIE OU D'EXPLOSION
Une installation, une utilisation, un réglage, une modification, un service ou une maintenance inadéquats
peuvent causer des dommages matériels ou matériels.
Reportez-vous à ce manuel. Pour obtenir de l'aide ou d'autres informations, consultez Quali Installateur,
service ou fournisseur de gaz naturel.
AVERTISSEMENT
Ne gardez pas et n'utilisez pas de gazole ou d'autres liquides avec des vapeurs inflammables près des
vapeurs inflammables ou de tout autre appareil.
POUR VOTRE SÉCURITÉ
MONOXYDE DE CARBONE
Cet appareil peut produire du monoxyde du carbone, un gaz
toxique et inodore.
L'utilisation de cet appareil dans des espaces clos peut
entraîner la mort.
Ne jamais utiliser cet appareil dans un espace clos comme un
véhicule de camping, une tente, une automobile ou une maison.
DANGER

Visit Us: Camplux.com
3330-A Marathon Ct Charleston, SC 29418 1(844) 538-7475
2
www.camplux.com
● Ne l'utilisez pas sur un balcon ou une terrasse, un véhicule de divertissement, un campeur ou un
bateau dans un appartement.
● Le gaz propane est extrêmement inflammable, veuillez suivre les instructions suivantes:
● Ne stockez pas ou n'utilisez pas d'essence ou d'autres liquides/gaz avec des vapeurs inflammables
à proximité de cet appareil.
● Connectez ou séparez toujours les bouteilles de propane à l'extérieur, loin de la flamme, de la
lumière de guidage de la lumière ou d'autres sources d'allumage, uniquement lorsque l'appareil est
en contact avec la fraîcheur.
● Les tuyaux de gaz ne sont pas autorisés à entrer en contact avec une surface chaude. Vérifiez le
tuyau avant chaque utilisation pour les brûlures, les égratignures et les kinks et autres dommages.
● Lisez et suivez tous les avertissements et instructions concernant ou accompagnant le gaz
propane/butane.
● Avant de connecter le cylindre propane/butane, vérifiez toujours si les appareils électriques, les
cylindres propane/butane et leurs connexions sont endommagés, la saleté ou les débris.
● N'utilisez pas si l'un a été endommagé ou modifié.
● Suivez les instructions de la section « Essais de fuite de gaz » de la page 4 de ce manuel. Ne testez
pas les fuites de gaz avec des allumettes allumées ou des flammes nues. N'utilisez pas de
cuisinières à fuite de gaz.
● Lorsque vous transportez, n'utilisez pas ou ne stockez pas le poêle, déconnectez toujours le gaz
propane/butane.
● Les cylindres propane/butane doivent rester droits pour empêcher les éclosions de propane/butane
liquide.
● Ne vous connectez pas à l'alimentation en gaz à distance, comme le gaz naturel ou les bouteilles de
propane/butane rechargeables.
● En cas d'incendie, éteindre le gaz au bouton de commande du brûleur et utiliser un extincteur "BC"
ou autre approprié.
● Main, visage et cheveux loin du brûleur. Utilisez de longs allumettes ou de longs briquets à nez pour
allumer le brûleur, ne portez pas de vêtements amples et ne laissez pas les cheveux longs accrocher
librement pendant l'éclairage ou l'utilisation du poêle.
● Toujours casser la jambe et la base du poêle pour former "V" pour empêcher le poêle de devenir
instable lorsqu'il est utilisé. Seulement utilisé dans l'avion.
● Ne déplacez pas le poêle en cours d'utilisation. Évitez de toucher la surface chaude.
● Manipulation appropriée de tous les matériaux d'emballage.
● Toute modification de l'appareil peut être dangereuse.
● Utilisez des gants de protection lorsque vous manipulez des pièces chaudes.
● Les pièces de gaz sont scellées par le fabricant et ne doivent pas être modifiées par l'utilisateur.
Lorsque vous remplacez le conteneur de gaz, éloignez-vous de toute source d'allumage.
● Gardez le tuyau en place pour vous assurer qu'il n'est pas déformé.
● Si le tuyau est usé ou endommagé, le remplacement du tuyau est crucial.
● Le diamètre maximum du pot/pot est de 8.7 in. (220 mm) et le minimum est de 3.9 in. (100 mm).
AVERTISSEMENT

Visit Us: Camplux.com
3330-A Marathon Ct Charleston, SC 29418 1(844) 538-7475
3
www.camplux.com
Instructions d'assemblage
AVANT D'INSTALLER OU DE FAIRE FONCTIONNER VOTRE VANNE, VOUS DEVEZ LIRE TOUS LES
AVERTISSEMENTS DE SÉCURITÉ ET LES INSTRUCTIONS D'ASSEMBLAGE.
Vérifiez le contenu de la boîte pour vous assurer que tous les composants sont inclus et non endommagés.
Étape 1: La première étape consiste à placer le poêle sur une surface plate extérieure.
Étape 2: Ouvrez le couvercle pour vous tenir debout.
Étape 3: La troisième étape consiste à s'assurer que le bouton de commande du brûleur est "fermé".
Étape 4: Connectez l'ensemble régulateur à l'accessoire du poêle. Les mains se resserrent seulement. Ne pas se
connecter entre les threads.
Étape 5: Tournez le cylindre propane dans le sens des aiguilles d'une montre pour connecter le cylindre propane à
l'ensemble régulateur. Les mains se resserrent seulement. Ne pas se connecter entre les threads.
REMARQUE: Le cylindre doit rester droit. Voir cette page.
Étape 6: Appliquez "Test de fuite de gaz", comme décrit dans ce manuel.
REMARQUE: Le cylindre propane doit être positionné sur un poêle d'au moins 7.9 in. (200 mm) .
7.9 in.
(200 mm)
Cadre de cuisson Bras de support d'écart
Poussez vers le
haut, continuez
à aller serré
Annexe
Tirez vers le bas et
tournez jusqu'à ce que
vous vous sépariez
Démonter
la bombe

Visit Us: Camplux.com
3330-A Marathon Ct Charleston, SC 29418 1(844) 538-7475
4
www.camplux.com
L'injecteur ou l'orifice est bien protégé par une structure spécialement conçue.
Même s'il devrait être nettoyé une fois par an. Si le trou de l'injecteur est bouché
et que le gaz n'est pas fourni par l'injecteur sous NO Pression de gaz, vous
pouvez essayer de le percer avec une goupille mince ouverte, ou vous feriez
mieux de contacter le centre de vente.
● N'utilisez jamais de flamme pour vérifier les fuites de gaz.
● Chaque fois qu'un cylindre est connecté à un poêle, un test de fuite de gaz doit être effectué dans
une zone bien ventilée.
● Gardez toujours l'unité loin des flammes nues, des étincelles ou allumez des cigarettes.
● N'utilisez pas le boiteux pour vérifier les fuites de gaz.
AVERTISSEMENT
Test de fuite de gaz
Étape 1: Assemblez le poêle en fonction des "instructions d'assemblage" dans ce manuel. Assurez-vous que le
bouton de commande du brûleur est "OFF".
Étape 2: Préparer une solution aqueuse de savon (une partie du liquide de lavage à trois parties de l'eau) pour
tester la fuite de gaz dans la connexion. Appliquer une grande quantité de mélange de savon sur
l'ensemble régulateur. Régulateur, le long de toute la longueur du tuyau, dans l'accessoire du poêle (situé
sur le côté droit du poêle).
Étape 3: Lorsque le bouton de commande du brûleur est en position "OFF", vérifiez les bulles que le cylindre est
relié à l'ensemble du régulateur, suivez toute la longueur du tuyau, et lorsque le four est installé, si le
mélange de savon commence Bouillir, fuite de gaz à travers la connexion. Débranchez le cylindre,
resserrez la connexion du gaz qui fuit et répétez la procédure avec un mélange de savon jusqu'à ce que
le gaz ne fuit plus. Ne jamais utiliser Vérifiez la flamme de la fuite de gaz.
Étape 4: Une fois que toutes les fuites de gaz sont scellées, attendez au moins 5 minutes de mousse de gaz pour
se disperser avant l'éclairage.
Suivez attentivement les instructions d'utilisation, allumez le brûleur et actionnez correctement l'unité.
Le poêle a trois brûleurs. Donc, il a trois investissements de capital-risque. Il y a deux trous dans chaque évent
comme première entrée d'air. Ces évents sont protégés par le panneau de commande ci-dessus Illustration
Donc, habituellement, il n'y a pas d'obstacles à ces évents et entrées. Même ainsi, vous devez également
vérifier ces évents et entrées d'air et les nettoyer avant chaque utilisation Évitez les obstacles accidentels à
l'approvisionnement en air.
Ne pas obstruer la circulation de l'air de
combustion et de ventilation
Panneau de
configuration
Venturie
Surveillez les bulles
Régulateur
Raccord de poêle
Trou De Seringue

Visit Us: Camplux.com
3330-A Marathon Ct Charleston, SC 29418 1(844) 538-7475
5
www.camplux.com
Instructions d'assemblage
LISEZ ATTENTIVEMENT TOUS LES AVERTISSEMENTS DE SÉCURITÉ ET LES INSTRUCTIONS
● Ne laissez pas l'essence ou d'autres vapeurs ou liquides inflammables entrer en contact avec le
poêle pendant l'éclairage ou lors de l'utilisation du poêle.
● Les tuyaux de gaz ne sont pas autorisés à entrer en contact avec une surface chaude. Vérifiez le
tuyau avant chaque utilisation pour les brûlures, les égratignures et les kinks et autres dommages.
AVERTISSEMENT
Étape 1: Assurez-vous que l'essai de fuite de gaz est terminé, que le bouton de commande du brûleur est fermé et
que le poêle est sur une surface plate à l'écart du matériau inflammable. Les deux brûleurs latéraux
seront allumés par p Ésope. Le brûleur du gril central doit être allumé manuellement. Nous vous
recommandons d'allumer un brûleur des deux côtés.
AVERTISSEMENT
Le poêle ne doit pas être exposé à des vapeurs ou des liquides inflammables pendant l'éclairage.
Étape 2: Détermine quel brûleur est allumé. Trouvez le bon bouton d'allumage pour allumer ce brûleur. Tournez le
bouton de commande du brûleur vers la position BIGFLAME et appuyez sur le bouton d'allumage pour
l'allumage. S'il n'y a pas d'allumage Ion, cliquez à nouveau sur le bouton. Si le brûleur est un brûleur
intermédiaire, aucun bouton d'allumage n'est fourni. Vous pouvez l'allumer avec une longue allumette.
AVERTISSEMENT
Si le brûleur ne s'allume pas dans les 5 secondes, éteignez immédiatement le bouton de commande du brûleur.
Attendez au moins 5 minutes jusqu'à ce que la fumée de gaz se dissipe avant d'essayer d'allumer le brûleur.
Étape 3: La troisième étape consiste à allumer les autres brûleurs, à réduire la flamme sur le premier brûleur
d'allumage et à répéter l'étape 2 vers les autres brûleurs.
AVERTISSEMENT
Si un brûleur ne s'allume pas dans les 5 secondes, éteignez immédiatement le bouton de commande du brûleur.
Attendez au moins 5 minutes jusqu'à ce que la fumée de gaz se dissipe avant d'essayer d'allumer le brûleur.
AVERTISSEMENT
Lorsque vous utilisez un brûleur intermédiaire, la plaque de cuisson doit être en place.
Étape 4: Utilisez le bouton de commande du brûleur pour ajuster la flamme du brûleur si nécessaire. Lorsque le
poêle n'est pas utilisé, éteignez le bouton de commande du brûleur.
Étape 5: Après chaque utilisation, laissez le poêle refroidir complètement, puis suivez les instructions de la section
« Sécurité après utilisation » et « Soins et entretien appropriés » de ce manuel.

Visit Us: Camplux.com
3330-A Marathon Ct Charleston, SC 29418 1(844) 538-7475
6
www.camplux.com
● Toujours permettre au poêle de refroidir complètement avant le traitement.
● Lorsque vous ne l'utilisez pas, déconnectez toujours le cylindre du poêle et placez un casque sur le
cylindre.
● Retirez l'ensemble du régulateur et stockez-le sous les branchies du poêle.
● Ne stockez pas les bouteilles de gaz dans des zones fermées telles que les maisons, les garages, etc.
Conservez la bouteille de gaz dans un endroit bien ventilé et frais, loin de toute source de chaleur ou de
flamme nue.
● Retournez le couvercle à la position fermée.
Remarque: Observez la hauteur et la
couleur de la flamme lorsqu'elle est
allumée. La flamme devrait avoir un
centre bleu et une pointe jaune.
Sinon, il peut y avoir des problèmes.
Après utilisation de la sécurité
Les appareils doivent être utilisés à l'écart des matériaux inflammables.
Enlever les combustibles: Au-dessus 48 in. (122 cm), Des deux côtés 24 in. (61 cm).
OFF/Petite flamme
ON/Énorme flamme
Fermez l'alimentation
en gaz dans le sens des
aiguilles d'une montre
Jaune
Bleu
Brûleur
Avertissement:
Lorsque vous utilisez un brûleur intermédiaire,
la plaque de cuisson doit être en place.
24 in.
(61 cm)
24 in.
(61 cm)
48 in. (122 cm)
PROPANE
1"-20 UNEF
1 lb
7.9 in. (200 mm)
3.9 in. (98 mm)
This manual suits for next models
1
Table of contents
Languages:
Other Camplux Stove manuals
Popular Stove manuals by other brands

Hussong
Hussong Kozy Heat CWST-ODK manual

Hunter
Hunter Compact 5 Installation and operating instructions

Jøtul
Jøtul GF 400 DV Sebago Installation and operation instructions

Extraflame
Extraflame Comfort Maxi user manual

Ekofires
Ekofires MC01A Installation & user's instructions

Morgan
Morgan MGS-SB4010SS user manual