CAPRIZZE CDC03000 User manual

1
USER MANUAL
Máquina de café expresso KAI
MODELO:
CDC03000 - CDC03005 - CDC03010

2

3
ES Español
IT Italiano
FR Français
DE Deutsch
EN English
4-15
28-39
52-63
16-27
40-51
64-75
PT Português
INDEX

4
EN English
WELCOME
This manual describes the correct use of this coffee maker and all the necessary safety
information before plugging it in. It is not recommended to give it any other use beyond those
detailed here.
This appliance is intended for use in domestic and similar areas such as: kitchens, offices,
cafeterias, country houses, customer areas in hotels, motels, and other residential type
environments.
SAVE THESE INSTRUCTIONS! Keep this manual in case of any questions or for future reference.
If you sell or give away this coffeemaker, make sure this manual comes with it.
HOW TO AVOID INJURIES?
Always KEEP out of reach of children.
This appliance is not intended for use by persons with reduced physical, sensory or mental
capabilities, or lack of experience and knowledge, unless they have been given supervision or
instruction concerning use of the appliance by a person responsible for their safety.
DO NOT TOUCH the metal surface directly with your hand while brewing. Use the knob and
handle. Remember that this coffee maker has components that reach high temperatures during
WARRANTY
Any type of modification to this coffeemaker and the use of non-original accessories voids ALL
WARRANTIES in their entirety.
LOCATION
for optimal performance, place this coffee maker on a flat table or countertop.
The coffee maker should not be placed inside a piece of furniture used daily due to the high
temperatures it reaches and the emission of steam. You need an open space that is at least 5 cm
from any object, furniture, or appliance. The rear panel must be more than 20 cm from the wall.
ALWAYS route the power cord behind this appliance.
IMPORTANT SAFETY INFORMATION!
This product is designed solely and exclusively to make espresso coffee and the variants that
are explained in detail in this manual. Any other use beyond those specified herein is not
recommended as it may result in fire, electric shock, or other serious personal injury.
DO NOT IMMERSE this coffee maker and its power cord in water under any circumstances.
Clean and maintain the removable parts of this appliance to extend its life and ensure the
quality of the coffee.
STORAGE
Store in a clean, dry place when not in use.

5
HOW TO PREVENT FIRES?
DO NOT USE this coffee maker if you notice damage to the power cord, damaged plug head,
or missing parts.
BEFORE USE, check the condition of the power cord and output connections of this appliance.
DO NOT place heavy weights on the power cord which may cause damage or kinks.
AVOID ELECTRICAL DAMAGE!
DO NOT USE near equipment in high temperature, high magnetic field and humid environment
such as refrigerator.
DO NOT MOVE OR TURN OFF the coffeemaker when in use.
DO keep the coffee maker unplugged when not in use.
MAKE SURE the power cord does not touch the hot surface of this appliance.
NEVER use this coffee maker with an empty water tank.
If there is any damage to the power cord, it should ONLY be removed by a manufacturer
authorized service agent or similarly qualified persons.
MOBILITY AND CLEANING TIPS
Before any cleaning or maintenance operation, turn off the coffee maker, unplug it from the
power outlet and let it cool down.
Do not use solvents or detergents when cleaning the coffeemaker. Use a soft damp cloth.
Remove the drip tray, empty it and wash it periodically.
Clean the tank periodically.
To remove the portafilter and filter, turn it counterclockwise and pull it out, hold the filter and
pour in the ground coffee. Then clean them with cleaning solution and towels, finally rinse them
with clean water.
Clean all removable parts with clean water and dry them well.
operation. (Such as high-pressure steam pipe, water outlet, etc.)
WAIT for this coffeemaker to regulate its temperature before using it again.
NEVER open the water tank while coffee is being made.
WHAT TO DO IF THE COFFEE MAKER IS MALFUNCTIONAL? Please contact the authorized
service center when you experience any malfunction.

6
LIST OF ELEMENTS OF THE COFFEE MAKER
1.Thermometer
2. Power on/off indicator
3. Power on/off button
4. Coffee indicator
5. Coffee/hot water button
6. Filter basket handle
7. Drip tray cover
8. Water tank
9. Steam button
10. Steam pipe
11. Steam indicator
12. Steam knob
13. Small filter for 1 cup of ground coffee
14. Large filter for 2 cups of ground coffee
15. Filter holder
16. Measuring/tamping bucket
BEFORE USING FOR THE FIRST TIME
1. Before preparing your first cup of espresso, clean all removable parts
2. Asegúrese de que esté enchufada.
3. Prepare 2 carafes of water without coffee, following the procedures described in the GUIDE
TO MAKING ITALIAN ESPRESSO COFFEE section of this Manual. This will thoroughly clean
everything.
WARNING: The first time you make coffee, the water may not come out. If this happens to you,
please turn the steam knob counterclockwise to fully open and press the “Coffee” button. When
there is water coming out of the steam nozzle, press it again to stop the flow and turn the steam
knob clockwise.
How is the water tank filled?
1. Pull out the water tank on the right.
2. Fill the tank with fresh clean water being careful not to exceed the MAX level. nor be less than
the MIN scale.
3. Put it back in the coffee maker.

7
GUIDE TO MAKING ITALIAN ESPRESSO COFFEE
Machine preheating phase.
1. Pull out the water tank on the right and fill it with the proper amount. Please note that the
water level cannot exceed the MAX scale, nor be lower than the MIN scale.
WARNING: Always check the water levels in the tank, if you see that it is below the MIN scale,
add the necessary amount. Forced operation will affect the life of the coffee maker.
2. Plug in the coffee maker and press the on/off button. If the red indicator light is on, it means
that the coffee machine is starting to preheat. When the thermometer pointer is between 80 and
120°C and the indicator light is on, it indicates that preheating is complete. If you want to stop
the coffee maker, press the on/off button again.
COFFEE PREPARATION PHASE
1. Put the coffee cup to be used under the filter holder, when the green coffee indicator light
is on, and then press the “Coffee” button to extract the coffee. When the cup has the desired
amount of coffee, press it again, with this it will stop and no coffee will come out.
Warning: please do not leave the coffee maker heating unattended.
Cool the machine for 5 minutes after finishing the coffee, turn the filter holder counterclockwise
and take it out, hold the filter and pour out the coffee residue.
2. Wash the filter holder and filter with tap water after they cool down completely, wipe the main
case and drip tray with a damp cloth.
IMPORTANT: To avoid splashing, never remove the filter basket handle while making coffee.
Note:
1. When the coffee machine finishes preheating, if you press the coffee button and steam button
at the same time, the coffee machine will directly brew coffee, and the maximum working time is
80 seconds.
2. When the coffee maker finishes making coffee or frothing milk, if there is no operation, the
machine will automatically shut down about 30 minutes.
3. Using the measuring spoon, measure out the ground espresso and place it in the filter basket.
Gently tamp the coffee to package it; Wipe any loose coffee from the rim of the filter basket
support to ensure a proper fit on the brew head.
4. Put the filter basket on the bracket. Align the filter basket bracket with the slots facing up on
the brew head of the brewer. Turn the handle counterclockwise (to the right) until the filter basket
support is securely locked.
5. Put the coffee cup to be used under the filter holder, press the “Coffee” button, to preheat the
coffee machine and the coffee cup through the hot water outlet.

8
Cappuccino is made from espresso + foamed milk. Therefore, you
should make espresso at first, and the following contents of this
manual mainly describe the process of how to make milk foam.
NOTE: To prepare 2 cups of cappuccino, fill the carafe with 3
cups of cold, clean water. Makes 2 cups of espresso and 1 cup for
steaming milk.
1. Fill a narrow pitcher with a handle (preferably metal) halfway
with cold milk and place it next to the coffeemaker.
2. When the coffee starts to flow into the carafe, hold the carafe by
the handle and hold it close to the jet of steam. Immerse the top
of the steam wand to 1/3 of the milk position and turn the steam
knob to “MAX”. Gradually move the top of the steam wand to
where it is just below the surface of the milk.
REMINDER: To avoid splashing, the tip should be just below the
surface of the milk.
IMPORTANT
When frothing milk, the volume of milk will double. The top half will be foamed, the bottom half
will be milk.
4. After the milk frothing process is complete, stop the steam delivery by turning the steam knob
clockwise and at the same time pressing the steam button.
5. Remove the jug from the steam jet.
6. When the coffee has stopped flowing into the carafe, turn the function knob to OFF.
CAUTION
Before removing the filter handle or the water tank safety cap, turn the function knob to STEAM
and wait until no more steam comes out of the steam jet. This will allow the extra steam to be
released and will clean the steam jet of any excess milk. Then turn the function knob back to the
OFF position.
7. Fill 1/3 of a cappuccino cup with freshly brewed espresso. Pour an equal amount of warm
milk and a tablespoon of frothed milk on top.
8. Dust the foam with cocoa powder, grated fresh nutmeg or cinnamon and enjoy a delicious
freshly brewed beverage.
TIP: It is recommended that you at least wait for the coffee machine to cool down for 10 minutes
after making steam before starting to use it again or use the manual pump water cooling
method. Otherwise, your coffee may have a “burnt” taste.
GUIDE TO MAKING CAPPUCCINO OR OTHER SPECIAL
COFFEE.

9
CLEANUP AFTER MAKING A CAPPUCCINO
1. After frothing milk, the steam pipe should be cleaned with a piece of damp cloth in time to
prevent the remaining milk from sticking to the steam pipe.
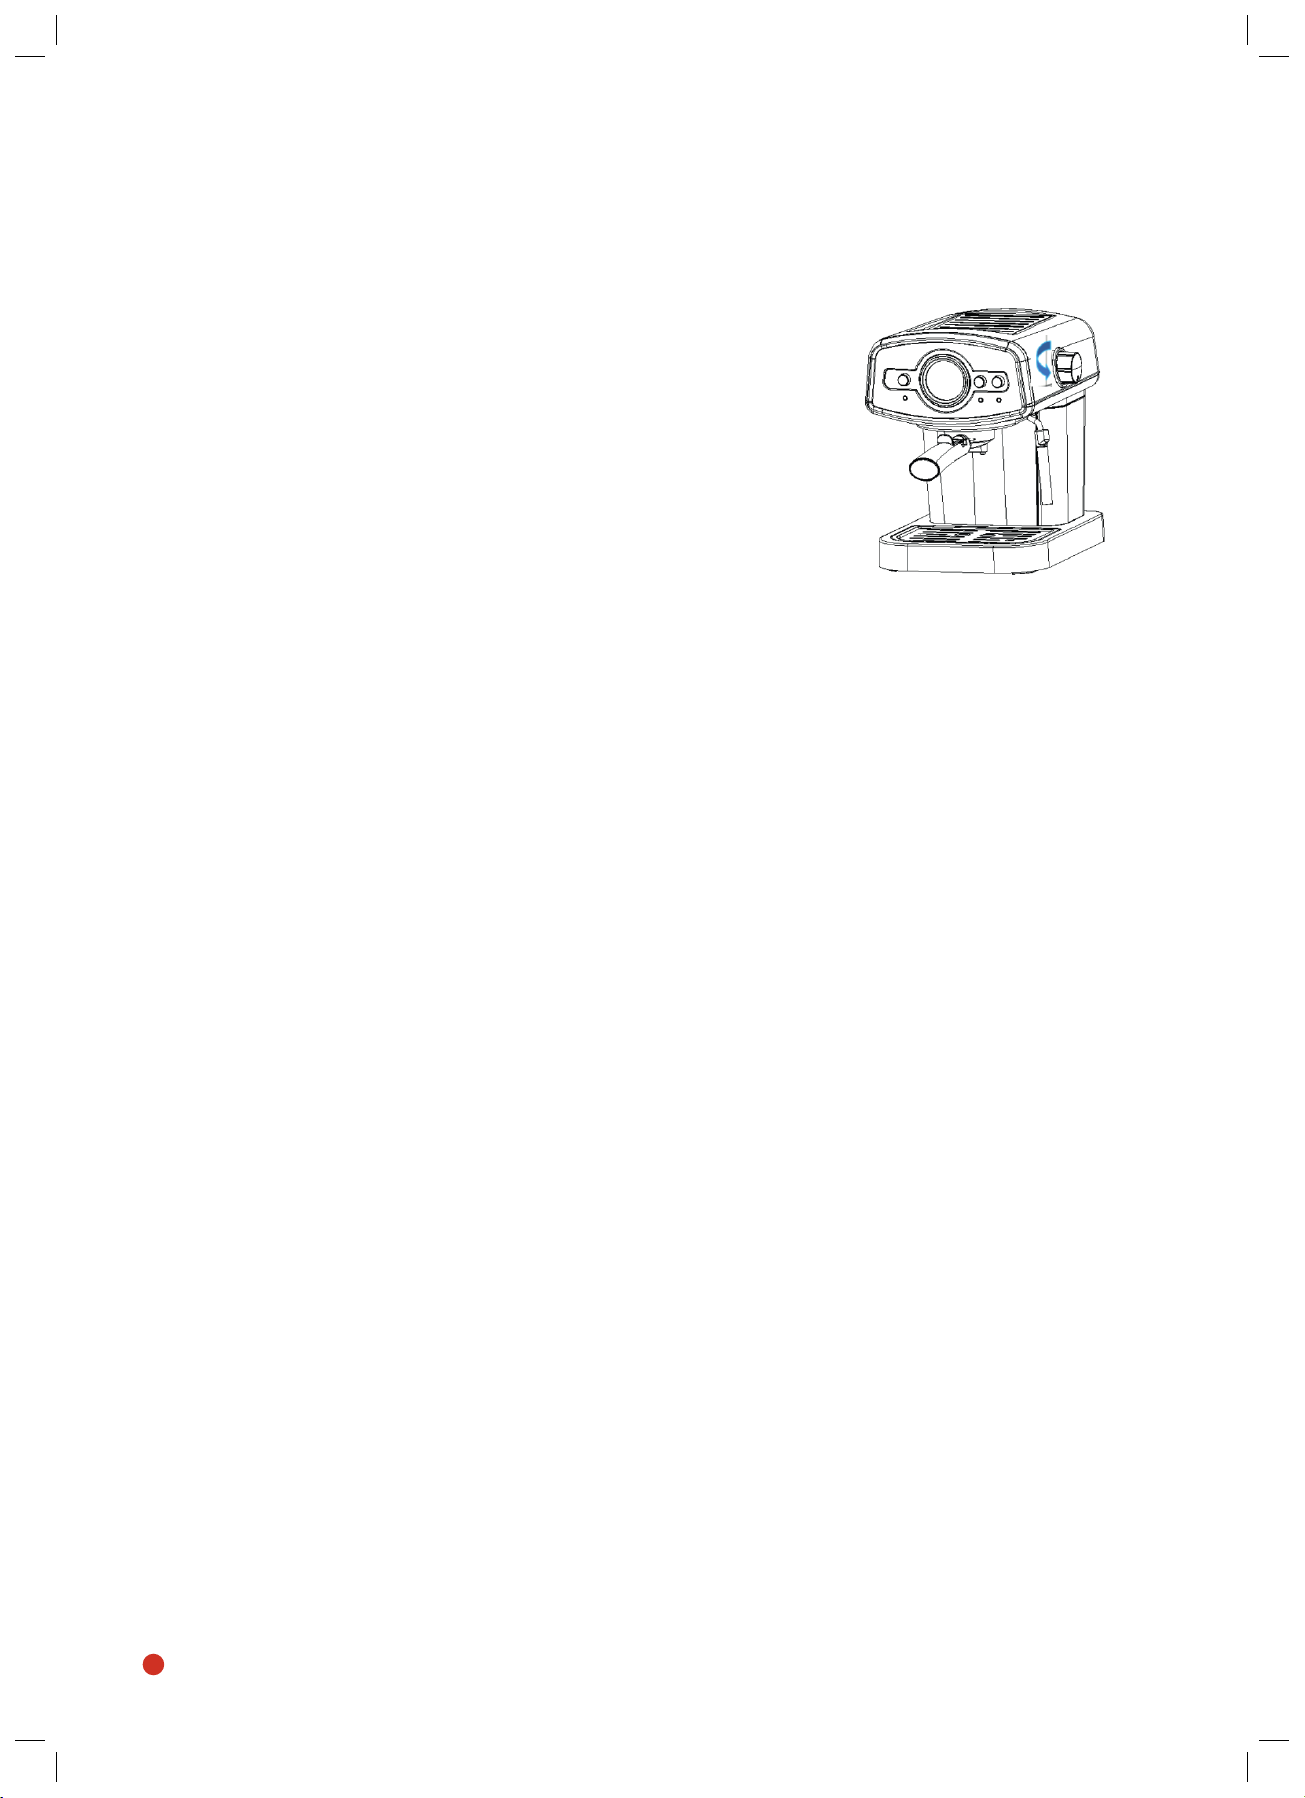
2. After milk foaming finished, turn on the steam knob to make the coffee machine release
steam for a few seconds, then turn off the steam knob, clean the steam outlet in case the steam
outlet is blocked for the remaining milk.
Hand pump water cooling method for coffee machine:
When the coffee machine is in the alarm state, you need to turn off the “Coffee” button and
press the “on/off” button to cancel the alarm state; after the alarm state is cancelled, press both
buttons at the same time, and then the coffee maker will work again. When the thermometer
goes back between 80 - 120 °C, it indicates that everything is ready to make coffee again.
Tip: To make more than one cappuccino, make all the coffees first and then make the frothed
milk for all the cappuccinos at the end.
TIPS FOR MAKING COFFEE AND CHOOSING BEANS
1. What kind of powder is suitable for this coffee machine?
A.- We can judge it by the shape of the coffee residue: 1. If the coffee residue is pulpy, it
indicates that the coffee powder is too fine; 2. If the coffee residue is in the form of loose sand,
it indicates that the coffee powder is too coarse; 3. If the coffee residue is pasty, it indicates that
the coffee powder is suitable.
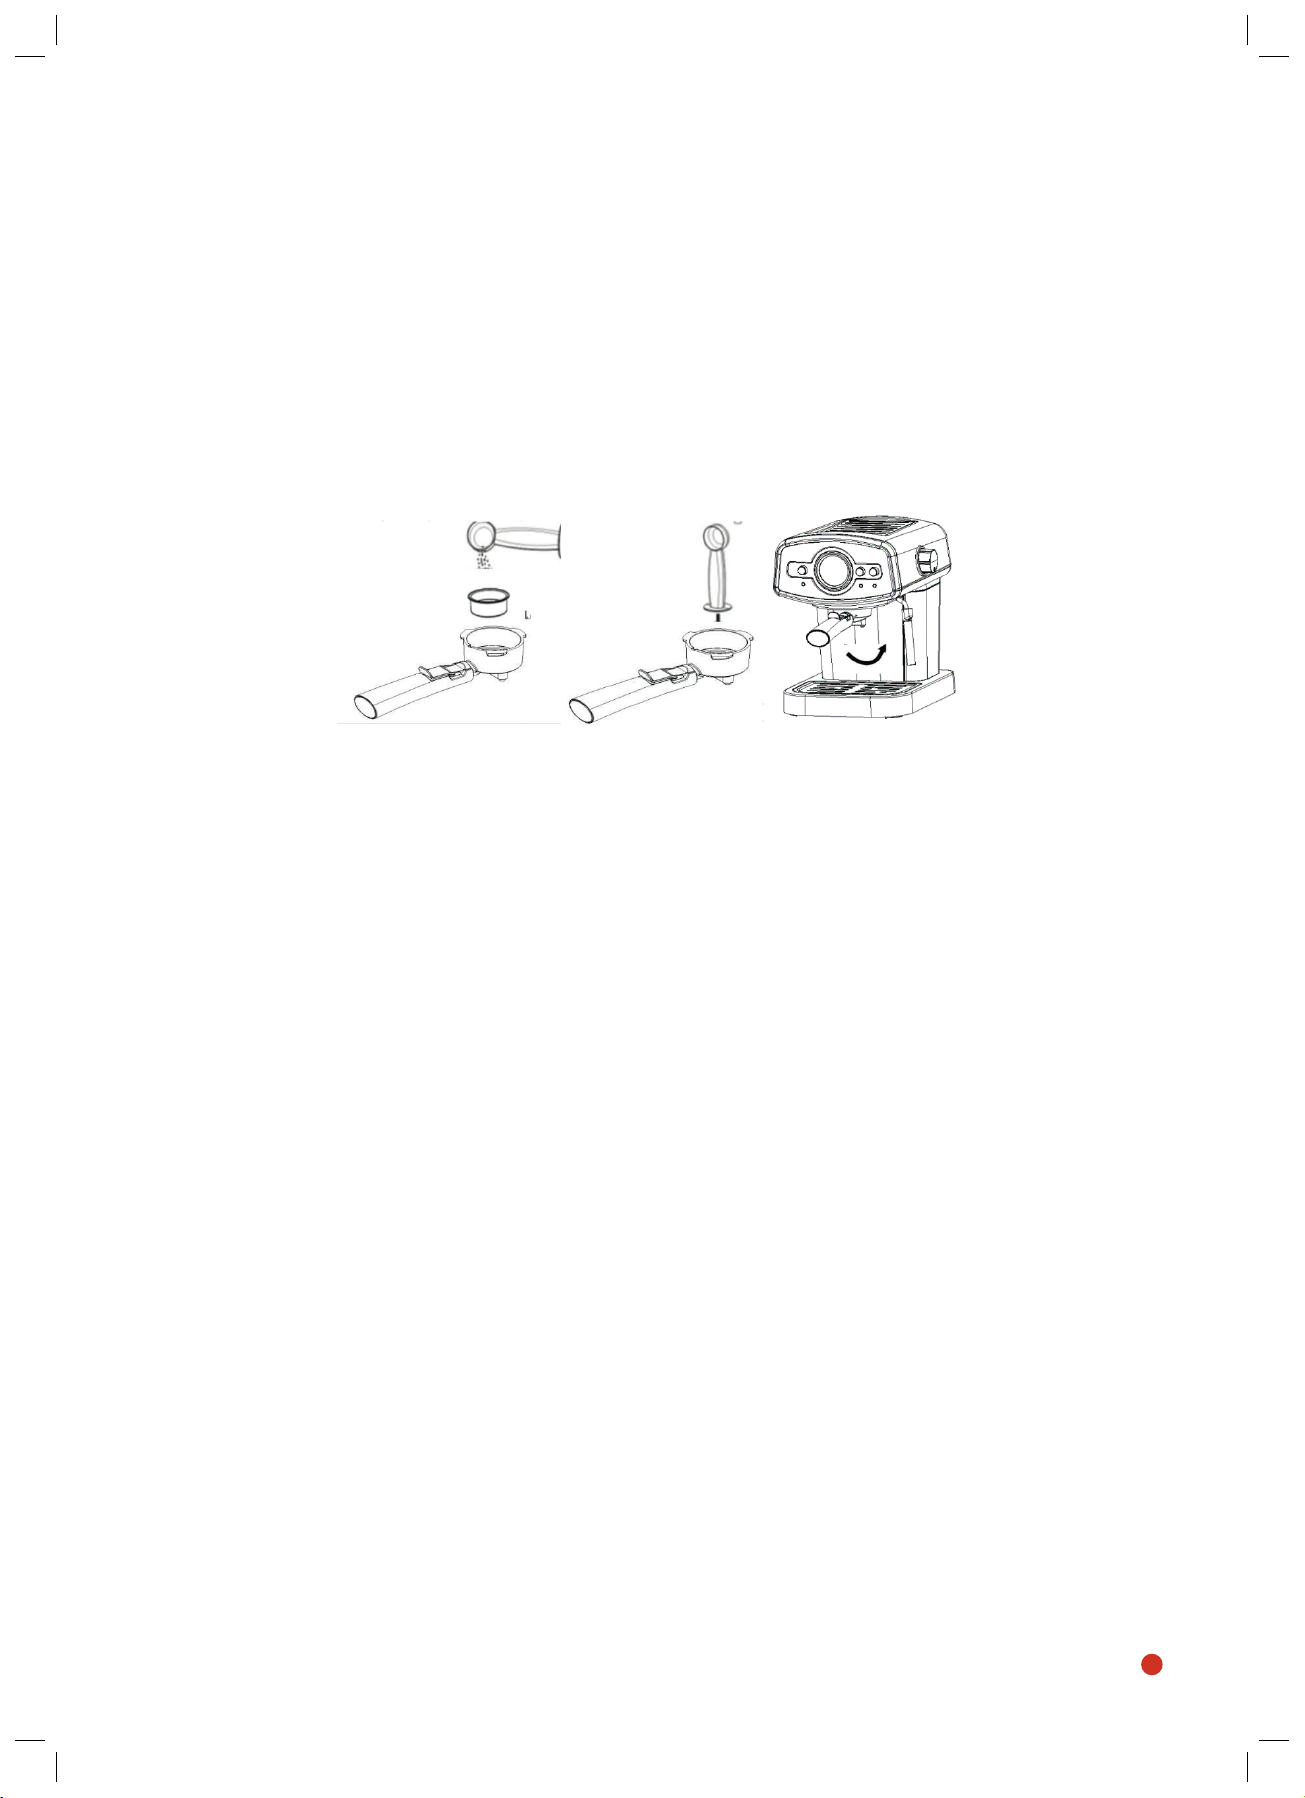
2. Is there any standard for use of coffee powder?
A.- To make a single cup of coffee, place a level measure (approximately 7-8 g) of ground
coffee in the filter.
To make a double cup of coffee only, place a level measure (approximately 14-15g) of ground
coffee in the filter.
3. How much force is needed to press the coffee with the tamping spoon?
A.- The force required is approximately 1.5 kg to press and remove the coffee powder using
only the hand.
What is the function of the area for heating the cup?
A.- By heating the coffee cup in this area, you can get a better coffee taste because the
temperature difference of the coffee decreases when the coffee is poured into the coffee cup.
4. What is the function of the stainless-steel sleeves in the steam tube?
A.- It can make the steam have a better angle and the milk foam becomes richer and finer.
5. Why couldn’t milk be turned into milk foam?
R.-
i. Be sure to choose milk kept in cold storage.
ii. Milk cannot be turned into milk foam after its temperature rises.
iii. Making milk foam is a kind of skill that must be practiced.
8. What should be done if the milk foam has relatively large bubbles?
A.- You can take the jar and hit it hard on the table a few times and rotate it in a certain
direction clockwise for several times. By doing so, you can remove the large bubbles and make
the organization of the milk smoother and denser, which will give it a thicker flavor.
9. What kind of milk is suitable for frothing milk?
A.- Low-fat milk is easy to foam, but the bubble and foam are a bit bigger and looser, and it
doesn’t have a thick flavor either. Whole milk is not easy to foam, but once you are successful
there will be an excellent result.

10
HOW TO HEAT WATER FOR INFUSIONS, TEAS, AND OTHER
DRINKS?
1. Connect the device. Press the ON/OFF button to turn on the coffee machine, the red
indication will light up.
2. Make sure the steam button is not pressed and press the coffee button. The pump will start
pumping the water. When the water starts to flow through the coffee spout, press the coffee
button again.
3. Press the steam button and wait for the white steam indication to light up. This means that the
boiler has reached the required temperature.
4. Take a container or a cup with liquid that needs to be heated. Place the cup under the steam
pipe. Immerse the pipe in the liquid for about 2 cm.
5. Press the steam button again and turn the steam control switch to the “MAX” position.
6. After reaching the required temperature, stop the release of steam by turning the switch
clockwise to the “OFF” position. Pick up the cup with hot liquid.
Regular cleaning and maintenance
1. In order to ensure the pure taste of coffee, please do descaling, cleaning and maintenance of
coffee machines after using it for 2-3 months.
2. Please use the “Coffee Machine Descaler” the proportion of water and descaling is about 4
measures to 1 or refer to the operating instructions. If there is no scaler you can use “citric acid”
instead the ratio of water to citric acid is about 3 measures to 1.
3. There is no need to put coffee powder when cleaning the coffee machine.
4. Clean the water outlet and steam tube respectively according to the steps for making
cappuccino.
5. Then use water to clean it more than 3 times to make sure it is clean.
6. Make sure the coffee machine rests for more than 10 minutes each time the cleaning process
is repeated.
10. What should I do if no steam comes out of the steam wand?
A.- Generally speaking, it is usually because the cleaning has not been done in time after
making the milk foam and the milk curdling blocks the steam pipe. You can use tools such as a
clip to clean it by putting it into the steam wand from one end. If you feel that it is still blocked,
try to clean it using the steam from the machine, pour into the tank a mixture with a cup that has
a measure of vinegar and a measure of water, then change the knob to the steam position, let
this solution can clean it. If the above could not solve the problem, please contact the after-sales
service center for solutions.

11
Common Troubleshooting
Fault Cause analysis Solution
The coffee is spill out
from the gap of the
filter holder
There are sundries inside the
seal ring.
Clean the sundries inside the seal
ring.
The coffee powder is too fine. Please replace it with the coffee pow-
der which is relevantly coarse.
The coffee powder has been
pressed too tightly.
Please press the coffee power with
strength of 3.3 pounds (about 1.5kg)
The seal ring is of aging. Please contact the authorized service
center.
1. The coffee handle
could not be switched
to the lock position.
2. The coffee is spill
out from the gap of the
filter holder
The coffee powder amount
has exceeded the max scale
of the filter holder.
Decrease the amount of the coffee
powder.
The coffee powder hasn’t be
added and the handle could
not be switched to the right
place.
Please contact the authorized service
center.
There are sundries inside the
seal ring.
Clean the sundries inside the seal
ring.
The coffee powder is too fine. Please replace it with the coffee pow-
der which is relevantly coarse.
Cold coffee
The indicator light is not on Operation when the indicator light is
on
Coffee machine is not pre-
heated Please preheat the coffee machine
Coffee cup is not preheated Please preheat the coffee cup
The pump is too noisy
Without water in water tank Please pour water into water tank
Mount the water tank in
wrong way Please mount water tank in right way

12
Light coffee
Coffee powder is not pressed
flat enough
Please press coffee powder to flat
again
Not enough coffee powder Please add coffee powder
Coffee powder is too coarse Please use dedicated Espresso coffee
powder
Coffee color is too dark
Coffee powder is pressed too
tight
Please press the coffee power with
strength of 3.3 pounds (about 1.5kg)
Too much coffee powder Please reduce coffee powder
The filter is clogged Please clean the filter
Coffee powder is too fine Please use right coffee powder
Water outlet is clogged Please clean the water outlet
The handle can’t rotate
to the locking position
Too much coffee powder Please reduce coffee powder
Can’t Rotate in place even
without coffee powder
Please contact the authorized service
center
Make coffee normal-
ly,but can’t make milk
froth
Steam outlet is clogged
Please clean the steam outlet by
using clip
Please add appropriate vinegar into
water tank
No water come out
from the pump
Water tank is not in place Please put water tank in place
Air pump (have air in tube )
When the pump working,turn on
the steam knob,let out appropriate
amount of water

13
If you cannot find the reason for the failure, please contact the authorized service center; After-
sales service could not be provided on the condition that the machine is disassembled by the
user himself.
Technical parameters and accessories list
Product model Rated voltage Rated power Volume Pressure
MD-2019A 220-240 V-50/60 Hz 1050 W 1.2L 15Bar
Accessories list
Coffee machine body 1 / Filter 2 / Coffee Spoon 1
ESPRESSO CUISINE GLOSSARY
Espresso has a strong flavor and can be said to be an original coffee. You can also keep its
flavor while mixing it with milk or other foods. Typical Espresso cuisine includes the following:
Cappuccino
The method of making cappuccino is to use the steam wand from an espresso machine to heat
a pot of milk to 66°C and cause it to produce a layer of dense bubbles on top of the milk. After
that, pour the espresso into the cup and then the milk. Make the espresso, milk and milk foam
each account for 1/3 in the cup, and then a cup of coffee in which the upper side is white,
and the lower side is light brown has been completed. Cappuccino can be drunk with sugar,
cinnamon, or cocoa powder.
Coffee latte
The word “Latte” means “milk”. It consists of hot milk and espresso. Pour a cup of hot milk and
espresso slowly from both sides of the coffee cup at the same time, and the ratio is about 6:1.
(There is only hot milk in the traditional Latte, and there is no foam in it.)
espresso macchiato
The word “Macchiato” means “smeared.” To make it, you just have to put some milk foam on
top of a standard espresso cup. Only a small portion of foam should be poured on top of the
espresso, rather than a lot of milk.
Latte macchiato
Latte Macchiato is a type of coffee made by pouring coffee into hot milk. First of all, you need
to prepare a cup of hot milk with milk foam and put it in a glass, then pour espresso into the
cup. You can have a heavy color on top and a light color on the bottom, which is quite nice.
Technically, you can pour espresso from the rim of the cup. Due to the different rate of decline of
the coffee, you can see some beautiful style changes outside the glass.
Mocha coffee
Mocca coffee is made from espresso, hot milk with foamed milk and chocolate sauce, etc., each
occupying 1/3 in the glass. You can pour the chocolate sauce by slowing down from the edge
of the cup, and a waterfall shape will appear.

14
Espresso with bread
Orthodox Espresso with Panna consists of putting a bit of whipped cream on top of the espresso.
There are now a variety of different coffee brewing flavors that are very popular. Some are with a
variety of types of syrups, some are with wine, some with honey, and some with soy milk.
Fancy coffee brewing methods
Any kind of fancy espresso is made based on espresso. Adding milk can not only add a little
milky aroma for coffee, but also create a variety of flavors by making milk, milk foam, and
cream in different proportions, giving us many options. The following image simply shows us a
variety of common proportion of milk in coffee.
TIP: Taste the coffee
The coffee maker cannot determine the flavor of the coffee, it changes due to the different types
of coffee beans that exist. Here we give a reference according to the flavor classification of
coffee beans

15
Regardless of where the coffee bean is produced, baking, grinding, and brewing could be the
important elements that affect the flavor of the coffee. Brew a cup of coffee for yourself, taste the
leisurely and carefree time carefully, and experience the smooth, salty aftertaste.
Correct disposal of this product:
This marking indicates that this product should not be disposed of with other household waste
throughout the EU. To prevent possible damage to the environment or human health due to the
uncontrolled disposal of waste, we must recycle it responsibly and thus promote the sustainable
reuse of material resources. To return your used device, please use the return and collection
systems or contact the retailer where you purchased the product. The recycling of this appliance
is safe for the environment, it can be taken to any appliance collection center.
Sour taste
Mocha, Hawaii sour coffee, Mexico, Guatemala, Costa Rica highland,
Kilimanjaro, Colombia, Zimbabwe, El Salvador, the Western Hemi-
sphere’s wet-type advanced new beans.
Bitter taste All kinds of old beans from Java, Medellin, Bogota, Angola, Congo,
Uganda
Sweet taste Colombia Mandheling, Venezuela’s old bean, Blue Mountains, Kiliman-
jaro, Mocha, Guatemala, Mexico, Kenya, Santos, Haiti
Neutral taste Brazil, Salvador, lowland Costa Rica, Venezuela, Honduras, Cuba
Savoury and mel-
low taste Colombia Mandheling, Mocha, Blue Mountain, Guatemala, Costa Rica

16
ES Español
BIENVENIDO
Este manual describe cuál debe ser el uso correcto de esta cafetera y toda la información de
seguridad necesaria antes de enchufarla. No se recomienda darle ningún otro uso más allá de
los que se detallan aquí.
Este electrodoméstico está destinado a ser utilizado en áreas domésticas y similares como:
cocinas, oficinas, cafeterías, casas de campo, área para clientes en hoteles, moteles y otros
entornos de tipo residencial.
¡CONSERVE ESTAS INSTRUCCIONES! Guarde este manual en caso de tener algún tipo de
duda o para una referencia futura. Si vende o regala esta cafetera, asegúrese de que este
manual la acompañe.
GARANTÍA
Cualquier tipo de modificación a esta cafetera y el uso de accesorios ajenos a los originales
anula por completo TODAS LAS GARANTÍAS.
UBICACIÓN
Para un funcionamiento óptimo, coloque esta cafetera sobre una mesa plana o encimera.
La cafetera no debe ubicarse dentro de un gabinete para su uso cotidiano debido a las altas
temperaturas que alcanza y la emisión de vapor. Necesita un espacio abierto y que se deje
como mínimo a 5 cm de cualquier objeto, mobiliario o electrodoméstico. El panel posterior
debe estar a más de 20 cm de la pared.
SIEMPRE coloque el cable eléctrico por detrás de este electrodoméstico.
¡INFORMACION DE SEGURIDAD IMPORTANTE!
Este producto está diseñado única y exclusivamente para hacer café espresso y las variantes
que están explicadas detalladamente en este manual. No se recomienda darle ningún otro tipo
de uso más allá de los que se especifican aquí, ya que podría provocar incendios, descargas
eléctricas u otras lesiones personales graves.
NO SUMERGIR bajo ningún concepto esta cafetera y su cable eléctrico en agua.
Limpie y dé mantenimiento a las partes extraíbles de este electrodoméstico para prolongar su
vida útil y garantizar la calidad del café.
ALMACENAMIENTO
Almacene en un lugar limpio y seco cuando no esté en uso.

17
¿CÓMO EVITAR LESIONES?
MANTENGA siempre fuera del alcance de los niños.
Este electrodoméstico no está diseñado para que lo usen personas con capacidades físicas,
sensoriales o mentales reducidas, o que tengan falta de experiencia y conocimiento, a menos
que una persona responsable de su seguridad les haya supervisado o instruido sobre el uso de
los electrodomésticos.
NO TOQUE la superficie metálica directamente con la mano mientras se esté haciendo café.
Por favor, utilice la perilla y el mango. Recuerde que esta cafetera tiene componentes que
alcanzan altas temperaturas mientras está en funcionamiento. (como el tubo de vapor de alta
presión, la salida de agua, etc.)
ESPERE a que esta cafetera regule su temperatura para volverla a utilizar.
NUNCA abra el tanque de agua mientras se esté haciendo café.
¿QUÉ HACER SI LA CAFETERA FUNCIONA MAL?
Póngase en contacto con el centro de servicio autorizado cuando experimente algún defecto en
el funcionamiento.
¿CÓMO PREVENIR INCENDIOS?
NO UTILICE esta cafetera si nota que existen daños en el cable eléctrico, si el cabezal del
enchufe está dañado o le falta alguna pieza.
ANTES DE UTILIZAR verifique el estado del cable eléctrico de este electrodoméstico y las
conexiones del tomacorriente.
NO COLOQUE objetos pesados sobre el cable eléctrico que puedan causarle daños integrales
o dobleces.
¡EVITE DAÑOS ELÉCTRICOS!
NO UTILIZAR cerca de equipos en alta temperatura, alto campo magnético y ambiente húmedo
como el refrigerador.
NO MUEVA NI APAGUE la cafetera cuando esté funcionando.
MANTENGA desconectada la cafetera si no está en uso.
ASEGÚRESE de que el cable eléctrico no toque la superficie caliente de este artefacto.
NUNCA utilice esta cafetera con el tanque de agua vacío.
De existir algún daño en el cable eléctrico, este debe ser reemplazado SOLAMENTE por un
agente de servicio autorizado por el fabricante o personas calificadas de manera similar.
CONSEJOS PARA MOVILIDAD Y LIMPIEZA
Antes de cualquier operación de limpieza o mantenimiento apague la cafetera, desconéctela
del tomacorriente y deje que se enfríe.
No utilice disolventes ni detergentes al limpiar la cafetera. Use un paño húmedo suave.
Retire la bandeja de goteo, vacíela y lávela regularmente.
Limpie el tanque regularmente.
Para quitar el soporte del filtro y el filtro, gírelo hacia la izquierda y sáquelo, sostenga el filtro
y vierta los residuos de café. Luego, límpielos con solución de limpieza y toallas, finalmente
enjuáguelos con agua limpia.
Limpie todas las partes extraíbles con agua limpia y séquelas a fondo.

18
LISTA DE ELEMENTOS DE LA CAFETERA
1.Termómetro
2. Indicador de encendido/apagado
3. Botón de encendido/apagado
4. Indicador de café
5. Botón de café/agua caliente
6. Asa de la cesta del filtro
7. Cubierta de la bandeja de goteo
8. Depósito de agua
9. Botón de vapor
10. Tubo de vapor
11. Indicador de vapor
12. Perilla de vapor
13. Filtro pequeño para 1 taza de café molido
14. Filtro grande para 2 tazas de café molido
15. Soporte del filtro
16. Cuchara medidora/ apisonadora
ANTES DE USAR POR PRIMERA VEZ
1. Antes de preparar su primera taza de espreso, limpie todas las partes extraíbles previamente.
2. Asegúrese de que esté enchufada.
3. Prepare 2 jarras de agua sin café, siguiendo los procedimientos descritos en la sección GUÍA
PARA HACER CAFÉ ESPRESSO ITALIANO de este Manual. Esto limpiará todo a fondo.
ADVERTENCIA: Es posible que durante la primera vez que haga café, el agua no salga. Si
esto llega a sucederle, por favor gire la perilla de vapor en sentido contrario a las agujas del
reloj para abrirla al máximo y presione el botón de “Café “. Cuando haya agua brotando de
la boca de vapor, presiónelo nuevamente para detener el flujo y gire la perilla de vapor en el
sentido de las agujas del reloj.
¿Cómo se llena el tanque de agua?
1.Saque el tanque de agua a la derecha.
2.Llene el tanque con agua limpia y fresca teniendo cuidado de no exceder el nivel MAX. ni ser
inferior a la escala MIN.
3.Vuelva a colocarlo en la cafetera.

19
GUÍA PARA HACER CAFÉ ESPRESSO ITALIANO
Fase de precalentamiento de la máquina.
1. Saque el tanque de agua a la derecha y llénelo con la cantidad adecuada. Tenga en cuenta
que el nivel de agua no puede exceder la escala MAX, ni ser inferior a la escala MIN.
ADVERTENCIA: Siempre verifique los niveles de agua en el tanque, si ve que está por debajo de
la escala MIN agregue la cantidad necesaria. El funcionamiento forzado afectará la vida útil de
la cafetera.
2. Enchufe la cafetera y presione el botón de encendido/apagado . Si la luz roja del indicador
está encendida, significa que la máquina de café comienza a precalentarse. Cuando el
puntero del termómetro está entre 80 y 120°C y la luz indicadora está encendida, indica que
el precalentamiento está completo. Si desea detener la cafetera, presione el botón encendido/
apagado nuevamente.
FASE DE PREPARACIÓN DEL CAFÉ
1. Coloque la taza de café que se utilizará debajo del soporte del filtro, cuando la luz
indicadora de café verde esté encendida y luego presione el botón de “Café “ para extraer el
café. Cuando la taza tenga la cantidad de café deseada, presiónelo nuevamente, con esto se
detendrá y no saldrá café.
Advertencia: por favor, no deje la cafetera calentando sin supervisión.
Enfríe la máquina durante 5 minutos después de terminar el café, gire el soporte del filtro hacia
la izquierda y sáquelo, sostenga el filtro y vierta los residuos de café.
2. Lave el soporte del filtro y el filtro con agua del grifo después de que se enfríen por
completo, limpie la carcasa principal y la bandeja de goteo con un paño húmedo.
IMPORTANTE: para evitar salpicaduras, nunca quite el asa de la cesta del filtro mientras esté
haciendo café.
3. Con la cuchara dosificadora, mida el café espreso molido y colóquelo en la canasta del
filtro. Apisonar suavemente el café para envasarlo; limpie cualquier resto de café suelto del
borde del soporte de la canasta del filtro para asegurar un ajuste adecuado en el cabezal de
preparación.
4. Coloque la cesta del filtro en el soporte. Alinee el soporte de la canasta del filtro con las
ranuras hacia arriba en el cabezal de preparación de la cafetera. Gire la manija en sentido
contrario a las agujas del reloj (hacia la derecha) hasta que el soporte de la canasta del filtro
esté bien bloqueado.
5. Coloque la taza de café que se utilizará debajo del soporte del filtro, presione el botón
“Café“para precalentar la máquina de café y la taza de café a través de la salida de
agua caliente.

20
Nota:
1.Cuando la máquina de café termine de precalentarse, si presiona el botón de café y el
botón de vapor al mismo tiempo, la máquina de café preparará café directamente, y el tiempo
máximo de trabajo es de 80 segundos.
2.Cuando la cafetera termine de preparar el café o hacer espuma de leche, si no hay
operación, la máquina se apagará automáticamente unos 30 minutos.
Cappuccino está hecho de espresso + leche espumada. Por lo
tanto, debe hacer espresso al principio, y el siguiente contenido
de este manual describe principalmente el proceso cómo hacer la
espuma de leche.
NOTA: Para preparar 2 tazas de capuchino, llene la jarra con 3
tazas de agua fría y limpia. Rinde para 2 tazas de espresso y una
taza para el vapor de la leche.
1. Llene una jarra angosta con asa (preferiblemente de metal)
hasta la mitad con leche fría y colóquela junto a la cafetera.
2. Cuando el café comience a fluir hacia la jarra, sostenga la
jarra por el asa y acérquela al chorro de vapor. Sumerja la parte
superior del tubo de vapor a 1/3 de la posición de la leche y
cambie la perilla de vapor al “MAX”. Mueva gradualmente la
parte superior del tubo de vapor al lugar donde está justo debajo
de la superficie de la leche.
RECORDATORIO
Para evitar salpicaduras, la punta debe quedar justo debajo de la superficie de la leche.
IMPORTANTE: al hacer espuma de leche, el volumen de leche se duplicará. La mitad superior
estará espumada, la mitad inferior será leche.
4. Después de que se complete el proceso de espuma de leche, interrumpa la entrega de vapor
girando la perilla de vapor en el sentido de las agujas del reloj y al mismo tiempo presionando
el botón de vapor.
5. Retire la jarra del chorro de vapor.
6. Cuando el café haya dejado de fluir hacia la jarra, gire la perilla de función a APAGADO.
CUIDADO
Antes de quitar la manija del filtro o la tapa de seguridad del tanque de agua, gire la perilla de
función a VAPOR y espere hasta que no salga más vapor del chorro de vapor. Esto permitirá que se
libere el vapor adicional y limpiará el chorro de vapor de cualquier exceso de leche. Luego gire la
perilla de función nuevamente a la posición de APAGADO.
7. Llene 1/3 de una taza de capuchino con espresso recién hecho. Vierta una cantidad igual de
leche tibia y una cuchara de leche espumosa encima.
8. Espolvoree la espuma con cacao en polvo, nuez moscada fresca rallada o canela y disfrute de
una deliciosa bebida recién hecha.
CONSEJO:Se recomienda que al menos espere a que la máquina de café se enfríe durante 10
minutos después de hacer el vapor antes de comenzar a usar nuevamente, o use el método de
enfriamiento por agua con bomba manual. De lo contrario, su café puede tener un sabor “quemado”.
GUÍA PARA HACER CAPPUCCINO U OTRO CAFÉ ESPECIAL
This manual suits for next models
2
Table of contents
Languages:
Other CAPRIZZE Coffee Maker manuals
Popular Coffee Maker manuals by other brands

Kuppersbusch
Kuppersbusch CKK6350.0 Instructions for use and installation

Brentwood Appliances
Brentwood Appliances TS-213W Operating and safety instructions

Fisher & Paykel
Fisher & Paykel EB60DSXB1 installation instructions

Philips
Philips HD7457 user manual

DeLonghi
DeLonghi La Specialista ARTE EC9155MB quick guide

DeLonghi
DeLonghi Magnifica S ECAM23.420.SB manual