Car Keys Express GMRM-6THZ1RE User manual

V2.0221
USER GUIDE
Pairing Instructions for Chevrolet, Buick, GMC, Cadillac,
Oldsmobile, Pontiac, Saturn, Suzuki Replacement Remotes.
Instruction Manual Part Number: GMPRR-7033-0
REPLACEMENT
REMOTE
Replacing car keys is simple and affordable again.™
www.CarKeysExpress.com

USER GUIDE
2
IMPORTANT NOTES
►You MUST have your existing key that already works with your vehicle
in order to use the EZ Installer™. If you have no working keys, return the
entire product to the retailer where it was purchased.
►All existing, working remotes must be present during the pairing
process. Once you pair a new remote, all previous remotes will be
erased from the memory. The others will not be functional until you pair
them again.
►Vehicle battery should be in good condition and fully charged prior
to pairing the new remote. Turn off headlights, radio, A/C fan, etc. to
minimize battery draw during the process.
►Do not use the EZ Installer while the vehicle is in motion. Unplug it
from the OBD port before driving the vehicle.
►Only original remote features will work, regardless of buttons included
in this package. This remote does not add features your vehicle did not
have before.
►For your security, a tamper-evident security label is installed over the
EZ Installer connector. If this label is missing, damaged, or the word
"VOID" appears on the EZ Installer, please exchange this product for a
new one at the retailer where it was purchased.
►Before pairing, familiarize yourself with the remote’s compatibility with
the make, model, and year of your vehicle on page 3.
LET’S GET STARTED
This product requires PAIRING. It’s important to follow these steps in
order to successfully complete setup.
If you skip a step, the remote WILL NOT work properly, and you’ll have
to repeat the setup process.
Find your PRIMARY DIAL POSITION in the following chart by
referencing your vehicle’s make, model, and year.

USER GUIDE
3
MAKE/MODEL
CHEVROLET
GMC
YEARS PRIMARY
DIAL POSITION
Colorado 2015-2020 2
Silverado 2014-2018 2
Suburban 2015-2020 2
Tahoe 2015-2020 2
Canyon 2015-2020 2
Sierra 2014-2018 2
Yukon 2015-2020 2
Visit CKESimpleKey.com for the most up-to-date vehicle compatibility list.
REMOTE PAIRING INSTRUCTIONS
Instructions have timing requirements. If you wait too long between steps, your
vehicle’s computer may time out, requiring you to start over. Once you begin
the pairing procedure, move at a quick and even pace.
NOTE: If the EZ Installer is left in the vehicle’s on-board diagnostic (OBD) port
for more than 5 minutes, an alarm will sound reminding you to remove it.
NOTE: If at any point the EZ Installer continues to beep rapidly, please refer to
the FAQ section for more information..
NOTE: This procedure will erase all old remotes when starting the
programming procedure. You MUST have all existing remotes present during
the programming process. Remotes can be added at any time using the EZ
Installer, but each time it is used the remote memory will be erased. You may
add up to 4 total remotes during this procedure.
COMPATIBILITY LOOKUP

USER GUIDE
4
1. Find your vehicle’s make, model, and year in the COMPATIBILITY LOOKUP
on page 3. Turn the dial on the EZ Installer to the position listed for your
vehicle’s make, model, and year.
NOTE: One working key should be present during the pairing process.
2. Begin with the vehicle in PARK and the engine OFF.
3. Enter the vehicle and close all doors.
4. Insert the key into the ignition and turn the key to the ON position. This
should be the position before starting the vehicle, see below. DO NOT start
the vehicle
5. Remove the security label from the EZ Installer and insert it firmly into
the on-board diagnostic (OBD) port located under the dash.
a. The location of your vehicle’s OBD port can be found in the
owner’s manual.
6. The EZ Installer will beep twice when it powers up and starts the process.
7. The EZ Installer will sound a short tune when programming mode has
started.
a. Your vehicle may or may not provide feedback such as the door
lock cycling, a message on the dashboard, or a chime.
8. After hearing this short tune, press and hold both Lock and Unlock on your
new remote for approximately 15 seconds.
9. Repeat step 8 for each additional remote to be programmed.
10. After all remotes have been added, turn the key to the Off position and
unplug the EZ Installer.
11. Press buttons on each remote to test they were properly programmed to
the vehicle.*
*Some vehicles may need to have the engine started and stopped, and the
driver's door opened and closed before the remotes will work.
FREQUENTLY ASKED QUESTIONS
Q: Can I use the same EZ Installer on other vehicles?
GM IGNITION POSITIONS

USER GUIDE
5
A: No. The EZ Installer will be locked to the first vehicle it is used on.
You may add more remotes to the same vehicle again as needed, but it
will not work on different vehicles. If the EZ Installer sounds 3 beeps at
1 second intervals, and then beeps rapidly, this signifies the device has
already been used on another vehicle. Visit CKESimpleKey.com or your
local retailer to purchase additional remotes.
Q: The new remote won’t pair to my car. What should I do?
A: If the EZ Installer doesn’t pair the remote to your car, most likely,
an incorrect dial position was used. In this case, the EZ Installer will
beep continuously after you press the pairing button. Check the
compatibility section on page 3 to confirm the correct dial position
for your make, model, year, and button configuration of your original
remote. Remove the EZ Installer, turn the Ignition off and try the
pairing process from step 1. If the remote still won’t pair, please contact
customer service at (888) 598-8910.
Q: The EZ Installer was unplugged during the pairing process. What
should I do?
A: The EZ Installer must remain plugged into the on-board diagnostic
(OBD) port until pairing is complete. If the EZ Installer becomes
unplugged during the pairing process, turn the ignition to the OFF
position, remove the key, and begin the pairing process again.
FCC REGULATORY STATEMENTS
MODEL: 2AOKM-GV6
47 CFR §15.19(a)(3) THIS DEVICE COMPLIES WITH PART 15 OF
THE FCC RULES. OPERATION IS SUBJECT TO THE FOLLOWING
TWO CONDITIONS. (1) THIS DEVICE MAY NOT CAUSE HARMFUL
INTERFERENCE, AND (2) THIS DEVICE MUST ACCEPT ANY
INTERFERENCE RECEIVED, INCLUDING INTERFERENCE THAT MAY
CAUSE UNDESIRED OPERATION.
NOTE: Changes or modifications not expressly approved by the party
responsible for compliance could void the user’s authority to operate
the equipment.

USER GUIDE
6
HELP
For help or assistance, please contact technical support at (888) 598-8910.
OTHER KEYS
Visit CarKeysExpress.com/store to find a variety of award-winning products, like
Universal Car Keys, Universal Car Remotes, and OEM keys and remotes.

USER GUIDE
7
PAGE INTENTIONALLY LEFT BLANK.

Patent US10755506B2
Designed and assembled in the USA
12101 Sycamore Station Place Ste. 140
Louisville, KY 40299
(888) 358-5397
© 2021 Car Keys Express
Replacing car keys is simple and affordable again.™

V2.0221
MANUAL DE USUARIO
Instrucciones de emparejamiento para Chevrolet, Buick, GMC,
Cadillac, Oldsmobile, Pontiac, Saturn, Suzuki Remplazo Remotos.
Número de la parte del manual de instrucciones: GMPRR-7033-0
REMPLAZO DEL CONTROL
REMOTO
Replacing car keys is simple and affordable again.™
www.CarKeysExpress.com

MANUAL DE USUARIO
2
NOTAS IMPORTANTES
►Usted DEBE tener la llave que funciona con su vehículo para poder
usar el instalador EZ Installer™. Si no tiene llaves que funcionen,
devuelva todo el producto donde lo compró.
►Durante el proceso de sincronización deben estar presentes todos
los controles remotos que funcionan. Una vez que sincronice un
control remoto nuevo, se borrarán de la memoria los controles remotos
antiguos. Los demás no funcionarán hasta que los sincronice de nuevo.
►Para sincronizar el control nuevo, la batería del vehículo debe estar en
buen estado y completamente cargada. Apague las luces delanteras,
la radio, el aire acondicionado, etc., para minimizar el consumo de la
batería durante el proceso.
►No utilice el instalador EZ Installer mientras el vehículo está en
movimiento. Desconéctelo del puerto de diagnóstico a bordo (OBD)
antes de conducir el vehículo.
►Solo funcionarán las funciones del control original,
independientemente de los botones incluidos en este paquete. Este
control no añade funciones que su vehículo no tenga.
►Para su seguridad, se instala una etiqueta de seguridad a prueba de
manipulaciones del conector EZ Installer. Si la etiqueta no está o está
dañada, o si la palabra VOID aparece en el conector EZ Installer, cambie
el producto por uno nuevo en la tienda donde lo compró.
►Antes de sincronizarlo, familiarícese con la compatibilidad del control
con la marca, el modelo y el año de su vehículo en la página 3.
COMENCEMOS
Este producto requiere una SINCRONIZACIÓN. Es importante seguir
estos pasos para completar la configuración de manera correcta.
Si omite un paso, el control NO funcionará correctamente, y tendrá que
repetir el proceso de configuración.
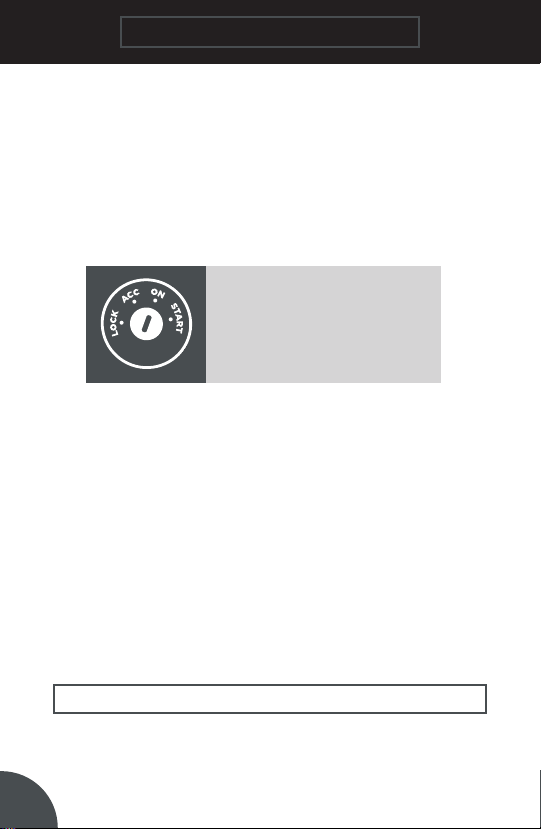
Encuentre la POSICIÓN PRIMARIA DE LA PERILLA en la siguiente tabla
según la marca, el modelo, el año.

USER GUIDE MANUAL DE USUARIO
3
CHEVROLET
GMC
Colorado 2015-2020 2
Silverado 2014-2018 2
Suburban 2015-2020 2
Tahoe 2015-2020 2
Canyon 2015-2020 2
Sierra 2014-2018 2
Yukon 2015-2020 2
Visite CKESimpleKey.com para obtener una búsqueda
de compatibilidad de vehículos actualizada.
INSTRUCCIONES DE EMPAREJAMIENTO
Las instrucciones tienen requisitos de tiempo. Si espera demasiado entre
los pasos, es posible que la computadora de su vehículo se apague, lo que
requerirá que empiece de nuevo. Una vez que empiece el procedimiento de
sincronización, avance a un ritmo rápido y uniforme.
NOTA: Si se deja el instalador EZ Installer en el puerto OBD del vehículo durante
más de 5 minutos, sonará una alarma que le recordará que lo quite.
NOTA: Si en algún momento el instalador EZ Installer continúa sonando
rápidamente, consulte la sección de preguntas frecuentes para obtener más
información.
NOTA: Este procedimiento borrará todos los controles antiguos al iniciar
el procedimiento de programación. Durante el proceso de programación
DEBEN estar presentes todos los controles. Se pueden agregar los controles
en cualquier momento usando el instalador EZ Installer, pero cada vez que se
BÚSQUEDA DE COMPATIBILIDAD
MARCA/MODELO AÑOS
POSICIÓN
PRIMARIA
DE LA PERILLA

MANUAL DE USUARIO
4
use se borrará la memoria remota. Puede agregar hasta 4 controles remotos
durante este procedimiento.
1. Encuentre la marca, el modelo y el año de su vehículo en la BÚSQUEDA DE
COMPATIBILIDAD en la página 3. Gire la perilla del instalador EZ Installer
para que esté en la posición indicada para la marca, el modelo y el año de
su vehículo.
NOTA: Durante el proceso de sincronización debe estar presente una llave
que funcione.
2. Comience con el vehículo en PARK y el motor en OFF.
3. Entre en el vehículo y cierre todas las puertas.
4. Inserte la llave y gírela hasta la posición ON. Esta debería ser la posición
antes de arrancar el vehículo, consulte a continuación. NO arranque el vehículo.
5. Quite la etiqueta de seguridad del instalador EZ Installer e insértelo
firmemente en el puerto OBD situado debajo del tablero.
a. Puede encontrar dónde se encuentra el puerto OBD de su
vehículo en el manual de instrucciones.
6. El instalador EZ emitirá dos pitidos cuando se encienda e inicie el proceso.
7. El instalador EZ Installer emitirá un sonido corto cuando el modo de
programación haya comenzado.
a. Su vehículo puede o no emitir una respuesta, como el ciclo de
bloqueo de la puerta, un mensaje en el tablero o un timbre.
8. Después de escuchar este sonido corto, mantenga presionado los botones
Lock y Unlock del control remoto nuevo durante aproximadamente 30
segundos.
9. Repita el paso 8 para cada control remoto adicional que programe.
10. Una vez que se hayan agregado todos los controles, gire la llave a la
posición Off y desconecte el instalador EZ.
11. Presione los botones de cada control remoto para controlar que se hayan
programado correctamente en el vehículo.*
*En algunos vehículos se tiene que encender y apagar el motor, y abrir y
cerrar la puerta del conductor para que funcionen los controles.
POSICIONES DE
IGNICIÓN DE GMC

USER GUIDE MANUAL DE USUARIO
5
PREGUNTAS FRECUENTES
P: ¿Puedo usar el mismo instalador EZ Installer en otros vehículos?
R: No. El instalador EZ Installer se bloqueará en el primer vehículo en
el que se utilice. Puede agregar más controles al mismo vehículo de
nuevo según sea necesario, pero no funcionará en otros vehículos. Si el
instalador EZ Installer emite 3 pitidos a intervalos de 1 segundo y luego
suena rápidamente, significa que el dispositivo ya ha sido utilizado
en otro vehículo. Visite CKESimpleKey.com o diríjase a su distribuidor
local para comprar controles adicionales.
P: El control remoto nuevo no se sincroniza con mi auto. ¿Qué hago?
R: Si el instalador EZ Installer no sincroniza el control con su carro, lo
más probable es que haya usado una posición de la perilla incorrecta.
En este caso, el instalador EZ Installer emitirá un pitido continuo luego
de que presione el botón de sincronización. Consulte la sección de
compatibilidad en la página 3 para confirmar la posición correcta de la
perilla para la marca, el modelo, el año y la configuración de botones
de su control original. Quite el instalador EZ Installer, apague el motor
e intente llevar a cabo el proceso de sincronización desde el paso 1. Si
el control no se sincroniza, comuníquese con el servicio de atención al
cliente al (888) 598-8910.
P: Se desconectó el instalador EZ Installer durante el proceso de
sincronización. ¿Qué hago?
R: El instalador EZ Installer debe permanecer conectado en el puerto
OBD hasta que se complete la sincronización. Si el instalador EZ Installer
se desconecta durante el proceso de sincronización, gire la llave a la
posición OFF, saque la lleve y comience el proceso de sincronización de
nuevo.
DECLARACIÓN REGLAMENTARIA DE LA FCC
FCC ID: 2AOKM-GV6
47 CFR §15.19(a)(3): ESTE DISPOSITIVO CUMPLE CON LA PARTE 15 DE
LAS NORMAS DE LA FCC. EL FUNCIONAMIENTO ESTÁ SUJETO A LAS
SIGUIENTES DOS CONDICIONES: (1) ESTE DISPOSITIVO NO PUEDE CAUSAR
INTERFERENCIAS PERJUDICIALES Y (2) ESTE DISPOSITIVO DEBE ACEPTAR
CUALQUIER INTERFERENCIA RECIBIDA, INCLUIDA LA INTERFERENCIA
QUE PUEDA CAUSAR UN FUNCIONAMIENTO NO DESEADO.

MANUAL DE USUARIO
6
NOTA: Los cambios o modificaciones que no estén expresamente
aprobados por la parte responsable del cumplimiento pueden anular la
autoridad del usuario para utilizar el equipo.
AYUDA
Para obtener ayuda o asistencia, comuníquese con el soporte técnico al
(888) 598-8910.
OTRAS LLAVES
Visite CarKeysExpress.com/store para encontrar una variedad de
productos galardonados, como llaves universales para carros, controles
universales para carros y llaves y controles OEM.

USER GUIDE MANUAL DE USUARIO
7
PÁGINA DEJADA EN
BLANCO INTENCIONADAMENTE.

MANUAL DE USUARIO
Patente US10755506B2
Diseñado y ensamblado en EE. UU.
12101 Sycamore Station Place Ste. 140
Louisville, KY 40299
(888) 358-5397
© 2021 Car Keys Express
Replacing car keys is simple and affordable again.™
This manual suits for next models
1
Table of contents
Languages:
Other Car Keys Express Remote Starter manuals

Car Keys Express
Car Keys Express HORM-6HS0RE User manual

Car Keys Express
Car Keys Express GMPRR-7011-0 User manual

Car Keys Express
Car Keys Express GMRM-MZ1RE User manual

Car Keys Express
Car Keys Express Simple KEY User manual

Car Keys Express
Car Keys Express GMRM-4TZ1RE User manual

Car Keys Express
Car Keys Express GMCRR-7030 User manual

Car Keys Express
Car Keys Express HORM-30RE User manual