Carolina Cooker M107828 User manual

2 x 4 Grill Owner’s Guide
Read and understand this manual to safely operate and maintain this product.
4006980
M107828

Keep this owner’s guide for future reference.
Model : M107828 CC 2X4 For Outdoor Use Only ! ! !
Conforms to ANSI STD Z21.58 -2018
Certicated to CSA STD 1.6-2018
For Outdoor Use Only
Please read this manual carefully to understand all the instructions about how to install, operate and maintain for
optimum performance and longevity.
We know you’ll enjoy your new 2 X 4 Grill and thank you for choosing our product. We hope you consider us for future
purchases.
Please read and save the instructions
This owner’s guide provides specic operating instructions for your model. Use your product only as instructed in this
manual. These instructions are not meant to cover every possible condition and situation that may occur. Common
sense and caution must be practiced when installing, operating and maintaining any appliance. If you have any ques-
tions, please contact us at:
Carolina Cooker: P.O. Box 799, Garner, NC 27529
Orders: 1-833-926-6537
Inquiries: 1-844-478-4334
Web: www.CarolinaCooker.com

1. Safety Symbols . . . . . . . . . . . . . . . . . . . . . . . . . . . . .1
2. General Safety Instructions . . . . . . . . . . . . . . . . . . 2
3. Gas Requirement . . . . . . . . . . . . . . . . . . . . . . . . . . . . . 3
3.1 LP Gas Hook-Up . . . . . . . . . . . . . . . . . . . . . . . . . . . . . . 3
3.2CylinderSpecications........................4
3.3HoseandRegulator...........................4
3.4LP(Propane)GasSupplyConnection..........5
3.5LPGasSupplyCylinderDisconnection........5
3.6LPTankRemoval,Transport&Storage........5
3.7LPTankFilling..................................5
3.8LPTankExchange.............................5
4. Locating the Product . . . . . . . . . . . . . . . . . . . . . . . . . 6
5. Assembly and Startup Procedure . . . . . . . . . . . . 7
5.1Contents......................................7
5.2Assembly......................................8
5.2.1ToolsRequired..........................8
5.2.2AssemblyInstructions...................8
6. Pre-Operation Leak Testing. . . . . . . . . . . . . . . . . . 13
6.1BeforeTesting................................13
6.2LeakTestingValves,Hose&Regulator........13
7. Lighting the Burner. . . . . . . . . . . . . . . . . . . . . . . . . . 14
7.1GeneralRules................................14
7.2LightingInstructions..........................14
8. Operations & Features. . . . . . . . . . . . . . . . . . . . . . 15
8.1PreparingFoodfortheGrill....................15
9. Care & Maintenance . . . . . . . . . . . . . . . . . . . . . . . . . 15
9.1GreaseOilBucket.............................15
9.2CookingGrates...............................15
9.3Burners.......................................15
9.4StainlessSteel................................16
9.5AnnualCleaningofBurnerHousing..........16
9.6MaintenanceGuidelines......................16
9.7 Recommended Cleaners . . . . . . . . . . . . . . . . . . . . . 17
10. Warranty . . . . . . . . . . . . . . . . . . . . . . . . . . . . . . . . . . 17
11. Replacement Parts . . . . . . . . . . . . . . . . . . . . . . . . 17
12. Parts Breakdown . . . . . . . . . . . . . . . . . . . . . . . . . . 18
13. Troubleshooting . . . . . . . . . . . . . . . . . . . . . . . . . . 19
Table of Contents

1Carolina Cooker®
844-478-4334
Model M107828
June 2021
• WARNING
DANGER indicates an imminently hazardous
situation which, if not avoided, will result in death
or serious injury.
• CAUTION
• WARNING
• WARNING
• WARNING
• WARNING
CAUTION indicates a potentially hazardous
situation which, if not avoided, may result in
minor or moderate personal injury, or
property damage.
WARNING indicates a potentially hazardous
situation which, if not avoided, could result in
death or serious injury.
WARNING:
Improper installation, adjustment, alteration,
service or maintenance can cause injury or
property damage. Read the installation, operating
and maintenance instructions thoroughly before
installing or servicing this equipment.
IF YOU SMELL GAS:
1. Shut o gas to the appliance.
2. Extinguish any open ame.
3. Open Lid.
4. If odor continues, keep away from the appli-
ance and immediately call your gas supplier or
your re department.
WARNING:
1. DO NOT store or use gasoline or other
ammable liquids or vapors in the vicinity of this
or any other appliance.
2. An LP cylinder not connected for use shall
not be stored in the vicinity of this or any other
appliance.
FOR OUTDOOR USE ONLY:
NEVER operate 2 X 4 Grill in enclosed areas, as
this could lead to gas accumulating from a leak,
causing an explosion or a carbon monoxide
buildup which could result in injury or death.
DO NOT use your 2 X 4 Grill in garages,
breezeways, sheds or any enclosed area.
NOT FOR USE BY CHILDREN. If these
instructions are ignored, a hazardous re or
explosion could result in physical injury, death
or property damage!
1. Safety Symbols

2Carolina Cooker®
844-478-4334
Model M107828
June 2021
1. For Household Outdoor Use Only – DO NOT use indoors or in any type of enclosed area such as a garage, shed or
breezeway. Keep clear of trees and shrubs. The 2 X 4 Grill are not intended for installation in or on recreational
vehicles, portable trailers, boats or any other moving installation. Not for commercial use.
2. The area surrounding your new 2 X 4 Grill should be kept clean and free from ammable liquids and other
combustible materials such as mops, rags or brooms, as well as solvents, cleaning uids, and gasoline.
3. To reduce the risk of serious or fatal injury from breathing toxic fumes and from explosion and re as a result of
leaking gas, use only outdoors in an open area with good ventilation. Do not obstruct the ow of combustion and
ventilation air.
4. Never use the 2 X 4 Grill in windy conditions. If located in a consistently windy area (oceanfront, mountaintop, etc.) a
wind break will be required. Always adhere to the specied clearances listed.
5. Do not leave the 2 X 4 Grill unattended while cooking.
6. This unit is designed for use with LP gas ONLY.
7. Do not use fuel such as charcoal briquettes on the 2 X 4 Grill.
8. Keep children and pets away from hot burner, DO NOT allow children to use or play near the 2 X 4 Grill.
9. Never attempt to repair or replace any part of the 2 X 4 Grill yourself unless specically recommended in this
manual. All other services should be performed by a qualied service technician.
10. Never lean over an open burner. Do not place clothing or other ammable material on or near the burner. Do not
wear loose-tting clothes or long sleeves while using the 2 X 4 Grill as some fabrics can be highly ammable.
11. Have an ABC re extinguisher accessible. Never attempt to extinguish a grease re with water or other liquids.
12. Never use aluminum foil on the burner grids, this can alter airow for proper combustion and also build up heat in
the control area causing the knobs and igniter to melt.
13. When using the 2 X 4 Grill, do not touch the burner grate or immediate surroundings as these areas become
extremely hot and can cause burns.
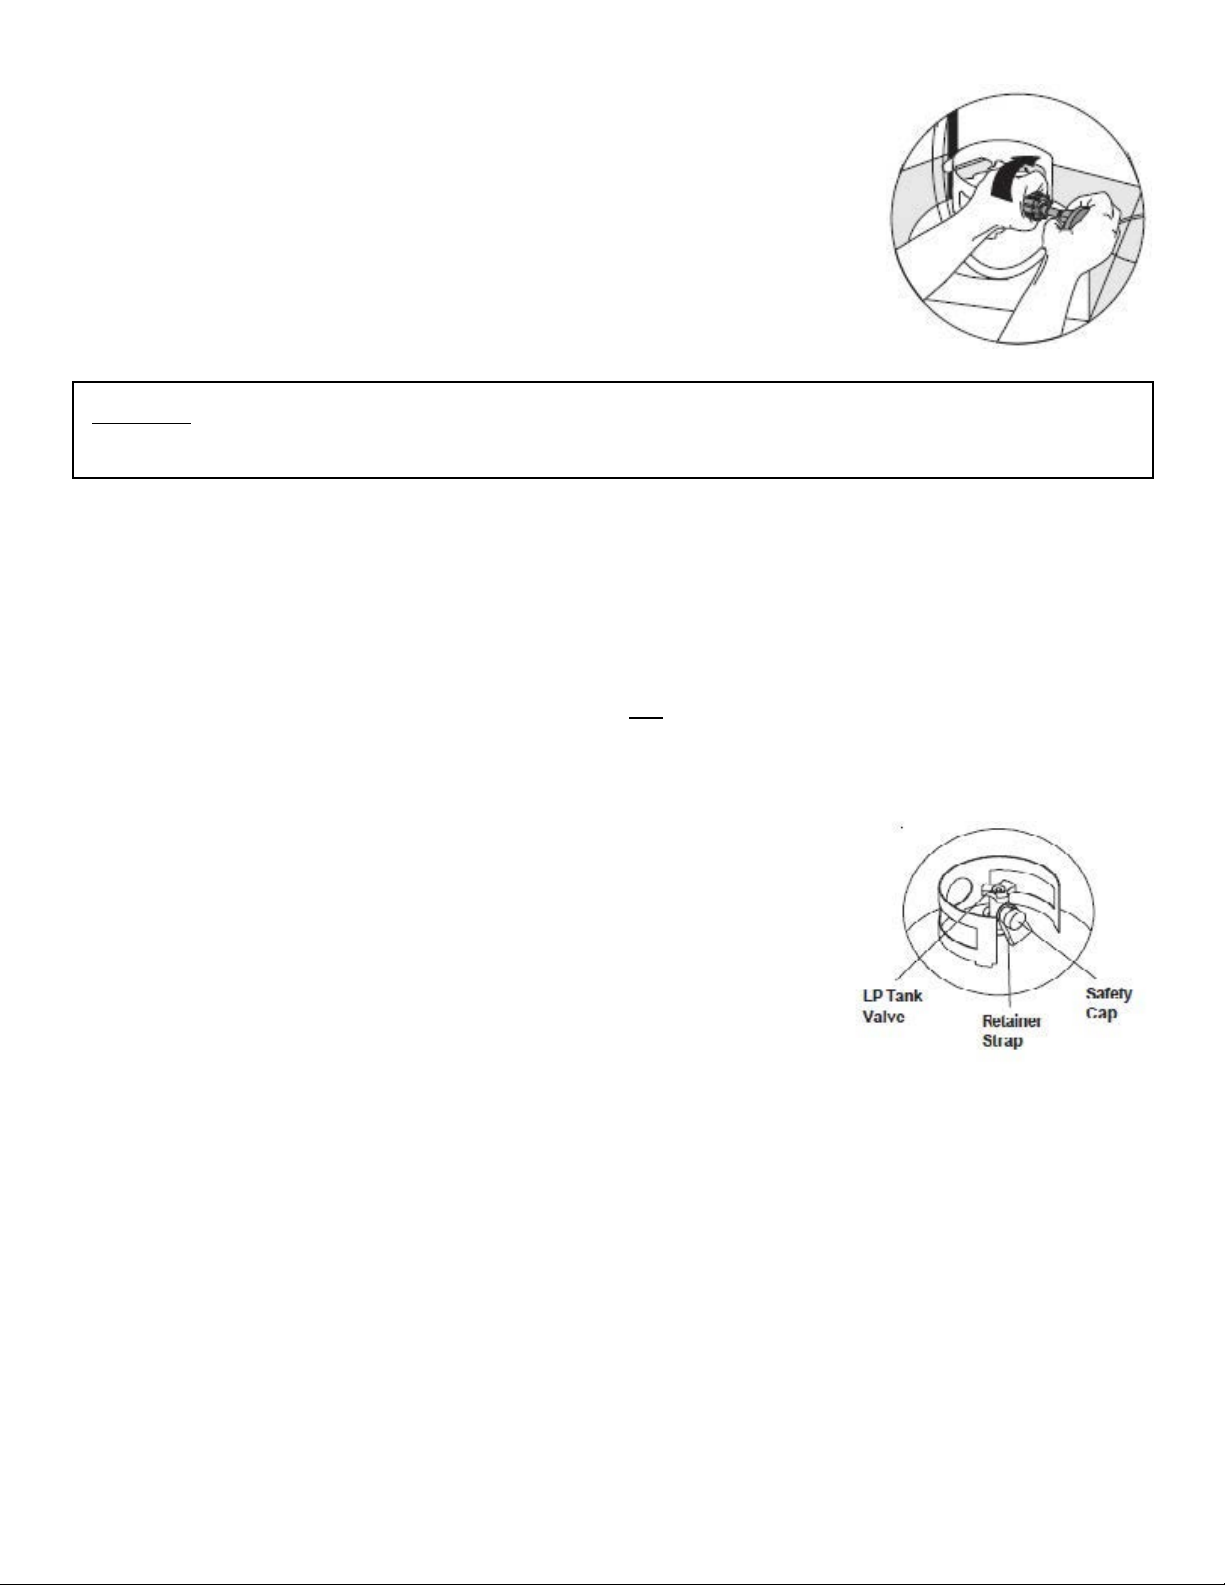
14. DO NOT allow grease or other hot material dripping from the burner onto valve, hose or regulator, turn o gas supply
immediately. After the 2 X 4 Grill has cooled, determine the cause and correct it. After cleaning the valve, hose and
regulator, perform a leak test before continuing use.
15. Do not heat any unopened glass or metal container of food on the 2 X 4 Grill. Pressure may build up and cause the
container to burst, possibly resulting in serious personal injury or damage to the 2 X 4 Grill.
16. Keep any electrical supply cords away from water or heated surfaces. Electrical cords should be placed away from
walkways to avoid tripping hazard.
17. Keep gas supply lines as short as possible.
18. Never move the 2 X 4 Grill when hot.
19. DO NOT use while under the inuence of drugs or alcohol.
20. DO NOT store a spare gas cylinder under or near your 2 X 4 Grill.
21. In the event that a burner goes out, turn burner knobs to the full OFF position. Do not attempt to use the 2 X 4 Grill
until the gas has had time to dissipate.
22. Do not use the burner until leak check has been made.
23. Turn o the cylinder valve when your 2 X 4 Grill is not in use.
24. Ensure the control knobs are in the “OFF” position when not in use.
2. General Safety Instructions

3Carolina Cooker®
844-478-4334
Model M107828
June 2021
NOTE: Always have a qualied service technician perform dicult conversions or modications.
WARNING: Never attach an unregulated gas line to the appliance. Connection to an unregulated gas line can cause
excessive heat or re
IMPORTANT: Before connecting the burner to gas source, make sure burner control knobs are in “OFF” position.
Verify the type of gas supply to be used, this grill is designed for use with LP gas ONLY.
All pipe sealants must be an approved type and resistant to the actions of LP gas. Never use pipe sealant on are
ttings. The installation of this appliance must conform with local codes or, in the absence of local codes, with either
National Fuel Gas Code, ANSI Z223.1/ NFPA 54, Natural Gas and Propane Installation Code, CSA B149.1, or Propane
Storage and Handling Code, B149.2, or the Standard for Recreational Vehicles, ANSI A 119.2/ NFPA 1192M, and CSA
Z240 RV Series, Recreational Vehicle Code, as applicable.
Gas valves are preset to operate only on LP gas.
3.1 LP Gas Hook-Up
This propane gas 2 X 4 Grill is designed to operate on propane gas ONLY, at a pressure regulated at 11” water column
(W.C.) when equipped with the correct propane orices on the valves and a propane regulator on the supply line regu-
lated at the residential meter. The LP gas 2 X 4 Grill is designed to be used with a standard 20 lbs gas cylinder and must
be constructed and marked in accordance with specications of the US Department of Transportation for propane gas
cylinders.
Always keep cylinder securely fastened in an upright position. Never connect an unregulated propane gas
cylinder to the 2 X 4 Grill.
Do not subject propane cylinders to excessive heat.
Never store a LP gas cylinder inside a building or in the vicinity of any gas-burning appliance.
3. Gas Requirement
•WARNING
•WARNING

4Carolina Cooker®
844-478-4334
Model M107828
June 2021
3.2 Cylinder Specications
• Any L.P. gas supply cylinder used with this appliance must be approximately 12 inches diameter and 18 inches high.
The maximum fuel capacity is 80% and is approximately 20 pounds of propane.
• The L.P. cylinder must have a shut-o valve (see picture) terminating in a Type 1 L.P.
• A Type 1 compatible cylinder with a Type 1 cylinder valve has a back-check valve
which does not permit gas ow, until a positive seal has been obtained.
• The cylinder must be arranged for vapor withdrawal. It must also include a collar to
protect the cylinder valve. A safety relief device having direct communication with
the vapor space of cylinder must be provided. This will expel high pressure gas if the
cylinder is overlled or overheated which could result in re or explosion.
• All L.P. gas cylinders used with this appliance shall be constructed and marked in
accordance with the specications for L.P. gas cylinders of the U. S. Department of
Transportation (DOT) or the National Standard of Canada, CAN/CSA-B339, Cylinders,
Spheres and Tubes for Transportation of Dangerous Goods; and Commission, as
applicable; and shall be provided with a listed overlling prevention device.
• Read labels on the L.P. Gas Supply Cylinder.
• New cylinders are always shipped empty for safety.
• Allow only qualied L.P. gas dealers to ll or repair your L.P. gas supply cylinder.
• Inform the gas dealer if it is a new or used cylinder to be lled.
• After lling, have the gas dealer check for leaks and to see that the relief valve remains free to function.
3.3 Hose and Regulator
The Type 1 connection system has the following features:
• The system will not allow gas to ow until a positive connection has been made.
NOTE: The cylinder control valve must be turned o before any
connection is made or removed.
• The system has a thermal element that will shut o the ow of gas in the event
of a re.
• The system has a ow limiting device which, when activated, will limit the ow of
gas to 10 cubic feet per hour.
• NEVER use 2 X 4 Grill without leak testing this connection.

5Carolina Cooker®
844-478-4334
Model M107828
June 2021
3.4 LP (Propane) Gas Supply Connection
1. The tank valve should be in the “OFF” position. If not,
turn the knob clockwise until it stops.
2. Make sure all burner valves are in the “OFF” position.
3. Always connect the gas supply regulator as follows:
Insert the regulator inlet into the tank valve and turn the coupling nut clockwise until
the coupler tightens up (see picture). Do not over tighten the coupler. Turn the main
tank valve on and turn the burner control valves on the unit to the “HIGH” position for
about 20 seconds to allow the air in the system to purge before attempting to light
the burners.
WARNING: Always take a leak test before lighting the 2 X 4 Grill to prevent a possible re or explosion. Never store
a spare propane cylinder in the vicinity of this 2 X 4 Grill, or in the vicinity of any other potential heat source.
3.5 LP Gas Supply Cylinder Disconnection
1. Turn the burner valves o.
2. Turn the tank valve o. (Turn clockwise to stop).
3. Detach the regulator assembly from the tank valve by turning the quick coupling nut counterclockwise.
3.6 LP Tank Removal, Transport and Storage
• Turn OFF all control knobs and LP tank valve. Turn coupling nut counterclockwise by hand only - do not use tools to
disconnect. Lift LP tank wire upward o of LP tank collar, then lift LP tank up and o of support bracket. Install safe-
ty cap onto LP tank valve. Always use cap and strap supplied with valve. Failure to use safety cap as directed may
result in serious personal injury and/or property damage.
• A disconnected LP tank in storage or being transported must have a safety cap
installed (as shown). Do not store an LP tank in enclosed spaces such as a
carport, garage, porch, covered patio or other building. Never leave a LP tank
inside a vehicle which may become overheated by the sun.
• Do not store LP tank in an area where children play.
3.7 LP Tank Filling
• Use only licensed and experienced dealers.
• LP dealer must purged tank before lling.
• Dealer should NEVER ll LP tank more than 80% of LP tank volume. Volume of propane in tank will vary by
temperature.
• A frosty regulator indicates gas overll. Immediately close LP tank valve and call local LP gas dealer for assistance.
• Do not release liquid propane (LP) gas into the atmosphere. This is a hazardous practice.
• To remove gas from LP tank, contact an LP dealer or call a local re department for assistance. Check the
telephone directory under “Gas companies” for nearest certied LP dealers.
3.8 LP Tank Exchange
• Exchange your Type 1 cylinder with OPD safety feature-equipped ONLY.
• Always keep new and exchanged LP tanks in upright position during use, transit or storage. Leak test new and ex-
changed LP tanks BEFORE connecting to burner.

6Carolina Cooker®
844-478-4334
Model M107828
June 2021
Check your local building codes for the proper method of installation. In the absence of local codes, this unit should
be installed in accordance with the National Fuel Gas Code No. Z223.1-1998 USA or CAN/CGA-B149.1/.2 Natural Gas/
Propane Code (Canada) latest edition or the National Electrical Code ANSI/NFPA No. 70 or the Canadian Electrical Code
CSA C22.1, 1990 or latest version.
• Before installing the grill in enclosures, copy all product information such as model number, serial number and type
of 2 X 4 Grill and store information in a safe place.
Location
Locate the 2 X 4 Grill only in a well ventilated area. Never locate the 2 X 4 Grill in a building, garage, breezeway, shed or
other such enclosed areas without an approved ventilation system. During heavy use, the 2 X 4 Grill will produce a lot of
smoke. Ensure there is adequate area for it to dissipate.
Clearance
• TO NON-COMBUSTIBLE CONSTRUCTION: A minimum of 36” clearance from the back of the grill is recommend-
ed. The grill can be placed directly adjacent to non-combustible construction below the cooking surface. The grill
exhausts combustion products and cooking greases to the back. Never locate the grill where this exhaust will be
dicult to clean.
Do not install this unit under unprotected ammable surfaces. Do not install or use this appliance inside a building,
garage, or any other covered area. It must not be used in or on recreational vehicles or boats.
ENSURING PROPER COMBUSTION AIR AND COOLING AIR FLOW
You must maintain proper air ow for your product to perform as it was designed. If airow is blocked, overheating and
poor combustion will result. Make sure not to block the 1” front air inlet along the bottom of the face or more than 75%
of the support grid surface with pans or griddles.
4. Locating the Product

7Carolina Cooker®
844-478-4334
Model M107828
June 2021
5. Assembly and Startup Procedure
Before beginning assembly, read and understand
the information contained in this Owner’s Guide.
Safety precautions and warnings are provided
in this Owner’s Guide and on the appliance. If
these hazard warnings are not heeded, bodily injury
or death could occur to you or to other persons.
5.1 Contents
The2x4GrillBBQCookerisshippedinonelargebox.Note
thatsomepartsarepackedinsidethecookerbody.
Checkthecontentsoftheboxtobesureallpartsare
presentpriortoassembly.Ifpartsaredamaged
call1-833-926-6537.
Contents
Item Description
1Cooker with burners
2 Axle
3Wheels
4Support Stand Legs
5Cooking Grate
6Side Shelf
7Hardware
8LP Tank Holder
9Grease Drain Valve
10 Grease Oil Bucket
11 Thermometer
12 Handle for Lid
13 Regulator and Hose (not pictured)
1
5
4
2
3
6
7
8
10
13
11
9
12
•WARNING

8Carolina Cooker®
844-478-4334
Model M107828
June 2021
Before beginning assembly, read and understand the
information contained in this Owner’s Guide.
Safety precautions and warnings are provided in this
Owner’s Guide and on the appliance. If these hazard
warnings are not heeded, bodily injury or death could
occur to you or to other persons.
1. Thisapplianceisspecicallydesignedtobeusedwith
aLPcylinderwithaType1cylindervalveandan
overllingprotectiondevice(OPD).
a. AType1valvecanbeidentiedbyitslargeexternal
threads.Donotconnecttoacylinderthatusesany
othertypeofvalveconnectiondevice.
2. Makesureallthepartshavebeenshippedwiththe
appliancebeforestartingassembly.
5.2.1 Tools Required
5.2 Assembly
Contents
Tool Used For
Phillips Screwdriver General Assembly
17 & 19mm
Open End Wrenches
Connecting hose to
valve assembly
Adjustable Pliers Connecting drain valve
Pliers Bending cotter pin
prongs
5.2.2 Assembly Instructions
1. Remove outer cardboard, then remove grate and all
parts packed inside the grill body.
2. Onceallpartshavebeenremoved,useaPhillips
screwdrivertoremovethelidhandle.
•WARNING

9Carolina Cooker®
844-478-4334
Model M107828
June 2021
NOTE: Do not roll the cooker rearward, as damage to
the air ow dampers and back lid stop may result.
3. Usingtwopeople,carefullyrollthecooker
forwarduntilitisrestingupsidedownonthelid.
Atarporothersoftmaterialisrecommendedto
protectthenish.
4. Installthesupportstandlegstothebottomofthe
grillusingthesuppliedhardwarewithaPhillips
screwdriver.
NOTE: The leg with 2 bolt holes on the side of the leg
need to be mounted on the backside of the grill
closest to the LP propane tank hook
5. TheLPpropanetankholdercanalsobeinstalledon
thebacksupportstandleg,whichhasthesidewith
thetankhook.
6. Use2bolts,washersandnutswithPhillips
screwdrivertosecurethebracket.
7. Notice:Theatsideofsupportneedstofacethe
backofthegrillforpropermounting.

10 Carolina Cooker®
844-478-4334
Model M107828
June 2021
CAUTION The cooker is heavy and requires two people
to roll the cooker into an upright position.
8. Removetheboltsfromtheaxlesupportbracketfrom
eachofthelegsbyusingaPhilipsscrewdriver.
10. Place each wheel on the axle. Put another large
washer followed by nut and cotter pin.
NOTE: Tighten nut snug but be sure the wheel
can spin freely.
11. Install grease drain valve on the threaded portion
using adjustable pliers to tighten.
9. Slidetheaxleinsidethesupportbrackets.
Placelargewasheroneithersideofthebracket.
NOTE: Do not omit the cotter pins. They are an important
safety feature.
12. Using two people, carefully roll the cooker
forward to an upright position so it is resting on
the stand support legs and wheels.

11Carolina Cooker®
844-478-4334
Model M107828
June 2021
13. Removethe4bolts(2oneachsideofthe
side shelf.
14. Slidethesideshelfintothebodyofthegrillthrough
the2squareholes.
15. Tighten all 4 bolts using Phillips screwdriver to the
body of the grill.
16. Install the gas regulator hose end to the control
valve box, with a 17mm and 19mm wrenches, and
secure tightly.
17. Open the grill lid, and Install the handle on the grill
using the supplied 4 bolts.

12 Carolina Cooker®
844-478-4334
Model M107828
June 2021
18. Hookthehandleofthegreaseoilbuckettothe
greasebailatthebottomofthegrill.
19. Install Thermometer using the supplied wing nut and
tighten to snug t.

13Carolina Cooker®
844-478-4334
Model M107828
June 2021
1. Do not insert any tool into the valve outlet or safety relief valve. You may damage the valve and cause a leak.
Leaking propane may result in explosion, re, severe personal injury, or death.
2. If a leak is detected at any time or you cannot stop a gas leak, immediately close pipeline valve and call LP gas
supplier or you re department!
3. Check all gas supply ttings before each use and each time the gas supply cylinder is connected to the regulator.
Have a qualied service technician leak test the burner any time a part of the 2 X 4 Grill system is replaced.
Never attempt to attach this burner to the self-contained LP gas system. Do not use the burner until leak testing.
6.1 Before Testing
DO NOT smoke while leak testing. Extinguish all open ames. Never leak test
with an open ame. Mix a solution of equal parts mild detergent or liquid soap
and water.
6.2 Leak Testing Valves, Hose and Regulator
1. Turn the 2 X 4 Grill control knob to OFF.
2. Be sure hose is tightly connected to LP tank.
3. Completely open LP tank valve by turning cylinder valve knob counterclockwise (right to left). If you hear a rushing
sound, turn gas o immediately. There is a major leak at the connection. Correct before proceeding by calling
dealer for replacement parts.
4. Brush soapy solution onto areas where bubbles are shown in LP tank (see picture).
5. If “growing” bubbles appear, there is a leak. Close LP tank valve immediately and re-tighten connections. If leads
cannot be stopped do not try to repair. Call dealer for replacement.
6. Always close LP tank valve after performing leak test by turning cylinder valve knob clockwise.
NOTE: When leak testing this appliance, make sure to test and tighten all loose connections. A slight leak in the
system can result in a low ame, or a hazardous condition.
Gas tanks now come equipped with a leak detector mechanism internal to the tank; when gas is allowed to escape
rapidly, it shuts o the gas supply. A leak may signicantly reduce the gas ow making the 2 X 4 Grill dicult to
light or causing low ames.
6. Pre Operation Leak Testing
•WARNING

14 Carolina Cooker®
844-478-4334
Model M107828
June 2021
• Failure to open the lid while igniting the burners, or not waiting 5 minutes to allow the gas to clear if the
barbecue does not light, may result in an explosive ame-up which can cause serious bodily injury or death.
• DO NOT use the grill if gas odor is present.
• DO NOT stand with head, body, or arms over the burner when lighting.
• Inspect the hose before using the burner. If there is excessive abrasion or wear, or if the hose is cut, it must
be replaced prior to the outdoor cooking gas appliance being put into operation. The replacement hose
assembly shall be specied by the manufacturer.
• Ensure the area around the barbecue is clear of ammable substances such as gasoline, yard debris,
wood, etc.
• Ensure there are no blockage of the airow through the vent space located below the face of the unit.
7.1 General Rules
Do not leave the 2 X 4 Grill unattended while cooking!
• Make sure the grill has been leak tested and is properly located.
• Light the burners using the instructions provided in this manual.
• Adjust heat settings to your desired cooking temperature.
• Allow burners to cool down, wipe o any splatters or grease.
• Do not put a cover on the 2 X 4 Grill while it is still hot as it could start a re.
NOTE: If for some reason, igniters fail to light, burners can be lit with a gas lighter.
NOTE: To light gas burner with a gas lighter, make sure the 2 X 4 Grill has been leak tested and burners are properly lo-
cated. Remove the cooking grid from the burner you wish to light. Insert long-necked gas lighter placing near to burner
ports. Press in the control knob and rotate left to “HIGH” setting to release gas. Turn on the button on gas lighter, burner
should light immediately. Place back the cooking grid and adjust burners to desired cooking temperature.
7.2 Lighting Instructions
1. Open lid before lighting burner.
2. Make sure the control knob is in OFF position.
3. Push and rotate the knob to HI position 3-5 seconds to light burner. And try again immediately if the burner does
not ignite on the rst attempt.
4. If ignition does not occur in 5 seconds, turn the knob to OFF, wait 5 minutes to allow gas to dissipate and repeat the
process.
5. To turn o, turn control knob clockwise until it locks in OFF position.
7. Lighting The Burner
•WARNING
•DANGER

15Carolina Cooker®
844-478-4334
Model M107828
June 2021
When initially turning the burners on, burn the burners to get rid of any odors or debris by operating at “HIGH” setting
8.1 Preparing Food for the grill
WARNING: Always observe safe food-handling and safe food-preparation practices when using this grill, to
prevent food-borne illnesses.
CAUTION: All cleaning and maintenance should be done only when 2 X 4 Grill is cool & with the fuel supply turned
o at the cylinder.
9.1 Grease Oil Bucket
The oil bucket located below on the drain valve should be cleaned periodically to prevent heavy buildup of debris.
NOTE: Allow the oil bucket to cool before attempting to clean.
9.2 Cooking Grates
The cooking grates can be cleaned immediately after cooking is completed and after turning o the 2 X 4 Grill. Wear a
barbecue mitt and scrub the cooking grates with a damp cloth. If the burner is allowed to cool down, cleaning the grates
will be easier if removed from the burner and cleaned with a mild detergent.
9.3 Burners
IMPORTANT: Gas control knobs should be in the ‘OFF” position and fuel line should be disconnected. To reduce the
chance of FLASHBACK, the procedure below should be followed at least once a month or when your 2 X 4 Grill has
not been used for an extended period of time.
1. Remove the burner from the 2 X 4 Grill body by carefully lifting the burner up and away from the gas valve orice.
Wire brush the entire outer surface of the burner to remove food debris and dirt. Clean any clogged ports with a sti
wire such as an open paper clip.
2. Inspect the burner for damage (cracks or holes) and if such damage is found, order and install a new burner.
3. After installation, check to ensure that gas valve orices are correctly placed inside the proper positions, also check
position of spark electrode.
8. Operations and Features
9. Care and Maintenance
•WARNING
•WARNING

16 Carolina Cooker®
844-478-4334
Model M107828
June 2021
9.4 Stainless Steel
After initial usage, areas of the 2 X 4 Grill may discolor from the intense heat given o by the burners. This is normal.
Purchase a mild stainless steel cleaner and rub in the direction of the grain of the metal. Specks of grease can gather on
the surface of the stainless steel and bake on to the surface and give a worn appearance. For removal, use a non-abra-
sive oven cleaner in conjunction with a stainless cleaner.
NOTE: Always scrub in the direction of the grain.
9.5 Annual Cleaning of Burner Housing
Burn-o the barbecue after every cookout will keep it ready for instant use, however, once a year you should give the
entire 2 X 4 Grill a thorough cleaning to keep it in top operating condition.
1. Shut o gas supply at source and disconnects fuel line. Protect fuel line tting.
2. Remove and clean the cooking grate and burner.
3. Cover the gas valve orices with a piece of aluminum foil.
4. Brush the inside and bottom of the 2 X 4 Grill with a sti wire brush, and wash down with a mild soap and warm water
solution. Wash thoroughly and let dry.
5. Remove aluminum foil from orices and check orices for obstruction.
6. Check electrode.
7. Reinstall cooking grate.
8. Reconnect to gas source and observe burner ame for correct operation.
IMPORTANT: You should NOT line the bottom of the burner housing with aluminum foil, sand or any other grease
absorbent substance, a grease re may occur.
9.6 Maintenance Guidelines
1. Store the grill in a dry place.
2. Keep outdoor cooking gas appliance area clear and free from combustible materials, gasoline and other ammable
vapors and liquids.
3. Do not obstruct the ow of combustion and ventilation air.
4. Keep the ventilation opening(s) of the cylinder enclosure free and clear from debris.
5. Visually check burner ames. Burner ames should be blue and stable with no yellow tips, excessive noise, or lifting.
If any of these conditions exist call our customer service line.
6. Clean outdoor cooking gas appliance, including special surfaces, with recommended cleaning agents, if necessary.
7. Check and clean burner for insects and insect nests. A clogged tube can lead to a re beneath the 2 X 4 Grill.

17Carolina Cooker®
844-478-4334
Model M107828
June 2021
JOB CLEANING AGENTS COMMENTS
Routine Cleaning Soap, ammonia, detergent medallion Apply with cloth or sponge
Fingerprints & smears Arcal 20, Lac-O-Nu Ecoshine Provides barrier lm
Stubborn stains & discolorations Cameo, Talc, Zud
First Impression Rub in direction of polish lines
Grease & Oil Any good commercial detergent Apply with sponge or cloth
Restoration/Passivation Benet, Super Sheen
9.7 Recommended Cleaners for Specic Situations
M107828 CC 2 X4 Grill Replacement Parts
Description Part Number
Burner 120065
BBQ Cooker Thermometer 103536A
BBQ Cooker Latch (set of 2) 72714
Handle 108177
Set Screws to Secure Burner
(5 per pack) 85831
Control Knob 80525
Regulator & Hose 91050
Grate 120062
Gas Valve 120064
Oil Bucket 120012
Replacementpartsformanyofourappliancesare
stockitems.Allpartslistedinthistableareavailableon
ourwebsiteand/orourstorelocations.Ifthepartyou
needisnotavailableforon-linepurchaseorin-store
pickup,simplycallourMailOrderCenterat
1-833-926-6537toplaceanorder.
Contactusat:
1-833-926-6537
OurmailorderhoursofoperationareMondaythrough
Friday,7:30amto8:00pm,andSaturdayfrom8:00am
to5:00pm(EST).
11. Replacement Parts
CarolinaCooker®warrants,totheoriginalpurchaser,
theappliancetobefreeofdefectsinmaterialand
workmanshipforaperiodofoneyearfromdateof
purchase.
NOTE: Paint nish may burn o under normal use and,
therefore, it carries no warranty.
10. Warranty
Table of contents
Other Carolina Cooker Grill manuals