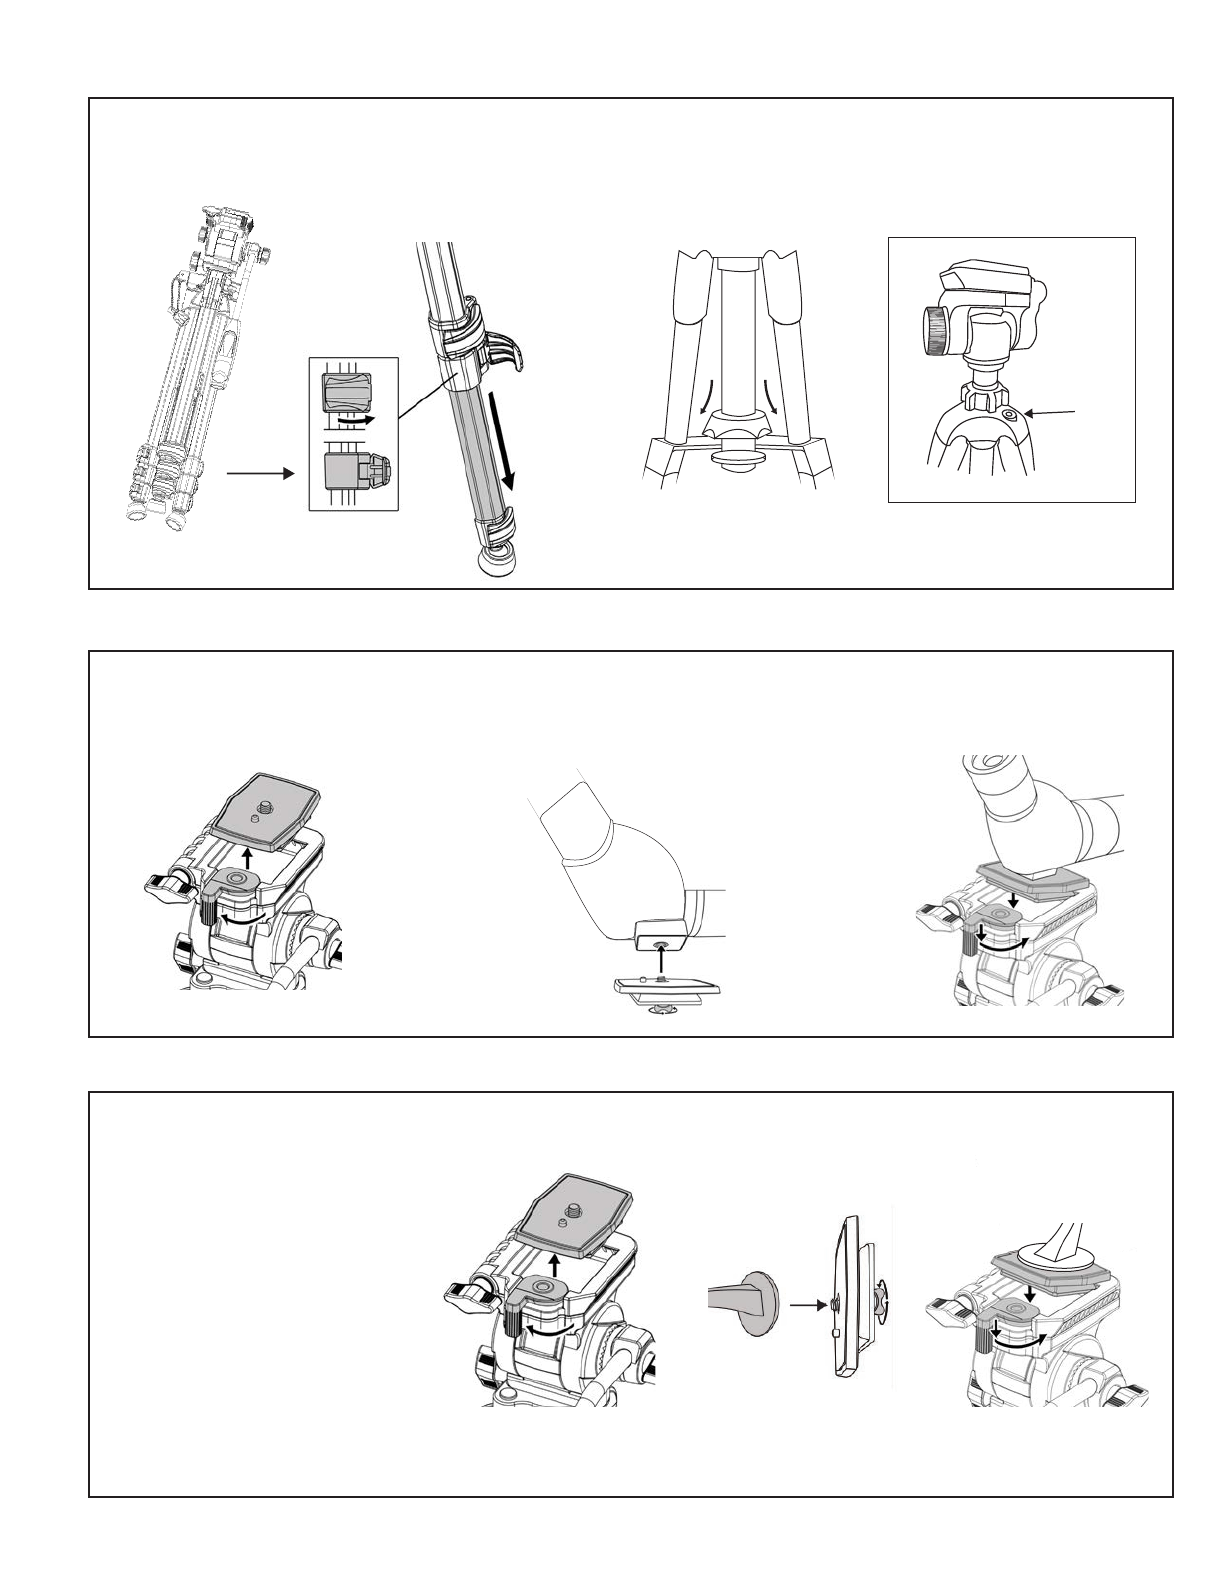
manuals.online logo
Brands
  1. Home
  2. •
  3. Brands
  4. •
  5. Carson
  6. •
  7. Camera Accessories
  8. •
  9. Carson TR-100 User manual

Carson TR-100 User manual


CARSON
®
QUICK
RELEASE
PLATE
PAN
LOCKING
KNOB
TR-100
3FNPWJOH0QUJD'SPN5SJQPE
The Rock Tripod
with 3-Way Fluid Panhead
Congratulations on selecting your new Tripod! In order to achieve optimum
performance, please follow instructions for proper use and care.
PRODUCT SPECIFICATION:
Head Type: 3-Way Fluid Panhead
Leg Sections: 3
Maximum Height: 20.8”
Maximum Tube Diameter: 20.5mm
Maximum Load: 5.5 lbs.
Features: Bubble Level, Quick Release Plate, Non-Slip Rubber Feet,
and Carrying Case
TR-100 PANHEAD DIAGRAM:
MOUNTING SCREW
IMPORTANT:
• Do not exceed maximum load capacity
of the tripod.
• Do not mount optic to tripod until all
legs are securely locked, level and
stabilized.
• Make sure all panhead locks are
tightened securely before mounting
any optic.
• Do not overtighten locks as this may
damage the locking mechanisms.
• Make sure optic is securely fastened to
quick release plate before mounting to
tripod.
• Do not carry the tripod by the panhead.
• Remove optic before adjusting or
transporting your tripod.
• Always store tripod in carrying case
when not in use.
˜°˛˝˙ˆˇ˘ˇ˘ˇ
˜°˛˝˙ˆ˛ˇ˘ˇˇˇ˛˝˛ˆˇ ˛ˇˇ˛˙˛ˆ˛˛ˇ˛˛ˇ˛˝˛˙˛ˇ˛˝˙ˆ
°˙ ˙˙ ˆˆ˙ ˙˙ ˇˆˆ˙ ˙˙
˙˘˘˘˝  ˙˘ˆ˝˙˛˝ ˘˛˙˙ˆ˘˘˝
www.carson.com
Carson Optical 2070 5th Avenue, Ronkonkoma, NY 11779 | Tel: 631-963-5000
1
1
SETTING UP TRIPOD:
1. Flip open leg locks and extend legs to desired
height. Close leg locks to lock in place (Fig. 1).
Fig. 1
2. To make sure tripod is level, the bubble level should
appear centered inside red circle. Adjust leg height as
needed to level tripod (Fig. 2).
Bubble Level
Fig. 2
ATTACHING CAMERA OR SPOTTING SCOPE:
1. Pull back plate locking lever
to remove quick release plate
(Fig. 3). Fig. 3
2. Insert mounting screw into thread on optic
and turn wingnut (located on underside of
quick release plate) clockwise until tight.
This will secure optic to plate (Fig. 4).
3. Reattach quick release plate to
Fig. 4 Fig. 5
ATTACHING BINOCULARS:
PLEASE NOTE: To attach your full sized
binoculars to a tripod, you will need a
tripod binocular adapter (not included).
1. Pull back plate locking lever to remove
quick release plate (Fig.6).
2. Insert mounting screw into thread on
adapter and turn wingnut (located on
underside of quick release plate)
clockwise until tight.This will secure
adapter to plate (Fig. 7).
3. Reattach quick release plate to
tripod head. Press down plate and
lever will shift into place and lock
(Fig. 8).
4. Attach binocular to adapter.
Fig. 6
Fig. 8
Fig. 7
2
tripod head. Press down plate and
lever will shift into place and lock
(Fig. 5).
USING TRIPOD:
1.To adjust center column
height, twist locking ring
counterclockwise to unlock.
Raise center column as
needed.Tighten locking ring
to secure (Fig. 9).
2.To tilt panhead up or down,
twist tilt/pan handle counter-
clockwise to loosen.Raise
or lower tilt/pan handle to
desired angle.Tighten
handle to lock in place
(Fig. 10).
Note:To keep level, raise or
lower Tilt/Pan Handle until
the bubble inside the bubble
level is in middle of tube.
Fig. 10
Bubble
Level
4.To switch between
landscape and portrait
mode, loosen horizontal tilt
locking knob by turning
counterclockwise.Tilt optic
to desired angle.Tighten
knob to lock in place
(Fig. 12).
Fig. 12
REMOVING OPTIC & STORING TRIPOD:
1.While holding optic securely, pull out plate locking
lever and lift optic upward to remove from tripod. Unscrew
quick release plate from optic and replace plate on tripod
(Fig. 13).
2.To put tripod away, loosen tripod center column collar.
Fold legs inward and unlock leg locks to retract.Tilt
head back so handle is parallel to legs.Secure all locks
and place in carrying bag (Fig. 14).
4UPXJOH:PVS5SJQPE
Pan
Locking
Knob
Fig. 13 Fig. 14
3
Center Column
Locking Ring
Fig. 9
Tilt/Pan
Handle
3.To adjust pan angle, loosen
pan locking knob by turning
counterclockwise.Turn tilt/pan
handle right or left as desired.
Tighten knob to lock in place
(Fig. 11).
Fig. 11

Other Carson Camera Accessories manuals

Carson BOAPOD TR-050 User manual

Carson

Carson BOAPOD TR-050 User manual

Carson TR-400 User manual

Carson

Carson TR-400 User manual

Carson BoaPod TR-050 User manual

Carson

Carson BoaPod TR-050 User manual

Carson Rock Tripod User manual

Carson

Carson Rock Tripod User manual

Popular Camera Accessories manuals by other brands

Aigis Mechtronics MT9213 Installation and operating instructions

Aigis Mechtronics

Aigis Mechtronics MT9213 Installation and operating instructions

ARRI MAXIMA user manual

ARRI

ARRI MAXIMA user manual

enphase ENCHARGE-3-1P-NA Quick install guide

enphase

enphase ENCHARGE-3-1P-NA Quick install guide

Sony XCHR70 Dimensions

Sony

Sony XCHR70 Dimensions

Airborne Projects DROTAG quick start guide

Airborne Projects

Airborne Projects DROTAG quick start guide

Philips LR6PS16C Specification sheet

Philips

Philips LR6PS16C Specification sheet

Sevenoak LevelCam Mini SK-W02N quick start guide

Sevenoak

Sevenoak LevelCam Mini SK-W02N quick start guide

Kenko Variable NDX manual

Kenko

Kenko Variable NDX manual

UPG Consumer Battery Solutions brochure

UPG

UPG Consumer Battery Solutions brochure

Fullwat LIR17500-12 manual

Fullwat

Fullwat LIR17500-12 manual

EVBIKE EVBAT36V16AH-F Installation and operating instructions

EVBIKE

EVBIKE EVBAT36V16AH-F Installation and operating instructions

GREMSY H3 user manual

GREMSY

GREMSY H3 user manual

Image Engineering iQ-Monopod Assembly instructions

Image Engineering

Image Engineering iQ-Monopod Assembly instructions

Powerfix Profi 280231 Operation and safety notes

Powerfix Profi

Powerfix Profi 280231 Operation and safety notes

EZ FX EZ Head RPT 25 Setup instructions

EZ FX

EZ FX EZ Head RPT 25 Setup instructions

Southwire 41210S operating instructions

Southwire

Southwire 41210S operating instructions

CANBAT TECHNOLOGIES LiFePO4 user manual

CANBAT TECHNOLOGIES

CANBAT TECHNOLOGIES LiFePO4 user manual

Silvestri Bicam III user manual

Silvestri

Silvestri Bicam III user manual

manuals.online logo
manuals.online logoBrands
  • About & Mission
  • Contact us
  • Privacy Policy
  • Terms and Conditions

Copyright 2025 Manuals.Online. All Rights Reserved.