Casa Gourmet Gold Cup Installation instructions

Original
Operating Manual
Coffee Maker
Gourmet Gold Cup (11851)

2
USA Branch
CASO Design USA LLC
info@CasoDesignUSA.com
www.CasoDesignUSA.com
T.: 908.604.0677
Document-Number: 11851 09-29-2021
Printing and typographical errors reserved.
© 2021 CASO Design USA LLC
1Operating Manual ..................................................................................4
1.1 General ................................................................................................................................. 4
1.2 Information in this manual .................................................................................................. 4
1.3 Warning notices................................................................................................................... 4
1.4 Limitation of liability ............................................................................................................ 5
1.5 Copyright protection ........................................................................................................... 5

3
2Safety .....................................................................................................5
2.1 Intended use......................................................................................................................... 5
2.2 General Safety information ................................................................................................. 6
2.3 Sources of danger ............................................................................................................... 7
2.3.1 Danger of burns ......................................................................................................7
2.3.2 Risk of injury............................................................................................................7
2.3.3 Dangers due to electrical power..............................................................................7
3Commissioning......................................................................................7
3.1 Safety information ............................................................................................................... 8
3.2 Delivery scope and transport inspection ........................................................................... 8
3.3 Unpacking ............................................................................................................................ 8
3.4 Disposal of the packaging................................................................................................... 8
3.5 Setup location requirements............................................................................................... 8
3.6 Electrical connection........................................................................................................... 9
3.7 Warning notices................................................................................................................... 9
3.8 Rating plate .......................................................................................................................... 9
4Design and Function .............................................................................9
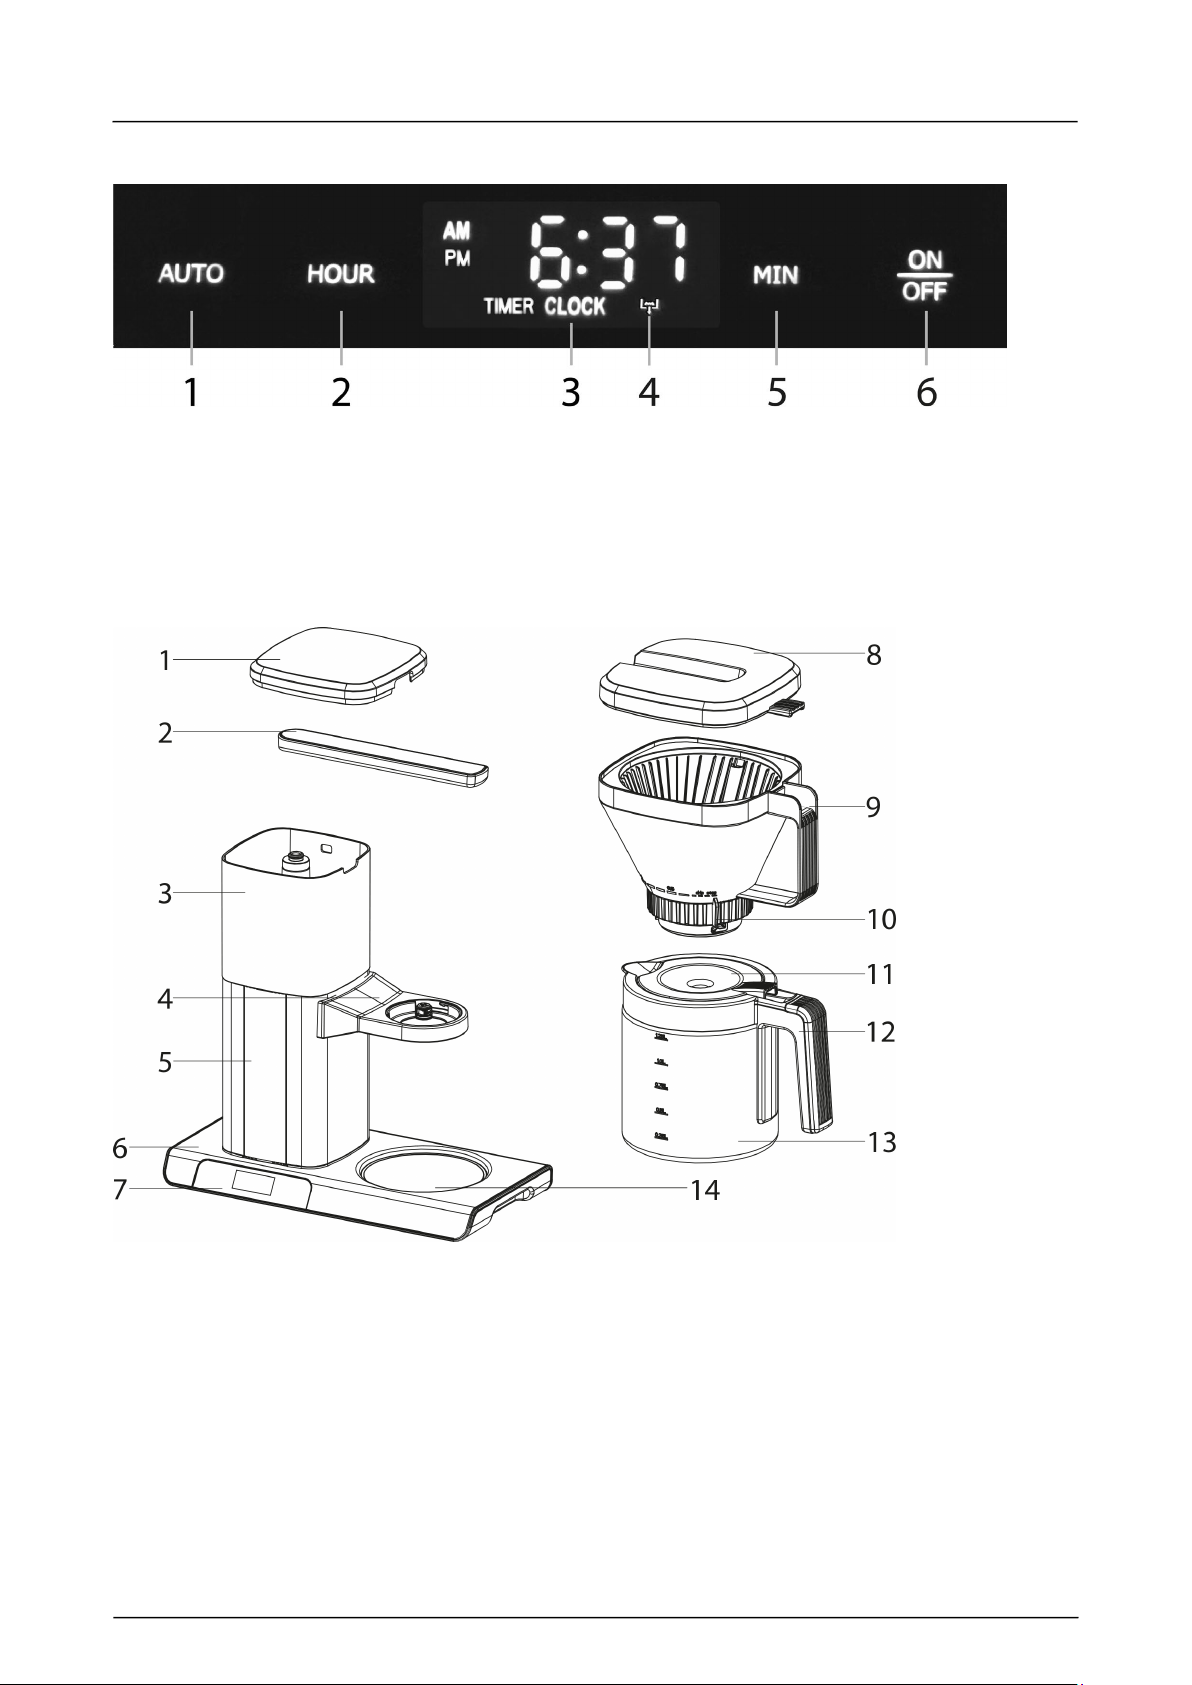
4.1 Display and Panel .............................................................................................................. 10
4.2 Making Coffee .................................................................................................................... 11
4.2.1 Before first use......................................................................................................11
4.2.2 Preparations..........................................................................................................11
4.2.3 Setting the clock....................................................................................................11
4.2.4 Dripping time – Brewing strength ..........................................................................12
4.2.5 Brewing coffee ......................................................................................................12
4.2.6 AUTO Start Function.............................................................................................13
4.2.7 Coffee jug or other coffee containers ....................................................................13
5Cleaning and Maintenance .................................................................14
5.1 Safety information ............................................................................................................. 14
5.2 Cleaning ............................................................................................................................. 14
5.3 Descaling............................................................................................................................ 15
6Troubleshooting ..................................................................................15
6.1 Safety notices .................................................................................................................... 15
6.2 Causes and rectification of faults..................................................................................... 16
7Disposal of the Old Device .................................................................16
8Guarantee.............................................................................................17
9Technical Data .....................................................................................17

4
1 Operating Manual
1.1 General
Please read the information contained herein so that you can become familiar with your device
quickly and take advantage of the full scope of its functions.
Your Gourmet Gold Cup will serve you for many years if you handle it and care for it properly.
We wish you a lot of pleasure in using it!
1.2 Information in this manual
These Operating Instructions are a component of the Gourmet Gold Cup (referred to hereafter
as the device) and provide you with important information for the initial commissioning, safety,
intended use and care of the device. The Operating Instructions must be available at all times
at the device. This Operating Manual must be read and applied by every person who is
instructed to work with the device: •Commissioning •Operation
•Troubleshooting and/or •Cleaning
Keep the Operating Manual in a safe place and pass it on to the subsequent owner along with
the device.
1.3 Warning notices
The following warning notices are used in the Operating Manual concerned here.
Danger
A warning notice of this level of danger indicates a potentially dangerous situation.
If the dangerous situation is not avoided, this can lead to death or serious injuries.
►Observe the instructions in this warning notice in order to avoid the danger of death or
serious personal injuries.
Warning
A warning notice of this level of danger indicates a possible dangerous situation.
If the dangerous situation is not avoided, this can lead to serious injuries.
►Observe the instructions in this warning notice in order to avoid the personal injuries.
Attention
A warning notice of this level of danger indicates a possible dangerous situation.
If the dangerous situation is not avoided, this can lead to slight or moderate injuries.
►Observe the instructions in this warning notice in order to avoid the personal injuries.
Please note
A notice of this kind indicates additional information, which will simplify the handling of the
device.

5
1.4 Limitation of liability
All the technical information, data and notices with regard to the installation, operation and
care are completely up-to-date at the time of printing and are compiled to the best of our
knowledge and belief, taking our past experience and findings into consideration.
No claims can be derived from the information provided, the illustrations or descriptions in this
manual. The manufacturer does not assume any liability for damages arising as a result of the
following:
•Non-observance of the manual •Uses for non-intended purposes
•Improper repairs •Technical alterations, modifications of the device
•Use of unauthorized spare parts
Modifications of the device are not recommended and are not covered by the guarantee.
All translations are carried out to the best of our knowledge. We do not assume any liability for
translation errors, not even if the translation was carried out by us or on our instructions. The
original German text remains solely binding.
1.5 Copyright protection
This document is copyright protected. CASO Design USA LLC reserves all the rights, including
those for photomechanical reproduction, duplication and distribution using special processes
(e.g. data processing, data carriers, data networks), even partially. Subject to content and
technical changes.
2 Safety
This chapter provides you with important safety notices. Improper use can result in personal or
property damages.
2.1 Intended use
This device is only intended for use in households in enclosed spaces for cooking/brewing of
coffee. This device is intended for use in the household and for similar applications such as:
•in kitchens for employees in shops, offices, and other commercial areas;
•by customers in hotels, motels and other residential establishments;
•in B&Bs,
•in agricultural estates.
Uses for a different purpose or for a purpose which exceeds this description are considered
incompatible with the intended or designated use.
Warning
Danger due to unintended use! Dangers can emanate from the device if it is used for an
unintended use and/or a different kind of use.
►Use the device exclusively for its intended use.
►Observe the procedural methods described in this Operating Manual.
Claims of all kinds due to damages resulting from unintended uses are excluded. The User
bears the sole risk.

6
2.2 General Safety information
Please note
Please observe the following general safety notices with regard to the safe handling of
the device.
►Read all these instructions before using the device.
►Children are not allowed to play with the device. The device and its connecting cable must
be kept away from children.
►The device may be used by individuals with reduced physical, sensory or mental
capabilities or a lack of experience and / or knowledge of their use if they are supervised or
have been instructed at to the safe use of the device and have understood the resulting
hazards.
►Cleaning and maintenance by the user must not be performed by children.
►Examine the device for any visible external damages prior to using it. Never put a damaged
device into operation.
►If the power cable or plug are damaged, then they must be replaced by the manufacturer or
its service agent in order to avoid a hazard.
►Do not leave the device unsupervised when it is in operation.
►Do not operate the device if it is empty. This could damage the device.
►Never fill the water tank beyond top mark.
►Use the device exclusively for brewing coffee. Do not fill any other liquids than water or
ground coffee in the device.
►Do not leave the power cord hanging within children's reach.
►The power cord must never be near or in contact with the hot parts of the machine, near a
source of heat or over a sharp edge.
►For your own safety, only use manufacturer accessories and spare parts suited to your
machine.
►Do not disconnect the plug from the socket by pulling on the cord.
►Do not use the coffeepot on an open flame or on electric cooker plates.
►Do not add water in the device when it is still hot.
►Always keep the lid closed when the coffee maker is operating.
►Never use the coffeepot without the lid.
►Only customer service departments authorized by the manufacturer may carry out repairs
on the device, as otherwise the guarantee entitlements will be null and void in the event of
any subsequent damages. Improperly performed repairs can cause considerable dangers
for the user.
►Defective components must always be replaced with original replacement parts. Only such
parts will guarantee that the safety requirements are fulfilled.
►Never leave the empty coffee jug on the warming plate otherwise it is liable to crack.

7
2.3 Sources of danger
2.3.1 Danger of burns
Warning
The water, heated in this coffee maker, the water tank as well as the warming plate,
become very hot. Please observe the following safety notices in order not to burn or
scald yourself or others.
►During brewing of coffee the water tank, warming plate, coffeepot and filterholder with
filter will become hot!
►Hot steam can escape.
►The device may still be hot after use due to residual heat.
►Let the device cool down before attaching or removing parts and before cleaning it.
►Please always test the temperature of the coffee, before drinking.
►The lid must always remain closed during brewing of coffee.
2.3.2 Risk of injury
Warning
There may be a risk of injury.
►The coffeepot is made of glass. Glass breakage can result in sharp and fierce edges.
There is a risk of injury.
►Do not use the coffee pot if it is damaged.
2.3.3 Dangers due to electrical power
Danger Mortal danger due to electrical power!
Mortal danger exists when coming into contact with live wires or subassemblies!
Observe the following safety notices to avoid dangers due to electrical power:
►Do not operate this device if it has a damaged cable or plug, if it is not working properly
or if it has been damaged or dropped. If the power cable or plug are damaged, then
they must be replaced by the manufacturer or its service agent in order to avoid a
hazard.
►Do not open the housing on the device under any circumstances. There is a danger of
an electrical shock if live connections are touched and the electrical or mechanical
structure is altered. In addition, functional faults on the device can also occur.
►Do not put the machine, power cord or plug in water or any other liquid.
►Be careful and avoid water spillage on the plug.
►Pull out the mains plug before cleaning the device.
3 Commissioning
This chapter provides you with important safety notices during the initial commissioning of the
device. Observe the following notices to avoid dangers and damages:

8
3.1 Safety information
Warning
Personal and property damages can occur during commissioning of the device!
Observe the following safety notice to avoid such dangers:
►Packaging materials may not be used for playing. There is a danger of suffocation.
3.2 Delivery scope and transport inspection
As a rule, the Gourmet Gold Cup is delivered with the following components:
•Gourmet Gold Cup •Coffee jug •Filterholder with gold tone filter
•Coffee spoon •Operating instructions
Please note
►Examine the shipment for its completeness and for any visible damages.
►Immediately notify the carrier, the insurance and the supplier about any incomplete
shipment or damages as a result of inadequate packaging or due to transportation.
3.3 Unpacking
To unpack the device, proceed as follows:
•Remove the device out of the carton and remove the packaging material.
3.4 Disposal of the packaging
Caso believes in the importance of recycling and has selected packaging materials
that not only protect your unit from damage during transit, but can be recycled to
minimize any ecological impact. Recycling the packaging materials preserves raw
materials and reduces waste. Take any packaging materials that are no longer
required to a recycling collection point for proper disposal.
Please note
►If possible, keep the original packaging for the device for the duration of the guarantee
period of the device, in order that the device can be re-packaged properly in the event
of a guarantee claim.
3.5 Setup location requirements
In order to ensure the safe and trouble-free operation of the device, the setup location must
fulfil the following prerequisites:
•Only use this coffee maker on a flat, stable, heat-resistant surface away from water
splashes and any heat sources.
•Choose the setup location in such a way that children cannot reach any hot surfaces on the
device.
•Do not operate the device under delicate furniture as the escaping steam could damage
them.

9
•Do not set up the device in a hot, wet or extremely damp environment or near flammable
material.
•The electrical socket must be easily accessible so that the power lead can be disconnected
easily, in the case of an emergency.
•The installation and assembly of this device in non-stationary setup locations (e.g. on ships)
must be carried out by specialist companies / electricians, provided they guarantee the
prerequisites for the safe use of this device.
3.6 Electrical connection
In order to ensure the safe and trouble-free operation of the device, the following instructions
must be observed for the electrical connection:
•Before connecting the device, compare the connection data (voltage and frequency) on the
rating plate with those of your electrical network. This data must agree in order that no
damages occur in the device. If in doubt, ask your qualified electrician.
•Make sure that the power cable is undamaged and has not been installed under the device
or over hot or sharp surfaces.
•The electrical outlet must be protected by a 16A safety cut-out switch.
•The electrical safety of the device is only guaranteed if the device is connected to a properly
installed protective conductor system. If in doubt, have the house installation checked over
by a qualified electrician. The manufacturer cannot be made responsible for damages that
are caused by a missing or damaged protective conductor.
3.7 Warning notices
Attention
Danger due to hot surface!
►Do not touch the hot surfaces of the device. Danger of burns!
►Do not set or lay any items on the device.
3.8 Rating plate
The rating plate with the connection and performance data can be founded on the bottom of
the unit.
4 Design and Function
This chapter provides you with important safety notices on the design and function of the
device.
Warning
►Do not leave the device unsupervised when it is in operation, so that you can intervene
quickly in the event of dangers.
►Operate the device only with placed filter holder.
►Only operate the device with the lid of the coffee pot closed.

10
4.1 Display and Panel
1. AUTO start mode
2. Setting the hour
3. Time LCD display with AM/PM
4. Descaling mode
5. Setting the minutes
6. Turn on/off the device;
Start the brewing process
1. Water tank cover
2. Sprayer
3. Water tank
4. Filter holder
insert
5. Main housing
6. Base
7. Control panel
8. Filter holder lid
9. Filter holder
10.Strength control
valve
11. Jug lid
12. Jug handle
13. Coffee jug
14. Warming plate

11
4.2 Making Coffee
Warning
►Warning symbol: hot steam.
►Caution hot steam can escape at device. Risk of burns.
4.2.1 Before first use
Clean the device as described under "Cleaning and Maintenance".
Carry out a brewing process without ground coffee to clean the device. Therefore, follow the
instructions under “Preparations” and “Brewing coffee”. Set the dripping time to 1.2.
4.2.2 Preparations
1. Depending on how many cups of coffee you want to prepare, fill the desired amount of
fresh, cold water into the water tank. Make sure that the sprayer is assembled correctly.
Close the water tank cover
2. Place the coffee jug on the warming plate under the drip protection. Pay attention that the
center line of the filterholder aligns with that of the coffee jug.
3. Put the gold tone filter into the filter holder. Fill the desired amount of ground coffee into the
filter, depending on how many cups of coffee you want to prepare.
4. Place the filter holder with the filter in the insert. Turn the filter holder clockwise, so that it’s
locked correctly. Close the filter holder lid.
5. Set your desired brewing strength with the strength control valve.
6. Insert the power plug.
7. Press the ON – OFF button, the device turns on.
8. CLOCK is flashing 5 times. Set the clock.
Please note
►We recommend using 55g of coffee powder for 1L of water.
►Do not fill too much ground coffee into the filter, otherwise the coffee grounds could
overflow.
►If the water tank is empty, the ON – OFF button will flash in white and the device can’t
be operated.
►Never fill the water tank beyond top mark.
►Do not fill hot water into the water tank.
4.2.3 Setting the clock
After plugging in the device, the ON – OFF button will light up. Press the ON – OFF button.
The display lights up and CLOCK will flash 5 times. You can press HOUR and MIN to set the
time.
As soon as CLOCK lights up constantly, the time is confirmed and you can start the operation.
You can either wait until it stops flashing or press ON – OFF to stop the flashing in advance.
You can always change the time with the MIN and HOUR button during operating mode /
when no function has started. The set time saves automatically.

12
4.2.4 Dripping time – Brewing strength
The dripping time can be adjusted with the strength
control valve. Set your preferred dripping time before
you start the process.
Faster dripping – shorter brewing time
The taste is less intense
Slower dripping – longer brewing time
The taste is more intense
The dripping is paused. You can close the drip stop to:
•prevent liquid from dripping onto the hot plate after brewing
•shortly pause the brewing process, serve some coffee and then continue dripping/brewing
(turn the control valve back to the previously set brewing time)
Attention
►The max. duration of drip stop during the process is 30 sec. If this time is exceeded, hot
water could flow over, as the water still gets out of the sprayer!
►Close the strength control valve tightly, so that no hot coffee can drip on the warming
plate.
►When opening the drip stop, turn on the strength control valve slightly, so that no hot
liquids can splash through the valve.
4.2.5 Brewing coffee
1. Complete the "Preparations".
2. To start the brewing process, press the ON – OFF button. During the brewing process it
lights up in red constantly.
3. When the brewing process has finished, the device switches into KEEP WARM mode. The
warming plate is heated for another 120 minutes to keep the coffee warm. During to whole
KEEP WARM process, the ON – OFF button flashes in red.
4. You can remove the coffee jug after the brewing process is finished and KEEP WARM has
started. Before you take out the coffee jug, turn the strength control valve to “Drip stop”.
Please note
►You can stop the brewing process at any time with the ON – OFF button. The red LED
turns white.
►To end the KEEP WARM process, press the ON – OFF button. The red flashing LED
turns off and the whole display lights up in white.
►To switch off the device, press ON – OFF for 3 seconds. Switch off the device when you
have removed the last coffee from the coffee pot.
►The amount of brewed coffee may differ from the amount of water as coffee grounds
absorb different amounts of water depending on the amount and degree of grinding of
the coffee grounds.
►Wait a few minutes before brewing coffee again. Let the device cool down.

13
Warning
►Do not take out the sprayer, the filter holder and/or the coffee jug during brewing, or hot
water will splash. Danger of burns.
►The warming plate is hot during and after keep warm. Danger of burns.
►Do not touch the sprayer to avoid being burned during brewing.
►Do not place an empty coffee pot on the hot warming plate.
4.2.6 AUTO Start Function
You can preset a specific start time for the brewing process.
1. Complete the "Preparations".
2. Press AUTO button for 3 seconds. TIMER is flashing in the LCD display.
3. Press the HOUR button to set the desired starting hour.
4. Press the MIN button to set the desired starting minute.
5. Press the AUTO button to confirm the automatic start time, it will light up in red.
6. When the automatic start time is reached, the device will start to brew the coffee. The red
LED of the AUTO button will turn off and the ON – OFF button will light up in red.
Please note
►You can set the AUTO Function as long as TIMER is flashing. If TIMER stops flashing
and you have not confirmed the automatic start time yet, the device switches back to
the current time. Press the AUTO button again, to get back to the AUTO function
operating.
►You can cancel the AUTO Start Function by pressing the AUTO button.
►You may see the preset automatic start time by holding the AUTO button.
►To change the automatic start time, cancel the AUTO Start Function and
follow the steps 2-5 again.
4.2.7 Coffee jug or other coffee containers
The provided coffee jug is perfectly designed for the use with the Gourmet Gold cup and
ensures the best function and coffee result.
However, as the strength control valve is operated manually, the device can also be used with
another heat-resistant, suited jug (like coffee cup, porcelain jug etc.).
Choose a suitable jug that can hold the entire amount of water that is in the water tank. The
opening of the jug must be large enough to prevent the dripping coffee from splashing or
overflowing. The jug must fit on the hotplate.
If you place a jug on the warming plate, that can’t hold the entire amount of water from the
water tank, make sure to close the strength control valve in time. Then place another container
under the coffee outlet and continue the dripping. You can close the strength control valve to
fill several coffee cups in one brewing process.
Complete the other "Preparations". Start the brewing process.

14
Please note
►The taste of your coffee may vary, when you close the drip stop several times and pour
out the coffee into several cups.
Attention
►Always be very careful, when operating with the strength control valve and different
jugs, as there is an increased risk of getting burned.
►Don’t close the strength control valve for more than 30 seconds, as the hot coffee could
overflow from the filter holder.
►Your jug can become hot as it is placed on the hotplate.
5 Cleaning and Maintenance
This chapter provides you with important notices with regard to cleaning and maintaining the
device. Please observe the notices to prevent damages due to cleaning the device incorrectly
and to ensure trouble-free operation.
5.1 Safety information
Attention
Please observe the following safety notices, before you commence with cleaning the
device:
►The device must be cleaned at regular intervals and limescale should be removed.
►Pull out the mains plug before cleaning the device.
►The water tank, coffee pot and filter holder with filter are hot after their use. There is a
danger of burns! Wait until the device has cooled down.
►Do not use any aggressive or abrasive cleaning agents or solvents.
►Do not scrape off stubborn dirt with hard items.
5.2 Cleaning
Remove the detachable parts such as filter holder lid, filter holder, gold tone filter, water tank
lid and coffee jug for cleaning.
To remove the filter holder, firstly take off the filter holder lid and then turn the filter holder
counterclockwise to remove it. Take out the gold tone filter. Remove the coffee grounds from
the gold tone filter.
Clean the detachable parts in hot water after each use.
The device and the warming plate can be gently wiped with a soft, damp cloth. Never use
abrasive cleaner to clean it.
Dry all parts thoroughly. Replace all parts.
Water droplets may buildup in the area above the filter holder and drip onto the product base
during brewing. To control the dripping, wipe off the area with a clean, dry cloth after each use
of the product.

15
Warning
►Do not clean the device when it is hot.
►Never put the device in water or under running water.
►Be sure to unplug the device before cleaning. To protect against electrical shock do not
immerse cord, plug or device in water or liquid.
5.3 Descaling
Depending on the hardness of water you should descale the device once every month.
1. Fill the water tank with one quarter of household descaler and three quarters of water.
2. Put the coffee jug on the warming plate, pay attention that the center line of the filter holder
aligns with that of the coffee jug.
3. Plug in the mains plug and turn on the device with the ON – OFF button.
4. Press MIN and ON – OFF together for 3 seconds. and ON – OFF start flashing in the
LCD display and the descaling process starts.
5. The descaling process is finished when the mixture in the water tank had been brewed
completely. Pour it away.
6. Rinse by operating the appliance with clean water at least 3 times, until there is no
noticeable odor of descaler. Pour away the water.
Please note
►If needed descale also the gold tone filter.
►Regularly decalcifying of your device will reduce the electricity used and prolong the life
of the device.
►The guarantee excludes devices which have stopped working or do not work properly
due to lack of descaling.
6 Troubleshooting
This chapter provides you with important notices with regard to operating the device. Observe
the following notices to avoid dangers and damages.
6.1 Safety notices
Attention
►Only qualified electricians, who have been trained by the manufacturer, may carry out
any repairs on electrical equipment.
►Improperly performed repairs can cause considerable dangers for the user and
damages to the device.

16
6.2 Causes and rectification of faults
The following table assists in localizing and rectifying minor faults.
Problem Possible cause Possible solution
Coffee brews too
slowly (more than 10
minutes) or is not hot
enough
Device is calcified Descale the device regularly, look at
chapter descaling.
There is coffee
grounds in the coffee
pot
Device needs to be cleaned.
The paper filter is too small.
Too much coffee ground is used.
Clean the device (esepcially the drip-
stop valve).
Use the gold tone filter or paper filter in
size 1x4.
Use lee coffee ground.
Coffee has
accumulated in the
filter and coffee
grounds overflowed.
The coffee pot was not placed on
the warming plate for too long
time during the brewing process,
so that the filter could not empty.
Too much coffee ground is used.
Unplug the mains plug.
Place the coffee pot on the warming
plate so that the filter can empty.
Clean the device.
Use lee coffee ground.
The drip-stop does not
work
Residues of coffee at drip-stop Clean the valve (at the bottom of the
filter holder) under running water.
Water leaks from the
bottom of the device.
Device is defective. Unplug the mains plug.
Do not use the device anymore.
Contact the customer service.
Attention
►If you are unable to solve the problem with the steps shown above, please contact
Customer Service.
7 Disposal of the Old Device
Old electric and electronic devices frequently still contain valuable materials.
However, they also contain damaging substances, which were necessary for their
functionality and safety. If these were put in the non-recyclable waste or were
handled incorrectly, they could be detrimental to human health and the
environment. Therefore, do not put your old device into the non-recyclable waste
under any circumstances.
Please note
►Utilize the collection point, established in your town, to return and recycle old electric
and electronic devices. If necessary, contact your town hall, local refuse collection
service or your dealer for information.
►Ensure that your old device is stored safely away from children until it is taken away.

17
8 Guarantee
Caso USA WARRANTY
We provide a 12 month guarantee for this product, commencing from the date of sale, for
faults which are attributable to production or material faults.
Your legal guarantee entitlements in accordance with § 439 ff. BGB-E remain unaffected by
this. The guarantee does not include damages, which were incurred as a result of improper
handling or use, as well as malfunctions which only have a minor effect on the function or the
value of the device. Consumables, transit damages, inasmuch as we are not responsible for
these, as well as damages, which were incurred as a result of any repairs that were not
performed by us, are also excluded from the guarantee entitlements.
This device is designed for use in domestic situations and has the appropriate performance
levels. Any use in commercial situations is only covered under the guarantee to the extent that
it would be comparable with the stresses of being used in a domestic situation. It is not
intended for any additional, commercial use.
In the event of justified complaints, we will repair the faulty device at our discretion or replace it
with a comparable trouble-free device.
Any pending faults must be reported within 14 days of delivery.
All further claims are excluded.
To enforce a guarantee claim, please contact us prior to returning the device (always provide
us with proof of purchase) and after this contact, ship the unit back to Caso USA for repair or
replacement at our option.
Info@CasoDesignUSA.com
9 Technical Data
Device Electric coffee machine
Name Gourmet Gold Cup
Item No. 11851
Mains data 120V~ 60Hz
Power consumption 1475W
External measurements 14.33“ x 6.85“ x 13.58“
Capacity 40.58 oz / 1.2 L
Net weight 6.6 lbs

18
Manuel d'utilisation
original
Machine à café électrique
Gourmet Gold Cup (11851)

19
Succursale USA
CASO Design USA LLC
info@CasoDesignUSA.com
www.CasoDesignUSA.com
T. : 908.604.0677
Numéro de document : 11851 09-06-2021
Sous réserve d'erreurs d'impression et de typographie.
© 2021 CASO Design USA LLC
10 Manuel d'utilisation .............................................................................21
10.1 Généralités ......................................................................................................................... 21
10.2 Informations relatives à ce manuel .................................................................................. 21
10.3 Avis d'avertissement ......................................................................................................... 21
10.4 Limite de responsabilités .................................................................................................. 22
10.5 Protection intellectuelle..................................................................................................... 22

20
11 Sécurité ................................................................................................22
11.1 Utilisation conforme .......................................................................................................... 22
11.2 Consignes de sécurités générales ................................................................................... 23
11.3 Sources de danger............................................................................................................. 24
11.3.1 Danger de brûlures ...............................................................................................24
11.3.2 Risque de blessure ...............................................................................................24
11.3.3 Dangers du courant électrique ..............................................................................24
12 Mise en service....................................................................................25
12.1 Consignes de sécurité....................................................................................................... 25
12.2 Inventaire et contrôle de transport ................................................................................... 25
12.3 Déballage............................................................................................................................ 25
12.4 Elimination des emballages .............................................................................................. 25
12.5 Exigences pour l'emplacement d'utilisation .................................................................... 26
12.6 Raccordement électrique .................................................................................................. 26
12.7 Avertissements .................................................................................................................. 26
12.8 Plaque signalétique ........................................................................................................... 27
13 Conception et fonctionnement ...........................................................27
13.1 Affichage et panneau......................................................................................................... 27
13.2 Préparation du café ........................................................................................................... 28
13.2.1 Avant la première utilisation ..................................................................................28
13.2.2 Préparatifs.............................................................................................................28
13.2.3 Régler l’heure........................................................................................................29
13.2.4 Temps d’égouttage - Force d’infusion...................................................................29
13.2.5 Préparation du café...............................................................................................29
13.2.6 Fonction de démarrage automatique ....................................................................30
13.2.7 Cafetière ou autres récipients à café.....................................................................31
14 Nettoyage et entretien.........................................................................31
14.1 Consignes de sécurité....................................................................................................... 31
14.2 Nettoyage ........................................................................................................................... 32
14.3 Détartrage........................................................................................................................... 32
15 Dépannage ...........................................................................................32
15.1 Consignes de sécurité....................................................................................................... 33
15.2 Causes et rectification des défauts .................................................................................. 33
16 Elimination des appareils usés .........................................................33
17 Garantie................................................................................................34
18 Données techniques ...........................................................................34
This manual suits for next models
1
Table of contents
Languages: