Before
using
the
Digital
Diary
for
the
first
time...
oc...
1
Turning
Power
On
and
Off
.......ssssessssescssseeruescrsransuseneesennesonenssaee
3
About
the
EL
Dacklight
.......cc..cessecssenensenerssscssescerscessnnensroerseaee
3
Before
using
the
Digital
Diary...
......00ccccccscccssssssssssorsereceesees
8
INtrOduCTION
........-eesseeens
dedes
snes
sanespoeansnaattnsessessaceastevaernpecsarsneeses
8
Write
down
important
data
somewhere!
.......,.ccscverssesseeessscesves
8
IMpOrtant
Precautions
....csc.sececsencscscsepecrssesssessssensessecssaaetsceess
8
GetHING
Started
.....scssescsccccsecccessssesssssscesnesesnssererenesacsnsevsnsensneas
9
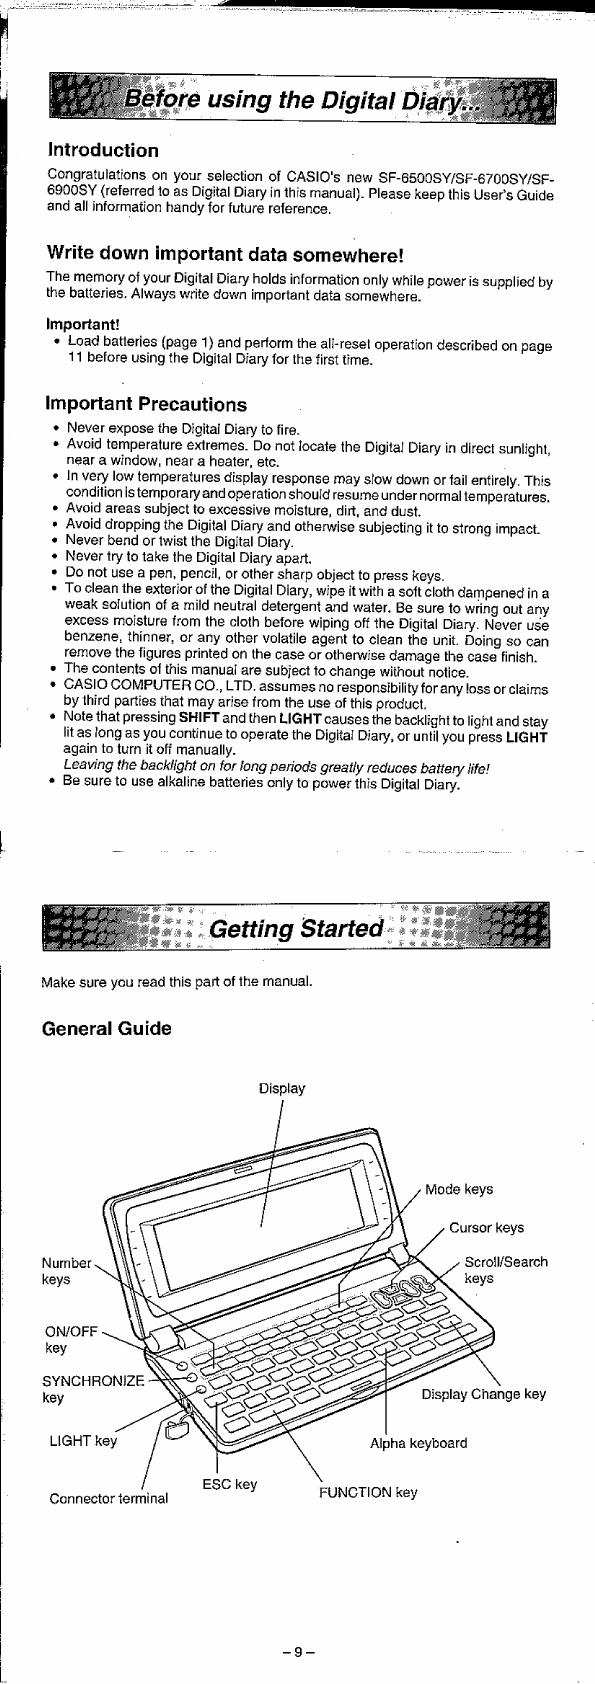
General
Guide
-
vue
Upaen
rags
canoes
canvaepeanssestveneacceesenensregenneneavenneesvannesne
9
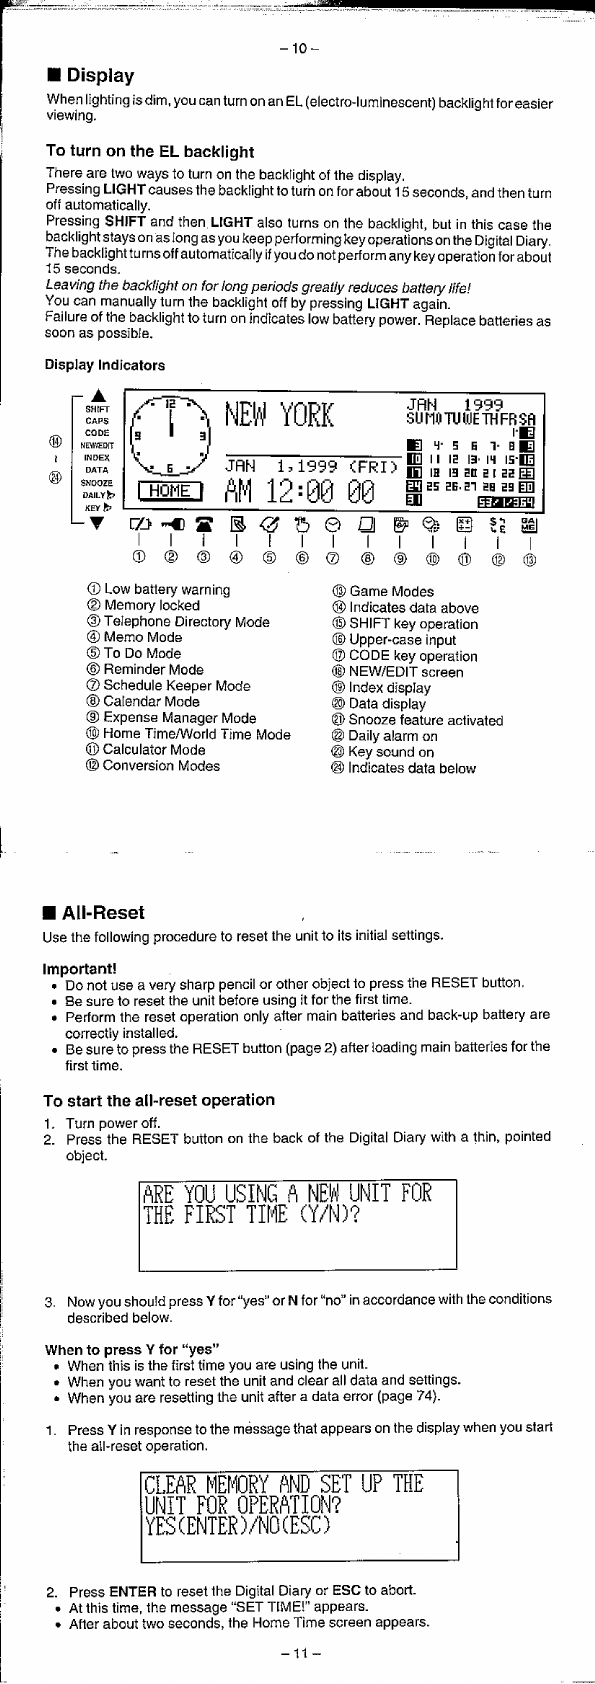
DiS
PAY
...scssssssscececsceesscessusnensonerscessscensscnsssgperspacaucancesecessenensnenaanenes
10
All-ROSOt
0...
eccccsessensnsecsecscessessnencusenensanessnensssenseuosesspessasennesenenses
11
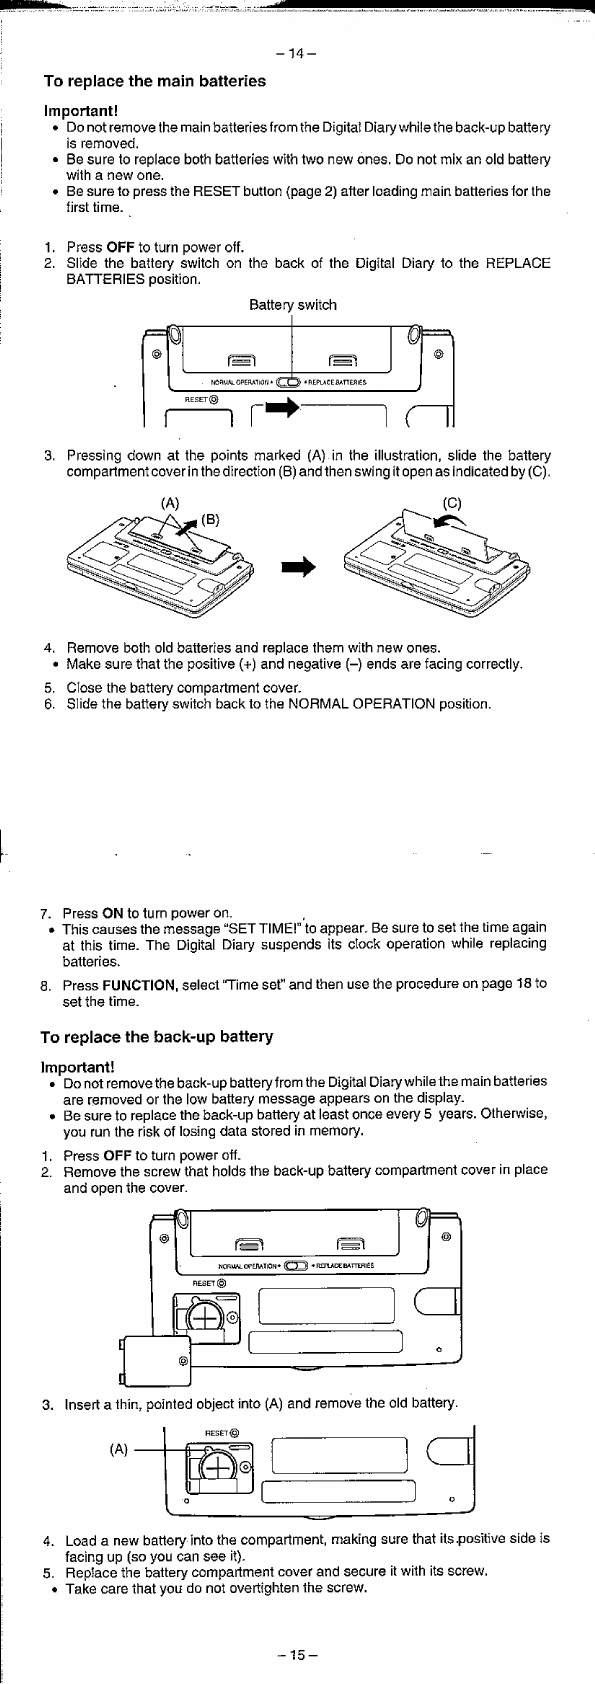
Power
SUpPplly
..........:cecsssnensensssceeesseessenersneattaceassoeeesasesseoesanensansas
12
Turning
Power
On
and
Off
.........cccusssssccsssssessscssrssversasescescesscees
16
FUNCTION
MOMUS
.........-.--sessenessescsscensscenssnensureacnecnenecnneseneerssentenass
16
SYSEOEM
LANQUAGE
....itccsseeesencesscesserenseensevensscneesecenasspentsonecerenceees
16
Display
Contrast
............:cccusssesscssscesscenssrssersenasscencsescessoneensenanten
17
Key
Input
SOU
0...
ccccecesecseececsesseenerscensssessnenscesessreaencnecesseeses
17
Destructive
Backspace
..........:cccccccsccescscsnseeeusenersecenseencrenennsenses
17
HOME
TIC
MOC
co
cccccscssesesenssvensssensseseccercecersensstnenstasorsneneents
78
Using
the
Daily
Alarim
........22..--:--cecssecssescescenseensesnesunreneeaceceneceees
19
World
THC
MOG
.......cssscccsssssssecercvessnscusnsnvsszecoececeaessannnsenes
21
ZOne
Information
Screen
........cscccscceesensescsvessseerseaceececeseeeceeesenas
22
Data
Bank
Operations..........
pened
aaennaneeneeeeeessencecsesssaaaurreenses
24
INPUTTING
TOXt
..,.....ceccerrseeeneeseeesneeeteeensennanseassnnnecsensannneetsnnsnenenay
24
Inpuiting
Dates
and
TIMES
....,..-...---eeseeeeeeeseceerneneesneneesessenenes
25
Display
Formats
..........
punsacenessoesaneagnensssenansoossucerscoceseseqteaaaneansnes
26
Telephone
Directory
MOG
.....cc.--cseccccersssstsesssennseneeennnnracs
27
RECOrd
SUMIMALY
»....ssesescetseeesteeseerstteetssenstarnsnesertreetensssentssettenenes
2D
MOM
MOC
....ccseccereceesseeeresccessenensnnerccorssanauascensesnaanensneenssaas
29
Record
SUMIMALSy
......ccccsessccecscertesesenesssennneeeseenesaaeerensssenensrsseats
29
Calendar
MOG
..sscccsecceccscseenerccncencsnnnnnenrsccsssaaaanennnenes
pearsasases
30
Maneuvering
Around
Calendar
..........:ceessesessensnesenneerteettees
30
Appointment
Markers
..........cseeesecsnnessssnessencaneeersteneerersnenes
31
Highlighting
Calendar
Dates
..........::scsesersenensenennnenenteennees
32
Working
Day
Count
...,....cecscesrecrseserseestsecnenentsseenaneasseenensesrenaynss
33
Weekly
Schedule
SCreen
........-scccsseseseessseeecstorseeeetereesstserssenenes
OD
SCHEAUIG
KOC
.0....2ceeveecsessecenenensneseensennenrrersrectansaanenecessenaes
34
Maneuvering
Around
Schedule
Keeper
Dates
..............-ee
34
Schedule
Alar
........:.ccsceeeeeeeeeeesesseesnnesaneusneeersseeneeenessatosneannetens
36
How
Schedule
Keeper
Data
is
Sorted
0...
eessssscesseseeseeeereeees
BE
Schedule
Type
Labels
and
ICONS
.......-..----sseseessnecennenerteenseees
37
Daily
Schedule
Screen
......cecccceeseneesnsnnenssensseneessssessssesnsnenes
38
FROMINGO)r
MOG
ou
.eecccccssssnnnneneessausacnenecennanerenneneeessnenaaanonsnenanys
39
Reminder
Alarms
.....c.cscccccssseorescessneceenssnenssernerassensessessssessssereres
AQ)
TO
DO
MOG
.0.....sssssvennrcssssacnsnonseessaaceneenneensrerenereccenristaaanenngey®
41
ReCOrd
SUMIMALPY
«0...
csrescescssseessnseessesensesnseensrnentnemannesesssenanseeenans
42
How
To
Do
Data
iS
SOrted
....-...--.cssssescsesesesearseenensnneanansereneneeens
43
Priority
ICOMS
.......sccsessecesessnsereeeetsscenceareneesanenesssnarrenaecsensesesonsyas
43