manuals.online logo
Brands
  1. Home
  2. •
  3. Brands
  4. •
  5. Casio
  6. •
  7. Watch
  8. •
  9. Casio 1590 Configuration guide

Casio 1590 Configuration guide

1590-1
AB
MEMO
P
1
2
FE
CD
Module No. 1590
MEMO
P
1
Voice Mode
•Press Cto change from mode to mode.After you perform an operation in any mode,
pressing Creturns to the Timekeeping Mode.
•In any mode, press Bto illuminate the display for about two seconds.
Timekeeping Mode
AB
MEMO
P
1
FE
CD
Alarm ModeTelememo Mode
MEMO
1
MEMO
1
MEMO
1
▲
▲
MEMO
1
▲
▲
Countdown Alarm ModeStopwatch Mode
▲
▲
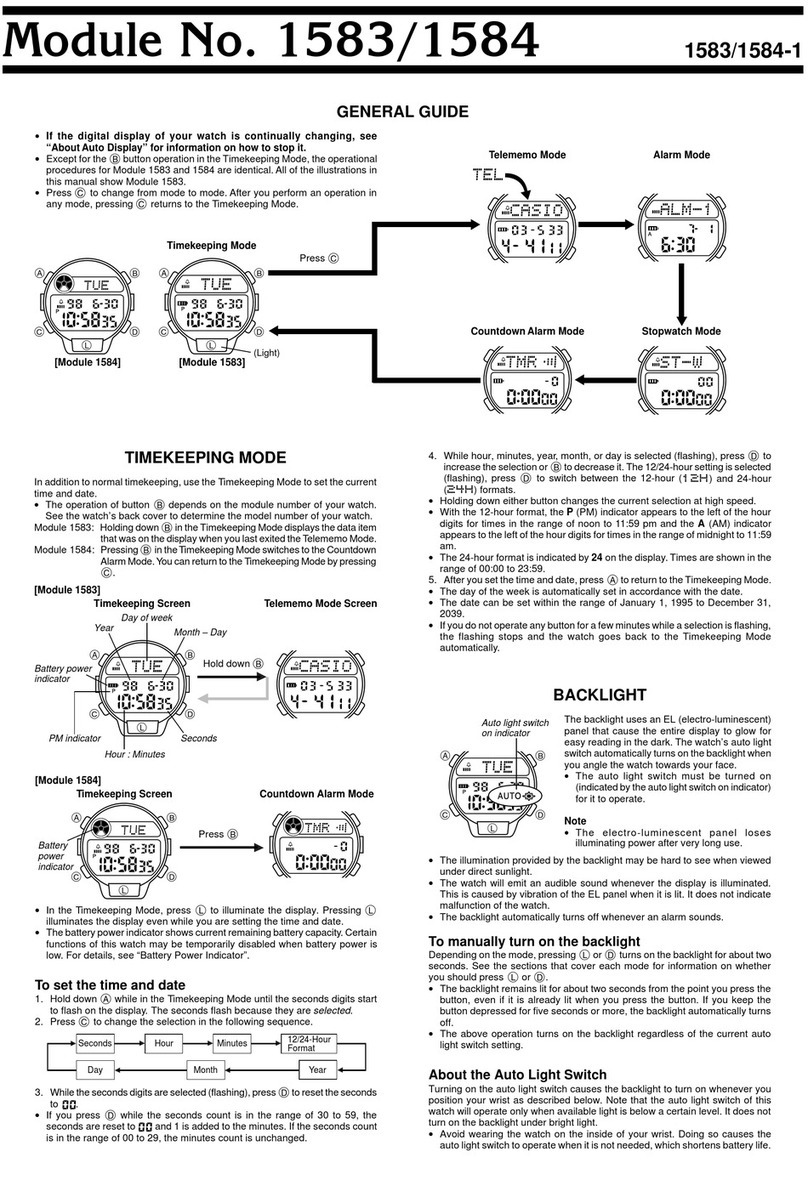
GENERAL GUIDE
TIMEKEEPING MODE
Use the Timekeeping Mode to set the time and date.
To set the time and date
1. Hold down Awhile in the Timekeeping Mode until the
seconds digits start to flash on the display. The seconds
flash because they are
selected
.
2. Press Cto change the selection in the following se-
quence.
Seconds Hour Minutes
Date Month Year
Day of week
AB
MEMO
P
1
FE
CD
Seconds
Hour : Minutes
Month – Date
Year
PM
indicator
3. While the seconds digits are selected (flashing), press Dto reset the seconds to 00.
If you press Dwhile the seconds count is in the range of 30 to 59, the seconds are
reset to 00 and 1 is added to the minutes. If the seconds count is in the range of 00
to 29, the minutes count is unchanged.
4. While any other digits (besides seconds) are selected (flashing), press Dto increase
the number or Bto decrease it. Holding down either button changes the current
selection at high speed.
•While any of the above digits are flashing, press Fto switch between the 12-hour and
24-hour formats.
•When the 12-hour format is selected, the indicator Pappears on the display to indicate
“p.m.”times.There isno indicatorfor “a.m.”times. Selectingthe 24-hourformat causes
the indicator 24 to appear on the display.
5. After you set the time and date, press Ato return to the Timekeeping Mode.
•The day of the week is automatically set in accordance with the date.
•The date can be set within the range of January 1, 1995 to December 31, 2039.
•If you do not operate any button for a few minutes while a selection is flashing, the
flashing stops and the watch goes back to the Timekeeping Mode automatically.
About the backlight
In any mode, press Bto illuminate the display for about two seconds.
•The backlight of the watch employs an electro-luminescent (EL) light, which loses
illuminating power after very long use.
•The illumination provided by the backlight may be hard to see when viewed under
direct sunlight.
•Thewatch will emitan audiblesound whenever thedisplay isilluminated.This is caused
by a transistor that vibrates when the EL panel lights up. It does not indicate malfunc-
tion of the watch.
•The backlight automatically turns off whenever an alarm sounds.
AB
MEMO
P
1
FE
CD
VOICE MODE
The Voice Mode lets you record and playback your voice or
other sounds. You can also clear recordings when you no
longer need them.
•The area number shows a value from 1to 5that indicates
the location of a recording and number of recordings cur-
rently in memory.
•The watch also has a built in speaker.
•If you do not operate any button for a few minutes while in
the Voice Mode, the watch automatically goes back to the
Timekeeping Mode.
Recording Duration
The watch has enough voice memory for up to 30 seconds
of sound data. You can make one recording 30 seconds
long, or up to five recordings that total up to 30 seconds.
Whenever you make a recording, the sound data is stored
together with the date and time that the recording operation
began.
Hour : Minutes
Microphone
Area number
Graphic display
Mode indicator
Month – Date
Important!
•You can also perform record, playback, and clear operations in theTimekeepingMode.
In the Timekeeping Mode voice memory contents can be played back in sequence
starting from the newest recording. In the Voice Mode, you can select a specific area
for playback.
•Total recording time is 30 seconds, and a full 30 seconds of recording are provided
when only a single recording is stored in voice memory.Afull 30 seconds of recording
may not be provided when more than one recording is stored in voice memory (due to
memory used up by memory partitioning).
AB
MEMO
P
1
2
FE
CD
Graphic display
Area number
2. Record the sound that you want.
•The message REC remains in the upper part of the display and the number of the
area being recorded to flashes while the record operation is in progress.
•Duringa recordingoperation, the graphicdisplay indicatesthe amountto voice memory
remaining.
3. To stop the record operation, press Eor F.
•When you stop the record operation, the message STOP appears on the display and
then the watch returns to the mode you were in when you started the record operation.
•It takes a moment for the record operation to stop after you press Eor F.
•The record operation stops automatically if voice memory becomes full.
To play back voice memory contents in sequence
1. In the Voice Mode or Timekeeping Mode, press Fto
play back the contents of the highest numbered voice
memory area (newest recording).
2. Each press of Fplays back the contents of each suc-
cessive voice memory area.
•Pressing Fafter area 1is played plays back the highest
numbered area again.
3. Press Eto stop playback.
To play back the contents of a specific voice memory area
1. In the Voice Mode, use Dto select the voice memory area you want.
•Each press of Dreduces the flashing area number by one. Numbers appear only for
voice memory areas that contain sound data.
2. Press Fto play back the contents of the selected voice memory area.
•Pressing Fagain plays back the contents of the previous voice memory area.
3. Press Eto stop playback.
About the Graphic Display
Thegraphic displayof the watchprovides youwith recordingtime information ata glance.
Each block ( ) in the graphic display represents 2.5 seconds.
•In any mode other than the Voice Mode, the graphic display indicates the total number
of seconds recorded in voice memory, as shown in the illustration on the left below.
The graphic display shown in this illustration indicates there is a total of 20 seconds of
data recorded in voice memory.
•In the Voice Mode, the graphic display shows the number of seconds recorded in the
currently selected voice memory area, as shown in the middle illustration below.
•During playback (in the Voice Mode or Timekeeping Mode), the graphic display shows
the number of seconds recorded in the voice memory area being played back, as
shown in the middle illustration below.
•Duringrecording (in the Voice Modeor Timekeeping Mode),the graphic display shows
the number of seconds of memory remaining, as shown in the illustration on the right
below. The graphic display shown in this illustration indicates there is a total of 10
seconds of voice memory remaining.
•Once voice memory is full, you will not be able to record any more until you clear all
existing data.
•It is always a good idea to check the number of recordings already in voice memory
and the voice memory’s remaining capacity before starting a new recording.
•Recordings may overlap slightly when more than one recording is stored in voice
memory. To avoid this problem, it is recommended that you pause slightly before start-
ing a recording that comes after an existing recording.
•All alarms (including the hourly time signal and Countdown Alarm) are temporarily
turnedoff while a recordingoperation isbeing performed.Anyalarm that occurs during
a recording operation will sound after the recording operation is complete.
•If playback produces a sound that is broken or unclear, try changing the distance
between the source of the sound and the microphone. Good results can normally be
obtained by speaking clearly in a normal voice with about 5cm (2 inches) between
your mouth and the microphone.
To record a sound 1. In the Voice Mode or Timekeeping Mode, hold down E
for about one second until the watch beeps.
•Release Eafter the watch beeps.
•Recordingsare storedin voice memoryareas insequence
starting from area 1.
•If voice memory is full or if there are already five record-
ings stored in voice memory, the message {FULL ap-
pears in the upper part of the display for about one sec-
ond after you press E.
1590-2
To clear voice memory contents
In the Voice Mode or Timekeeping Mode, hold down Dfor about three seconds until the
watch beeps.
•This operation clears all data in voice memory. Note that you cannot clear data in a
specific area.
•The message {CLEAR remains on the display for about four seconds as voice
memory contents are being cleared. You cannot perform a record operation while the
{CLEAR message is on the display.
•The watch returns to the mode you were in when you started the memory clear opera-
tion after all memory contents are cleared.
•If voice memory contents are being used for a voice alarm, the messages {CLEAR
and {ALARM alternate in the upper part of the display to indicate that the voice
alarm is also being cancelled.
AB
MEMO
1
FE
MEMO
1
CD
Remaining
memory
Name
TELEMEMO MODE
The Telememo Mode lets you store up to 30 pairs
of name and telephone number data. Data is au-
tomatically sorted based on the characters of the
name. You can recall data by scrolling through it
on the display.
•See the “CHARACTER LIST” for details on how
the watch sorts data.
•The data item on the display when you exit the
Telememo Mode appears first the next time you
enter the Telememo Mode.
•If you do not operate any button for a few min-
utes while in the Telememo Mode, the watch
automatically goes back to the Timekeeping
Mode.
Number of
telememo
items stored
Mode indicator
Telephone number
To input new Telememo data
1. In the Telememo Mode, press Dto display the new data
display.
•The new data display is the one that is blank (contains no
name and telephone number).
•If there is no Telememo data stored in memory yet, the
new data display appears as soon as you enter the
Telememo Mode.
2. Holddown Auntilthe flashing cursor appears inthe text
area.
3. Use Dand Bto change the character at the cursor
position in the text area. The character changes in the
following sequence.
[New Data Display]
AB
MEMO
1
FE
CD
Cursor
Text area
Number area
•Holding down either button changes the character at high speed.
4. When the character you want is at the cursor position, press Cto move the cursor to
the right.
5. Repeat the steps 3 and 4 until your text is complete.
•You can input up to eight characters in the text area.
6. After you input a name, use Cto move the cursor to the number area.
•The text area can hold up to eight characters. When the cursor is located at the eighth
space of the text area, moving the cursor to the right causes it to jump down to the first
digit in the number area. When the cursor is at the 12th digit of the number area,
moving it to the right causes it to jump back up to the first character of the text area.
7. Use Dand Bto change the character (hyphen, number, or space) at the cursor
position in the number area. The character changes in the following sequence.
•Holding down either button changes the character at high speed.
8. When the character you want is at the cursor position, press Cto move the cursor to
the right.
9. Repeat steps 7 and 8 until you complete number input.
•You can input up to 12 digits in the number area.
•After you input data, you can return to the new data display for input of more that by
pressing Eor F. Next, continue from step 3.
10.After inputting your data, press Ato store it and return to the Telememo Mode.
•When you press Ato store data, the message SORT appears on the display for a
few seconds.After the sort operation is complete, the normal Telememo Mode display
(without the cursor) appears.
•The text area of the display can show only six characters at a time, so longer text
scrolls continuously from right to left.
•If the message {FULL appears in the text area of the display, it means that memory
is full. To store more data, you will first have to delete some of the data stored in
memory.
•If you do not perform any button operation for a few minutes while the cursor is on the
display, the watch automatically returns to the normal Telememo Mode (without the
cursor).
(space) to to
Press B
Press D
(space)
0 to 9x
PressD
PressB
To recall Telememo data
In the Telememo Mode, press Fto scroll forward through stored data items or Eto
scroll in reverse.
•Holding down either button scrolls through the data at high speed.
To edit Telememo data items
1. In the Telememo Mode, scroll through the data items and display the one you want to
edit.
2. Hold down Auntil the flashing cursor appears in the text area.
3. Use Cto move the cursor to the character you want to change.
4. Use Band Dto change the character.
•For details on inputting characters, see “To input new Telememo data” (steps 3 for
name input and 7 for number).
5. After making thechanges that youwant, press Atostore it andreturn to theTelememo
Mode.
To delete Telememo data
1. In the Telememo Mode, scroll through the data items and display the one you want to
delete.
2. Hold down Auntil the flashing cursor appears in the text area.
3. Press Band Dat the same time to delete the data item.
•At this time the cursor appears in the text area, ready for input.
4. Input data or press Ato return to the Telememo Mode.
Continuously scrolls
Text area
Last letter of text
Separator (inserted automatically)
ALARM MODE
You can set five independent alarms with hour, minutes,
month, and date. When the alarm is on, the alarm sounds
at the preset time. Press any button to stop the alarm after
it starts to sound.
When the hourly time signal is on, the watch beeps every
hour on the hour.
•You can use voice memory contentsas youralarm sound.
•If you do not operate any button for a few minutes while in
theAlarm Mode, the watch automatically goes back to the
Timekeeping Mode.
AB
MEMO
1
FE
CD
Mode indicator
Alarm No.
Hour : Minutes
Alarm on indicator
Month – Date
Alarm Types
The types of alarm you get depends on the information you set.
•To set a Daily Alarm
Set the hour and minutes for the alarm time. Set xfor the month and xx for the date
(see step 4 under “To set alarms”). This type of setting causes the alarm to sound every
day at the time you set.
•To set a Date Alarm
Set the month, date, hour and minutes for the alarm time. This type of setting causes the
alarm to sound at the specific time, on the specific date you set.
•To set a 1-Month Alarm
Set the month, hour and minutes for the alarm time. Set xx for the date (see step 4
under “To set alarms”). This type of setting causes the alarm to sound every day at the
time you set, only during the month you set.
•To set a Monthly Alarm
Set the date, hour and minutes for the alarm time. Set xfor the month (see step 4 under
“To set alarms”). This type of setting causes the alarm to sound every month at the time
you set, on the date you set.
To set alarms
1. Press Dwhile in the Alarm Mode to selectAlarm 1 through Alarm 5.
2. After you select an alarm, hold down Auntil the hour digits flash on the display. The
hour digits flash because they are
selected
.
•At this time, the alarm is automatically turned on.
3. Press Cto change the selection in the following sequence.
Alarm 1 Alarm 2 Alarm 3 Alarm 4
Alarm 5Hourly Time Signal
Hour Minutes Month Date
4. Press Dto increase the selected digits and Bto decrease them. Holding down
either button changes the selection at high speed.
•To set an alarm that does not include a month (daily alarm, monthly alarm), set xfor
the month. Press Dor Buntil the xmark appears (between 12 and 1) while the
month digits are flashing.
•To set an alarm that does not include date (daily alarm, 1-month alarm), set xx for the
date. Press Dor Buntil the xx mark appears (between 31 and 1) while the date
digits are flashing.
•The format (12-hour and 24-hour) of the alarm time matches the format you select for
normal timekeeping.
•When setting the alarm time using the 12-hour format, take care to set the time cor-
rectly as morning (no indicator) or afternoon P.
5. After you set the alarm, press Ato return to the Alarm Mode.
1590-3
COUNTDOWN ALARM MODE
The countdown timer can be set within a range of 1 minute
to 24 hours. When the countdown reaches zero, an alarm
sounds for 10 seconds or until you press any button.
Note that you can also select auto repeat timing that auto-
matically restarts the countdown from the original value you
setwhenever zero isreached.This continues untilyoumanu-
ally stop the countdown.
•Note that the P(p.m. times) and 24 (24-hour format)
indicator (for the current time) does not appear in the
Countdown Alarm Mode.
•If you do not operate any button for a few minutes while in
theCountdownAlarmMode, thewatch automaticallygoes
back to the Timekeeping Mode.
AB
MEMO
1
FE
CD
Hours
Mode indicator
Minutes
Current time
Seconds
To set the countdown start time
1. Hold down Awhile in the Countdown Alarm Mode until the hours digit starts to flash
on the display. The hours digit flashes because it is
selected
.
2. Press Cto change the selection in the following sequence.
3. Press Dto increase the selected number or Bto decrease it. Holding down either
button changes the selection at high speed.
•To set the starting value of the countdown time to 24 hours, set 0:00.
4. After you set the countdown start time, press Ato return to the Countdown Alarm
Mode.
To use the countdown timer
1. Press Fwhile in the Countdown Alarm Mode to start the countdown timer.
2. Press Fagain to stop the countdown timer.
•You can continue countdown timer operation by pressing F.
3. Stop the timer and then press Eto reset the countdown time to its starting value.
•When the end of the countdown is reached and auto repeat timing is off, the alarm
sounds for 10 seconds or until you stop the alarm by pressing any button. Countdown
timing stops, and the countdown time is automatically reset to its starting value after
the alarm stops.
To switch auto repeat timing on and off
1. Hold down Awhile in the Countdown Alarm Mode until
the hours digit starts to flash on the display. The hours
digit flash because it is
selected
.
2. Press Fto switch auto repeat on and off.
3. Press Ato return to the Countdown Alarm Mode.
•When the end of the countdown is reached while auto
repeatis on,the alarmsounds, butthe countdownrestarts
from the beginning without stopping. You can stop the
countdown by pressing Fand manually reset to the start
time by pressing E.
Hours Minutes
Auto repeat on indicator
AB
MEMO
1
FE
CD
AB
MEMO
1
FE
CD
STOPWATCH MODE
The Stopwatch Mode lets you measure elapsed time, split
times, and two finishes. The range of the stopwatch is 23
hours, 59 minutes, 59.99 seconds.
(a) Elapsed time measurement
FF F F E
Start Stop Re-start Stop Clear
(b) Split time measurement
FE E F E
Start Split Split release Stop Clear
(c) Split time and 1st-2nd place times
FE F E E
Start Split Stop Split release Clear
Mode indicator
Hours
Minutes
1/100 second
J
J
J
J
JJ
J
J
J
First runner
finishes. Second runner
finishes. Record
time of first runner.
J
J
J
Record time of
second runner.
Seconds
To turn an Alarm and hourly time signal on and off
1. In the Alarm Mode, press Dto select an alarm or the hourly time signal.
2. When the alarm or hourly time signal you want to is selected, press Eto turn it on
and off.
•When an alarm is selected, each press of Echanges its setting in the following se-
quence:
Indicates standard alarm is on.
Indicates voice alarm is on.
Indicates hourly time signal is on.
•The standard alarm on indicator ( ), voice alarm on indicator ( ) and the hourly
time signal on indicator ( ) are shown on the display in all modes while these func-
tions are turned on.
•Turning on the voice alarm causes the contents of voice memory to be used as the
alarm sound.
To test the alarm
Hold down Fwhile in the Alarm Mode to sound the alarm.
•Holding down Fwhile one of the alarms (1 through 5) is displayed sounds the alarm
sound. Holding down Fwhile the hourly time signal is displayed sounds the hourly
time signal.
•Holding down Fwhile the voice alarm is turned on sounds the contents of the voice
alarm and a beep sound.
Voice Alarm Precautions
•To use the voice alarm, record a message, set the alarm, and turn on the voice alarm.
•You should use the voice memory of this watch either as a voice memo or as voice
alarm contents. The watch automatically use the standard beeper alarm whenever
there is nothing stored in voice memory. Deleting voice memory contents while the
voice alarm is turned on automatically switches to the standard beeper alarm.
•When the voice alarm is turned on, all voice memory contents are played back in
sequence, starting from the highest numbered voice memory area.
•Whenan alarmtime is reached while the voice alarm is turned on, the standard beeper
alarm sounds for about one second and then voice memory contents are played.
•The alarm operation (standard beeper alarm followed by voice memory contents) is
repeated for at least 20 seconds. If voice memory contents are 15 seconds long, for
example, the alarm operation takes a total of 16 seconds, so two alarm operations are
performed for a total of 32 seconds.
•If a single alarm operation takes more than 20 seconds, it is performed only once.
•Thevoice alarm doesnot soundin the StopwatchMode. Whenan alarm timeis reached
while the watch is in the Stopwatch Mode, the standard beeper alarm sounds even
when the voice alarm is turned on.
Standard Alarm On Voice Alarm On Off
1
2
3
4
5
6
7
8
9
10
11
12
13
14
15
16
17
18
19
20
21
22
23
24
25
26
27
28
29
30
31
32
33
34
35
36
37
38
39
40
41
42
(space)
CHARACTER LIST

Other Casio Watch manuals

Casio GW-1200BCJ Troubleshooting guide

Casio

Casio GW-1200BCJ Troubleshooting guide

Casio 5069 User manual

Casio

Casio 5069 User manual

Casio Sport SGW-500H-2BVER User manual

Casio

Casio Sport SGW-500H-2BVER User manual

Casio BG-540PP Troubleshooting guide

Casio

Casio BG-540PP Troubleshooting guide

Casio 3417 User manual

Casio

Casio 3417 User manual

Casio 2886 User manual

Casio

Casio 2886 User manual

Casio 5303 User manual

Casio

Casio 5303 User manual

Casio 2481 User manual

Casio

Casio 2481 User manual

Casio 2609 User manual

Casio

Casio 2609 User manual

Casio 2556 User manual

Casio

Casio 2556 User manual

Casio Pathfinder PAG80 User manual

Casio

Casio Pathfinder PAG80 User manual

Casio 5608 User manual

Casio

Casio 5608 User manual

Casio 3214 User manual

Casio

Casio 3214 User manual

Casio MR-G 5068 User manual

Casio

Casio MR-G 5068 User manual

Casio 3000 User manual

Casio

Casio 3000 User manual

Casio DW-6100CF Troubleshooting guide

Casio

Casio DW-6100CF Troubleshooting guide

Casio 3475 User manual

Casio

Casio 3475 User manual

Casio QW-750 Configuration guide

Casio

Casio QW-750 Configuration guide

Casio HS-80TW User manual

Casio

Casio HS-80TW User manual

Casio QX-2328 User manual

Casio

Casio QX-2328 User manual

Casio STANDARD W219 - 50-Meter WR Watch Manual User manual

Casio

Casio STANDARD W219 - 50-Meter WR Watch Manual User manual

Casio 2952 User manual

Casio

Casio 2952 User manual

Casio Edifice EFA-131BK-1AV User manual

Casio

Casio Edifice EFA-131BK-1AV User manual

Casio G-Shock MRGG2000CB-1A User manual

Casio

Casio G-Shock MRGG2000CB-1A User manual

Popular Watch manuals by other brands

Zeon IN5600 CALIBRE 447 Operation manual

Zeon

Zeon IN5600 CALIBRE 447 Operation manual

Garmin FORERUNNER 255 Series owner's manual

Garmin

Garmin FORERUNNER 255 Series owner's manual

G-Shock GB-6900AA Pairing Instructions

G-Shock

G-Shock GB-6900AA Pairing Instructions

Lotus Multifunction ILM6P27/77 instruction manual

Lotus

Lotus Multifunction ILM6P27/77 instruction manual

Zeon IN8205 CALIBRE 717 Operation manual

Zeon

Zeon IN8205 CALIBRE 717 Operation manual

Seiko V157 instructions

Seiko

Seiko V157 instructions

Samsung EI-AN920 user manual

Samsung

Samsung EI-AN920 user manual

eta 251.274 PWD Technical Communication

eta

eta 251.274 PWD Technical Communication

Samsung SM-R350 user manual

Samsung

Samsung SM-R350 user manual

Ebel Caliber 503 operating instructions

Ebel

Ebel Caliber 503 operating instructions

Timex W-105 manual

Timex

Timex W-105 manual

Elari KidPhone Fresh Multilingual user manual

Elari

Elari KidPhone Fresh Multilingual user manual

Ronstan RF4030 operating instructions

Ronstan

Ronstan RF4030 operating instructions

Chr. Ward C900 WORLDTIMER Owner's handbook

Chr. Ward

Chr. Ward C900 WORLDTIMER Owner's handbook

HOLZKERN DREAMWATCHER SPECIAL EDITION 42 MM quick start guide

HOLZKERN

HOLZKERN DREAMWATCHER SPECIAL EDITION 42 MM quick start guide

Huawei WATCH GT2 user guide

Huawei

Huawei WATCH GT2 user guide

Oakley DOUBLE TAP instruction manual

Oakley

Oakley DOUBLE TAP instruction manual

LG Watch Sport user guide

LG

LG Watch Sport user guide

manuals.online logo
manuals.online logoBrands
  • About & Mission
  • Contact us
  • Privacy Policy
  • Terms and Conditions

Copyright 2025 Manuals.Online. All Rights Reserved.