Catler TC 9010 User manual

TC 9 010
User’sManual
THERMOCOOKER

THERMOCOOKER

3
TABLE OF CONTENTS
TABLE OF CONTENTS
5 CATLER RECOMMENDS SAFETY FIRST
10 KNOW YOUR TC 9010
10 Description of the appliance and its accessories
12 Icons on the display
12 Display description – Recipes
13 Display description – MANUAL cooking
14 Display description – automatic programmes
15 BEFORE FIRST USE OF YOUR TC 9010
15 Preparation before use
16 Language selection
17 Connecting to aWi-Fi network
18 ASSEMBLING YOUR TC 9010
18 Blender
19 Food processor
20 Steamer
21 OPERATING YOUR TC 9010
21 Basic use
22 Adding ingredients
22 Reversing
22 Overview of controls and icons on the display
24 Table of preparation time and speed
24 Table of accessories and attachments
25 Speed table for attachments
26 PREPARATION ACCORDING TO RECIPES
26 Preparation
27 Add to favourite recipes list
27 View alist of favourite recipes
27 Recipe search
28 MANUAL COOKING
29 AUTOMATIC PROGRAMS
29 Table of automatic programmes
30 NEW RECIPES
31 CARE AND CLEANING
31 Cleaning the container of the blender
32 Removing the steam basket
32 Cleaning the base
32 Cleaning the accessories and attachments
33 Reset of thermal fuse
33 Storage

4CONGRATULATIONS
Congratulations
on the purchase of your new TC 9010 thermocooker.

5
CATLER RECOMMENDS SAFETY FIRST
We understand the importance of safety and that’swhy we put your safety rst from the
initial design concept to the production itself. Nevertheless, please be careful and follow the
instructions below when using this appliance.
• This appliance is not to be used by children.
Keep this appliance and its power cord out of
children.
• This appliance may be used by persons with
physical, sensory, mental impairments or by
inexperienced persons, if they are properly
supervised or have been informed about how
to use of the product in asafe manner and
understand the potential dangers.
• Children must not play with the appliance.
• Cleaning and maintenance performed by the
user must not be performed by children.
• If the power cord is damaged, ask the
authorised service for areplacement in order
to prevent hazards. It is forbidden to use the
appliance with the power cord damaged.
WARNING: There is arisk of serious injury if
used incorrectly. Pay attention when handling
the cutting blades, especially when removing
the blades from the container, emptying the
container and during cleaning.

6CATLER RECOMMENDS SAFETY FIRST
• Clean the parts of the appliance and
accessories that come into contact with food
according to the instructions in the chapter
“Care and Cleaning”.
• Before replacing the accessories or accessible
movable parts, please turn the appliance off
and disconnect it from the power supply.
• Always disconnect the appliance from the
power socket if you are leaving it unattended
and before assembly, disassembly or cleaning.
• This appliance is intended for use in the
home. The appliance is also designed for non-
commercial use in areas such as:
– kitchenettes in stores, offices and other
workplaces;
– agriculture;
– guests in hotels, motels and other dwelling
locations;
– bed and breakfast businesses.
• The appliance must not be immersed during
cleaning.
WARNING: Avoid spilling on the plug.

7
CATLER RECOMMENDS SAFETY FIRST
WARNING: The surface of the heating element
contains residual heat after use.
CAUTION: HOT SURFACE. The surface heats
up during use and may remain hot after
use.
WARNING: DO NOT USE THIS APPLIANCE WITH
APROGRAMMABLE SWITCH, TIMER SWITCH
OR ANY OTHER DEVICE THAT AUTOMATICALLY
SWITCHES THE APPLIANCE ON.
• Before connecting the appliance to apower socket, check that the nameplate rated
voltage matches the voltage of the power socket the appliance is to be connected to.
Connect the appliance only to aproperly grounded socket. Do not use an extension cord.
• This appliance is designed for the preparation and processing of common household
foods. Do not use it for purposes other than those for which it was designed. Do not use
the product outdoors.
• Only use the appliance on at, dry, clean, stable and re-resistant surface. Do not use the
appliance on metal surfaces, such as on the kitchen sink drainage board.
• Do not place the appliance on or near table edge, electric or gas stove or other sources of
heat.
• Do not use the appliance on asurface which is heat-sensitive or covered with table cloth,
paper or other ammable material, in the vicinity of curtains or other ammable or heat-
sensitive materials.
• During operation, the appliance must be placed on the kitchen unit countertop with no
cabinet or overhanging shelf over itself.
• Do not place any objects on the appliance.
• Use the appliance only with the accessories supplied or recommended by the
manufacturer. Do not use the supplied accessories to heat or prepare food on another
appliance.
• Keep ngers, hands, hair, kitchen utensils, jewellery or loose clothing out of the reach of
moving parts/accessories of the appliance.
• To push raw materials through the lling funnel, always use the supplied pusher. Under no
circumstances use your hands, ngers, wooden spoons or other kitchen utensils.
• Always follow the minimum and maximum lines marked on the appliance accessories.
Under no circumstances ll the appliance accessories above the maximum mark. The
maximum amount for chopping food is 1,200 g carrots / 1,800 g water.
• Make sure that the bottom of the container and the temperature sensors are clean and dry
for proper and safe use of the appliance.

8CATLER RECOMMENDS SAFETY FIRST
• Use the appliance only with the supplied base. Do not use another base or use the
supplied base with other accessories.
• Before removing the container from the base, make sure that the appliance is switched
o, the main switch is switched to “0”(o) and the plug is disconnected from the mains
socket.
• Always carefully remove the used accessories/attachment before removing processed
food.
• Use the handles and protective kitchen gloves when handling the appliance and its
accessories.
• Take extra care when using the steam attachment, as there is arisk of burns from escaping
steam, especially when removing the steaming basket lid.
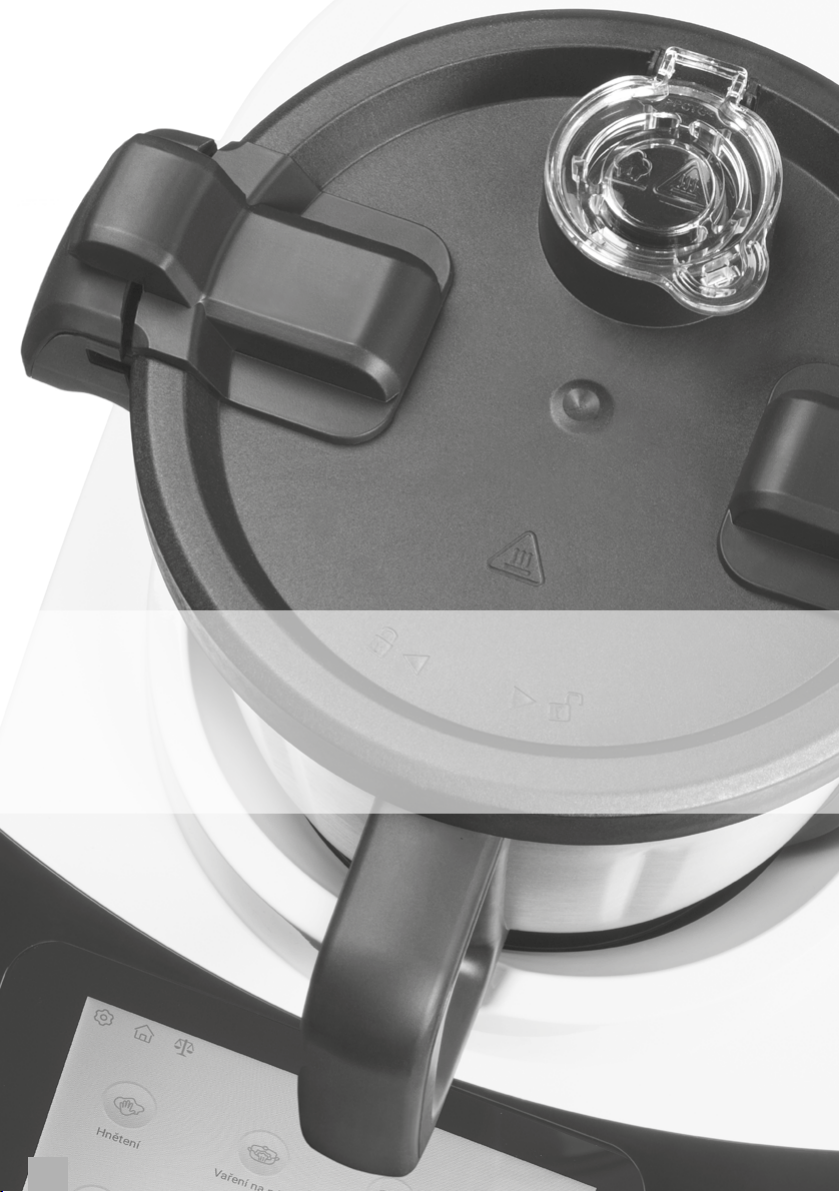
• Do not remove the lid while the appliance is in operation.
• Always make sure that the lling cap is closed when you have selected the chopping
function.
• Do not use the appliance with an empty container.
• Never use the blender lid if you want to use the appliance as afood processor and vice
versa. There is arisk of injury and damage to the appliance’slocking mechanism.
• Before eating, make sure that the food is properly processed.
• We recommend checking the temperature of the food before serving, especially for
infants, small children or people whose health does not allow them to check the
temperature of the food.
• After the preparation is completed, the indoor fan will run for about 2 minutes. Do not
disconnect the mains plug from the mains socket during this time. The fan cools the
internal components, thus preventing the appliance from overheating. The fan switches
o automatically when the appliance cools down. This is normal.
• When disconnecting the appliance from the mains socket, always pull the plug, not the
power cord. Otherwise, damage to the power cord or the socket could occur.
• Allow the appliance to fully cool down before moving, cleaning, maintenance or storage.
• Never handle the appliance while it is in operation or connected to the mains.
• To prevent electric shock, do not immerse the appliance, plug or power cord or in water or
any other liquid.
• Do not place heavy objects on the power cord or the appliance.
• Regularly clean the appliance after each use according to the instructions in the Cleaning
and maintenance chapter. Do not perform any maintenance on the appliance other than
the cleaning described in this user’smanual.
• Do not use the appliance if it malfunctions, has been dropped on the oor, immersed in
water or damaged in any way.
IMPORTANT SAFETY INSTRUCTIONS FOR USING ELECTRICAL EQUIPMENT
• Fully unwind the power cord before use.
• Do not leave the power cord hanging over the edge of atable or counter top or allow it
to touch ahot surface or to become tangled up. Do not put heavy objects on the power
cord.
• For safety reasons, we recommend to connect the appliance in an independent electrical
circuit separated from other appliances. Do not use adapter plugs or extension cords to
connect the appliance to apower outlet.

9
CATLER RECOMMENDS SAFETY FIRST
• To prevent electric shock, do not immerse the appliance, its base or the power cord in
water or other liquids.
• We recommend that you check your appliance regularly. Do not use the appliance if it is
damaged in any way or if the power cord or plug is defective. All repairs or adjustments
must be performed at the nearest Catler authorised service centre.
• Any maintenance other than routine cleaning must be entrusted to an authorised Catler
service centre.
• We recommend to install aresidual current device (standard safety switches in your power
outlet) to provide ahigher level of protection when using the appliance. We recommend
to install aresidual current device (with anominal residual operating current of no more
than 30mA) in the electric circuit in which your appliance is to be connected. For further
expert advise, please contact your electrician.
Instructions are also available at www.catler.eu.

10 KNOW YOUR TC 9010
KNOW YOUR TC 9010
DESCRIPTION OF THE APPLIANCE AND ITS ACCESSORIES
1
2
3
4
5
6
7
8
9
10
11
12
13 15
16
17
18
19 20 21 22 23 24 25

11
KNOW YOUR TC 9010
1. Blender lid
2. Front handle of the blender container
3. Main switch (located on the side of the appliance)
4. Touch control panel
5. Control dial/button
6. Filling hole cap
7. Blender filling hole
8. Side handles with safety lock
9. Container for processing food
10. Base
11. Ventilation openings
12. Anti-slip feet with suction cups
13. Food processor lid
14.
15. Stainless steel steam basket
16. Chopping knife
17. Kneading whisk
18. Double-sided disc for grating and slicing
19. Pusher
20. Measuring cup
21. Whisk
22. Spatula
23. Steaming basket lid
24. Shallow steaming basket
25. Deep steaming basket
26. Adapter when using adouble-sided disc (not shown)

12 KNOW YOUR TC 9010
ICONS ON THE DISPLAY
Icon to enter settings
The icon to return to the home screen
Icon to enter weighing mode
DISPLAY DESCRIPTION RECIPES
1 2 3 4 5
6
1. View recipes by category
2. Alphabetical list of recipes
3. Recipe search
4. Download new recipes
5. View history and favourite recipes
6. Go to next screen

13
KNOW YOUR TC 9010
DISPLAY DESCRIPTION MANUAL COOKING
1 2 4 53
1. Temperature setting dial – 37°C to 130°C, in 5°C increments
2. Button to start preparation/go to next screen
3. Cooking time setting dial – 0 to 90 minutes
4. Stop button
5. Speed adjustment dial – 0 to 12

14 KNOW YOUR TC 9010
DISPLAY DESCRIPTION AUTOMATIC PROGRAMMES
1 2 3 4
5 6 7 8
1. Kneading programme
2. Steaming programme
3. Slow cooking programme
4. Cooking programme
5. Grinding programme
6. Mowing programme
7. Turbo programme
8. Weight programme

15
BEFORE FIRST USE OF YOUR TC 9010
PREPARATION BEFORE USE
Before rst use, remove all packaging and advertising labels / stickers from the appliance.
Before disposing of the packaging material, make sure that you have removed all the
accessories.
Before rst use, wipe the container and the base with asoft sponge slightly moistened in
warm water. Wipe dry using aclean wiping cloth.
WARNING!
NEVER IMMERSE OR WASH THE
CONTAINER OR BASE IN WATER OR ANY
OTHER LIQUID.
Wash all accessories and attachments carefully in warm water with asmall amount of
washing-up liquid. Rinse in clean water and wipe dry.
Hand and dishwasher safe accessories: blender lid, blender lid seal, whisk, kneading whisk,
chopping knife, steam basket, food processor pusher, food processor lid, food processor lid
seal, double-sided grating and slicing disc, adapter, spatula, measuring cup.
WARNING!
BE CAREFUL WHEN HANDLING THE
CHOPPING KNIFE AND DOUBLESIDED DISC
TO AVOID BEING INJURED BY THEIR BLADES.

16 BEFORE FIRST USE OF YOUR TC 9010
LANGUAGE SELECTION
The Thermocooker TC 9010 allows you to set the user language of the control panel to English
or Czech.
1. Once powered on, click on the icon to access the setup screen.
2. Click on Language and select Czech or English.
3. Amessage will appear indicating that the appliance settings have changed.
4. Click on Yes and the system will change the language.

17
BEFORE FIRST USE OF YOUR TC 9010
CONNECTING TO AWIFI NETWORK
The Thermocooker TC 9010 can be connected to your home Wi-Fi network. This will result in
regular software updates, including the addition of new recipes.
1. Once powered on, click on the icon to access the setup screen.
2. Click on Network parameter.
3. Alist of available Wi-Fi nteworks will be shown.
4. Click on the selected Wi-Fi network and you will be prompted to enter your password.
5. Click in the password area where the cursor is ashing and the keyboard will appear.
6. Enter your Wi-Fi password and click Connection.
7. You will be automatically connected to aWi-Fi network.

18 ASSEMBLING YOUR TC 9010
ASSEMBLING YOUR TC 9010
Depending on the intended purpose of use, assemble the appliance as ablender, food
processor or as asteamer.
1. Insert the drive shaft into the hole in the bottom of the container. When inserting, pay
attention to the cut-outs in the hole, otherwise it will not be possible to insert the shaft.
2. Carefully place the container on its side or turn the container upside down, but always
hold the tip of the shaft with one hand so that it does not fall out. With the other hand,
place the nut on the bottom of the shaft so that the protrusions on the nut t between the
protrusions on the bottom of the shaft (the nut can only be inserted in one way). Now turn
the nut clockwise until the arrows on the nut point to the locked lock symbols that are
marked on the bottom of the container.
REMARK:
If you need to remove the drive shaft from the container, proceed in the opposite way.
3. Insert the container into the base so that the pins on the bottom of the container t into
the slots in the base.
BLENDER
1. Attach the attachment (kneading whisk, whisk, chopping knife or steam basket) that you
will use to the shaft.
WARNING!
BE CAREFUL WHEN HANDLING THE
CHOPPING KNIFE TO AVOID BEING INJURED
BY IT.

19
ASSEMBLING YOUR TC 9010
2. Put the blender lid on the container. To replace the lid, align the tabs on the lid with the
grooves in the handles and turn the lid clockwise until you feel resistance. The handles
are equipped with safety locks that interrupt the operation of the appliance if the lid is
released.
REMARK:
Always make sure that the blender lid seal is properly seated. Do not use the appliance
without the without the seal in place.
FOOD PROCESSOR
1. Place the adapter on the shaft and then the double-sided disc.
WARNING!
BE CAREFUL WHEN HANDLING THE
DOUBLESIDED DISC TO AVOID BEING IN
JURED BY IT.
2. Put the lid of the food processor on the container. To replace the lid, align the tabs on the
lid with the grooves in the handles and turn the lid clockwise until you feel resistance. The
handles are equipped with safety locks that interrupt the operation of the appliance if the
lid is released.
REMARK:
Always make sure that the food processor lid seal is properly seated. Do not use the
appliance without the without the seal in place.
WARNING!
ALWAYS USE THE SUPPLIED PUSHER TO
PUSH INGREDIENTS THROUGH THE FILLING
FUNNEL. UNDER NO CIRCUMSTANCES USE
YOUR HANDS, FINGERS, WOODEN SPOONS
OR OTHER KITCHEN UTENSILS.

20 ASSEMBLING YOUR TC 9010
STEAMER
1. When using the steam attachment, asucient amount of water must be added to the
container.
2. To insert the deep steaming basket, align the protrusions with the grooves in the handles
and turn them clockwise until you feel resistance. The handles are equipped with safety
locks that interrupt the operation of the appliance if the deep steaming basket is released.
3. Place the shallow steaming basket on the deep steaming basket and then the lid.
REMARK:
Always make sure that the steaming basket seal is properly tted. Do not use the
appliance without the without the seal in place.
WARNING!
WHEN PREPARING FOOD IN THE STEAM
ATTACHMENT, BE ESPECIALLY CAREFUL NOT
TO SCALD YOURSELF WITH HOT STEAM. LIFT
THE LID OF THE STEAM ATTACHMENT SO
THAT THE STEAM ESCAPES AWAY FROM YOU.
4. The appliance is now assembled and ready for use.
Table of contents
Popular Cooker manuals by other brands

Euromaid
Euromaid CS505 Installating and operation manual

Esse
Esse CAT Installation & commissioning instructions

Zanussi
Zanussi ZCK66350BA user manual

inventum
inventum VFG6034WGRVS instruction manual

Hotpoint
Hotpoint HUE 53GS Instructions for installation and use

AEG
AEG COMPETENCE 3201 F operating instructions