manuals.online logo
Brands
  1. Home
  2. •
  3. Brands
  4. •
  5. Causemann
  6. •
  7. Toy
  8. •
  9. Causemann Slingshot RG20/900 DLG Manual

Causemann Slingshot RG20/900 DLG Manual

Page 1of 16
Slingshot RG20/900 DLG EPP Wing Build Instructions (Lightweight)
Kit supplied by Causemann Flugmodellbau
1. Introduction
These build instructions are for a lightweight EPP wing covered in laminating film for slope
flying when nothing else is able to fly. Servos top mounted and a 1S LiPo embedded in the
fuselage. This is an experienced builder’s model, so feel free to use and adapt these
instructions to meet your needs and experience.
2. General Design Layout and Target Weight
The EPP Wing kit includes a sheet of 2mm balsa for the 2 ailerons (43mm at root and
23mm at tip), plus the fixed centre section that will be used to secure the wing
trailing edge to the fuselage. A target weight to aim for based on the out of the box
weights:-
Out of the box weights
Grams
EPP Wing Core L
30.3
EPP Fuselage
4.6
Fin (3mm Depron)
1.5
Balsa (2mm sheet)
8.2
Carbon Spars (1.5mm dia)
5.4
Tail Carbon (3 x 0.5mm)
2.2
Radio, etc
Battery (1S 650 mAh)
13.0
Receiver (FR-4CH) & plug
6.0
Servos BMS-101AMG (x2)
9.4
Horns (x2)
0.9
Covering (32 Micron)
18.5
Lead ballast, Glue, etc
10.0
TARGET TOTAL
110.0
Page 2of 16
Page 3of 16
3. Gorilla Glue Tips
I use Gorilla Glue to join the EPP with anything. This glue foams up when it comes into
contact with water. First make some puncher holes in the EPP so the glue can grip the EPP.
Wet with water using a small paint brush. Apply Gorilla Glue to both surfaces and spread
with a small stick. Try and force the glue into the puncher holes. Push the 2 surfaces
together, remove as much excess as you can. Hold together with masking tape until
hardened. As the glue foams it will try and expand and push the surfaces apart.
4. Wing
You may need to trim a little off the trailing edge to get a clean sharp edge that’s a little
thicker than the 2mm ailerons. I removed a little after covering the bottom with film so
there was a straight edge for the ailerons, and then added the top film.
Start by rounding off the wing tips using sandpaper. A 30mm diameter is a good guide. Make
sure both wings are the same.
Make up a small peg (eg carbon or bamboo 2 mm diameter) about 40mm long so that 10mm
can stick out the front of the wing and plug into a hole in the EPP fuselage. It makes sure the
wing is centre. Cut a half channel in each EPP wing root to take the peg.
95mm
95mm
460mm 460mm
16mm
23mm
23mm
175mm
C of G
20-25mm
44mm
44mm
2mm balsa
aileron
EPP Wing
EPP Wing
50mm
2mm balsa
aileron
Page 4of 16
Join the 2 EPP wing halves together with the top of the wing on the table to end up with a
small dihedral on the lower wing surface. Make some puncher holes in each side of the EPP
wing root. Join the two wing halves together with tape on the upper surface and open up
the join from the bottom. Wet both surfaces. Apply Gorilla Glue and spread out with a small
stick forcing the glue into the puncher holes. Put the top surface of the wing on a flat surface
so the excess glue squeezes out and clean up the excess. Add some tape to the join and
weigh down so the wing top surface is flat.
Once set (2-3 hours) remove the tape and clean up the excess glue with a sharp knife blade
and then sandpaper smooth so there are no bumps. Don’t worry about any valleys, just the
peaks.
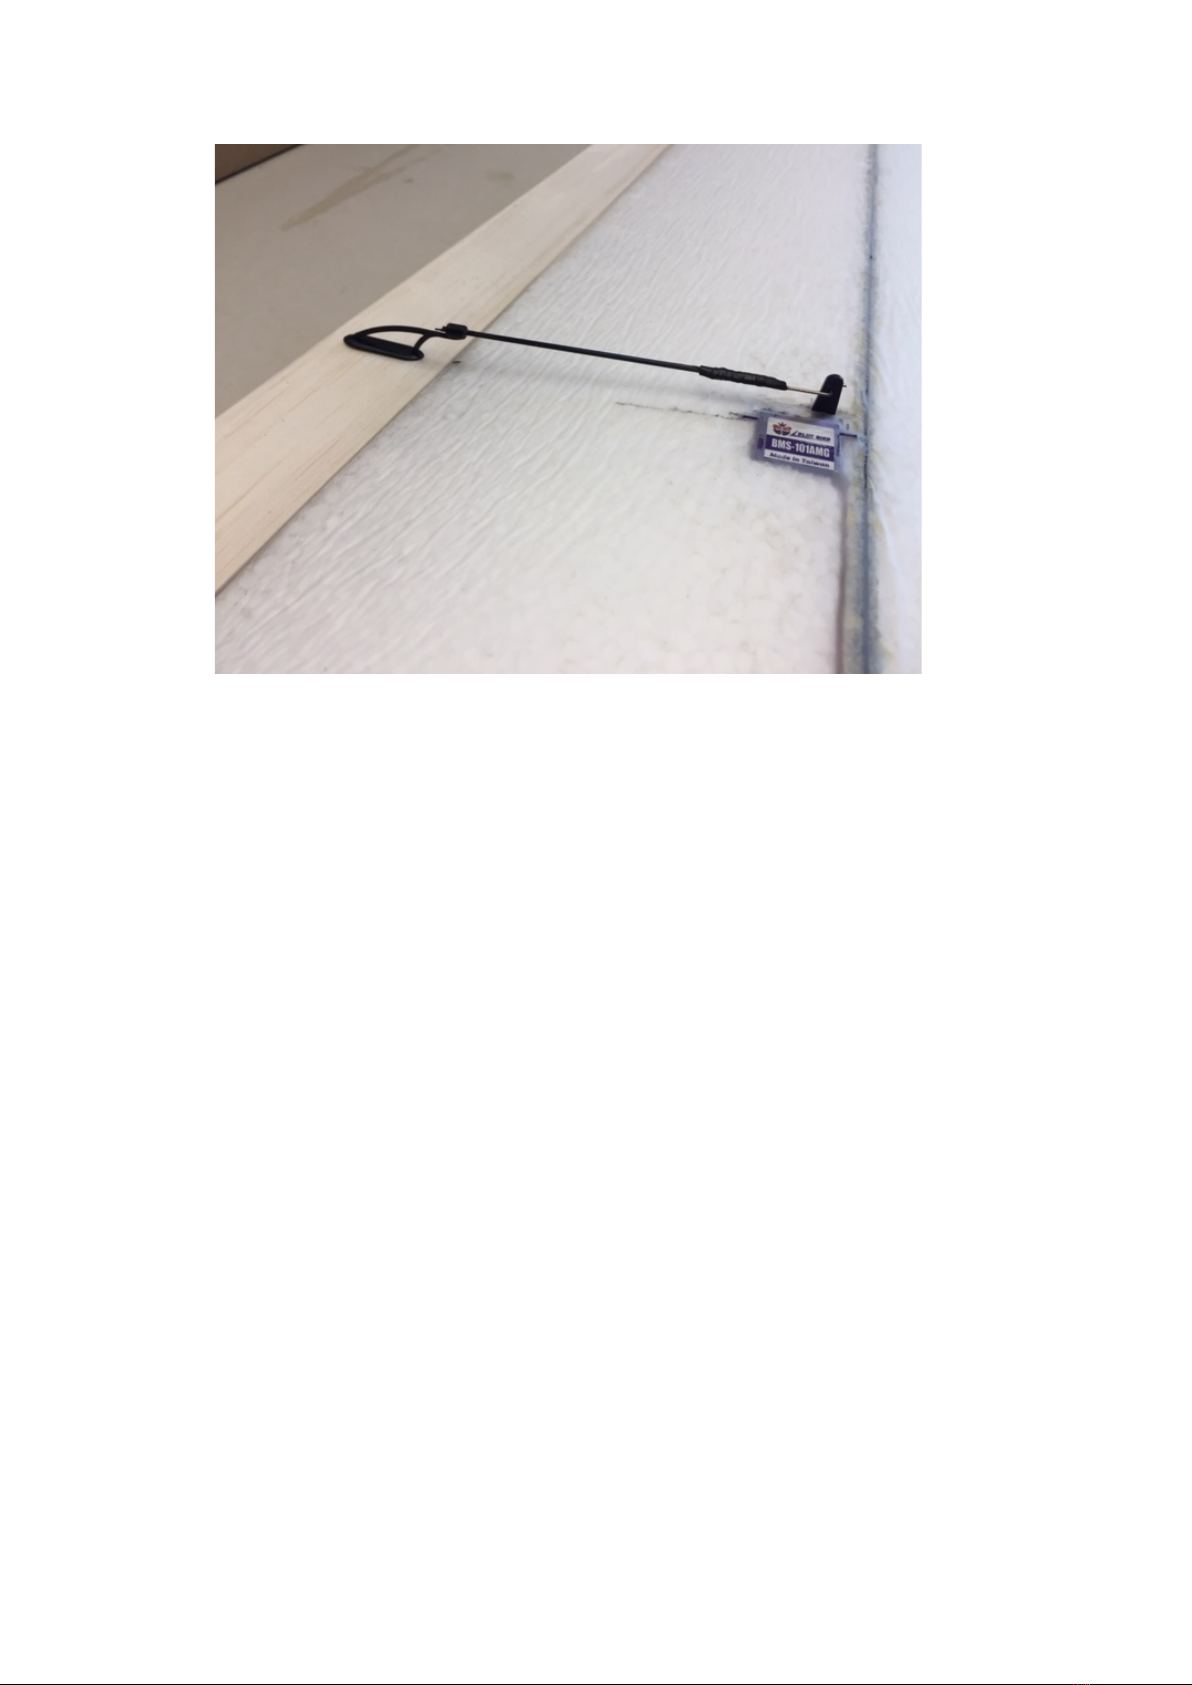
The 1.5mm carbon wing spars need a slot cut in the EPP wings. 40mm from the leading edge
at the root and 30mm at the tip looks about right and create a smooth bow curve. Tape the
spar in position and mark each side with a fine marker pen. I used a Dremel cut off wheel to
cut a slot no more than 2mm deep between the lines. Use a small stick to hold the wheel
shaft off the wing surface to keep a check on the cut depth.
Cut off the excess length of carbon rod which you can use for servo push rods. Roughen up
the surface off the carbon to take off the shine and help the glue stick.
Wet the spar slot with water, then add the Gorilla glue and spread with a small stick. Press in
the carbon wing spars and clean up the excess. The glue will try and push the carbon rods
out so they need to be weighed down as the glue dries. When cleaned up, cover the entire
length with tape. Put the wing upside down, top surface down and weigh down the length of
under side with 2 lengths. I used a couple of pieces of timber.
When dry remove the tape, cut off the excess glue that’s foamed up with a knife blade and
sand smooth. You should now have a very rigid wing.
Page 5of 16
Wing Trailing Edge (TE) centre section fuselage saddle detail.
The 2mm balsa sheet is 100mm wide, so you need to plan how best to cut the ailerons and
saddle layers.
Make up trailing edge to fuselage centre saddle by laminating 2-3 pieces of 2mm balsa with
grain in opposite directions (like plywood), then profiled to the wing section.. See picture
below of the underside of the wing. This is glued to the EPP wing and will locate on the
fuselage just in front of the fin. You will need to the cut back the wing saddle on the EPP
fuselage to suit. This gives positive a location between the wing and fuselage as well as
stiffen up the rear considerably.
50mm
50mm
20mm
20mm
10
25mm
2 layers
2mm balsa
TE saddle
Page 6of 16
Page 7of 16
Decide the location for your receiver and servos. I wanted to plug the battery directly into
the receiver to avoid the need for an extra plug / socket and on off switch (you’ll need a
special charging lead). Remember to program your radio and centre the servos so they 90
degrees to the servo body before installing.
Page 8of 16
I find it better to top mount the servos and receiver so all the wiring is on the same side of
the wing. I mounted the receiver so the power cable from the battery could be inserted with
a standard servo plug (keep it simple). The servo wires and antenna can be pushed into a slit
that’s cut with a sharp knife. Nice a neat.
Cut the ailerons to size (43mm at root and 23mm at tip), round off the rear edge and add a
small bevel for a top tape hinge.
Now you should be ready to cover with film. I am using 32micron laminating film. I added a
wide black strip to the lower surface and some red to the upper wing tips so I can see which
way it’s up in flight.
Push the servo horns out of the way below the surface and cover with laminating film with a
warm / hot iron. Bottom first with large overlap, followed by the top surface with little to no
overlap. Keep the iron moving or you risk melting the EPP foam.
Cover the ailerons with laminating film and top hinge using clear tape. Add the control horns
and make up the control rods. You should now have a fully working wing.
Page 9of 16
Page 10 of 16
5. Tail
First mark out where the carbon stiffeners need to be cut so the carbon strip can be
attached to the EPP fuselage, either below (as I did) , or above between the wing and
fuselage. You may need to a cut a slot in the EPP fuselage to avoid the carbon being bent (if
it does it will bend the EPP fuselage!).
Note: The carbon strip extends so it can be glued to the fuselage bottom surface.
Page 11 of 16
Cut the Depron with a sharp blade and ruler. Insert the carbon strip and hold together on
one side with tape. From the other side apply a little Gorilla glue and hold flat while it
expands hardens.
It’s now ready to cut out the profile to join to the EPP fuselage with Gorilla glue.
6. Fuselage
It’s time for a trail balance to see where the Centre of Gravity is and how much ballast is
needed in the nose. I am using the 75 micron film I have that is strong, so I have used that as
most of the area is forward of the Centre of Gravity. The battery I have which is a 1S LiPo
650mAh round battery 13g in weight and 12mm diameter so it fits just right. I have left
space for some lead ballast in front of the battery with some EPP foam surrounding that will
be cut in from the top.
Page 12 of 16
Cut a slug of EPP from one site to the other so the battery fits in the centre line. It’s a good
idea to mark each side, left and right, so you can out the sides back the same way.
Cut the core of the EPP out so you are left with the 2 sides that can be glued back in.
Wire up the battery and check it all works before using Gorilla glue to put the 2 sides back
where they came from.
Glue 2 lengths of the left over 3mm carbon strip either side of the fuselage for rigidity and
hold down with fibre tape.
Page 13 of 16
Finally cover top and bottom with fibre tape for added strength. Add some colour and apply
the laminating film. I have extended the 75 micron film down to the tail.
Once covered glue the wing to the fuselage and it’s ready.
Page 14 of 16
Page 15 of 16
Once it’s been test flown and the balance is right then cut a slot in the EPP close to the nose
just large enough for lead ballast. Glue in with lots of Gorilla glue so there’s hard protection
on the inside.
7. Balance. Throws and Flying
The C of G is expected to be somewhere between 20 and 25mm from the leading edge. The
lead ballast can be taped on so it’s easy to adjust at the flying field / slope.
Start with 20mm C of G and lots of up trim to get a glide and then work back. As the balance
moves back the elevator pitch becomes more sensitive, so dial down the rate.
As this is my lightweight build I pushed the C of G back to 30mm with 10g of lead ballast
giving a final 120g flying weight. I may find it a more relaxing flight to move it back to 25mm.
Aileron Throws midway @ 35mm width
When the balance is right it’s very sensitive to pitch elevator control. 1-2 mm is enough. At
high rates an attempted loop with 5mm up will stall out rather than tighten.
Low
Elevator +1mm / -1mm
Aileron +3mm / -2mm
Page 16 of 16
High
Elevator +4mm /-4mm
Aileron +10mm / -10mm
Flying the Lightweight
In the lightest of wind it can be flown slower than the 190g model I first built. It just looks
right in the air. Good speed range in a 5-10 mph wind. Tight turns little loss of height. Picks
up speed and lift well. Easy large / small loops. Ten out of ten design.
Excellent DLG launch performance and a lot tougher than a pure foam ready to fly. On the
slope you can throw it well out into wind away from the slope into some good lift.
The 32 micron film doesn’t stick that well to EPP, has little rigidity so the wing flexes under it.
It works OK on the Depron tail, so I’ll use it again for that, but not EPP.

Popular Toy manuals by other brands

Fisher-Price L5198 Bubble Mower instructions

Fisher-Price

Fisher-Price L5198 Bubble Mower instructions

Majik CATCH FISHING CHALLENGE Assembly instructions

Majik

Majik CATCH FISHING CHALLENGE Assembly instructions

Fisher-Price HEAD SPINNERTAIL W1392 quick start guide

Fisher-Price

Fisher-Price HEAD SPINNERTAIL W1392 quick start guide

GPX BOT2000 user manual

GPX

GPX BOT2000 user manual

Little Tikes 631917M Assembly guide

Little Tikes

Little Tikes 631917M Assembly guide

TILLIG BAHN 85353 quick start guide

TILLIG BAHN

TILLIG BAHN 85353 quick start guide

Trix UP 844 manual

Trix

Trix UP 844 manual

Baby Einstein Sea Dreams Soother manual

Baby Einstein

Baby Einstein Sea Dreams Soother manual

Black Horse Model Thermal 3.0 Instruction manual book

Black Horse Model

Black Horse Model Thermal 3.0 Instruction manual book

LEGO 10230 Assembly manual

LEGO

LEGO 10230 Assembly manual

Eduard MiG-21bis instructions

Eduard

Eduard MiG-21bis instructions

Herr Engineering HRR506 Assembly instructions

Herr Engineering

Herr Engineering HRR506 Assembly instructions

roco 42660 manual

roco

roco 42660 manual

VTech Baby Lil' Critters Soothing Starlight Polar Bear Parents' guide

VTech Baby

VTech Baby Lil' Critters Soothing Starlight Polar Bear Parents' guide

LeapFrog Rainbow Lights Ladybird Parents' guide

LeapFrog

LeapFrog Rainbow Lights Ladybird Parents' guide

BVM Grumman F-9F Cougar CONSTRUCTION AND OPERATING MANUAL

BVM

BVM Grumman F-9F Cougar CONSTRUCTION AND OPERATING MANUAL

Jamara Dancing Car 40 3710 instructions

Jamara

Jamara Dancing Car 40 3710 instructions

V-tech Peppa Pig Learn & Explore Tablet 5466 Parents' guide

V-tech

V-tech Peppa Pig Learn & Explore Tablet 5466 Parents' guide

manuals.online logo
manuals.online logoBrands
  • About & Mission
  • Contact us
  • Privacy Policy
  • Terms and Conditions

Copyright 2025 Manuals.Online. All Rights Reserved.