CCM Spitfire 2020 Series User manual

OWNERS MANUAL

CCM Spitfire Series Motorcycle
OWNER’S MANUAL
Issue 9
07/09/2020
All rights reserved.
Any reprinting or unauthorized use
without the written permission of
CCM Motorcycles
is expressly prohibited.

Contents
Introduction ......................................................................3
Motorcycle Details........................................................4
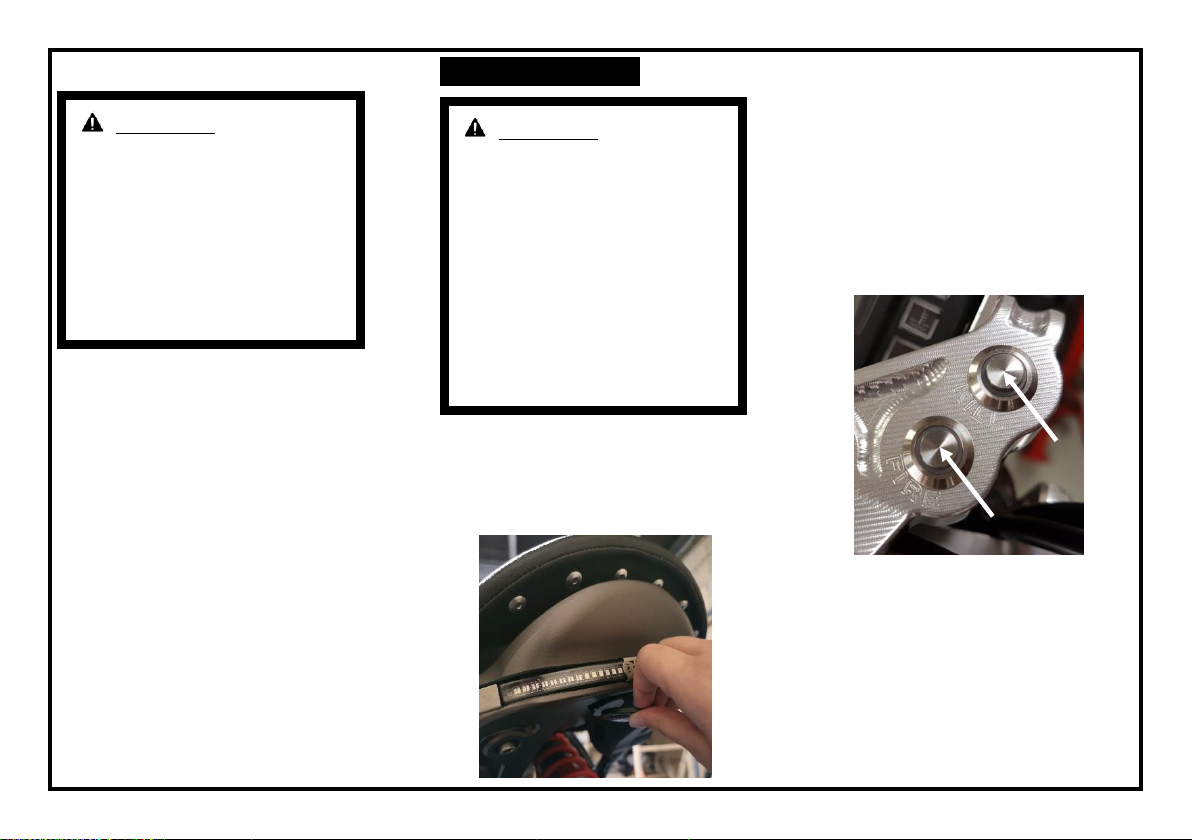
Controls & Instruments............................................5
Instrument panel..................................................................5
Ignition Lock ............................................................................6
Foot Controls..........................................................................8
Side stand..................................................................................8
Fuel Tank ...................................................................................9
Side stand..................................................................................9
Seat ................................................................................................9
RAF BF 100 Pannier Boxes.......................................... 10
Riding Information........................................................ 11
Before riding............................................................................ 11
Pre-ride checks ....................................................................13
Motorcycle Storage ......................................................... 15
Maintenance................................................................... 16
Running In ............................................................................... 16
Daily Checks........................................................................... 16
Service Information...........................................................17
Scheduled Maintenance ............................................. 23
Service Record .................................................................. 26
Confirmation of Maintenance Work..................... 31
Technical Information ....................................................33
Tightening Torque Figures...................................... 39
Cleaning..................................................................................... 41
Warranty..........................................................................42
How to Enrol in the Warranty Scheme ............ 42
How to keep your Warranty valid....................... 44
What to do if you need a Warranty Repair... 44
What is covered?.............................................................. 45
What is NOT covered?.................................................. 45
Miscellaneous..................................................................... 46
Transfer of Warranty................................................... 47
Registered Owner ............................................................. 51

3
Introduction
Congratulations on your choice of CCM motorcycle.
Please take the time to read this owner’s manual thoroughly as it will inform you of the correct operation and safety procedures required to safely ride the motorcycle. This
manual includes important informationregarding the motorcycle controls, technical features and accessories as well as tips for keeping your motorcycle in its best possible
condition through maintenance and care in line with the CCM warranty package.
If you have any questions concerning your motorcycle, the CCM service department will gladly provide advice and assistance.
We hope that you enjoy your new CCM and that all your journeys are safe.
Note:
This Owner's Manual is a valuable document. Please keep it safe as it will be required in connection with servicing and any warranty claim that may arise.
This manual should be transferred to the new owner if the motorcycle is sold.
The high safety standards of CCM motorcycles are maintained by constant development of designs, equipment and accessories. Due to this, your motorcycle may differ
from the information supplied in this manual. CCM cannot entirely rule out errors and omissions. We hope you can appreciate that no claims can be entertained based on
the data, illustrations or descriptions in this manual.

Motorcycle Details
Motorcycle Details
CCM Customer Contact Details
Model:
CCM Contact Address:
Unit 5 Jubilee Works,
Vale Street,
Bolton,
BL2 6QF
Registration Number:
Vehicle Identification Number:
Engine Number:
Service Contact Name: Steven Bridgeman
Date of First Registration:
Service Contact Telephone: 01204 866268

5
Controls & Instruments
Instrument panel
Warning Lights & Controls
The motorcycle is fitted with a digital instrument
display with the following warning lights and
controls;
1) Mode button
2) Reset button
3) High beam warning light
4) coolant temperature warning light
5) Neutral gear warning light
6) Low fuel warning light
7) Left indicator warning light
8) Right indicator warning light
Note:
- The instrument clock display will remain visible
in all ignition conditions.
Display
- Instrument display has the following 3
information areas;
1) Engine speed
2) Road speed
3) Selected function
- Pressing mode button will cycle the information
displayed in area 3 through the following display
fields, in the order shown below;
- Trip distance 1
- Trip Distance 2
- Odometer
- Coolant Temperature
- Clock
- RPM
- Average Speed
- Current Ride duration
- Total ride duration
- Battery voltage
- Maximum engine speed
- Maximum coolant temperature
Function Reset
- The following fields in display area 3 can be
reset;
•Trip distance 1
•Trip Distance 2
•Average Speed
•Current Ride duration
•Maximum engine speed
•Maximum coolant temperature
To reset a field in display area 3, press either
mode button until desired field is shown, then
press and hold the left mode button for around 2
seconds until field value is reset to zero.
Note: When Trip 1, Average Speed or Current ride
time are reset, the other two will also reset
automatically.
2
4
6
7
5
3
1
3
2
1
8

6
Changing of settings
To change the time, press and hold the MODE and
RESET button at the same time for 2 seconds.
Press the RESET button to increment the selected
setting and press the MODE button to toggle
between selected settings. Once complete, press
and hold MODE and RESET button for 2 seconds to
revert to normal display mode.
Ignition Lock
Ignition is toggled on and off by holding the
wireless key fob against the receiver area
indicated below;
When ignition is turned to the “on” position,
instrument display and sidelights will illuminate,
and electrical functions such as horn, indicators
and brake light will become functional.
To start engine, ensure ignition is in the “on”
condition with the dashboard illuminated and
press “FIRE” button (1).
To turn engine off, press the “KILL” button (2).
WARNING!
Never activate the ignition lock whilst
the vehicle is moving as the electrical
systems will be switched off, which may
result in loss of control or an accident.
Additionally, refrain from storing the key
fob in a location which will be in close
contact with the receiver.
Risk of battery running low if ignition left
on for long periods.
WARNING!
Changing of any settings other than time
is strictly prohibited. Changes to these
settings is logged in the instruments and
will invalidate your CCM warranty. It is
important that the factory settings are
used. Contact CCM if you require factory
settings to be re-installed.
2
1

7
Steering Lock
The steering lock is a two position, key operated
lock, located on the right-hand side of the
headstock.
To engage the steering lock, remove the steering
lock cover until the steering lock is accessible,
turn handlebars fully left, insert key, turn key
anti-clockwise to stop, press key into lock, turn
key clockwise to stop and remove key,
remembering to replace steering lock cover over
the steering lock.
To disengage the steering lock, remove the
steering lock cover until steering lock access is
sufficient, insert key, turn anti-clockwise to stop,
at which point lock spring will push key away from
lock, then turn key clockwise to stop and remove
key, remembering to replace the steering lock
cover over the steering lock.
Left handlebar switch
1. Passing light
Depress to temporarily illuminate the high-beam
headlight.
2. High-beam/low-beam control
Depress the beam control button to illuminate the
high-beam headlight (the button will remain
depressed while the high-beam is illuminated and
the BLUE tell-tale warning illuminates on the
instrument display).
Press the beam control button again to revert to
low-beam setting.
3. Turn signal indicator
Press the turn signal control to the left to
illuminate the left signal indicators (the GREEN
tell-tale signal will flash on the instrument
display).
3
4
2
1
WARNING!
Never operate the steering lock while the
vehicle is moving. This may result in loss of
control or an accident.

8
Press the turn signal control to the right to
illuminate the right signal indicator (the GREEN
tell-tale signal will flash on the instrument
display).
To cancel indicators, press the control switch in
whilst in a central position (the GREEN tell-tale
signal will stop flashing in the dash unit and signal
indicators will be cancelled).
4. Horn
Push the horn button to sound the horn.
Foot Controls
Brake Pedal
Apply downwards pressure to engage rear brake
only.
Gear Lever
Side stand
The side stand is an “always up” and should
automatically spring into the “up” condition when
it becomes unloaded.
When parking the motorcycle using the side
stand, turn the handlebars to the left and ensure
side stand is securely in the “down position”
before releasing. It is advised that the motorcycle
is left in first gear when parked.
Note: Side stand is designed to support
motorcycle only, riders and passengers must NOT
load or sit on the motorcycle whilst it is held by
side stand.
Neutral
1st Gear
2nd Gear
3rd Gear
4th Gear
5th Gear
6th Gear

9
Fuel Tank
To open the fuel tank cap
Press the fuel cap down and rotate anti-
clockwise until stop then release. This will
release the fuel cap from its recess.
Once cap is raised, rotate anti-clockwise to
unscrew cap.
To close the fuel tank cap
Insert fuel cap and turn clockwise until stop.
Note: Ensure the rubber seal sits flush with
mating surface.
Press the filler cap down and turn clockwise to
stop.
Note: The maximum fuel fill level is 10mm below
the bottom of the filler neck when the motorcycle
is on its side stand.
Side stand
The side stand is an “always up” and should
automatically spring into the “up” condition when
it becomes unloaded.
When parking the motorcycle using the side
stand, turn the handlebars to the left and ensure
side stand is securely in the “down position”
before releasing. It is advised that the motorcycle
is left in first gear when parked.
Note: Side stand is designed to support
motorcycle only, riders and passengers must NOT
load or sit on the motorcycle whilst it is held by
side stand.
Seat
Remove the 2 bolts from underneath the tail piece
and remove the nut from the Sub-frame. Lift the
seat vertically upwards to release the seat from
the motorcycle.
To re-fit seat, align the bosses of the bottom of
the tail piece, the stud to the sub-frame and
replace the fixings.

10
RAF BF 100 Pannier
Boxes
Alongside each pannier box, you will receive;
2 x M6 x 40 Brass Screws
2x M6 Nyloc Nuts
1 x Key for the Pannier Box Lock
On delivery, these items will be inside the box.
To Install the Pannier Boxes
•With the lid closed, slide the brackets on the
back of the box over the bars on the side of
the rack. Ensure the box hinge is toward the
front of the bike.
•Open the lid and install the brass Screws
from inside the box through into the captive
nut so the end of the screw is flush with the
end.
•Position the Nyloc nut so it lines up with the
captive nut.
•Screw the brass screw through into the
Nyloc nut. You will require a 13mm spanner
to complete this.
To Remove the Pannier Boxes
•Use a 13mm spanner and unscrew the brass
screw from the Nyloc nut.
•Unscrew the brass screw from the captive
nut and remove the brass screw.
•The pannier box can now be removed from
the rack.

11
Riding Information
Before riding
•Please Refer to Pre-Ride Checks section.
•Rider's equipment
Always ride with correctly fitting protective
clothing designed for use on a motorcycle. This
includes; Helmet; Eye protection; Gloves; Jacket;
Trousers; Boots. The law requires that you wear
an approved helmet and visor or eye protection.
•Speed
As your speed increases, always bear in mind that
there are many factors that can adversely affect
the handling of your motorcycle. These include
but are not limited to; Settings of the spring-strut
and shock-absorber system; Imbalanced load;
Loose clothing; Incorrect tyre pressures; Worn or
damaged tyres; Strong winds.
•Maximum speeds for tyres
The motorcycle's top speed might be higher than
the maximum speed permitted for the tyres.
Excessive speeds can damage the tyres, and this
could cause accidents.
Comply with the tyre-specific speed restrictions.
•Correct loading
Overloading and imbalanced loads can adversely
affect the motorcycle's handling.
Do not exceed the permissible gross weight and
be sure to comply with the instructions on
loading.
•Alcohol and drugs
Even small amounts of alcohol or drugs will
adversely affect your perception and your ability
to assess situations and make decisions and slow
down your reflexes. Medication can exacerbate
these effects.
Do not ride your motorcycle after consuming
alcohol, drugs and/or medication.
•Risk of poisoning
Exhaust fumes contain carbon monoxide, which
is colourless and odourless but highly toxic.
Inhaling the exhaust fumes therefore represents
a health hazard and can even cause loss of
consciousness with fatal consequences. Do not
inhale exhaust fumes. Do not run the engine in an
enclosed space.
•High voltage
Do not touch live parts of the ignition system
when the engine is running as this can cause
electric shock.
•Risk of fire
Temperatures at the exhaust are high. Flammable
materials (e.g. hay, leaves, grass, clothing and
luggage, etc.) could ignite if allowed to come into
contact with the hot exhaust pipe. Do not permit
flammable materials to come into contact with
the hot exhaust system.
Cooling would be inadequate if the engine were
allowed to idle for a lengthy period with the
motorcycle at a standstill: overheating would
result. In extreme cases, the motorcycle could
catch fire.
Do not allow the engine to idle for an unnecessary
length of time
•Mounting the bike
When mounting or dismounting the bike the side-
stand should be in the retracted position.
Repeatedly overloading the side stand could
cause a failure of the component resulting in the
motorcycle falling.
Starting the engine
To start the engine,
Deactivate the ignition lock by swiping the key
fob over the receiver.
Ensure the motorcycle is in neutral or the clutch
lever is pulled in.
Press the fire button and hold until the
motorcycle starts (use of cold start lever may be
required in low temperatures).

12
Note:
Do not hold the fire button down for more than 5
seconds continuously.
During a bump start it is necessary to hold the
start button in order to keep the ECU live.
Engine revs
When started from cold, allow the motorcycle a
moment to warm up and for oil to properly
circulate within the engine before revving/riding
the motorcycle. When riding, avoid high engine
speeds until the engine reaches proper operating
temperature.
Your motorcycle is not designed for extended
periods of revving at engine speeds in excess of
8000 rpm. Riding with the engine revving at
speeds in excess of 8000 rpm can result in
damage and engine-revolution excursions above
this limit are logged in the control unit's memory.
CCM refuses to accept liability for engine damage
if engine-revolution excursions above this limit
are stored in the control unit's memory.
Running in
See
Maintenance
section for running-in
instructions.
Brake pads
New brake pads have to bed down before they can
achieve their optimum friction levels. You can
compensate for this initial reduction in braking
efficiency by exerting greater pressure on the
levers.
New brake pads can extend stopping distance by
a significant margin.
Apply the brakes in good time.
Tyres
New tyres have a smooth surface. This must be
roughened by riding in a restrained manner at
gradually increasing lean angles until the tyres
are run in. This running in procedure is essential
if the tyres are to achieve maximum grip. Tyres do
not have their full grip when new and there is a
risk of accidents at extreme angles of lean.
Avoid extreme angles of lean.
Loading the motorcycle
Always use caution when loading luggage onto
the motorcycle.
Ensure the weight is evenly distributed between
the left and right sides and the weight is as close
to the centre of the motorcycle as possible.
Loading the extreme rear of the
motorcycle with a lot of weight can
adversely affect the motorcycles handling.
Never exceed the motorcycles maximum gross
weight (see Technical Information).

13
Pre-ride checks
The following items should be checked before
every ride to ensure the motorcycle will function
correctly:
See
Service Information
section for more in depth
instruction.
Chain & Sprocket:
•Check chain tension.
•Check chain condition.
•Check sprocket condition.
Brakes:
•Check front and rear brake fluid
levels. Top up if low.
•Check front and rear brake pads for
signs of wear or damage. Replace if
necessary.
•Check for a spongy feel on front or
rear brake lever/pedal. Bleed brake
system if necessary.
Tyres:
•Visually inspect tyres for splits or
damage. Replace if necessary.
•Check tyre tread level is sufficient for
the type of riding about to be done.
•Check tyre pressures are in line with
the recommended pressures.
Wheels:
•Inspect front and rear wheel rims for
splits, cracks or dints. Replace if
necessary.
•Check front and rear wheel spokes are
tensioned correctly.
•Check rear wheel alignment is set
correctly. Adjust if necessary.
Clutch:
•Check clutch lever smooth operation
and free play. Adjust if necessary.
•Check the clutch hose for damage or
fraying. Replace if necessary.
Throttle:
•Check the throttle cable for smooth
operation and free play. Adjust if
necessary.
•Check the throttle cable for signs of
damage or fraying. Replace if
necessary.
Fuel:
•Ensure fuel level in tank is sufficient.
•Check for fuel leaks.
Engine oil:
•Ensure oil level in engine is correct.
Top up if low. See
Technical
Information
for required oil type. See
Service Information
for more details.
•Check vehicle for oil leaks. If signs of
leaking fluid are seen do not ride the
motorcycle and seek professional
advice from the CCM Services team.
See
Service Information
for more
details.
Coolant:
•Check coolant level in radiator.
Coolant should be visible through filler
neck on top of radiator elements. Top
up if lower than elements.
•Check vehicle for signs of coolant
leaks. If signs of leaking fluid are seen
do not ride the motorcycle and seek
professional advice from the CCM
Services Team.
Bodywork fixings:
•Check security of all bodywork fixings
and fasteners.

14
Lights and instruments:
•Check function of all electrical
systems to ensure they are
functioning correctly.
Fixings:
•Visually check all fixings for
looseness and damage.
Suspension:
•Check front forks for smoothness of
operation.
•Visually check for leaks.
Steering:
•Check steering action in all directions
for smoothness of operation.
•Check steering components to ensure
no looseness.

15
Motorcycle Storage
Short term
Always store your motorcycle in a cool, dry place and if necessary, protect it against dust with a porous cover. Always ensure the motorcycle is dry and the engine has fully
cooled before covering.
Long term
Before storing your motorcycle for an extended period of time:
•Thoroughly clean the motorcycle.
•Lubricate the brake and clutch lever pivots along with the side and main stand pivots.
•Lubricate any control cables.
•Coat any bright metal parts in acid-free grease (e.g. Vaseline or ACF50).
•Drain the motorcycle fuel tanks.
•Remove the battery or connect it to the lithium battery optimizer.
•Cover muffler outlet with a plastic bag to stop moisture entering.
•Stand the motorcycle in a room in such a way that there is no weight on either the front or rear wheel to prevent tyre damage during storage (use a box type
stand).
Returning the motorcycle to service
Before attempting to ride the motorcycle after a long period of storage:
•Remove any protective grease applied.
•Thoroughly clean the motorcycle.
•Remove any exhaust muffler covers.
•Check condition of battery and install a charged battery if necessary.
•Work through the pre-operational checklist before attempting to start or ride the motorcycle.

16
Maintenance
Running In
To ensure the best performance and reliability of your motorcycle, it is important that the following running in procedure is followed. Failure to comply may result in
warranty invalidation.
At all times;
• Do not use high engine speed when engine is cold.
• Avoid labouring the engine. Downshift before engine “struggles”.
• Do not use higher engine speed than required. Using a lower gear increases fuel economy and reduces environmental and noise pollution.
<500 MILES
•Do not use full throttle
•Vary the throttle opening and engine-speed range frequently.
•Avoid maintaining constant engine speeds for prolonged periods of time
•Avoid high engine speeds
•Do not exceed 75mph.
•Avoid aggressive acceleration and deceleration manoeuvres, except in an emergency
•Maximum speeds during running-in Period ≤75 mph
500 –1000 MILES
•Ensure first service (as per Service Record) is carried out.
•Maximum engine speed can be gradually increased to the rev limit for short periods.
Daily Checks
See “Pre-Ride Checks” section

17
Service Information
•Checking engine oil
The engine can seize if the oil level is low, and this
can lead to accidents.
To ensure that the engine oil level is read
correctly, check the oil level only when engine is
at operating temperature, turned off and with the
motorcycle held upright.
Ensure the oil level is between the maximum and
minimum marks on the left-hand side of the oil
level inspection window.
If the engine oil level is too low, top up with new
oil.
If the engine oil level is too high, have the oil level
corrected by the CCM Services Team.
•Adding Engine Oil
- To top up engine oil, ensure ground is
flat and level.
- Remove oil filler cap (1).
Top up oil to specified level on the inspection
window. See
Technical Information
for correct oil
type.
Re-fit filler cap and wipe any excess oil away
using a cloth.
Always check for signs of leaks after performing
an oil change and do not ride the motorcycle if
anything is seen
•Replacing engine oil and filter
Start the engine and run it until operating
temperature is reached to thin the oil.
Place the motorcycle on its side stand with a
drain pan underneath the oil sump plug.
Remove the oil sump plug (1) and allow oil to drain
into drain pan.
Beware, engine oil will be hot.
Once most of the oil is drained remove the oil
strainer (3) by unscrewing the 2 fastening bolts
and inspect for debris, clean if necessary.
Then remove the oil strainer drain plug (2) and
allow any oil to drain out.
2
1
3
MAXIMUM MARK
MINIMUM MARK

18
Remove the oil filter cover (4) and oil filter
element.
Fit a new oil filter element and replace the filter
cover.
Replace the oil strainer, oil strainer drain plug and
oil sump plug.
Fill the engine with the specified amount of
engine oil.
Run the engine until the fan kicks in then for a
further one minute to ensure it is at the correct
operating temperature.
Check the oil level in the inspection window and
adjust if necessary.
Always check for signs of leaks after performing
an oil change and do not ride the motorcycle if
anything is seen.
•Braking system
Checking operation of brakes
Operate both brake levers, the pressure points
must be clearly perceptible.
If pressure point is not clearly perceptible, bleed
the brake system and re-check. If problem
persists, check system for damage and contact
approved service provider.
Checking brake pad thickness
Brake pads worn past the minimum permissible
thickness can cause a reduction in braking
efficiency and under certain circumstances they
can cause damage to the brake system.
In order to ensure the dependability of the brake
system, do not permit thebrake pads to wear past
the minimum permissible thickness.
Visually inspect the condition and thickness of
the brake pad friction material.
To change the front brake pads, the wheel must
first be removed.
Checking brake-fluid level
A low fluid level in the brake reservoir can allow
air to penetrate the brake system.
This significantly reduces braking efficiency.
To check level, turn the handle bars to a straight-
ahead position and hold motorcycle upright.
Check the fluid level in the front brake master
cylinder (1) is above the minimum marker.
Check the fluid level in the rear master cylinder is
above the minimum marker.
4
1

19
•Coolant
Risk of burns from escaping coolant!
The hot cooling system is pressurised.
Allow the coolant to cool down before
opening the radiator cap.
Make sure the ground is flat and level, hold the
motorcycle vertical.
Once the radiator has cooled, remove the cap (1)
by turning it counter-clockwise.
Ensure correct coolant level is maintained.
Coolant minimum level is defined by the internal
top plate. Maximum level is 40mm below top cap)
•Clutch
Checking operation of clutch
- Pull in the clutch lever.
- The pressure point must be clearly
perceptible.
- If it is not, have the clutch checked by
an approved CCM workshop.
Checking clutch lever play
Pull in clutch lever until resistance is felt.
Recommended clutch lever play (a) is 3-5mm
The lever position can be adjusted to suit hand
size. To adjust the lever distance, rotate the
adjuster (B) COUNTER-CLOCKWISE. To increase
the lever distance, rotate the adjuster (B)
CLOCKWISE.
•Wheels and tyres
Checking tyre tread depth
Your motorcycle's handling and grip can be
impaired even before the tyres wear to the
minimum tyre tread depth permitted by law.
Have the tyres changed in good time before they
wear to the minimum permissible tread depth.
Make sure the ground is level and firm and place
the motorcycle on its stand.
1
40mm
Table of contents