CDA FW224 User guide

1| Instruction Manual
1
FW224
Integrated under counter larder fridge
Use and maintenance

2| Instruction Manual
Important
The CDA Group Ltd cannot be held responsible for injuries or
losses caused by incorrect use or installation of this product.
Please note that CDA reserve the right to invalidate the guarantee
supplied with this product following incorrect installation or misuse
of the appliance or use in a commercial environment.
This appliance is not designed to be used by people (including
children) with reduced physical, sensorial or mental capacity, or
who lack experience or knowledge about it, unless they have
had supervision or instructions on how to use the appliance by
someone who is responsible for their safety.
Under no circumstances should any external covers be removed
for servicing or maintenance except by suitably qualified personnel.
Appliance information:
Please enter the details on the appliance rating plate below for
reference, to assist CDA Customer Care in the event of a fault with
your appliance and to register your appliance for guarantee
purposes.
EU Declarations of Conformity
This appliance has been manufactured to the strictest standards
and complies with all applicable legislation, including Electrical
safety (LVD) 2014/35/EU and Electromagnetic interference (EMC)
2014/30/EU. Parts intended to come into contact with food conform
to 1935/2004/EC.
Appliance Model
Serial Number

Instruction Manual | 3
IMPORTANT INFORMATION FOR CORRECT DISPOSAL OF THE
PRODUCT IN ACCORDANCE WITH EU DIRECTIVE 2012/19/EU.
At the end of its working life, the product must not be disposed of
as urban waste. The refrigeration system contains insulating gases
and refrigerants, which require specialised waste disposal. The
valuable materials contained in this appliance can be recycled.
It must be taken to a special local authority dierentiated waste
collection centre or to a dealer providing this service.
Before disposing of an old appliance, remove the door seals, latch
or bolt lock to avoid the risk of child entrapment.
Disposing of a household appliance separately avoids possible
negative consequences for the environment and health. It also
enables the constituent materials to be recovered, saving both
energy and resources. As a reminder of the need to dispose of
household appliances separately, the product is marked with a
crossed-out wheeled dustbin.

4| Instruction Manual
Important
Never store inflammable or explosive items and strong corrosive
acids or alkalis in the appliance.
This is a household appliance, which is produced in accordance
with the national standard. It is intended for food storage only, not
for storage of blood, medicine and biological products.
To prevent risk of fire, keep the appliance away from petrol or any
other inflammables.
To prevent risk of electromagnetic interference or other accidents,
do not place a microwave oven on top of the refrigerator or use
any electric appliance inside the refrigerator.
Do not allow children to play with or near the appliance.
The internal surfaces of the fridge compartment may be very cold
when the appliance is running. Avoid touching, if possible, the
surfaces especially when hands are wet.
Do not splash water onto the appliance. Keep it away from places
of high humidity that may have adverse eect on the electric
insulation performance.
This appliance is designed to be used in ambient temperatures
between 10˚C and 32˚C. Use outside of this range may cause the
appliance to fail.

Instruction Manual | 5
Before first use
You must allow the fridge to settle for at least twenty four hours
prior to switching the power on.
It is recommended that you clean the interior of the appliance prior
to first use, using a solution of bicarbonate of soda and warm water
and then thoroughly drying the interior.
The fridge may have an odour to it at first use. This will disappear
as the appliance cools.
When first switching the appliance on it is advisable to set the
fridge to setting 3 and leaving the fridge to settle for 24 hours
before adusting the temperature to the preferred setting.
Please note:
The appliance will work continuously until it comes down to the
correct temperature.
If the appliance is switched o, you should allow five minutes
before switching it on again to prevent unnecessary damage to the
compressor.
Never store inflammable or explosive items and strong corrosive
acids or alkalis in the appliance.
This fridge cools your food by making the inside back of the
cavity cold. It is normal for frost to build up on this surface; it then
dissipates and drains through a small drain at the bottom, where it
evaporates harmlessly. The presence of frosting at the back is not
a malfunction of the fridge.
This refrigeration appliance is intended for use as a built-in
appliance

6| Instruction Manual
Use
Fridge
• Never put liquids in the refrigerator uncovered
• Never put hot foods in the refrigerator. Warm food should be
allowed to cool to room temperature before being put into the
refrigerator
• Nothing should rest against the rear wall of the refrigerator, as
this will cause frost and possible condensation problems which
will be dicult to remove
• Make sure food is clean and any extra water is wiped away
before putting into the fridge
• Wrap or cover food before putting into the fridge. This will
help prevent the loss of moisture, keep food fresh and avoid
unpleasant odours
• Sort foods prior to storing. Any foods to be used soon should be
stored at the front of the shelf to prevent deterioration caused by
the door being open for prolonged periods
• Do not overfill the fridge. There should be sucient space
between the foods to allow the cool air to circulate
• Thawing frozen foods in the fridge compartment will help to keep
the temperature low and save energy
Note: If the appliance does not have a freezer compartment ( )
it is not suitable for freezing foodstus.

Instruction Manual | 7
Storage and use
The fridge is for short term food storage. Although the
temperature can be maintained between 0-10˚C, extended
periods of food storage is not recommended.
As the cold air circulates within the fridge, the temperature can
vary between the dierent sections. As such, foods should be
stored in dierent sections according to type.
1. Butter and eggs
2. Food in jars and bottles
3. Drinks, e.g. milk
4. Cooked food
5. Yoghurts and cheese
6. Fresh meat and fish
7. Fruit and vegetables
The fridge shelves can be moved according to the storage
requirements within the fridge section. To move the shelf, lift up
the front section and then pull it outwards. To replace, slide the
shelf back into the slot, and lower the front section.
When storing root vegetables with leaves, such as carrots or
turnips, their leaves should be removed. This prevents the leaves
from absorbing nutrients from within the vegetables.
Fig.1
1
2
3
4
5
6
7 7

8| Instruction Manual
Fig. 2
Controls
Temperature control
The temperature controls for this fridge are simple and easy to
use. To change the temperature simply press the adjust button on
the right hand side of the unit to cycle through settings 1 to 5. The
warmest setting being 1 and the coldest being 5.
After changing the temperature setting, the time taken to achieve
the new temperature will depend on how big the change is from
the previous setting.
Switching on and o
When the fridge is connected to a power supply the lights
below the setting numbers will illuminate, indicating which setting is
currently being used.
To switch the appliance on and o simply press and hold the
power button on the left hand side of the unit for approximatley 5
seconds
Power Adjust
1 2 3 4 5
Instruction Manual | 9
Care and cleaning
Always disconnect the appliance
from the power supply before any
cleaning or maintenance.
The fridge and crisper sections
should be cleaned using a solution
of bicarbonate of soda and lukewarm
water. Do not use abrasive products
or detergents. After washing, rinse and
dry thoroughly.
Clean the shelves, drawers and balconies separately by hand with
a mild solution of washing up liquid and water. Do not put them in
the dishwasher.
The water drain hole at the back of the fridge compartment should
be cleaned periodically to prevent the defrosted water from
collecting inside the fridge compartment. The drain plug can be
used to clean the drain hole.
If the appliance is not to be used for prolonged periods of time,
unplug and clean the appliance. The doors should be left slightly
ajar to prevent the formation of mildew and unpleasant odours.
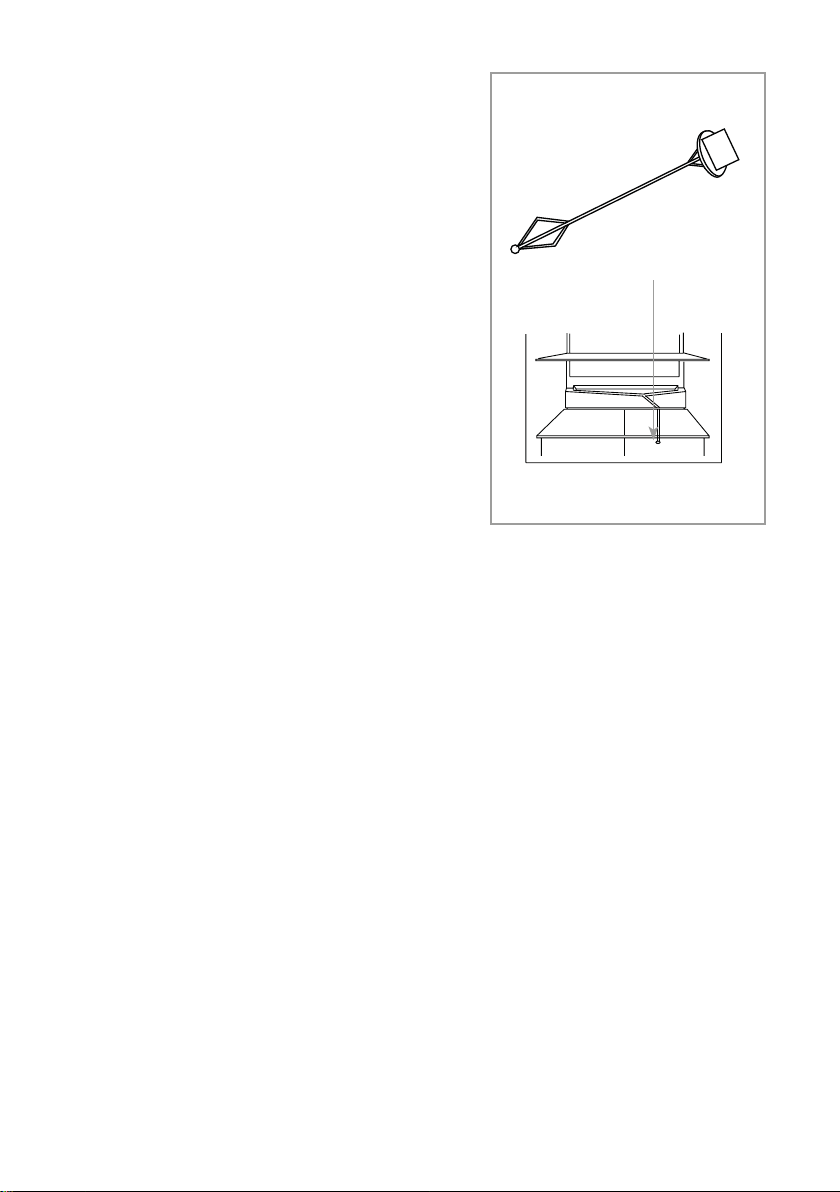
Fig. 3
Water Outlet
Cleaning Rod

10 | Instruction Manual
Defrosting the fridge
The fridge is self-defrosting. Any water created will run out of the
fridge through the channel at the back of the fridge.
It is important to keep the channel clear at all times using the
cleaning tool supplied.
The defrosted water is collected in the evaporating tray at the back
of the appliance and dissipated by evaporation.
If you notice a heavy build up of ice, refer to the troubleshooting
section on ice on page 11.
Table of contents
Other CDA Refrigerator manuals


