Cedarshed B124 User manual

BAYSIDE
1,2 Ftx 4 Ft
MODEL 8124
MODEL SPECIFIC INSTRUCTION MANUAL
rHflw6iler0

Planter
hox
F124
3" scrgw$
ACCESSORIES
AND HARDVVARE
A
s
tr
\N
Door
Handle
\u Hasp
Fasteners
n
1 1/8" nai s
Iri
ii
il
2" nails
Part Number Part Name Size or Type No.
ACCESSORIES
P-H-PLAQL Cedar.shed plaque T
P-SH - 001 Window shutters 2
P-FW - 001 Flower box L
P-H . MFLASS Metal roof flashine 3" xL2" L5
Part Number Part Name Size or Tvpe No.
FASTENERS
P-H - SC2 2" screws Bag 75
P-H - SC3 3" screws Bag 254
P-H - NL 1.75 I3/4" finishing nails Bae 260
Part Number Part Name Size or Tvpe No.
DOOR HARDWARE
DR - 003 Dutch Door t
P-H - HASP Hasp 1
P-H. DHAND Door handles L
P-H - THING6 Door hinses 4
P-H - BBLT4 Barrel bolt L
Instruction manual, questionaire and driver bit
* door trim-narrow to be used when door is located on 8 ft side/
wide to be used when door is located on 4 ft side.
-1-

BLz4I
FOLNDATION PREPARATION
PREPARE THE SITE:
Before you begin assembly', clear the construction area. Remove all organic material
such as roots -qrass, dirt and large rocks that may compromise the ability to level the site.
lvlake sure the ground siopes au,ay from the site at least 10 ft. (3.05 m.) in all directions,
lf necessar-r", build up the centre of the site and slope arvay from the high point to provide
drainage. Fill in anv lou' spots within the perimeter of the site. Be sure to use gravel or a
,eood packing material to level the site. lvlake sure it is packed dorvn before beginning
the building process.
FILND \TION CHOICES:
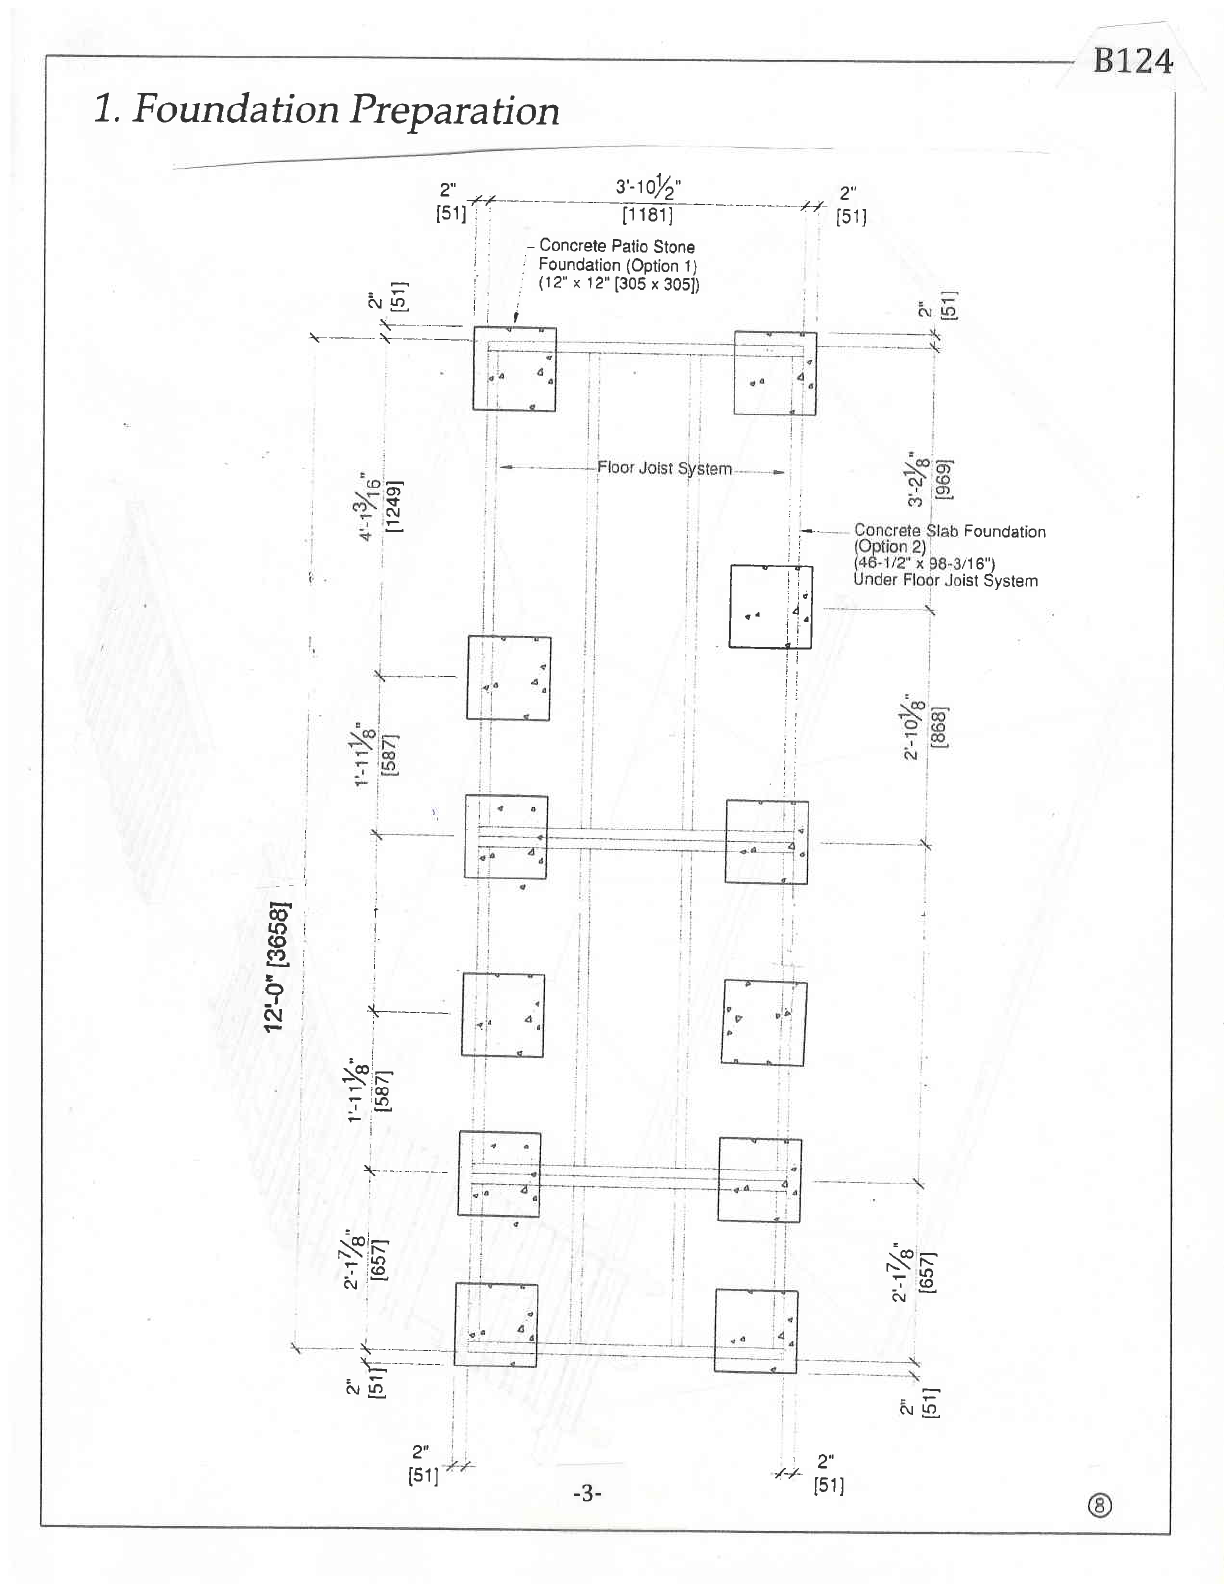
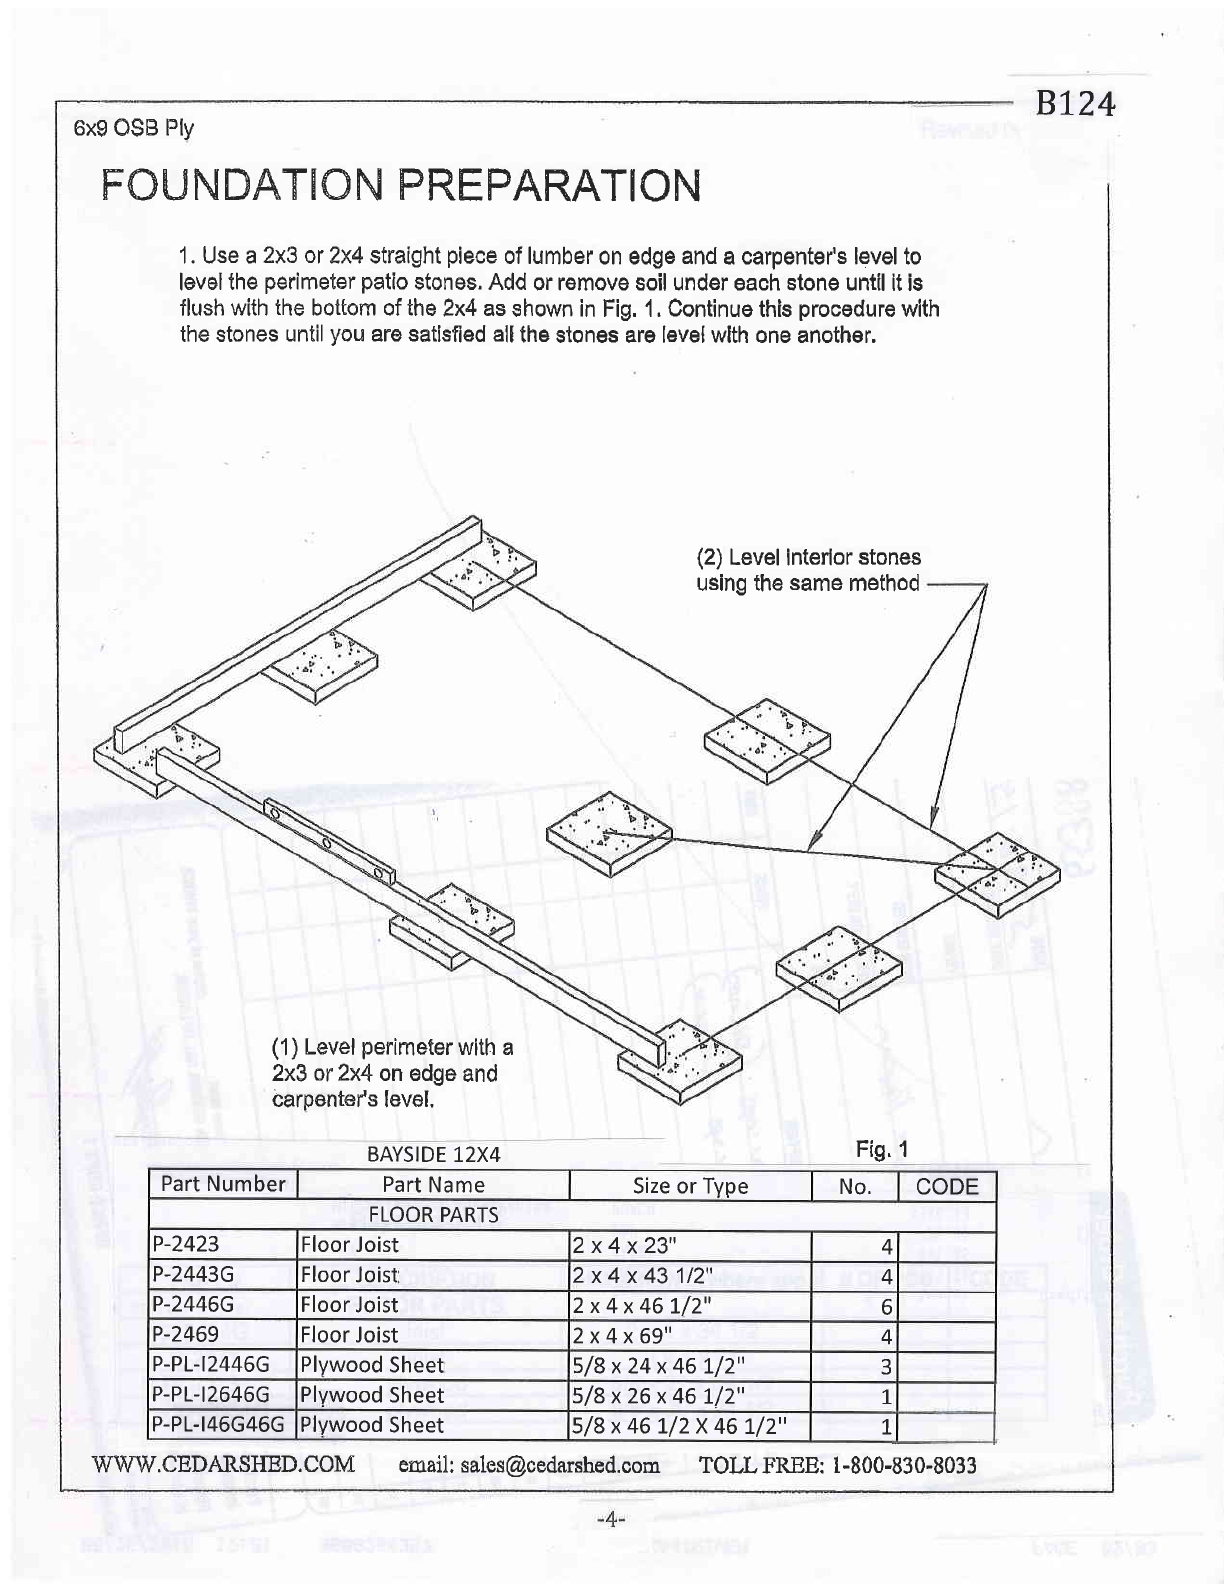
1. Concrete Patio Stones (not included)
If the gound is stable and has sufficient drainage, you can set patio stones directly on a
finn compacted gravel base. Make sure the stones are thick enough to allow air
circulation under the stntcture. This helps to prevent dry rot from setting iri on the joist.
The bearin_s points are outlined in the next page of this manual.
2. PRESSURE TREATED WOOD STRINGERS (not included)
A second option is to use {xa (90 mm x 90 mm) stringers which can run the full width of
the structure. Be sure to us'e a stringer every 4 ft. For example for an 8xl2 floor
structure, you rvill need 4-8 ft, stringers. This reduces the amount of leveling needed as
you only need to level each end of the stringer. However, it will increase the height of
the shed and you may require a ramp or an additional step at the doorways,
3. CONCRETE SLAB
Typically a slab 3"-4" (75 - 102 mm) thick laid over a sublease of 4" (102 mm) of gravel
or crushed rock is suffrcient but may vary (consult your local Home Centre). Either mix
your own Qonclete or have it delivered to your site. A l0'x l0'x 4" (3.05 m. x 3.05 m. x
10.2 cm.) slab will require approximately 1 cubic yard (0.764 cubic metre) of concrete.
ln any case, make sure you excavate the slab area to a depth of 6" (l 5,2 cm.), use 4"
( 10.2 crn.) of gravel as your subbase. Welded wire mesh as reinforcing (optional) and 4"
(10.2 cm,) of concrete (trowel to allow for drainage away from the centre high point).
Still r.rse l" (2,54 cm,) thick patio stones on the concrete slab to allow adequate air
circulation to keep the floor joist dry, This will prevent dry rot from setting in.
4. POURI}IG CONCRETE PIER POINTS USTNG SALINA TUBES
Another option would be the pouring of concrete pier points using sauna tubes. Using the
next page as a guide, place sauna tubes into the ground at each of the bearing points,
Make sure the tops of the sauna tubes are level with the other. You may also wish to
inbed metal straps into the concrete. These straps will be nailed to the joist structure.
-2-

1. F oundation Preparation
i,r<:___ _ ,#__ _ ____ on, fr,,,,
I ' - Concrete Patio Stone
i , Foundation (Option 1)
i , (12" x 12" [305 x 305])
ii i
i!A
\- =-
\ ___\ _-_-_
, Foundation
/16',)
ist System
t--..-ia
I rrl
ti'l
| , ';l
| .' ,1.1
I lf I
lrl
t i: I
II
il
jl
jl
o,
$
N
=
Ng
r
I
i
I
.x---_--
i
I
\@i-
Fi@
t ,lr)
|- - ---
00
tf)i
(o
GI
!i
O)
$ll
:
-\- N
'r (O
c!
siE'
'r i(O
f! t-
--+- ---
\- -----
i\t !f)
,, fs'j,t
2',
[511 -3-

BL24
6x9 OSB Ply
FOU N DATIC N FR,EPARATION
1. Use a 2x3 or 2x4 straight piece of lumber on edge and a carpenter's level to
levelthe perimeter patio stones. Add or remove soil under each stone until it is
flush with the bottom of the 2x4 as shown in Fig. 1 . Continue this procedure wlth
the stones until you are satisfied allthe stones are level wlth one another.
(2) Level interlor stones
using the same method
(1) Level perimeterwith a
2x3 sr 2x4 on edge and
earpentefs level.
BAYSIDE 1.2X4 Fig. 1
Part Number Part Name Size or Tvpe No. CODE
FLOOR PARTS
P-2423 Floor Joist 2x4x23" 4
P-2443G Floor Joist 2x4x43112" 4
P-2446G Floor Joist 2x4x46L/2" 6
P-2469 Floor Joist 2x 4x 69" 4
P-PL-t2446G Plywood Sheet 5/8x24x46If2" 3
P-PL-t2646c Plywood Sheet 5/8 x26 x 46 1./2" L
P-PL-I46G46G Plywood Sheet 5/8 x 46 L/2x 46 1.12" L

BLT4
46lz" x 46 /2" |oist Box - P9 Revised L2/22/10
IOIST BOX ASSEMBLY
Lay the joist parts out as per Fig. P9-1, Using 2- 3" screws per join! assemble the
joist box together as per Fig P9-2. The completed joist box is pictured in Fig. p9-3.
73 L/2" [343] L3 7/2" [343]
INSIDE
SPACING INSIDE
SPACING
461/2" x 46 7/z' joist box Iayout
Fig P9-1
Completed floor Panel
Fig p9-3
TOLL HREE: 1-800-830-8033
-5-

46 r5" X 26" f oist Box - PIz
IOIST BOX ASSEMBLY
Lay the joist parts out as per Fig. P12-1. Using 2-3" smews per joist
assemble the joist box together as per Fig L2-2. The completed joist box
is pictnred in Fig. P72-3.
FigPL2-2
Fig. PL2-3
L3 Yz" (343)
13 Vz" [343) L3 W' (343)
INSIDE SPACING
@
rn
i
CY)
N
46 t/2" x76" floor panel layout
Fig Pt2-1

BT24
46lz" X72" Joist Box - Pl1
IOIST BOX ASSEMBLY
Lay the joist parts out as per Fig P11-1. Usin g?-3" screws per joist
assemble the joist box together as per Fig, P-rL-z. The completed joist
box is pictured in Fig. Pt1-3
FigPLL-Z
46 Vz" x72" floor panel layout.
NG
46G
69
Yz','
ES
13_
SIDIN
L31/2" (343)
Fis. P11.3
Fig P11-1

FLOORASSEMBLY BLz4
Attach P-11, P-9, and P-12 joist
F-1and Fig F-2 for details. boxes together using 6-3" screws. Please refer to Fig
P-PL.T2646G
-]^t
Fig F-1
Affix the plywood panels as per Fig. F-3 using 2" screws on 12" and
affixing the plywood to each row of joist, The finished floor is shown in
Fig F-4.
Fig F-4

F1,24
BW-003
BW-003
U T-UU)
B
Part Number Part Name Size or Tvpe No. CODE
WALL PARTS AND PANELS
P-2346G Headers 2x3x 46L/2" 6not shown
BW-003 Solid wall panel 46 Llzx73 \14" 6BW-003
ww-003 Window wall panel 46 L/2x74 3f 4" Lww-003
DF-005 Door Frame 48x73 t/4" 1_ DF-005
-9-

8124
Part Number Part Name
TOP PLATES
P-2341"G 2x3 x 4t 1./2"
P-2346c 2x3x 461/2"
Top plates 2x3x7L3/4"
2x3x26t/4"
GW-008 -'-,, IWrO01 .- GW-008
SHED OUTLINE
-- lr
,l
I
eiI
I
I
I
J
RF 019 I
RF-O19
ROOF PARTS AND PANELS
nel
Gable panel 9 x 5L 5/8" 2
lnfillwall 46 t/2x9 Lf 4" 3
Roof panel 24x51,5/8" L
423/4x 515/8"
I copE
RF-032 Roof panel 46 L/2 x 5L 5/8" 1, RF-032
P-B-G446G Soffits 1,/2x4x46If2" I
P-B-G424 Soffits Lf2x4x24" 1.
P-B-G437 Soffits L/2x 4 x37" 2
P-1446c Fascia L x4 x 46 I/2" 2
P-1424 Fascia Lx 4 x24" 2
P-L442 Fascia tx4x42" 4
P-1455Yg Gable Fascia 1x4x55" 2
-10-

81,24
Part Number Part Name Size or Type No. CODE
TRIMS PARTS
P-1280G Trim (short) tx2x80 t/2" 2
P-t279C Trim (short) Lx2x79 L/4" t
P-1.IK79C Trim (short) t x L 3/4 x79 1./4" L
P-13C79C Trim (short) tx3 L/4x79 rf 4" 1,
P-1289G Trim (long) Lx2x89 L/2" 4
P-13C89G Trim (long) Lx3 t/4 x89 Lf 2" 2
P-B-G645 skirtine tfZx6x45" L2
P-B-G445 skirtine Lf2x4x45" 5
P-11K48 top door trim (narrow)* Lxt3/4x48" 1,
P-L348 top door trim (wide)* l-x3Fx48" Tno code
P-B-14848 door skirtine Ix4t/8x 48" 1
* door trim-narrow to be used when door is located on 8 ft side/
wide to be used when door is located on 4 ft side.
-I1,-
Table of contents
Other Cedarshed Outdoor Storage manuals
Popular Outdoor Storage manuals by other brands

garofalo
garofalo TUSCANY user manual

Empire
Empire Apex Summerhouse 5060659536980 instructions

Arrow Storage Products
Arrow Storage Products EZEE Shed EZ6565LVCR Owner's manual & assembly guide

Holz-Blech
Holz-Blech Annika II 28 manual

Rutland County
Rutland County Normanton Assembly instructions

Globel
Globel Lotus Assembly

ABSCO SHEDS
ABSCO SHEDS 23151SK-PTX manual

ABSCO SHEDS
ABSCO SHEDS 45302WK Assembly & instruction manual

Biohort
Biohort LEISURE TIME BOX 100 Assembly instruction

Rowlinson Garden Products
Rowlinson Garden Products Potting Store SS291C Assembly instructions

Arrow
Arrow CPHC202007 Owner's manual & assembly guide

TMG
TMG TMG-MS1320A product manual