Celebration Saunas DVU708 User manual

DVU708
DVD/VCD/CD/MP3/USB/SD/MMC Player
with FM/MW Tuner
Operating Instructions

1
Safety Precautions Contents
Precautions
• Useonly ina12-voltDCnegative-ground
electricalsystem.
• Whenreplacingthefuse,besuretouseone
withanidenticalamperagerating.Using
afusewithahigheramperagerating may
causeseriousdamagetotheunit.
• DONOTattempttodisassemble theunit.
Laser beams from the optical pickup are
dangeroustotheeyes.
• Makesurethatpinsorotherforeignobjects
donotgetinsidethe unit;theymaycause
malfunctions,orcreatesafetyhazardssuch
aselectricalshockorlaserbeamexposure.
• Ifyouhaveparkedthecarforalongtimein
hotorcold weather,waituntil thetempera-
tureinthecarbecomesnormalbeforeoper-
atingtheunit.
• Keepthevolumeatalevelatwhichyoucan
hearoutsidewarningsound(hornssirens,etc.).
• DONOTopencoversanddonotrepair your-
self.Consultthedealeroranexperiencedtech-
nicianforhelp.
• InadditiontoordinaryCDs,thisunitcanplay-
backCD-RorCD-RW,MP3.
Note:
• Playingadefectiveordustydisccancause
dropoutsinsound.
• Holddiscsasillustrated.
• Donottouchtheunlabeledside.
• Donotattachanyseal,labelordataprotec-
tionsheettoeithersideofadisc.
• Donot exposeadisctodirectsunlightor
excessiveheat.
• Wipea dirtydiscfromthecenteroutward
withacleaningcloth.
• Neverusesolventssuchasbenzineoralco-
hol.
• Thisunitcannotplay3-inch(8cm)discs.
• Neverinsert a3-inchdisccontained inthe
adapteroranirregularlyshapeddisc.
Theunitmaynotbeabletoejectit.
Toprovide acleardemonstrationand
anal-
ternativeforeasyunderstandingof theopera-
tionofthisunit,graphicillustrationwasused.
However, thisillustrationisnotnecessary
printedastheactualimagefoundontheunit.
SafetyPrecautions.........................................1
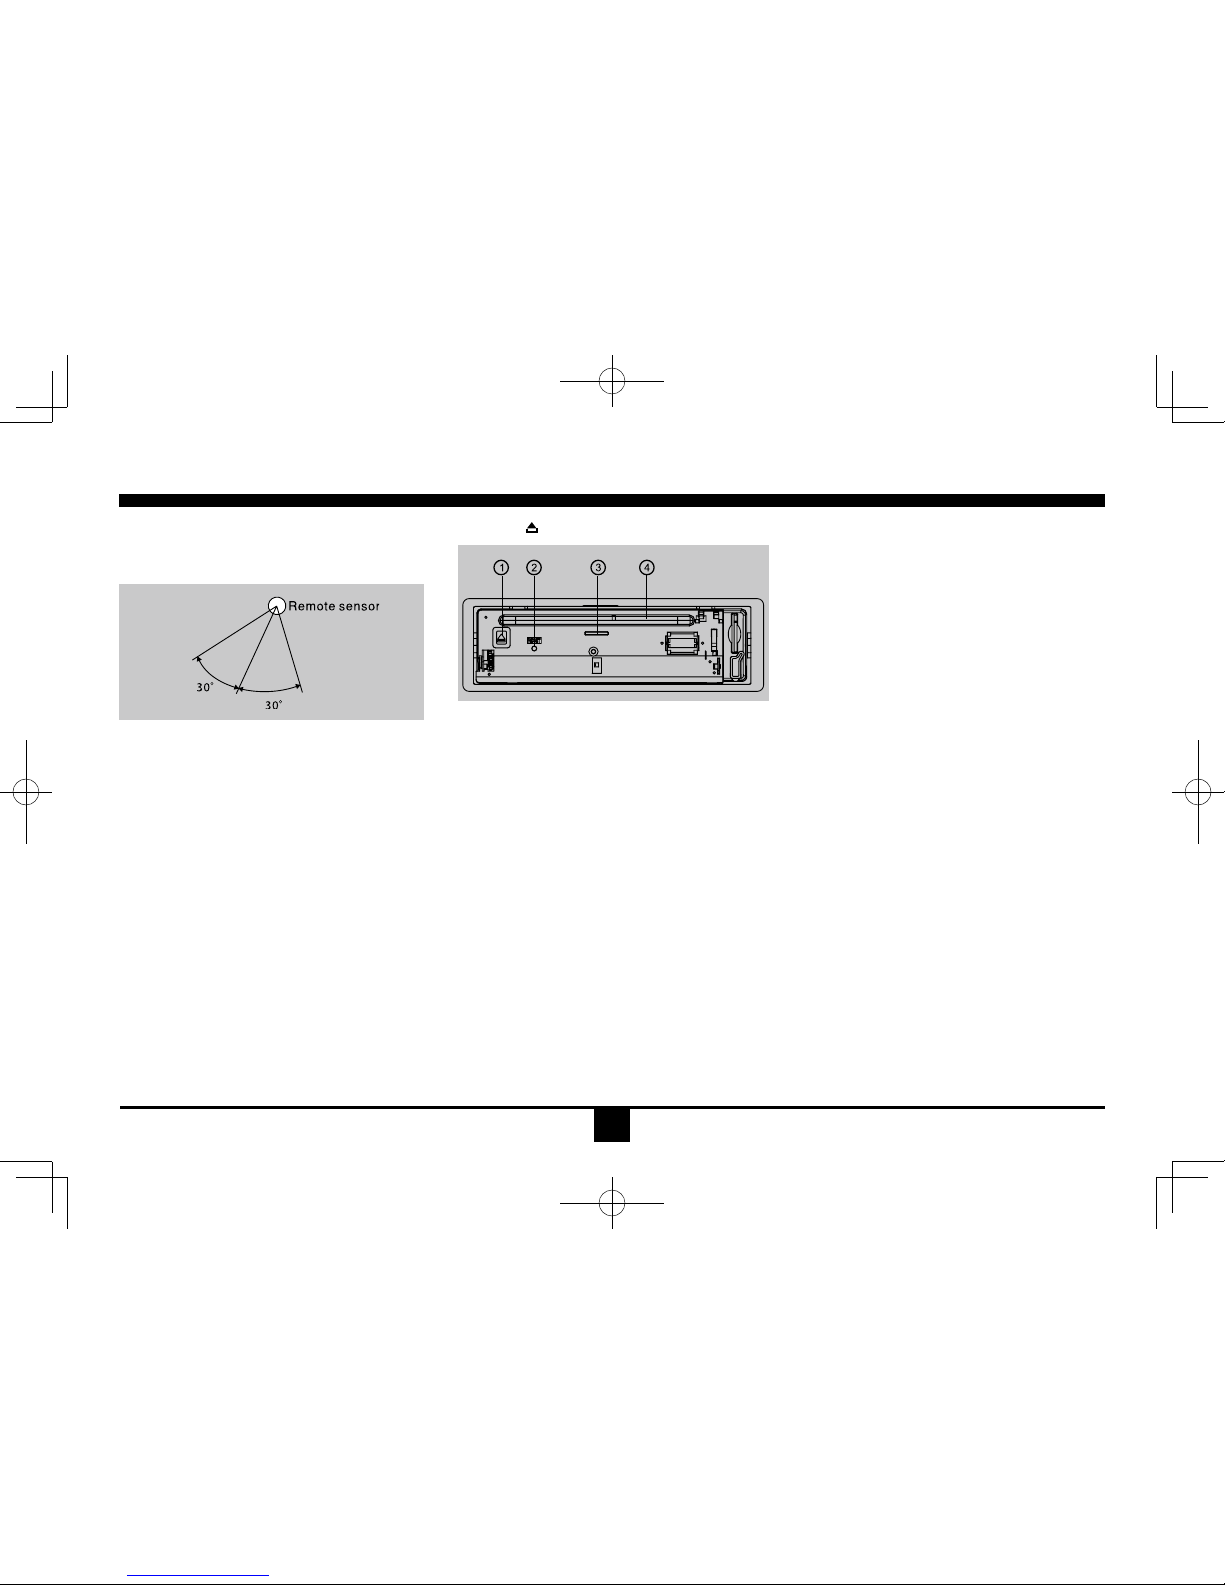
PanelControls...............................................2
RemoteControls......................................... 3-4
GeneralOperation...................................... 4-5
RadioMode....................................................6
USB/SD/MMC/MP3Mode..............................7
DiscMode..................................................7-11
DVDSetup.............................................. 12-13
ElectricalConnections............................ 14-15
Anti-TheftSystem.........................................15
InstallationGuide..........................................16
Troubleshooting............................................17
Specications...............................................18

2
Panel Controls
Power on/off: Press PWR to turn on/off the unit.
LOC ST/MO
LOUD
1.Poweron/off
2.Sourceswitch
-Radio
-Disc(whendiscinserted)
-Card(whenSD/MMCinserted)
-USB(whenUSBinserted)
-Aux-in
3.Mute
4.-Rotatetheknobtoadjustvolumelevel.
-Shortpresstoselectaudiomenu,and
rotatetheknobtoadjustlevel.
-Longpresstoenterintosettingmenu,then
eachpresschangesthemode.
5.Bandswitch:FM1-FM2-M3-MW1-MW2
6.Button1:Play/Pause
7.Button2:Introplay(10sec)
8.Button3:Trackrepeatplay
9.Button4:Trackrandomplay
10.Button5:-VideosystemNTSC\PAL60\
PAL\AUTO
-Folderdown(MP3)
11.Button6:-DVDaudio/VCDaudioL/R/ST
-Folderup(MP3)
*1-6radiopreset:Presstolistentoapreset
station.Holdformorethan2secondsto
storestation.
12.USBconnector
13.SD/MMCcardslot
14.Panelopen
15.FMmono/stereo(Radiomode)
16.Loudness
17.Radiolocal/distant
18.-Shortpresstoswitchtoclockdisplay,
pressagaintoexit.
-ShortpresstodisplayDVDinformationin
DVDvideomode.
-Longpresstoenterclocksetting.
19.-Tofastsearchwithinatrack/skiptonext
orprevioustrack
-Radiotune
20.Radiostationautopreset
21.RemoteSensor

3
Power on/off: Press to turn on/
off the unit.
Remote Controls
Replacing the lithium battery of
remote control unit.
Whentherangeofoperationofthecard
remotecontrolbecomesshort ornofunction,
replacethelithiumbatterywith a newone.
Make sure the batterypolarityreplacementis
correct.
1.Pulloutthebatteryholderwhilepressingthe
stopper.
2.Insertthebutton-typelithiumbattery with
the(+)markfacingupward. Insertthebattery
holderintotheremotecontrol.
1 2
(CR2025)
1.Zoom(DVD/VCDonly)
2.Title(DVDonly)
3.Poweron/off
4.Setup
5.Menucursor
6.Enter
7.Program
8.Digitarea
9.-Shortpresstoselectaudiomenu,androtate
theknobtoadjustlevel.
-Longpresstoenterintosettingmenu,then
eachpresschangesthemode.
10.Volume
11.Mute
12.-Radiotune
-Trackskip/seek
13.Subtitle(DVDonly)
14.-Radio
-Disc(whendiscinserted)
-Card(whenSD/MMCinserted)
-USB(whenUSBinserted)
-Aux-in
15.Repeat
16.RepeatA-B
17.Stop/Return
18.Play/Pause
19.Gotosearch
20.-DVDmenu
-PBC(forVCD2.0orup)
21.-OSD:Onscreendisplay
-AMS:Radiopresetscan/Radioautopreset
22.-DVDaudio
-VCDaudioL/R/ST
23.-Shortpresstoswitchtoclockdisplay,
pressagaintoexit.
-ShortpresstodisplayDVDinformationin
DVDvideomode.
-Longpresstoenterclocksetting.
-Returntopreviousmenu(Settingmenu)
24.Angle(DVDonly)
25.-VideosystemPAL/NTSC/AUTO
-Radioband(inRadiomode)

4
Pressthe buttontoopenthepanel.
Remote Controls
Remote control operating range
Theremotecontrolcanoperatewithina
distanceof3~5m.
Warning
• Storethebatterywherechildrencannot
reach.Ifachildaccidentallyswallowsthe
battery,consultadoctorimmediately.
• Donotrecharge,short,disassembleorheat
thebatteryordisposeitinare.
• Donotleavethebattery withothermetallic
materials.Otherwise, thebattery maystart
togiveoffheat,crackorcatchre.
• Whenthrowingawayorsavingthebattery,
wrapitintapeandinsulate.
Behind the Panel General Operation
Switching on and off
1.PressPWRtoturnontheunit.
2.PressSRConceormoreto selectyour
desiredfunction:DISC,USB,CARD,Aux (
Aux-in),Tuner(Radio).
3.PressPWR againtopoweroff.
4.Whenyouswitch offthesystem orcarig-
nition,thesettings,tunerpresetsand the
volumelevelwillberetainedin theunit's
memory.
Clock Display
PressDISPonthepanelor on theremote
controltodisplayclocktime,and pressDISP
againtoexit.
Clock Setting
1.PressDISPmorethan2 seconds,minute
displayblinks, then rotate the knob to set
minute.
2.Presstheknobonce,hourdisplay blinks,
thenrotatetheknobtosethour.
3.PressDISPagaintoexit.
Audio Setting
PresstheVOLknob toselectaudiomenu:
VOL/BAS/TRE/BAL/FAD,and thenrotateto
adjust.
- VOL
Displayshowsthevolumelevel
VOLandnumberfrom0to40.
1.Whenthereisadiscinserted,shortpressto
ejectthedisc,press andholdmorethan 2
secondstoejectthediscforcedly.
Whenthere isnotadisc inserted,press
and hold more than 2secondsto reset the
mechanismcore.
2Resethole
Note: Pressing the RESET hole will erase
the clock setting and stored stations.
3Panelstatusindicator
Lightupwhenyouipthepaneldown;
Twinklewhenyouremovethepanel.
4Discslot,insertthedisc.

5
- BAS
DisplayshowstheBASSlevel.
BASSrange:-7to+7.
-TRE
DisplayshowstheTREBLElevel.
TREBLErange:-7to+7.
- BAL
DisplayshowstheBALANCElevel.
BALANCE range: 10 L(full left) to 10 R(full
right).
L=leftspeaker,R=rightspeaker.
- FAD
DisplayshowstheFADERlevel.
FADER range:10R(full rear)to10F (full
front).
R=rearspeaker,F=frontspeaker.
Menu Setting
PresstheVOLknob more than2seconds
toenterintomenumode,then eachpress
changesthemode.
- EQ
TheEqualizerfunctionappliespresetsound
effectstotheunit’saudiooutputsignal.Rotate
theknobtoselectEQsoundeffect:
FLAT-CLASSIC-ROCK-POP-JAZZ-USER
Withtheequalizerfunctionactivated,ifbassor
trebleisadjusted,theEQModewill revertto
“Off”.Whentheequalizerfunctionisactivated,
themostrecentlyselectedbass/treble levels
cannotbeadjusted.Whentheequalizerfunc-
tionisnotactive,theunitwillreturntothemost
recentlyselectedbassandtreblelevels.
- LOUD ON/ OFF
When listeningto musicatlow volumes, this
featurewillselectivelyboostcertainbass and
treblefrequencies.
- BEEP ON/ OFF
Thebeeptonefeatureallowstheselectionof
anaudiblebeeptonetobeheard eachtime
themenuisaccessed.
- SUBW ON/ OFF
Rotatetheknobtochoosesubwoofer-outon
oroff.
- 12 /24 HOURS
12 HOURS MODE:
The clock displays in the type of 12 hours such
as 11:18 AM.
24 HOURS MODE:
The clock displays in the type of 24 hours such
as 20:18.
- DX/LOCAL
Selectable when the current source is Radio
mode. Choose radio distant or local.
DX: Stations with strong and weak
signals can be broadcast.
LOCAL: Only station with strong signal can be
broadcast.
- MONO/STEREO
Selectable when the current source is Radio
mode.
Thisoptionallowsyouto select radio FM
mono/stereo.
- AREA SET
Thisoptionallowsyoutoselecttheappropriate
frequencyspacingforyourarea.
RotatetheknobtochooseUSAorEurope.
General Operation

6
Radio Mode
Selecting a Band
PressBANDonceormoretoselectFM1- FM2
- FM3 - MW1 - MW2.
Displayshowswaveband,frequency,and
presetstationnumberifalreadystored.
Selecting a Station
Pressthe or tuning buttontotuneto
anotherstation.
Tuning
- AUTO SEEK
Pressthe or buttonstoseekthenext/
previousstationautomatically.
- MANUAL SEEK
Pressandholdthe or buttonstoenter
manualtuningmode.Press thebuttonsagain
tomovetheradiofrequencynumberup or
downonestep.
Note:
• Duringmanualseeking,ifthe pausebe-
tweentwooperatingsteps is longerthan5
seconds,whenyoucontinue to pressthe
or buttons,theunitwill enterauto
seeking.
• Duringmanualseeking,whenyoupressand
holdthe or buttons,theunitwillseek
continuously.
Preset Mode
Sixnumberedpresetbuttonsstoreand recall
stationsforeachband.Thestored stations
(1-6)forthecurrentbandcan beviewedon
thescreen.
Storing Stations
- Auto storing
1.Selectaband(ifneeded).
2.PressAMSbrieyto searchallstationsin
theband,the6strongestavailable station
willbeautomaticallysavedinthe preset
button(numbers1-6)
- Manual Storing
1.Selectaband(ifneeded),then selecta
station.
2.Pressandhold a presetbutton(numbers
1-6)onthefrontpanelorremotecontrol.
3.Thepresetnumberandstationisdisplayed
andhighlighted.
Recalling a Station
1.Selectaband(ifneeded).
2.Pressafrontpanelor remote control
presetbutton(numbers1-6)toselectthe
correspondingstoredstation.

7
Note:
USBfunctions(ashmemorytype)MP3music
play.
1.SD/MMCcardsupport.
2.USBflashmemory2in1 (SD/MMC)sup-
port.
3.SupportFAT16&FAT32
4.Filename:32byte/dirname:32byte/tag
name:32byte.
5.Tag(id3tagver2.0)
Title/artist/album:32bytesupport.
6.Multicardreadernotsupport.
7.USB1.1support.
Not all kinds of USB devices are compat-
ible with the unit.
USB/SD/MMC/MP3 Mode
Accessing Disc Mode
Ifadiscisalreadyin the discslotbutisnot
playing,presstheSRC button onthefront
panelorontheremotecontroltoswitchtothe
DISCsource.ToplaylesfromanSDorUSB
that is already inserted, choose the CARD
orUSBsource.Thediscplaybackscreen is
indicatedbelow:
1.SourceIndicator
2.CurrentTrack/TotalTrack
3.NameoftheSongDisplay
4.Time/Clock
5.AudioFolder
6.PictureFolder
7.VideoFolder
2 4
5
6
7
1 3
Disc Mode
1. Load SD/MMC Card
Insertthe SD/MMCcardintotheslot.Theunit
willreadtheleofthecardautomatically.
2 . Take out SD/MMC Card
PushSRCbuttontonon-SDmode, pressthe
SD/MMCcardtopopout.
3. Load USB Device
InsertUSBdeviceinto theUSBjack.The
unitwillreadthe fileintheUSBdevice
automatically.
4. Take out USB Device
PresstheSRC buttontonon-USBmode and
takeouttheUSBdevicefromtheUSBjack.

8
Insert a Disc
Press toipdownthepanel.Insertthedisc
intotheslot,andtheunitwillchange todisc
modeautomatically.
Note:
•Pleaseconrmwhetherthereisadiscin
theunitbeforeyouinsertanotherone.
•Theunitwillexitcurrentplayingsourceand
enterDVDmodewhenonediscisinserted.
Eject the Disc
Press toflipdownthe panel.Press to
ejectthedisc.
Note:
•Afterejectingthedisc,theunitrevertstora-
diomode.
•You canejectadiscwiththe unit powered
off.Theunitremainsoffafterthedisc is
ejected.
Disc Playback
1.Whendiscinserted,displayshows LOAD.
ForMP3ordiscwithmixed files, reading
timemayexceed1minute.
2.ERRORwillbedisplayedif errorfoundin
discoperation.
3.ForVCD/CD,VCD orCDiconwillappear
onthedisplay.
4.WhileMP3/WMAles playback,MP3/WMA
iconwillappearonthedisplay.
5.For DVD, DVD icon will appear on the
displayandTITLEappears.PressENTER
or toplay.
File Type Supported
Audio le: MP3(*.mp3), WMA(*.wma)
Video le:
MPEG 2 (*.vob)
MPEG 1 (*.dat)
Xvid
Picture le: JPEG (*.jpg)
MP3 le:
ISO9660or ISO9660+ Joliet format -Max.
30characters.
Max. nested directory is 8 levels.
The max. album number is 99.
The max. length of each track is 99 minutes
59 seconds.
Supported sampling frequency for MP3 disc:
8KHz to 48KHz (44.1KHz preferably).
Supported bit-rates of MP3 disc are: 32 - 320
kbps (128 kbps preferably).
Disc and File NOT Supported
*.AAC, *.DLF, *.M3U, *.PLS, MP3 PRO files
and files with DRM.
Open session discs.
Audio/Picture/Video File Playback
WhenAUDIO/PICTURE/VIDEOleisplayed,
Category/Folder/Filelistwillbedisplayedon
thescreen,andle/foldername beingplayed
willbedisplayedontop.Currentselecteditem
willbehighlighted.
Category Select
Use / toselect AUDIO
PICTURE
VIDEO
PressENTERtoconrm.
Folder Select
Use / toenterfolderlistand use / to
selectdesiredfolder,pressENTERtoconrm.
File Select
Use / toenterfilelist and use / to
selectdesiredle,pressENTERtoplayback.
ForPICTURE,press to slide show the
pictures,pressPROGto selectpicture
showingstyle.
ForMUSIC,press willenterpoweronlogo,
thenpress toreturn.
Disc Mode

9
Note:
MP3andWMA(WindowsMediaAudio)music
lesaredigitalaudiolesthatarecompressed
toallowmorefiles to bestored.Thisunit
canplayMP3/WMAandvideodirectly from
filescontainedonaCD-R/RW,DVD-ROM,
DVD+RW,DVD-RW,DVD+R, DVD-Rand
DVD-VIDEO, or anSD card or USB Device.
Manytypesofsoftware are availableforcon-
vertingaudiofilesinto MP3/WMA formats.
NeroorRoxioEasy CDCreatorarerecom-
mended.This unitcanplay MP3(MPEG1,2,
2.5AudioLayer3).However,theMP3record-
ingmediaandacceptedformatsarelimited.
Entering ID3 Tag
ThisunitsupportsID3tagversion2.0.
Forcharactercodes,refertothe tabletothe
below.
Entering File and Folder Names
Namesusingthecode listcharactersarethe
onlyfilenamesandfoldernames thatcan
beenteredanddisplayed. Usinganyother
characterwillcausethe le andfoldernames
tobedisplayedincorrectly.Theunitrecognizes
andplaysonlyfileswith theMP3/WMA
extension.
Note:
Alenameenteredwithcharactersnotonthe
codelistmaynotplaycorrectly.
Electronic Shock Protection
•10secondsforCD-DA(CDA)
•>45secondsforMP3recordedat 44.1kHz,
128kbps
•>90secondsforWMArecordedat44.1kHz,
128kbps
Bit Rates
Theunitsupportsbitratesfrom32-320kbps.
MP3 Playing Order
When selected for play, files and folders
(FolderSearch,FileSearchorFolder Select)
areaccessedinthe orderinwhichthey were
writtentothemedia.Asaresult,the order in
whichtheyareexpectedtobe played may
notmatchtheorderinwhichtheyareactually
played.Youmay beabletosetthe orderin
whichMP3/WMAfilesaretobe playedby
assigningfilenamesbeginningwithplay
sequencenumberssuchas "01"to"99".For
example,amediumwiththe followingfolder/
lehierarchyissubject toFolderSearch,File
SearchorFolderSelectasshownbelow.
()
0
1
2♪①
♪②
5
♪⑧
♪⑦
6
7♪⑨
♪③
3
4
♪④
♪⑤
♪⑥
Layer1Layer 2Layer 3Layer 4Layer5
○Root Folder
Folder
♪File
Theplayerwillonlyrecognizethreefolder
levelsanddoesnotdisplayfolderscontaining
onlyotherfolders.In theexampleabove,the
unitwilldisplayfolders3,4,6,and8,butnot2
and7sincetheydonotcontainsincetheydo
notcontainanytracks directly.Folder 5 isnot
recognizedatallsinceitisatthefourthlevel.
Disc Mode

10
Disc Mode
Select Desired Track
-Press or toskiptothenexttrack.
-Use1-9and 0,10+buttonson theremote
controltoselectdesiredtracknumber.
Fast Forward/Backward During
Playback
Press or formorethan 2 secondsonce
ormoretoselectX2, X4,X8,X20tofast
backwardorforwardtrackduringplayback.
-Duringthefast forwardorbackward
operation,press brieytoplaybackagain.
-Duringthefast forwardorbackward
operation,thevolumewillbemuted.
Intro (For CD/VCD only)
Youcanplaythebeginning ofeverytrackfor
15secondsinsequence.
1.Duringplayback,pressINT once.
INTON/OFFwillappearonthedisplay.
2.PressINTagaintoselectthecurrenttrack.
Random Track Playback (For CD/
VCD/MP3 Only)
Youcanplayallthetracksinrandomorder.
1.Duringplayback,pressRDMonceormore.
-RDMiconwillappearonthedisplay.
2.PressRDMagaintoselectnormalplayback.
Repeat
Duringplayback,pressRPTonceormore.
-RPTiconwillappearonthedisplay.
-ForVCD/CD:DisplayappearsRPTONE
RPTALL RPTOFF
-ForDVD:Display appears RPTCHAPTER
RPTTITLE RPTOFF
-ForFiledisc:DisplayappearsRPTONE
RPTDIR RPTALL RPTOFF
Note:Ifyoudo not selectRPTon,whenthe
entirediscorTITLEplaybackhasfinished,
thesystemwillstop.Ifnoothercontrol,after5
minutestheunitwillturnintostandbymode.
Repeat A B
Selectdesiredpassagetorepeatplayback.
-PressA Bonce toselectstartingpoint.
DisplayshowsREPEATA.
-PressA Bagaintoselectendingpoint.
DisplayshowsREPEATA B,andselect-
edpassagestarttoreplay.
-PressA Bonceagaintoexit.
DisplayshowsA BCANCEL.
Pause
- Duringplayback,press topauseplay-
back.
- Thesoundwillbemuted.
- Display"PAUSE" in theTVscreen,display
andblink"PAUSE"onthepaneldisplay.
Press againtocontinueplayback.
PBC - Playback Control (For VCD
Only)
1.Ifyouinserta VCDwithPBC,playback
startsfromthebeginning ofthe1sttrack
automatically.
2.PressPBCtoshowmenu, use / or
digitbuttontoselectdesiredtrack.Press
toreturntopoweronlogo.PressPBCagain
toexitmenu.

11
Disc Mode
GOTO
Gotodesiredtrack/chapterortimepoint
directly.
PressGOTObuttonontheremote control,
trackorDVDTitle/Chapterandtimedisplayon
topofthescreen. Currentitemishighlighted.
Use / toselectdesired item.Usedigit
buttontoselectnumber.Press ENTER to
conrm.
Program
- PressPROGtoenterprogramlist.Use /
or / cursoranddigitbuttontoenternum-
ber.
ForDVDandFiledisc,selecttitleandchap-
ternumber.
ForVCDandCD,selecttracknumber.
- Press toplay, or movethecursorto se-
lect"PLAY"andpressENTERtoplay.
- Ifyouwant todelete thelist, movethe cur-
sorto"CLEAR",pressENTER todeleteall
thelistsetbefore.
- PressPROGagaintoexitprogramplay.
DVD Audio Select
PressAUDIOorR/Ltoselectaudiolanguage
tolisteniftheDVDhas multipleaudio
languages.
VCD Audio Select
PressR/Ltoselectaudiochanneltolisten.
DVD Subtitle Select
PressSUB.Ttoselect thesubtitlelanguage
toshowiftheDVDhas multiple language
subtitles.
DVD Title Select
PressTITLEtodisplaytitleorchapterlist,use
/ or / cursorordigitnumberto select,
pressENTERtoplay.
DVD Angle Select
PressANGLEtoselectdifferentangletoview
iftheDVDhasmultiple-angleviews.
ZOOM
PressZOOMbutton,thepicturewill be
zoomedaccordingly.
PROGRAM
PROGRAM

12
DVD Setup
PressSETUP to display setup menu on the
screen.
Use toselectsetupitems:
SYSTEM - LANGUAGE - VIDEO
DVD System Setup
Use , toselectandENTERtoconrm.
- TV SYSTEM: NTSC/PAL 60/PAL/AUTO
SelecttheTVsysteminthesettingmenu.
- TV TYPE: 4:3PS/4:3LB/16:9
SelectTVtypetowatchwidescreenmovies.
4:3PanScan:For4:3TV,leftandrightedges
willbecut.
4:3LetterBox:For4:3TV,blackbars willap-
pearontopandbottom.
16:9:For16:9widescreenTV.
- PASSWORD
1.Pressnumberbutton"0000"ontheremote
control,thenpresstheENTER button to
conrm.
2.Pressthedesired4-digit password,and
thenpressENTERbuttontoconrm.
3.Recordthepasswordand keepitina safe
placeforfuturereference.
If you forget the password, please
enter 0000 to reset a new password.
The password : 0000
- RATING:
1 KID SAFE/2 G/3 PG/4 PG13/5 PG-R/6 R/7
NC-17/8 ADULT
Theratingofthediscisfrom1to8:
(1)withthemostlimitswhenplaying.
(8)withtheleastlimitswhenplaying.
Originalsetting:8
Note:
Theratingcanbeselectedonlyunder the
passwordunlockedstatus,and thelimitscan
beworkedonlyunderthepassword locked
status.
- DOWNMIX:
LT(/RT)/STEREO/VSS
Selectcompositeaudiooutputfrom2channel
speakersystem.
- DEFAULT: RESTORE
Ifthisitemisselected,the unit willreturnto
originalsetting.
DVD Language Setup
Use , toselectandENTERtoconrm.
- OSD LANGUAGE:
English
German
Spanish
French
Portuguese
Selectonelanguagethatyouarefamiliarwith
todisplaysystemmenu.
- AUDIO LANG:
Chinese
English
French
Spanish
Portuguese

13
DVD Setup
German
Selectonedialoguelanguagethatyouare
familiarwithwhenplayingbackDVDdiscs.
Note:
IftheDVDdisc has theaudiofilein the
selectedlanguage,thedialogues youlistened
towillbeintheselectedlanguage.
IftheDVDdiscdoesnotcontaintheaudiole
intheselectedlanguage,thedialogues you
listenedtowillbeinthedefaultlanguage.
Youcanchangethelanguage bypressing
[AUDIO]keyoftheremotecontroller.
- SUBTITLE LANG:
Chinese
English
French
Spanish
German
Off
Selectonelanguagethatyouarefamiliarwith
todisplayDVDsubtitles.
IftheDVDdischasthe subtitle fileinthe
selectedlanguage,thesubtitle will be
displayedintheselectedlanguage.
IftheDVDdiscdoesnot containthesubtitle
leintheselectedlanguage,thesubtitlewillbe
displayedinthedefaultlanguage.
- MENU LANG:
Chinese
English
French
Spanish
Portuguese
German
Selectonelanguagethatyouarefamiliarwith
todisplayDVDmenu.
Note:
IftheDVDdisc hastheselectedlanguage,
theDVDMENU/TITLEwillbedisplayedinthe
selectedlanguage.
IftheDVDdisc does notcontaintheselected
language,theDVDMENU/TITLE willbe
displayedinthedefaultlanguage.
DVD Video Setup
Use , toselectandENTERtoconrm.
- BRIGHTNESS
Setthebrightnessofthevideooutputwith
from0to12.
- CONTRAST
Setthecontrastof the videooutputwith
from0to12.
- HUE
Setthehueofthevideooutputwith
from-6
to+6.
- SATURATION
Setthesaturationofthevideooutputwith
from0to12.
- SHARPNESS
Setthesharpnessofthevideooutputwith
from0to8.

14
Electrical Connections
Wiring Diagram
ISO Connector
Amplifier
Connector
Fuse 15A
Rear Line-out (Gray)
L(White)
R(Red)
Front Line-out (Brown)
L(White)
R(Red)
Video out (Yellow)
(Green)
Subwoofer out
(Black)
Antenna
Aux in
L(White)
R(Red)

15
Electrical Connections Anti-Theft System
Using the ISO Connector
1.Ifyourcar is equippedwiththe ISOcon-
nector,thenconnecttheISOconnectorsas
illustrated.
2.ForconnectionswithouttheISOconnec-
tors,checkthewiringinthevehiclecarefully
beforeconnecting,incorrectconnectionmay
causeseriousdamagetothisunit.
Cutthe connector, connectthecolored
leadsofthepower cord tothecarbattery,
asshowninthecolourcodetablebelowfor
speakerandpowercableconnections.
Location Connector A Connector B
RearRight(+)-Purple
RearRight(-)-Purple/
BlackStripe
FrontRight(+)-Gray
FrontRight(-)-Gray/
BlackStripe
FrontLeft(+)-White
FrontLeft(-)-White/
BlackStripe
RearLeft(+)-Green
RearLeft(-)-Green/
BlackStripe
1
2
3
4
5
6
7ACC+/Red
ANT/Ampcontrol/
Blue
Battery12V(+)/Yellow
Ground/Black
8
Function
Telephone-mute/Pink
Thisunitisequippedwithaip-downdetachable
panel.
Panelcanbedetachedandtaken withyou,
helpingtodetertheft.
Removing the Panel
1.Switchoffthepoweroftheunit.
2.Pressbuttontoipdownthepanel.
3.Atanangleholdthepaneltopullitout.
4.Placethepanel intothecaseand takeit
withyouwhenyouleavethecar.
Installing the Panel
1.Holdthepanelandensurethe panelfaces
towardyou,andsetthe rightsideofthe
panelinthepanelbracket.
2.Presstheleftsideofthepaneluntilitlocks.
Removing the Unit
1.Removethepanelandthetrimplate.
2.Insertbothremovalkeysintohole onthe
frontofthesetuntiltheylock.
3.Pullouttheunit.
LightingConnection/
Brown

16
Installation Guide
Installation Procedures
Firstcompletetheelectricalconnections,and
thencheckforcorrectness.
Reset
Press buttontoipdown thepanel.Then
presstheRESETbuttonwithapointedobject
toresettheunittotheoriginalstatus.
Note:PresstheRESETbuttonwill erasethe
clockandstoredstations.
Installation Opening
Thisunitcanbeinstalledin anydashboard
havinganopeningasshownbelow.
Thedashboardshouldbe4.75mm- 5.56mm
thickinordertobeabletosupporttheunit.
52mm
183mm
Important:Removethesetwoscrewsbeforeinstallation.Otherwise,theplayerwillnotwork.
1. Inset mounting collar into the dashboard, and bend the mounting tabs out with a screw-
driver.
Makesurethatlocklever isushwiththemountingcollar(notprojectingoutward).
2. Secure the rear of the unit.
Afterxingmountingboltandpowerconnector,xtherearoftheunittothecarbodybyrubber
cushion.
3. Insert trim plate.
lock lever

17
Troubleshooting
Ifyoususpectsomethingiswrong,immediately
switchpoweroff.Immediatelystopusingitand
callthestorewhereyoupurchasedit.
Nevertrytorepairtheunityourselfbecauseit
isdangeroustodoso.
General
No power or no sound.
Car'sengineswitchisnoton.
Turn your car's key to ACC or ON.
Cableisnotcorrectlyconnected.
Check connection.
Fuseisblown.
Replace fuse.
Check volume or mute on / off.
Iftheabovesolutionscannothelp.
Press the RESET button.
Disc
Disc is inside but no sound.
Discisupsidedown.
Place disc in the correct direction, and the
label side up.
Discisdirtyordamaged.
Clean disc or change another disc.
Disc sound skips, tone quality is
low.
Discisdirtyordamaged.
Clean CD or change another CD.
Sound skips due to vibration.
Mountingangleisover30o.
Adjust mounting angle to less than 30o.
Unstablemounting.
Mount the unit securely with the mounting
parts.
Radio
Noise in broadcasts.
Stationistoofar,orsignalsaretooweak.
Select other stations of higher signal level.
Preset station lost.
Batterycableisnotcorrectlyconnected.
Connect the battery cable to the terminal
that is always live.
Error Display Messages
Display shows ERROR.
Discisdirty,damagedorupsidedown.
Press to eject the disc.
When video le initializing time is
too long.
Filereaderrororletypenotsupported.
Press SRC to exit. Then press SRC to play
disc again.

18
Specications
General
Powersupply
Maximumpoweroutput
Continuouspower
output
Suitablespeaker
impedance
Pre-Ampoutputvoltage
Fuse
Dimensions(WxHxD)
Weight
Aux-inlevel
Sub-out
12VDC(11V-16V)
Testvoltage14.4V,
negativeground
50Wx4channels
20Wx4channels(4
10%T.H.D.)
4-8ohm
4.0V
(CDplaymode:1KHz,
0dB,10K load)
15A
178x50x166mm
2.2kg
≥300mV
4.0V(CDplaymode:
61Hz,0dB,10K load)
FM Stereo Radio
Frequencyrange
Usablesensitivity
Frequencyresponse
Stereoseparation
Imageresponseratio
IFresponseratio
Signal/noiseratio
87.5-108.0MHz
(Europe)
87.5-107.9MHz
(America)
8dBμ
30Hz-15KHz
30dB(1KHz)
50dB
70dB
>55dB
AM(MW) Radio
Frequencyrange
Usablesensitivity
(S/N=20dB)
522-1620KHz
(Europe)
530-1710KHz
(America)
30dBμ
Disc Player
System
Frequencyresponse
Signal/noiseratio
Totalharmonicdistortion
Channelseparation
Videosignalformatsystem
Videooutput
Discdigital
audiosystem
20Hz-20KHz
>80dB
Lessthan
0.20%(1KHz)
>60dB
NTSC\PAL
60\PAL\
AUTO
1 0.2V
Components
Mountingcollar
MachinescrewsM5x6mm
Mountingbolt(50mm)
Wireconnector
Removablefaceplatecase
Trimplate
Removalkey
OperatingInstructions
Rubbercushion
Remotecontrolunit
Battery(CR2025)
1
4
1
1
1
1
2
1
1
1
1
Note:
Specificationsandthedesignaresubjectto
changewithoutnoticeduetoimprovements.

CLASS 1
LASER PRODUCT
P.N.:127075002601
Table of contents