ZENEC ZE-160DVD User manual

INSTRUCTION MANUAL
MODEL NO:
ZE-160DVD
DVD & MP3/ WMA
RDS RECEIVER
CAR DVD RECEIVER
ZE-160DVD
ZE-160DVD Manual E neu-.indd 1ZE-160DVD Manual E neu-.indd 1 07.09.2004 10:41:48 Uhr07.09.2004 10:41:48 Uhr

%N 2
Section
Contents 00
Thank you for buying this
product.
Please read through these operating
instructions, so you will know how to
operate your headunit properly.
After you have finished reading the
instructions, put them away in a safe
place for future reference.
ZE-160DVD Manual E neu-.indd 2ZE-160DVD Manual E neu-.indd 2 07.09.2004 10:41:49 Uhr07.09.2004 10:41:49 Uhr

ion
0
ZE-160DVD Manual E neu-.indd 3ZE-160DVD Manual E neu-.indd 3 07.09.2004 10:41:50 Uhr07.09.2004 10:41:50 Uhr

%N 4
Section Se
c
1 Before You Start
General Function .................................. 1
Cautions ............................................... 2
Region Numbers .................................. 2
What the Marks on DVD Indicate ......... 3
Disc Organization DVD......................... 3
Video CD and CD/MP3 ........................ 3
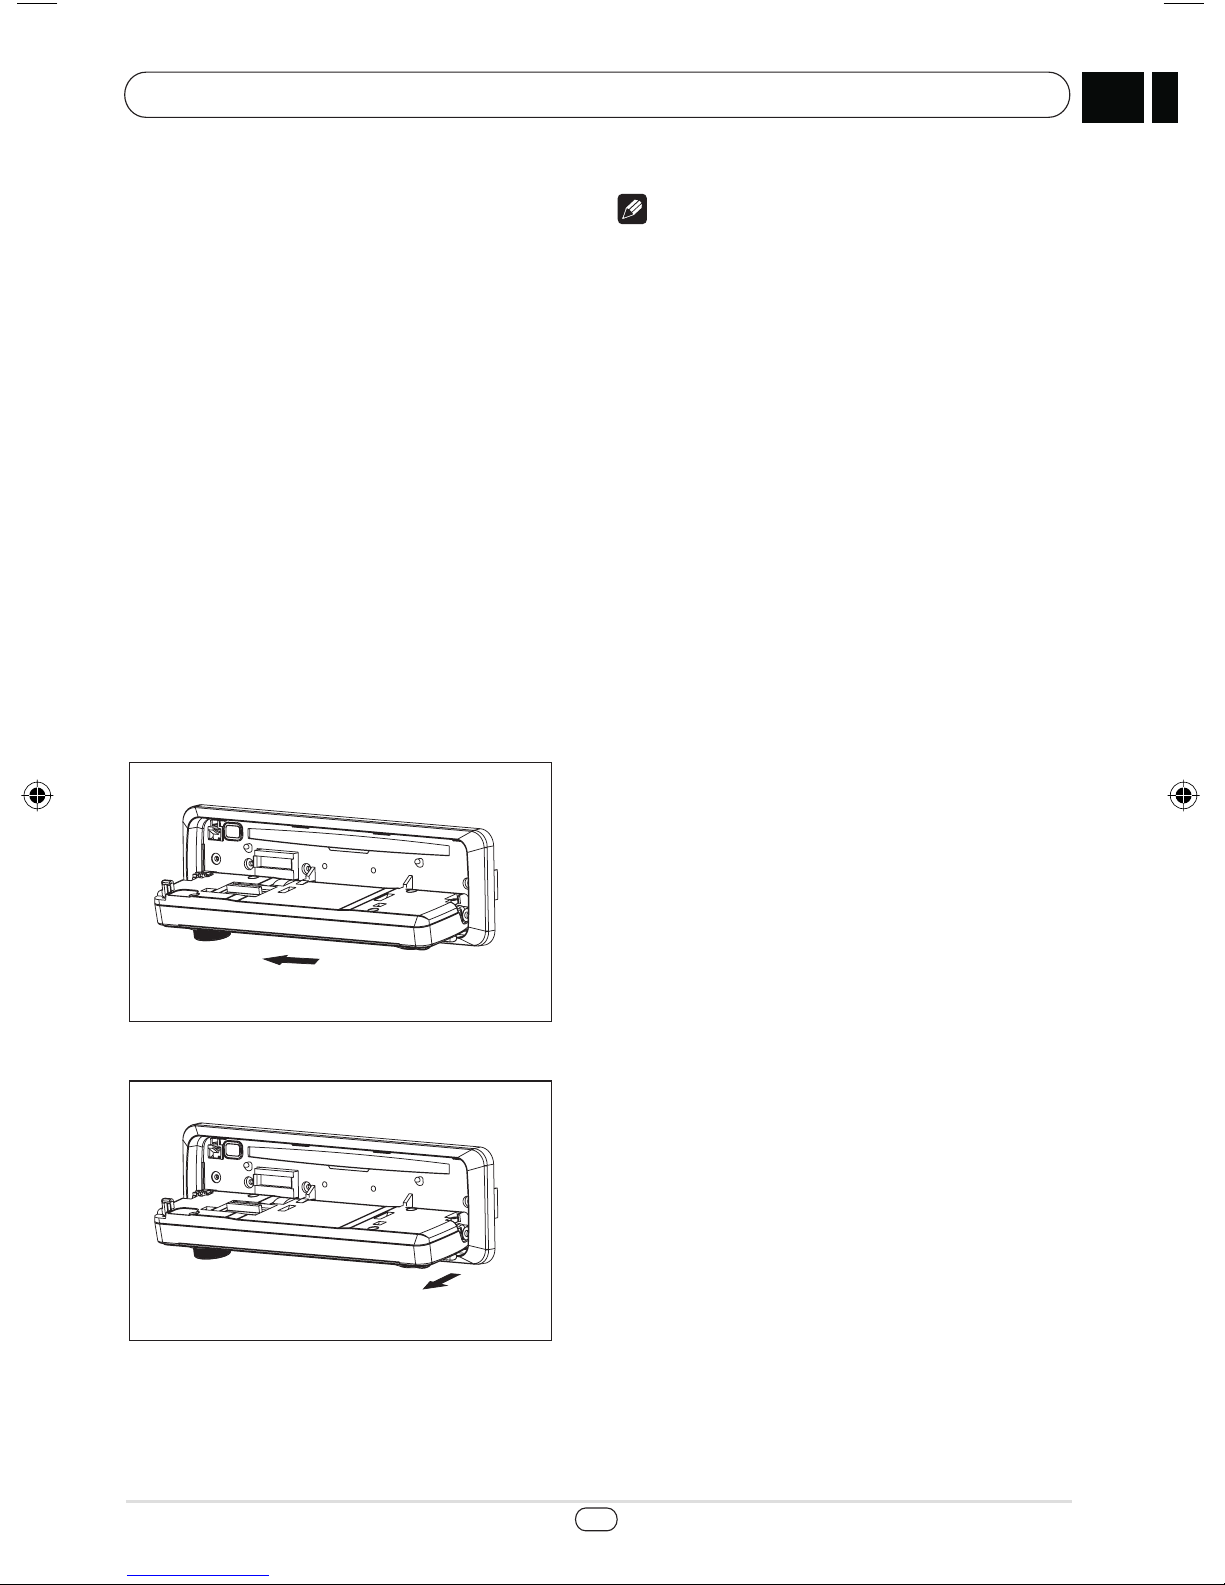
Protecting your Unit from Theft............ 4
Removing the front Panel..................... 4
What‘s what.......................................... 5
• Head Unit........................................... 5
• Remote Control ................................. 7
2 Basic Operation
Power ON/OFF..................................... 8
Mute Control ........................................ 8
Mode Switch ........................................ 8
Volume Control..................................... 8
Switch the Display Mode ..................... 8
Set Clock.............................................. 8
Reset Switch ........................................ 8
System Setup....................................... 9
Setup Bass, Treble, Balance, Fader,
Loud, Sound Effect and subwoofer ..... 9
3 Tuner Operation
Select Tuner Function ........................ 10
Select Band........................................ 10
Search Station.................................... 10
Change to Preset Station ................... 10
Store Current Station ......................... 10
Scan Stored Station ........................... 10
Select LOC/DX Control ...................... 10
4 DVD Operation
Before Operation................................ 11
Release front Panel ............................ 11
Load in Disc........................................ 11
Eject out Disc ..................................... 11
Select zoom........................................ 12
Pause/Playback.................................. 12
Start/Stop Playback ........................... 12
Skip Playback..................................... 12
Repeat Playback ................................ 12
Select Chapter/Track or Playtime ...... 12
Select Subtitle Language--only DVD.. 13
Select Audio Track (language)
--only DVD.......................................... 13
Select Camera Angle.......................... 13
Fast Forward/Fast Backward............. 13
Select rearplay.................................... 13
Return................................................. 13
Clear ................................................... 13
5 Dual Zone (Real Playback)
Operation
What is Dual Zone Playback .............. 14
Enable Dual Zone Playback ............... 14
Mute Function for Rear Side Playback14
Disable Dual Zone Playback .............. 15
6 Built-in Player Setup
Set Language ..................................... 16
Set Video............................................ 17
Set Audio............................................ 18
Set Rating........................................... 19
7 CD Changer Operation
Mode Switch ...................................... 20
Pause and Playback........................... 20
Select Discs........................................ 20
Random/Scan .................................... 20
Repeat Play ........................................ 20
8 Installation & Connection
Installation Notes................................ 21
Accessories and Hardware ................ 21
Installation Procedure ........................ 22
Cables Connection........................ 23/24
Speakers Connection......................... 25
Outlet Power Amplifier Connection.... 26
Fuse.................................................... 26
9 Additional Information
Warning .............................................. 27
Precautions ........................................ 27
Troubleshooting ................................. 27
Notes.................................................. 28
Care of discs ...................................... 30
Specification....................................... 31
Warranty............................................. 32
Contents 00
0
ZE-160DVD Manual E neu-.indd 4ZE-160DVD Manual E neu-.indd 4 07.09.2004 10:41:50 Uhr07.09.2004 10:41:50 Uhr

ion
%N 1
Section
0
01 Before You Start
Sound effect of Dolby
Surround 2 channel—layout
diagram of speakers
General Function:
Type of supported discs:
DVD-5, DVD-9, DVD-10, SVCD, DVCD, VCD,
CD, MP3, etc.
RearPlay function lets you enjoy DVD and
radio at the same time.
TV Type:
NTSC, PAL or Auto
Video output:
Pan&Scan, Letter box, Wide
Audio output:
• Dolby digital
• 2.1CH output.
• 2 CH RealPlay output.
Audio input:
• Stereo input.
Disc Playback functions:
• Multi-visual angle, Multi-language.
• Fast Forward, Fast Backward, Slow
Forward, Slow Backward
• Broken point auto-memory
AM/FM Tuner:
• Store 18 FM and 12 AM broadcasting
stations while
FM Frequency: range 87.5M~108 MHz
AM Frequency: range 522k--1620kHz
• Tune automatically and manually
Manufactured under license from Dolby
Laboratories.
”Dolby” and the double-D symbol are
trademarks of Dolby Laboratories.
ZE-160DVD Manual E neu-.indd Abs1:1ZE-160DVD Manual E neu-.indd Abs1:1 07.09.2004 10:41:51 Uhr07.09.2004 10:41:51 Uhr

%N 2
Section Se
c
Before You Start
Cautions:
• Keep the volume low to concentrate on
traffic and road conditions for driving
safety.
• When washing car, keep Car DVD AV
System (including speakers and disc)
from water or humidity in order to avoid
electric shorts or other damages.
• Maintenance consisting of delicate
components, please avoid random
disassembling or adjusting any parts.
If requiring repair, please go to a
professional maintenance center.
• This unit is for car with a 12-volt battery
and negative grounding.
• Laser Disc System
Do not put little objects like coins into the
product.
• Do not place screwdrivers or other
metals near disc or Laser Disc Player.
• Car Ventilation
Parking in direct sunlight for several
hours will cause higher temperature in
the car. So start the car first to cool down
the internal temp, and then turn on the
AV system.
• Preset Memory
After cut off power supply, preset
memory will disappear and the whole
system will return to factory default
settings.
• Installation
The unit should be installed horizontally
with front side up less than 15°.
• Video system of a connected component
This product is NTSC/PAL system
compatible. When connecting other
components to this product, be sure
components are compatible with the
same video systems. If it is not, images
will not be correctly reproduced.
Region numbers:
DVD players and DVD discs feature region
numbers indicating the area in which they
were purchased. Playback of DVD is not
possible unless it features the same region
number as the DVD player. This product‘s
region number is displayed by a sticker on
this product.
The illustration below shows the regions and
corresponding region numbers.
01
0
ZE-160DVD Manual E neu-.indd Abs1:2ZE-160DVD Manual E neu-.indd Abs1:2 07.09.2004 10:41:51 Uhr07.09.2004 10:41:51 Uhr

ion
%N 3
Section
Before You Start
What the marks on DVDs
Indicate
The marks below can be found on DVD disc
labels and packages. They indicate the type
of images and audio recorded on the disc,
and the functions you can use.
Disc organization DVD
On DVD-Video discs, the contents are
divided into titles which are in turn divided
into chapters.
With video material, a single work (movie
etc.) usually corresponds to a single title,
with different scenes corresponding to
separate chapters. With karaoke discs, one
song corresponds to one title.
However, some discs are not organized like
this, so bear this in mind when using the
search function.
Video CD and CD/MP3
On CDs/MP3 and Video CDs, the contents
are divided into tracks. One track usually
corresponds to one song. On some discs,
tracks may also feature an index.
With Video CDs featuring PBC (Playback
Control), you can use a menu to perform
playback operations. It may not be possible
to use function of selecting track directly
using number buttons.
Indicates the number of audio system`s
output channels.
Indicates the number of subtitle languages.
Indicates the number of viewing angles.
Indicates the picture size (aspect ratio:
screen width-to-height ratio) type.
Indicates the number of the region where
playback is possible.
1
01
ZE-160DVD Manual E neu-.indd Abs1:3ZE-160DVD Manual E neu-.indd Abs1:3 07.09.2004 10:41:52 Uhr07.09.2004 10:41:52 Uhr

%N 4
Section Se
c
Protecting your unit from
theft
The front panel can be detached from the
head unit and stored in the protective case
provided to discourage theft.
Keep in mind to press open button and then
detach the front panel.
Removing the front panel
• Press OPEN button on panel to put down
the front panel.
• Push the right side of panel towards left
and then pull it off outward you.
Before You Start
Note:
• Never use force or grip the display and
the buttons tightly when removing or
attaching.
• Avoid subjecting the front panel to
excessive shocks.
• Keep the front panel out of exposure to
direct sunlight and high temperatures.
01
0
ZE-160DVD Manual E neu-.indd Abs1:4ZE-160DVD Manual E neu-.indd Abs1:4 07.09.2004 10:41:54 Uhr07.09.2004 10:41:54 Uhr

ion
%N 5
Section
12 34
5
6789 10 11 12 13 14 15 16 17
Before You Start
eOPEN button
• Press to open the front panel.
rSELECT/LOCAL button
• Press to select audio effect setup,
e.g. Bass, Treble, Balance, Fader,
Loud
• Press and hold over 2 sec,
it switches between LOCAL/
DISTANCE while the tuner is
playing as a source.
tVOLUME
• Rotate to boost or reduce the
volume.
uPOWER/MUTE button
• Press to turn on the unit power
from standby state; Press to mute
the volume at power on state.
• Press and hold for over 2 sec, it will
turn off the unit.
i(5634) /AS/PS button
• Press to move the cursor during
playback setup.
• Press [6] to scan the stored station
for tuning.
• Press [6] and hold over 2 sec to
scan current band and auto store
the available stations.
oPREVIOUS ( 9) / REVERSE
(7)button
• Press to go to the previous track
(chapter) or seek tuning decrease
frequency automatically while the
tuner is playing as a source.
• If press and hold over 2 sec, it
perform fast backward playback
or seek tuning decrease frequency
manual while the tuner is playing as
a source.
What‘s what
Head Unit:
1
01
ZE-160DVD Manual E neu-.indd Abs1:5ZE-160DVD Manual E neu-.indd Abs1:5 07.09.2004 10:41:54 Uhr07.09.2004 10:41:54 Uhr

%N 6
Section Se
c
right -
right +
left -
grey
grey/black
white/black
left + white
Correct
left +
right -
right +
left -
Wrong
left +
right +
right -
left -
Wrong
right -
right +
left -
left +
Wrong
Before You Start
NEXT ( :) / FORWARD
(8)button
• Press to go to the next track
(chapter) or seek tuning increase
frequency automatically while the
tuner is playing as a source
• Press and hold over 2 sec, to
perform fast forward playback
or to increase tuning frequency
manually while the tuner is playing
as a source.
DISP button
• Press to display the clock time.
1/DISC- button
• Press to preset tuning and previous
disc search when using a CD
changer.
2/DISC+ button
• Press to preset tuning and next
disc search when using a CD
changer.
3/P.MODE button
• Press to preset tuning and switch
play mode (e.g. random, intro
[scan] ) when using a CD changer.
4/ZOOM button
• Press to preset tuning and zoom
playback when using built-in DVD
player.
5/REPT button
• Press to preset tuning and
repeated playback when using
built-in DVD player or using a CD
changer.
6/STOP button
• Press to preset tuning and stop
playback when using built-in DVD
player.
BAND/ENT button
• Press to select band among three
FM and two AM bands.
• if current mode is DVD player, the
key is used as PLAY (ENTER)
• Press and hold over 2 sec to turn
on/off dual zone playback.
PAUSE (;) button
• Press to pause during playback
• Press to move ahead one frame at
a time during pause When using
built-in DVD.
• Press to resume normal play back
while paused when using a CD
changer.
MODE button
• Press to choose revolve through all
of the available sources.
01
0
ZE-160DVD Manual E neu-.indd Abs1:6ZE-160DVD Manual E neu-.indd Abs1:6 07.09.2004 10:41:55 Uhr07.09.2004 10:41:55 Uhr

ion
%N 7
Section
right -
right +
left -
grey
grey/black
white/black
left + white
Correct
left +
right -
right +
left -
Wrong
left +
right +
right -
left -
Wrong
right -
right +
left -
left +
Wrong
0
123
456
789
10+
Mode Disp
Menu Setup Pause
Stop
Band
Enter
Play
Vol- Vo l+
Goto Mute
Ti tle RPT Slow PBC
Audio Sub-
title Angle P/N
Clea r Retu rn
Dis p
Before You Start
• Please refer to keys logo on the remote
control to operate.
• For keys detail usage please see DVD
Operation chapter (page 11~page 13).
Note:
• DISP button
This button is different from the DISP on
the panel. It is only used for DVD player
OSD control.
Use and care of the remote
control
Installing the battery
• Slide the tray out on the back of the
remote control and insert the battery with
the plus (+) and minus (-) poles pointing in
the proper direction.
Warning & Caution
• Keep the battery out of the reach
of children. Should the battery be
swallowed, immediately consult a doctor.
• Use only one CR2025 (3V) lithium battery.
• Remove the battery if the remote control
is not to be used for a month or longer.
• Do not recharge, disassemble, heat or
dispose of battery in fire.
• Do not handle the battery with metallic
tools.
• Do not store the battery with metallic
materials.
• In the event of battery leakage, wipe the
remote control completely clean and
install a new battery.
• When disposing of used batteries, please
comply with governmental regulation or
environmental public institution‘s rules
that apply in your country/area.
• Always check carefully that you are
loading the battery with its plus (+) and
minus (-) poles facing in the proper
directions.
Remote Control:
1
01
ZE-160DVD Manual E neu-.indd Abs1:7ZE-160DVD Manual E neu-.indd Abs1:7 07.09.2004 10:41:57 Uhr07.09.2004 10:41:57 Uhr

%N 8
Section Se
c
RESET
RESET
12V
night lamp
Basic Operation
Power ON/OFF
• Press [POWER/MUTE] button to turn the
unit on.
• Press and hold [POWER/MUTE] button
until the unit is turned off.
Note:
• When one disc is loading in/out, the unit
can also be switched off.
Mute Control
• When the unit is turning on, press
[POWER/MUTE] button to mute the
sound of player. Press it again, the unit
will exit MUTE mode.
Mode Switch
• Press [MODE] button to select source
according to the following sequence:
Tuner → DVD (Built-in player) →
CDC (Multi-CD changer) →Aux →Tuner
Volume Control
• Rotate the knob to boost or lower the
volume.
Switch the display mode
• Press [DISP] button repeatedly, different
displays will be switched on LCD screen
according to the following sequence, and
after 5 sec, it will turn back to the default
display of current mode automatically.
Tuner:
Frequency (default) →Clock
CDC:
Play time (default) →Clock
DVD:
Play time (default) →disc type →Clock
Aux: Aux (default) →Clock
Note:
• When the unit is in standby state, only
current time be displayed on LCD if the
clock display is enabled.
Set Clock
• If current display mode is Clock mode,
press and hold [DISP] to go into clock set
mode.
In clock set mode:
• Press [DISP] button will switch between
Hour and Minute setting.
• Press [:] button will increase time data.
• Press [:] button will decrease time data.
Note:
• If there is no operation within 5 sec, unit
will quit clock set mode.
RESET Switch
• Press [RESET] button to restore the
default value of system setup.
02
0
ZE-160DVD Manual E neu-.indd Abs1:8ZE-160DVD Manual E neu-.indd Abs1:8 07.09.2004 10:41:58 Uhr07.09.2004 10:41:58 Uhr

ion
%N 9
Section
RESET
12V
night lamp
Basic Operation
System setup
• When the unit is power on and current
display mode isn‘t Clock mode, press
and hold [DISP] button to enter system
setup mode.
• Press [:] and [9] to select setup item,
use [DISP] button to set value and apply.
Setup item Rang default
Clock mode 12H/24H 12H
Clock display ON/OFF ON
Light in ON/OFF ON
BEEP ON/OFF ON
TimeDisp ON/OFF OFF
contrast 0~7 0
Note:
• If there is no operation within 5 sec or
longer unit will exit system setup mode.
Setup Bass, Treble,
Balance, Fader, Loud,
Sound effect and subwoofer
• Press [SEL/LOC] button to select
Audio mode according to the following
sequence:
Volume →Bass →Treble →Balance →
Fader →Loud →Sound effect →Volume
Bass and Treble Control
• In Bass or Treble mode, Rotate the knob
to boost or depress Bass/Treble.
Balance and Fader Control
• In Balance mode, rotate the knob: to
adjust the volume proportion from left
side to right side.
• In Fader mode, rotate the knob: to adjust
the volume proportion from front side to
rear side.
Loudness Control
• In Loud mode, rotate the knob to enable/
disable Loudness control.
Sound Effect Control
• In Sound Effect mode, rotate the knob to
select sound effect control according to
the following sequence:
NORMAL →POP →FLAT →CLASSIC →
JAZZ →ROCK →NORMAL
Subwoofer Control
• In Subwoofer mode, rotate the knob: to
adjust the subwoofer value from -7 to +7.
2
02
ZE-160DVD Manual E neu-.indd Abs1:9ZE-160DVD Manual E neu-.indd Abs1:9 07.09.2004 10:41:59 Uhr07.09.2004 10:41:59 Uhr

%N 10
Section Se
c
Tuner Operation
Select Tuner Function
• Press [MODE] button and select RADIO
Mode, then the unit will be switched to
tuning status.
Select Band
• Press [BAND] button to circularly select
the band from:
FM 1 →FM 2 →FM 3 →AM1 →AM2 →
FM 1
Search Station
Station Auto-search
• Press [:] button to search station
automatically and increase frequency.
Search will be stopped when a station is
found or the button is pressed again.
• Press [9] button to search station
automatically and decrease frequency.
Search will be stopped when a station is
found or the button is pressed again.
Station Manual Search
• Press and hold [:] or [9] button the
system will enter Manual Search Mode;
• press [:] or [9] again, the system will
increase or decrease tuning frequency
with a step-length of 9KHz in AM band or
50KHz in FM band.
Note:
• Without operation in 5 secs, system will
exit Manual Search Mode.
Change to Preset Station
• Press [1/DISC-], [2/DISC+], [3/P.MODE]
[4/ZOOM], [5/REPT], [6/STOP] button
to switch to preset station and relevant
frequency of station will be displayed on
LCD.
Store Current Station
• Under current frequency, press one of the
six number buttons a little longer to store
up the station frequency.
Scan Stored Station
• Press [6] button to scan the stored
station in current band and playback
each station for 5secs.
• Long press [6] button to scan the station
band and auto-store the frequency of
searched station into relevant station.
Select LOC/DX Control
• Press [SEL/LOC] over 2 secs to enter
shortdistance control mode, and LOC
icon will be ON; press it again over 2 secs
to long - distance control mode, and LOC
icon will be OFF.
03
0
ZE-160DVD Manual E neu-.indd Abs1:10ZE-160DVD Manual E neu-.indd Abs1:10 07.09.2004 10:41:59 Uhr07.09.2004 10:41:59 Uhr

ion
%N 11
Section
OPEN Eject
DVD Operation
Before Operation
• Before applying laser disc operation,
please make sure monitor has been
properly connected to the unit.
• Audio output mode depends on the type
of discs and different disc has different
output mode, so carefully read the
description of disc before operation.
Release Front Panel
• Press [OPEN] button to put down the
front panel; please see sketch below for
the whole operation.
Load in Disc
• Before inserting disc, make sure no disc
is in the unit. Please see eject button is lit
or not to confirm whether there is disc or
not.
• After disc load in, please close the front
panel in order to control playback.
Eject Out Disc
• First press [OPEN] button to put down
the front panel. Then press [ @] button,
if a disc is in the unit, the disc will be
ejected.
Note:
• In DVD mode, unloading the disc will
make the unit automatically returning to
tuner mode.
• In standby mode, inserting the disc
will turn on the system power supply
automatically.
• After inserting disc, it will take some time
to start to playback.
• This player can playback 12cm disc only.
Don`t insert 8cm disc to the loading slot.
Eject
Eject
3
05
ZE-160DVD Manual E neu-.indd Abs1:11ZE-160DVD Manual E neu-.indd Abs1:11 07.09.2004 10:42:00 Uhr07.09.2004 10:42:00 Uhr

%N 12
Section Se
c
DVD Operation
Select Zoom
• Press [4/ZOOM] once, Zoom Play will be
changed once according to the following
sequence:
1X →2x →3x →1X
Pause & Playback
• Press [;] button to pause play.
• Press [ ENTER ] to resume normal
playback.
Start & Stop Playback
• Press [ ENTER ] button to start to
playback disc.
• Press [6/STOP] button to stop playback.
Skip Playback
• Press [9] button to skip to the beginning
of current chapter and begin playback.
• Press [:] button to skip to the beginning
of next section/chapter and begin play-
back.
Repeat Playback
• Press [5/REPT] button once to repeat
playback of the current Chapter/Track.
• Press it twice to repeat playback of the
whole Title/Disc.
• Press it for the third time to cancel repeat
playback and simultaneously indicate on
LCD screen.
Select Chapter/Track or Play
time
• Press [GOTO] button in remote control
to select play time (for CD/VCD) or select
desired chapter (for DVD).
• Press direction button to select different
content and then use number button to
enter chapter number or time data.
• In DVD mode, press it again to select play
time of the title which will be indicated on
screen.
Note:
• If you‘re using CD discs, directly press
number button in remote control to select
certain track. You don‘t have to press
[GOTO] button to activate it.
• When it is VCD disc and PBC OFF, press
number buttons to select a track directly.
05
0
ZE-160DVD Manual E neu-.indd Abs1:12ZE-160DVD Manual E neu-.indd Abs1:12 07.09.2004 10:42:02 Uhr07.09.2004 10:42:02 Uhr

ion
%N 13
Section
DVD Operation
Select Subtitle Language
---only DVD
• When disc is playing back, subtitle
language is in disc initiation setting.
Press [SUB-TITLE] button on the remote
control to switch among disc-supported
languages. If the disc only supports
one subtitle, the function will not work.
If no operation within 3 secs, language
description will disappear.
Select Audio Track (language)
---only DVD
• When disc is playing back, audio track
(language) will be set-by the disc playing.
Press [AUDIO] button on the remote
control to select among the supported
languages. If no operation within 3 secs,
audio description will disappear.
Select Camera Angle
• If DVD disc supports multi-angle
playback, press [ANGLE] button on the
remote control to playback images in
different camera angles. If discs don‘t
support multi-angle playback, this
function will not work. If no operation
within 5 secs, angle description will
disappear.
Fast Forward & Fast
Backward
• Press and hold [:]/[9] on front panel or
press [8]/[7] button on remote control
to fast forward and fast backward play
current disc.
• Press the button once per time, fast
forward and fast backward speed will
be changed according to the following
sequence:
1X →2X →4X →8X →20X →1X
Select RearPlay
• Press [REAR] in remote control to turn
On/Off Dual Zone playback.
• Press and hold [BAND] on front panel to
turn ON/OFF Dual Zone playback.
Return
• When there are folders on the disc, use
the direction key to select the folder and
press [ENTER] key to access it, press
[RETURN] key to go back to the parent
folder.
Clear
• Press [CLEAR] button to clear the
incorrect inputs.
5
05
ZE-160DVD Manual E neu-.indd Abs1:13ZE-160DVD Manual E neu-.indd Abs1:13 07.09.2004 10:42:02 Uhr07.09.2004 10:42:02 Uhr

%N 14
Section Se
c
15
Dual Zone (Rear Playback) Operation
What is Dual Zone Playback
This car DVD receiver has a function Dual
Zone Playback. Dual Zone means the front
side and the rear side in the car. This
function enables the driver to listen to the
radio/CDC/Aux-in while the passengers on
the rear seat can watch DVD movies at the
same time. The front side can play back the
source from radio/CDC/Aux-in or DVD, the
rear side can only play back DVD.
Enable Dual Zone Playback
Dual Zone playback can be enabled by
pressing the REAR key on remote control or
by pressing and holding the BAND key on
the panel, and the icon REAR on the LCD
will be lit. If currently the front side is playing
DVD, then It will automatically switch to
radio mode, and rear Side will keep playing
DVD; if currently the front side is playing
source other than DVD, such as radio, CDC
or Aux-in, then the rear side will start playing
the DVD.
Note:
1. When Dual Zone playback is enabled,
then the speaker output for rear side of
the amplifier will be disabled (please refer
to the illustration [1] next page), avoid
disturbing rear passengers watching
DVD;
If the frontside playback mode is
switched to DVD again, then the speaker
output of the rear side from the amplifier
will be enabled automatically (it is usually
disabled during dual zone playback).
please refer to the illustrations (2) next
page.
2. The remote control will be used only for
rear side play back control after Dual
Zone playback was enabled;
3. When Dual Zone playback is enabled, the
audio line output of RL and RR will output
the DVD audio signal.
Mute Function for Rear Side
Playback
After the Dual Zone playback was enabled,
the mute function for rear side playback can
be enabled/disabled by pressing the MUTE
key on remote control alternatively, and the
icon of MUTE on the LCD will also be turned
on/off accordingly.
Note:
The MUTE key will only be activated during
DVD playback. This function will be auto
disabled if the playback is stopped.
05
0
ZE-160DVD Manual E neu-.indd Abs1:14ZE-160DVD Manual E neu-.indd Abs1:14 07.09.2004 10:42:03 Uhr07.09.2004 10:42:03 Uhr

ion
%N 15
Section
Ö Ð Î Ä
FRONT L
FRONT R
REAR L
REAR R
FRONT L
FRONT R
REAR L
REAR R
(1)
(2)
Dual Zone (Rear Playback) Operation
Disable Dual Zone Playback
If Dual Zone playback was enabled, pressing
the REAR key on remote control or pressing
and holding the BAND key on the panel will
disable this function, the icon REAR on the
LCD will also go off. If currently the front
side is playing back DVD, then only the Dual
Zone playback mode is disabled, the front
side will still play DVD.
Note:
1. When Dual Zone playback is disabled,
then the speaker out for rear side from
the amplifier will be enabled (please refer
to the illustration (2);
2. If the front side is not playing DVD, then
the audio line output of RL and RR will
have no output, and vice versa they will
output DVD audio signal, and the fading
level is determined by the volume control.
3. After the Dual Zone playback has been
enabled, the status will be kept even the
disc was ejected;
4. If a disc reading error occurred, the
system will stop reading the disc. If the
current front side playback mode is DVD,
then it will quit and switch to the radio
mode. The disc can be read again only
after re-entering DVD mode, reload disc,
or enable Dual Zone playback function
again.
5
05
ZE-160DVD Manual E neu-.indd Abs1:15ZE-160DVD Manual E neu-.indd Abs1:15 07.09.2004 10:42:04 Uhr07.09.2004 10:42:04 Uhr

%N 16
Section Se
c
OSD Men u
Sub title
Aud io
DVD Men u
OSD
Eng lish
Eng lish
Eng lish
Eng lish
On
Eng lish
Chin ese
Fren ch
Span ish
Dutc h
Lang uage Vid eo Au dio R ating
OSD Men u
Sub title
Aud io
DVD Men u
OSD
Eng lish
Eng lish
Eng lish
Eng lish
On
Eng lish
Chin ese
Fren ch
Span ish
Dutc h
OSD Men u
Sub title
Aud io
DVD Men u
OSD
Eng lish
Eng lish
Eng lish
Eng lish
Of f
Lang uage Vid eo Au dio R ating
OSD Men u
Sub title
Aud io
DVD Men u
OSD
Eng lish
Eng lish
Eng lish
Eng lish
On
Lang uage Vid eo Au dio R ating
Ö Ð Î Ä
Built-in Player Setup
Set Language
• Insert DVD disc and press [STOP] until
the screen displays ”stop2”.
• Press [SETUP] which is in the remote
control to enter setup menu, select
[Language].
• Select [Language] and press [ENTER] to
confirm.
• Set OSD Menu language to English/
Chinese/French/Spanish/Dutch/Auto/Off
and press [ENTER] to confirm.
• Set Subtitle language to English/Chinese/
French/Spanish/Dutch/Auto/Off and press
[ENTER] to confirm.
• Set Audio language to English/Chinese/
French/Spanish/Dutch and press [ENTER]
to confirm.
• Set DVD Menu language to English/
Chinese/French/Spanish/Dutch and press
[ENTER] to confirm.
• Set OSD Menu language to open or
close.
Lang uage Video Aud io R ating
OSD Men u
Sub title
Aud io
DVD Men u
OSD
Eng lish
Eng lish
Eng lish
Eng lish
On
Eng lish
ÖÐÎÄÖ Ð Î Ä
OSD Men u
Sub title
Aud io
DVD Men u
OSD
Eng lish
Eng lish
Eng lish
Eng lish
On
Eng lish
Chin ese
Fren ch
Span ish
Dutc h
Auto
Off
Lang uage Video Aud io R ating
Fran cais
Ne derl ands
Espa nol
06
0
ZE-160DVD Manual E neu-.indd Abs1:16ZE-160DVD Manual E neu-.indd Abs1:16 07.09.2004 10:42:04 Uhr07.09.2004 10:42:04 Uhr
Table of contents
Languages:
Other ZENEC Car Receiver manuals

ZENEC
ZENEC ZE-080DVD User manual

ZENEC
ZENEC ZE-NC4110 - MOUNTING INSTRUCTIONS FOR SANTA... User manual

ZENEC
ZENEC DVD & MP3 User manual

ZENEC
ZENEC ZE-ME194 User manual

ZENEC
ZENEC ZE-NE3810 User manual

ZENEC
ZENEC ZE-NC3811D User manual

ZENEC
ZENEC ZE-NC2010 User manual

ZENEC
ZENEC Z-E2015 User manual

ZENEC
ZENEC ZE-MC294 User manual

ZENEC
ZENEC Z-E6150 User manual

ZENEC
ZENEC ZE-MC192 User manual

ZENEC
ZENEC ZE-MU703 User manual

ZENEC
ZENEC ZE-NC3810 User manual

ZENEC
ZENEC ZE-NC620D User manual

ZENEC
ZENEC ZE-NC526 User manual

ZENEC
ZENEC ZE-MC2000 User manual

ZENEC
ZENEC ZE-200DVD User manual

ZENEC
ZENEC ZE-NC2010 User manual

ZENEC
ZENEC Z-E3150 User manual

ZENEC
ZENEC ZE-NC3141D User manual