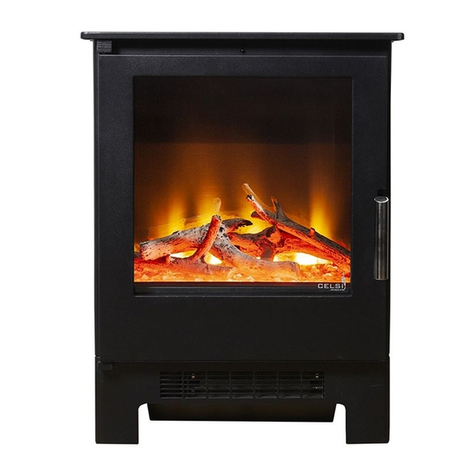
Celsi PURAFLAME G2 User manual

Packing Check list
Package 1 1 off Electric stove
1 off Remote control handset
2 off AAA batteries
1 off Instructions manual
CELSI PURAFLAME G2 LARGE STOVE
B-180870
IMPORTANT
This appliance can be used by children aged from 8 years and above and persons with reduced
physical, sensory or mental capabilities or lack of experience and knowledge if they have been
given supervision or instruction concerning use of the appliance in a safe way and understand
the hazards involved!
Children shall not play with the appliance!
Cleaning and user maintenance shall not be made by children without supervision.
Children of less than 3 years should be kept away unless continuously supervised.
Children aged from 3 years and less than 8 years shall only switch on/off the appliance
provided that it has been placed or installed in its intended normal operation position and they
have been given supervision or instruction concerning use of the appliance in a safe way and
understand the hazards involved.
Children aged from 3 years and less than 8 years shall not plug in, regulate and clean the
appliance or perform user maintenance.
THIS INSTRUCTION BOOKLET MUST BE LEFT WITH THE USER
MODEL- CESLPFRE

TABLE OF CONTENTS
SECTION 1: IMPORTANT SAFEGUARDS.. .........................................................3
SECTION 2: TECHNICAL SPECIFICATION............................................................4
SECTION 3: STRUCTURE AND PARTS..................................................................4
SECTION 4: INSTALLATION INSTRUCTIONS
SECTION 5: OPERATING INSTRUCTIONS.........................................................6
SECTION 6: MAINTENANCE............................................................................12
SECTION 7: ENVIRONMENT............................................................................13
SECTION 8: SERVICING...................................................................................13
5.1 Operating by Manual Keypad...............................
5.2
5.2.1
...............................7
Operating by Remote Handset............................................................7
Button Description .......................................................................8
5.2.2 How to change the manual heat setting ..........................................8
5.2.3 How to use the thermostat.............................................................9
5.2.4 How to use the function settings ....................................................9
5.2.4.1 How to change the Flame Image.............................................10
5.2.4.2 How to change the Flame Speed............................................ 10
5.2.4.3 How to change the Volume.....................................................10
5.2.4.4 How to change the Mood Lighting(Not applicable on this model) ...11
5.2.4.5 How to change the Brightness .. .............................................11
5.2.4.6 How to change the Sleep Timer...............................................11
2
4.1 Location..............................................................................................5
4.2 Electrical Work ...................................................................................5

WARNING: This heater is not equipped with a device to control the room temperature.
Do not use this heater in small rooms when they are occupied by persons not capable of
leaving the room on their own, unless constant supervision is provided.
CAUTION — Some parts of this product can become very hot and cause burns. Particular
attention has to be given where children and vulnerable people are present.
WHEN USING ELECTRICAL APPLIANCE, BASIC PRECAUTIONS SHOULD
ALWAYS BE FOLLOWED TO REDUCE THE RISK OF FIRE, ELECTRIC SHOCK AND
INJURY TO PERSONS, INCLUDING THE FOLLOWING IMPORTANT SAFETY
ADVICE.
READ ALL INSTRUCTIONS BEFORE USING THIS APPLIANCE.
Regarding installation of the appliance.
§This appliance is supplied with a rewirable plug fitted with
a 13A fuse. Should the fuse or plug need replacing, and
you are competent to do so, it must be replaced with a 13A
fuse and the plug muse be a 13amp BS1363A approved
fitted with a 13A fuse.
§Connect this appliance to single-phase AC supply of the
voltage specified on the rating plate.
§This heater must be earthed. If in any doubt consult a
suitable competent person.
§Ensure that the plug socket-outlet connection for this appliance is accessible. It
MUST be readily accessible for easy electrical isolation in the event of servicing
and replacing components etc.
§This appliance MUST NOT be located immediately below an electrical socket-outlet.
§Avoid the use of an extension cord as this may overheat and cause a risk of fire.
§This appliance is fitted with an automatic thermal cut out to reduce the risk of damage
in the event of abnormal operation e.g. when covered. If the heater stops operating
whilst the flame effect continues normally this indicates that the cut out is in operation.
If this occurs disconnect the power supply at the plug socket-outlet and ensure that any
obstructions to the fan heater outlet or fan blades etc. are removed. The heater will
automatically reset when cool enough. The thermal cut out WILL NOT RESET unless
the obstruction is removed and the appliance cools. If the heater is still not operating
after 10 minutes disconnect the appliance and seek expert advice.
§If the supply cord is damaged it must be replaced by the manufacturer, its service agent
or a similarly qualified person in order to avoid a hazard. The cable used MUST be
capable of handling 2.5kW of power at 240V and MUST contain an earth wire.
§To completely shut this appliance off turn all the controls to OFF and remove the plug
from the socket-outlet.
§Use the heater in a well-ventilated area.
SECTION 1: IMPORTANT SAFEGUARDS
3

SECTION 2: TECHNICAL SPECIFICATION
SECTION 3: STRUCTURE AND PARTS
4
Power Supply 230VAC 50Hz
General Power 10W to 2000W
Heat Power 1000W to 2000W
Flame Effect 10W to 12W
Heater has an over heating power cut off safety feature.
Manual
Keypad
ON/OFF Switch
Air
outlet
Screen

5
SECTION 4: INSTALLATION INSTRUCTIONS
This stove must be installed by a qualified, competent person.
4.1 Location
1. The stove must have a minimum clearance of 50mm to combustible material on all
sides. A clearance of minimum 50mm to non-combustible materials is also required
to ensure correct operation.
2. This appliance is for indoor installation only and is not designed to be installed
outside. The appliance must be kept away from any source of damp or moist
conditions. Avoid any close contact with water.
3. If there is any doubt regarding the suitability of the installation site contact your
supplier.
4.2 Electrical Work
THIS PRODUCT MUST BE EARTHED
1. If the mains socket is required to be concealed this can be sited adjacent to the back of
the fireplace.
2. Should the stove be connected directly into the mains supply a fused switch spur with
a 13amp fuse must be fitted. It is imperative that the power supply is capable of handing
a load of 2000 watts(2kW).
3. If the supply cable is damaged in any manner it MUST be replaced.
4. Do not connect the appliance to an extension lead.
5. The stove must not be modified from the manufactures specification in any way and
the appliance must only be used for the purpose recommended by the manufacturer.
6. If the stove shows any signs of damage it is important that it is examined by a qualified
person.
7. Please observe these instructions as failure to do so may result in electric shock or
other injury.
8. Check the technical specification.
9. Always ensure that all electrical work complies with the relevant Building Regulations
and the Electrical Code of Practice. All electrical work should be carried out by a
qualified electrician.
10. Do not install a time switch to operate the appliance.
11. If in any doubt contact your supplier or a qualified electrician.

BOOT UP PROCEDURE:
Switch the manual ON/OFF switch to the ON position .The screen should now appear
white for a few seconds after which the “boot-up” sequence will begin. If the white screen
remains for over fifteen seconds without displaying the hourglass icon, simply turn off
the unit using the main rocker switch, wait for 3 seconds then turn back on. The white
SECTION 5: OPERATING INSTRUCTIONS
NOTE: if this product experiences exceptionally low or exceptionally high supply
voltages it may automatically reset or stop functioning. If this occurs the product
should be unplugged or isolated from the main supply for a period of 30 seconds
before the power is then re-supplied.
Boot-up to 2 minutes during which this hourglass icon will be seen-
screen will appear and the hourglass will appear after a few seconds.
When boot-up is complete this icon will be seen on the screen-
Press the ON/Standby button when prompted.
The appliance is now ON.
NOTE: if the Manual ON/OFF switch is turned to the OFF position, the heater cuts off
due to overheat or the power to the unit is interrupted, the unit will reboot once power is
restored.
6
CAUTION! THE UNIT’S POWER CORD MUST BE CONNECTED TO A PROPERLY
EARTHED AND PROTECTED 240V OUTLET. ALWAYS USE EARTH FAULT
PROTECTION WHERE REQUIRED BY THE ELECTRICAL CODE.
This appliance can be operated by both a remote control and a manual keypad.
Once the unit has been properly connected to an earthed electrical socket-outlet
ensure the manual On/Off switch, located on the right hand side of the appliance,
is in the ‘ON’ position
MANUAL ON/OFF SWITCH
This switch turns the appliance on/off. Once turn off the appliance will need to RE-BOOT
before use -see details above.
NOTE: The manual on/off switch must be in the ‘ON’ position when using both remote and
manual operation.
WARNING! DO NOT OPERATE THE UNIT IF IT IS DAMAGED OR HAS MALFUNCTIONED.
IF YOU SUSPECT THE UNIT IS DAMAGED PLEASE CALL A QUALIFIED SERVICE
TECHNICIAN TO INSPECT AND TO REPLACE ANY PART OF THE ELECTRICAL SYSTEM
NECESSARY.

5.1 Operating by Manual Keypad
MANUAL KEYPAD SWITCHES
These keypad switches provide identical functionality to the remote control handset. For a
detailed description of the function if each button see the section below titled “Operating by
Remote Handset”.
5.2 Operating by Remote Handset
Ensure the batteries are installed properly in the remote control handset.
The effective range of the remote control is up to 4 meters (13 feet).
The appliance must have completed the intial BOOT-UP sequence before the remote
will function.
IMPORTANT NOTE REGARDING THE USE OF THE REMOTE CONTROL HANDSET
NOTE: The manual keypad on the appliance will provide you
however that this keypad is used only if you lose the remote
remote handset to carry out all functions.
●
●
●
7
with complete functional control of the unit. It is intended
handset or the handset batteries have failed. Please use the
The Celsi remote handset has been ergonomically designed to enable the operator to view
the keypad whilst transmitting signals to the appliance. Unlike most remote handsets which
require the tip of the handset to be pointed towards the appliance the Celsi handset transmits
from the underside as shown below. This prevents the requirement to rotate and point the
remote when the buttons are pushed.

5.2.1 Button Description
The functionality fo the buttons described below is the same for both the remote control
handset and the manual keypad.
ON/STANDBY: This button is used turn the fire ON
or OFF.
MUTE: This button is used to mute the sound or
restore the sound.
THERMOSTAT: This button is used to turn the
‘How to use the thermostat’.
thermostat on. For further information see
FUNCTION: This button is used to enter function mode. For further information see
to use the function settings’.
‘How
INCREASE: This button is used to change a ‘thermostat’ or ‘function’ setting.
DECREASE: This button is used to change a ‘ thermostat’ or ‘function’ setting.
5.2.2 How to change the manual heat setting
Press the button to place the appliance into manual l.heat mode
NOTE: When this button is pressed the appliance will fall
previously set.
out of thermostat mode if
Press the Lo/Hi/Off button to put the heater in to LOW heat setting
mode. The heater will output LOW heat.
Press the Lo/Hi/Off button again to put the heater into HIGH heat
setting mode. The heater will output HIGH heat.
Press the Lo/Hi/Off button again to turn the heat function OFF.
The next press of the Lo/Hi/Off button will return the unit to the
LOW heat setting, and so the cycle is repeated.
Lo/Hi/Off: This button is used to change the manual
heat seating to low, High or Off. For further
heat setting’.
8
information see ‘How to change the manual

5.2.3 How to use the thermostat
Press the button to put the appliance into thermostat
mode.
NOTE: When this button is pressed the appliance will fall
manual heat mode if previously set.
out of
When running in thermostat mode the unit will regulate the heat
setting automatically between high and off in order to maintain
the comfort level selected. To change the comfort level follow
the steps below.
Press the ‘TEMP’ button to display the thermostat icon on screen. This icon shows the
current thermostat heat setting.
This icon will remain on screen for 3 seconds. If no other buttons are pressed during this
time the icon will disappear from the screen and continue to run at this thermostat setting.
When the thermostat icon is on screen the thermostat heat setting can be changed by
The on screen icon will now display the new heat setting. There are ten comfort levels to
choose from:
Lowest<------------------------------------------------------------------------------------>Highest
Select a satisfactory setting and then wait for 3 seconds for the icon to disappear.
The thermostat is now set.
NOTE: The unit will continue to run in thermostat mode until the appliance is switched
OFF or the unit is set to manual heat mode.
9
pressing the buttons to increase or decrease the regulated temperature.
5.2.4 How to use the function settings
press the button to enter function mode. The first of the five available functions will
now be displayed on screen.
The five functions are as follows:
Flame Image Flame Speed Volume Mood Lighting Brightness
Sleep Timer
(Mood lighting not applicable on this model)

To access each of the functions simply continue to press the ‘FUNC’ button until the required
function is displayed.
The icon will stay on screen for 3seconds. If no other buttons are pressed during this time,
the icon will disappear from the screen and continue to run with its current setting.
The buttons can be used to change each function setting.
Descriptions of the six function modes are shown separately in the sections below.
5.2.4.1 How to change the Flame Image
Press the ‘FUNC’ button as described above to
is on the screen.
display the flame image
icon
Press the buttons to change the flame
image. There are three flame images to choose
from and the image will change on screen as
The flame image is now set.
5.2.4.2 How to change the Flame Speed
Press the ‘FUNC’ button as described above to
display the flame speed icon is on the screen.
Press the buttons to change the flame
speed. There are five flame speeds to choose
from and you will see the speed change as you
scroll through the selections. Once the desired
speed is selected wait for 3 seconds for the on
screen icon to disappear.
The flame speed is now set.
you scroll through the selections . Once the desired image is
selected wait for 3 seconds for the on screen icon to disappear.
10
5.2.4.3 How to change the Volume
Press the ‘FUNC’ button as described above to
display the volume icon is on the screen.
Press the buttons to change the volume.
There are 6 volume settings to choose from
(including mute) and you will hear the volume
The volume is now set.
change as you scroll through the selections . Once the desired
volume is selected wait for 3 seconds for the on screen icon to
disappear.

5.2.4.4 How to change the Mood Lighting (Not applicable on this model)
Press the ‘FUNC’ button as described above to
display the mood lighting icon is on the screen.
Press the buttons to change the mood
lighting. There are 4mood lighting settings to
choose from(including off) and you will see the
5.2.4.5 How to change the Brightness
Press the ‘FUNC’ button as described above to
display the brightness icon is on the screen.
Press the buttons to change the screen
brightness. There are 3 brightness settings to
choose from and you will see the brightness change
The mood lighting is now set.
The brightness is now set.
NOTE: In daylight conditions this brightness change may appear quite subtle.
mood lighting change as you scroll through the options . Once
the desired mood lighting is selected wait for 3 seconds for the
on screen icon to disappear.
as you scroll through the selections. Once the desired brightness
is selected wait for 3 seconds for the on screen icon to disappear.
11
5.2.4.6 How to change the Sleep Timer
Press the ‘FUNC’ button as described above to
display the sleep timer icon is on the screen.
Press the buttons to change the sleep
timer.
There are 9 sleep timer settings to choose from (including off):
OFF 30 mins 1 hour 1 hour 30 mins 2 hours
2 hours 30 mins 3 hours 3 hours 30 mins 4 hours

Once the desired sleep timer is selected wait for 3 seconds for the on screen icon to
disappear.
The sleep timer is now set.
IMPORTANT NOTES REGARDING THE USE OF THE SLEEP TIMER
Once the sleep timer has been changed from ‘OFF’ to any of the 8 available sleep timer
setting, the appliance will now continue to run for the selected time. Once this time has
elapsed the appliance will automatically turn to STANDBY.
If the sleep timer has been selected and it is no longer required it can be cancelled by entering
the function mode, selecting the sleep timer and changing the setting to ‘OFF’.
Whilst the appliance is running in sleep timer mode it is still possible to change any
functionality without affecting the timer, for example, heat setting or mood lighting.
If the sleep timer setting is changed whilst the sleep timer is in operation the new setting
will now be used for the sleep timer process.
The sleep timer is always reset to ‘OFF’ after entering standby mode
12
§ Always remove the plug from the socket-outlet and allow the heater to cool down
before cleaning it.
§Wipe the exterior surface of the appliance occasionally with a soft damp cloth (not
dripping wet) and dry the exterior surface before operating the heater.
WARNING!
Do not immerse the heater in water.
Do not use any cleaning chemicals such as detergents and abrasives.
Do not allow the interior to get wet as this could create a hazard.
SECTION 6: MAINTENANCE
§Light accumulated dust may be removed from the appliance with a soft dry cloth.
§To store away the appliance put it back in to its original packaging and store it in a
clean dry place.
§In the event of malfunction do not try to repair the heater yourself as this may result in
a fire hazard or electric shock.

This marking indicates that this product should not be disposed with
other household wastes throughout the EU. To prevent possible harm to
the environment or human health from uncontrolled waste disposal,
recycle it responsibly to promote the sustainable reuse of material
resources. To return your used device, please use the return and
collection systems or contact the retailer where the product was
purchased. They can take this product for environmental safe recycling.
BFM EUROPE LTD
GORDON BANKS DRIVE, TRENTHAM LAKES STOKE-ON-TRENT ST4 4TJ
Technical Queries: 01782 339039
Service Fault Enquiries: 01782 339008
SECTION 7: ENVIRONMENT
SECTION 8: SERVICING
13
This manual suits for next models
1
Table of contents
Other Celsi Stove manuals
Popular Stove manuals by other brands

Starke
Starke PA-EL180 instruction manual

Nordpeis
Nordpeis Smarty SN-00005 Series user manual

Dovre
Dovre 250 Installation instructions and operating manual

England's Stove Works
England's Stove Works 30-NCP Installation & operation manual

Stuv
Stuv P-10 Directions for use

lifelong
lifelong LLGS23-2 quick start guide

Regency
Regency FIREGENIE FG39-LPG Owners & installation manual

Heat Design
Heat Design Vitae25Bi Installation and operating instructions

Moretti Design
Moretti Design ARIA SLOT GLASS 7 manual

Stanley
Stanley REGINALD HPB User instructions

Extraflame
Extraflame EcoLogica Idro Use and maintenance manual

Woodstock Soapstone
Woodstock Soapstone KEYSTONE 204 Replacing Guide