centor ARES Basic III Guard Tour Verification... User manual

1
Table of Contents:
English .............................................................................................................................................................................................................................3
INTRODUCTION:..........................................................................................................................................................................................................4
iButton:......................................................................................................................................................................................................................5
Tour Checkpoints:......................................................................................................................................................................................................6
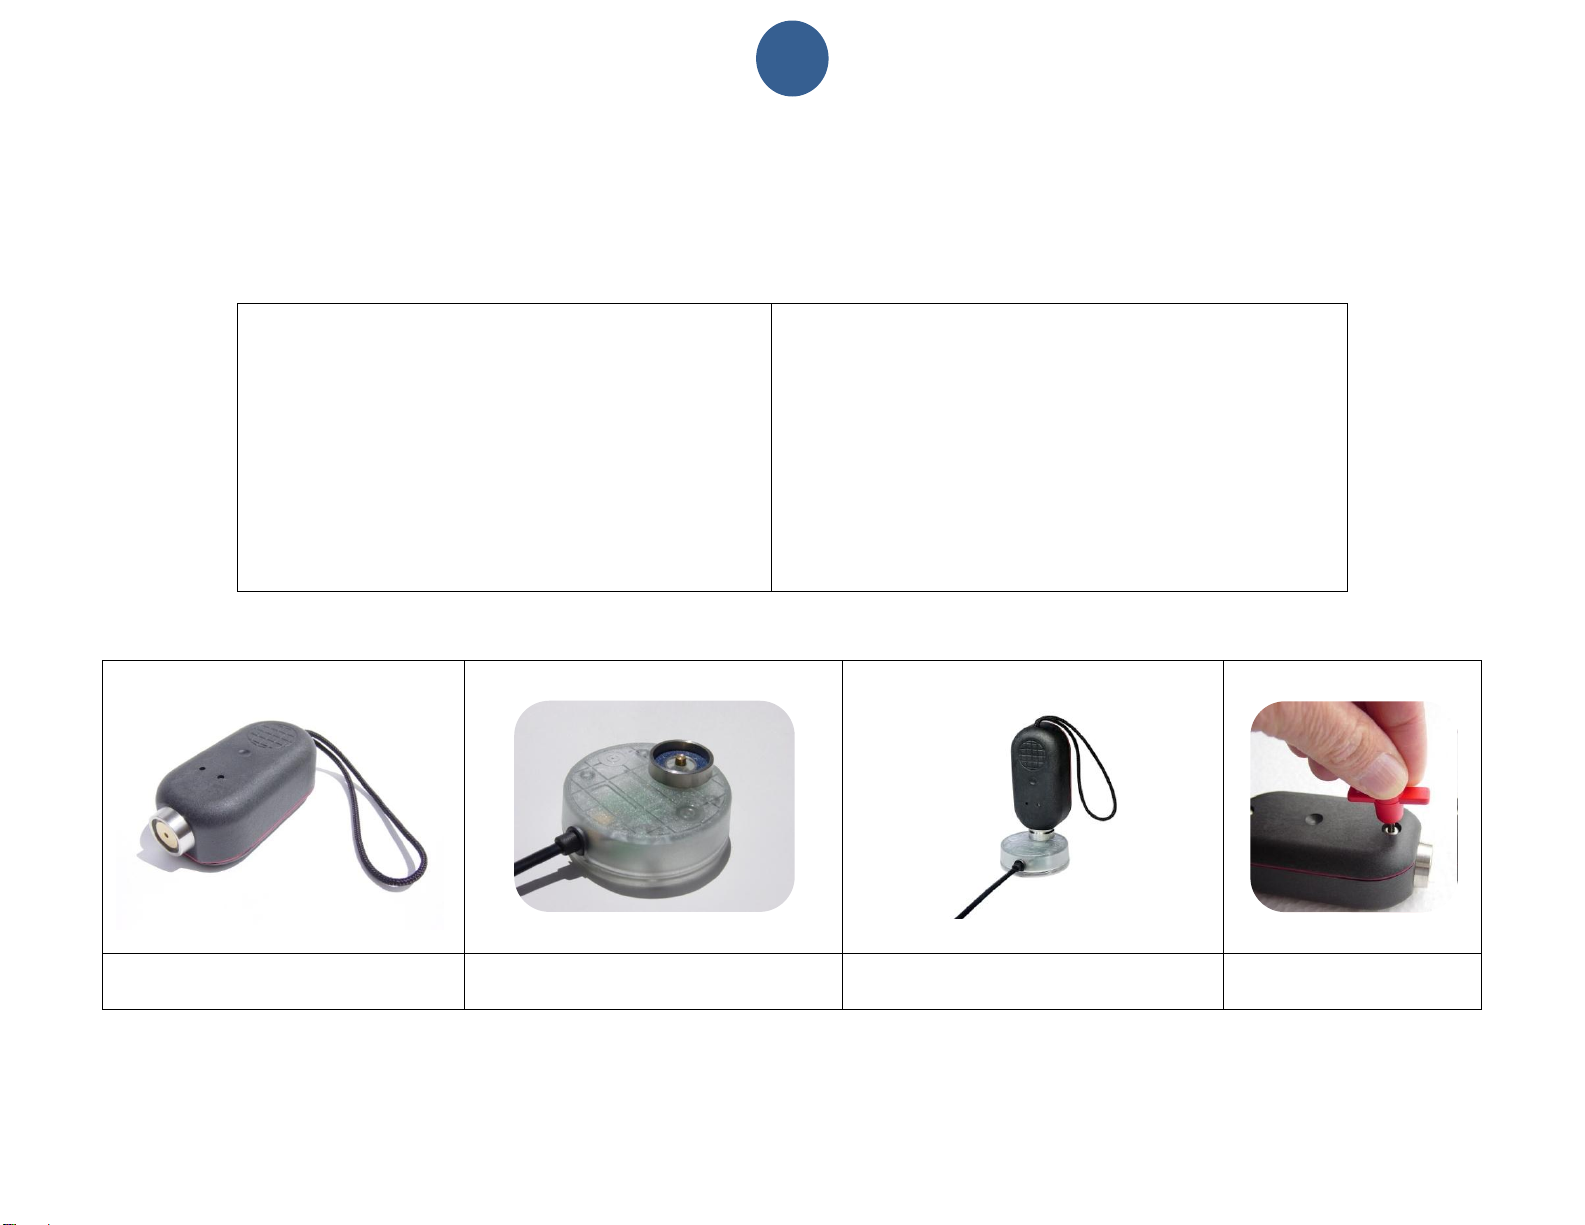
M8000-RB Recorder: ....................................................................................................................................................................................................7
M8000-RB Setup:..........................................................................................................................................................................................................7
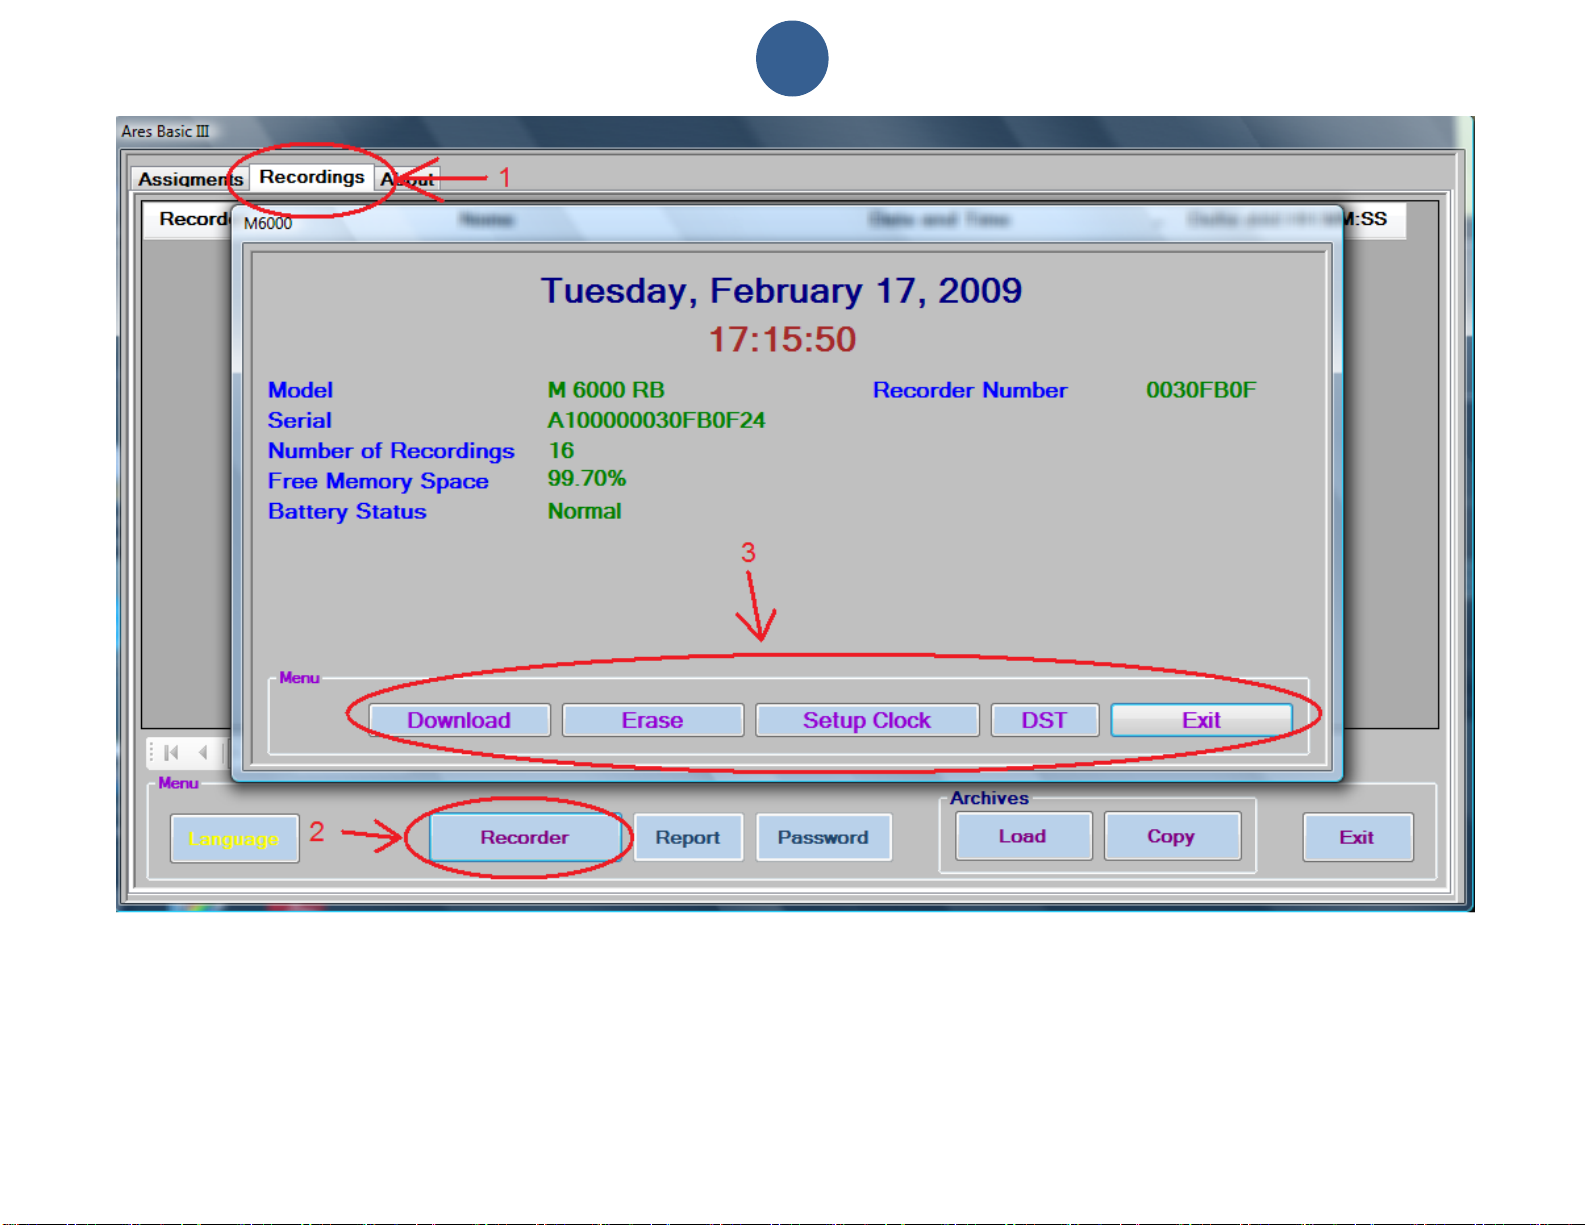
Time & Date Setup:....................................................................................................................................................................................................7
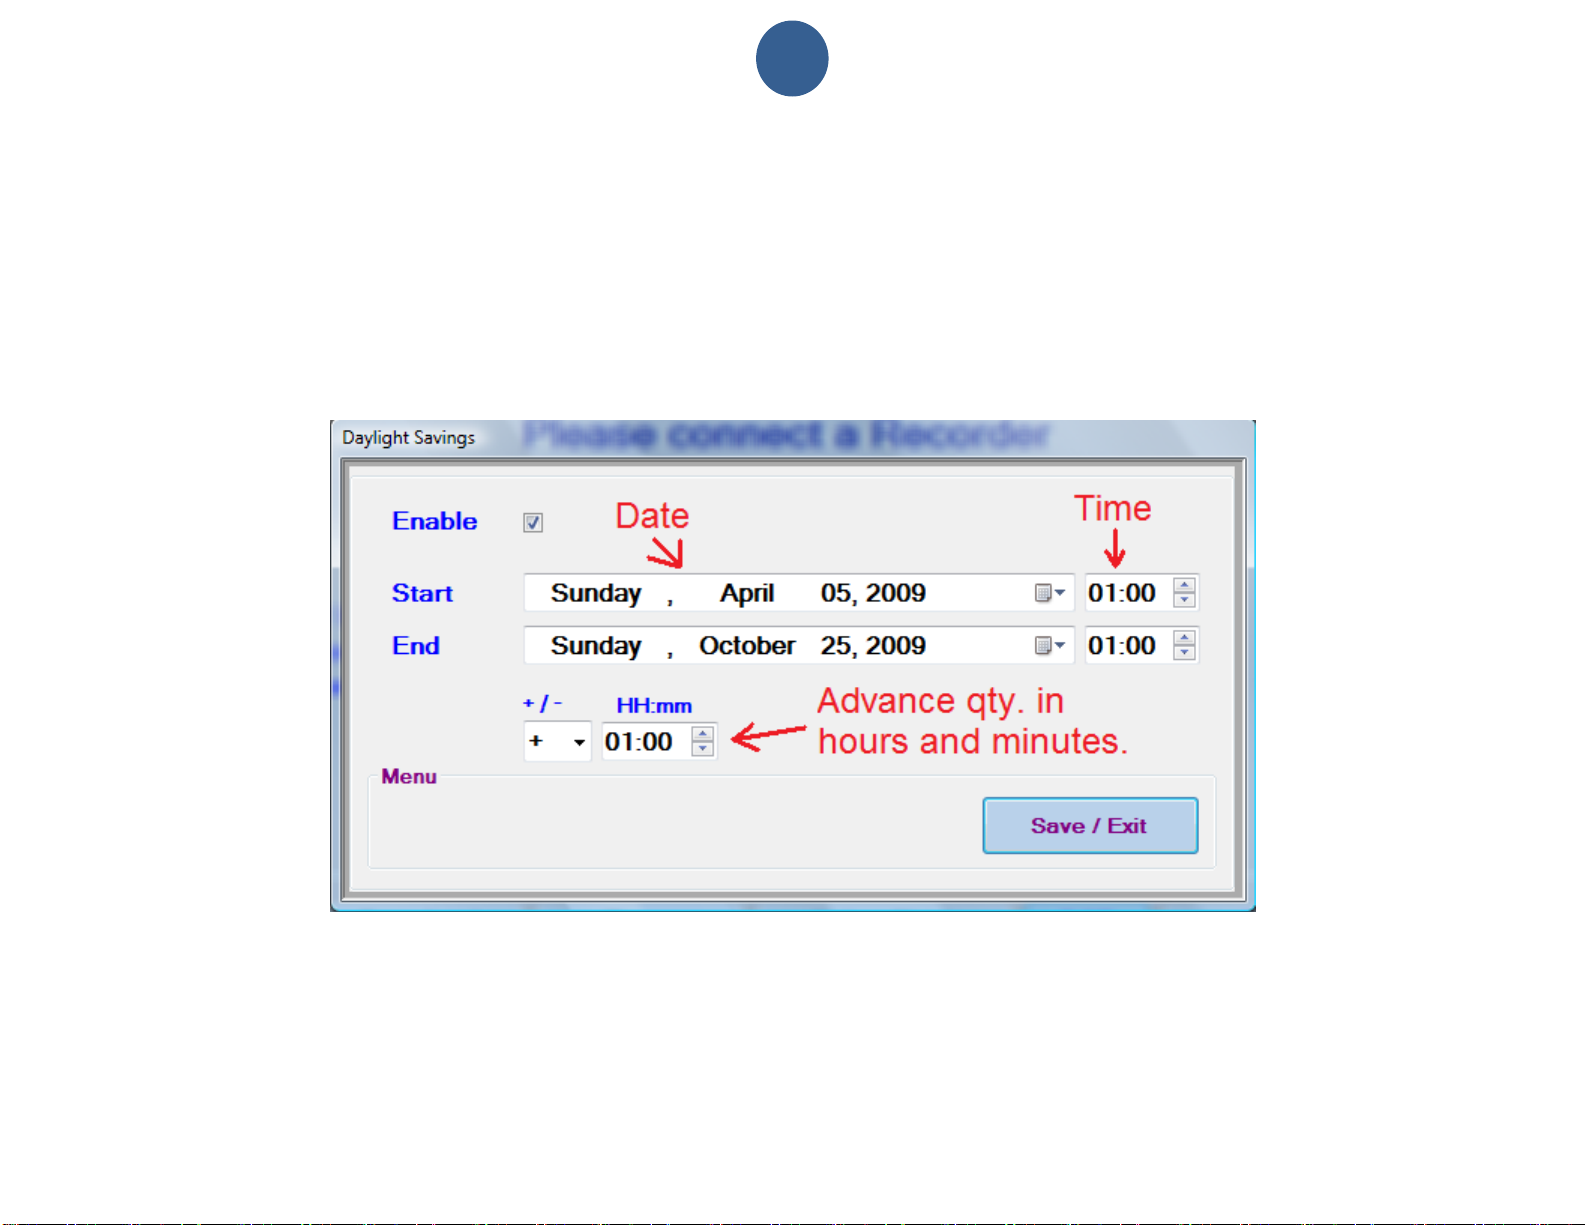
Daylight Savings Setup:.............................................................................................................................................................................................9
How to Download Recordings: .................................................................................................................................................................................10
Memory Delete / Reset: ...........................................................................................................................................................................................10
Assignments: ..............................................................................................................................................................................................................11
Preparation:.............................................................................................................................................................................................................11
How to add an assignment (Tour Checkpoints, elements, etc.):................................................................................................................................11
Recordings Screen:.....................................................................................................................................................................................................14
Reports.......................................................................................................................................................................................................................16
How to make a Report .............................................................................................................................................................................................16
How to save (export) a report in PDF or Excel formats:................................................................................................................................................19
Password:...................................................................................................................................................................................................................20
Archives:.....................................................................................................................................................................................................................21
Portable Data Transfer Unit T8000:.............................................................................................................................................................................23
How to assign download key to T8000: ....................................................................................................................................................................23
How to download M8000-RB Recorders into T8000:................................................................................................................................................23
FCC Compliance:........................................................................................................................................................................................................24
EC Compliance:..........................................................................................................................................................................................................24
ANNEX III................................................................................................................................................................................................................24
Español ..........................................................................................................................................................................................................................26
INTRODUCCION:.......................................................................................................................................................................................................27
iButton:....................................................................................................................................................................................................................28
Estaciones de Registro:...........................................................................................................................................................................................29
Registrador M8000-RB:...............................................................................................................................................................................................30
Como ajustar la hora y la fecha:...............................................................................................................................................................................30
Como borrar la memoria de su Registrador..............................................................................................................................................................30
Como descargar marcaciones:.................................................................................................................................................................................31
Como ajustar la hora de ahorro de luz solar (DST > Daylight Savings Time). ...........................................................................................................32
Asignaciones:..............................................................................................................................................................................................................33
Carpeta de Marcaciones:.............................................................................................................................................................................................36
Reportes: ....................................................................................................................................................................................................................38
Como generar un reporte:........................................................................................................................................................................................38
Como salvar (exportar) un reporte en formatos PDF o Excel:.......................................................................................................................................41
Contraseña: ................................................................................................................................................................................................................42
Archivos:.....................................................................................................................................................................................................................43

2
Trasferidor Portátil de Datos T8000:............................................................................................................................................................................45
Como asignar la llave de descarga a la plataforma T8000:.......................................................................................................................................45
Como descargar Registradores M8000-RB en la plataforma T8000: ........................................................................................................................45
FCC Compliance:........................................................................................................................................................................................................46
EC Compliance:..........................................................................................................................................................................................................46
ANNEX III ...................................................................................................................................................................................................................46

3
English
Ares Basic III
Guard Tour Verification System

4
INTRODUCTION:
ARES is the Greek God of War. For our purposes, War on Crime! And War on Industrial accidents! The ARES Basic III Guard
Tour Verification System was developed to aid the users of guard services, to efficiently program and supervise their guard’s
activities (watch the watchers). Its main benefit materializes, as a considerable reduction of the probability of theft, fire and in-
dustrial accidents.
M8000-RB Recorder
P8000 Download Cradle
How to connect M8000-RB to
P8000
Security Key
Image 1
Capabilities:
Multiple Guards.
Multiple Supervisors.
Multiple Recorders.
Multiple Tour Checkpoints.
Automatic Archive Manager.
Simple & User Friendly Report Manager.
Exports Reports to Excel and Acrobat.
Bi-Lingual operation (English or Spanish).
Components:
Ares Basic III employs state of the art technology:
Our portable M8000-RB Recorder.
P8000 Download Cradle.
Ares Basic III Software (CD)
Maxim / Dallas Serial Numbered iButtons, used
as Tour Checkpoints and Guard ID Keys.

5
iButton:
An iButton is a microcircuit, encapsulated in a stainless steel weather resistant button, of great durability and reliability
(1,000,000 recordings per button). Each iButton is a guaranteed, unique, never to be repeated, factory programmed ROM. Its
16-character serial number is kept in laser-cut poly-silicon links, not as stored magnetic charge! Because of its design and
the strict control of the manufacturing process, the DS1990A iButton is an identifier that cannot be counterfeited. It is appropri-
ate for applications where absolute identification is required.
Due to its great reliability, the iButton developed and manufactured by DALLAS SEMICONDUCTOR has positioned itself solidly
in the international market as a universal identifier of Persons, Objects and Events. iButton dimensions are Height 5mm, Diame-
ter 16mm.
The serial number of each iButton is physically the number that will identify each Guard, Supervisor, Tour Checkpoint, etc. The
16 character serial number comes printed on the metallic surface of each button; starts with two big characters (digits or letters)
located towards it's middle left, 12 smaller positioned at a lower level and finally 2 big towards it's middle right.
Do not worry! The system will assist you to seamlessly read and assign each iButton serial number on the Assignments Folder
(Tab).
Image 2

6
Tour Checkpoints:
Each Tour Checkpoint is composed by 1 iButton with its wall mount device. It goes securely mounted on a pinpoint location
within a particular Tour Area (office building, warehouse, parking lot, farm, ship dock, air dock, chemicals plant, etc.). This loca-
tion is generally chosen due to its vulnerability to criminal activity or prone to industrial accidents, consequently requiring special
attention by repetitive touring.
A Tour Checkpoint when touched by the guard with his assigned recorder will transmit to the said device its unique serial num-
ber; this number, along with the actual time and date of the readout will be stored within the M8000-RB’s memory. This data,
when downloaded into the PC will produce all the necessary reports to evaluate guard performance.
Tour Checkpoint Assembly Mounts (iButton Mounts):
iButtons are provided with a multipurpose installation mount, manufactured in polycarbonate, a weather resistant injection mold-
ing plastic, which can be used to assemble all Tour Checkpoints. The mount consists of two transparent plates, one front plate
and one back plate. The front plate comes with a special circular retaining rim to press fit the iButton. Both plates come with an
internal cavity in which a label or photograph can be fitted. The plates come assembled together (and/or to any desired sur-
face), with rivets or screws in such a way that all mount contents are securely retained with no possibility of coming loose. For
Tour Checkpoints wall mounting, we recommend the use of 1/8” self thread screws (provided with mounts).
Image 3
Transparent
Policarbonate wall
mount
Black ABS Wall
Mount
Aluminum Wall Mount
Guard & Supervisor ID Keys

7
M8000-RB Recorder:
It is a portable electronic device designed to "read" and store iButton serial numbers, along with the precise time and date of the
readout. The unit is capable of downloading the stored recordings (5460, 64K) into any IBM or compatible PC, Pentium (100
MHz.) or higher processor. It is a sturdy device capable of withstanding harsh environments and impacts. The unit is powered
by a 3 AAA batteries. The reader has a luminous indicator called LED (light emitting diode) and a Buzzer.
To install battery: Open the top of your reader by removing the 2 security screws with the casing key and connect 3 AAA bat-
teries, preferably alkaline. If the batteries are in good shape the LED will emit 5 green blinks with 5 beeps.
To make recordings: To make recordings of Tour Checkpoints, ID Keys, Incident Booklets, (any iButtons) you need only to
touch them with the reader’s probe. If a correct recording is effected the reader will emit 2 green blinks with 2 (two) beeps.
Low battery: The M8000-RB recorder will signal a low battery status by emitting 1 red blink with 2 (two) beeps. A brand new
set of batteries will last for one year or 500,000 recordings.
Full Memory: When the memory of your reader reaches “full” status (5460 recordings), each time you attempt a recording, the
reader will emit 1 red blink with 4 beeps;this means your recorder is not reading anymore. For this case please make a full
download of data to your PC and then erase the memory to reset; now your reader will be ready for the next load cycle of 5460
new recordings.
M8000-RB Setup:
1. Connect your Download Cradle to your PC, to the RS232 or USB port.
2. If are going to use a USB port, install its driver (CD supplied within box).
3. Run the Ares Basic III Program.
Time & Date Setup:
1. Connect your recorder M8000-RB to the P8000 download cradle (See image 1).
2. Click on the “Recordings”tab (See image 4).
3. Press the “Recorder”button.
4. Press the “Setup Clock”button.
5. Your M8000-RB Time & Date will be synchronized with your PC’s Time & Date. Note: Make sure your PC’s Time & Date are
correct.

8
Image 4

9
Daylight Savings Setup:
1. Connect your recorder M8000-RB to the P8000 download cradle (See Image 1).
2. Select the “Recordings”data Tab (See image 4).
3. Press the “Recorder”button.
4. Press the “DST”button.
5. Select Day Light Savings Enable button. The System will display default date settings for the USA. If you desire to change
DST settings, please use the provided calendar by a click on the drop list arrow.
6. Press Save / Exit to save changes.
Image 5

10
How to Download Recordings:
1. Connect your recorder M8000-RB to its P8000 download cradle (See Image 1).
2. Select the “Recordings”data Tab (See Image 4).
3. Press the “Recorder”button.
4. Press the “Download”button.
Memory Delete / Reset:
1. Connect your recorder M8000-RB to its P8000 download cradle (See Image 1).
2. Select the “Recordings”Tab (See Image 4).
3. Press the “Recorder”button.
4. Select “Erase”.
A normal “full” Download (5460 recordings) will take 3 minutes and will advise you of its progress and function status.
Every time your Recorder is downloaded its memory will be automatically erased. An automatic backup of the recorders trans-
actions will be instantaneously made right before the recorder’s data contents is erased.

11
Assignments:
Preparation:
Before you commence assignments, please effect the following preparation and verification sequence:
1. Make a sketch of your premises and a list of all the sites (Tour Checkpoints), elements and persons you want to control.
2. Sketch on hand; take a thorough tour of your premises (you might want to bring a Security Advisor along with you).
3. Note on your list, the 16-character serial number of each iButton to be installed (Tour Checkpoint), confronted with its actual
matching installation site-name.
4. Your sketch will be useful when you proceed to assign and install all iButtons.
5. All Tour Checkpoints are best installed at a height of 45 inches from the floor level. The use of water sealant around the
plate edges is recommended to protect the ink of the paper labels from being washed out during the rainy season. Always
use both mount plates. iButton mounts can be installed in walls, doors, furniture, fences, metal surfaces, trees, etc.
The Assignments data Tab was designed for simplicity; with it you will able to effect all assignations of Tour Checkpoints,
Guards, Supervisors, plus whatever other elements you desire to control(Ex: Fire Extinguishers).
Pre-assigned System Messages:
Battery Disconnected: Each time the battery of any of your recorders is disconnected, the recorder will record the Time &
Date of the event. This message will appear on the “Recordings Screen”confronted with the recorder’s ID number and the time
& Date of the event.
Low Battery: Every time any of your recorders enters a low battery status, the recorder will record the Time & Date of the
event; this message will appear on the Recordings Screen confronted with the Recorder Serial number and the Date & Time of
the event.
How to add an assignment (Tour Checkpoints, elements, etc.):
1. Select the Assignments Tab.
2. Press the “ADD Id” button located in the button bar (see image 6).
3. Read/Touch with your P8000 Cradle, the iButton you want to assign (see image 7).
4. In the window “Add”, key in the Checkpoint name, Guard name, Supervisor name, Vehicle Registration Tag number or the
name and/or number of whatever person or element/site you want controlled.
5. Once this procedure is completed you can proceed to install your Tour Checkpoints.

12
Image 6

13
Image 7

14
Recordings Screen:
This screen will allow you to scroll down and view all recordings. Its menu button bar located at the bottom of the window will
allow you to access the recorders communications, the Reports module, the language of the program, set your password and
Load / Copy archives (see how to download recordings on page 10).
Deltas:
Delta is the time taken between one recording and the next recording. It is expresses in ddd:hh:mm:ss Days, Hours, Minutes
and Seconds.
Date and Time:
It is the date and time of each recording.
Name:
It is the name assigned to each iButton as Checkpoint, Person, fire extinguisher vehicle, etc.
Recorder:
Is the unique never to be repeated serial number of each recorder.

15
Image 8

16
Reports
How to make a Report
1. To generate reports select the Recordings tab.
2. Press the “Report”Button.
3. The system will prompt you with a selection “Filter” window.
4. To filter (poll) by a particular Checkpoint, Guard, item etc., click on the item (it will turn to red color).
5. To reset filtering select the “Reset Filter”Button.
6. To view the report to a printer press “View Report”.
7. Before printing, the system will display a Print Preview.
8. The button bar located bar at the top of your Print Preview screen contains several user friendly functions that will help you
prepare your reports before printing, these are, printer setup, print layout, page size and orientation, search for specific pag-
es and save reports in PDF or Excel.
9. To print select the printer Icon.

17
Image 9

18
Image 10

19
How to save (export) a report in PDF or Excel formats:
1. Select the “Recordings” tab.
2. Click on the “Report”Button.
3. The system will prompt you with a Selection Filter Window.
4. To filter (poll) by a particular Checkpoint or item click on the item (it will turn to red color).
5. To reset filtering select the “Reset Filter”Button.
6. To view the report you want to export press “View Report”.
7. To save the report in Excel or Acrobat select the “Save” icon located on the top of your preview screen and then
select either of the 2 optons.
Image 11

20
Password:
If you desire to restrict access to the program, select the Password button, enter your password, verify and press OK. The next
time you attempt to run the program it will request you to key-in the password you previously selected.
Image 12
Table of contents
Languages:
Popular Industrial Electrical manuals by other brands

Utility Relay
Utility Relay AC-PRO instructions

Murata
Murata GRM1885C2A561JA01 Series Reference sheet

Siemens
Siemens 12CLN500 installation instructions

Murata
Murata GCM1885C1H270JA16 Series Reference sheet

Eaton
Eaton Power Defense PDC4X3TA800 Instruction leaflet

Murata
Murata GJM0225C1E6R2DB01 Series Reference sheet

Murata
Murata GRM1557U1A132JA01 Series Reference sheet

Murata
Murata GQM22M5C2H3R0BB01 Series Reference sheet

Rotomotive Powerdrives
Rotomotive Powerdrives ROBUS 12 Operation and maintenance manual

Siemens
Siemens SINUMERIK 840D sl operating manual

Tecnoware
Tecnoware FSTEL1K2M user manual

Eaton
Eaton Crouse-Hinds FSQ Series Installation & maintenance information