manuals.online logo
Brands
  1. Home
  2. •
  3. Brands
  4. •
  5. CERNO
  6. •
  7. Outdoor Light
  8. •
  9. CERNO Fons Floor Lamp Quick start guide

CERNO Fons Floor Lamp Quick start guide

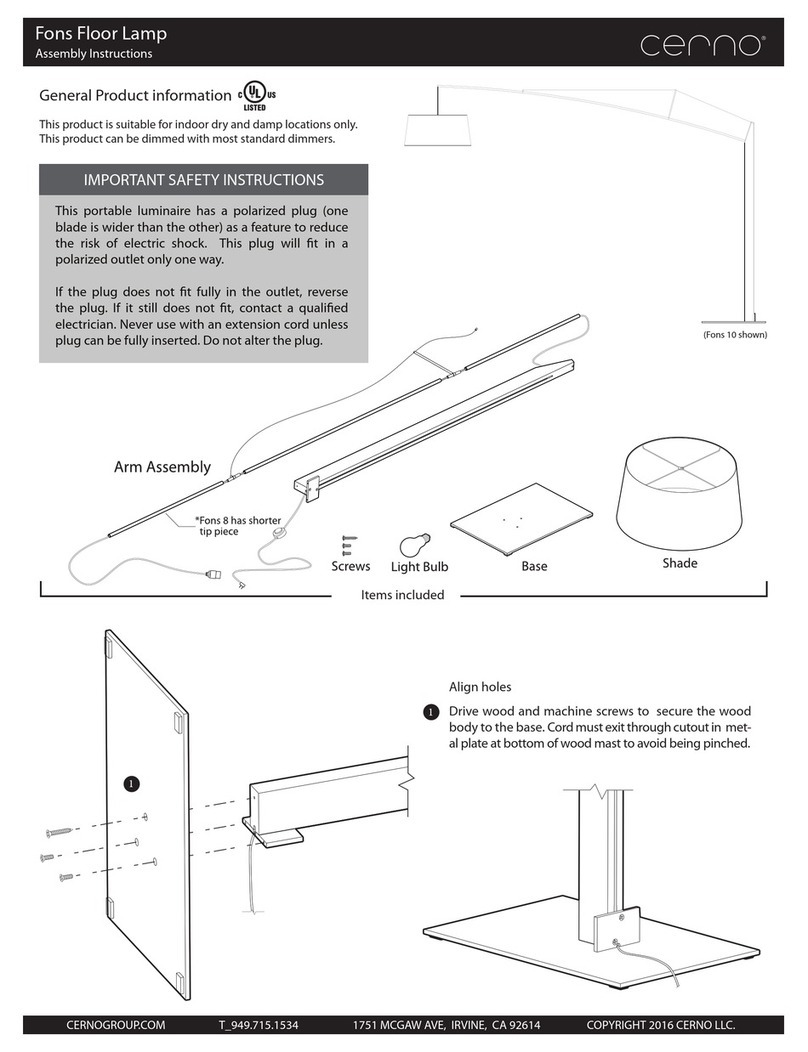
Fons Floor Lamp
Assembly Instructions
CERNOGROUP.COM T_949.715.1534 1751 MCGAW AVE, IRVINE, CA 92614 COPYRIGHT 2016 CERNO LLC.
General Product information
This product is suitable for indoor dry and damp locations only.
This product can be dimmed with most standard dimmers.
Items included
(Fons 10 shown)
Align holes
Drive wood and machine screws to secure the wood
body to the base. Cord must exit through cutout in met-
al plate at bottom of wood mast to avoid being pinched.
1
1
This portable luminaire has a polarized plug (one
blade is wider than the other) as a feature to reduce
the risk of electric shock. This plug will t in a
polarized outlet only one way.
If the plug does not t fully in the outlet, reverse
the plug. If it still does not t, contact a qualied
electrician. Never use with an extension cord unless
plug can be fully inserted. Do not alter the plug.
IMPORTANT SAFETY INSTRUCTIONS
CERNOGROUP.COM T: 949.715.1534 22892 GLENWOOD DRIVE, ALISO VIEJO, CA COPYRIGHT 2021 CERNO LLC. ISSUE DATE 01/01/2021
Fons Floor Lamp
Assembly Instructions
1st
2nd
Press the segments onto coupler. Secure
by fastening set screws as shown to the
left. Tighten only until set screws are ush
with the outside of the segments. You will
do this at 2 locations; closer to the mast
rst, then the one closer to the socket.
Push the end of the boom up to give slack
to the cable.
Pull cable and insert into the thin slot on
top of the wood body. The plug on the
end of the cable should seat fully into the
hole.
Raise tube necklace assembly and insert
the rst tube segment into the wood
body until fully seated. The screw should
be aligned and engaged in the slot.
Fons 8 has a short tip piece
Fons 10 has a long tip piece
(fons 10 shown)
3
4
2
2
5
5
4
5
Set height of lamp shade/light by pulling
or giving slack to power cord.
Determine height desired
13”
6
6
CERNOGROUP.COM T: 949.715.1534 22892 GLENWOOD DRIVE, ALISO VIEJO, CA COPYRIGHT 2021 CERNO LLC. ISSUE DATE 01/01/2021
After light bulb height is set, carefully
push the cord into the long cavity along
the back with a blunt tool.
Optional: Press the rubber cordstock (in-
cluded in hardware kit) into cavity covering
the clear electrical cord.)
(Stretching the rubber cord can make it easier to press into the cavity, but will eect its overall length. Excess rubber cord can be trimmed easily with scissors.)
Loosen the nut above
the socket and slip the
shade onto socket as
shown. Tighten nut to
lock shade onto sock-
et.
7
8
8
Optional Lower Diuser Installation.
To install lower diuser, carefully bend lower diuser, slip into the
bottom of the shade, and release. The diuser should rest at on top
of the lower shade ring.
Following shade and top diuser installation, install light bulb
into socket.
NOTE: To remove lower diuser, gently lift up one edge of the lower
diuser and carefully bend the diuser until it can be removed from
the bottom of the shade assembly.
Optional Top Diuser Installation: Prior to installation of bulb and
lower diuser.
Note! Top Diuser is included by custom request only. If your
xture did not include a top diuser, please skip this section.
Feed the socket through the hole in top diuser, align socket with
shade spider and place socket into slot located at the center of the
shade spider. With the shade spider in position tighten the nut on
the top end of the socket to hold the shade in place. Lower the top
diuser down onto the shade spider.
Fons Floor Lamp
Assembly Instructions
CERNOGROUP.COM T: 949.715.1534 22892 GLENWOOD DRIVE, ALISO VIEJO, CA COPYRIGHT 2021 CERNO LLC. ISSUE DATE 01/01/2021
Fons Floor Lamp
Assembly Instructions
CERNOGROUP.COM T_949.715.1534 1751 MCGAW AVE, IRVINE, CA 92614 COPYRIGHT 2016 CERNO LLC.
Fons Lamp
Assembly Instructions for optional diusers
Care, Maintenance instructions
Regularly maintaining your Cerno® product is easy and will help keep it looking beautiful. Scratches can be bued out in minutes. Wood surfaces
will be revitalized with minimal eort every few years. The LED light source is rated to last 50,000 hours, and should last the life of the product.
Your xture includes materials listed below. Please use these tips to keep your product looking its best.
Oiled Walnut: Wood surfaces should be dusted and cleaned with a damp cloth. Every 1 - 3 years, re-oil and wax wood surfaces to maintain the rich
wood sheen. Remember to wipe with the wood grain, and remove any excess oil or wax when nished.
Brushed Aluminum: Everyday cleaning of metal surfaces can be done with a damp cloth. Repair: To remove scratches from brushed aluminum, use
Scotch-Brite (Gray or Maroon) to bu the scratched area. In a pinch, you can use the rough side of your kitchen sponge.
Polymer: To clean polymer surfaces, use a damp cloth with soap and water or typical cleaners. Avoid heavy-duty cleaners (i.e. anything solvent-
based), as they can damage the material. Repair: Scratches can be bued out of polymer surfaces using 200 - 300 grit sandpaper.
Cerno’s mission since the company’s inception has been to fuse quality, performance and resource eciency with contemporary design.
Producing environmentally responsible products involves far more details than merely guaranteeing your products energy ecient
performance and maintaining eco conscious manufacturing practices. We live in a consumer age characterized by excess and waste,
where nearly everything we posses is viewed as disposable, from the cars we drive to the bottle of water you are drinking right now.
At Cerno we aim to provide our customers an opportunity to purchase objects of value to enhance their built environment. We construct our
products with integrity that will pass the test of time with the goal of evading a premature trip to the local landll. All the products are assembled
by human hands and endure rigorous testing to assure that our exceptionally high standards of quality are always satised.
Warranty
In addition to our two year product defect warranty, Cerno oers a repair service for the life of your product. Every Cerno product is designed and
manufactured in the United States which facilitates excellent quality control and easy access to our engineers and service technicians. At Cerno we
pride ourselves on delivering products executed with an unparalleled level of craftsmanship. For any reason should our customers have an issue
with their orders upon delivery we will repair or replace the item.
In addition to our warranty and quality guarantees, Cerno welcomes customer feedback so please e-mail all comments to info@cernogroup.com
CERNOGROUP.COM T: 949.715.1534 22892 GLENWOOD DRIVE, ALISO VIEJO, CA COPYRIGHT 2021 CERNO LLC. ISSUE DATE 01/01/2021

Other CERNO Outdoor Light manuals

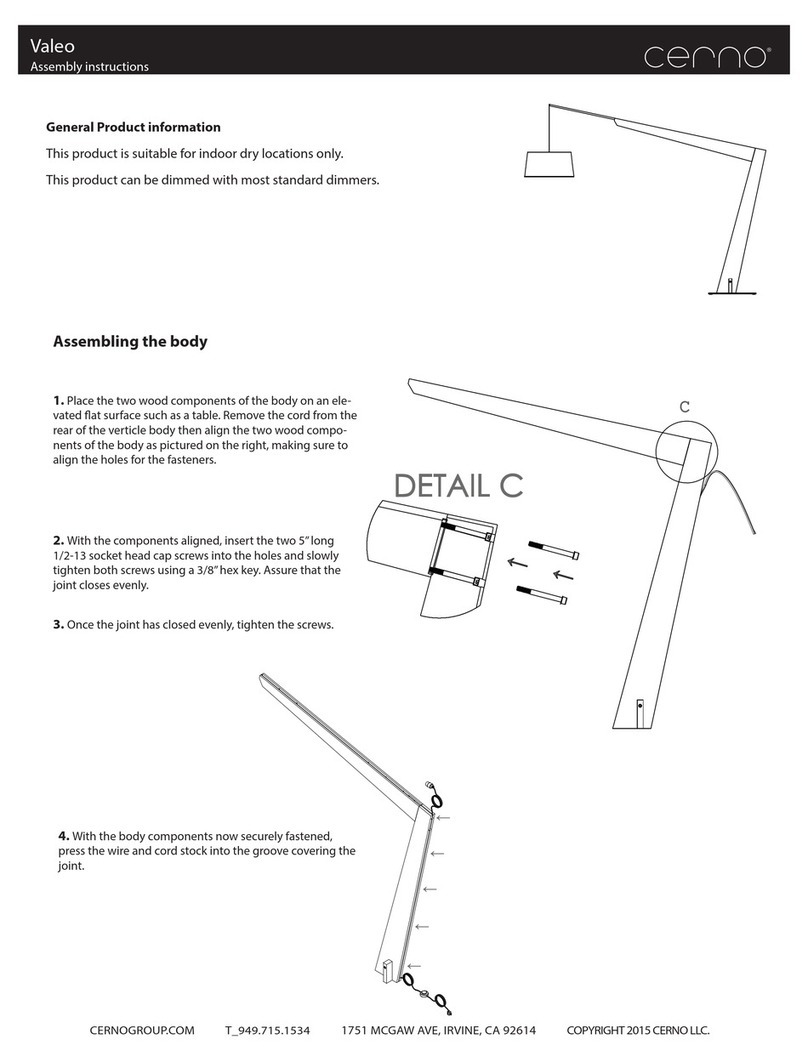
CERNO Valeo User manual

CERNO

CERNO Valeo User manual

CERNO Fons Floor Lamp User manual

CERNO

CERNO Fons Floor Lamp User manual

Popular Outdoor Light manuals by other brands

VIBIA Palo Alto Assembly instructions

VIBIA

VIBIA Palo Alto Assembly instructions

Alice's Garden VASO 65 manual

Alice's Garden

Alice's Garden VASO 65 manual

Ledsavers 64641 manual

Ledsavers

Ledsavers 64641 manual

Iluminarc ILUMILINE ML user manual

Iluminarc

Iluminarc ILUMILINE ML user manual

HUDSON VALLEY LIGHTING TROY LIGHTING SOREN B8906 installation instructions

HUDSON VALLEY LIGHTING

HUDSON VALLEY LIGHTING TROY LIGHTING SOREN B8906 installation instructions

liniLED RGB 160 manual

liniLED

liniLED RGB 160 manual

Gainsborough H249 Instructions for use

Gainsborough

Gainsborough H249 Instructions for use

brennenstuhl OLI 0300 A operating instructions

brennenstuhl

brennenstuhl OLI 0300 A operating instructions

Gama Sonic 117i90480 instruction manual

Gama Sonic

Gama Sonic 117i90480 instruction manual

Home Decorators Collection HB7251-292 Use and care guide

Home Decorators Collection

Home Decorators Collection HB7251-292 Use and care guide

Volt VPL-1043-4-BBK installation instructions

Volt

Volt VPL-1043-4-BBK installation instructions

LIGMAN BA-10643 installation manual

LIGMAN

LIGMAN BA-10643 installation manual

Visual Comfort Fresno XL 3/4 Assembly instructions

Visual Comfort

Visual Comfort Fresno XL 3/4 Assembly instructions

LUCIDE LIVIA 11812/01/30 General Specifications

LUCIDE

LUCIDE LIVIA 11812/01/30 General Specifications

MaxLite DBL Series operating instructions

MaxLite

MaxLite DBL Series operating instructions

SLV WORK LIGHT FLOOR operating manual

SLV

SLV WORK LIGHT FLOOR operating manual

SUN AMEX BORNEO 30 RGB Instructions for use

SUN AMEX

SUN AMEX BORNEO 30 RGB Instructions for use

LUCIDE ZARO manual

LUCIDE

LUCIDE ZARO manual

manuals.online logo
manuals.online logoBrands
  • About & Mission
  • Contact us
  • Privacy Policy
  • Terms and Conditions

Copyright 2025 Manuals.Online. All Rights Reserved.