Certa VDRILXACT User manual


Table of Contents
General Tool Safety Warnings......................................................................................................2
Work Area........................................................................................................................................2
Electrical Safety.............................................................................................................................2
Personal Safety..............................................................................................................................2
Power Tool Use and Care..........................................................................................................3
Battery Tool Use and Care........................................................................................................3
Additional Warnings Applica le for the Cordless Drill.................................................4
Important Safety Instructions for Battery Charger........................................................4
Important Safety Instructions for the Battery Pack.......................................................5
Sym ols.................................................................................................................................................6
Product Information.........................................................................................................................6
Layout................................................................................................................................................6
Technical Specifications.............................................................................................................7
Charging Battery Pack.....................................................................................................................7
Drill Operations...................................................................................................................................8
Torque Settings.............................................................................................................................8
Drilling................................................................................................................................................8
Forward/Reverse switch............................................................................................................8
ON/OFF switch..............................................................................................................................8
Changing from 1st Gear to 2nd Gear....................................................................................8
Battery capacity indicator.........................................................................................................9
LED Lamp.........................................................................................................................................9
Changing the Tool........................................................................................................................9
Screwdriving...................................................................................................................................9
Sound and Vi ration....................................................................................................................9
Maintenance and Servicing..........................................................................................................10
Trou leshooting...............................................................................................................................10
1

General Tool Safety Warnings
Save all warnings and instructions for future reference.
The term “power tool” refers to your mains operated (corded) power tool or
attery-operated (cordless) power tool.
Work Area
1. Keep your work area clean and well lit. Cluttered enches and dark areas
invite accidents.
2. Do not operate power tools in explosive atmospheres, such as in the
presence of flamma le liquids, gases, or dust. Power tools create sparks
which may ignite the dust or fumes.
3. Keep ystanders and children away while operating a power tool.
Distractions can cause you to lose control.
Electrical Safety
1. Power tool plugs must match the outlet. Never modify the plug in any
way. Do not use any adapter plugs with earthed (grounded) power tools.
Unmodified plugs and matching outlets will reduce risk of electric shock.
2. Avoid ody contact with grounded surfaces such as pipes, radiators,
ranges and refrigerators. There is an increased risk of electric shock if your
ody is grounded.
3. Do not expose power tools to rain or wet conditions. Water entering a
power tool will increase the risk of electric shock.
4. Do not a use the cord. Never use the cord to carry the tools or pull the
plug from an outlet. Keep cord away from heat, oil, sharp edges or moving
parts. Replace damaged cords immediately. Damaged cords increase the
risk of electric shock.
5. When operating a power tool outdoors, use an extension cord suita le for
outdoor use. Use of a cord suita le fir outdoor use reduces the risk of
electric shock.
6. If operating a power tool in a damp location is unavoida le, use a Ground
Fault Circuit Interrupter (GFCI) protected supply. Use of a GFCI reduces
the risk of electric shock.
Personal Safety
1. Stay alert, watch what you are doing and use common sense when
operating a power tool. Do not use tool while tired or under the influence
of drugs, alcohol, or medication. A moment of inattention while operating
power tools may result in serious personal injury.
2. Use personal protective equipment. Always wear eye protection. Safety
equipment such as dust mask, non-skid safety shoes, hard hat, or hearing
protection used for appropriate conditions will reduce personal injuries.
3. Prevent unintentional starting. Ensure the switch is in the off-position
efore connecting to power source and/or attery pack, picking up or
carrying the tool. Carrying power tools with your finger on the switch or
2

energizing power tools that have the switch on invites accidents.
4. Dress properly. Do not wear loose clothing or jewellery. Keep your hair,
clothing, and gloves away from moving parts. Loose clothes, jewelry, or
long hair can e caught in moving parts.
5. Remove adjusting keys or wrenches efore turning the tool on. A wrench
or a key that is left attached to a rotating part of the tool may result in
personal injury.
6. Do not overreach. Keep proper footing and alance at all times. The
ena les etter control of the power tool in unexpected situations.
7. Only use safety equipment that has een approved y an appropriate
standards agency. Unapproved safety equipment may not provide
adequate protection. Eye protection must e ANSI-approved and
reathing protection must e NIOSH-approved for the specific hazards in
the work area.
Power Tool Use and Care
1. Do not force tool. Use the correct tool for your application. The correct
tool will do the jo etter and safer at the rate for which it is designed.
2. Do not use tool if switch does not turn it on or off. Any power tool that
cannot e controlled with the switch is dangerous and must e repaired.
3. Disconnect the plug from the power source and/or the attery pack from
the power tool efore making any adjustments, changing accessories, or
storing the tool. Such preventive safety measures reduce risk of starting
the tool accidentally.
4. Store idle power tools out of the reach of children and other untrained
persons. Power tools are dangerous in the hands of untrained users.
5. Maintain tools with care. Check for misalignment or inding of moving
parts, reakage of parts and any other condition that may affect the
power tool’s operation. If damaged, have the power tool repaired efore
use. Many accidents are caused y poorly maintained power tools.
6. Keep cutting tools sharp and clean. Properly maintained tools with sharp
cutting edges are less likely to ind and are easier to control.
7. Use only accessories that are recommended y the manufacturer for your
model. Accessories that may e suita le for one tool may ecome
hazardous when used on another tool.
Battery Tool Use and Care
1. Ensure the switch is in the off position efore inserting attery pack. Insert
the attery pack into power tools that have the switch on invites
accidents.
2. Recharge only with the charger specified y the manufacturer. A charger
that is suita le for one type of attery pack may create a risk of fire when
used with another attery pack.
3. Use power tools only with specifically designated attery packs. Use of
any other attery packs may create a risk of injury and fire.
4. When attery pack is not in use, keep it away from other metal o jects
like paper clips, coins, keys, nails, screws, or other small metal o jects that
can make a connection from one terminal to another. Shorting the attery
3

terminals together may cause urns or a fire.
5. Under a usive conditions, liquid may e ejected from the attery, avoid
contact. If contact accidentally occurs, flush with water. If liquid contacts
eyes, additionally seek medical help. Liquid ejected from the attery may
cause irritation or urns.
Additional Warnings Applicable for the Cordless Drill
•old power tool by insulated gripping surfaces, when performing an
operation where the cutting accessory or fastener may contact hidden
wiring. Cutting accessory and fasteners contacting a “live” wire may make
exposed metal parts of the power tool “live”, which can give the operator
an electric shock.
•Use appropriate detectors to determine if utility lines are hidden in the
work area or call the local utility company for assistance. Contact with
electric lines can lead to fire and electric shock. Damaging a gas line can
lead to explosion. Penetrating a water line causes property damage and
may cause an electric shock.
•Switch off the power tool immediately when the tool insert jams. Be
prepared for high reaction torque that can cause kick ack.
•old the machine with a firm grip. High reaction torque can riefly occur
while driving in and loosening screws.
•Secure the work piece. A work piece clamped with clamping devices or in
a vice is held more securely than y hand.
•Be extra careful when cutting in high or hard-to-reach locations. Avoid
sawing overhead. Be on the lookout for hidden wires and falling de ris.
•Keep your workplace clean. Blends of materials are particularly
dangerous. Dust from light alloys can urn or explode.
•Always wait until the machine has come to a complete stop before
placing it down. The tool insert can jam and lead to loss of control over
the power tool.
•Do not open the battery. Danger of short circuiting. Protect the attery
against heat, e. g., also against continuous sun irradiation and fire. There is
danger of explosion.
•In case of damage and improper use of the battery, vapours may be
emitted. Provide fresh air and seek medical help in case of complaints.
The vapours can irritate the respiratory system.
•When the battery is defective, liquid can escape and come into contact
with adjacent components. Check any parts concerned. Clean such parts
or replace them, if required.
Important Safety Instructions for Battery Charger
•Before using battery charger, read all instructions and cautionary
markings on battery charger, battery pack, and product using battery.
•Use only the charger which accompanied your product or direct
replacement. Do not su stitute any other charger. Use only same supplier
approved chargers with your product.
•Do not disassemble charger or operate the charger if it has received a
sharp blow, been dropped or otherwise damaged in any way. Incorrect
4

reassem ly may result in a risk of electric shock, electrocution or fire.
•Do not recharge battery in damp or wet environment. Do not expose
charger to rain or snow. If battery case is cracked or otherwise damaged,
do not insert into charger. Battery short or fire may result.
•Charge only same supplier approved rechargeable batteries. See
Functional Description and Specifications. Other types of atteries may
urst causing personal injury and damage.
•Charge battery pack in temperatures above 0ºC and below 45ºC. Store
tool and battery pack in locations where temperatures will not exceed
49ºC. This is important to prevent serious damage to the attery cells.
•Pull by plug rather than cord when disconnecting charger or when
disconnecting cords using the daisy chain feature. This will reduce risk of
damage to electric plug and cord.
•Make sure that cord is located so that it will not be stepped on, tripped
over, or otherwise subjected to damage or stress.
•Do not use an extension cord unless it is absolutely necessary. Use of
improper extension cord could result in risk of fire, electric shock, or
electrocution.
•Do not operate charger with damaged cords or plugs — have them
replaced immediately.
•Disconnect the charger from the outlet before attempting any cleaning.
This will reduce the risk of electric shock. Removing the attery pack will
not reduce this risk.
Important Safety Instructions for the Battery Pack
•Do not incinerate the battery pack even if it is severely damaged or is
completely worn out. The attery pack can explode in a fire. Toxic fumes
and materials are created when lithium ion attery packs are urned.
•Do not charge or use battery in explosive atmospheres, such as in the
presence of flammable liquids, gases or dust. Inserting or removing the
attery from the charger may ignite the dust or fumes.
•If battery contents come into contact with the skin, immediately wash
area with mild soap and water. If attery liquid gets into the eye, rinse
water over the open eye for 15 minutes or until irritation ceases. If medical
attention is needed, the attery electrolyte is composed of a mixture of
liquid organic car onates and lithium salts.
•Contents of opened battery cells may cause respiratory irritation.
Provide fresh air. If symptoms persist, seek medical attention.
•Charge the battery packs only in the charger which accompanied your
product.
•DO NOT splash or immerse in water or other liquids. This may cause
premature cell failure.
•Do not store or use the tool and battery pack in locations where the
temperature may reach or exceed 40°C (such as outside sheds or metal
buildings in summer).
•When batteries are not in tool or charger, keep them away from metal
objects.
•DO NOT put batteries into fire or expose to high heat. They may explode.
5
Symbols
The following sym ols or initials may e used on the tool. Please see elow to
learn their meaning. Proper interpretation of these sym ols will allow you to
operate the tool etter and safer.
Symbol Name Designation/Explanation
V Volts Voltage
A Amperes Current
Hz Hertz Frequency (cycles per second)
Kg Kilograms Weight
Min Minutes Time
s Seconds Time
Ø Diameter Size of drill its, grinding wheel etc..
noNo load speed Rotational speed at no load
…/min Revolutions or
reciprocation per minute
Revolutions, strokes, surface speed,
or its etc.. per minute
0 Off position Zero speed, zero torque...
Arrow Action in the direction of the arrow
Direct current Type or a characteristic of current
Read manual sym ol Alerts user to refer to the manual
Wear eye protection Alerts user to wear eye protection
Class II construction Dou le insulated construction tools
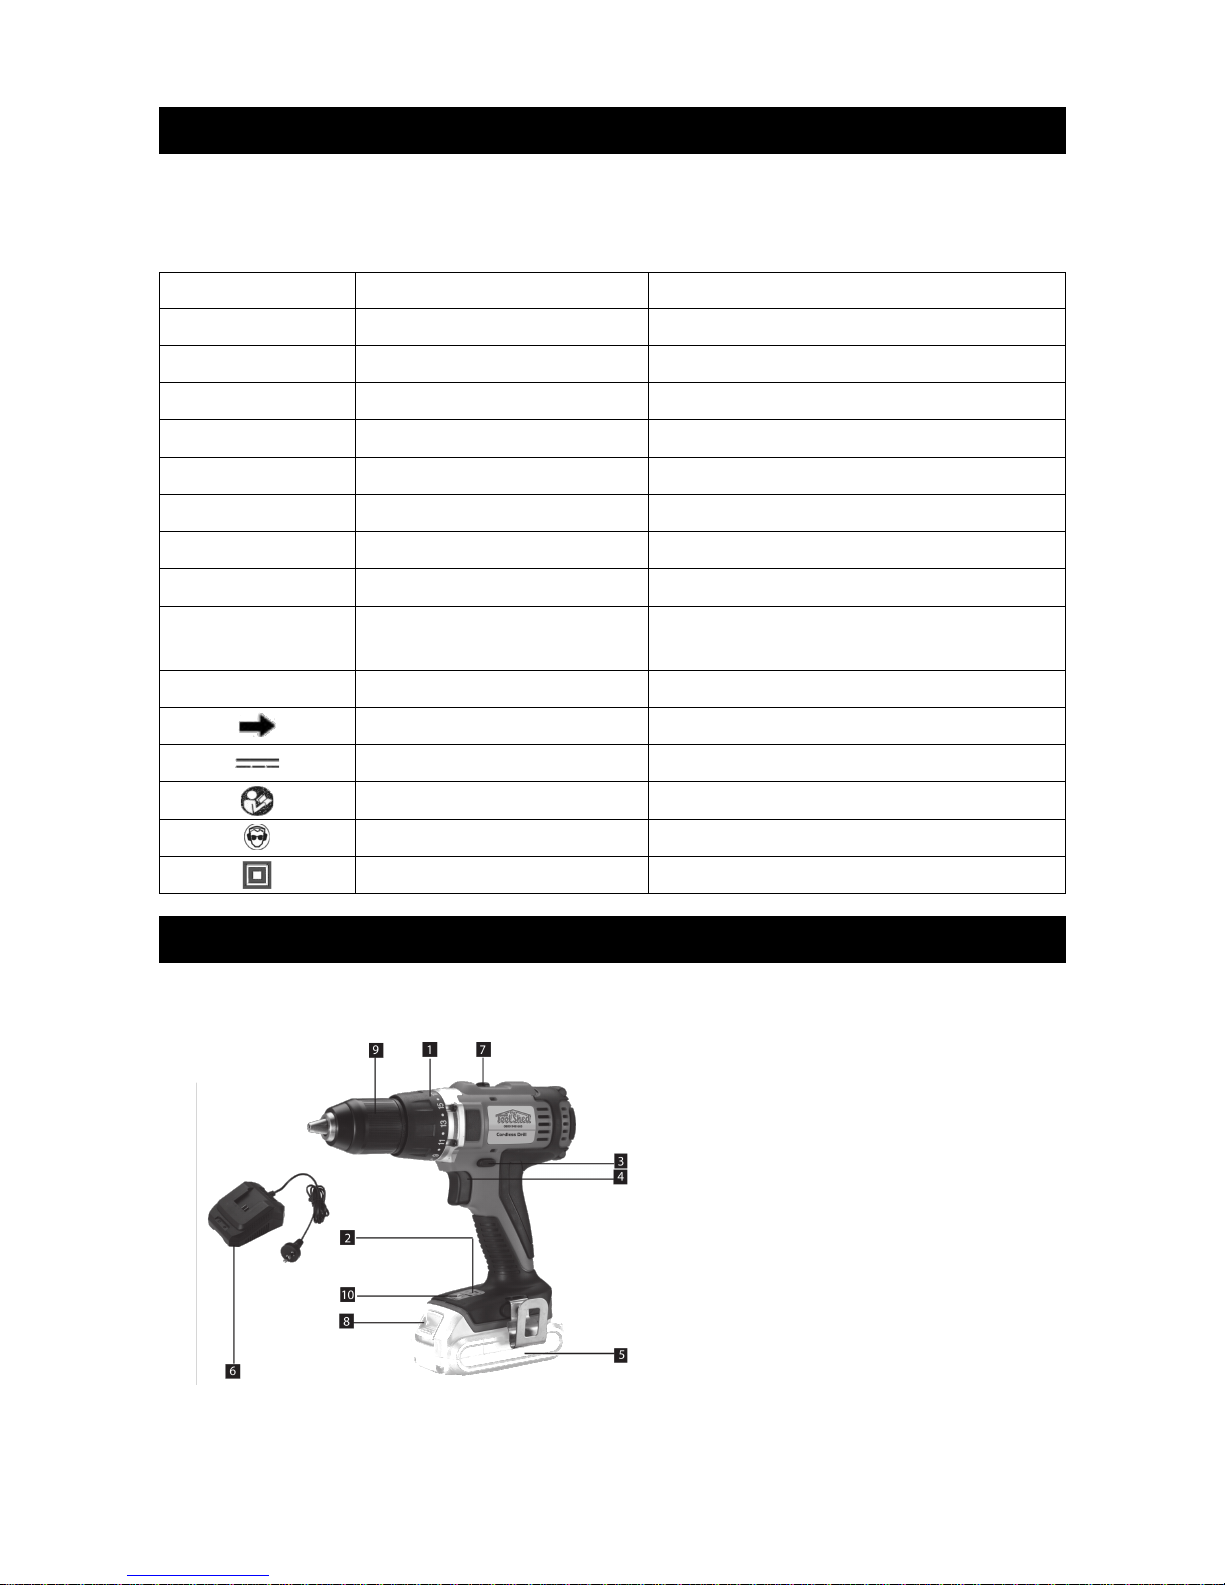
Product Information
Layout
1. Torque Selector
2. Battery Capacity Indicator
3. Changeover Switch
4. ON/OFF Switch
5. Li-Ion Battery Pack
6. Battery Charger
7. Gear Selection Switch
8. Pushlock Button
9. Quick-change Drill Chuck
10. LED Lamp
6
Technical Specifications
Voltage Supply 17V d.c./1.3 A h Li-ion
Idling Speed 0-400/0-1400rpm
Torque Settings 19+1
Forward & Reverse Rotation Yes
Chuck Clamping Width Max 13mm
Battery Charging Current 1300mA
Mains Voltage for Charger 100-240V~/50-60Hz
Charging Time 1 hour
Weight 1.5kg
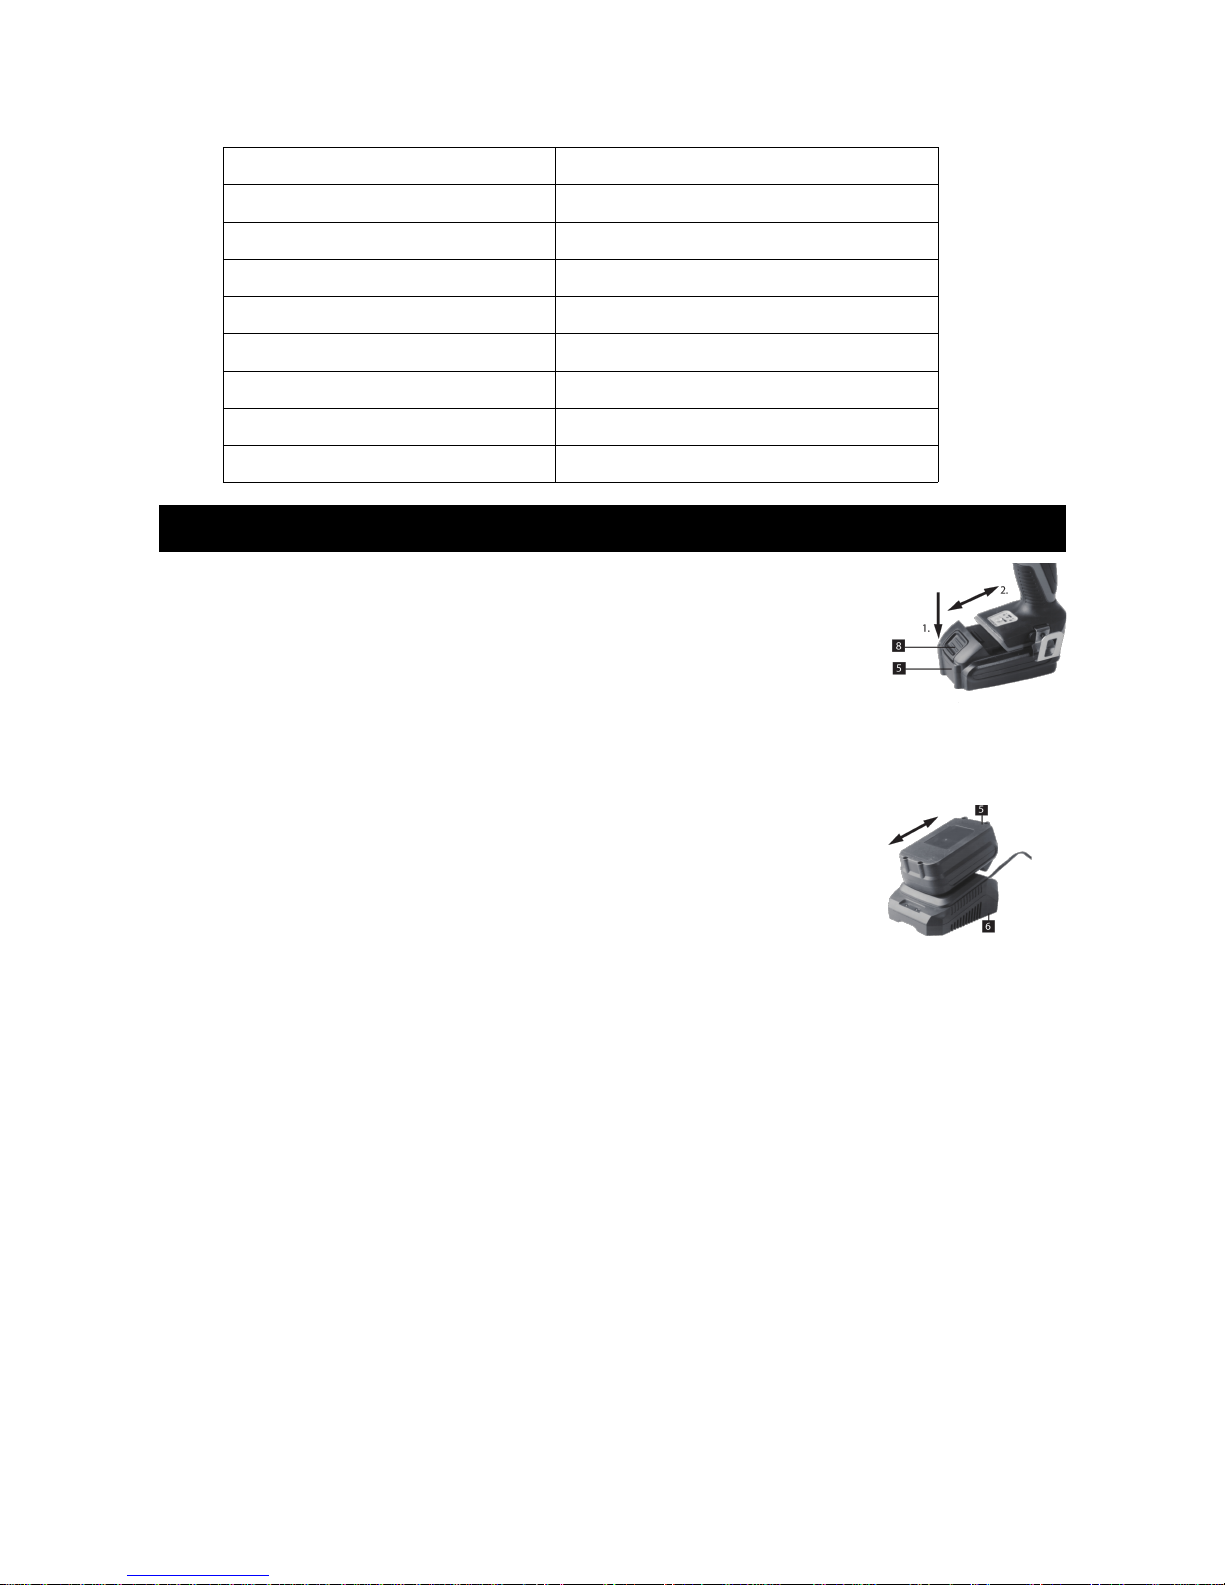
Charging Battery Pack
1. Remove the attery pack (5) from the handle, pressing the
push lock uttons (8) downwards to do so.
2. Check that your mains voltage is the same as that marked
on the rating plate of the attery charger. Plug the mains
plug of the charger (6) into the mains socket outlet, turn
on the power the green LED will illuminate.
3. Push the attery pack onto the attery charger. The green LED
extinguishes and the red LED will illuminate,which indicate that the
attery pack is eing charged.
4. When the charging period is completed after approx 1
hour, the green LED will illuminate and the red LED will
extinguish.
5. The temperature of the attery pack may rise slightly
during the charging operation. This is normal. If the green
LED extinguishes during charging, the temperature is either a ove or
elow the perfect charging temperature. In this case, pull the plug of the
charger and charge the attery in an environment in which the
temperature is either warmer or colder.
If the attery pack fails to ecome charged, please check
•whether there is voltage at the socket-outlet
•whether there is proper contact at the charging contacts on the charger.
If the attery continues to fail charging, please contact the Kogan customer
support team.
To ensure that the attery pack provides long service you should take care to
recharge it promptly.
You must recharge the attery pack when you notice that the power of the
cordless screwdriver drops.
Never fully discharge the attery pack. This will cause the attery pack to
develop a defect.
7

Drill Operations
Torque Settings
The cordless screwdriver is fitted with a mechanical torque
selector.
The torque for a specific size of screw is selected with the set-
collar (1). The correct torque depends on several factors:
•the type and hardness of the material
•the type and length of screws
•the requirements needed to e met y the screwed joint
The clutch disengages with a grating sound to indicate when the set torque is
reached.
Note: the tool must e at a standstill when the torque is eing set with the
setting ring.
Drilling
For drilling purposes, move the set-collar to the last step
“drill”. In this setting, the slip clutch is inactive.
The maximum torque possi le will e used in drilling mode.
Forward/Reverse switch
With the slide switch (3) a ove the ON/OFF switch, you can
select the direction of rotation of the attery powered
drill/screwdriver, and secure it against eing switched on
accidentally. You can choose etween clockwise and
anticlockwise rotation. To avoid causing damage to the gearing it
is advisa le to change the direction of rotation only when the tool
is at a standstill.
The ON/OFF switch is locked when the slide switch is in the centre position.
ON/OFF switch
Varia le speed control is possi le with the ON/OFF switch (4). The further you
press the switch, the higher the speed of the attery powered drill-screwdriver.
Changing from 1st Gear to 2nd Gear
You can work at a higher or lower speed depending on the position
of the selector switch. To avoid damaging the gear unit you should
only change over gears when the tool has stopped.
8

Battery capacity indicator
The 3 colour LEDs will indicate the status of attery capacity as soon as you
press the ON/OFF switch (4).
•All LEDs illuminate: Battery is fully charged.
•Yellow and red LEDs illuminate: Battery has adequate charge.
•Red LED: The attery is empty. Please recharge.
LED Lamp
The LED lamp (10) can e used in poor lighting conditions to
illuminate the area where you want to drill or screw. The LED
lamp (10) will e lit automatically as soon as you press the
ON/OFF switch (4).
Changing the Tool
Important. Set the changeover switch (3) to its centre position
whenever you carry out any work (for example changing the tool,
maintenance work, etc.) on the cordless screwdriver.
•The cordless screwdriver is fitted with a quickaction chuck
(9) with an automatic spindle stop.
•Open the chuck (9). The chuck opening (a) must e large enough to hold
the tool (drill it or screwdriver it).
•Select the suita le tool. Push the tool as far as possi le into the chuck
opening (a).
•Tighten the chuck (9), then check that the tool is secure.
Screwdriving
We recommend using self-centering screws (eg. Recessed head screws)
designed for relia le working. Be sure to use a it that matches the screw in
shape and size.
Sound and Vibration
Sound and vi ration values were measured in accordance with EN 60745.
LpA: sound press level 71,23dB(A)
KpA: uncertainty 3dB(A)
LWA: sound pressure level 82,23dB(A)
KWA: uncertainty 3dB(A)
Wear ear muffs! The impact of noise can cause damage to hearing.
Drilling in Metal
Vi ration emission value ah = 3,782m/s2
K uncertainty = 1,5m/s2
Screwing without hammer action
Vi ration emission value ah < 2.5m/s2
K uncertainty = 1,5m/s2
9

Maintenance and Servicing
To prevent serious injury or death from accidental operation, turn the Power
Switch of the tool to its “OFF” position and disconnect battery pack from tool
before performing any inspection, maintenance, or cleaning procedures.
•Clean out dust and de ris from vents and electrical contacts y lowing
with compressed air. Always wear safety goggles when cleaning tools
with compressed air.
•Keep tool handles clean, dry and free of oil or grease.
•Use only mild soap and a damp cloth to clean the tool, keeping away from
all electrical contacts.
Note: Certain cleaning agents and solvents are harmful to plastics and other
insulated parts. Some of these include gasoline, turpentine, lacquer thinner,
paint thinner, chlorinated cleaning solvents, ammonia and household detergents
containing ammonia.
Tool maintenance must only e performed y qualified repair personnel. If the
tool is not working properly, do not attempt to repair it yourself. Contact the
Kogan customer support team.
Troubleshooting
Problem Possible Causes Likely Solutions
Tool will not start. •Battery pack not
installed properly.
•Battery pack not
charged.
•Check attery pack
installation.
•Check attery pack
charging requirements.
Battery pack will
not charge.
•Battery pack not
inserted into charger.
•Charger not plugged
in.
•Insert attery pack
into charger until red
LED appears.
•Plug charger into a
working outlet. Refer
to “Important
Charging Notes” for
more details.
•If chargers are daisy
chained together
check all connections.
•Check current at
receptacle y plugging
in a lamp or other
appliance.
•Check to see if
receptacle is
10

•Surrounding air
temperature.
•Battery pack too hot
or too cold.
connected to a light
switch which turns
power off when you
turn out the lights.
•Move charger and
attery to a
surrounding air
temperature of a ove
4.5°C or elow 40.5°C.
•The charger will not
charge a attery pack
if the cell temperature
is elow approximately
0°C or a ove 60°C.
•The attery pack
should e left in the
charger and the
charger will egin to
charge automatically
when the cell
temperature warms up
or cools down.
11
Table of contents
Other Certa Drill manuals


