Chainavasion DG Series User manual

ultimedia System
DG Series lnstruction Manual
Warning
Disc Operation and Maintenance
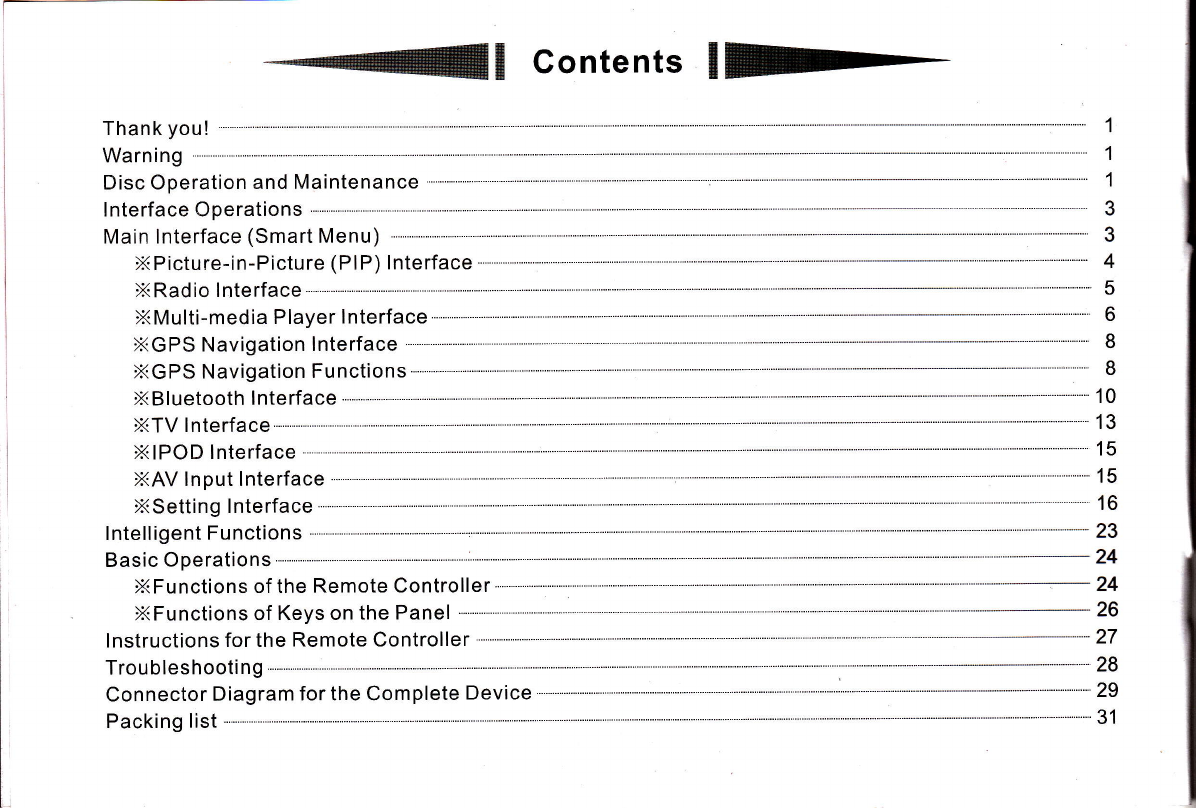
lnterface Operations
Main lnterface (Smart Menu)
XPicture-in-Picture (PlP) lnterface
XRadio lnterface
1
1
1
3
3
4
5
6
I
8
26
27

I
oFor your own safety, do not watch TV or perform related operations while driving.
This system just helps you reverse a car. We are not liable for any accident that occurs when you
perform a reverse maneuver.
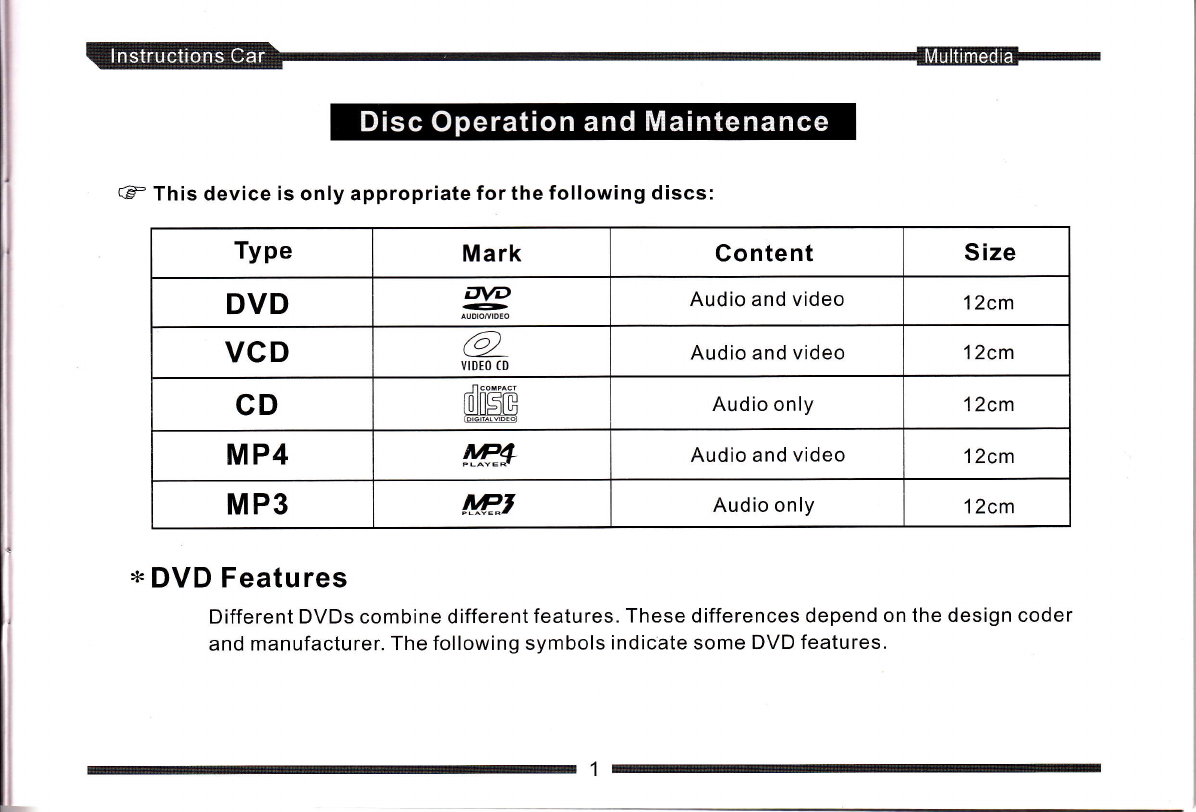
€ This device is only appropriate for the following discs:
Type Mark Content Size
DVD DVD
GD Audio and video 12cm
VCD @
VIDEO (D Audio and video 12cm
CD ffi Audio only 12cm
MP4 !w3 Audio and video 12cm
MP3 !!P-J Audio only 12cm
DVD Featu res
Different DVDs combine different features. These differences depend on the design coder
and manufacturer. The following symbols indicate some DVD features.

@ n"oion code and video output format @ sound track quantity
PgH Dotby digitat stereophonic system [#,,-l caption quantity
Digital theater system
5.1 sound track audio
Video mode
Two-channel stereo
Closed caption
Angle
Restricted
oo
L.l<
E
ffi
IET
l-l
li&eE
5--L
Stereol I
Note: Certain functions of this device need to be supported by DVDs. lf DVDs do not support these functions or a
special setting is required, the functions may not be usable. Check these functions before playing DVDs or
follow the tips dlsplayed on the screen. lf discs are polluted or damaged, sound skipping may occur. To
optimize the sound effects, do the following:
Avoid using discs with a label as viscose Use a soft cloth to clean the disc
glue is left on the disc when the label is removed. from the center to the edge.
Never place the disc
heat sources such as
keep the disc in cars
excessively high.
Hold the disc by its edge to keep it clean. or_-\
(=@)
in direct sunl ight or near
the warm air pipes. Do not
where the temperature is Never use discs contaminated by viscose glue or ink
o,.-\
(e,
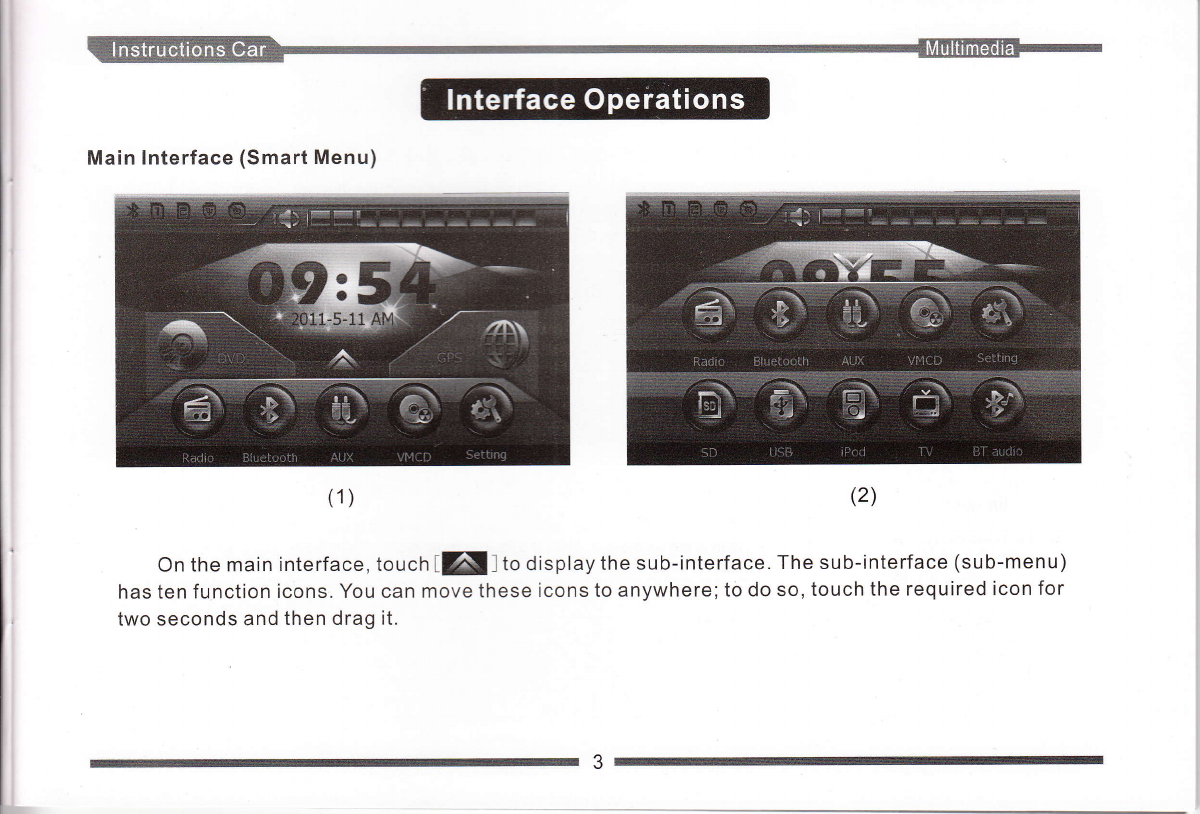
Main lnterface (Smart Menu)
On the main interface, touch tEI l to display the sub-interface. The sub-interface (sub-menu)
has ten function icons. You can move these icons to anywhere; to do so, touch the required icon for
two seconds and then drag it.
(2)
(1)

Picture-i n-Picture (PlP) lnterface
Touch fFf on the media player interface to display the PIP interface. This interface houses the
minimize, maximize and close buttons. After enabling PlP, touch the PIP interface frame and keep doing
so to drag the screen. After maximizing the PIP interface, do not touch the icons on the top and bottom
bars within a period to display a fullscreen. lf you touch the fullscreen, these icons are displayed again.
Touch ffff to display the PIP interface on the main page. Touch fli on the main menu to
access the entertainment functions while driving.
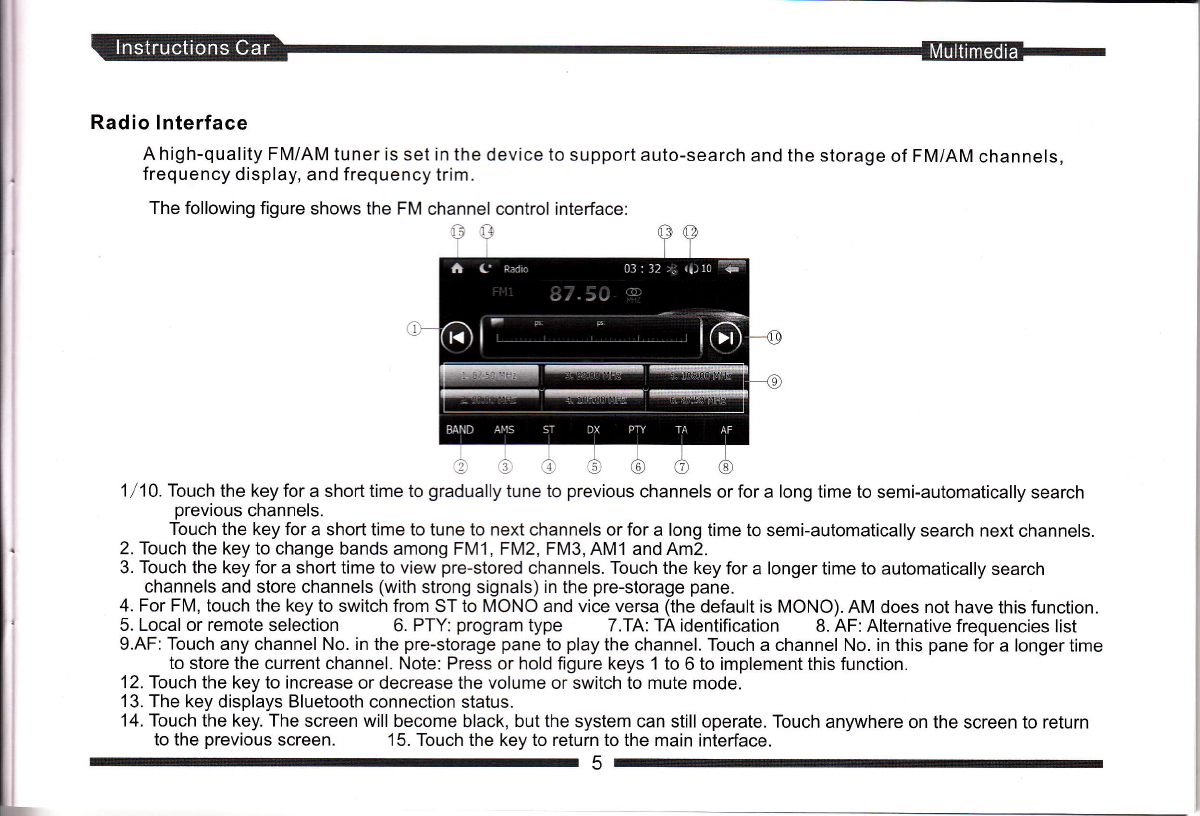
Radio lnterface
A high-quality FM/AM tuner is set in the device to support auto-search and the storage of FM/AM channels,
frequency display, and frequency trim.
The following figure shows the FM channel control interface:
1/10. Touch the key for a short time to gradually tune to previous channels or for a long time to semi-automatically search
previous channels.
Touch the key for a short time to tune to next channels or for a long time to semi-automatically search next channels.
2. Touch the key to change bands among FMl, FM2, FM3, AM1 and Am2.
3. Touch the key for a short time to view pre-stored channels. Touch the key for a longer time to automatically search
channels and store channels (with strong signals) in the pre-storage pane.
4. For FM, touch the key to switch from ST to MONO and vice versa (the default is MONO). AM does not have this function.
5. Local or remote selection 6. PTY: program type 7.TA: TA identification 8. AF: Alternative frequencies list
9.AF: Touch any channel No. in the pre-storage pane to play the channel. Touch a channel No. in this pane for a longer time
to store the current channel. Note: Press or hold figure keys 1 to 6 to implement this function.
12. Touch the key to increase or decrease the volume or switch to mute mode.
13. The key displays Bluetooth connection status.
'14. Touch the key. The screen will become black, but the system can still operate. Touch anywhere on the screen to return
to the previous screen. 15. Touch the key to return to the main interface.

Multi-media Player lnterface
l. This product supports the following:
1. Audio and video formats, such as DVD, VCD, SVCD, CD, MP3, WMA, MP4, and AVt
2. USB media, SD or MMC card
3. lmage (such as JPEG and BMP) browsing
4. Folder or directory browsing .
5. ESP for various discs
ll. Warning: Correctly use the system to ensure its long service life. For example, play legaldiscs
and keep discs clean.
l.After a disc is correctly inserted, the disc automatically loads.
2.lf adiscisloaded,touchMODEortouch tnf , toplaytheDVD. lfthediscjamsordoesnot
load, touch I r ] untilthe disc ejects and the loader is reset.
3.When you play a disc, touch tXfll to return to the main interface.
lll. lnsert a USB device or SD card to display the player interface.
1.lf you have already inserted the USB device or SD card, toucht! ttUSal orl!|1SD), orpress
MODE to display the corresponding interface.
lV. Functions
1 . As shown in the following figure, keylllo 16 are function keys. Touchll]to display function
keys on the second page and touchIK]to return to the first page. foucnl lto hide the bottom
button bar.
2. ln player mode, the screen maximizes when the top and bottom bars are not displayed if you do
not touch the screen for a certain amount of time. The top and bottom bars are displayed if you
touch the screen.
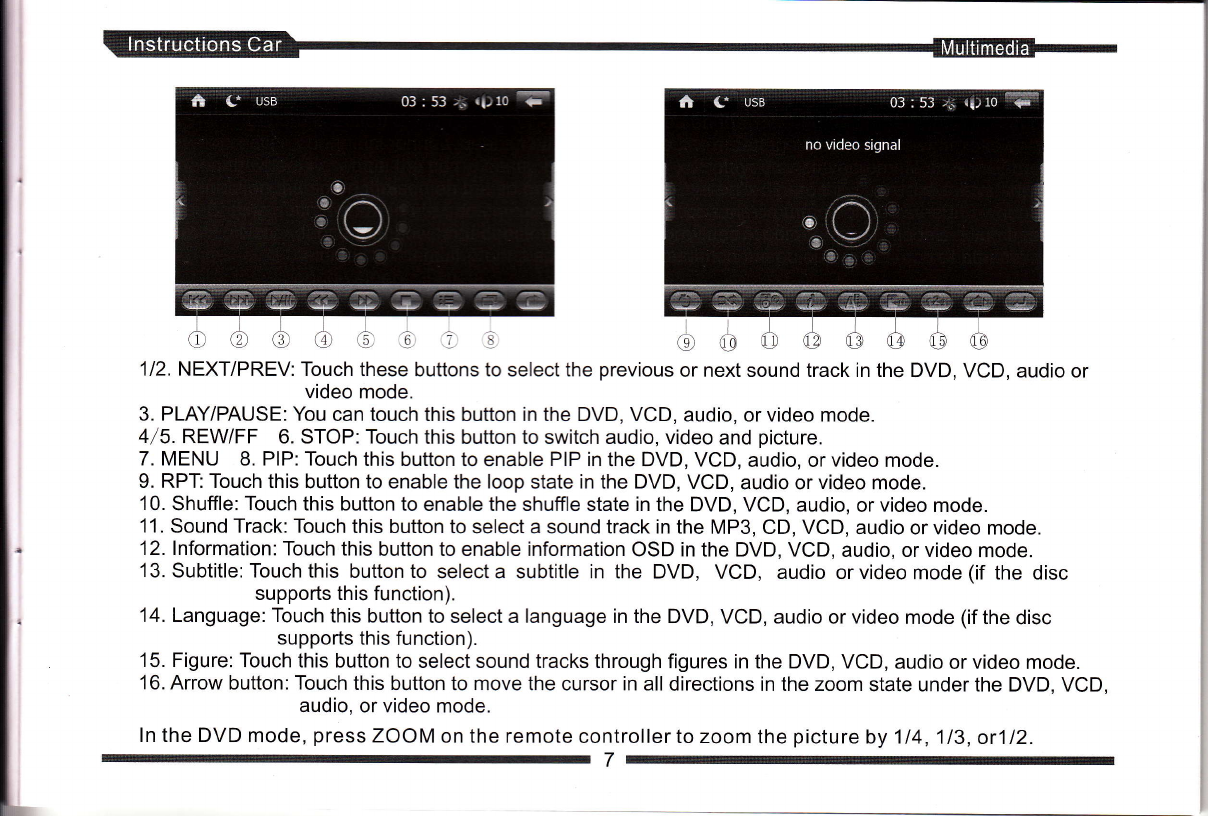
1/2. NEXT/PREV: Touch these buttons to select the previous or next sound track in the DVD, VCD, audio or
video mode.
3. PLAY/PAUSE:You can touch this button in the DVD, VCD, audio, or video mode.
4/5. REWIFF 6. STOP: Touch this button to switch audio, video and picture.
7. MENU 8. PIP: Touch this button to enable PIP in the DVD, VCD, audio, or video mode.
9. RPT: Touch this button to enable the loop state in the DVD, VCD, audio or video mode.
10. Shuffle: Touch this button to enable the shuffle state in the DVD, VCD, audio, or video mode.
11 . Sound Track: Touch this button to select a sound track in the MP3, CD, VCD, audio or video mode.
12. lnformation: Touch this button to enable information OSD in the DVD, VCD, audio, or video mode.
l3.Subtitle:Touchthis buttonto selecta subtitle in the DVD, VCD, audio orvideomode(if the disc
supports this function).
14. Language: Touch this button to select a language in the DVD, VCD, audio or video mode (if the disc
supports this function).
15. Figure: Touch this button to select sound tracks through figures in the DVD, VCD, audio or video mode.
16. Arrow button: Touch this button to move the cursor in all directions in the zoom state under the DVD, VCD,
audio, or video mode.
ln the DVD mode, press ZOOM on the remote controller to zoom the picture by 114,113, or112.
h

GPS Navigation lnterface
Precautions and Safety Warning
1 . Use GPS carefully. This system just provides navigation reference for you. Never use this system
for precise measurement of position, distance, location, terrain and others.
2. When you use GPS for the first time, park your car at one open space without a shelter. positioning
requires at least two minutes based on the environment and strength of satellite signals.
3. For your safety, set up the route before you set off. Never operate this system while you are driving.
We are not Iiable for any traffic accident that occurs when you operate this system rather than pay
attention to the road condition while driving.
4. This system cannot provide correct positioning and navigation if satellite signals are interfered by
tunnel, building, subway, forest, weather, tall obstacle or mobile phone base station. The system
resumes normal positioning and navigation after you move away from these sources.
5. Note that satellite signals may be interfered by any wireless communications product (such as a
cell phone or speed alarm) and become unstable.
6. Road planning is for reference only. Road properties, such as one-way road and no left turn, may
be ad j usted by the local traffic department based on transportation circumstance, road
construction, governmental or commercial activities. Therefore, you must obey current traffic
rules relating to road conditions and signs. lf the current road conditions are different from the
map, choose an appropriate route.
GPS Navigation Functions
This system provides a navigation map (note: this map applies to certain models).
(A) The GPS navigation system provides proportional real-time crossing data to display the
actual crossing, so you do not have to worry about driving at a complex crossing.

i
i
( B ) The real-time map covers all major cities in China.
( C ) Hand operation: Clear and correct voice navigation provides timely instructions and chooses the
most appropriate road for you. Although road conditions are complex, the car
multi-media navigation system and the precise GPS navigation map provide
efficient traffic information, so you are free to drive to the next destination!
For details, touch Help on the GPS page.

Bluetooth lnterface
Bluetooth communications, ready to use and safe, enables synchronization between the cell phone
and the audio device, so you never miss a call while driving.
l. Bluetooth match condition
lf the cell phone supports Bluetooth connection, the cell phone can be connected to the device for
data exchange synchronization.
ll. Matching the cell phone Bluetooth and the device Bluetooth
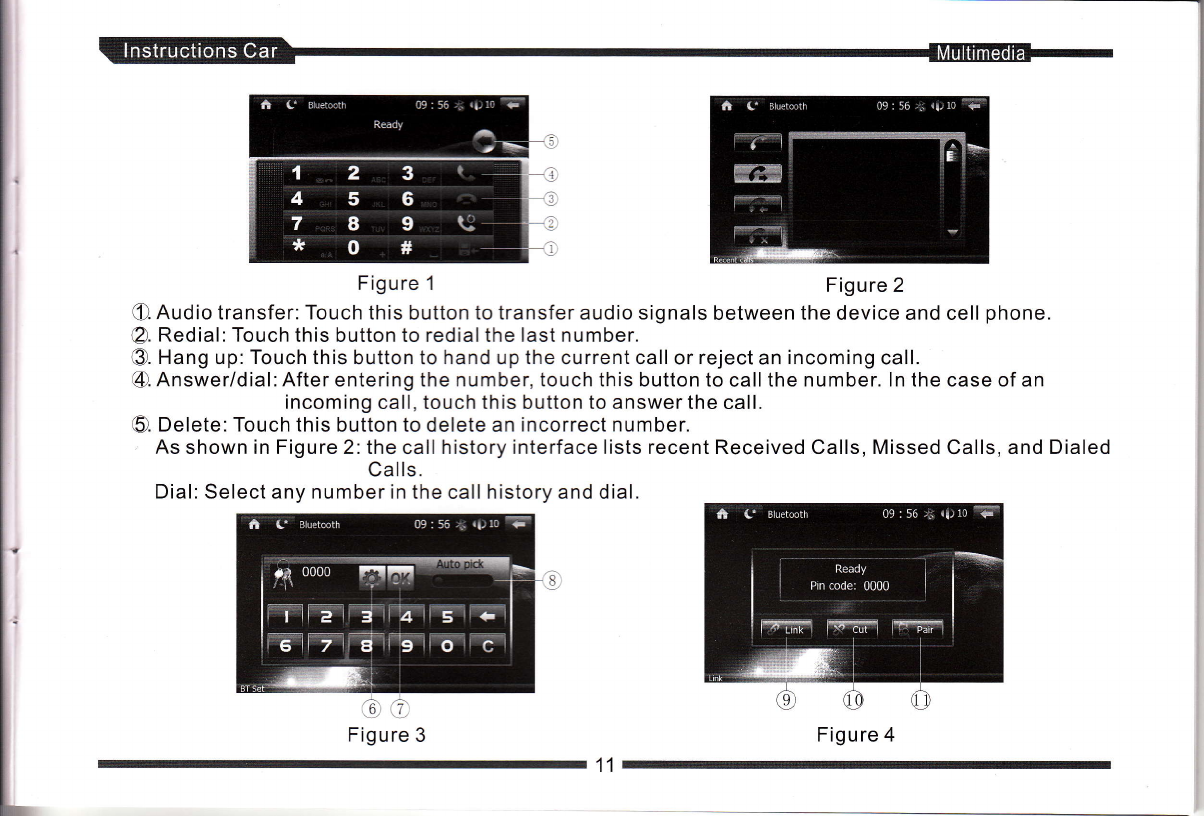
Touch Bluetooth Call on the main interface to display the Bluetooth interface.
1. Touch tryffffiJ, (Match) on the Bluetooth interface to display a related interface. On this interface,
touch Match, as shown in Figure 4. Now, the system displays a message: "Matching".
2. Set your cell phone mode to Bluetooth and start this mode. Use your cell phone to search devices
and enter the initial password (0000) to connect the cell phone to the device.
3. lf the cell phone and the device are matched, the cell phone displays a message: "Do you want to
connect to the device?" Select Yes. The cell phone is automatically connected to the Bluetooth
device in about 10 seconds. At this time, the screen displays a message: "Connected".
4. The cel!*g[one is successfully connected to the Bluetooth device.
5. Touch tlfll at the upper righi to return to the Bluetooth interface.
lll.Touch operations on the Bluetooth call interface
l.Touch inl to display the interface for dialing a Bluetooth
number, as_shown in Figure 1:
2.Touch tnl to displayihe Bluetooth call history interface,
as shown in Figure 2:
3.Touch tllto display the Bluetooth setting interface, as
shown in Fiqure 3:
4.Touch flflto display the Bluetooth call matching interface,
as shown in Figure 4:
10
l.
i'
I
I
L
C. Audio transfer: Touch this button to transfer audio signals between the device and cell phone.
@. Redial:Touch this button to redialthe last number.
@. Hang up: Touch this button to hand up the current call or reject an incoming call.
4). Answer/dial: After entering the number, touch this button to call the number. ln the case of an
incoming call, touch this button to answer the call.
5). Delete: Touch this button to delete an incorrect number.
As shown in Figure 2: the call history interface lists recent Received Calls, Missed Calls, and Dialed
Calls.
Dial: Select any number in the call history and dial.
GO
Figure 3
Figure 1Figure 2
11
Figure 4

6). Set up: Touch this button to customize the Bluetooth password. Enter a four-digit number and then
touch OK. (Note:The modified number replaces the initial Bluetooth paisword.)
(2. OK: Enter the custom password and then touch this button to validate the seiting.
€). Auto-answer: Touch the right end of this status bar to display a blue dot and enable the auto-answer
function. Now, you can automatically answer a call. Touch the left end of the bar to
disable this function.
@. Connect:After matching is complete, touch this button to connect the cell phone to the device.
@. Disconnect: Touch thii button to disconnect the cell phone and device.
(!). tvtatcn: lf the device must be connected to the cell phone, touch this button to match them first.
lV. Touch operations on the Bluetooth music interface
Touch t E I in the main menu to display the Bluetooth music interface.
This function is available only when your cell phone is connected to the device through Bluetooth.
When you play a sound track in your cell phone, the system displays the Bluetooth music interface,
as shown in the following figure:
Stop:After you touch this button, the time on the player returns to O0:00.
PREV: Touch this button to select to play the previous sound track in the play mode.
Play/pause: ln the pause mode, touch this button to play the music. In the play mode, touch this button
to pause the music.
NEXT: Touch this button to select to play the next sound track in the play mode.
a
@
€).
@12
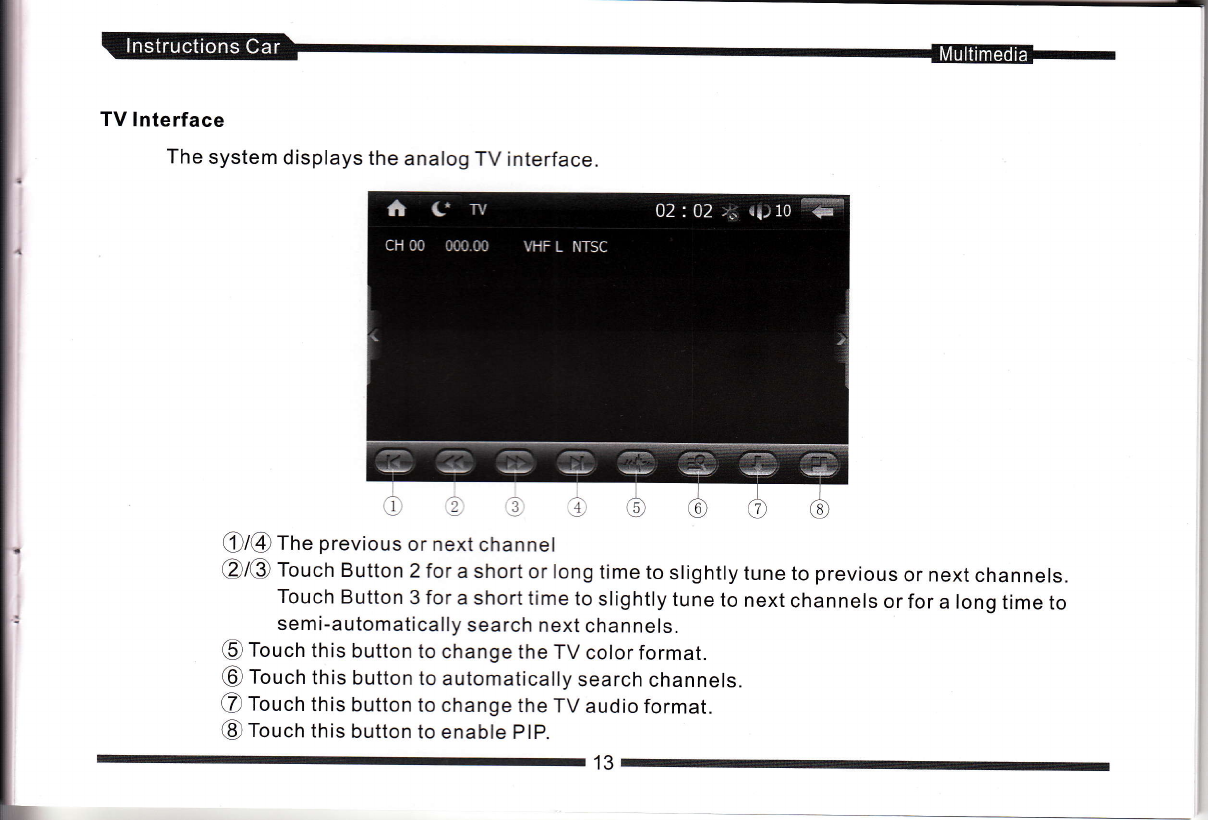
TV lnterface
The system displays the analog TV interface.
Oi@ ffre previous or next channel
@/@ Toucn Button 2for a short or long time to slightly tune to previous or next channels.
Touch Button 3 for a short time to slightly tune to next channels or for a long time to
semi-automatically search next channels.
@ Touch this button to change the TV color format.
@ Touch this button to automatically search channels.
@ Touch this button to change the TV audio format.
@ Touch this button to enable PlP.
r13

The system displays the digital TV interface.
Select Digital TV on the main page or press MODE on the control panelto display the digitalTV interface.
ln the TV mode, touch Auto-search to automatically search channels in the whole TV channel range. The
system automatically stores valid channels in the preset channel list in an ascending manner. Touch I r ]
orI v ] to change preset channels, or touch t H f to select your desired channel on the list interface.
Note: Either analog TV or digital TV is available. This depends on which type of device you buy.
14
j
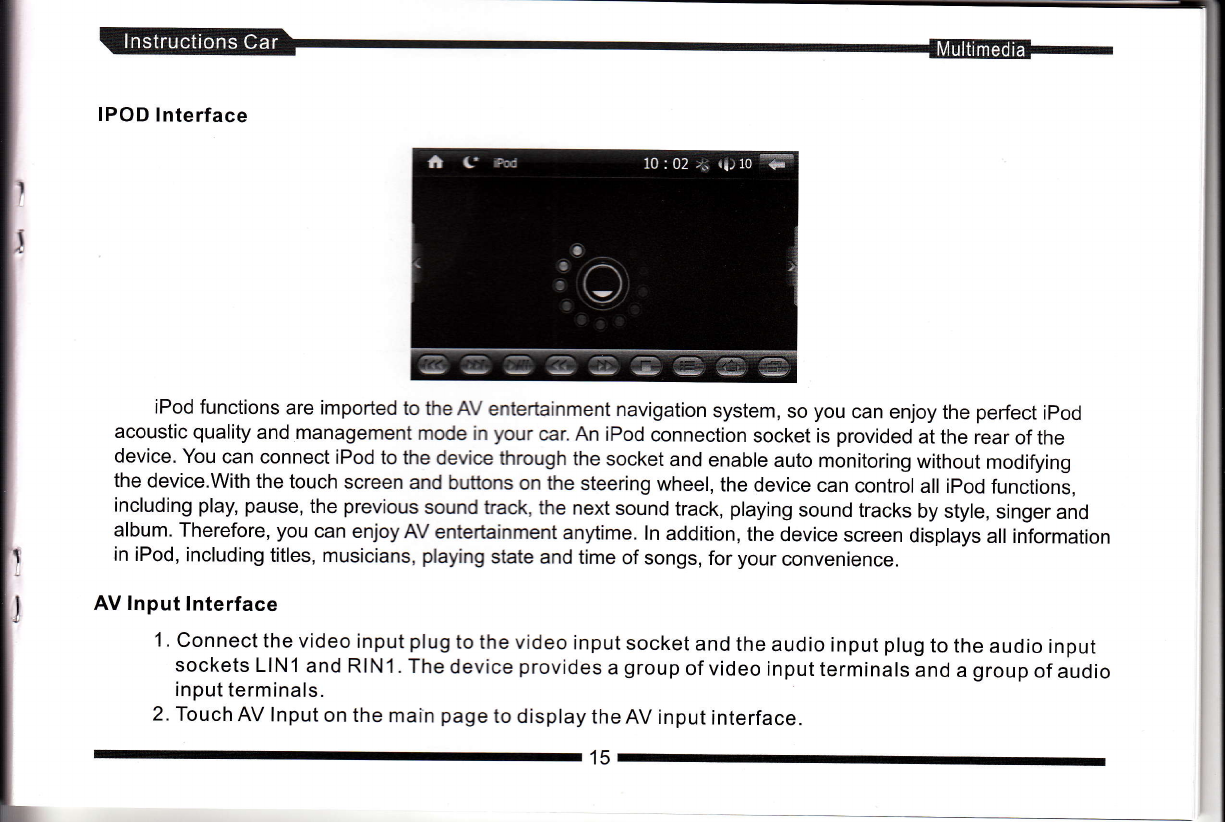
IPOD lnterface
iPod functions are imported to the AV entertainment navigation system, so you can enjoy the perfect ipod
acoustic quality and management mode in your car. An iPod connection socket is provided at the rear of the
device. You can connect iPod to the device through the socket and enable auto monitoring without modifying
the device.With the touch screen and buttons on the steering wheel, the device can control all ipod functions,
including play, pause, the previous sound tack, the next sound track, playing sound tracks by style, singer and
album. Therefore, you can enjoy AV entertainment anytime. ln addition, the device screen displays all information
in iPod, including titles, musicians, playing state and time of songs, for your convenience.
AV Input lnterface
1 . Connect the video input plug to the video input socket and the audio input plug to the audio input
sockets LlNl and RlN1. The device provides a group of video input terminals and a group of audio
input terminals.
2. Touch AV lnput on the main page to display the AV input interface.

Setting Interface
Touch tI, to display the setting interface. You can perform all system settings on this interface,
including navigation, backlight audio, system information, start logo, background and other function
settings. The setting interface comprises three pages. You can turn pages upwards or downwards.
(Note: You can ignore the Factory Mode setting that is intended for the manufacturer.
16

1. GPS Navigation Path Selection:
. .Touch f Eltlr.rrrigation Setting) to display the path setection interface. Touch thryf anO [ffiJ to
select the related file. Touch OK. *Note: You can enable navigation only by selecting'iEEorrect map path.
2. Backlight Setting:
This function prevents your view from being affected by too bright backlight when you drive at night.
The default backlight value is100%.
l'
L
This manual suits for next models
1
Table of contents


