Challenger Genesis User manual

USER’S MANUAL
GB

1
CHAP. I Introduction
1
Dear Customer,
You have just taken possession of your new CAMPING-CAR
We thank you for your order and congratulate you on your choice.
We suggest that you get to know your new camping car by reading this manual, and hope that you are fully satisfied
with it.
This user’s manual gives you all the information you need about the equipment in the living compartment and
precautions to be taken and instructions to be followed in using it. For information about the basic chassis, please refer
to the instructions and recommendations given by the manufacturer.
Follow our advice and leave without any worries.
In addition, the dealer who sold you the vehicle will be happy to give you advice based on thorough experience, in
particular as concerns safety equipment or required equipment in your country and/or in the countries you want to visit
(safety vests, triangle(s), etc).
Do not hesitate to call him for any reason.
N.B.: Be sure to keep a copy of the approval documents and all the invoices related to your camper (sales invoice,
maintenance invoices, etc.). They will be requested in case of a warranty claim.
Good reading and happy motoring!

2
Summary
Chap. I INTRODUCTION P. 1
Chap. II PREPARATION BEFORE LEAVING
Carrier preparation P. 3
Preparing the living compartment (outside)
P. 3
Preparing the living compartment (inside)
P. 4
Chap. III CARRYING PASSENGERS P. 5
Chap. IV LOADS P. 6
Chap. V WINDOWS AND SKYLIGHTS P. 7
Chap. VI DRIVING P. 10
Chap. VII !"##$!"%&'yres(P. 11
Chap. VIII SIGNALING, lights P. 12
Chap. IX "$!)*!"+,-#%#','-). P. 14
Chap. X PARKING MANOEUVRES P. 15
Chap. XI THE CAMPING CAR DRIVER’S CHARTER P. 17
Chap. XII OPERATION OF APPLIANCES
Electricity power supply P. 18
Additional battery P. 18
Control and instrumentation panel P. 21
Fuses P. 22
Food Safety P. 25
Refrigerator P. 26
Gas oven (option only) P. 31
Mini grill (UK mobile home version only) P. 32
Plaque de cuisson p. 33
Water heater / Heating P. 34
Combi TRUMA DIESEL P. 38
Chauffage à Air alimenté par le GASOIL P. 42
Chauffage WEBASTO Air Top 5500 P. 42
Chauffage EBERSPÄCHER P.44
Gas circuit P.46
Water circuit P. 47
230 V circuit P.49
Panoramic skylights P. 50
Beds P. 51
Electric table support P. 53
Chemical WC: C250 P. 54
Chap. XIII MOVING THE SWIVELLING SEATS P. 57
(in the driver’s cab)
Chap. XIV SAFETY Ventilation - Fire extinguisher P. 58
Chap. XV WINTER USE P. 59
Precautions and recommendations
Chap. XVI CLEANING P.60
Chap. XVII WINTER STORAGE P. 61
Chap. XVIII MODELS PRESENTATION P. 62
3
CHAP. II Preparation before leaving
A camping car has two separate parts ; firstly the basic
vehicle or carrier that provides the transport, and secondly
the living compartment in which you will spend your
holidays.
You should make a few standard verifications on both of
these components before leaving.
CARRIER PREPARATION
You should make the same verifications on the carrier
before you leave as you would normally do for your car.
This includes routine verifications, namely checks on the
levels of your engine oil, cooling circuit water, windscreen
washer fluid, and that all parking lights and indicators are
working, without forgetting to adjust the two outside rear
view mirrors that are very useful considering the width of
the vehicle.
It is very important to check the level of the electrolyte in
batteries that contain electrolyte (see chapter on battery
maintenance).
Obviously, the tire pressure should be checked.
% !" ,!-./%'0"%+-1-./%2)3 ,!'3".'%&outside(
The first thing to do before you leave is to switch on the
electricity power supply to the living compartment. A
motor home has two batteries, one supplying the carrier
(engine) and a second supplying the electrics in the living
compartment.
The battery is located in a specific compartment.
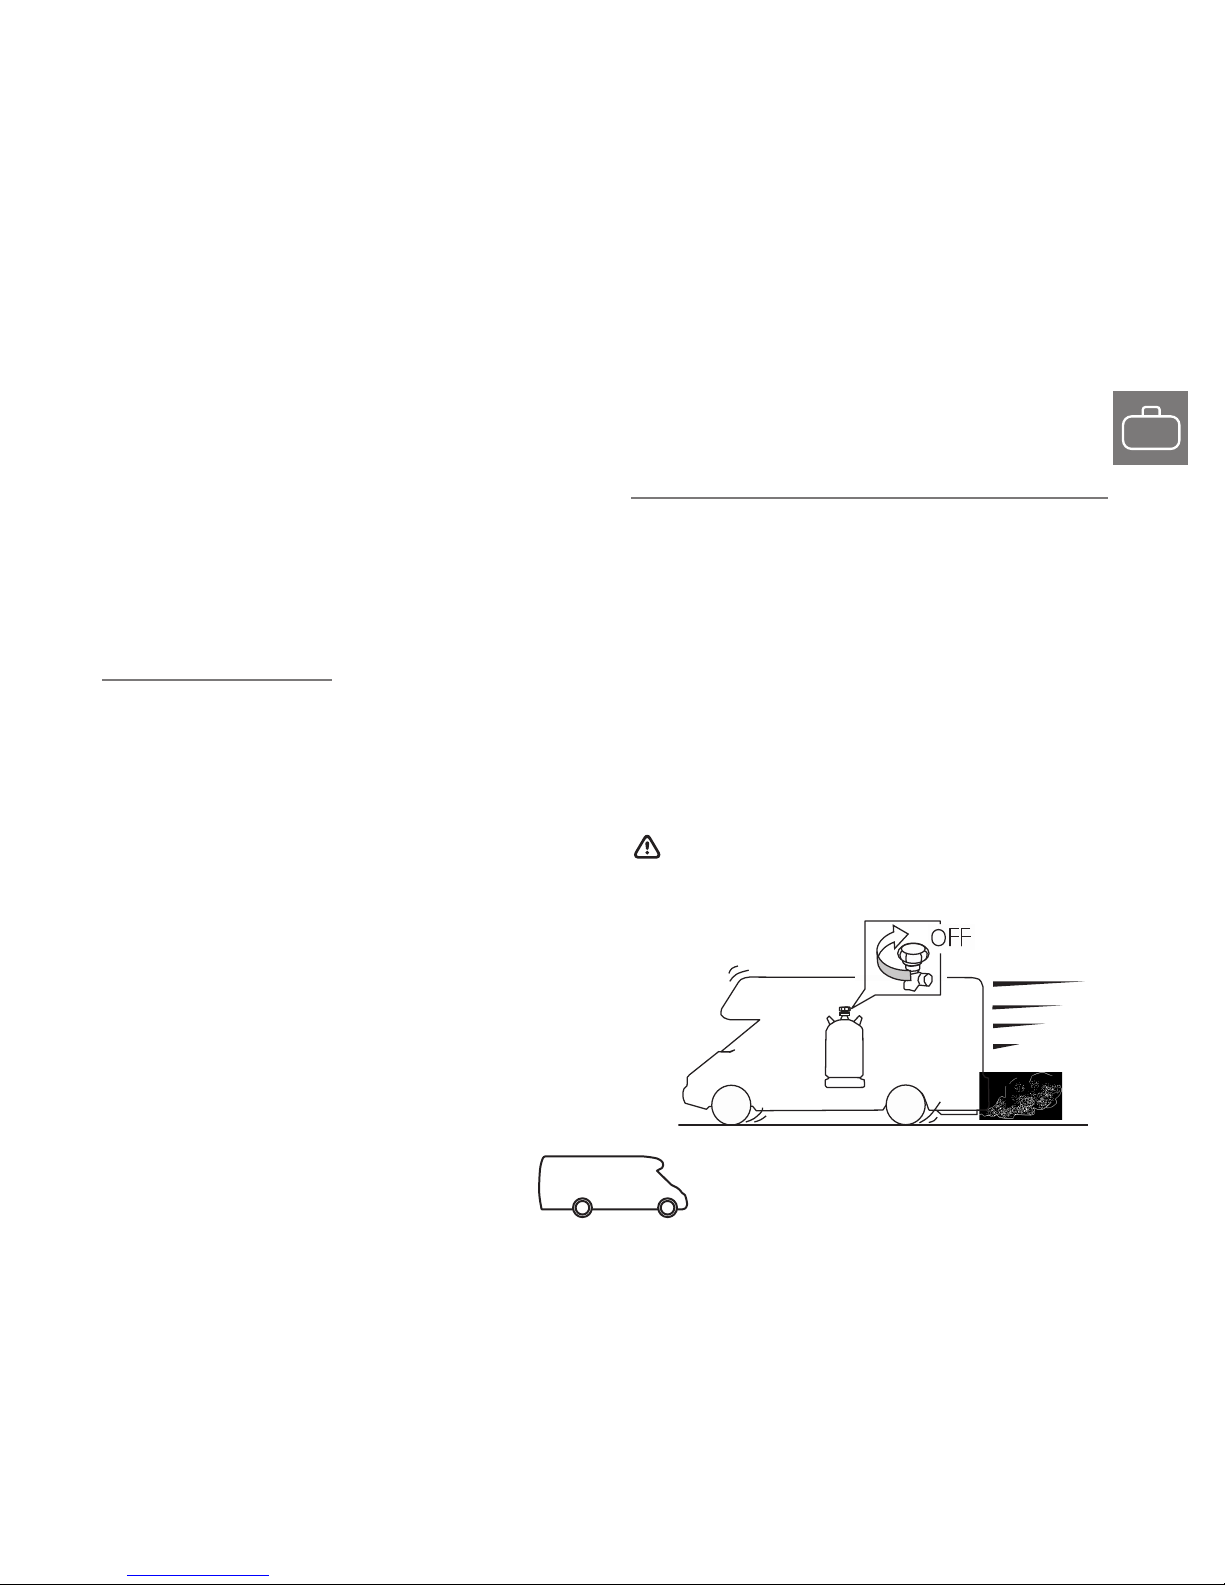
The motorhome is further prepared for use by positioning
the gas bottles (2 13kg bottles, PROPANE only; one bottle
only on certain models) in an externally-accessed watertight
locker. Gas bottles must be turned off when vehicle is in
motion....
When driving, gas cylinders must be closed.
Pictograms are placed in the appropriate location to
remind you of this.
4
CHAP. II Préparation avant le départ
!" ,!-./%'0"%+-1-./%2)3 ,!'3".'%&outside(%(continued)
The clean water tank is filled through an external orifice
marked by a specially identifiable pictogram to distinguish
it from the fuel tank on your basic vehicle.
Any covers or plugs on air intakes or orifices on all
household appliances should be removed.
Blanking pieces for the refrigerator grills are supplied as
an option by your sales outlet.
The WC cassette also needs to be put into service by
adding a dose of the appropriate chemical without
forgetting to add little water.
This operation is done through the outside door (access
flap), but can also be done very easily from inside the
living compartment.
When you have finished all operations outside your
camping car, you can start the operations to be done
inside the living compartment.
% !" ,!-./%'0"%+-1-./%2)3 ,!'3".'%&-.#-4"(5
The first thing to do is to switch on the electrical circuit on
the control panel.
Check that the water pump is working and purge any air
in the circuit, for example by carefully opening the kitchen
taps. All air is purged when water starts flowing. Do the
same thing for the cold water and hot water circuits which
are independent.
Air also needs to be purged in the gas circuit. Open the
cylinder in the outside compartment, then open the red
supply valves to the various appliances. Purge by opening
the heater supply valve and switching the gas on. You will
know that there is no more air in the circuit when it starts
working (flame). Repeat the operation for each device
that uses gas.
Your preparation operations will be finished when the
water and gas are both working. Please refer to chapter
XI for operation of each appliance.
PLEASE NOTE5more detailed information from the
manufacturer of each of these devices is supplied with
the vehicle.

5
CHAP. III Transport des passagers
The number of authorized seated positions in your
camping car when driving on the road is marked on the
registration certificate. When travelling, passengers must
be seated in the places indicated (pictograph) with safety
belts securely fastened.
Equipment, accessories and conveniences in the
living area of the camping car are designed for use when
the vehicle is stationary only.
This is particularly the case for the extensible television
support which is only usable after vehicle total stop.
+",#"%.)'"5
A pictogram indicates the seats which must not be used
when on the road.
Their use while the vehicle is in motion may contravene
road regulations and introduce risks about which the user
should be aware.
Similarly, unexpected movements of the vehicle can make
standing people fall over.
Therefore, the driver and passengers should evaluate
these risks in each case.
The manufacturer cannot be held responsible for
incidents or accidents occurring whilst the camping car
is in motion.

6
CHAP. IV Chargements kg
The camping car is a mobile home so everyone can lay
it out as he or she wishes, but some rules have to be
respected ; these can be summarized as two main rules.
The first, is to keep the center of gravity low. This is a
question of safety to improve the road holding of your
camping car.
You simply need to keep the weight low, in other words
put everything heavy in the lower compartments and
lightweight articles in the top cupboards.
The second rule, is the maximum authorised loaded
weight.
This is noted directly on the motor-caravan’s registration
certificate.
You must respect this limit by reducing your load, simply
by eliminating everything that is superfluous.
Inaddition,youmustalsorespectthe maximum authorized
load on each of the front and rear axles, as well as a left/
right distribution that is an balanced as possible with
respect to the vehicle axis (loaded vehicle with, of course,
passengers included).
The maximum permitted loads on each axle are given on
the living compartment identification plate.
If you have a roof rack and would like to use it to transport
lightweight equipment (see centre of gravity problem),
make sure your load is tied down firmly and to protect
your “roof plate” in order to avoid rubbing or other
damaging actions, which would cause the roof covering
(polyester skin) to deteriorate.
On the inside, take full advantage of the storage areas for
clothing and utensils; when traveling, everything must be
perfectly wedged in and furniture doors must be closed
and locked.
7
CHAP. V Windows and skylights
Our units are equipped with plastic windows (bays and
skylight).
In most cases, your camper is equipped with push-out bay
windows that open directly to the outside and skylights,
which must be closed and locked when the camper is on
the road.
«SKYROOF» front panoramic skylight
It is strongly recommended not to use aerosols
near the bay windows and skylights (risk of ring
formation).
These windows must be cleaned exclusively with
water and mild soap. Never use detergent products,
including those designed for everyday use. In
particular, those based on hydrocarbons or alcohol
may alter window transparency and even cause
cracking.
OUVERT
FERMÉ et
VERROUILLÉ
Appuyer sur le bouton
central pour
manœuvrer la poignée
OPEN
CLOSED
and LOCKED
Push on the center
button to manipulate
the handle
8
CHAP. V Windows and skylights
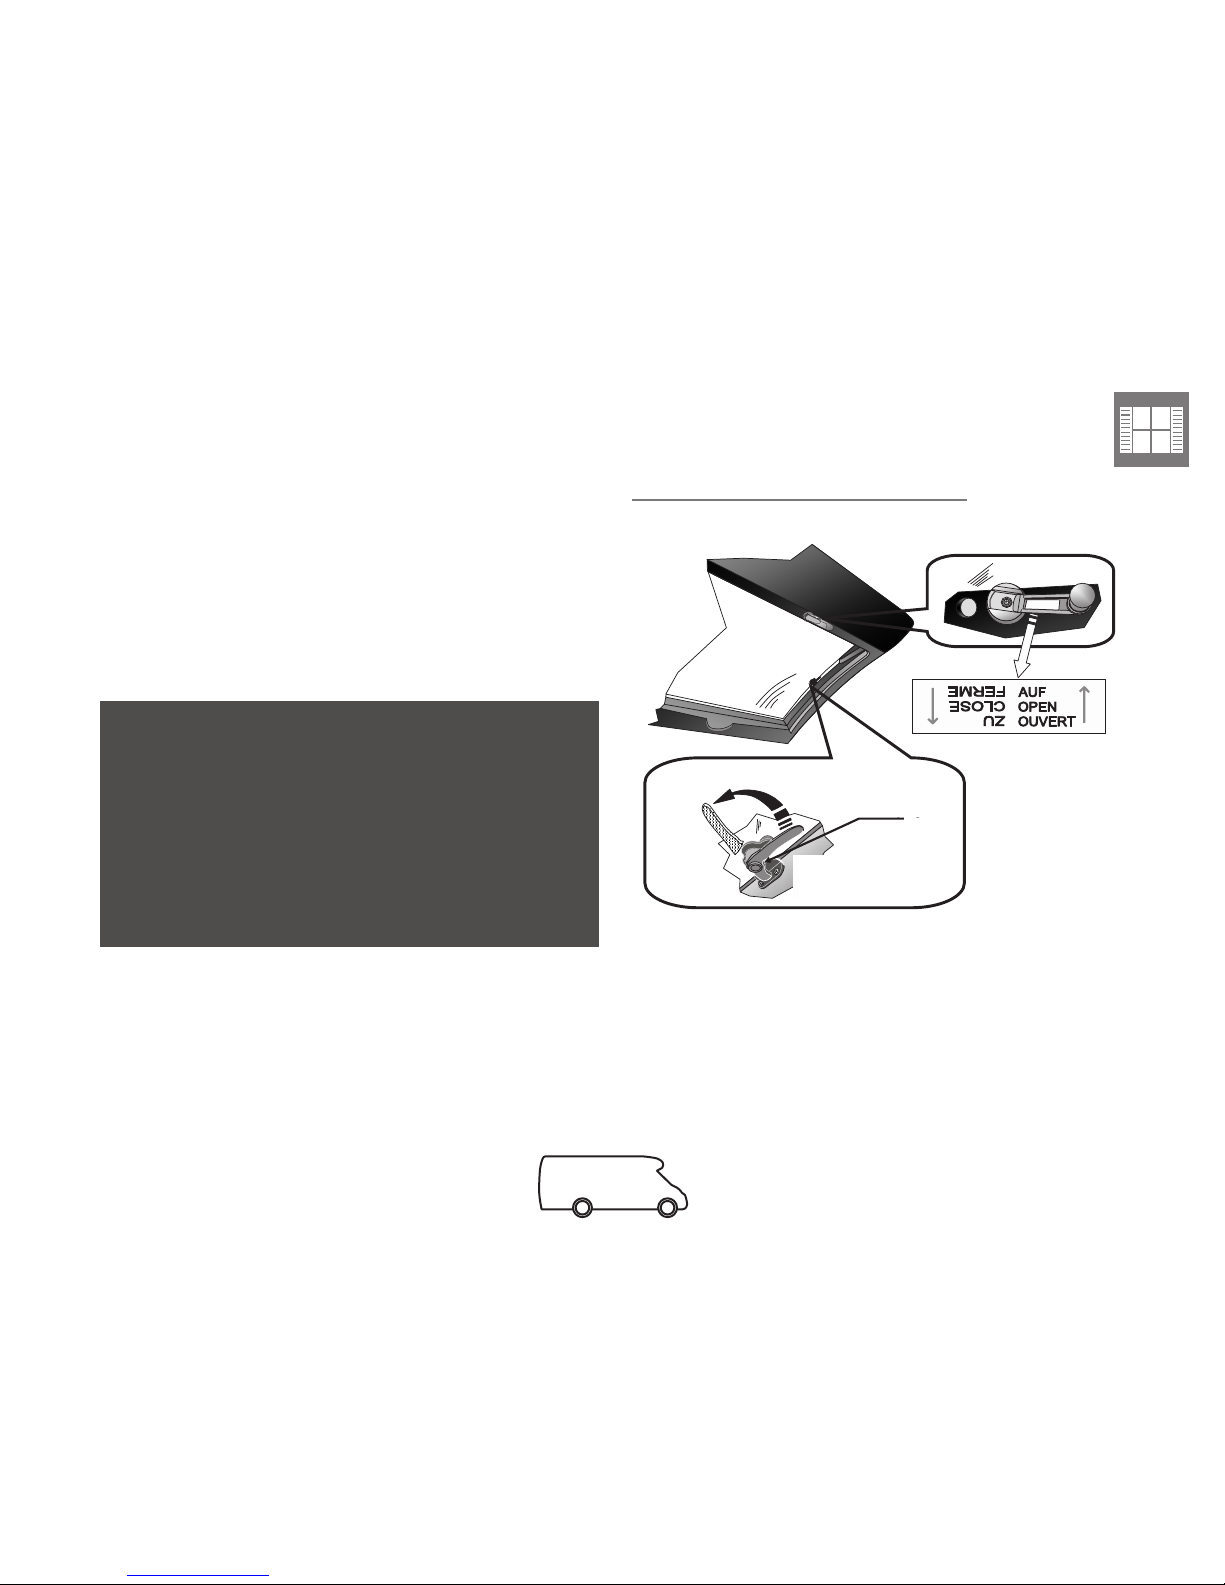
!Panoramic skylight ! !!!!! !Bathroom skylights
Open
Close
Ne jamais revenir en arrière pour
mettre la manivelle dans son logement
Vérifier le bon verrouillage par une
poussée d'ouverture sur la vitre.
S'il y a ouverture refaire la manœuvre
de fermeture / verrouillage
Tourner à fond la
manivelle pour obtenir
une fermeture optimale
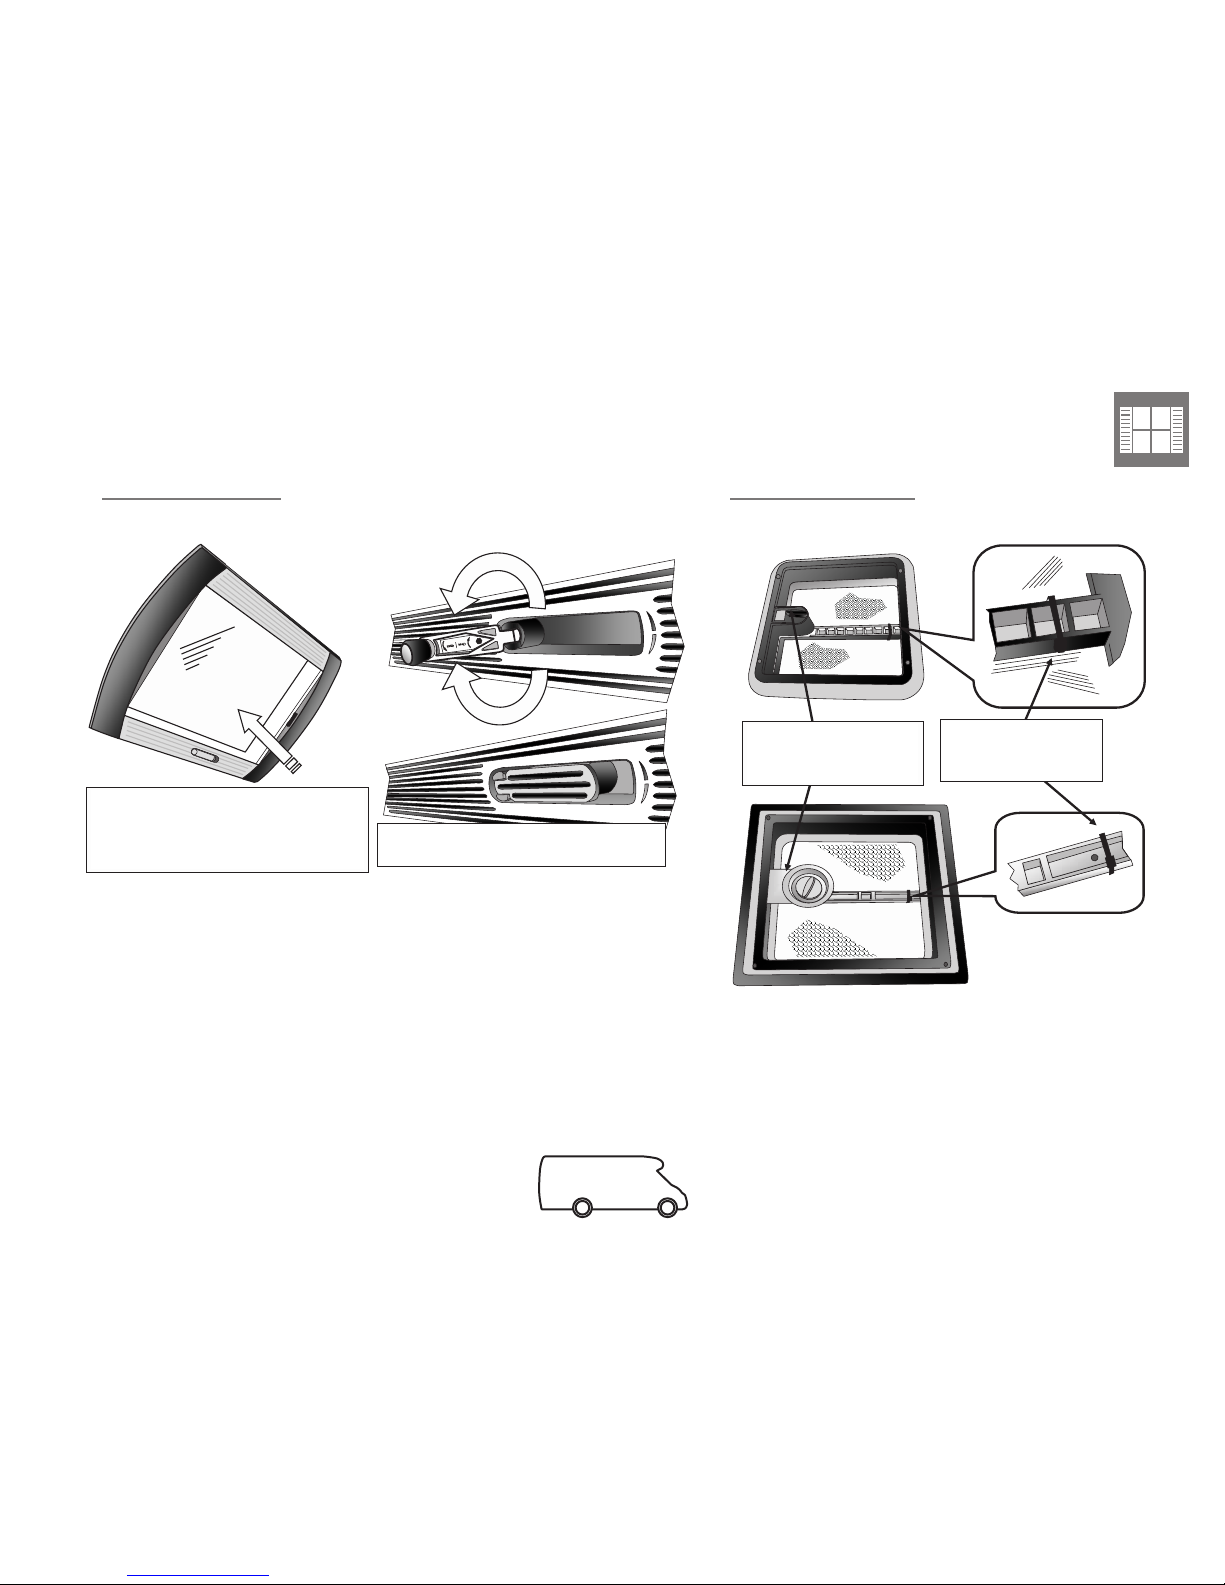
A la mise en service
veillez à enlever le
collier de transport
Check to see that it is properly locked
by pushing to open the pane.
If the pane opens, repeat the closing /
clocking procedure.
Turn the crank as far as
possible to obtain opti-
mal closing
When starting opera-
tion, be sure to remove
the transport collar
Never go backwards to put the crank in
its housing.

9
CHAP. V Windows and skylights
!Type 1 Push-out Bay Windows !Type 2 Push-out Bay Windows
OUVERT
FERMÉ
et
VERROUILLÉ
OUVERT
FERMÉ
et
VERROUILLÉ
OUVERT
FERMÉ et
VERROUILLÉ
Appuyer
sur le
Bouton
central pour
manœuvrer
la poignée
Push on
the center
button to
manipulate
the handle.
OPEN
OPEN
OPEN
CLOSED
and LOCKED
CLOSED
and LOCKED
CLOSED
and LOCKED

10
CHAP. VI Driving
!General - overtaking
A camping car is driven in much the same way as a car.
However, the vehicle is larger (both in height and in
width) and heavier ; therefore acceleration is not the
same.
Therefore the most important point is the size and you
must respect road signs about size, particularly signs
that control the height, width and maximum weight ;
your vehicle weighs more than 2 T.
For the width, note that if your rear view mirrors pass,
everything will pass..
Breakdown - Transport
Precautions - Signaling
Avoid the following dangers:
- Underground car parks.
- Some service stations, which may have
superstructures that are too low.
- Shop signs that project over the road.
- Tree branches that hang over the road.
- Passages under porches.
- Narrow roads.
- Bridges and narrow passageways
- etc.
and do not forget speed humps and level crossings.
If you park in reverse gear, do not keep going until the
wheels touch the pavement, the overhang at the back
can be long, so watch the back of your camping car.
When driving, take care with the length on tight turns
and do not hesitate to give yourself a little extra room.
En cas de transport du camping-car sur un plateau (Camion, train…) il est
impératif que le camping-car soit dans le même sens de déplacement
When the camper is carried on a platform (truck, train, etc.), it
must be placed facing in the direction the carrier is headed.
En cas de transport du camping-car sur un
plateau (Camion, train, bateau…) il est
strictement interdit d'attacher le camping-car
au plateau par le châssis
En cas de transport du camping-car sur
un plateau (Camion, train, bateau…) .
Veillez à ce que l'arrimage soit fait en
calant et en entourant le pneumatique
When the camper is carried on a platform
(truck, train, etc.), do NOT attach the cam-
per to the platform by the camper body.
When transporting the camper on a
truck bed (truck, train, boat, etc.)
The attachment must be made by
lashing and wedging the tire.

11
CHAP. VII Pressure
!Tyres
Verification of pressure should be done when the motor
home is loaded (cold tires).
Tire pressure is given by the carrier manufacturer in the
maintenance booklet and is also found on the front door
frame.
In addition, the maximum tyre pressure authorised by the
manufacturer is indicated in PSI on the side of the tyre (15
PSI = 1 bar).
Alignment is adjusted by the manufacturer of the unit
at the factory and must be checked again without
fail at 1500 km. A yearly check-up / adjustment is highly
recommended. These interventions are paid for by the
user.
Spare tyre
The Fix and Go Kit system has been adopted in place of the
spare tyre.
In case of a flat tire, please do the following:
- completely remove the vehicle from the traffic area. If
you are on the highway, pull off on the emergency stop
area or onto a rest area.
- put on safety clothing (safety vest) before getting out of
the vehicle on the side opposite traffic.
- ensure passenger safety by asking your passengers to
go away from the vehicle and/or to the other side of the
protective barrier if there is one.
12
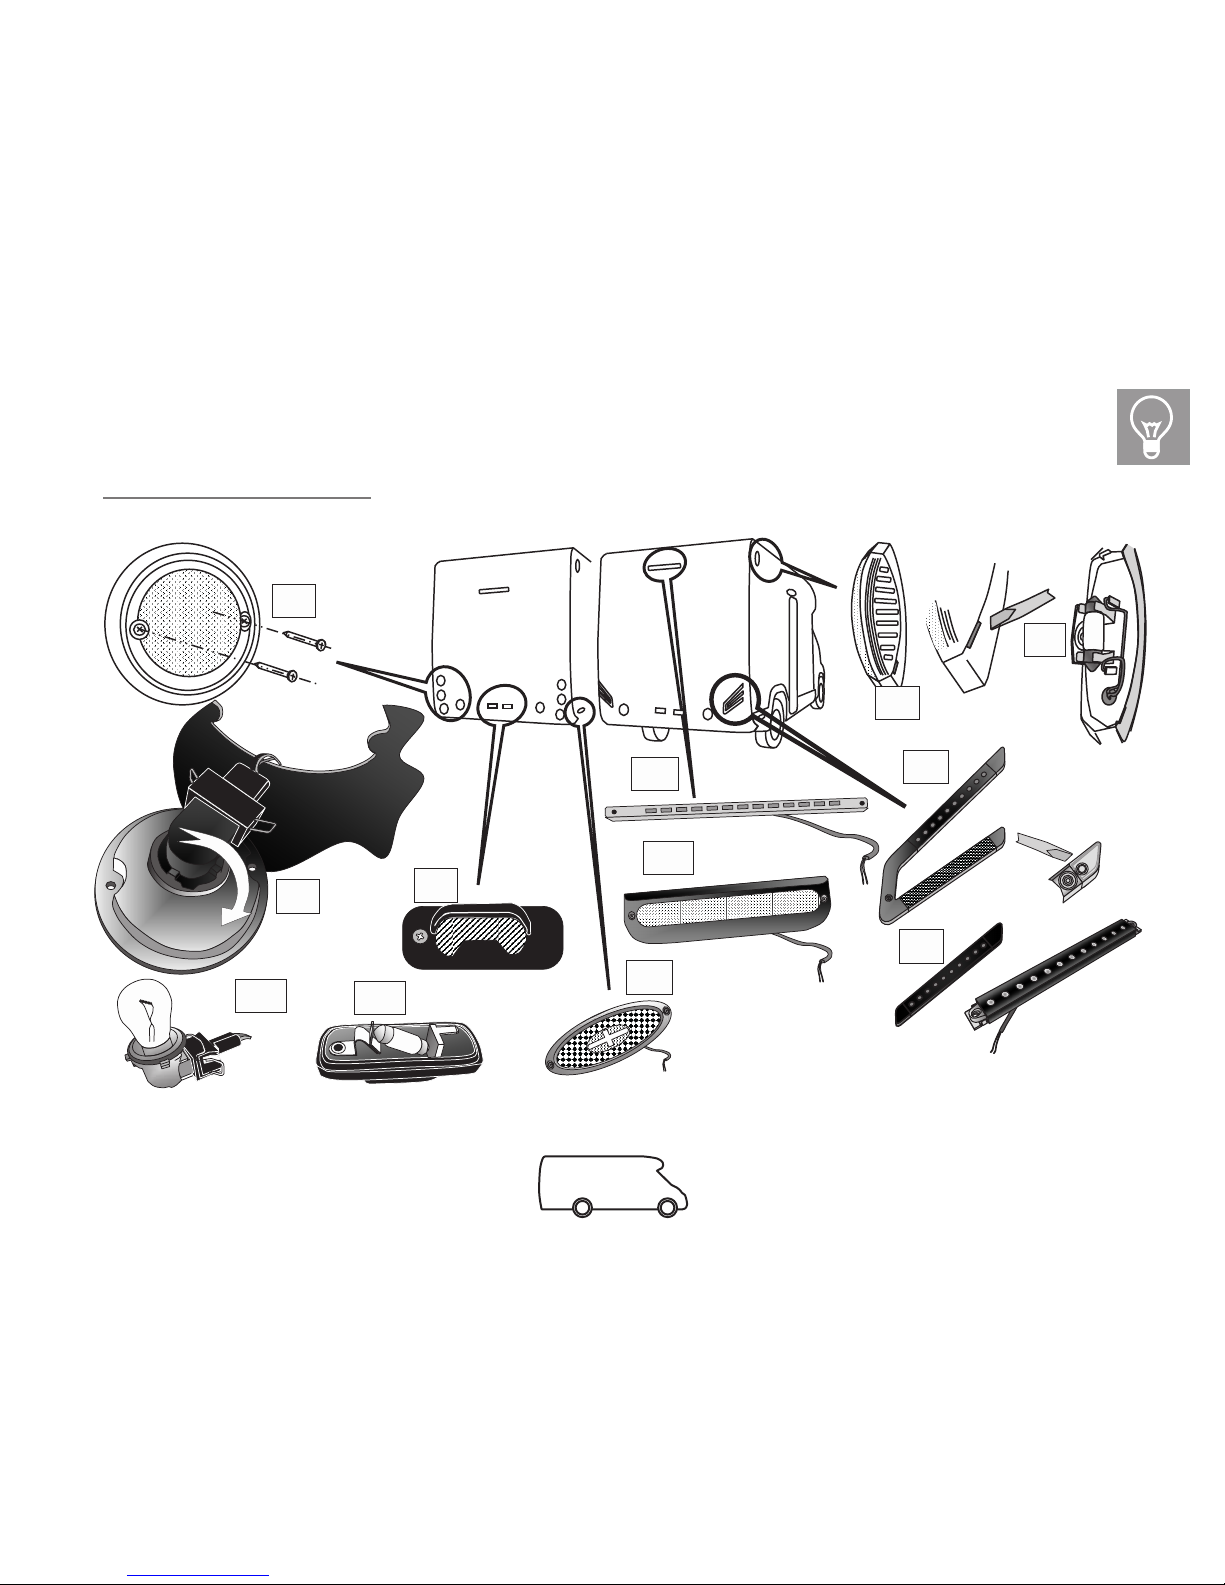
CHAP. VIII Signaling
!Placement of lights and access
1a
2a
3a
1b
1c
1d
1e
1f
2c
2b
1g
1h

13
CHAP. VIII Signaling
!Lights
1a 1d
1e
1f
2a
3a 1g
1b
1c
2b
2c
1h
6789:%;<=>?@%A%<BC<D8?E7%;<=>?@%A%FE=%;<=>?@5
- Remove the fixation screws
- Remove the bulb from its housing
- Turn the bulb support in the direction of the
arrow to remove the bulb
- Replace the bulb and reassemble the moun-
ting, being careful to maintain the joint position
.GHI:7%J;8?:%;<=>?5
- Remove the fixation screw
-
Push the bulb toward the screw to free the prong
- Replace the bulb and reassemble the moun-
ting, being careful to maintain the joint position
+<H<?<B=%;<=>?@5
- Remove the light cover with a screwdriver
which fits into the slot
- Replace the bulb, being careful to maintain
the lens position
- Replace the cap, red back
K7C%I789:%;<=>?%8BC%+"4%@<C:;<=>?@5
- Remove the two fixation screws
- Disconnect the wires
-
Replace the light and the connector by crimping
6789:%A%JE@<?<EB%+"4%;<=>?@5
- Removing the fastening screw
-
Remove the light assembly cover with a screw-
driver in the slot provided for this purpose
- Disconnect the wires
-
Replace the light and the connector by crimping
- Replace the light assembly covers
L;8@><B=%;<=>?@%;:C5
-
Remove the light assembly cover with a screw-
driver in the slot provided for this purpose
- Disconnect the wires
-
Replace the light and the connector by crimping
- Replace the light assembly covers
The signaling lights are standard bayonet lights
Stop / Road lights: white, 21 w / 5 w
Blinker lights: orange, 21 w
Back-up lights: white, 21 w
Fog lights: white, 21 w
License plate lights: shuttle, 5 w
Eclairages à Led
3rd brake light : JOKON 02818
JOKON 0207014
Sidelights JOKON 05024
Brake / position lights JOKON 13262
Flashing lights JOKON 13255
14
CHAP. IX Euro-relais station
These stations are provided specially for camping car
enthusiasts.
It is fairly easy to find them, since all specialized press
magazines print frequently updated guides telling you
where to find them.
You can fill up with water in these stations, and also and
especially you can empty your waste water and the WC
cassette.
Please leave the area in a clean condition for the next
user.

15
CHAP. X Parking manoeuvres
When you find a place to park, you will settle for operating
using your mirrors, but do not hesitate to get help for
reversing.
Some of our models are fitting with a parking detector, an
ideal aid for demanding motor caravanners.
The parking detector informs the driver of the distance of
an obstacle by means of an audible signal, which makes
parking safer. The system is automatically activated as
soon as reverse gear is engaged.
Operation
The parking detector emits ultrasonic sound waves that
are reflected by an obstacle and generates an audible
signal. The exact detection of the distance of an obstacle
renders parking manoeuvres easier, even in restricted
spaces. The frequency of the ultrasonic sound waves
has been chosen to avoid interference and discomfort to
people and pet animals.
Signalling
In some circumstances the system may fail to detect or
incorrectly signal obstacles:
!!"#! $%&'"()*! +,'-! "! ($./)*0! &-"/*1! +,'-! -$))$+&! $2!
projections;
!!!"#!$%&'"()*!'-"'!,&!3*24!&.$$'-!"#5!2*6)*(',3*!78)"&&!"#5!
mirrors), especially if it is located almost parallel to the
motor caravan body.
Obstacles
…lisses et inclinés
Obstacles
…lisses et circulaires
Obstacles
…
qui absorbent le son
front
0m 0,5m 1,1m 1,5
m
rear
-3 )!',.'%!"3,!M#5
This system is exclusively an aid to the driver and must never be considered to be infallible. You must always
take care and use your judgement.
Carry out parking manoeuvres at low speed in order to ensure your own safety and that of others.
Stop your vehicle when audible signalling starts, to take into account the effects of inertia.
Regularly check that the detectors operate correctly and clean them carefully.
In the event of rain, snow, or ice, the sensitivity of the detectors can be temporarily reduced by up to 20%. Take even
more care in these conditions.
Obstacles that are...
Smooth and sloped
Obstacles that are...
Smooth and circular
Obstacles that are... that
absorb the sound waves

16
CHAP. X Parking manœuvres
!parking
To ensure perfect stability of your rear (*) jacks, remember
to take along at least two wooden wedges to place on the
ground under the jack shoe.
The jacks serve only to stabilize your motorhome and
keep it from moving when you walk around on the inside;
they should never be used to correct a slant or as for
changing a tire.
Make sure that the floor of your motor home is perfectly
horizontal to ensure the correct operation of all the
functions in your motor home’s living compartment.
(*) A standard feature on some models and an option on
others.

17
CHAP. XI The camping car driver’s charter
As with all types of vehicles, you need to follow the
highway code when driving a camping car. You must
respect traffic rules applicable to private cars.
In town centers or suburban areas, you should park your
camping car:
- in areas with low population density
-
where it will not obstruct visibility and access to shops
- so that it does not hinder traffic.
When staying in your camping car in this type of area:
- Do not have anything projecting outside the vehicle
- Do not cause any nuisance for neighbors
- Do not monopolize public areas
- Take care that your pets do not make a mess outside.
Drain waste water into appropriate locations such as
special service areas, stands, public or private toilets, etc.
Warning: Do not empty your waste water into rain water
drain pipes (gullies) since not all of them are connected to
a treatment plant.
All water drain taps must be closed when traveling.
Put domestic garbage in bags and leave the bags in
locations provided for them.
Applying all these principales will make for
good neighborliness, help to protect the environment
so that you can expect a warm welcome
wherever you go.
18
CHAP. XI Operation of appliances
General
The electrical energy necessary for your lighting and for
operation of all household appliances, water pump, WC,
etc. in your living compartment is provided by a 12 volt
battery (2 on certain models).
All extra batteries are installed in addition to the basic
vehicle battery.
A coupling relay is installed between the two batteries:
- when traveling, this relay couples the two batteries
together so that they are recharged simultaneously.
- separate» the batteries when stopped. In this way, if
your unit battery is completely flat, you can still start
your vehicle engine.
The battery(ies) of living compartment is(are) located:
- generally inside a special box in a rear comportment
of the camping car.
- under the front passenger seat.
Additional battery
Our motorhomes use two types of batteries: lead-based
and gel-based.
It is up to you to decide on their respective advantages;
your selection criteria, in particular utilization, will
determine your choice.
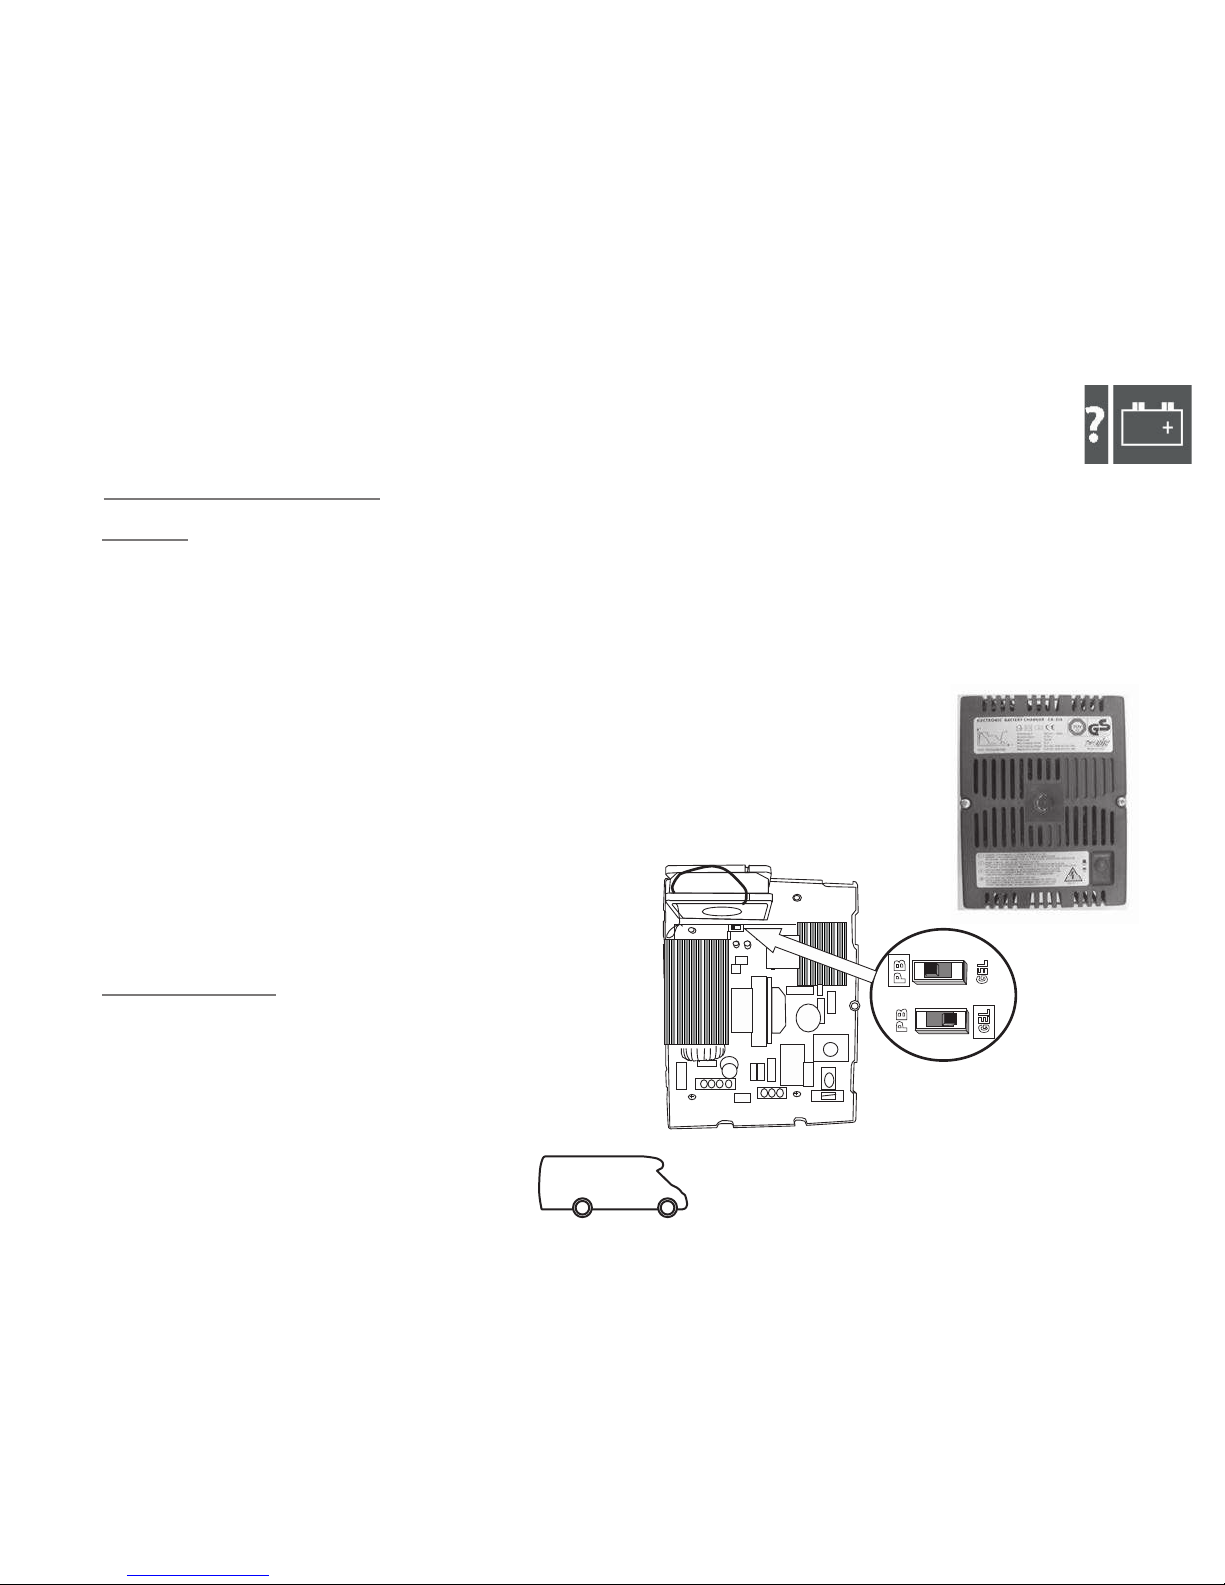
ELECTRICITY POWER SUPPLY
CB 516 charger: To access the contactor, open the hood
(remove the two attachment screws) and look for it next
to the fan.
Depending on your choice, you MUST adapt the battery
charger to the type of battery.
19
Operation of appliances
The natural phenomenon by which batteries discharge
slowly and regularly means that they are often in a deep
discharge situation.
It has been observed that only a very small percentage of
batteries are capable of accepting charge and therefore
operating satisfactorily, starting from this deep discharge
condition.
In order to avoid this situation, you MUST:
- either take out your batteries after charging them
and storing them protected from frost.
- or to leave the vehicle connected to the 230 V supply
and thus make sure that the living compartment
remains charged.
- or at least for short periods (1 or 2 weeks), disconnect
the batteries and leave them in position after
recharging them.
Given the diverse and varied conditions of use of cell
batteries (not supplied by the manufacturer), its
guarantee is excluded of global guarantee.
In the event that an auxiliary battery is replaced, the new
battery must be of the same type and capacity as the
auxiliary battery originally installed.
Battery level alarm
A buzzer is installed on certains models.
Fitting «electrical options»
We draw your attention to the need to connect the
solar panel according to our recommendations. The
connection is planned in the pre-equipment (see electrical
diagram provided with the living compartment. Any
direct connection to the battery may disrupt the correct
operation of the electrical installation of our cell.
The same applies for all additional accessories and
generators to be connected after the relay box.
Fitting living compartment batteries
Fitting the battery underneath the Ford chassis passenger seat:
Several components are required to fit the additional
battery supplied in our various models, namely:
- 1 battery
- 1 drip tray
- 1 wiring harness
- 1 degassing pipe
- 1 holding clamp + screw, nut and washer
- 1 battery cover
BATTERIE
This manual suits for next models
2
Table of contents


