Champ RCEP600WR User manual

RCEP600WR
Survival Skybox
Multi-Function Emergency Radio
Owner’s Manual
E
-
P
R
E
P
G
E
A
R
What’s in this package?.............................................................................................. 1
Tour of the Survival Skybox: Front View.................................................................. 1
Tour of the Survival Skybox: Top View and Back Panel ........................................2
Before You Start: Charge Up the Survival Skybox.................................................2
Setting the Time and Date..........................................................................................3
Lighting function ..........................................................................................................3
Mobile Phone Charging ...............................................................................................3
Setting Up Bluetooth Wireless ..................................................................................4
Streaming Audio With Bluetooth...............................................................................4
AM/FM/Weather Band Radios ...................................................................................5
Using AM/FM/Weather Band radio...........................................................................5
Alert Function................................................................................................................5
Alarm Clock ....................................................................................................................5
Sleep function...............................................................................................................5
Specifications................................................................................................................6
Limited 12 Month Warranty........................................................................................ 6
Pour des instructions en français, se reporter à la page 7.
Para obtener instrucciones en español, consulte la página 15.

2
1
IMPORTANT SAFETY INSTRUCTIONS
PLEASE READ AND SAVE THIS FOR FUTURE REFERENCE
Some of the following information may not apply to your particular product; however, as
with any electronic product, precautions should be observed during handling and use.
• Readtheseinstructions.
• Keeptheseinstructions.
• Heedallwarnings.
• Followallinstructions.
• Donotusethisapparatusnearwater.
• Cleanonlywithdrycloth.
• Donotblockanyventilationopenings.Installinaccordancewiththemanufacturer’sinstructions.
• Donotinstallnearanyheatsourcessuchasradiators,heatregisters,stoves,orotherapparatus
(including amplifiers) that produce heat.
• Protectthepowercordfrombeingwalkedonorpinchedparticularlyatplugs,convenience
receptacles, and the point where they exit from the apparatus.
•
Only use attachments/accessories specified by the manufacturer.
• Referallservicingtoqualiedservicepersonnel.Servicingisrequiredwhentheapparatushas
beendamagedinanyway,suchaspower-supplycordorplugisdamaged,liquidhasbeenspilledor
objects have fallen into the apparatus, the apparatus has been exposed to rain or moisture, does
not operate normally, or has been dropped.
• Useonlywiththecart,stand,tripod,bracket,ortablespeciedbythemanufacturer,orsoldwith
the apparatus. When a cart is used, use caution when moving the cart/apparatus combination to
avoid injury from tip-over.
• Unplugthisapparatusduringlightningstormsorwhenunusedforlongperiodsoftime.
ADDITIONAL SAFETY INFORMATION
•TheAC/DCadaptersuppliedwiththisproductisintendedtobecorrectlyorientedinaverticalor
oor mount position.
•Donotuseunauthorizedchargersorpoweradapters.Useonlychargersorpoweradaptersthat
came with your product or that is listed in the user’s guide.
•Apparatusshallnotbeexposedtodrippingorsplashingandnoobjectslledwithliquids,suchas
vases, shall be placed on the apparatus.
•Donotattempttodisassemblethecabinet.Thisproductdoesnotcontaincustomerserviceable
components.
•Apparatusshallnotbeexposedtodrippingorsplashingandnoobjectslledwithliquids,suchas
vases, shall be placed on the apparatus.
•Alwaysleavesufcientspacearoundtheproductforventilation.Donotplaceproductinorona
bed,rug,inabookcaseorcabinetthatmaypreventairowthroughventopenings.
•Donotplacelightedcandles,cigarettes,cigars,etc.ontheproduct.
•Careshouldbetakensothatobjectsdonotfallintotheproduct.
•Donotattempttodisassemblethecabinet.Thisproductdoesnotcontaincustomerserviceable
components.
•Themarkinginformationislocatedatthebackofapparatus.
•Tobecompletelydisconnectthepowerinput,theAC/DCadapterofapparatusshallbedisconnected
from the mains.
•AC/DCadapterisadisconnectdevice.TheAC/DCadaptershouldnotbeobstructedORshouldbe
easily accessed during intended use.
•Theventilationshouldnotbeimpededbycoveringtheventilationopeningswithitemssuchas
newspaper, table-cloths, curtains etc.
•Nonakedamesources,suchaslightedcandled,shouldbeplacedontheapparatus.
•Attentionshouldbedrawntotheenvironmentalaspectsofbatterydisposal.
•Theuseofapparatusinmoderateclimates.
Precautions for the unit
•Donotusetheunitimmediatelyaftertransportationfromacoldplacetoawarmplace;condensation
problems may result.
•Donotstoretheunitnearre,placeswithhightemperatureorindirectsunlight.Exposuretodirect
sunlight or extreme heat (such as inside a parked car) may cause damage or malfunction.
•Cleantheunitwithasoftclothoradampchamoisleather.Neverusesolvents.
•Theunitmustonlybeopenedbyqualiedpersonnel.
FCC Information
This device complies with Part 15 of the FCC Rules. Operation is subject to the following two
conditions: (1) this device may not cause harmful interference, and (2) this device must accept any
interference received, including interference that may cause undesired operation.
Note:ThisequipmenthasbeentestedandfoundtocomplywiththelimitsforaClassBdigitaldevice,
pursuant to Part 15 of FCC Rules. These limits are designed to provide reasonable protection against
harmfulinterferenceinaresidentialinstallation.Thisequipmentgenerates,uses,andcanradiate
radiofrequencyenergyand,ifnotinstalledandusedinaccordancewiththeinstructions,maycause
harmful interference to radio communications.
However,thereisnoguaranteethatinterferencewillnotoccurinaparticularinstallation.Ifthis
equipmentdoescauseharmfulinterferencetoradioortelevisionreception,whichcanbedetermined
byturningtheequipmentoffandon,theuserisencouragedtotrytocorrecttheinterferencebyone
or more of the following measures:
•Reorientorrelocatethereceivingantenna.
•Increasetheseparationbetweentheequipmentandreceiver.
•Connecttheequipmentintoanoutletonacircuitdifferentfromthattowhichthereceiveris
connected.
•Consultthedealeroranexperiencedradio/TVtechnicianforhelp.
Changes or modifications not expressly approved by VOXX Accessories Corporation could void the
user’sauthoritytooperatetheequipment.
RF Exposure Warning
Thisequipmentmustbeinstalledandoperatedinaccordancewithprovidedinstructionsandthe
antenna(s) used for this transmitter must be installed to provide a separation distance of at least 20
cm from all persons and must not be co-located or operating in conjunction with any other antenna
ortransmitter.End-usersandinstallersmustbeprovidewithantennainstallationinstructionsand
transmitter operating conditions for satisfying RF exposure compliance.
Industry Canada Regulatory Information
ThisdevicecomplieswithRSS-210oftheIndustryCanadaRules.Operationissubjecttothe
following two conditions: 1) this device may not cause interference and 2) this device must accept any
interference, including interference that may cause undesired operation of the device.
ICRadiationExposureStatement:ThisequipmentcomplieswithICradiationexposurelimitssetforth
for an uncontrolled environment.
Industry Canada Regulatory Information
CANICES-3(B)/NMB-3(B)
Avis d’Industrie Canada
CANICES-3(B)/NMB-3(B)
Important battery information
Warning: Your product contains a battery and charging system which is designed to work in
temperatures that do not exceed 50°C (122°F). Leaving this product in a closed automobile or the
trunk of an automobile where temperatures may exceed 50°C may result in permanent battery
damage, fi re, or explosion. Please remove your product from the automobile when you exit, do not
place your product in the trunk of your automobile, and do not leave your product in any location
where temperatures may exceed 50°C.
Ecology
Your product must be disposed of properly according to local laws and regulations. Because this
product contains a battery, the product must be disposed of separately from the household waste.
Emergencies Happen.
Be prepared. The Survival Skybox has the tools to help you get the information and power you need whenever and wherever you need
it.Itistheperfectadditiontothegarage,therecroom,oranywhereathomeoraway.Bluetoothwirelessletsyouenjoymusicorother
audio from your smartphone through the Survival Skybox’s stereo speakers whenever and wherever you want. And a suite of essential
emergency preparedness tools means you’ll be ready when the unexpected happens, with weather and news when other sources are down,
mobilephonecharging,abuilt-inashlightwithemergencybeacon,andtime/dateandtemperatureinfoontheSurvivalSkybox’sdigital
display. Best of all, the Survival Skybox’s rechargeable battery can be recharged via AC adapter, or via the built-in solar panel or crank-
powered dynamo if you’re off the grid.
What’s in this package?
•ACpoweradapter •Thisuserguide •TheSurvivalSkyboxMulti-FunctionEmergencyRadio
Tour of the Survival Skybox: Front View
Radio playing
indicator/Alert LED
Time, Radio
Band /
Frequency,
Stereo
indicator

2
1
Precautions for the unit
•Donotusetheunitimmediatelyaftertransportationfromacoldplacetoawarmplace;condensation
problems may result.
•Donotstoretheunitnearre,placeswithhightemperatureorindirectsunlight.Exposuretodirect
sunlight or extreme heat (such as inside a parked car) may cause damage or malfunction.
•Cleantheunitwithasoftclothoradampchamoisleather.Neverusesolvents.
•Theunitmustonlybeopenedbyqualiedpersonnel.
FCC Information
This device complies with Part 15 of the FCC Rules. Operation is subject to the following two
conditions: (1) this device may not cause harmful interference, and (2) this device must accept any
interference received, including interference that may cause undesired operation.
Note:ThisequipmenthasbeentestedandfoundtocomplywiththelimitsforaClassBdigitaldevice,
pursuant to Part 15 of FCC Rules. These limits are designed to provide reasonable protection against
harmfulinterferenceinaresidentialinstallation.Thisequipmentgenerates,uses,andcanradiate
radiofrequencyenergyand,ifnotinstalledandusedinaccordancewiththeinstructions,maycause
harmful interference to radio communications.
However,thereisnoguaranteethatinterferencewillnotoccurinaparticularinstallation.Ifthis
equipmentdoescauseharmfulinterferencetoradioortelevisionreception,whichcanbedetermined
byturningtheequipmentoffandon,theuserisencouragedtotrytocorrecttheinterferencebyone
or more of the following measures:
•Reorientorrelocatethereceivingantenna.
•Increasetheseparationbetweentheequipmentandreceiver.
•Connecttheequipmentintoanoutletonacircuitdifferentfromthattowhichthereceiveris
connected.
•Consultthedealeroranexperiencedradio/TVtechnicianforhelp.
Changes or modifications not expressly approved by VOXX Accessories Corporation could void the
user’sauthoritytooperatetheequipment.
RF Exposure Warning
Thisequipmentmustbeinstalledandoperatedinaccordancewithprovidedinstructionsandthe
antenna(s) used for this transmitter must be installed to provide a separation distance of at least 20
cm from all persons and must not be co-located or operating in conjunction with any other antenna
ortransmitter.End-usersandinstallersmustbeprovidewithantennainstallationinstructionsand
transmitter operating conditions for satisfying RF exposure compliance.
Industry Canada Regulatory Information
ThisdevicecomplieswithRSS-210oftheIndustryCanadaRules.Operationissubjecttothe
following two conditions: 1) this device may not cause interference and 2) this device must accept any
interference, including interference that may cause undesired operation of the device.
ICRadiationExposureStatement:ThisequipmentcomplieswithICradiationexposurelimitssetforth
for an uncontrolled environment.
Industry Canada Regulatory Information
CANICES-3(B)/NMB-3(B)
Avis d’Industrie Canada
CANICES-3(B)/NMB-3(B)
Important battery information
Warning: Your product contains a battery and charging system which is designed to work in
temperatures that do not exceed 50°C (122°F). Leaving this product in a closed automobile or the
trunk of an automobile where temperatures may exceed 50°C may result in permanent battery
damage, fi re, or explosion. Please remove your product from the automobile when you exit, do not
place your product in the trunk of your automobile, and do not leave your product in any location
where temperatures may exceed 50°C.
Ecology
Your product must be disposed of properly according to local laws and regulations. Because this
product contains a battery, the product must be disposed of separately from the household waste.
Emergencies Happen.
Be prepared. The Survival Skybox has the tools to help you get the information and power you need whenever and wherever you need
it.Itistheperfectadditiontothegarage,therecroom,oranywhereathomeoraway.Bluetoothwirelessletsyouenjoymusicorother
audio from your smartphone through the Survival Skybox’s stereo speakers whenever and wherever you want. And a suite of essential
emergency preparedness tools means you’ll be ready when the unexpected happens, with weather and news when other sources are down,
mobilephonecharging,abuilt-inashlightwithemergencybeacon,andtime/dateandtemperatureinfoontheSurvivalSkybox’sdigital
display. Best of all, the Survival Skybox’s rechargeable battery can be recharged via AC adapter, or via the built-in solar panel or crank-
powered dynamo if you’re off the grid.
What’s in this package?
•ACpoweradapter •Thisuserguide •TheSurvivalSkyboxMulti-FunctionEmergencyRadio
Tour of the Survival Skybox: Front View
Radio playing
indicator/Alert LED
Hand crank
Volume
knob
Radio playing
indicator/Alert LED
Flashlight/
Distress
light
Channel knob
LCD Display
Month/Date Day Temperature
Time
Time, Radio
Band /
Frequency,
Stereo
indicator
NOAA
alert
indicator
Bluetooth
indicator
RadioFrequency
Alarm/Snooze
indicator
USB charging
indicator
Battery
indicator
Control Panel
Bluetooth
On/Off/
Sleep Mode
Previous
Next
FM/AM/Weather
Band select
USB
charging
on/off
Time set Alarm on/
off/set
Alert on/off
2
3
Hand-Crank Charging
The hand crank charges the Survival Skybox’s internal battery.
Figure 3
Before You Start:
Charge Up the Survival Skybox
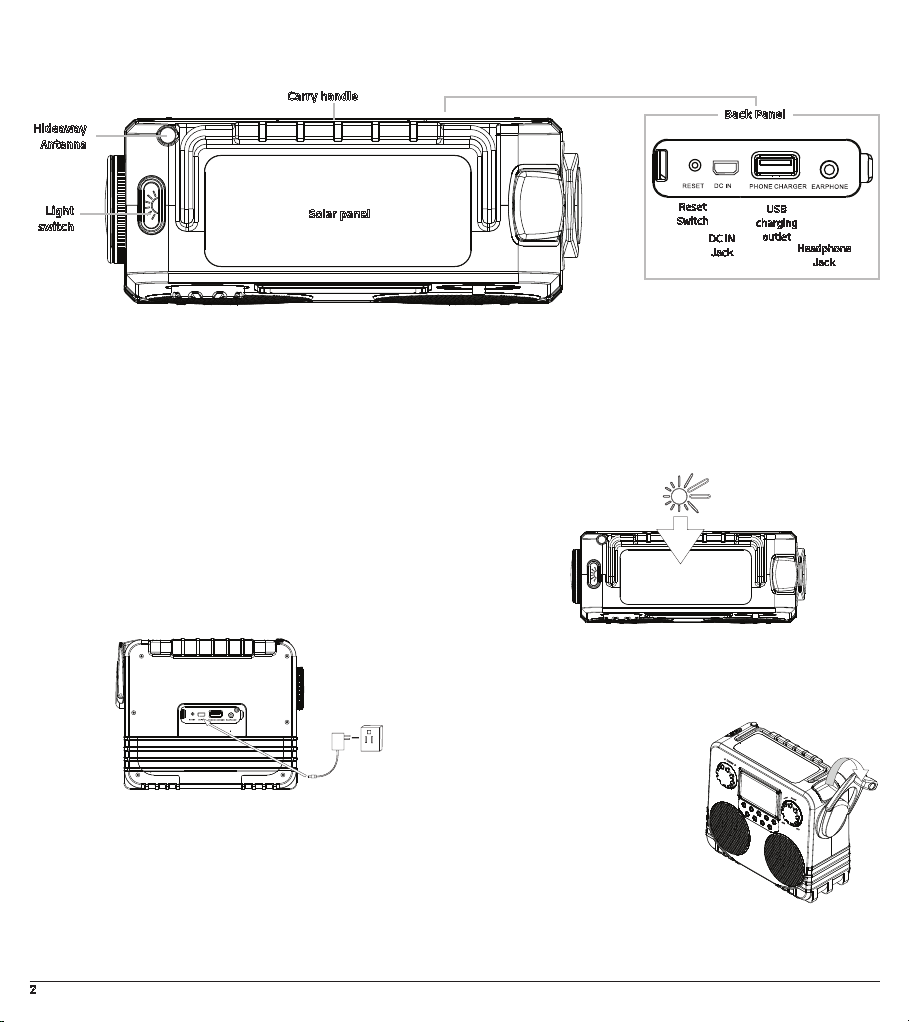
Plugging in for power
1. OpenthedoorcoveringtheDCINjackontheSurvivalSkybox’s
backpanel.ConnecttheadaptertotheDCINjackofthe
Survival Skybox.
2. Connect the AC power adapter to a convenient wall outlet
(Fig. 1). The Survival Skybox starts charging and the battery
indicatorashes.Whenthebatteryisfull,theindicatorwillstop
ashing.Afullchargetakesapproximately5hours.
Figure 2
Figure 1
Solar Charging
ThesolarpanelchargestheSurvivalSkybox’sinternalbattery.It
could take 45 hours under strong sunlight. The charging icon will be
shown on the display while charging (Fig. 2).
Tour of the Survival Skybox: Top View and Back Panel
Carry handle
Solar panel
Hideaway
Antenna
Light
switch
Back Panel
Reset
Switch
DCIN
Jack
USB
charging
outlet Headphone
Jack
Setting the Time and Date
When you first plug in or charge the Survival Skybox, the front
display will show “12:00” for the time. Setting the time and date is
easy...here’s how.
To set the time and date:
1. Make sure the radio is off. Press the button to turn it off if it
isn’t already.
2. PressandholdtheSETbuttononthefrontpaneluntilthehour
digits(“12”)startashing.Thismeansyoucansetthehour.Use
the and buttons on the front panel to set the current hour.
3. Onceyou’vesetthecorrecthour,presstheSETbuttonagain.
Theminutesdigits(“00”)startashing,whichmeansyoucan
set the minutes. Use the and buttons on the front panel to
set the current minutes.
4. Onceyou’vesetthecorrectminutes,presstheSETbutton
again.Theyear(“2012”)startsashing,whichmeansyoucan
set the current year. Use the and buttons on the front
panel to set the current year.
5. Onceyou’vesetthecorrectyear,presstheSETbuttonagain.
TheMonthdigits(“12”)startashing,whichmeansyoucanset
the current month. Use the and buttons on the front panel
to set the current month.
6. Onceyou’vesetthecorrectmonth,presstheSETbuttonagain.
TheDatedigits(“01”)startashing,whichmeansyoucanset
the date. Use the and buttons on the front panel to set the
current date.
7. Onceyou’vesetthecorrectdate,presstheSETbuttonagain.
Nowyoucanchangewhethertheclockshowsthetimein
12-hour (for example, 3:30 PM) or 24-hour (for example, 15:30)
format. The default is the 12-hour format. Press the buttons
tochangetothe24-hourformat,orpressSETtokeepthe12-
hour format.
That’sit!Thetimeanddateareset.Ifyouneedtomakeachange
toanyofthesesettings,justpressandholdtheSETbuttonwhen
theradioisoffandpressSETuntilyouseethesettingyouwantto
change.
1. Open the hand crank.
2. Grip the Survival Skybox with
one hand and the crank with the
other.
3. Turn the handle rapidly (about
120 to 150 RPM). The Survival
Skybox starts charging and the
batteryindicatorashes(Fig.3).
IMPORTANT:Don’tforcethe
hand crank. Make sure you turn
from the handle only–don’t grab
the entire crank.
2
3
Hand-Crank Charging
The hand crank charges the Survival Skybox’s internal battery.
Solar Charging
ThesolarpanelchargestheSurvivalSkybox’sinternalbattery.It
could take 45 hours under strong sunlight. The charging icon will be
shown on the display while charging (Fig. 2).
Tour of the Survival Skybox: Top View and Back Panel Setting the Time and Date
When you first plug in or charge the Survival Skybox, the front
display will show “12:00” for the time. Setting the time and date is
easy...here’s how.
To set the time and date:
1. Make sure the radio is off. Press the button to turn it off if it
isn’t already.
2. PressandholdtheSETbuttononthefrontpaneluntilthehour
digits(“12”)startashing.Thismeansyoucansetthehour.Use
the and buttons on the front panel to set the current hour.
3. Onceyou’vesetthecorrecthour,presstheSETbuttonagain.
Theminutesdigits(“00”)startashing,whichmeansyoucan
set the minutes. Use the and buttons on the front panel to
set the current minutes.
4. Onceyou’vesetthecorrectminutes,presstheSETbutton
again.Theyear(“2012”)startsashing,whichmeansyoucan
set the current year. Use the and buttons on the front
panel to set the current year.
5. Onceyou’vesetthecorrectyear,presstheSETbuttonagain.
TheMonthdigits(“12”)startashing,whichmeansyoucanset
the current month. Use the and buttons on the front panel
to set the current month.
6. Onceyou’vesetthecorrectmonth,presstheSETbuttonagain.
TheDatedigits(“01”)startashing,whichmeansyoucanset
the date. Use the and buttons on the front panel to set the
current date.
7. Onceyou’vesetthecorrectdate,presstheSETbuttonagain.
Nowyoucanchangewhethertheclockshowsthetimein
12-hour (for example, 3:30 PM) or 24-hour (for example, 15:30)
format. The default is the 12-hour format. Press the buttons
tochangetothe24-hourformat,orpressSETtokeepthe12-
hour format.
That’sit!Thetimeanddateareset.Ifyouneedtomakeachange
toanyofthesesettings,justpressandholdtheSETbuttonwhen
theradioisoffandpressSETuntilyouseethesettingyouwantto
change.
Lighting function
Press the (light) button on the top panel of the Survival
Skyboxtoturnontheashlight.WhentheSurvivalSkyboxisfully
charged, the light can work up to 5 hours consecutively. For every
minuteofhand-crankingat120RPM,theashlightcanworkup
to 3 minutes consecutively. Press the (light) button twice to
turnontheredashlightforemergency.Pressthe (light)
button again to turn off the light.
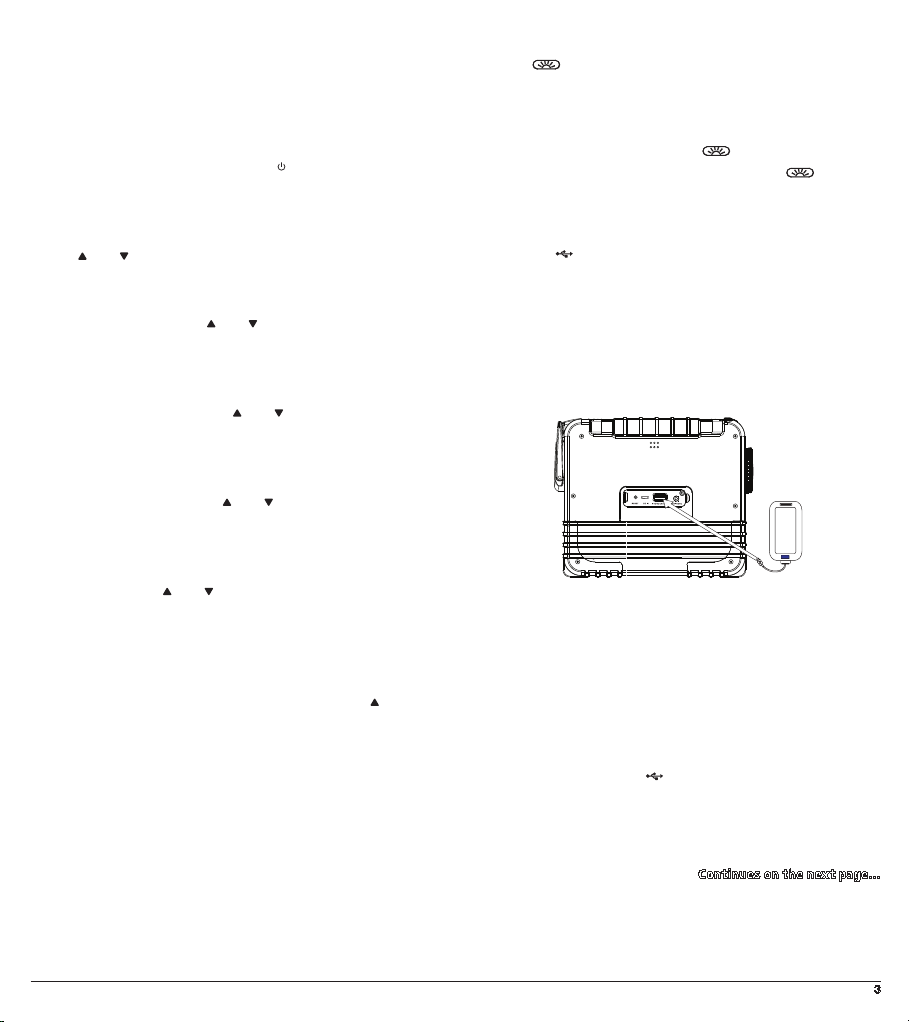
Mobile Phone Charging
1. Press the button to turn on mobile phone charging mode.
LifttherubbercoverofthePHONECHARGERjackonthe
Survival Skybox’s back panel.
2. PlugoneendofyourchargingcableintothePHONECHARGER
port behind the door on the Survival skybox’s back panel. Plug
the other end of your charging cable into the USB charging port
on your mobile phone.
IMPORTANT:TheSurvivalSkyboxmaynotchargeallmodelsof
all brands of mobile phones. Phone adapters are not included
(you’ll have to use the cable that came with your mobile phone).
3. After the connection, hand-crank the Survival Skybox to
enablemobilephonecharging.(Ifthebatteryisfull,theSurvival
Skybox could directly charge the mobile phone without hand-
cranking motion.)
4. After charging press the button to turn off mobile phone
charging mode and disconnect USB cable. Cover the back panel
connections with rubber cover.
Continues on the next page...

4
5
The Survival Skybox’s mobile phone charging feature is intended to
provide an emergency battery charge of your mobile phone battery
so you could make an emergency phone call. Percentage will vary
due to your mobile phone and Survival Skybox’s internal battery
charge.IftheSurvivalSkybox’sinternalbatteryrunsoutofcharge,
disconnect your mobile phone USB cable form the Survival Skybox
and use the hand crank to give the internal battery enough charge
to then return to phone charging again.
NOTES:Phonetalkingtimewilldifferfromphonetophone.
NOTE!Chargingofmobilephonebatterywillbelimitedduetosize
ofinternalSurvivalSkybox’sbattery.Itisintendedforemergencies
to provide enough charge to make an emergency call or send
emergency text. You may use Dynamo to continue charging after
internal battery has been depleted to continue to charge your
mobile phone.
IMPORTANT:TheSurvivalSkyboxmaynotchargeallmodelsofall
brands of mobile phones. Phone adapters are not included (you’ll
have to use the cable that came with the device).
Setting Up Bluetooth Wireless
Pairing
The Bluetooth-enabled device that you wish to stream audio to
your Survival Skybox must first be paired to the Survival Skybox.
The process is simple, and in most cases the pairing process needs
to be done only once.
To pair your Bluetooth-enabled device with the Survival Skybox:
1. Make sure your mobile phone’s Bluetooth is turned on. See the
wireless and/or network settings menu on your phone to check.
2. IftheSurvivalSkyboxisn’talreadyon,pressthe button to
turnitonandthenpressthebutton.“BLUE”willbeshownon
the display and the backlit of the Tuning knob and Volume knob
willbeashingrapidly.
3. Open the Bluetooth settings menu on your device. Select
“Weather Radio” from the list of devices available (you might
havetoscanfordevices).Ifyourdeviceasksforapassword,
enter “0000”.
4. A confirmation screen will appear on your phone once the
Survival Skybox and your phone are successfully paired. The
backlight stays lit to indicate successful connection. The
Survival Skybox is now ready for you to stream audio from your
phone.
AM/FM/Weather Band Radios
The Survival Skybox lets you listen to local weather band, as well as
your local AM and FM radio stations.
To turn the radio on/off: Press the button.
To change between AM, FM, or WB (weather band):PresstheBAND
button. The display shows which mode the radio is in: AM, FM, or WB
(weather band).
To increase or decrease radio volume: Turn the Volume knob left to
decrease or right to increase the radio volume.
Using AM/FM/Weather Band radio
To tune to FM, AM or Weather Band radio frequencies: Turn the
Tuningknobtogoupordownthrougheachradiofrequencywhile
in FM or AM radio mode. Turn the Tuning knob to scan through
frequenciesuntilyoundastationyouwouldliketolistenoruntil
you hear the weather information.
Alert Function
1. Press the button to turn on the Survival Skybox.
2. PresstheBANDbuttontoselectWB(weatherband)(Alert
function is not available in FM/AM mode).
3. PressandholdtheALERTbutton.“ALE”willbeshownonthe
displayandanALERTiconwillbeashingwhichindicatesAlert
mode is enabled.
4. WhenaNOAAalertsignalisreceived,theSurvivalSkybox
will switch on automatically and broadcast the Weather Band
information.
5. ToturnofftheAlertmode,pressandholdtheALERT/SNbutton.
5. Turn the volume on your phone to at least 3/4 max, then start
playing something on the phone. Control the Survival Skybox
volume on the Survival Skybox itself, using the Volume knob.
NOTE:IfyounoticethesoundfromtheSurvivalSkyboxis
distorted, turn down your phone’s volume.
Reconnecting
When you turn it on, the Survival Skybox reconnects automatically
with the last paired device. When you leave the Bluetooth operating
rangewiththeSurvivalSkyboxturnedON,itdisconnects.When
you come back into the Bluetooth operating range, your device will
be re-connected.
Streaming Audio With Bluetooth
Once you’ve paired and connected your device with the Survival
Skybox, you can control music playback from the palm of your
hand. Select your music, stop it, change songs and playlists, all right
from your device’s screen.
To adjust volume: Turn the Survival Skybox’s Volume knob.
To disconnect from the Multi-Function Jobsite Radio:Eitherturn
Bluetooth off on your device or choose “Disconnect” from the list of
options in your device’s Bluetooth settings.
To reconnect with the Survival Skybox: Just turn the Survival
Skybox on and wait a few seconds for the Survival Skybox to find
andconnecttoyourdevice.IftheSurvivalSkyboxstillhasn’tfound
your device (which may happen if, for instance, another device has
been connected after yours) make sure the Survival Skybox isn’t
connected to another device currently. Then select the “Weather
Radio” from the list of Bluetooth connections available in your
device’s Bluetooth menu to connect to it.

4
5
Alarm Clock
Setting the Alarm
1. When the Survival Skybox is off, press and hold ALARM until the
clockashestoenterthealarmsettingmode.
2. Press / to set the time. Press and hold / to decrease or
increasethetimevaluequickly.
3. Press ALARM to confirm and exit.
Enabling/Disabling the Alarm
When the Survival Skybox is off, press ALARM to enable or disable
the alarm.
• Tosilencethealarmfunctionmomentarily,pressALERT/SN.The
alarmwillturnonagainwhenthesnoozeperiod(5minutes)is
over.
• Toturnoffanddisablethealarm,presstheALARMbutton.
• Ifyouwouldlikethealarmtoactivateagainthenextday,press
the ALARM button and the ALARM indicator will show on the
display.
Sleep function
Insleepmode,theunitwillturnoffautomaticallyafteraspecied
time (up to 90 minutes).
1. Press and hold the button until you see “90” in the display.
Then press the button repeatedly to cycle through the
available durations for Sleep Mode (90, 80, 70, 60, 50, 40, 30, 20
or10minutes.)NotethattheSurvivalSkyboxwillautomatically
turnonwheninitiatingSLEEPmode,anditwillstayonforthe
duration of the selected Sleep time.
2. To cancel the sleep function, press the button.
AM/FM/Weather Band Radios
The Survival Skybox lets you listen to local weather band, as well as
your local AM and FM radio stations.
To turn the radio on/off: Press the button.
To change between AM, FM, or WB (weather band):PresstheBAND
button. The display shows which mode the radio is in: AM, FM, or WB
(weather band).
To increase or decrease radio volume: Turn the Volume knob left to
decrease or right to increase the radio volume.
Using AM/FM/Weather Band radio
To tune to FM, AM or Weather Band radio frequencies: Turn the
Tuningknobtogoupordownthrougheachradiofrequencywhile
in FM or AM radio mode. Turn the Tuning knob to scan through
frequenciesuntilyoundastationyouwouldliketolistenoruntil
you hear the weather information.
Alert Function
1. Press the button to turn on the Survival Skybox.
2. PresstheBANDbuttontoselectWB(weatherband)(Alert
function is not available in FM/AM mode).
3. PressandholdtheALERTbutton.“ALE”willbeshownonthe
displayandanALERTiconwillbeashingwhichindicatesAlert
mode is enabled.
4. WhenaNOAAalertsignalisreceived,theSurvivalSkybox
will switch on automatically and broadcast the Weather Band
information.
5. ToturnofftheAlertmode,pressandholdtheALERT/SNbutton.
5. Turn the volume on your phone to at least 3/4 max, then start
playing something on the phone. Control the Survival Skybox
volume on the Survival Skybox itself, using the Volume knob.
NOTE:IfyounoticethesoundfromtheSurvivalSkyboxis
distorted, turn down your phone’s volume.
Reconnecting
When you turn it on, the Survival Skybox reconnects automatically
with the last paired device. When you leave the Bluetooth operating
rangewiththeSurvivalSkyboxturnedON,itdisconnects.When
you come back into the Bluetooth operating range, your device will
be re-connected.
Streaming Audio With Bluetooth
Once you’ve paired and connected your device with the Survival
Skybox, you can control music playback from the palm of your
hand. Select your music, stop it, change songs and playlists, all right
from your device’s screen.
To adjust volume: Turn the Survival Skybox’s Volume knob.
To disconnect from the Multi-Function Jobsite Radio:Eitherturn
Bluetooth off on your device or choose “Disconnect” from the list of
options in your device’s Bluetooth settings.
To reconnect with the Survival Skybox: Just turn the Survival
Skybox on and wait a few seconds for the Survival Skybox to find
andconnecttoyourdevice.IftheSurvivalSkyboxstillhasn’tfound
your device (which may happen if, for instance, another device has
been connected after yours) make sure the Survival Skybox isn’t
connected to another device currently. Then select the “Weather
Radio” from the list of Bluetooth connections available in your
device’s Bluetooth menu to connect to it.

6
7
Limited 12 Month Warranty
Voxx Accessories Corp. warrants that for 12 months from date of
purchase, it will replace this product if found to be defective in materials
or workmanship. Return it to the address below for a replacement with a
currentequivalent.Thisreplacementisthecompany’ssoleobligationunder
thiswarranty.ANYIMPLIEDWARRANTYOFMERCHANTABILITYORFITNESS
FORAPARTICULARUSEISDISCLAIMED.Thiswarrantyexcludesdefects
ordamageduetomisuse,abuse,orneglect.Incidentalorconsequential
damages are disclaimed where permitted by law. This warranty does not
cover product purchased, serviced or used outside the United States or
Canada.
U.S.A.:AudiovoxReturnCenter,150MarcusBlvd.,Hauppauge,NewYork
11788
CANADA:AudiovoxReturnCenter,c/oGenco,6685KennedyRoad,Unit#3
Door 14, Mississauga Ontario L5T 3A5
For additional support, call our Consumer Help Line at 1-888-217-7900 or
visit Champ-Eprep.com
Specifications
Built-in battery: 3.7V 1800mAh
Life per charge Flashlight: 5hrs
Distress light: 31hrs
Radio playback: 7hrs
Bluetooth playback: 5hrs
Mobile device charge/talktime: 1.5hrs*
DC input: 5V 0.8A
Time to 100% battery charge via DC input: ~5hrs
Solar panel: 5V/100mA (sunlight intensity: 38,000 LUX)
Time to 100% battery charge via solar power: ~45hrs @ 38,000 LUX
Handcrank power: 2.5W @ 120rpm
Time to 70% battery charge via handcrank: 3hrs @ 120rpm
Power yield
1minhandcranking@120rpm:3minsashlight
3minhandcranking@120rpm:9minsashlight
5mins phone talktime*
12mins radio (moderate volume)
USB Output Voltage: 5V ± 0.25
Maximum power consumption of LED lighting: 1W
Flashlight LED lifespan: >10,000hrs
Radio Specification:
AMfrequencies 520~1710kHz
FMfrequencies 87.5~108MHz
WeatherBand 1CH 162.400MHz
2CH 162.425MHz
3CH 162.450MHz
4CH 162.475MHz
5CH 162.500MHz
6CH 162.525MHz
7CH 162.550MHz
*Minutes will vary by phone type, operating system, and settings.
Table of contents
Other Champ Radio manuals


