Champion LeakMaster NE240 User manual

Rev. 07-00
Operation Manual
Vehicle Evaporative Emissions
Leak Detection System
EVAP-Approved
Smoke Machine
LeakMaster
NE240
TM
Nitrogen Smoke Machine with UltraTraceUV TM
STAR EX. 2014
Redline v. Star EnviroTech
Case IPR2013-00106

Table of Contents
Introduction ……………………. 3
Technical Specifications ……………………. 3
Cautions & Usage Tips ……………………. 4
Tester Overview ……………………. 5
Accessories ……………………. 6
Initial Assembly ……………………. 7
Dual Phase Overview ……………………. 7
Tester Hookup ……………………. 8
Prior to EVAP Testing ……………………. 8
Phase-one ……………………. 9
Phase-two .…………………. 11
Other Leak Detection Applications .…………………. 12
Tester Maintenance .…………………. 17
Troubleshooting Chart .…………………. 18
Accessories List .…………………. 19
Maintenance Record Chart .…………………. 20

Congratulations! You are in possession of the most useful, yet simple to operate
Evaporative Emissions System (EVAP) diagnostic tester available today. The LeakMaster
NE240’s versatile 12-volt design was specifically developed to diagnose vehicle EVAP
systems for leaks. However, it will also diagnose many other closed systems where you
may suspect a leak. Its unique Dual-Phase design allows the operator to confirm the
integrity of the system being tested by utilizing a metered-air system. If the tool has
confirmed a leak in the EVAP system being tested, the tool then introduces a special non-
toxic diagnostic marked-vapor (smoke) into the system, using an inert gas such as nitrogen
for safer EVAP testing. To locate the source of the leak you simply look for the smoke
exiting the leak or use a conventional ultraviolet (UV) lamp to view the UV deposit left
behind, pinpointing the exact location of the leak. The LeakMaster technology has become
“THE” choice of major auto manufacturer’s for verifying and detecting OBD-II EVAP leaks
and is the “Essential” tool they specify for their dealer service programs.
Note: The LeakMaster NE240 arrives filled with a full charge of Smoke-Producing Solution
that will last approximately 1000 tests before the solution may need to be replenished.
Dual-Phase Operation:
Unique to its design, the LeakMaster NE240 leak tester is a Dual-Phase tool. Phase-one utilizes
an inert gas such as Nitrogen to test the integrity of the vehicle’s fuel vapor recovery system by
quickly determining if in fact a leak exists. Phase-two quickly finds the leak utilizing both visual-
vapor (smoke) and UltraTraceUV technology. UltraTraceUV is a unique chemical bonded to the
smoke that deposits an ultraviolet ‘fingerprint’ at the exact location of the leak.
This dual-phase operation is accomplished automatically. Your LeakMaster NE240’s internal
pressure regulator automatically sets the critical pressure that must be maintained during EVAP
testing. You don’t need to set flow rates and you don't need to be concerned with ambient
temperatures or barometric pressures. The LeakMaster NE240 will not spill its solution regardless
of the position you set it in and is refillable by the end-user when the smoke-producing solution is
depleted. The smoke it produces, as well as the UltraTraceUV dye, is non-toxic and non-corrosive.
The LeakMaster NE240 needs no assembly, it is self-calibrating, and requires no maintenance
other than a recommended annual smoke-solution change.
Read this manual in its entirety prior to performing any actual tests on a vehicle. This leak
tester is to be operated by a properly trained and qualified professional only.
Technical Specifications:
LeakMaster NE240
Height
Width
Depth
Weight
Ship weight
Power supply
Amperage usage
23 in. (58.4 cm)
18 in. (45.7 cm)
9 ½ in. (24.1 cm)
17 lb. (7.6 kg)
20 lb. (9.0 kg)
12-volt DC
15 amps.
Supply pressure
Supply volume
Operating temp. range
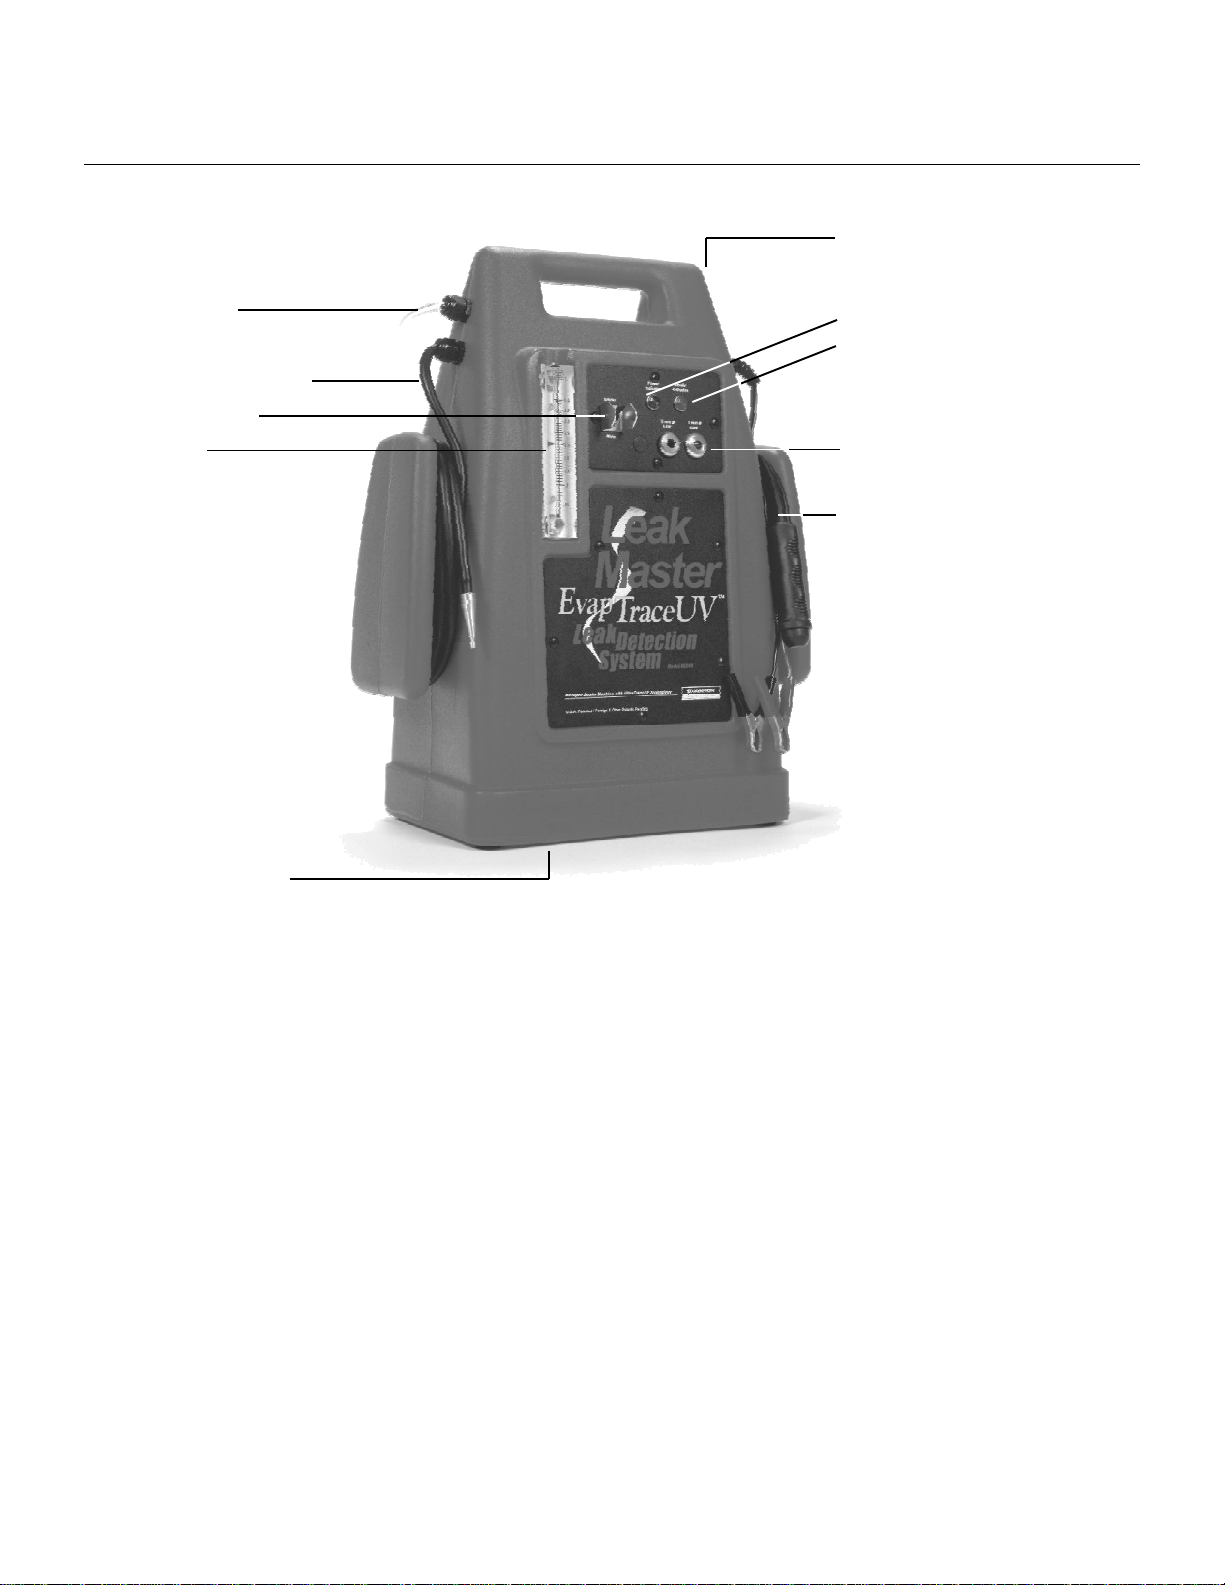
Air supply line (Clear)
Smoke supply line (Black)
Power supply line
Remote starter cable
13.0 in. H2O (.032 bar)
15 liters per minute
45°F to 140°F (7.2°C to 60°C)
12 feet (3.6m)
12 feet (3.6m)
12 feet (3.6m)
12 feet (3.6m)
3

Cautions and Usage Tips:
TO PREVENT PERSONAL INJURY
AND / OR DAMAGE TO EQUIPMENT
Use this equipment in the manner specified by the manufacturer.
Understand operating procedures / Follow all safety precautions.
Because of the EVAP System's volatile fumes, we always recommend
you use an inert gas such as Nitrogen when testing the EVAP System.
Correctly connect power supply to battery and chassis ground.
Change the smoke-producing solution in the LeakMaster NE240 once a
year.
Use only UltraTraceUV™Smoke Solution No. P0716UV. Altering the
solution, hoses, cables or any other replacement parts will void the
warranty; may cause tester malfunction; may cause damage to property
or may cause personal injury.
Do not use with running vehicle engine.
Do not perform test near source of spark or ignition.
The 12V DC battery source you use to power the LeakMaster NE240
must be in good condition and fully charged.
Wear eye protection that meets OSHA standards.
Follow safety precautions when using ultraviolet light source.
Operating pressure must be 50-125 PSI (3.4-8.5 bar)
Store and operate the LeakMaster NE240 in upright position.
Never introduce anything into the .040 or .020 measurement standards,
on the LeakMaster NE240 control panel, other than the LeakMaster
NE240 transparent nitrogen/air supply line tip. Inserting anything else
into the standards (including the black smoke supply hose tip) can
contaminate the standards rendering them inaccurate and ineffective.
!
Smoke exiting a very small leak is even easier to see if after filling the
system with smoke you cycle the remote starter button on/off at about
15 second intervals. This will introduce the smoke and allow the
system pressure to decrease making the leak even more visible.
A bright halogen spotlight is an excellent way to highlight the smoke
exiting a leak.
Use a good quality UV lamp to look for the UV deposited.
When operating the LeakMaster NE240 in near freezing temperatures,
cycle the operation of the LeakMaster NE240 15 seconds ON and 15
seconds OFF for approximately the first minute or two of operation.
This will allow the tester to reach its optimum temperature.
4

Nitrogen / Air Supply Hose;
is used when performing the Phase-one test in order to confirm the
integrity of the system, or when verifying any system for leaks.
Smoke Supply Hose; is used to introduce diagnostic smoke into the system being tested for
leaks.
Selector Switch; selects the machine’s Phase-one or Phase-two function.
Flowmeter; with its pointer-flag is used to establish a quick Pass / Fail when determining if the
vehicle being tested has a .040 or .020 leak.
Water Separator / Filter; assures a clean supply of Nitrogen or Air (located on back of tester).
Power Indicator Light; turns on when connecting the power leads to a battery, indicating good
contact.
Diagnostic Smoke Indicator Light; turns on after depressing the remote starter button,
indicating smoke production.
EVAP System Standards; are used to calibrate the flowmeter in order to perform the Phase-one
portion of the EVAP test.
Remote Starter & Power Cables; are used to operate the tester.
Drain / Fill Plug; used to drain and replace the smoke solution during the yearly maintenance
service (located on the outside-bottom of the tester).
5
Tester Overview:
Component Description
Power Indicator Light
Diagnostic Smoke
Indicator Light
EVAP System Standards
(& space for future Standard)
Remote Starter
& Power Cables
Water Separator / Filter
(Rear of Tester)
Nitrogen / Air
Supply Hose
Smoke Supply Hose
Selector Switch
Flowmeter
Drain / Fill Plug

Accessories:
The following accessories are included with every LeakMaster NE240.
The Cap Plugs Kit is used to seal the intake ducting of the
engine under test. These cap plugs range in size from 1 ¾"to
4 ½". They may be used to seal either the inside diameter of
an opening, or flip them over and seal the opening at the
outside diameter.
The Smoke Diffuser is an adapter designed to locate leaks
around doors, windows and sunroofs. The adapter allows the
operator to lay down a thick bed of smoke (from outside the
vehicle) along door seams, sunroof, windshield and windows in
order to watch for disturbance caused by unwanted airflow.
This EVAP Service Port Adapter is used when connecting
to a vehicle's Fuel Vapor Recovery System. It connects
directly to the factory service access port on the vehicle.
CEA-04
CEA-03
This rubber cone tapers in size from 1" to 3 ½" and has a
5/16" opening at the small end of the cone to which a short
section of hose is connected. The smoke supply nozzle is
inserted into the end of the hose to introduce smoke into any
system with an opening between 1" and 3 ½".
This cone is perfect for accessing the exhaust system of
automobiles and light trucks. It can also be used to access
radiators, water pumps or even seal the intake ducting while
filling the system through the cone adapter.
You can also use the cone to plug or seal the exhaust
system while testing the intake vacuum system. This is
achieved by plugging the hose leading from the cone with a
tapered plug provided. Plugging the exhaust pipe will prevent
smoke pressure loss through the tail pipe, in the event an
intake and exhaust valve are open in the same cylinder
CEA-01
This 25' Coilhose® is used to deliver Nitrogen to the EVAP
tester. Connect the ¼pipe-thread to the Nitrogen regulator
and the quick-disconnect fitting to the EVAP tester.
CEA-02
In addition, a halogen spotlight is provided. A bright light
source helps locate the smoke when looking for leak(s).
HS400AC
6

Initial Assembly:
The only assembly required of the LeakMaster NE240 is to install the quick-connect fitting to the
rear of the water separator / filter, located on the back of the tester.
Note: The LeakMaster NE240 arrives filled with a full charge of Smoke-Producing Solution
that will last approximately 1000 tests before the solution may need to be replenished.
Dual-Phase Function in the EVAP System:
Unique to its design, the LeakMaster NE240 has a Dual-Phase function. Phase-one tests the
integrity of the vehicle’s evaporative emissions system by quickly determining if in fact a leak
exists. Phase-two quickly finds the leak by utilizing Diagnostic Smoke leak detection technology,
including its exclusive UltraTraceUV marked-vapor dye.
This dual-phase operation is accomplished automatically. Your LeakMaster NE240’s internal
pressure regulator automatically sets the critical pressure and flow rates that must be maintained
during EVAP testing. Your LeakMaster NE240 is spill-proof, is self-calibrating, and requires a
minimum amount of maintenance.
Evaporative Emissions System Overview:
The vehicle’s Fuel Vapor Recovery System is the most neglected part of the
vehicle’s emission system, according to the Environmental Protection Agency
(EPA).
The vehicle’s EVAP system is used to collect fuel vapors from the fuel tank. These vapors are
stored in a canister filled with activated charcoal. The EVAP system allows the fuel vapors to be
drawn from the canister and combust during certain operating conditions. This process is called
canister purging since the fuel vapors are purged from the canister. OBD-II requires Powertrain
Control Module (PCM) monitoring for proper operation of the EVAP system and for possible leaks
to the atmosphere.
A faulty EVAP system will allow hydrocarbons (HC) to escape into the atmosphere. Factory
emission tests have determined that an EVAP system with a leak as small as .020 can yield
an average of 1.35 grams of HC per vehicle driven mile. This is over 30-times the current
allowable exhaust emissions standard. In addition to causing HC emissions, failure of this
system wastes fuel and many times creates customer-complaints of “gasoline odors”. With the
introduction of On Board Diagnostics (OBD), the automotive industry has been capable of
determining that a vehicle’s evaporative system has a leak. Prior to the LeakMaster technology,
determining where the EVAP leak was had been a difficult and time-consuming challenge.
7

Tester Hookup:
Prior to performing EVAP tests:
When the vehicle’s engine is turned off, the OBD-II EVAP System is generally venting in one form
or another. Use a scanner and 'close' the EVAP System in order to perform any leak tests.
Remember that all tests with the LeakMaster NE240 are performed with the engine off!
It is best to perform all testing in calm air, so that the smoke exiting the leak will not be blown away
impairing your view of the leak.
Because of the EVAP System's volatile fumes, we always recommend you connect the
LeakMaster NE240 to an inert gas such as Nitrogen to create the smoke when testing the
Evaporative System, in order to prevent creating a flammable fuel mixture inside the fuel tank.
However, the LeakMaster NE240 can also be used to perform its functions with conventional shop-
air, if being used to test systems other than the EVAP System.
Black to
Ground
1. Connect the LeakMaster NE240 Red power
cable to a 12-Volt DC power supply. If you are
using a battery, be sure it is in good condition
and fully charged!
2. Connect the LeakMaster NE240 Black ground
cable to the vehicle's chassis ground. DO
NOT connect to battery ground! A spark in the
vicinity of the battery can cause an explosion!
Check to see that the LeakMaster NE240
'Power Indicator' lamp is on, indicating good
battery contact.
3. Connect either Nitrogen or shop air supply line
to the LeakMaster NE240 water-separator
located on the back of the machine. Be sure
supply pressure is between 50 psi and 125
psi.
8

Phase
-
one:
1. Position the Selector Valve on the LeakMaster NE240 control panel to
'METER'.
2. Determine if the vehicle you are testing is governed by a .040 or .020
acceptable leak requirement Standard. Insert the LeakMaster NE240 air
supply hose (transparent hose) nozzle tip into the appropriate Standard on
the LeakMaster NE240 control panel.
3. Turn on the LeakMaster NE240 by depressing the remote starter button and
observe the position of the flowmeter's indicator ball.
4. Position the flowmeter's red 'pointer flag' so that it aligns with the
measurement observed in step 3 above (See figure 1). Release the remote
starter button and remove the air supply hose nozzle tip from the standard.
Figure 1
Figure 4
Evaporative System Test & Diagnosis:
Note: This flowmeter measurement indicates the vehicle's
Pass or Fail line for that particular leak Standard.
5. Locate the vehicle EVAP Service Port and remove the green cap. (Figure 2)
6. Install the EVAP Service Port Adapter that is provided with the LeakMaster
NE240. (Figure 3)
7. Insert the LeakMaster NE240 transparent Air Supply Line nozzle tip into the EVAP Service Port
Adapter. (Figure 4)
Figure 3
Figure 2
(Clear Hose)
9

Note: Be sure the vehicle's EVAP System has been 'closed'.
8. Depress the remote starter button to activate the LeakMaster NE240. Notice that at the
beginning of the test procedure, the flowmeter's indicator-ball is toward the top of the flowmeter.
This indicates that the EVAP System is being filled. Usually in less than 30 seconds of
activating the LeakMaster NE240 (depending on capacity and fuel system level), the
flowmeter's indicator-ball will fall within the meter’s visible scale. Continue to depress the
remote starter button until the ball stops descending. This could take an additional two
minutes.
9. Once the meter's indicator-ball has stopped descending, observe if the indicator-ball is above
or below the flowmeter's red pointer-flag. A measurement above the pointer-flag indicates
an unacceptable leak in the EVAP System (Fail). A measurement below the pointer-flag
indicates an acceptable leak in the EVAP System (Pass).
Helpful Tip: You will find that many of the leaks in the vehicle's EVAP System are due to an
unsecured or faulty fuel cap. For this reason, we recommend you do not disturb the vehicle's fuel
cap prior to completing the Phase-one test. This way if an unacceptable leak has been determined
after completing the Phase-one test, you can reposition or test the fuel cap, then perform the
Phase-one test again. If you discover the leak was due to a fuel cap problem, you will have been
able to identify with the symptom. Otherwise if you disturb the fuel cap prior to performing Phase-
one, and the vehicle passes the test, you will never know for sure if the leak was the fuel cap or if
you are dealing with an intermittent condition.
Proceed to Phase-two of the test procedure if it has been determined that the
vehicle you are testing has an unacceptable leak in the EVAP System.
IMPORTANT: The EVAP Service Port on OBD-II vehicles was designed with a schrader
valve prior to considering Diagnostic Smoke as a means for diagnosing EVAP leaks. It has
been determined that this smoke, when passed through this schrader valve, will have a
tendency to partially condense and not be as dense and as effective as when it comes
directly out of the LeakMaster NE240.For this reason, during the ‘Phase-two’ testing,
it is strongly recommended that you remove the Schrader Valve prior to introducing
the Diagnostic Smoke into the EVAP system. WARNING: The Schrader valve is
installed with a left-hand thread! You must turn it in a clockwise rotation in order to
remove it.
10

Phase-two:
1. Position the Selector Valve, on the LeakMaster NE240 control panel, to 'SMOKE'.
2. Remove the air supply hose nozzle tip and the EVAP Service Port Adapter from the vehicle
being tested.
3. Carefully remove the vehicle's EVAP Service Port schrader valve using a clockwise rotation.
4. Reinstall the EVAP Service Port Adapter onto the vehicle.
5. Connect the LeakMaster NE240 smoke supply hose nozzle tip to the EVAP Service Port
Adapter. (This is the LeakMaster NE240 black hose).
6. Remove the vehicle's fuel cap prior to introducing smoke into the EVAP system. Depress the
remote starter button to activate the LeakMaster NE240. The 'Diagnostic Smoke Indicator
Light' on the control panel will light indicating that you are producing Smoke. Secure the fuel
cap once smoke is observed exiting the fuel tank's neck area. (The removal of the fuel cap
saves time when filling the EVAP System).
Note: The LeakMaster NE240 flowmeter is inactive during 'Phase-two' test procedure.
7. Continue to introduce smoke into the EVAP System for 60 seconds so test pressure is
obtained. Use the provided halogen spotlight to follow the EVAP System's path and look for
the smoke exiting at the source of the leak(s). See the smoke and you've found the leak! You
can also look for the UltraTraceUV that has been deposited at the exact location of the leak.
This is especially helpful when the leak is in an area that is not readily visible, as on the top of
the fuel tank. Once you gain access to the area of the leak, shine the UV light to identify the
exact location of the leak. Be sure to use a good quality ultraviolet lamp source.
Helpful Tip: After filling the system for 60 seconds with smoke and test pressure has been
obtained (step 7 above), continue to introduce the smoke into the EVAP System in a pulsating
manner. Press and release the Remote Starter Button in intervals of approximately 15 seconds
ON and 15 seconds OFF. This technique introduces smoke while allowing the system pressure to
decrease. Note: exiting smoke is actually more visible as the system pressure decreases.
Continue this cycle until you see the smoke exiting the leak(s).
8. Repair the leak(s) and once again perform the Phase-one test to verify the integrity of the
vehicle's EVAP System.
9. Reinstall the vehicle's EVAP Service Port schrader valve in a counter-clock rotation.
11

Other Leak Detection Applications:
NOTE: While the LeakMaster NE240 is primarily a vehicle fuel evaporative system tester, all
of the following tests can also be performed with the LeakMaster NE240, when Selector
Valve set to ‘SMOKE’.
1. Vacuum and Induction Leaks: Select a vacuum line on the engine that is easily accessible and insert
the tapered brass nozzle from the black smoke supply hose into this line. (The supply line to the brake
booster is a good choice when introducing smoke into the intake manifold. It is important to make sure
that you enter this line at a point where the check valve will not interfere). It’s a good idea to purge the
intake system by first filling it with smoke before completely sealing it in order to look for the
leak(s). With the engine off, depress the remote push button switch until the system is filled (30
seconds to 1 minute is usually sufficient time for most systems to fill). Once smoke is observed exiting
the intake system, you are ready to completely seal off the intake system.
Seal the system to be tested by selecting the appropriate provided cap-plug that will seal the engine’s
air intake. Note: It is best to seal the engine’s intake as close to the air inlet origin as possible to inspect
the entire system. This is especially important on engines equipped with mass airflow sensors and
related ducting connecting it to the intake system. If the system you are testing cannot be sealed with
the kit we have provided, it will become necessary to seal the intake by other means. A latex rubber
glove and a strong rubber band are an excellent combination to accomplish this task. Simply stretch the
wrist of the glove around the air passage and secure with the rubber band. You may choose to plug the
tail pipe of the vehicle with the exhaust cone that is provided -- be sure the exhaust cone’s hose is also
plugged. (It is possible that smoke pressure can be lost out the exhaust if both an intake and exhaust
valve are open in the same cylinder at the same time). Continue to introduce smoke into the system for
approximately one additional minute or until smoke is seen exiting a leak. Use the halogen light to
highlight and identify the origin of the smoke. Release the push button and begin short pulses to
pinpoint the source of the leak. With the LeakMaster NE240 you will find leaks in places you would
never have thought to look before. So take a good look in and around the engine compartment where
smoke might be escaping.
Carbureted Engines and Typical Leak Sources
1. Vacuum and induction leaks.
2. Exhaust leaks.
3. EGR valve leaks.
4. Oil seals and gasket leaks.
5. Idle motors and solenoid leaks.
6. Brake booster leaks.
7. Component testing (radiators, water pumps and
valves).
8. Under dash leaks.
9. Intercooler and turbo charger leaks.
10. Wind and water leaks (sunroofs and windows).
12

Fuel Injected Engines and Typical Leak Sources
13

2. Exhaust Leaks: Escaping exhaust gases can be very dangerous to the occupants of a vehicle
yet these repairs are very neglected — but so easy to find with the LeakMaster NE240.
Put the vehicle on a lift to expose the underside. With the engine off, simply insert the exhaust
adapter cone into the tail pipe of the vehicle being tested (Figure 5). Insert the black smoke
supply line nozzle into the exhaust cone’s hose opening and depress the remote starter button.
Most exhaust systems will fill in less than two minutes, now look for the smoke exiting wherever
there is a leak. Even though exhaust leaks are very easy to find with LeakMaster NE240, here
are two helpful tips to make finding exhaust leaks even easier:
(a) It is best to test a cold exhaust system rather than a hot one. It is easier to repair a cold
exhaust system if a leak is detected. Another reason to test the system cold is that a very
hot catalytic converter may consume some of the smoke. But most importantly, many small
exhaust leaks are only visible on a cold exhaust system due to ‘thermal expansion’.
(b) Seal off the vehicle’s intake system in order to achieve proper system pressure in the
event both an intake and exhaust valve are open in the same cylinder at the same time.
3. EGR Valve Leaks: The engine gas re-circulating (EGR) valve is at the heart of the emission
control system. Since the EGR valve operates in such a hostile environment it is always
susceptible to leakage. During a normal test for vacuum leaks, the EGR valve will be exposed
to smoke and may show leaks at the seat, the diaphragm, or even the base gasket. If smoke is
seen exiting the valve, disconnect the vacuum supply line from the valve and introduce smoke
directly into the valve. This test will verify whether the diaphragm is leaking, or the valve is
leaking at the seat. Smoke can also be used to check the EGR ports for restriction. Simply
'open' or remove the valve and introduce smoke in through the tail pipe to verify that these ports
are open.
4. Oil Seals and Gasket Leaks: Many oil leaks can be located with the LeakMaster NE240. It is
important to understand that the LeakMaster NE240 will only find leaks that will allow air to flow
through them. Example: A cam seal may allow air to pass through whereas a drain plug or
pressure sensor will not. To locate oil leaks it is necessary to pressurize the crankcase with
smoke. To pressurize the crankcase, remove the dipstick and slip a hose over the dipstick
tube, and insert the smoke supply nozzle into the hose and fill the system with smoke. Plug the
PCV vent line and remove the oil filler cap. Start introducing smoke into the crankcase until
smoke is seen exiting out of the oil filler port. Install the oil filler cap and continue filling the
system. Once the system is full inspect for leaks using a bright spotlight.
Figure 5
14

5. Idle Motors and Solenoid Leaks: A small leak in idle motors and solenoid components can
make an engine idle rough and even stall. Leaks in these components are usually found during
a normal vacuum leak test. It is not unusual to find base gaskets and o-rings leaking in and
around motors and solenoids.
6. Brake Booster Leaks: A leaking vacuum brake booster not only effects engine performance
like other types of vacuum leaks, but more importantly it can effect the stopping power of the
vehicle. The brake booster is a simple component to check for leaks. First disconnect the
vacuum supply line to the booster, then insert the smoke supply nozzle into the brake booster
and begin introducing smoke. From under the hood look for smoke exiting around the crimped
area of the booster canister. Now check inside the vehicle under the dash, by depressing the
brake pedal while inspecting with a bright lamp. This vacuum booster is a sealed unit and
should allow no flow through it at any time.
7. Component Leak Testing (radiators, water pumps, valves, etc.): When installing new or
rebuilt parts nothing is more frustrating than to discover on completion of the job that the
component is faulty, or has a leak. It is far easier to inspect a radiator or water pump before it
is installed than to find out after the job is completed and the antifreeze is installed, that there is
a leak. Component leak testing has endless possibilities; anything from hoses to diaphragms
can be tested. Supplied with every LeakMaster NE240 is an exhaust cone adapter that can be
used to access any opening from 1" to 3 ½". Simply introduce smoke into the system being
tested, seal any inter-connecting ports or passages and look for smoke to exit a leak.
8. Under Dash Leaks: Under dashboard leaks can be very difficult to locate. The LeakMaster
NE240 can confirm or eliminate the possibility of an under dash leak in minutes, and locate the
source of the leak in a few more minutes. Most vehicles have a common vacuum supply line
that originates at the engine intake. This vacuum source comes through the firewall to supply
the climate control functions as well as other systems in the vehicle. Vacuum systems under
the dashboard are intended to be closed systems. Any flow through these systems would
indicate that there is a leak present.
To locate under dashboard leaks, install the clear air supply nozzle into the main vacuum line
leading to the dashboard. (Be sure the LeakMaster NE240 selector valve is set to 'Meter' for
this test). Introduce air into the system and watch the flowmeter indicator ball. If the ball drops
to zero the system is leak-free. Now with the air still being introduced into the system, change
the selector lever or button from heat to defrost to vent and observe the flowmeter for any
change of flow. If the flowmeter indicates flow in any of these positions, you will know what
portion of the system has a leak. Set selector valve to 'Smoke' and introduce smoke into the
system where a leak has been determined. Use a bright spotlight under the dashboard and
inspect the lines for smoke flow to pinpoint the leak.
9. Intercooler and Turbo Charger Leaks: Engine compartments with turbochargers tend to run
hotter than normally aspirated engines causing hoses and seals to dry out and leak. For
turbocharged systems to operate efficiently there can be no leaks in the intercooler, ducting,
exhaust or the turbo itself. Intercoolers and turbochargers are tested with the engine off, as
with all tests performed with the LeakMaster NE240.
15

To test these systems for leaks, connect the smoke supply line to the intake system and
introduce smoke into the “cold” side of the turbocharger. With the intake under smoke
pressure, the intercooler, the ducting, the waste gate, and the cold side of the turbo can be
inspected for leaks. To inspect the “hot” side or exhaust side of the turbo, introduce the smoke
into the exhaust pipe using the exhaust cone and inspect the exhaust, the exhaust manifold,
and the hot side of the turbocharger.
10.Wind and Water Leaks from sunroofs, windows and windshields: One of the toughest
leaks to find on an automobile is wind or water leaks around the doors, windows, and sunroofs.
It isn’t practical to search for these leaks while driving at 65 M.P.H. although that is when they
are most noticeable. Hearing where the wind is or seeing the water entering the vehicle can
identify the leak, but this does not always locate the origin of the leak. We all have learned that
air or water can enter in one location and travel a path and manifest itself in an all-together
different spot. With the LeakMaster NE240 you will actually identify the exact location of where
the problem starts and you can do it without ever leaving the driveway.
First, park the vehicle in an area that is shielded from the wind (preferably inside a closed
facility). With all the vehicle’s windows rolled up, turn the blower motor on to high-fan and the
“fresh air” setting (not re-circulate), and close all doors. The cabin of the vehicle is now under a
slight positive pressure. Attach the Smoke Diffuser (supplied with the LeakMaster NE240) to
the black smoke supply line (Figure 6) and operate the tester until dense smoke begins to flow
from the diffuser (be sure the LeakMaster NE240 selector valve is set to 'Smoke'). From
outside the vehicle simply direct the smoke exiting the diffuser approximately 2 to 3 inches
away from the areas to be tested. The smoke should linger along the path you are following.
Watch for any disturbance in the smoke caused by air leaking from inside the vehicle. Once
you find a leak, mark its location with a wax pencil or a removable marker. Now open the doors
(or sunroof) and inspect for the cause of the leak(s).
Figure 6
16

!
Tester Maintenance:
The LeakMaster NE240 has been designed to deliver years of trouble-free operation with a
minimum of maintenance requirement. The following are basic recommendations that will help
keep your LeakMaster NE240 operating in a like-new condition for many years to come.
YEARLY SERVICE: Regardless of operating frequency it is recommended to replace the
LeakMaster NE240 smoke solution once a year.
Smoke Solution Replacement Instructions: It will not be necessary to gain access to the interior
of the LeakMaster NE240 housing to change the smoke solution. The entire procedure is
performed from outside of the tester.
1. Place your LeakMaster NE240 on its back. (Be careful not to damage the water separator)
2. Remove the drain plug, located on the bottom of the tester, using a ¼ inch Allen-wrench.
3. Stand the tester upright and allow the residual smoke solution to drain from the smoke canister
into a catch basin.
4. Once again place the tester on its back.
5. Empty the entire 16 oz. contents of the new smoke solution Part No. P0716UV container into
the smoke canister through the same drain hole opening.
6. Use the ¼ inch Allen-wrench to secure the drain plug back onto the smoke canister. Torque
the drain plug to 60-80 in. lbs. (5.65-6.78 N•m). (DO NOT over-tighten drain plug).
7. Record your name and the date of the smoke solution change on the maintenance record chart
located on the last page of this manual.
8. Dispose of the residual smoke solution according to local, state and federal regulations for
waste oil.
Caution: To prevent personal injury and equipment damage, use ONLY
manufacturer-approved smoke-producing solution P0716UV in the
LeakMaster NE240.
To order smoke-producing solution P0716UV: 1-888-459-9955
Flow Meter cleaning:
While seldom necessary and not recommended for routine maintenance, the following will explain
the procedure in servicing the flowmeter, should it ever need cleaning. If you experience the
flowmeter’s float [ball] beginning to stick during operation, you must clean the meter to regain
normal function. The flow tube and flowmeter body can best be cleaned with a little pure soap and
water. Remove the top fitting from the flowmeter. Remove and clean the ball. With a moist, but
not wet, long cotton swab clean the meter’s flow tube. Place the ball back into the meter. Put a
small amount of petroleum jelly on the top fitting’s “O” ring to maintain a good seal and secure the
fitting back onto the meter. Be sure to avoid excessive cleaning solution from entering the
flowmeter! Note: Avoid cleaning solvents such as benzene, acetone, carbon tetrachloride, alkaline
detergents, caustic soda, liquid soaps that contain chlorinated solvents and other harsh chemicals.
17

Troubleshooting Chart:
Sym
ptom
Likely Cause
Solution
1. The green power
indicator lamp on the
tester does not come ON.
1a. Poor power-supply cable
connection.
1b. Battery providing power
is too weak.
1c. Lamp has burned out.
1a. Secure the connection at the
positive terminal and chassis ground.
1b. Verify the battery is in good
condition and fully charged.
1c. Replace lamp.
1. The red smoke
indicator lamp on the
tester does not come ON
but the tester is still
producing smoke.
2. The red smoke
indicator lamp on the
tester does not come ON
and the tester is NOT
producing smoke.
1. Lamp has burned out.
2. The smoke-producing
element in the smoke
canister is not turning on.
1. Replace lamp.
2. Remove the tester's rear panel
and Inspect for loose connection at
the smoke canister or circuit board.
1. The tester is not
producing smoke -- even
though the green and red
lights are on.
1a. Battery providing power
is too weak.
1b. The tester has depleted
the smoke-producing
solution.
(This solution should last
approximately 1,000
2-minute tests)
1a. Verify the battery is in good
condition and fully charged.
1b. Add smoke-producing solution.
(Follow instructions in this manual).
1. Smoke will not come
out of the fuel neck area
when filling the EVAP
system with smoke during
the Phase-two test.
1a. Fuel tank level is too
high and is blocking the fuel
neck passage.
1b. Vehicle has a roll-over
valve preventing pressure
relief through the tank neck.
1a. Reduce the fuel level in the
vehicle's fuel tank so it is bellow the
base of the fuel tank neck.
1b. Introduce smoke from the neck or
partially fill the system with smoke by
allowing smoke introduction prior to
closing vent solenoid.
1. I turn the tester on but
there is no air or smoke
coming out of either hose.
1a. Poor power-supply cable
connection.
1b. Battery providing power
is too weak.
1c. Tester's internal solenoid
is stuck closed.
1a. Secure the connection at the
positive terminal and chassis ground.
1b. Verify the battery is in good
condition and fully charged.
1c. Disconnect the air or Nitrogen
quick-release at the tester's water
separator and re-connect it.
18

Accessories List:
Part No. Description
P0716UV Smoke-Producing Solution (LeakMaster NE240 arrives full)
(16 oz. in plastic bottle with easy-refill spout)
CEA-01 Exhaust Cone Adapter (1" to 3 ½" Diameter)
CEA-02 Assorted Cap-plug Set
CEA-03 Diffuser Adapter (for wind and water leak testing)
CEA-04 EVAP Service Port Adapter Fitting w / Schrader Valve Removal Tool
HS400AC 400,000 Candlepower Spotlight (w / 20 ft. cord & battery clips)
To order smoke solution, accessories,
or speak to a technical support line:
1-888-459-9955
You may also fax to
714-433-2840
19

Maintenance Record:
Change the Smoke-Producing Solution Part No. P0716UV once a year and document it
below.
DATE NAME DATE NAME
NOTES:
20
Table of contents