ChamSys QuickQ Series Mounting instructions

ChamSys
QuickQ 10, QuickQ 20 and
QuickQ 30 Console
Installation, Software manual and
Warranty Certificate

www.chamsys.co.uk QuickQ User Manual
Page 2of 43
Edition Notes
The QuickQ User Manual includes a description, safety precautions, installation, programming, operation and
maintenance instructions for the QuickQ series console as of the release date of this edition.
Trademarks
ChamSys, the ChamSys logo and QuickQ are registered trademarks or trademarks of ChamSys Ltd in the United
Kingdom and other countries. Other company and product names and logos referred to herein may be
trademarks of their respective companies.
Copyright Notice
The works of authorship contained in this manual, including, but not limited to, all design, text and images are
owned by ChamSys Ltd. All rights reserved.
Manual Use
ChamSys authorises its customers to download and print this manual for professional information purposes only.
Chauvet expressly prohibits the usage, copy, storage, distribution, modification, or printing of this manual or its
content for any other purpose without written consent from ChamSys
Intended Audience
Any person installing, operating, and/or maintaining this product should completely read through the guide that
shipped with the product, as well as this manual, before installing, operating, or maintaining this product.
Disclaimer
ChamSys believes that the information contained in this manual is accurate in all respects. However, ChamSys
assumes no responsibility and specifically disclaims any and all liability to any party for any loss, damage or
disruption caused by any errors or omissions in this document, whether such errors or omissions result from
negligence, accident or any other cause. ChamSys reserves the right to revise the content of this document
without any obligation to notify any person or company of such revision, however, ChamSys has no obligation to
make, and does not commit to make, any such revisions. Download the latest version from www.chamsys.co.uk

www.chamsys.co.uk QuickQ User Manual
Page 3of 43
Table of Contents
Care of Your Console ....................................................................................................................................................4
Safety Notes..................................................................................................................................................................4
Glossary........................................................................................................................................................................5
QuickQ Software User Manual .....................................................................................................................................7
1. Introduction.............................................................................................................................................................7
2. New Shows and Patching .......................................................................................................................................14
3.0 Home Screen and Controlling Fixtures ................................................................................................................18
3.2 Controlling Fixtures with QuickQ........................................................................................................................19
3.3 Recording Items with QuickQ..............................................................................................................................26
3.4 Editing Cues .........................................................................................................................................................32
3.5 Effects..................................................................................................................................................................33
3.6 Execute Window...................................................................................................................................................35
3.7 MIDI Notes and Timecode...................................................................................................................................37
3.8 Audio Input...........................................................................................................................................................38
3.9 Upgrading Console Software................................................................................................................................39
3.9 FCC Part 15 Notice...............................................................................................................................................40
4.0 Technical Specifications.......................................................................................................................................41
QuickQ Console Warranty Certificate ........................................................................................................................43

www.chamsys.co.uk QuickQ User Manual
Page 4of 43
Care of Your Console
To keep your console in best condition please observe the following recommendations:
Keep liquids away from the console. Drinks spilt over a console may cause irreparable damage.
Keep the console out of direct sunlight –place the console in the shade. Excess heat from the sun may cause
damage to the touch screens and to overlays.
Do not use sharp objects on the touch-screen. If you wish to use an object other than your finger, then use a
blunt object that will not damage the surface.
Do not block the ventilation grills on the rear panel, side and underneath the console.
Do not use the console outside its operating temperature range.
Handle the console with care when moving or transporting it. The console contains components that may be
damaged by shock such as a hard drive. Always use a padded flight case wherever possible.
Do not use solvents or cleansers to clean the console. Do not rub firmly on the metal or plastic surfaces –this
may cause the paint or lettering to be removed. Gently use a damp cloth to clean the panels. Do not put
water on the touch screen as this may get inside it and make it unusable.
Safety Notes
Do not open the console unless you are a skilled person authorised and trained by ChamSys in console
maintenance and repair. The console contains components with voltages that may shock.
CAUTION: QuickQ consoles incorporate a replaceable CR2032 processor battery. These batteries can cause a
serious burn hazard if ingested. Do not place battery into the mouth. Keep out of reach of small children. If
accidentally ingested the battery it is imperative to seek immediate medical help.
Do not use the console if the power cables are damaged in any way.
Repairs should only be undertaken by authorised service representatives. There are no user serviceable parts
inside the console.
If liquids are spilt over the console then remove power immediately, and seek advice from your authorised
service representative.
When transporting the console ensure that there are sufficient people to carry the console.

www.chamsys.co.uk QuickQ User Manual
Page 5of 43
Glossary
Below are a few commonly used terms to help with getting started with QuickQ programing.
DMX or DMX512: an acronym for Digital Multiplex and is a standard for digital communication networks that are
commonly used to control stage lighting and effects. Today, we can transmit DMX data over both direct DMX
cables and via Network. QuickQ has connections for both.
Fixture: A fixture is the name used by the console to control a device. Each Fixture has its own number. A Fixture
can be a lamp operated by a dimmer, an LED, a Moving Light or any device that can be controlled via DMX. Other
consoles may refer to this as a Lighting Instrument, Instrument, or Head, and may be referred to by a channel
number or head number.
Fixture Mode: Most fixtures have different modes that can be selected on the physical fixture itself. It is
important that the mode set on the fixture matches the mode selected during Patching. The Fixture mode
defines the number of DMX Channels a fixture uses.
DMX Channels: DMX512 has 512 individual DMX channels per each Universe of DMX.
DMX Universe: A collection of 512 DMX Channels is referred to as a Universe of DMX.
Patching: Telling the console what fixtures are connected to the console and connected via DMX.
Start DMX Address: Often shortened to DMX address as in “what is the DMX address of that fixture?” Each
fixture has its own starting DMX address, which is different for every fixture.
Fixture Number: Each fixture is given a number during patching. Fixtures 1 to 20 or 1 to 40 on the QQ30 can also
be controlled from the fixture faders with the corresponding number. These may also be referred to as the
Channel Number if it is a simple dimmer in a theatre.
Group: A collection of more than one fixture of the same Type and Fixture Mode, but could also be a collection of
all the Fixtures of one gel colour.
Cue: A recorded collection of values of levels and Attributes for one or more fixtures.
Attributes: QuickQ has 4 attributes categories used to describe and control Fixtures. Intensity, Colour, Position
and Beam. Beam includes many functions that are simply not the other 3, for example –shutter, prism and gobo
wheels!
FX: Shortened from Effects. The automated application of changes to one of the 4 attributes. There are Intensity
Effects, Colour Effects, Beam Effects and Position Effects built into QuickQ.
MIDI: MIDI is an acronym that stands for Musical Instrument Digital Interface. It is a way to connect devices that
make and control sound. It can be used to trigger lighting from an audio device such as a digital keyboard.
Multifunction Faders: Are found on the left side of the console. The QQ10 and the QQ20 have 20 faders and the
QQ30 has 40 faders.
Multifunction Fader Mode: The faders on the left side of the console can operate in one of 3 modes using the
mode buttons on the console above the COL MIX encoders or on the bottom left of the touch screen:
Fixture: each fader controls one fixture as assigned during patching.
Group: each fader controls a group or collection of fixtures recorded to it
Cue: each fader can have one cue recorded to it for playback in this mode.

www.chamsys.co.uk QuickQ User Manual
Page 6of 43
Cue Stack: One or more cues, either taken one after the other by pressing the go button or taken automatically
one after the other in a Chase.
Theatre Style Cue Stack: a numbered sequence of cues in a cue stack, typically run one after the other in the
same order and fader in and out with a Fade Time.
Chase: an automated sequence of cues taken one after the other.
Fade Time: the time taken for a cue to change. Fade in and fade out can be the same or different.
Playbacks: are the faders on the bottom right of the console:
QQ10 has one theatre style cue stack and two chase cue stacks
QQ20 and QQ30 each have 10 playbacks
Palettes: a collection of fixture attributes of one type - i.e. colour, that can be used as building blocks when
recording cues. They are then referenced by cues and many cues can contain the same palette. The advantage is
if for example, you had 500 cues all referencing the colour palette named “yellow” and you wanted to change the
particular shade of yellow you had used in all 500 cues - re-recording the colour palette “yellow” would achieve
this in one action. Palettes are found towards the top of their respective parameter windows.

www.chamsys.co.uk QuickQ User Manual
Page 7of 43
Network Port WIFI MIDI ports
Antenna
QuickQ Software User Manual
1. Introduction
This document is intended to enable you to get up and running with QuickQ consoles. It is designed to introduce
the layout of the console along with programming instructions and the key functions.
This manual covers QuickQ software version 2.0 and onwards.
QuickQ Consoles
The QuickQ range of consoles includes the QuickQ10, Quick 20 and QuickQ 30 consoles. All consoles run the same
QuickQ software –they just vary in number of faders, encoders and buttons and number of universes output
from the console.
QuickQ consoles use the same operating system utilising the same installer .cdq extension files.
Connections
The picture below shows the connections on the QuickQ 20 console. The QuickQ 10 and 30 consoles have similar
layouts, with the QuickQ 10 having only 1 DMX port and no Midi connectors. The QuickQ 30 has 3 DMX ports.
Plugging Up
DMX Connections
The QuickQ 10, 20 and 30 consoles have either 1, 2 or 3 direct DMX outputs respectively on the rear of the panel
so you can connect your DMX cables direct to the console.
Alternatively, you can use Ethernet and an external Ethernet to DMX converter box such as our range of SnakeSys
Ethernet to DMX Interfaces or Chauvet Net-X range. Connect the Interface to the console Network port via a
network cable.
Power Socket Power HDMI USB Ports Audio DMX Kensington
Switch Output ports ports lock
www.chamsys.co.uk QuickQ User Manual
Page 8of 43
Powering Up
To power up the console, simply plug in the supplied 12v DC power supply. If the console has been shut down via
the software, press the power switch on the back panel. After a few seconds the screen will come to life, you will
see the operating system loading.
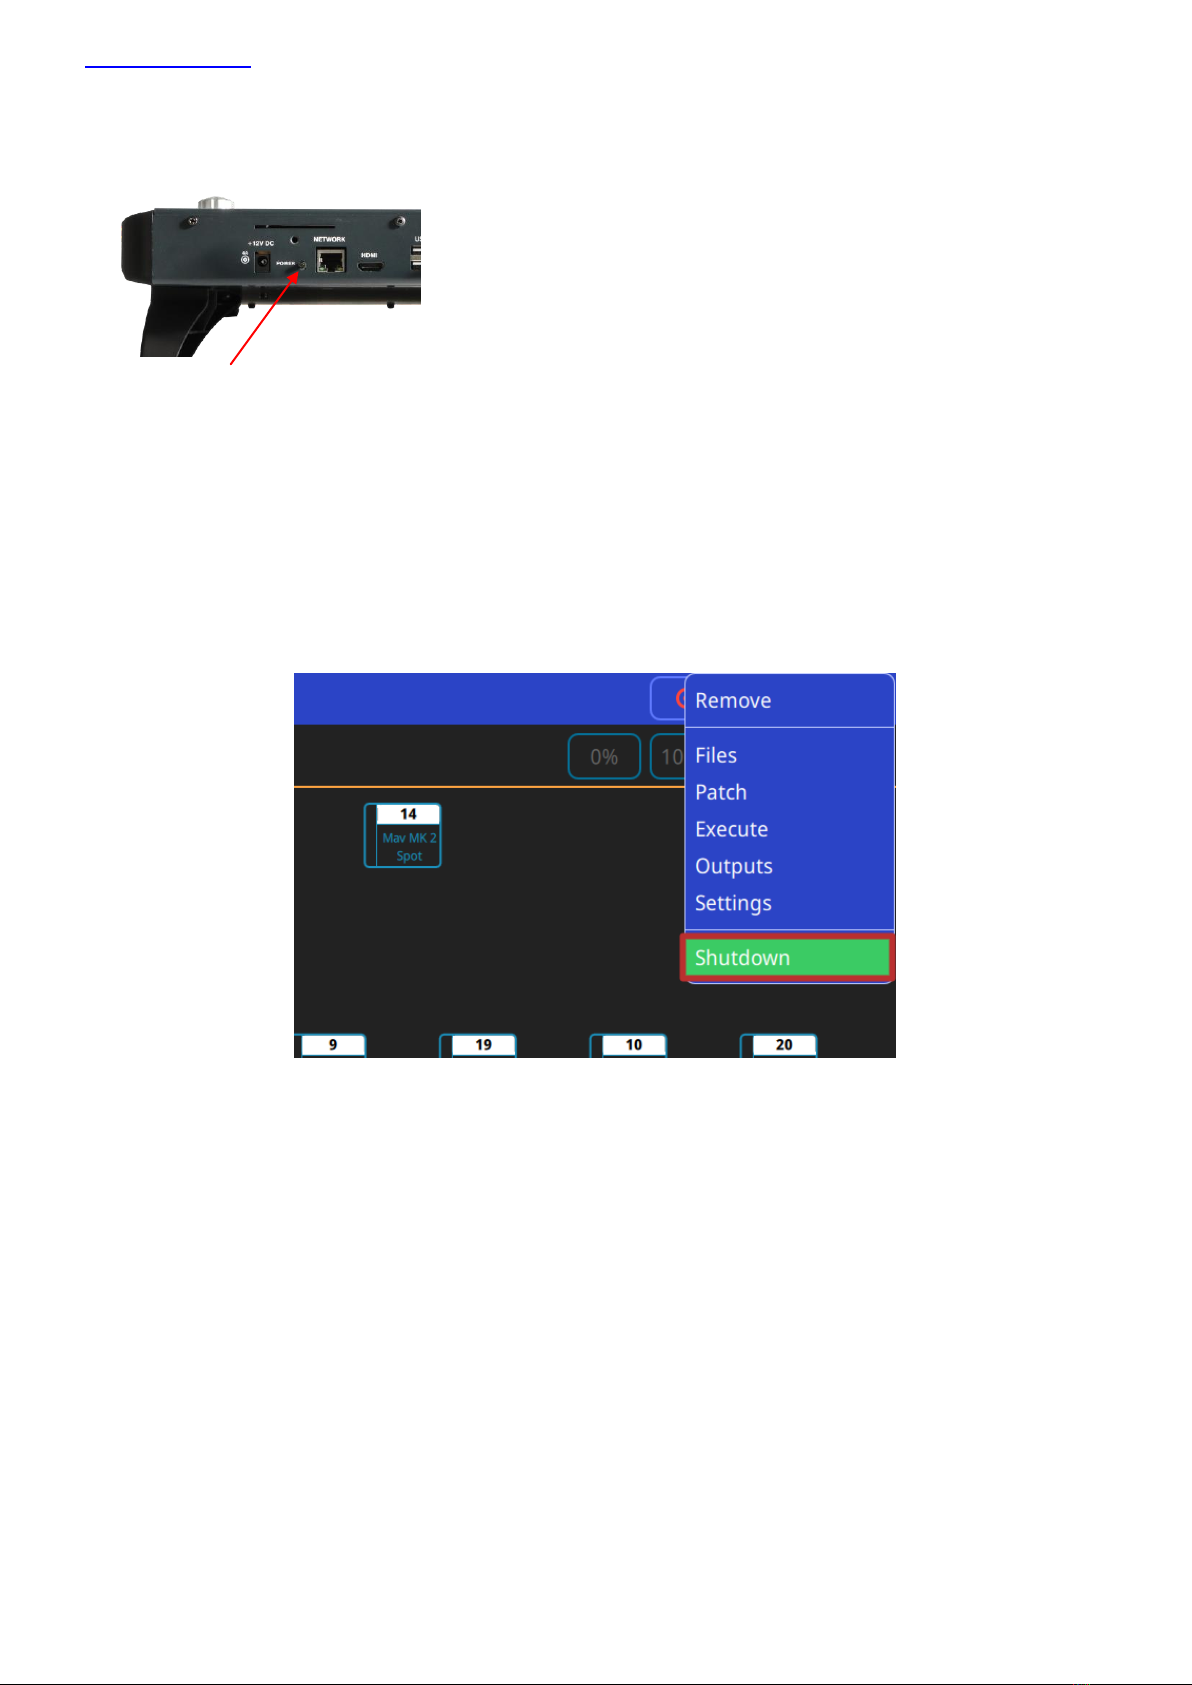
Powering Down
To power down the console it is necessary to shut down the QuickQ application. The console operating system
performs an automatic shutdown and turns itself off when complete. To quit the QuickQ application, press the
Menu button on the top right of the display and then select the QUIT soft button. When asked for confirmation, press
the YES.
If for any reason you are unable to power off the console then you may need to force the console to power off as
below.
Forcing the Console to power off
Switch off the console at the mains supply.
www.chamsys.co.uk QuickQ User Manual
Page 9of 43
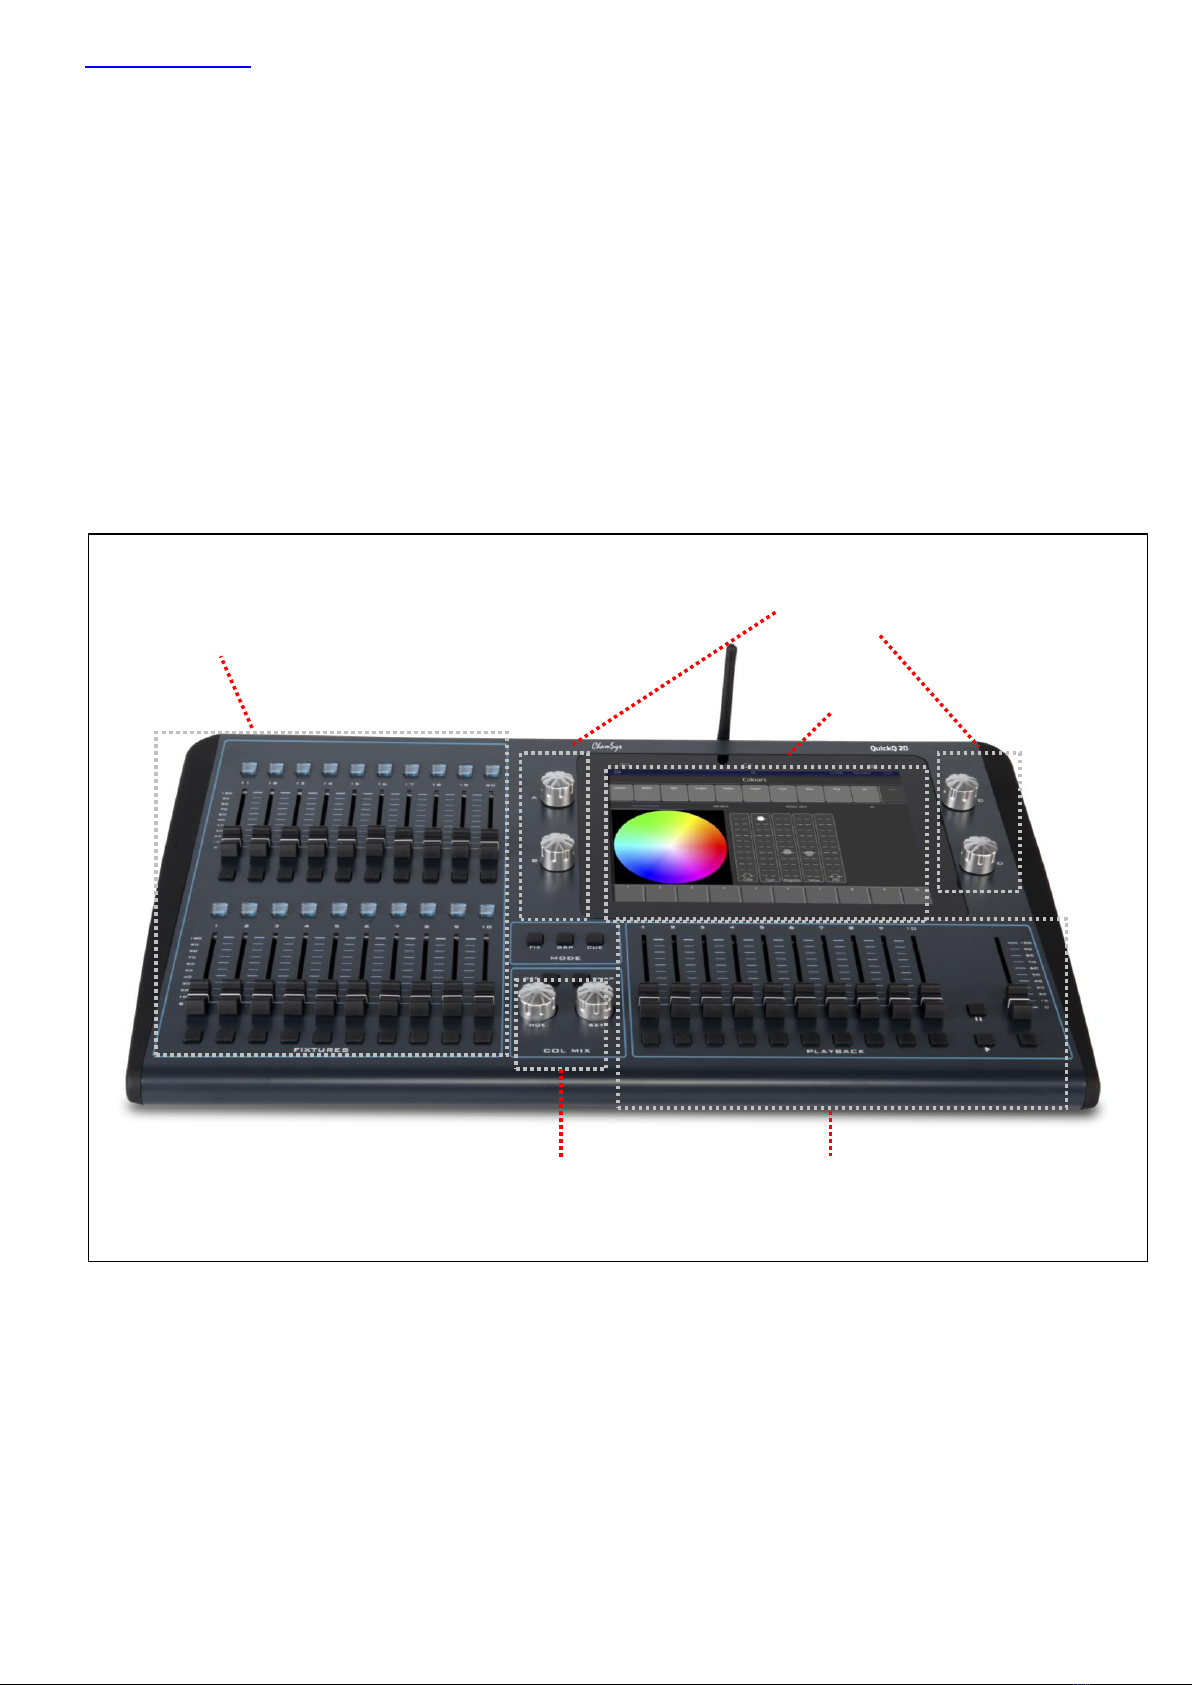
Console Layout
All QuickQ consoles layout are very similar - the programming interface is consistent across the entire range of
consoles.
One of the main areas of QuickQ consoles is the large 9.7” multi-touch display. QuickQ consoles feature an
intuitive smart phone based, app-based user interface making them extremely user friends.
Other key areas of the QuickQ physical hardware, is the Multi-function fixture/Group/Cue faders to the left of the
display and the Playback section below the multi-touch display.
QuickQ consoles have a grand master fader located on the lower right side of the console –this fader must be at
full to enable connected fixtures to output from the console.
Playback
section
Multi-function
fixture/group/cue
faders
Touch
Screen
Attribute
encoders
Dedicated
Colour control
section
www.chamsys.co.uk QuickQ User Manual
Page 10 of 43
User Interface layout
The QuickQ user interface is based around a smart phone style interface, with familiar buttons similar to those
used on phones/tablets such as the home and menu keys.
The top menu bar of the interface remains consistent with its buttons in all windows on the console.
From Left to Right the functions here are:
Back, Clear, Home, Record, Action and Menu as pictured below.
Below this a ‘soft’ toolbar of options specific to each window can be found.
For example in the ‘Home’ window buttons on screen to open controls for Intensity, Position Colour and Beam
can be found.
The Central section of the screen area shows the current open window –for example the fixture layout view on
the ‘home’ window and the Colour picker in the ‘colour’ window.
At the bottom of the display legends can be found for each playback on the console. The legends for each
playback also show handy feedback such as the current cue of the playback if a multi-cue stacks such as a chase.
www.chamsys.co.uk QuickQ User Manual
Page 11 of 43
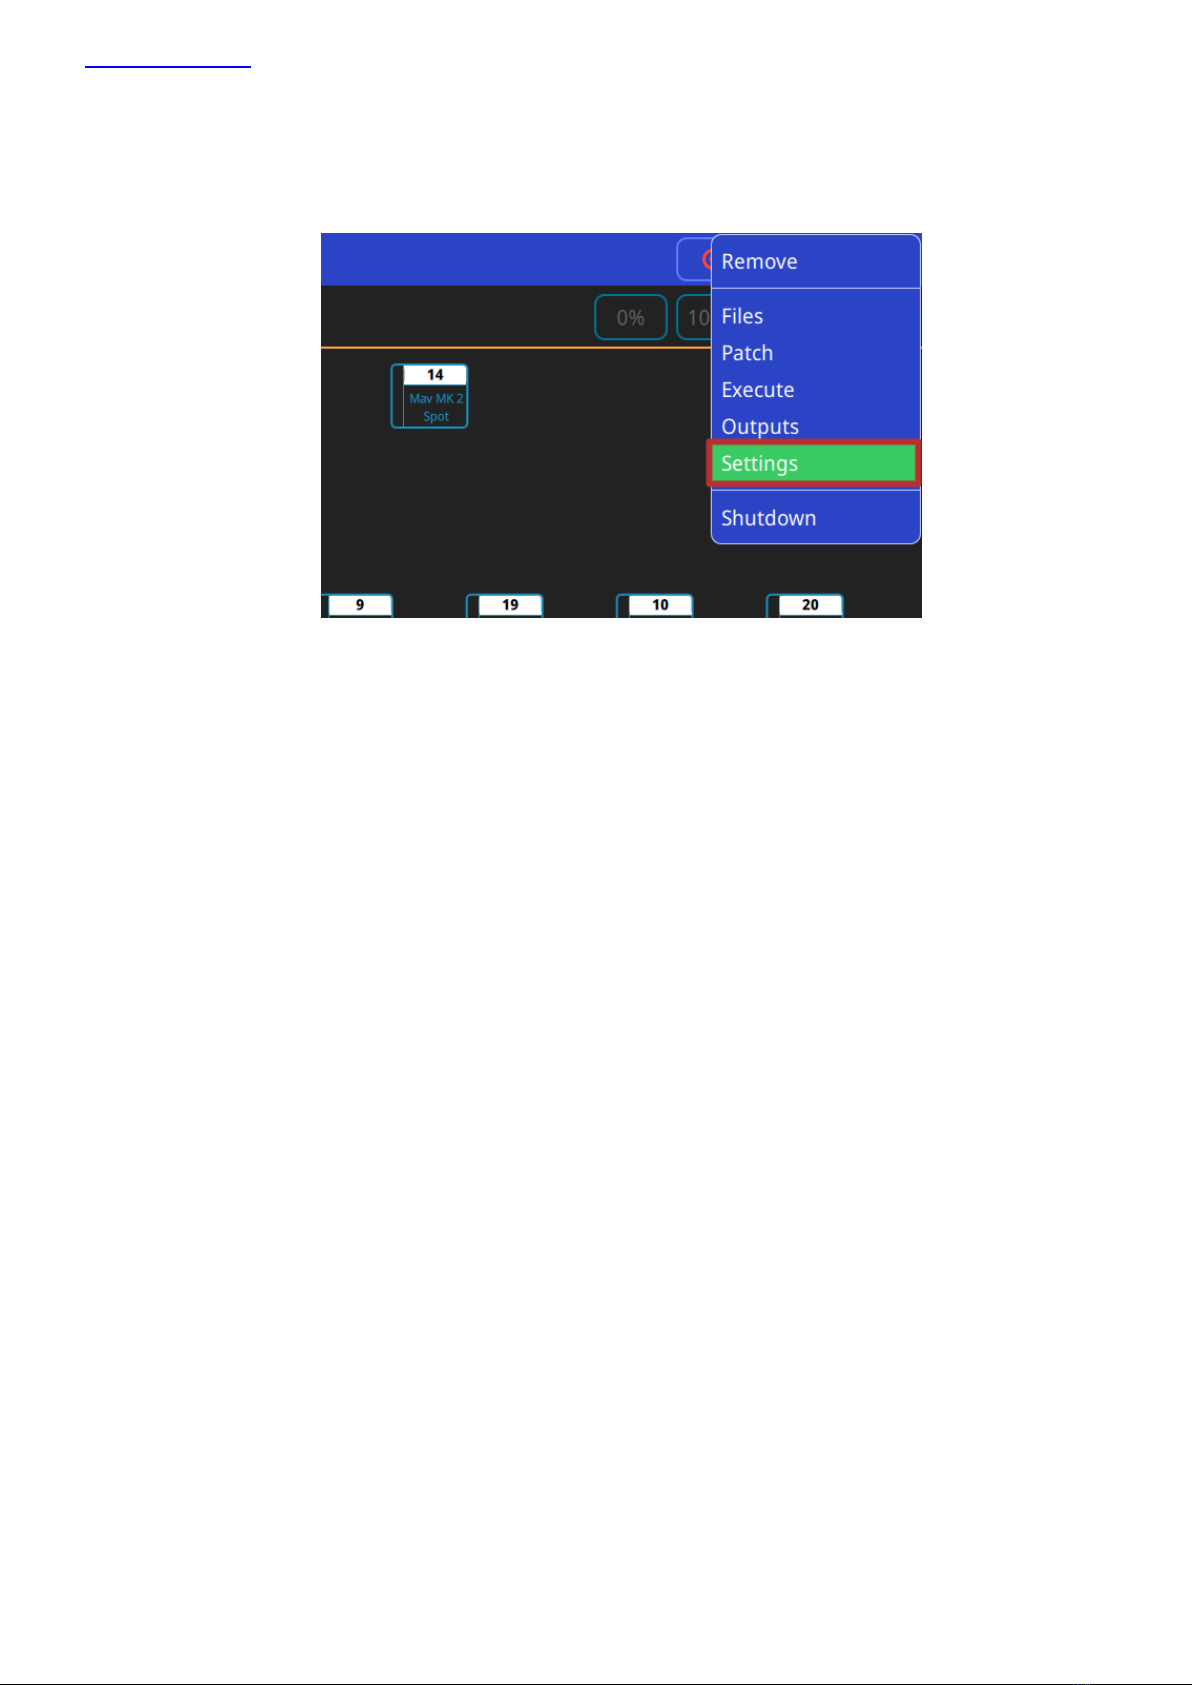
Settings Menu
To access the QuickQ settings menu, click the main menu button on the top right of the display and press the
“Settings” option. Within the Settings window, you are able to adjust network, DMX and user interface options.
Also found within the QuickQ Settings window are a selection of global options that can be applied to the console,
these can be found below the “Network”, “DMX”, “User Interface” and “Update” buttons. Changing the way the
console playbacks, cue stacks and chases behave, QuickQ consoles can be run in 2 different modes, live mode and
theatre mode.
Theatre mode, unlike Live mode, defaults all future cue recordings to cue stacks, enabling the user to step
through the cues one at a time. In addition to this, Theatre mode also enables the use of move when dark and
playback crossfades, converting playback 2 to a dedicated crossfade fader.

www.chamsys.co.uk QuickQ User Manual
Page 12 of 43
DMX Settings
The DMX Settings window can be used to define the way the console outputs DMX. QuickQ automatically assigns
each console universe to a corresponding DMX port located on the rear of the console.
If you wish to output via the console’s network port, the output protocol and universe can be defined within this
window. With each available universe defined at the top of the window, within a universe tab simply select the
protocol required from the “Send Over Network” drop down and set the ArtNet universe below it.
The DMX Settings window also features a Test Mode for testing the console output and a Hot takeover mode for
responding to additional ArtNet data.
Once enabled, Test mode sends a 0-255 DMX ramp on the currently selected universes, outputting to all
connected fixtures irrespective of patch or address.
Hot takeover mode allows the console’s output to automatically be enabled and disabled based on the current
DMX traffic on the connected network. If for instance QuickQ detects another console outputting on the network,
QuickQ will disable its own output to ensure the other signal is received.
Network
Split into 2 tabbed sections, the Network settings window allows users to configure both a wired and a wireless
network connection.
The Wi-Fi connection on the console is used to connect phones and tablets to the console. Using the QuickQ
remote app, Android and iOS devices can connect by capturing the displayed QR code or by manually connecting
on the external device. The console name (SSID), and Wi-Fi password can be defined within the Network settings
window. The console’s Wi-Fi connection cannot be used to output DMX.
The Wired connection window can be used to define the console’s IP address and subnet mask, these can be
adjusted by pressing within the text boxes and entering the values with the popup keyboard.

www.chamsys.co.uk QuickQ User Manual
Page 13 of 43
User Interface Options
The User Interface options window enables users to change the console language. Supporting GB English, US
English, Spanish and Dutch, the language can be changed by pressing the language drop down and selecting the
appropriate language.
www.chamsys.co.uk QuickQ User Manual
Page 14 of 43
2. New Shows and Patching
Starting a New Show
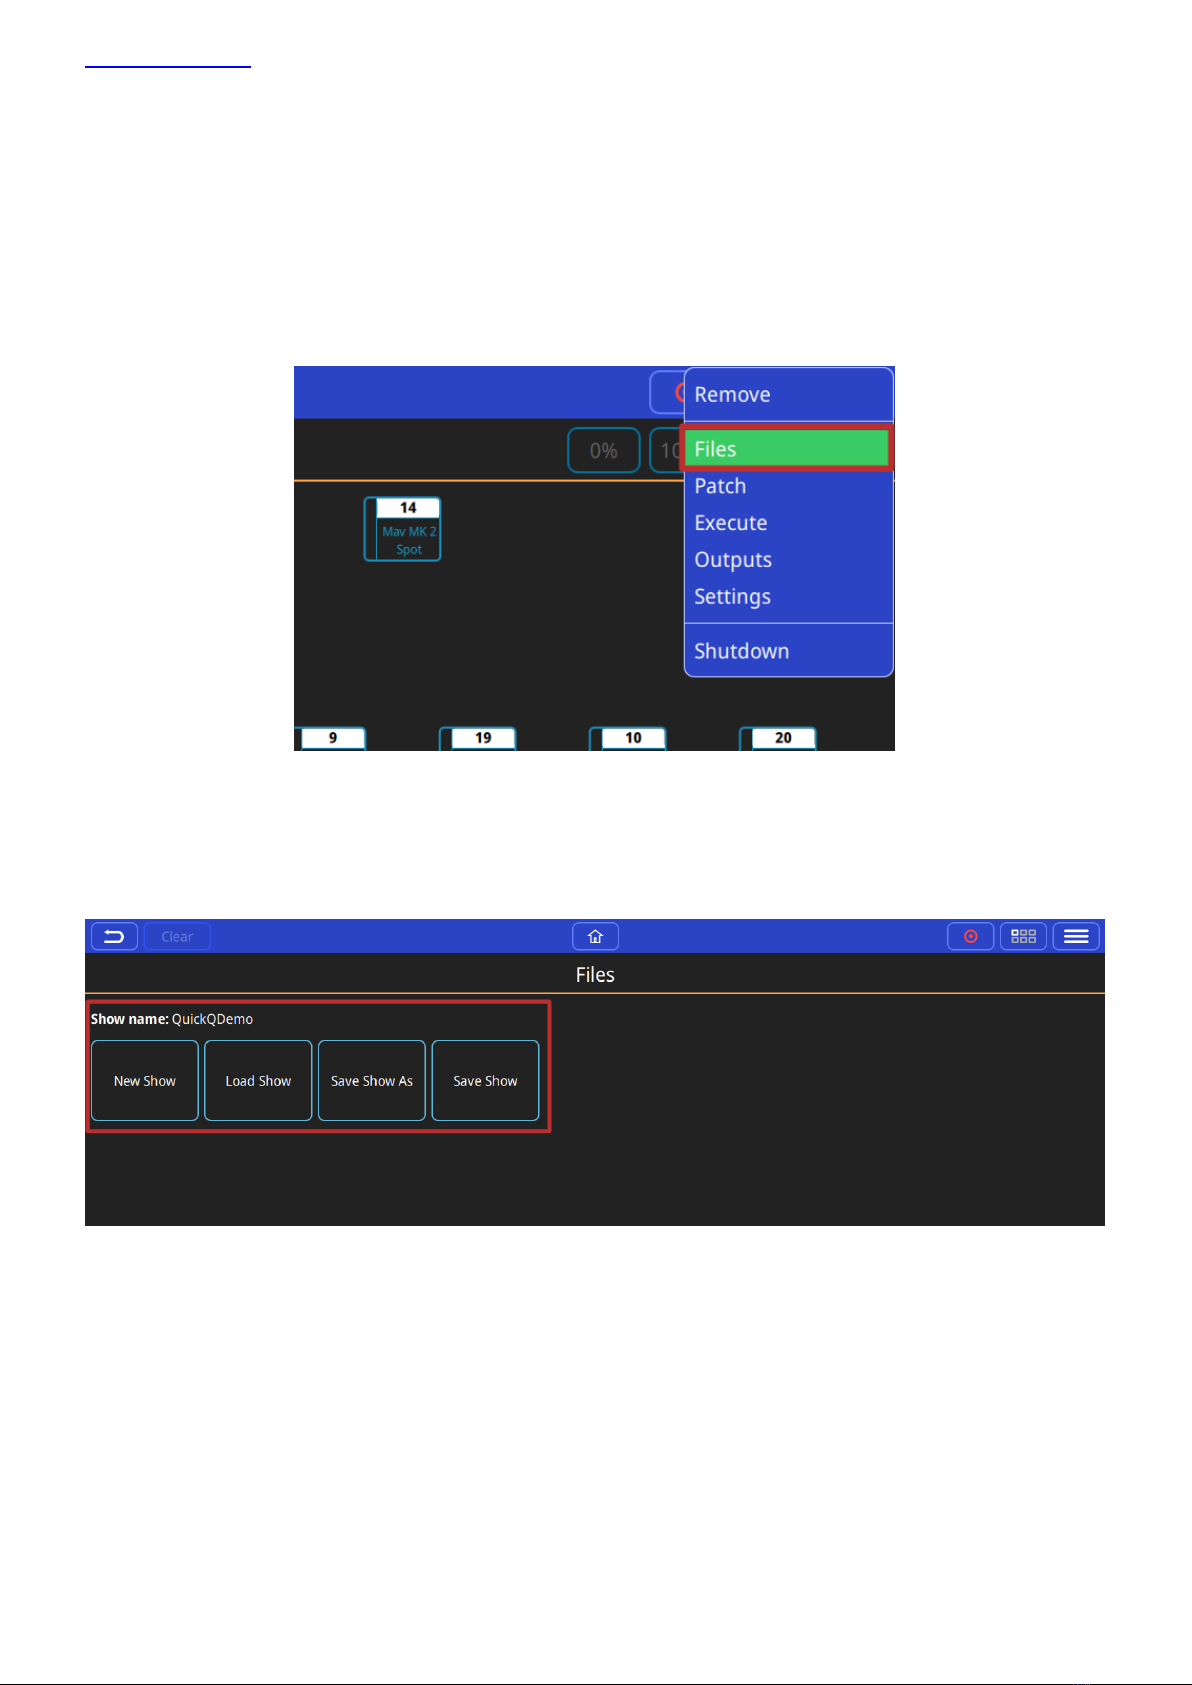
To start a new show, press the menu button on the top right of the display and select the ‘Files’ menu.
In the Files Menu, Press the ‘New Show’ soft button. This clears the current show file from memory –saved shows
still remain stored on the console and can be loaded back into memory at any point, by selecting the ‘Load Show’
option in this window. Confirm by selecting yes.
Once a new show has been started the console will automatically open the Patch window. The Patch window can
be accessed at any time by selecting ‘Patch’ from the menu button –top right of the display.
www.chamsys.co.uk QuickQ User Manual
Page 15 of 43
Patching
The patch window is used to tell QuickQ consoles what fixture(s) being connected and controlled to the console
and which console universe they have been connected on the console and the fixture(s) address.
You must ensure that the DMX Address on the physical fixture(s) matches the address of the fixture(s) patched on
the console.
QuickQ features a comprehensive fixture library of over 25,000 different fixture files; this library is constantly
Adding Fixtures
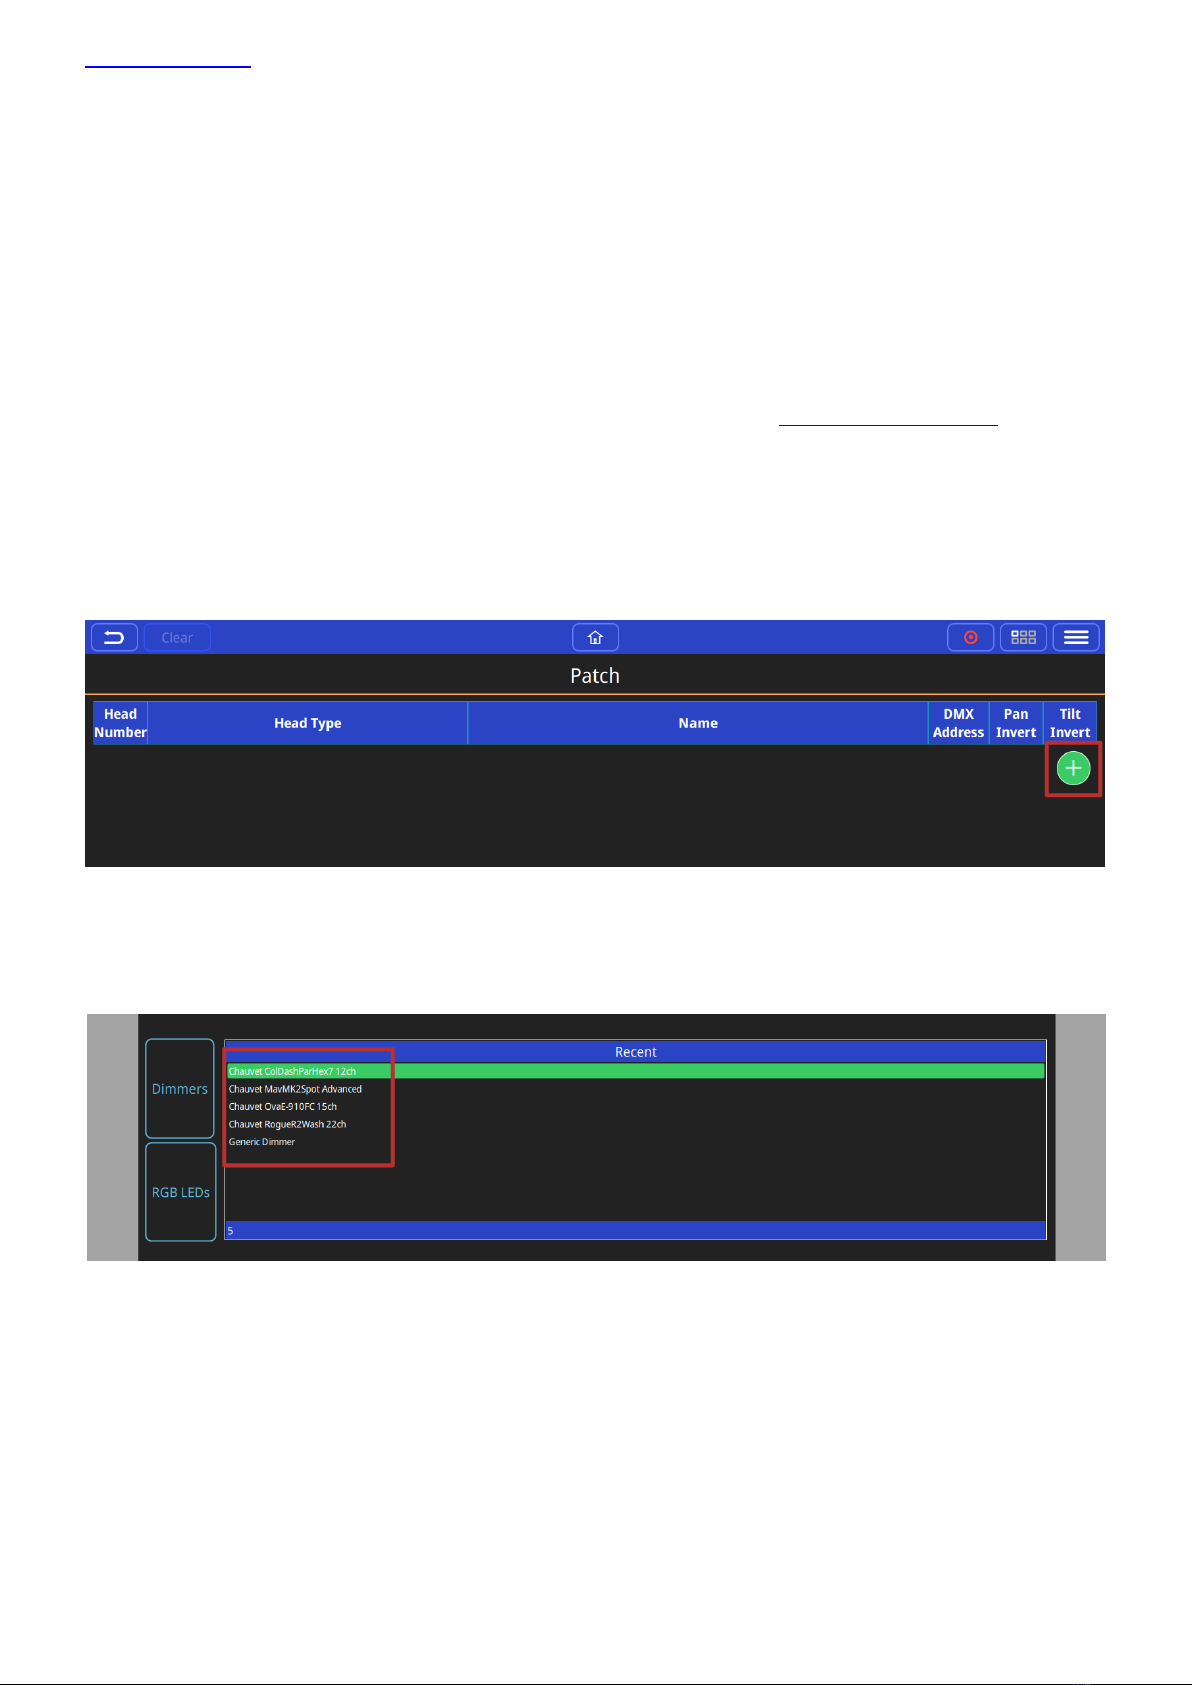
To Patch or Add some fixtures, open the patch window from the menu button and select the ‘+’ button on the
lower right-hand side of the patch window
The Add Fixtures window has two different views ‘Quick’ and ‘Find Fixtures’. The ‘Quick’ option shows recently
patched fixtures from previous shows and also gives the option to quickly select simple fixtures like dimmers or
RGB LED fixtures.
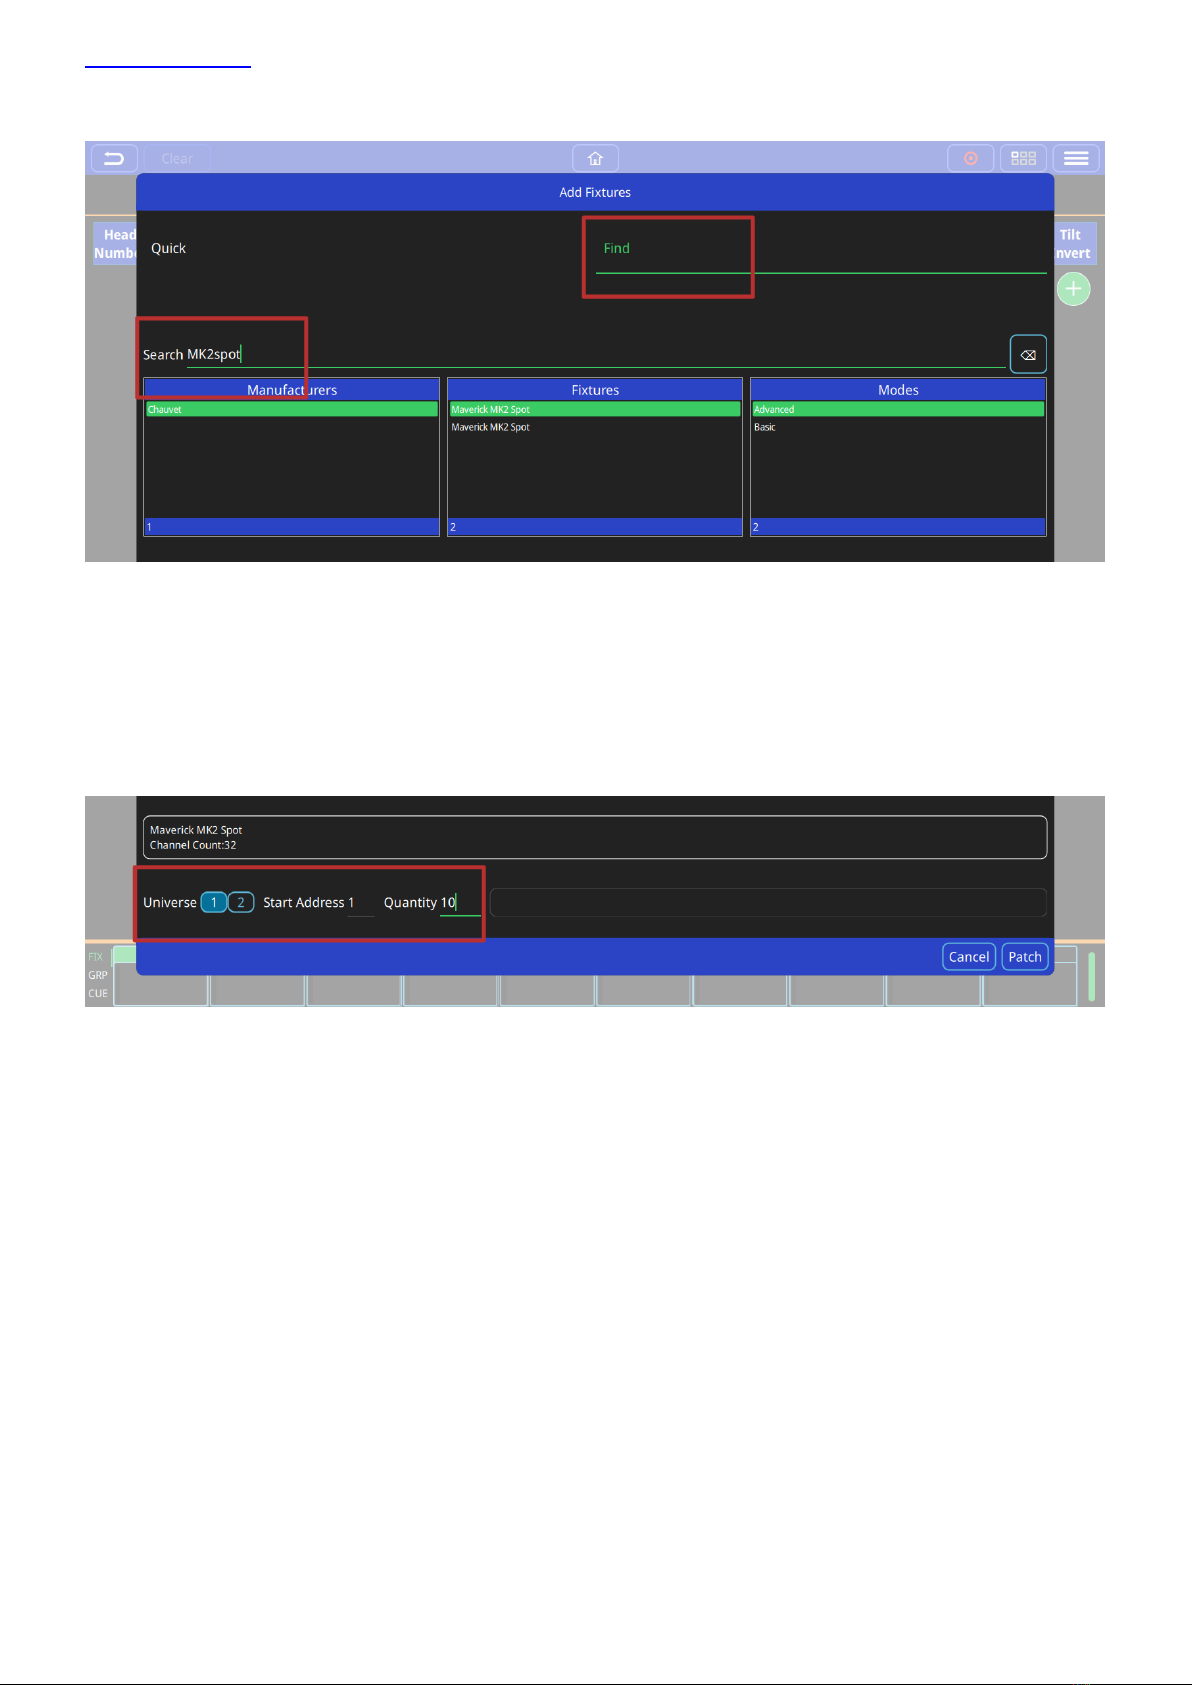
The ‘Find Fixtures’ option allows any fixture from the library of 23,000 fixtures to be quickly selected.
The search box is used to find your fixture. E.g. entering ‘Chauvet Mav’ would filter the library to show all fixtures
manufactured by Chauvet and in the Maverick range. Entering ‘sharpy’ for example would show all fixtures in the
library called Sharpy. E.g. Clay Paky, Sharpy.
Select the Manufacturer, Fixture and Mode from the 3 boxes below the search box.
www.chamsys.co.uk QuickQ User Manual
Page 16 of 43
Once selected, enter the universe that the fixture(s) will be patched onto. Next enter the DMX start address of the
first fixture.
Finally enter the Quantity of this type of fixture to be patched and press the ‘Patch’ button on the lower right of
the window.
Naming Fixtures
The Patch window features a name column; the default for this field is the fixture name from the QuickQ fixture
library. This name is used on the Home screen and can custom set per fixture.
It is recommended that you name the dimmer or the head based on its location (e.g. front wash / back truss SL).
Single fixtures can be renamed simply by pressing and holding on the fixture name to open the Rename fixture
dialog
To rename multiple fixtures use the Action menu, select the fixture(s), then select the rename option from the
action menu bar at top of window.

www.chamsys.co.uk QuickQ User Manual
Page 17 of 43
Changing DMX Addresses of patched fixtures
To change the DMX address of a single patched fixture press and hold on the DMX Address inside the patch
window, then enter the new address on Set DMX Address menu.
To change DMX address of multiple fixtures, use the Action menu, select fixture(s), then select the repatch option
from the action menu bar at top of window.
Removing fixtures
To remove a fixture from the Patch, select remove from the action menu, then select the fixture(s) to be
removed. Note that this will erase any programming for these particular fixture(s).
RDM Auto patch
QuickQ supports RDM Auto patch of RDM compliant fixtures. When using the RDM auto patch function the
QuickQ console will automatically re-address any fixtures with conflicting DMX addresses.
To use RDM Auto patch, in the patch window select RDM Auto Patch from the menu button.

www.chamsys.co.uk QuickQ User Manual
Page 18 of 43
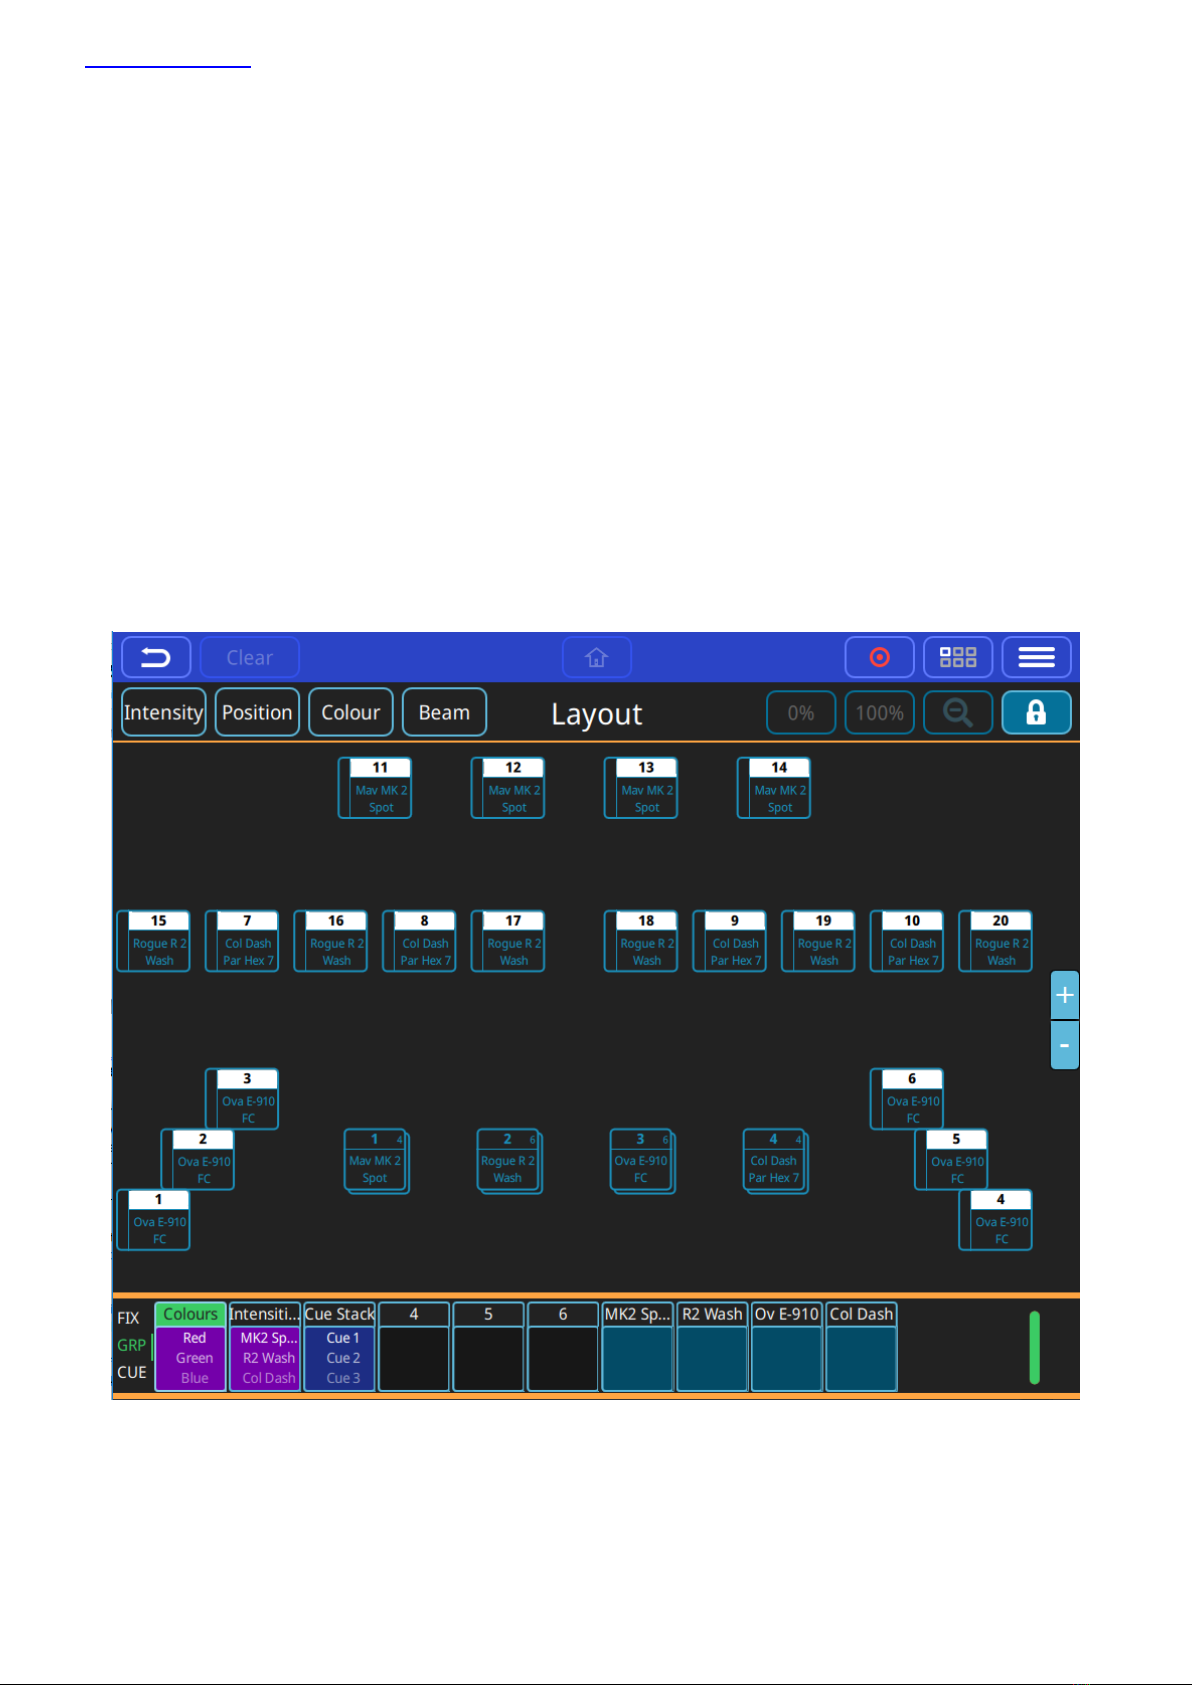
3.0 Home Screen and Controlling Fixtures
3.1 Home –Layout Screen
Introduction to the Layout Screen
On QuickQ consoles, the Layout screen can be accessed by pressing the home button located centrally at the top
of the display. Using this screen, fixtures can be arranged as desired and selected. Colours and intensities of these
fixtures will also be visually displayed here. Once patched, fixtures will appear near the top of the window. Both
fixtures and groups can be viewed here by switching between these on the left.
Creating Groups
Groups can be created by selecting fixtures, either in the Layout window, or using the multi-functional faders on
the left of the console, pressing the Record icon, and selecting an empty fader in Group mode. The newly created
group should then appear under the Groups section in the Layout screen.
Setting up the Layout Screen
Fixtures or groups can be added to the Layout screen by simply dragging them to their desired positions. Once
fixtures have been placed as required, the Layout screen can be locked or unlocked by tapping the padlock icon
near the top right of the display. This prevents any unwanted movement of fixtures.
Zoom In/Out
The view of this window can be adjusted using a two-finger pinching action to zoom in and out. The view can also
be reset to default by tapping the magnifying glass icon near the top right of the display.

www.chamsys.co.uk QuickQ User Manual
Page 19 of 43
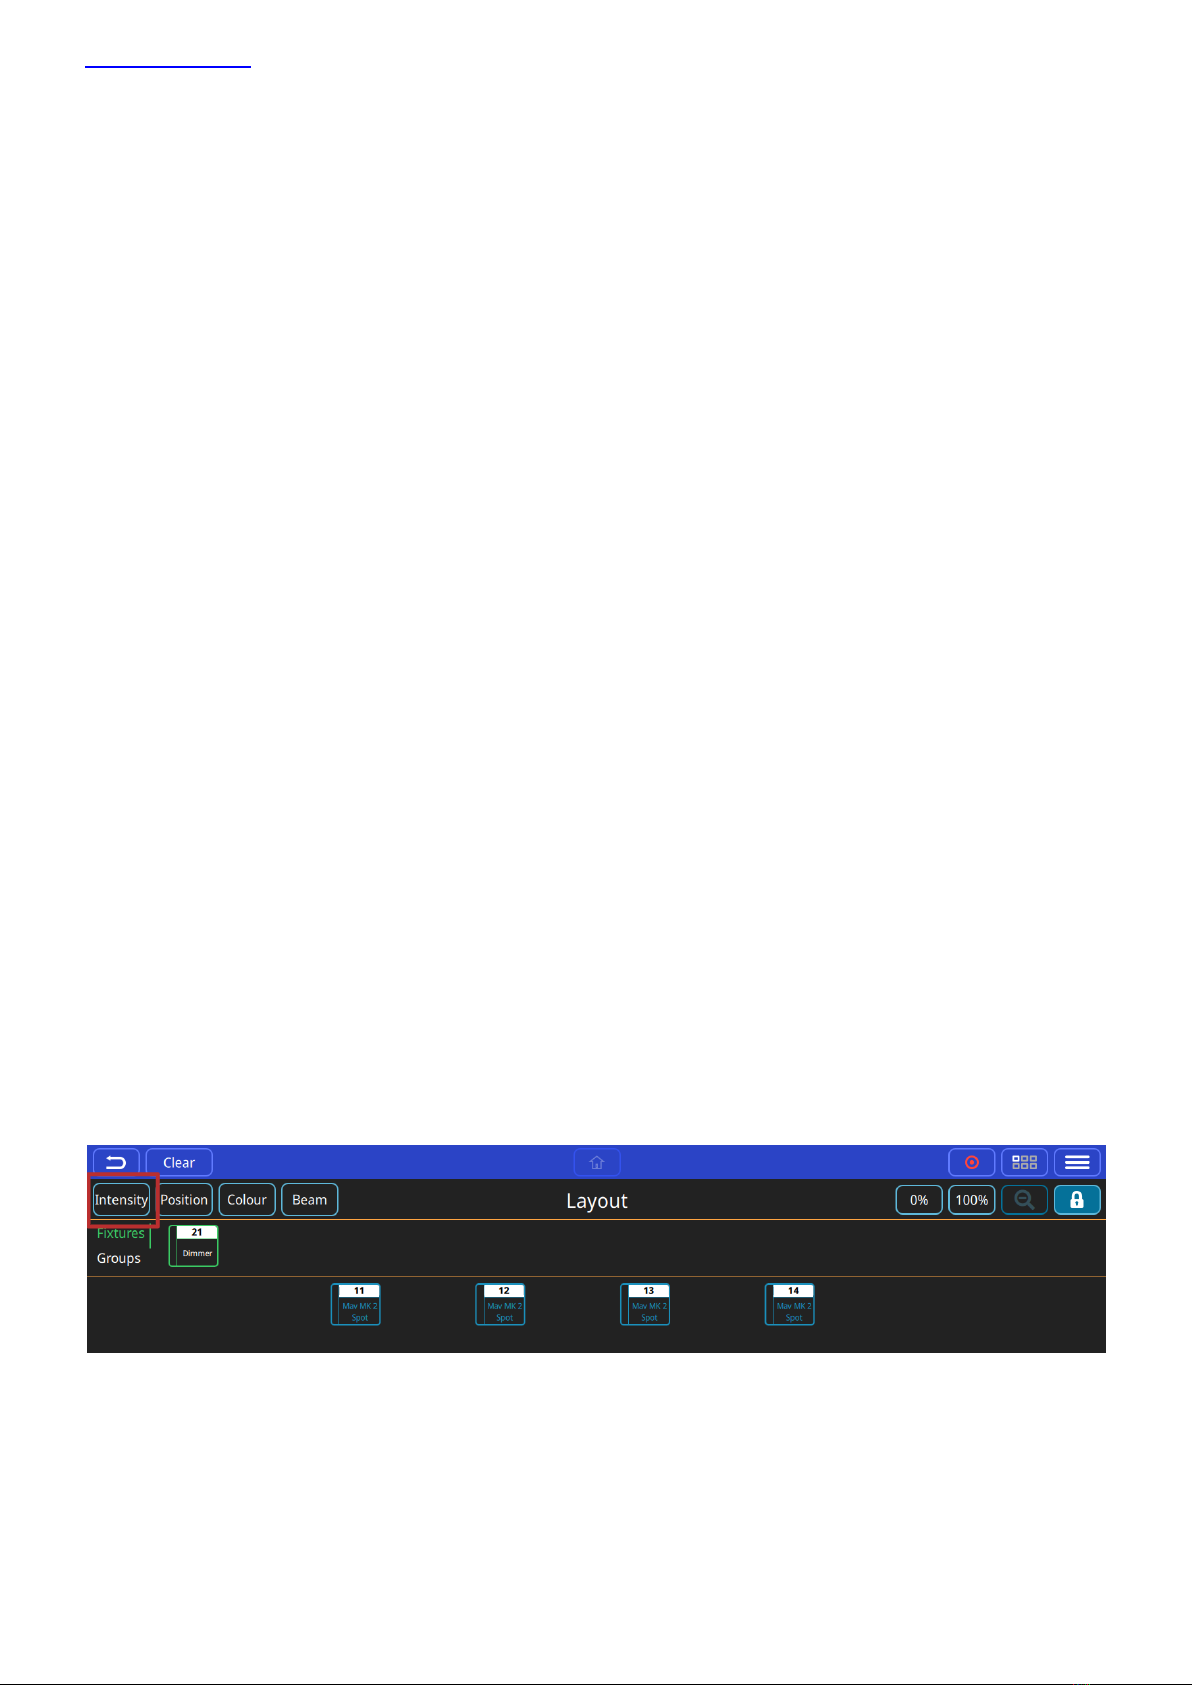
Selecting Fixtures
Tap to select fixtures. Once selected, fixture icons highlight green, as pictured above. Selected fixtures can quickly
be given 100% or 0% intensity by tapping the corresponding buttons near the top right of the display. Once
selected, fixtures can be programmed via the Intensity, Position, Colour and Beam windows (see section 3.2).
3.2 Controlling Fixtures with QuickQ
Controlling Fixtures
Fixtures can be controlled directly by selecting them and their attributes (intensity, Colour, Beam, and Position)
adjusted. Any adjustments made can be recorded into cues. Fixtures may also be controlled by cues.
Selecting Fixtures
Fixtures can be selected in several ways, using:
Multifunction faders on the left of the console in fixture mode (press the [FIX] mode button):
Raise one or more of the multifunction faders. The fader controls the fixtures intensity.
Pressing the fixture select button beneath a fixture fader. This does not affect intensity.
Multiple fixtures can be selected in one go. Press on a button beneath the fader for the start of the range
and at the same time press a fixture button that defines the end of the range.
The multifunction faders on the left of the console in group mode (press the [GRP] mode button):
Raise one or more of the multifunction faders. The fader controls the group of fixtures intensity.
Multiple groups of fixtures can be selected in one go. Press on a button beneath the fader for the start of
the range and at the same time press a fixture button that defines the end of the range.
Home Screen:
Touching one or more of the fixture icons in the home screen.
Touching one or more of the group icons in the home screen.
Selected fixtures have a green border around the icon in the home screen, or around the group’s icon and the
included fixtures.
Selected fixtures have a brighter LED above the fader.
You can deselect a fixture by selecting it again.
Controlling Fixtures with Cues
Fixtures may also be controlled by cues. Cues can be recorded and played back on one or more of the playbacks
1-10, or from one or more the multifunction faders, when they are in cue mode. (Press the [CUE] mode button).
Playbacks can have one or more cues recorded on them. Cue mode faders can have only one cue recorded to
them.
Capture Fixtures - Clear Fixtures
Fixtures that have had attributes changed directly using one of the select methods are considered to be
“captured” and any adjustments to their attributes will be output directly. This means the selected fixtures values
will be held until the (Clear) button in the main menu bar is pressed. If (clear) is selected, then fixture values will
return to any values being applied from cues, either from cues on the playbacks or from cue mode fader cues.
Parameter values captured from directly selected fixtures can be recorded into cues.
www.chamsys.co.uk QuickQ User Manual
Page 20 of 43
Controlling Fixtures from Cues
Cues contain recorded parameter values. Cues can be played back from the playbacks or from the intensity faders
when in cue mode. (Press the [CUE] mode button) or from a combination of both. The fader will control the
intensity of the instruments between a zero level and the maximum level that was recorded into the cue.
The select buttons at the bottom of the fader now act as Flash Buttons and will instantly apply the maximum
recorded intensity and activate the cue on the fader when pressed.
Highest Takes Precedence and Latest Takes Precedence
Cues can be played back by raising the faders from either of these locations. If two separate cues are playing back
intensity for the same fixture then the highest intensity being played back will be visible on the stage. This is
known as Highest Takes Precedence.
If two separate cues are playing back any of the other attributes for a fixture, Colour, Beam, or Position, the latest
one to be activated will have its contents output on the stage.
Activating Cues and Releasing Cues
Cues can be started and stopped from playing or outputting by raising and lowering the playback faders or the
cue faders. When playing we consider them “active”, when not outputting we say they are “released”. Cues can
released one at a time by returning their faders to the bottom of their travel or all at once from the (Action) menu
and then (Release All). This does not affect values captured by fixtures directly selected.. These, if being output,
will only stop being output when (Clear) is pressed.
Controlling Intensity
Intensity for a selected fixture can be controlled directly from the instrument or group faders, from the intensity
window or from the home screen 0% and 100% buttons.
Using Instrument Faders
As we have seen, moving one or more of the multifunction faders while in intensity mode will set intensity to a
level. The intensity level of a whole group can be adjusted or set, when in group mode (press the [GRP] mode
button).
Intensity Window
Intensity can also be controlled from the Intensity window. Go to the Home Screen and select the Intensity
button.
Other manuals for QuickQ Series
1
This manual suits for next models
3
Table of contents
Popular Music Mixer manuals by other brands

CAKEWALK
CAKEWALK V-STUDIO 100 Getting started guide

Behringer
Behringer EURODESK MX9000 User's manual

Automatic Technology
Automatic Technology C03M V1 installation instructions

Behringer
Behringer EURORACK UB1204-PRO Technical specifications

Mackie
Mackie 1202-VLZ Pro owner's manual

Compaq
Compaq AlphaStation XP900 manual


