CHANCEE U190CAR User manual

U190CAR Floor Sweeper
Instruction Manual

We explore safer, higher-end and more user-friendly cleaning equipment
through technical advantage and idea innovation.

Preface
This instruction manual contains all the information that you need to use and
maintain the machine. Please read it carefully before getting started. Only with
correct operation and regular maintenance can the machine be kept in its best
working condition.
This instruction manual is an important part of the product and should be kept
together with the machine.
If this manual is lost, please contact us immediately and we will be glad to provide
you with a new one. All technical details included in this manual are property of
Anhui Chancee Technology Co., Ltd and are protected by law.
Some components of the product may be harmful or dangerous and we have tried
our best to include them in this manual. It is the user’s obligation to pay special
attention to them during the work. However, since it is impossible for us to point out
all potential dangers, we expect you to be extremely cautious during the work so as
to protect the machine, yourself and other people in the working area
In this manual we use illustrations to show the components and functions of the
machine. It is possible that some of them contain details that are slightly different
from those of yours. However, all the instructions presented here still apply to
your product and should be followed strictly during the operation.
.
Only accessories from the original manufacturer can be used on the machine. Using
accessories from other sources may lead to low working efficiency or even accidents
in extreme cases.
We usually modify or improve our products to meet the latest market demand.
However, this is NOT suitable for machines that have been sold. We will NOT be
responsible for any injury or loss caused due to the user’s improper operation either.
If you have any question, complaint or suggestion, please feel free to contact us and
we will be at your service with all our knowledge and enthusiasm.
We wish you a pleasant experience with our product!

Technical parameters
1
Chapter 1 General description
2/3
1.1 Contents and purposes
1.2 General instructions
1.3 Safety requirements for the batteries
1.4 General safety requirements
Chapter 2 Operating the machine
4/7
2.1 Buttons and pedals of the machine
2.2 Operation process of the machine
2.3 Cautions during the operation
Chapter 3 Regular inspection and replacement of damaged parts
8/10
3.1 Adjustment and replacement of the main brush
3.2 Adjustment and replacement of the side brushes
3.3 Replacement of the filter element
3.4 Adjustment of the height of the baffles
3.5 Replacement of the fuses
Chapter 4 Common problems and solutions
11
Chapter 5 Maintenance
12
Chapter 6 After-sale services
13
Warranty card
14
Contents

- 1 -
Technical parameters
Category Unit Parameter
Cleaning width mm 1,900
Main brush width mm 700
Side brush width mm 500 * 4
Cleaning efficiency m2/h 16,800
Battery capacity V/Ah 48/100
Water tank capacity L 80
Garbage can capacity L 180
Main brush motor power W 800
Side brush motor power W 80 * 4
Driving motor power W 1,200
Suction motor power W 500
Working time h 4-5
Grade ability % 25
Product size mm 2,330 * 1 ,900 * 1,960

- 2 -
Chapter 1 General description
1.1 Contents and purposes
Potential risks concerning the use of the machine are listed in the following
sections. Since most accidents take place when safety rules are ignored, it is
necessary that you read them carefully and take precautions before getting
started. The best guarantee against any accident is a careful and cautious user,
which might be better than other precautions available. When using the
machine, pay special attention to the people in the working area, especially
children.
1.2 General instructions
Before any maintenance and repair, turn off the power and remove the key
from the general switch.
The machine can only be operated by qualified personnel. Children and
disabled people are strictly forbidden to use it.
Keep the battery away from sparks, flames and smoke.
Do NOT use the machine in places with dangerous, flammable or explosive
gases, liquids or water vapor.
The machine can be used to clean regular garbage. It must NOT be used to
clean silk ropes, belts, high-temperature sundries, accumulated water, or
flammable, toxic and harmful materials, so as to avoid entanglement and
burning of the brushes.
Keep loose clothing, hair, fingers and other parts of your body away from the
air vent and any moving part of the machine.
Turn off the power if you do not use the machine.
Do NOT use the machine in slopes with an inclination larger than the fixed
value.
Do NOT smoke when charging the battery.
Do NOT use the machine in very dirty places. Repeat the sweeping if there is
too much garbage.
The machine should be stored at a temperature between -10 °C and 40 °C.
The temperature of the working area should be between -10 °C and 40 °C, and
the humidity should be between 30% and 95%.
Do NOT use the machine as a means of transportation.
When the machine is not moving, stop the brushes to avoid damage to the
ground.
In the event of a fire, use a POWDER extinguisher rather than water.

- 3 -
When a failure is produced, make sure that it is NOT due to the lack of regular
maintenance.
If some spare parts need to be replaced, you can purchase them from the
original manufacturer or an authorized distributor.
To make sure that the machine is in the proper operating and safety condition,
the user or service center must abide by what is stated in Chapter III and
Chapter V.
Attention must be paid even when the machine is about to be dismantled and
scrapped. Since some harmful substances (such as batteries, waste oil, etc.)
have met the required standards, they should be sent to a specific center for
treatment.
1.3 Safety requirements for batteries
The battery must NOT be in a low voltage state; charge the battery as soon as
possible when the voltage is below 42 V;
To avoid electric leakage, keep the battery dry and clean;
Do NOT put metallic objects (such as tools) on the battery to prevent it from
being short-circuited and burned;
The charging room should be well ventilated;
When the key switch is in the position “ON”, do NOT install or remove the
battery;
Before installing or removing the battery, disconnect first the negative wire (-)
and then the positive wire (+). When rewiring, pay special attention to the
polarity of the battery, as wrong connection would probably damage electrical
components;
Avoid direct contact between the positive and the negative electrodes, because
it would cause a large current short circuit, high heat or even a fire.
1.4 General safety requirements
In addition to what is mentioned in this manual, the general safety
requirements must also be observed. Even if you have used a similar product
before, we recommend that you read this manual carefully so that you can
save much time as well as take precautions to protect the machine and
yourself. It is vital that you become familiar with all the accessories and
components before turning on the machine. Read our instructions carefully so
that you will not be confused when you get started.
- 4 -
Chapter 2 Operating the machine
2.1 Buttons and pedals of the machine
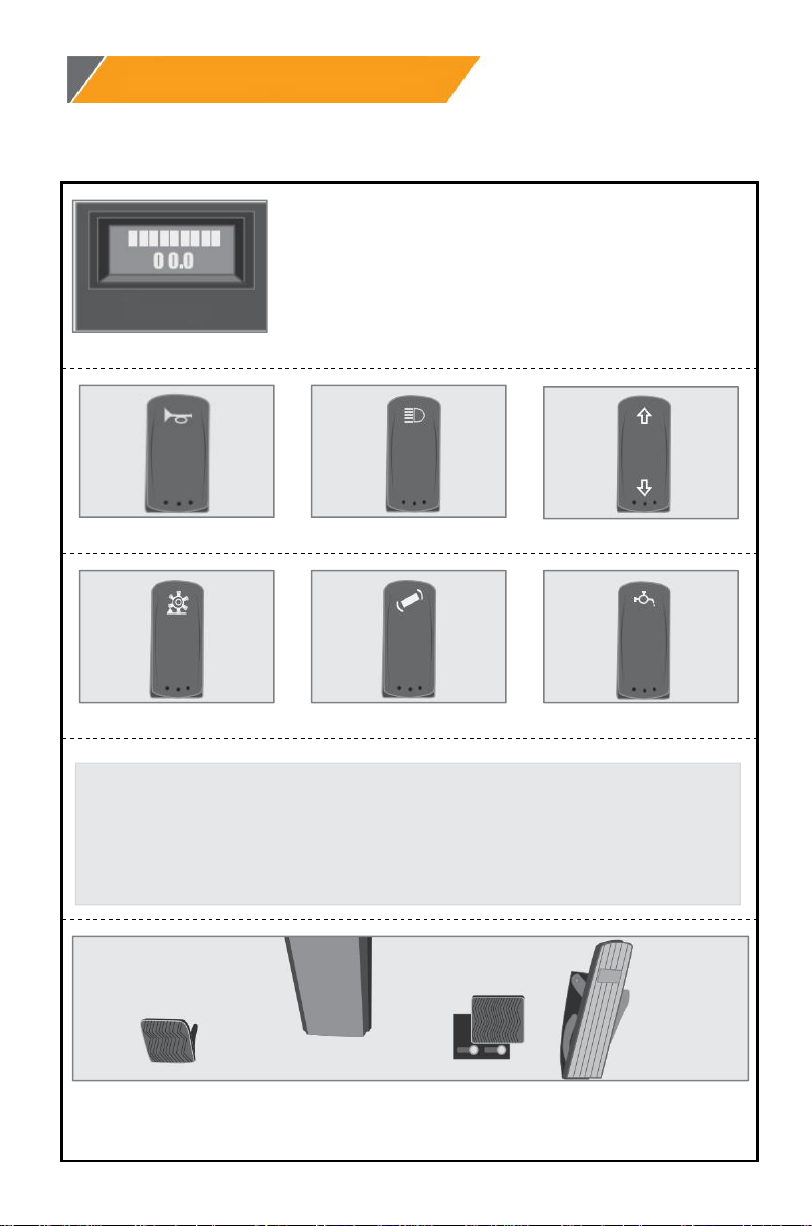
2.1.1 Key controlling buttons of the machine
Voltmeter
Note: when the general switch is turned on, the
current voltage of the machine will be displayed; if
the voltage is lower than 42V, charge the batteries
immediately.
Loudspeaker button
Main light button
Forward/backward button
Sweeping button
Dust-vibrator button
Sprinkler button
Note:
The sweeping button has three gears: the front gear, the middle gear and
the reset gear.
Do NOT use the dust-vibrator button with the sweeping button turned on.
Before turning on the sprinkler button, make sure that the sprinkler valve
is open; when it is turned off, close the valve to prevent splashes.
Large garbage pedal
Brake pedal
Accelerator
pedal
- 5 -
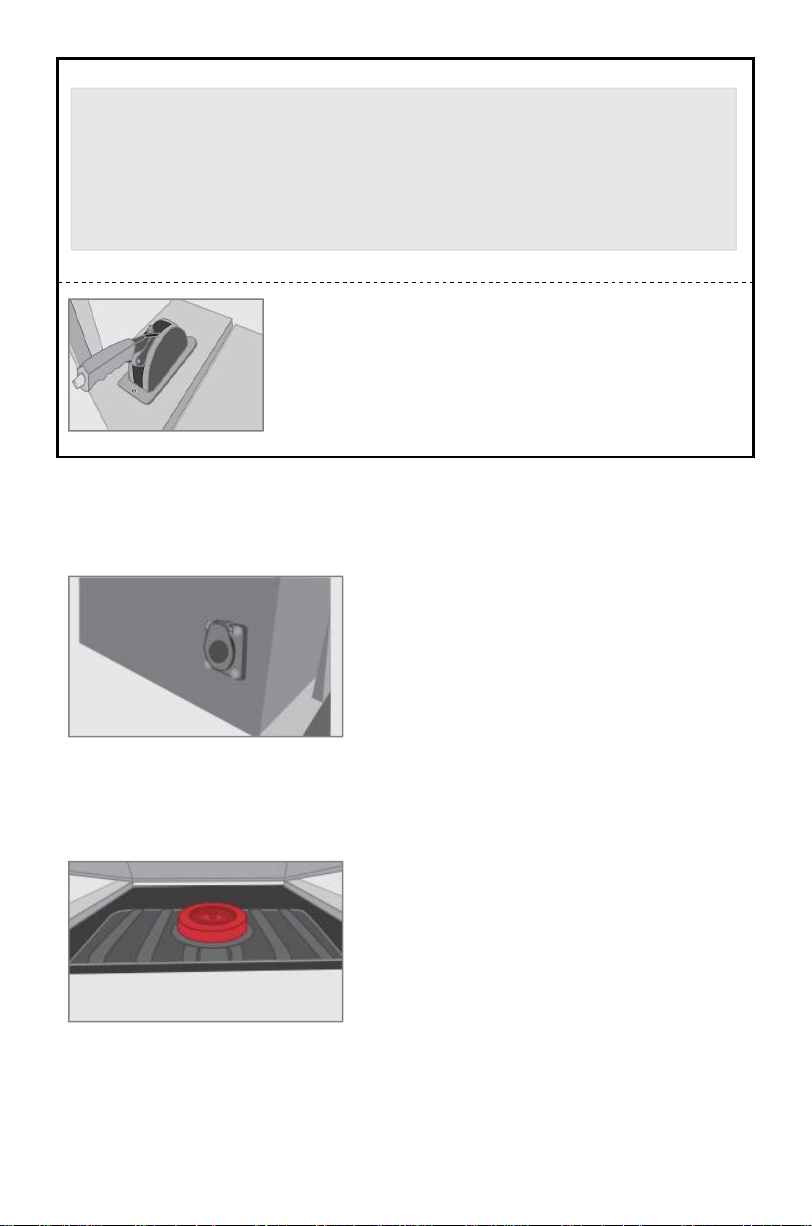
Note:
2.1.2 Charging the batteries
A socket with a minimum diameter of 6 mm is required.
If you need to stop charging the batteries, disconnect directly.
2.1.3 Adding water to the water tank
Before using the machine, add clean water to the clean water tank. Pay
attention to the water quality so that the waterway will not be blocked.
2.2 Operating the machine
2.2.1 Before the operation
Before getting started, make sure that no doors or covers are open and the
The sweeping button has three gears: the front gear, the middle gear and
the reset gear.
The dust-vibrator button can only be used when the sweeping button is
turned off.
Before turning on the sprinkler button, make sure that the sprinkler valve
is open; when it is turned off, close the valve to prevent splashes.
Hand brake: release the hand brake before driving
the machine.

- 6 -
garbage can is correctly closed. If the machine does not work after
transportation, check every part first.
2.2.2 Power display
Insert the start key in the steering wheel console and turn the start switch
clockwise to the "ON" position. The current voltage of the battery will be
displayed in three seconds. If the voltage is lower than 42 V, charge the battery
first.
2.2.3 Starting the machine
Be seated on the driver’s seat.
Step on the brake pedal and turn the start key to the "ON" position.
Move the machine to the work area using the steering wheel and the
forward/backward button.
The moving speed can be adjusted from 0 to the maximum value by pressing
the accelerator pedal.
Press the sweeping button to start work, and use the steering wheel,
accelerator pedal and forward/backward button to move the machine.
The garbage can must be closed during the sweeping work.
The sweeper applies automatic and one-button operation. When the sweeping
button is turned on, all motors (including the main brush motor, side brush
motor, and ventilator motor) will automatically start, and the main brush and
side brushes will automatically descend.
2.2.4 Stopping the machine
Release the accelerator pedal to stop the machine.
Press the stop button and all sweeping functions are stopped, and the main
brush and side brushes are raised.
Turn the start switch to the "OFF" position.
2.3 Cautions
2.3.1 General instructions
When the brushes are rolling, do NOT leave the machine in the same place for
a long time, because this would leave unnecessary marks on the ground.
If you need to remove large light garbage, you can lift the front baffle so that
the garbage can be recycled into the garbage can. Note that when the front
baffle is lifted, the suction efficiency of the machine will be reduced.
In order for the machine to achieve its best cleaning effects, the filter screen

- 7 -
should be vibrated regularly: stop the machine, press the dust-vibrator button
to start the dust-vibrator motor and keep it operating for one minute.
During the work, the filter screen should be vibrated every 30 minute on
average (depending on the working area)
The machine cannot collect garbage when the filter screen is blocked or the
garbage can is filled. Do NOT use the machine on the damp ground to prevent
the filter screen from being damaged.
The garbage can must be discharged every time when the work is finished.
2.3.2 Discharging the garbage can
Release the pedal to stop the machine.
Remove the buckle of the garbage can.
Pull the garbage can downward, drag it out and take out the garbage.
Put the garbage can back in the machine and fasten the buckle.
2.3.3 Push/drag of the machine
Push/drag the machine when it is turned off or when there is a fault.
Make sure that the speed is not greater than 5km/h.
Press the button to the forward gear when moving the machine forward, and
to the backward gear when moving it backward.
2.3.4 Storage of the machine
If the machine is not about to be used within 30 days, please disconnect the
battery and store it in a clean and dry place.

- 8 -
Chapter 3 Regular inspection and replacement of
damaged parts
3.1 Adjustment and replacement of the main brush
Note:
3.1.1 Adjusting the position of the main brush
Note:
Note:
3.1.2 Replacement of the main brush
When the main brush is seriously worn and cannot work normally, please replace
it following the instructions below:
Step 1: remove the L-shaped screw and the rocker arm of the main brush.
Step 2: remove the nuts on the side board of the brush to take out the board.
Step 3: take out the old brush.
Step 4: install the new brush in the reverse order (the direction of the main
brush: the arrow is in the direction of the head of the machine)
Any adjustment must be realized on the flat
ground.
Make sure that the main brush is stopped
and the machine is powered-off.
Check the width of the contact surface with
the ground. The appropriate width range is
2-4 cm.
If the width of the contact surface is not
within this range, adjust the position of the
main brush.
Use the adjusting nuts
on both sides to
adjust the position of
the main brush.
The main brush is capable of sending garbage to the garbage can through its own
rotation.
Attention!
Wear gloves so that your hands will not be hurt.
- 9 -
Step 5: adjust the position of the main brush according to 3.1.1.
Step 1
Step 2
Step 3
Step 4
3.2 Adjustment and replacement of the side brushes
Note:
3.2.1 Adjustment of the side brushes
Note:
Front side brush adjusting screw
Rear side brush adjusting screw
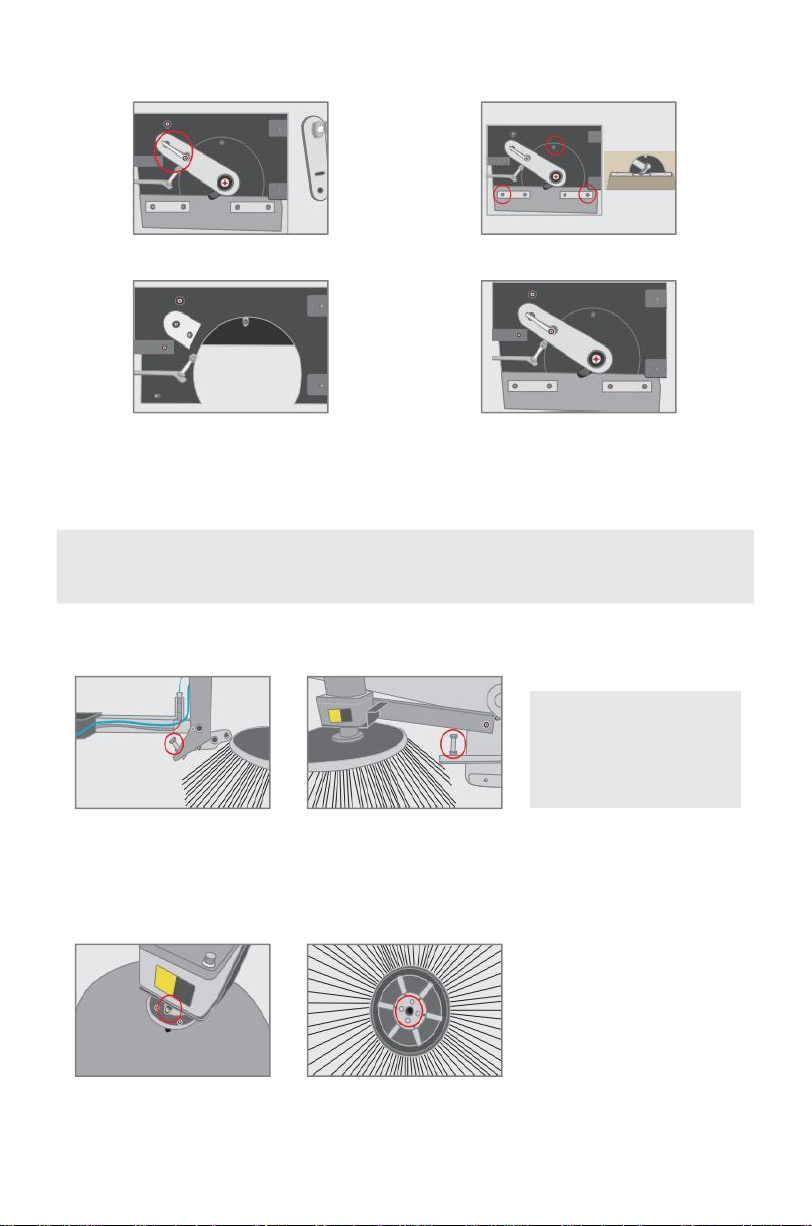
3.2.2 Replacement of the side brushes
Step 1: loosen the
Allen screws of the
side brushes;
Step 2: remove the
screws shown in the
picture and take out
the old brush(es);
Install the new
brush(es) in the
reverse direction.
Step 1
Step 2
The side brushes can sweep out garbage in dead corners so that the cleaning
efficiency of the machine can be boosted.
Use the adjusting nuts
on both sides to
adjust the position of
the side brushes.

- 10 -
3.3 Replacement of the filter element
Note:
Step 1
Step 2
Step 3
Remove the nuts on the panel of the dust-vibrator motor and pull out the
filter element.
Remove the screws inside the filter element and replace the filter element.
Apply lubricating oil to the seal of the new filter element.
Install the filter element in the reverse order.
3.4 Adjustment of the height of the baffles
Note:
Take out the garbage can.
Check if the baffles are complete. When the gap is larger than 20mm or the
crack is larger than 10 mm, replace the corresponding baffle.
Check whether the height of the baffles are between 0~3 mm. If it is not within
this range, adjust the height of the corresponding baffle.
3.5 Replacement of the fuses
When an electrical unit is overloaded or the current is too large, the
corresponding fuse is blown automatically to protect the unit and the machine.
The filter is used to remove dust and small particles. When dust and high-density
garbage such as leaves cannot be cleaned, the filter element needs to be
replaced.
The main function of the baffles is to concentrate the suction force of the
sweeper. If the side and the rear baffles are off the ground, garbage may be
missed during the cleaning.

- 11 -
Chapter 4 Common problems and solutions
Problems
Causes
Solutions
The machine is out of
power
The main fuse is blown
Replace the main fuse
The batteries have no power output
Charge the batteries (Charge the
batteries once a month if the machine
is not going to be used for a long time)
Replace the broken batteries
The machine moves
abnormally
The driving motor
runs well
The chains have fallen
out
Reinstall the chains
The gearbox is broken
Replace the gearbox
The driving motor
runs abnormally
The driving motor is
broken
Replace the driving motor
The driving motor
controller is broken
Replace the driving motor controller
The accelerator panel
is broken
Replace the accelerator panel
The main brush does
not work
The fuse is blown
Replace the fuse
The belt of the main brush is broken
Replace the belt of the main brush
The main brush motor is broken
Replace the main brush motor
The side brushes do not
work.
The fuse is broken
Replace the fuse
The side brush motor is broken
Replace the side brush motor
The brushes do not rise
or fall
The fuse of the pushing rod is blown
Replace the fuse
The relay is broken
Replace the relay
The pushing rod motor is broken
Replace the pushing rod motor
The cleaning effects are
not good
The brushes are worn
Replace the worn brushes
The brushes are entangled
Remove the entanglements
The baffle are worn
Replace the worn baffles
The machines moves too fast
Reduce the speed
The ventilator has a
fault
The ventilator works
Start the dust-vibrating button
The ventilator does not
work
Replace the ventilator
Leaves or large garbage
cannot be cleaned
completely
The brushes are too high
Adjust the height of the brushes
The brushes are entangled
Remove the entanglements
The machines moves too fast
Reduce the speed
Dust or fine ashes
cannot be cleaned
completely
The filter element is blocked
Clean or replace the filter element
The baffles are broken
Replace the broken baffles
The garbage moves
forward
The front baffle is broken
Replace the front baffle
The brushes become
worn very quickly
The brushes are pressed too tightly
Adjust the height of the brushes
The ground is too rough
No solution available
The garbage can leaks
The sealing strip of the garbage can is broken
Replace the sealing strip of the
garbage can
The batteries cannot be
charged
The batteries are broken
Replace the broken batteries
The charger is broken
Replace the charger
The battery connecting cables are loose
Tighten the loose battery connecting
cables
The batteries discharge
too quickly
The batteries are not well charged
Charge the batteries
The batteries are broken
Replace the broken batteries

- 12 -
Chapter 5 Maintenance
Regular maintenance is necessary in order for the machine to be in its best
condition, as well as to extend its service life and ensure the operator’s safety. The
time interval of maintenance can be changed under certain circumstances, but this
must be determined by a professional technician.
When performing maintenance, make sure that the machine is turned off and the
key is removed from the switch.
5.1 Operating conditions
Temperature: -10 °C ~ 40 °C
Relative humidity: 5%~70%
No electricity-conductive and explosive gases or dust are presented
No corrosive gases or vapor are presented
Well ventilated indoor environment
5.2 Maintenance timetable
Items
Upon
receiving
Every
10 h
Every
50 h
Every
100 h
Every
200 h
Every
500 h
Height of the brush plates
Are the brush plates
entangled?
Belt of the main brush
Dust suction motor and
filter element
Baffles
Dust-vibrator motor
Are all nuts and screws
tightened?
Degree of wear of the brake
Degree of wear of the
brushes
Are all the driving chains
tightened?

- 13 -
Chapter 6 After-sale services
6.1 General description
Seven-day guaranteed return, fifteen-day guaranteed replacement, one-year
warranty for the whole machine, 6-month warranty for damaged parts, and no
warranty for consumables (calculated from the next day after receiving the
machine).
The delivery receipt and purchase invoice are certificates for warranty and
must be kept properly.
6.2 Contents of warranty
Category
Contents
Warranty period
The entire
machine
Sheet metal parts, batteries, motors,
controllers, accelerator pedal, relay, charger,
spray gun, high-pressure pump, brake
assembly
1 year
Damaged
parts
Shock attenuator, inner springs, wheels,
nozzles, lights, bearings, universal wheels,
fuses
6 months
Consumables
Side brush, main brush, filter element, baffle,
conveyor belt, sealing strip, high pressure
water pipe
No warranty
6.3 Cases not covered in the warranty
The operator fails to perform maintenance according to the instruction manual,
resulting in damage or failure.
The surface and/or the structure of the machine are obviously damaged due to
improper operation.
Disassembly or modification not approved by the original manufacturer.
Damage due to weather or force majeure.
The warranty is expired or the machine has been used for more than 1,500
hours.

- 14 -
Warranty Card
用户名
User’s name
联系电话
Tel
通讯地址
Address
票据号
Bill No.
购买时间
Date of purchase
机身编号
Serial number
产品型号
Type of product
日期
Date
更换配件:
Accessories to be replaced:
故障描述:
Fault description:

- 15 -
Anhui Chancee Technology Co., Ltd.
Direction: 11 Qiaowan Road, Heifei, Anhui, China
Website: www.chanceeglobal.com
Table of contents
Other CHANCEE Blower manuals


