ChargeArm CA01 User manual
User Manual ChargeArm v.1.0 1
User Manual

User Manual ChargeArm v.1.0 2
Contents
1. CE Declaration of conformity .............................................................................................................. 3
2. Introduction......................................................................................................................................... 4
3. Safety................................................................................................................................................... 5
4. Use....................................................................................................................................................... 7
5. Maintenance ..................................................................................................................................... 12
6. Product specifications ....................................................................................................................... 13
7. Mounting accessories........................................................................................................................ 15
8. Troubleshooting ................................................................................................................................ 16
9. Storage & transport........................................................................................................................... 17
10. Warranty.......................................................................................................................................... 17
11. Notes ............................................................................................................................................... 17

User Manual ChargeArm v.1.0 3
1. CE Declaration of conformity
ChargeArm bv
Zijlweg 76
2013DK Haarlem
The Netherlands
+31235513600
declare under our sole responsibility that the following product
Equipment: ChargeArm
Brand name: ChargeArm
Model/type: CA01
is in conformity with the
Directive 2006/42/EG of the European parliament and the council of 17 May 2006 on
machinery, and amending Directive 95/16/EC.
Haarlem, 21 February 2022
Manufacturer representative:
ChargeArm bv
____________________________
Camille van den Brande

User Manual ChargeArm v.1.0 4
2. Introduction
Congratulations with the purchase of your ChargeArm.
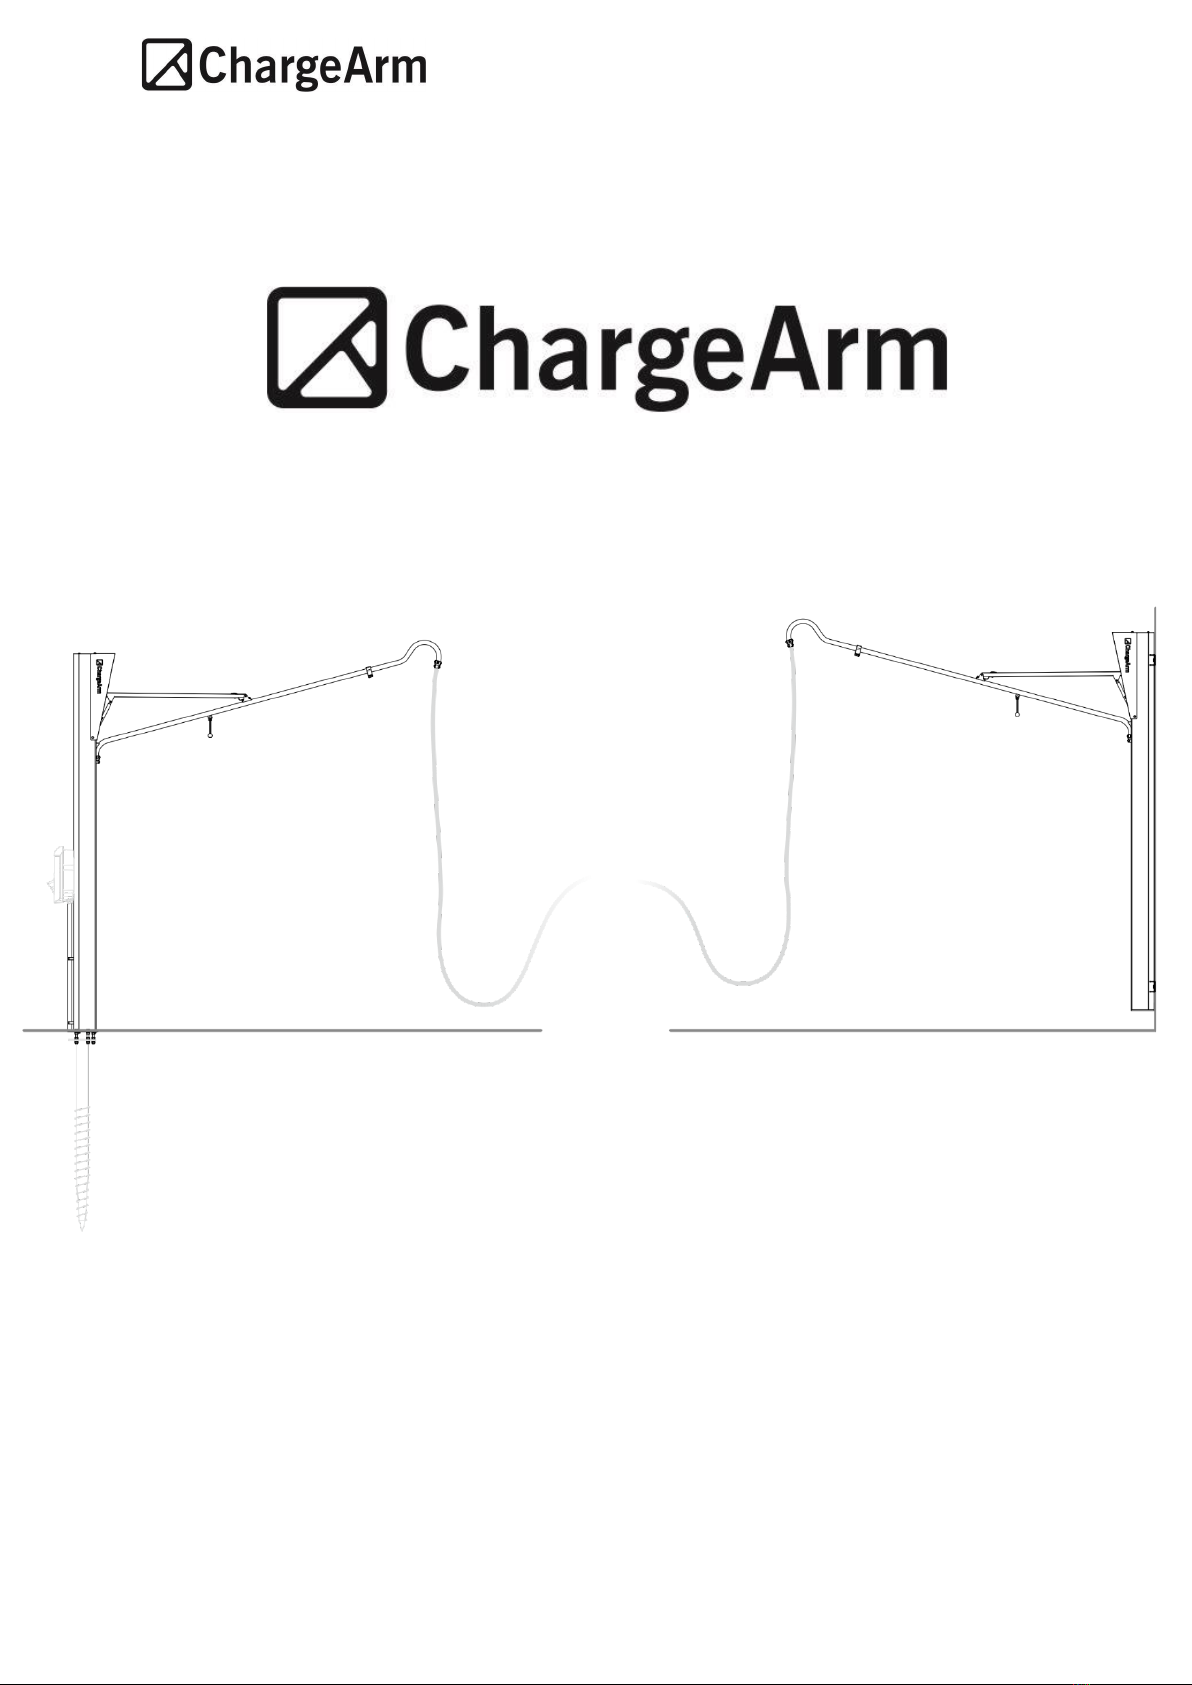
The ChargeArm can be installed as a freestanding or wall mounted retractable arm for your EV
charging cable. This user manual covers both versions of the ChargeArm.
The charge box and charge cable are not included with the ChargeArm. This document only
describes the use of the ChargeArm, not the charge box.
This document is intended for the ChargeArm user. The installation of the ChargeArm must be
executed by a trained professional. The installation is described in the documents: Installation
manual ChargeArm Foundation Screw and Installation Manual ChargeArm Wall Mount .
The ChargeArm is intended to guide your charging cable over an area, such as a pavement, in a
safe and user friendly manner. Should the ChargeArm extend over public domain, please check
with you local authorities if this is permitted.
Your installer is obligated to install the ChargeArm in combination with a charge box and
charging cable in accordance with local legislation. If the installation is not executed according to
the installation manual and local legislation the warranty of the ChargeArm will be deemed null
and void.
ChargeArm b.v. (a Limited company in The Netherlands) is not responsible for any damage that
may occur as a result of incorrect installation or use of the ChargeArm.
The ChargeArm allows for the mounting of many types of charge boxes to the upright of the
ChargeArm in a variety of ways. In this document a specific charge box is mounted to the rear of
freestanding ChargeArm. This configuration is only explanatory and the operation should be
identical for other mounting options.

User Manual ChargeArm v.1.0 5
3. Safety
-Only extend the ChargeArm when charging your vehicle. Do not leave it extended when
not in use.
-Do not extend or retract the arm of the ChargeArm whilst bystanders or objects are
within the movement zone of the ChargeArm.
-Children or inexperienced users should not operate the ChargeArm. When in doubt
block the movement of the ChargeArm with the optional ChargeArm lock (see 7, part
1577.600).
-Always study the user manual before instigating maintenance or repairs to the
ChargeArm.
-Only use components that have been supplied with the ChargeArm for operating the
ChargeArm.
-Do not alter the construction of the ChargeArm and do not use the ChargeArm for
functions other than a retractable EV charging cable arm, for example as a support for a
sun shade.
-Do not temporarily hang objects on the ChargeArm.
-Do not remove or loosen screws or bolts pertaining to the ChargeArm.
-Always extend and retract the ChargeArm in the manner described in chapter 4 so as to
avoid fingers, hands or clothing being trapped in the ChargeArm structure.
-Do not use the ChargeArm when it is damaged.
-While extending the arm, only pull the charge cable gently in the direction of the arm
movement and not sideways. A sideways movement can damage the mechanism or arm
and may lead to dangerous situations.
-When the arm is extended do not pull the cable sideways. This could damage the
mechanism or arm and also lead to dangerous situations.
-Do not try to hang from the ChargeArm or pull the Charging Cable harshly downwards.
-Do not use the ChargeArm during heavy storms, when it is snowing or there is freezing
rain. The formation of ice on the ChargeArm may damage the product or harm the user.
-Unqualified installation, maintenance or operation can damage the ChargeArm or cause
harm. This product has a CE marking attached to it. Do not remove this type plate. State
the information on the type plate when you contact your installer or ChargeArm
specialist.
-Make sure the charging connector is in a holder when not in use. This holder is often
part of the charging box or can be purchased as a separate product.

User Manual ChargeArm v.1.0 6
-Check on a regular basis if greenery is blocking the movement of the arm. Trim away
vegetation if necessary. Do not use a strimmer near the base of the ChargeArm as it may
damage the charging cable.
User Manual ChargeArm v.1.0 7
4. Use
This document describes a freestanding ChargeArm with a charge box mounted to the rear of
the upright. This charge box has a holding position for the charging connector when it is not in
use. The ChargeArm can be installed in multiple ways, such as the wall mounted version, but in
general the manner of use will be the same.
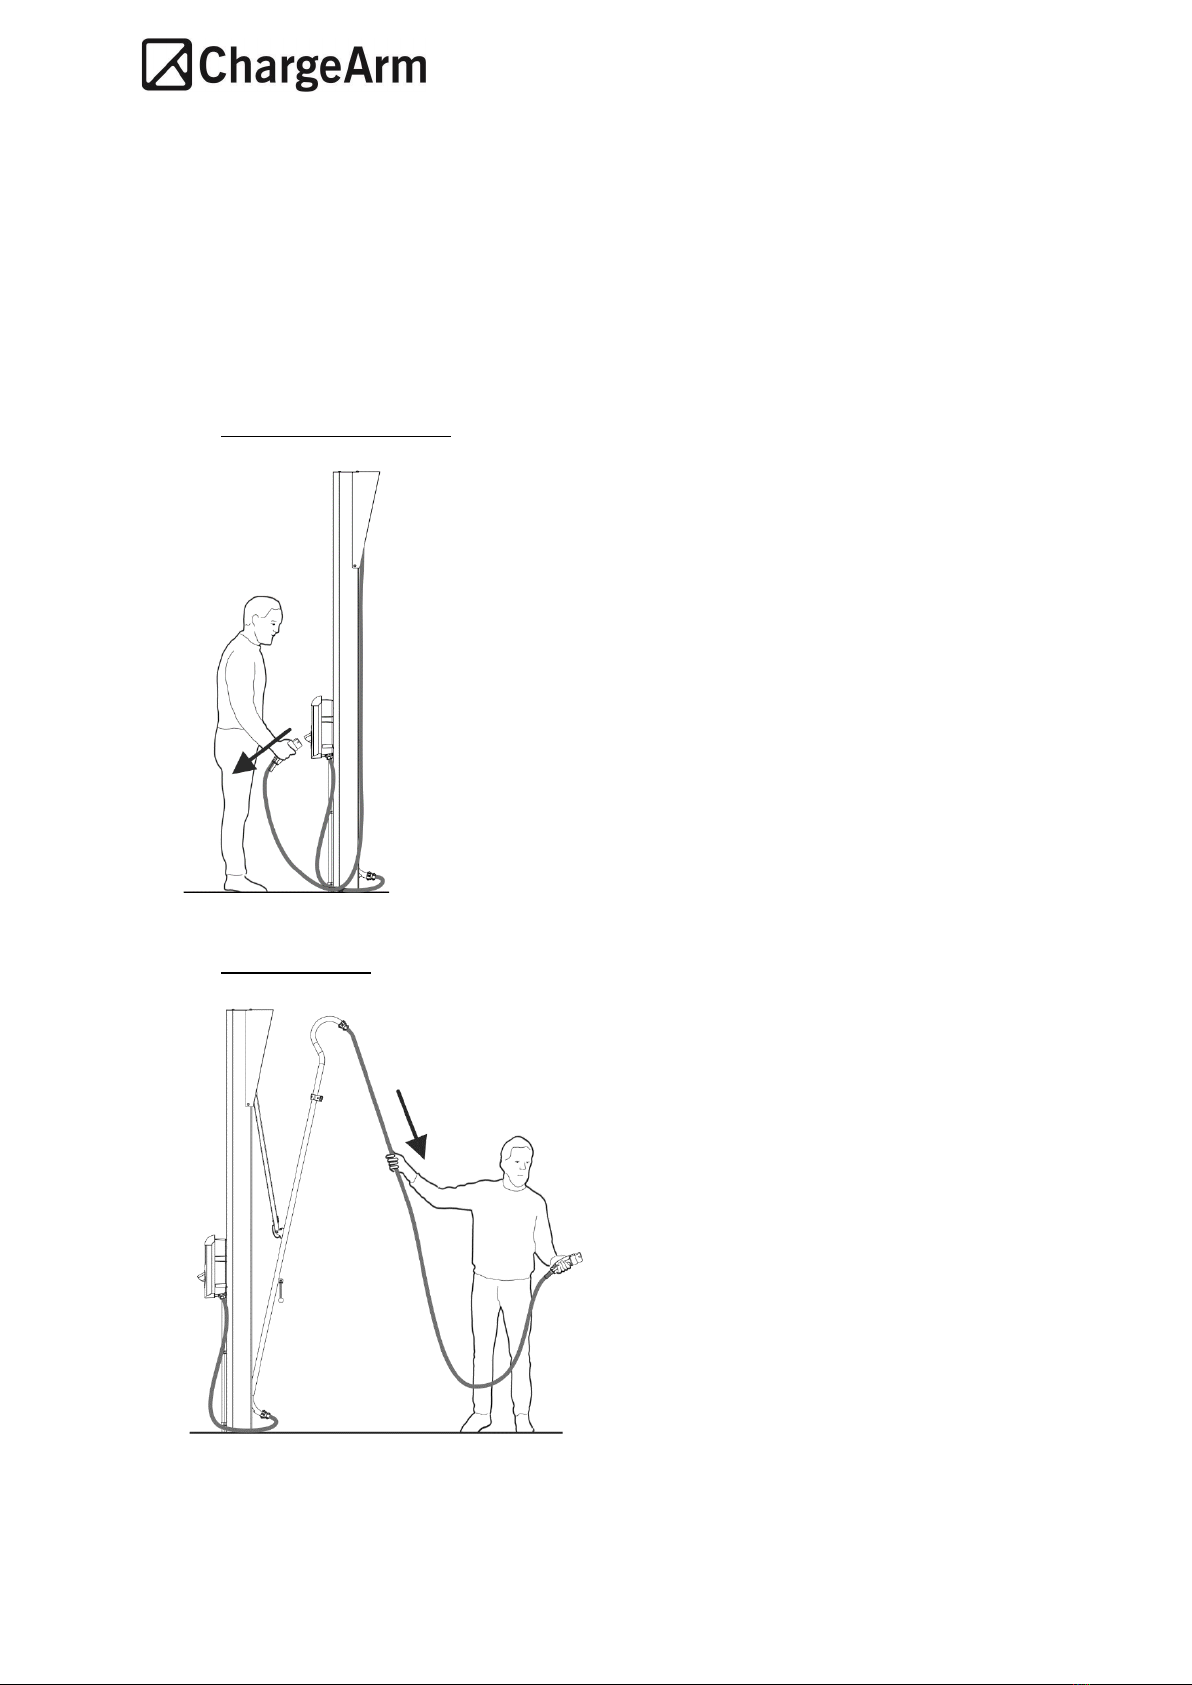
1. Release the Charge cable:
-Depending on your installation this can be from the charge box or
from a separate connector holder mounted somewhere else.
2. Pull out the arm:
-Be careful that no one is standing in
between you and the ChargeArm. (See 3,
Safety of movement zone for the arm)
-Pull the cable gently with one hand whilst
holding the cable connector in your other
hand.

User Manual ChargeArm v.1.0 8
3. Let the arm fly out:
-Pull gently on the charge
cable and let the arm
automatically fly out.
-Make sure no one is standing
in the movement zone of the
arm.
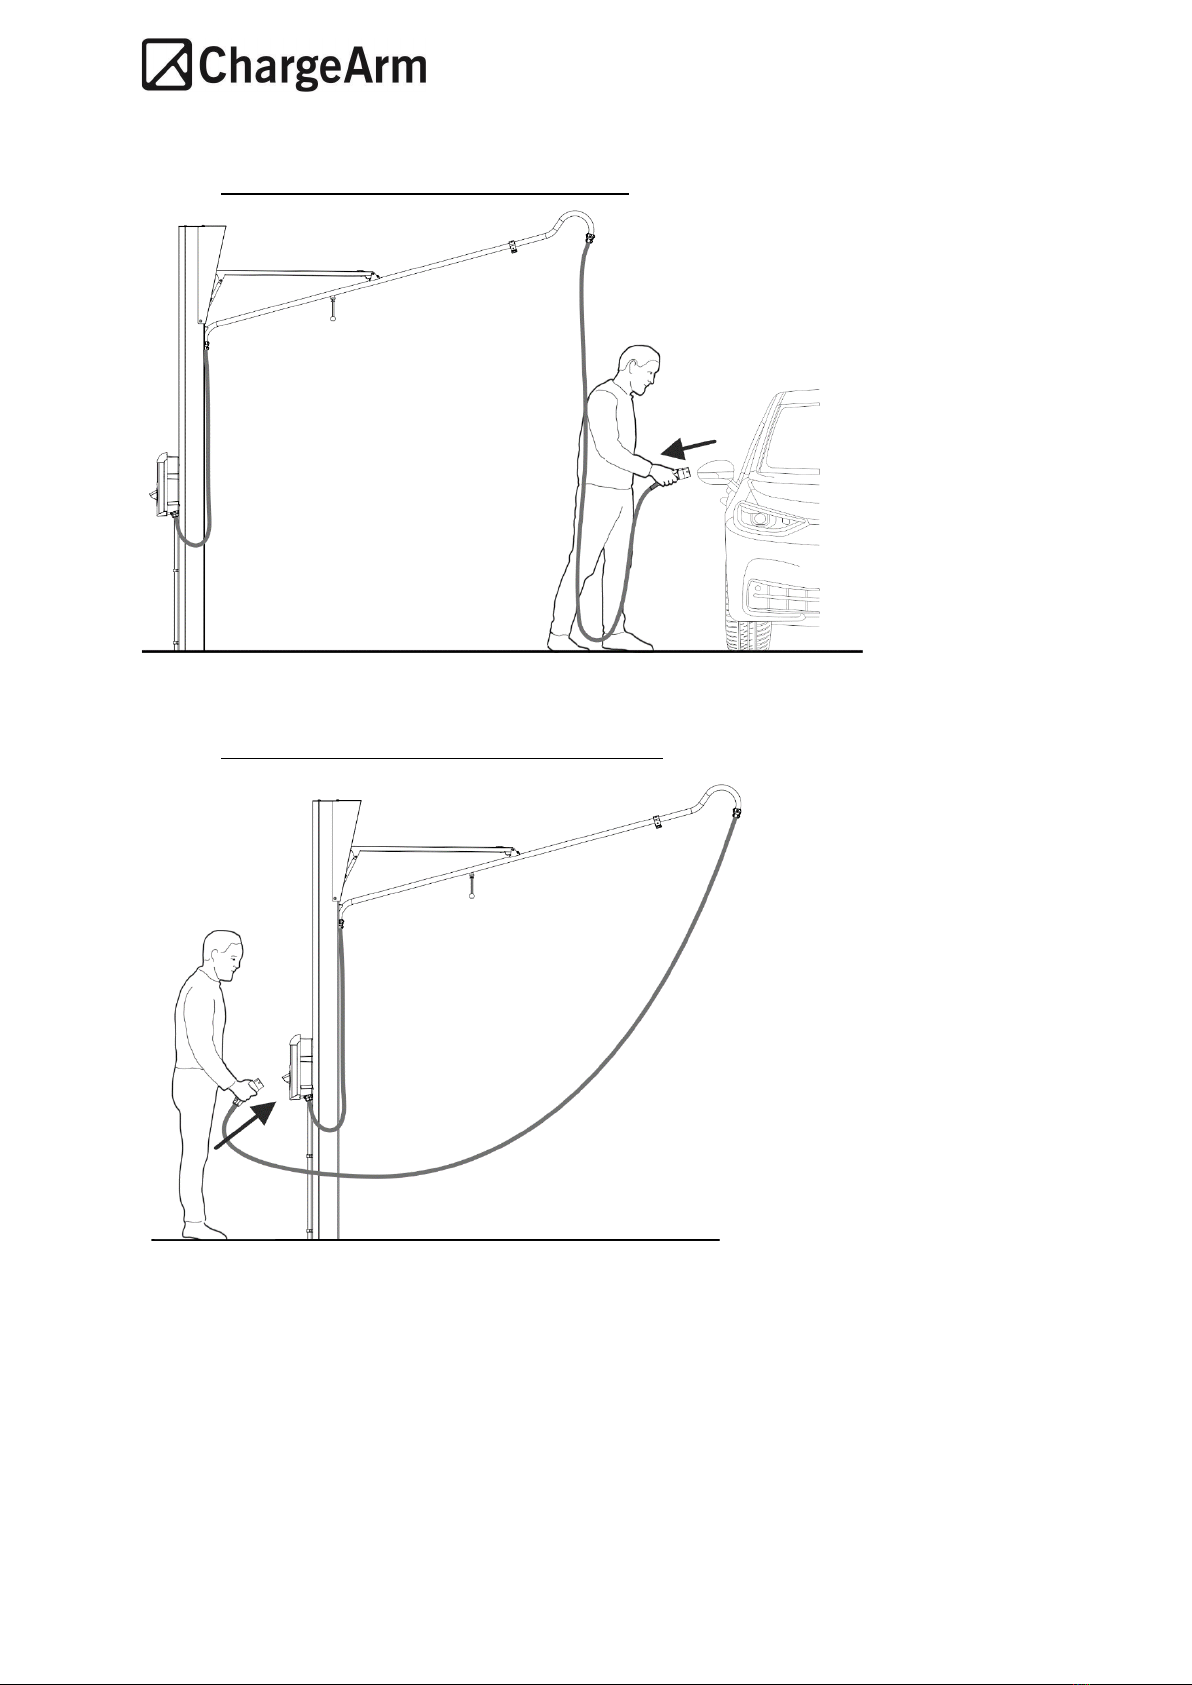
4. Connect the charge cable to the car:
-Follow the
instructions
of your
charge box
and car for
connecting
correctly.
User Manual ChargeArm v.1.0 9
5. After charging, disconnect the charging cable:
-Follow the
procedure as
described in
your car’s
manual.
6. Put the charge cable connector back in its holder:
-Depending on your
installation this can also
be a different holder.

User Manual ChargeArm v.1.0 10
7. Pull down the ChargeArm using the pull cord:
-Make sure no one is
interfering with the
movement of the
arm. (See 3, Safety for
the movement zone
of the arm)
-Start pulling down
the arm using the pull
cord.
8. Move the arm to the fully closed position:
-Whilst still pulling
down on the pull cord
use your other hand
to push the arm
inwards.
-Try to move the arm
in a constant & fluid
movement. If you
stop the gas lift will
push the arm back
outwards.
-Do not grip around
the arm so as to
ensure that your
fingers do not
become trapped in
the mechanism.
User Manual ChargeArm v.1.0 11
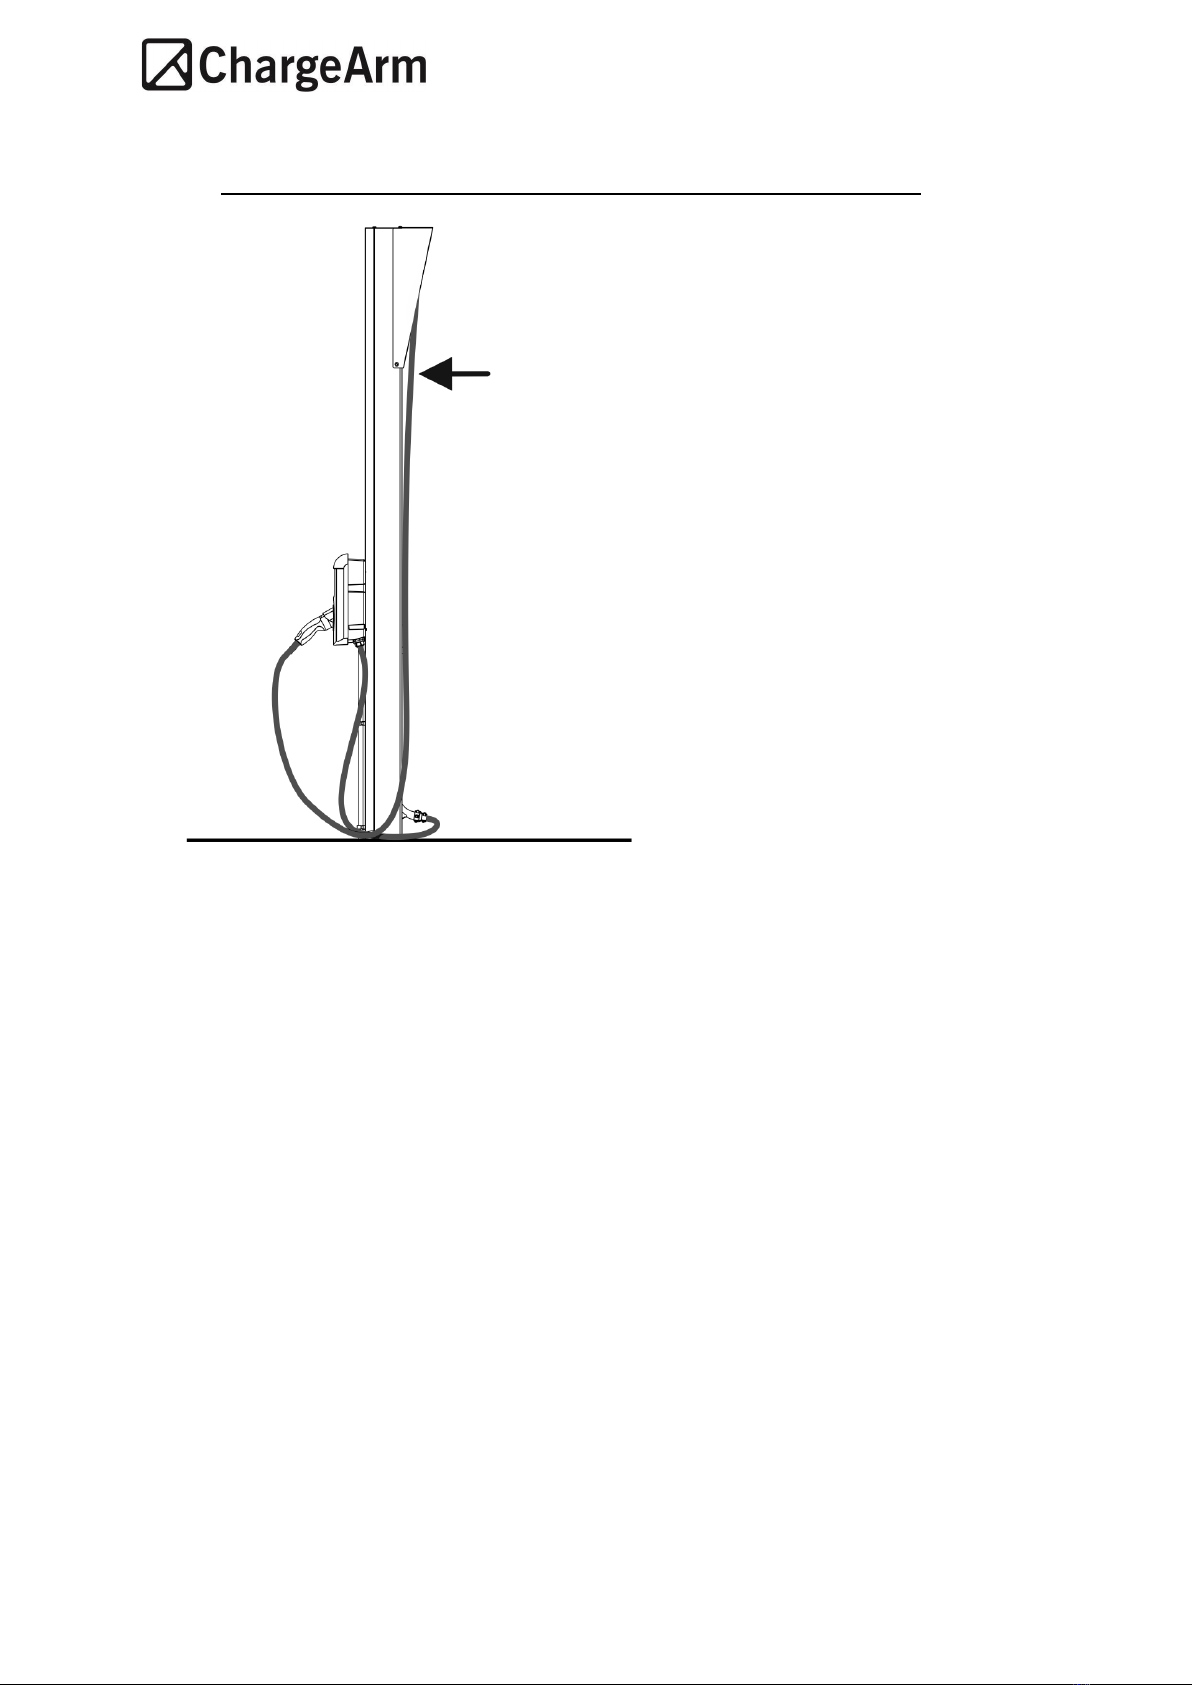
9. Push the cable into the cable clamp to achieve a tidy look for your ChargeArm:
-This feature is only intended to tidy up
the cable. It is recommended however
not doing so will not affect the
operation.

User Manual ChargeArm v.1.0 12
5. Maintenance
-Remove dirt from the base and inside cavity of the ChargeArm upright structure on a regular
basis. This can be done by hand a brush or a portable vacuum cleaner.
-To minimize the amount of dirt accumulating around and within the base of the ChargeArm
it is advised to have fixed paving, a grid or gravel around the base of the ChargeArm.
-The ChargeArm should only be cleaned with wet cloth and mild detergents such as car
shampoo.
-Do not use a jet washer to clean the ChargeArm.
-Verify on a regular basis if the ChargeArm moves freely and fully extends and retracts and
when doing so that no parts are damaged. If the ChargeArm does not achieve the fully
extended position it is possible that the gas lift needs to be replaced. For gas lift
replacement contact your installer. Only a dedicated gas lift may be used which can be
ordered by your installer. Do not use a different type of gas lift as this will alter the
articulation characteristics of the ChargeArm.
-If the gas lift is damaged or has lost its force, do not use the ChargeArm until the gas lift has
been replaced.
-It is advised to replace the gas lift every 5 years.
-Always retract the ChargeArm when heavy storms, snow or freezing rain are forecast. The
formation of ice on the ChargeArm may damage the product or harm the user.
-Make sure the movement of the arm is not obstructed by vegetation or trees.
-Check on a regular basis if the foundation of the ChargeArm is still firm and solid.
-Check on a regular basis whether the strain reliefs are securely in place and fully fastened.
-Check possible wear on the charging cable on a regular basis, in particular near the strain
reliefs on either end of the arm.

User Manual ChargeArm v.1.0 13
6. Product specifications
Freestanding version

User Manual ChargeArm v.1.0 14
Wall mounted version

User Manual ChargeArm v.1.0 15
7. Mounting accessories
During the installation of your ChargeArm it is likely that a choice has already been made for a
charge box and it’s method of mounting. If during the life of the ChargeArm a new charge box
needs to be mounted the following mounting options are available:
It is possible to lock the operation of the ChargeArm with the optional Lock. This will prevent
unwanted extension of the arm.

User Manual ChargeArm v.1.0 16
8. Troubleshooting
The ChargeArm does not extend when pulling the charge cable or the pull cord:
-Check if the optional lock is in use. If so, remove the lock.
-Check if something is blocking the movement of the carriage wheels within the upright
profile. If so, remove the obstruction and try again.
-Check if the arm is deformed. Contact your installer if you notice any deformation.
-Do not use any lubricants in the upright of the ChargeArm. The track wheels inside the arm
are designed to run without any lubrication.
The ChargeArm makes a loud noise when retracting:
-Check if the arm is deformed. Contact your installer if you notice any deformation.
-Do not use any lubricants in the column of the ChargeArm. The track wheels inside the arm
are designed to run without any lubrication.
The ChargeArm does not fully extend or retract:
-Check if something is blocking the movement of the carriage wheels within the upright
profile. If so, remove the obstruction and try again.
-Extend the arm and check if the arm returns to the fully extended position when pulling the
arm down slightly. If it remains static in the new position it is possible that the gas lift is not
functioning properly anymore. Contact your installer for a replacement. The force of the gas
lift is dependent on the ambient temperature. It is normal for the gas lift to be weaker in
very cold weather and stronger in hot weather. The ChargeArm is designed to operate in
ambient temperatures of -20 to 40 °C.

User Manual ChargeArm v.1.0 17
9. Storage & transport
In the case of a complete product replacement the removal of the ChargeArm should be
executed by the installer. For storage and transport the original ChargeArm packaging should be
used to retain any possible warranty conditions.
10. Warranty
For warranty we refer to the installer’s warranty. Excluded from warranty are:
-Damage caused by excessive use of the ChargeArm
-Misuse of the ChargeArm, such as using it as a support for objects not intended to be
attached to the ChargeArm.
-Insufficient maintenance
-Normal wear and tear as a result of normal ChargeArm use
-Discoloration of the materials caused by weather influences
-Damage caused by third parties or abnormal circumstances such as fire and storm damage
11. Notes
THIS DOCUMENT CONTAINS INFORMATION THAT MAY CHANGE WITHOUT PRIOR NOTICE.
The latest version of this document may be downloaded via: https://chargearm.com
You may not copy, reproduce, distribute, transmit, modify, create derivative works, or in any other
way exploit any part of this material without the prior written permission of ChargeArm b.v..
ChargeArm and all ChargeArm product names and slogans are registered trademarks of ChargeArm
b.v..
ChargeArm products may be protected by one or several patents.
All other mentioned products or services are possible registered trademarks from their respective
owners.
Images of the forementioned products in this document are illustrative and may deviate from reality.
© 2022 ChargeArm b.v.. All rights reserved.
Other manuals for CA01
1
Table of contents
Popular Cables And Connectors manuals by other brands


IDEAL Networks
IDEAL Networks LanTEK III MPTL Quick reference guide

Insignia
Insignia NS-SBNC100P9 Quick setup guide

Wieland
Wieland gesis NRG 5+2 Installation instruction

Converters.TV
Converters.TV HDMI v1.3 over CAT6 Distributor Operation manual

TRENDnet
TRENDnet TEW-8000F datasheet

Aikexin
Aikexin DK104 user manual

TRENDnet
TRENDnet TU2-EX12 - datasheet

Code 3
Code 3 Matrix Installation and operation instructions

Illustra
Illustra Pro PTZ Quick reference guide

Festo
Festo NEBC-S1G9-K N-S-S1G9 Series Assembly instructions

TERK Technologies
TERK Technologies BSP-2 Connections & Warranty

Amphenol
Amphenol PL18X-301-70-G95 Assembly manual