Charter Digital Cable User manual

1-888-GET CHARTER | charter.com 1
Charter Digital Cable®
and Charter HD
Easy Install Guide
Your guide to installing and setting
up your Charter HD and Digital Cable
Charter Digital Cable®
and Charter HD Easy Install Guide
1-888-GET CHARTER
(1-888-438-2427)
charter.com
1-888-GET CHARTER | charter.com 1
21-888-GET CHARTER | charter.com
2charter.com
Table of Contents
Safety and Install Tips 1
Installing Charter Digital Cable®2
Your Digital Receiver 2
Connecting Receiver to Stereo TV 3
Connecting Receiver to Stereo TV and VCR 4
Connecting Receiver to Standard TV 5
Connecting Receiver to Standard TV and VCR 6
Activating Digital Receiver 7
Installing Charter HD 8
Your HD Receiver Ports 8
Connecting HD Receiver to HDTV 9
Connecting HD Receiver to HDTV Using Component Cables 10
Connecting HD Receiver to HDTV Using a DVI Cable 11
Connecting HD Receiver to HDTV and VCR 12
Connecting HD Receiver to HDTV and DVD Player 13
Activating HD Receiver 14
Setting Picture Format and Size 15
Using Advanced Services 16
Troubleshooting 17
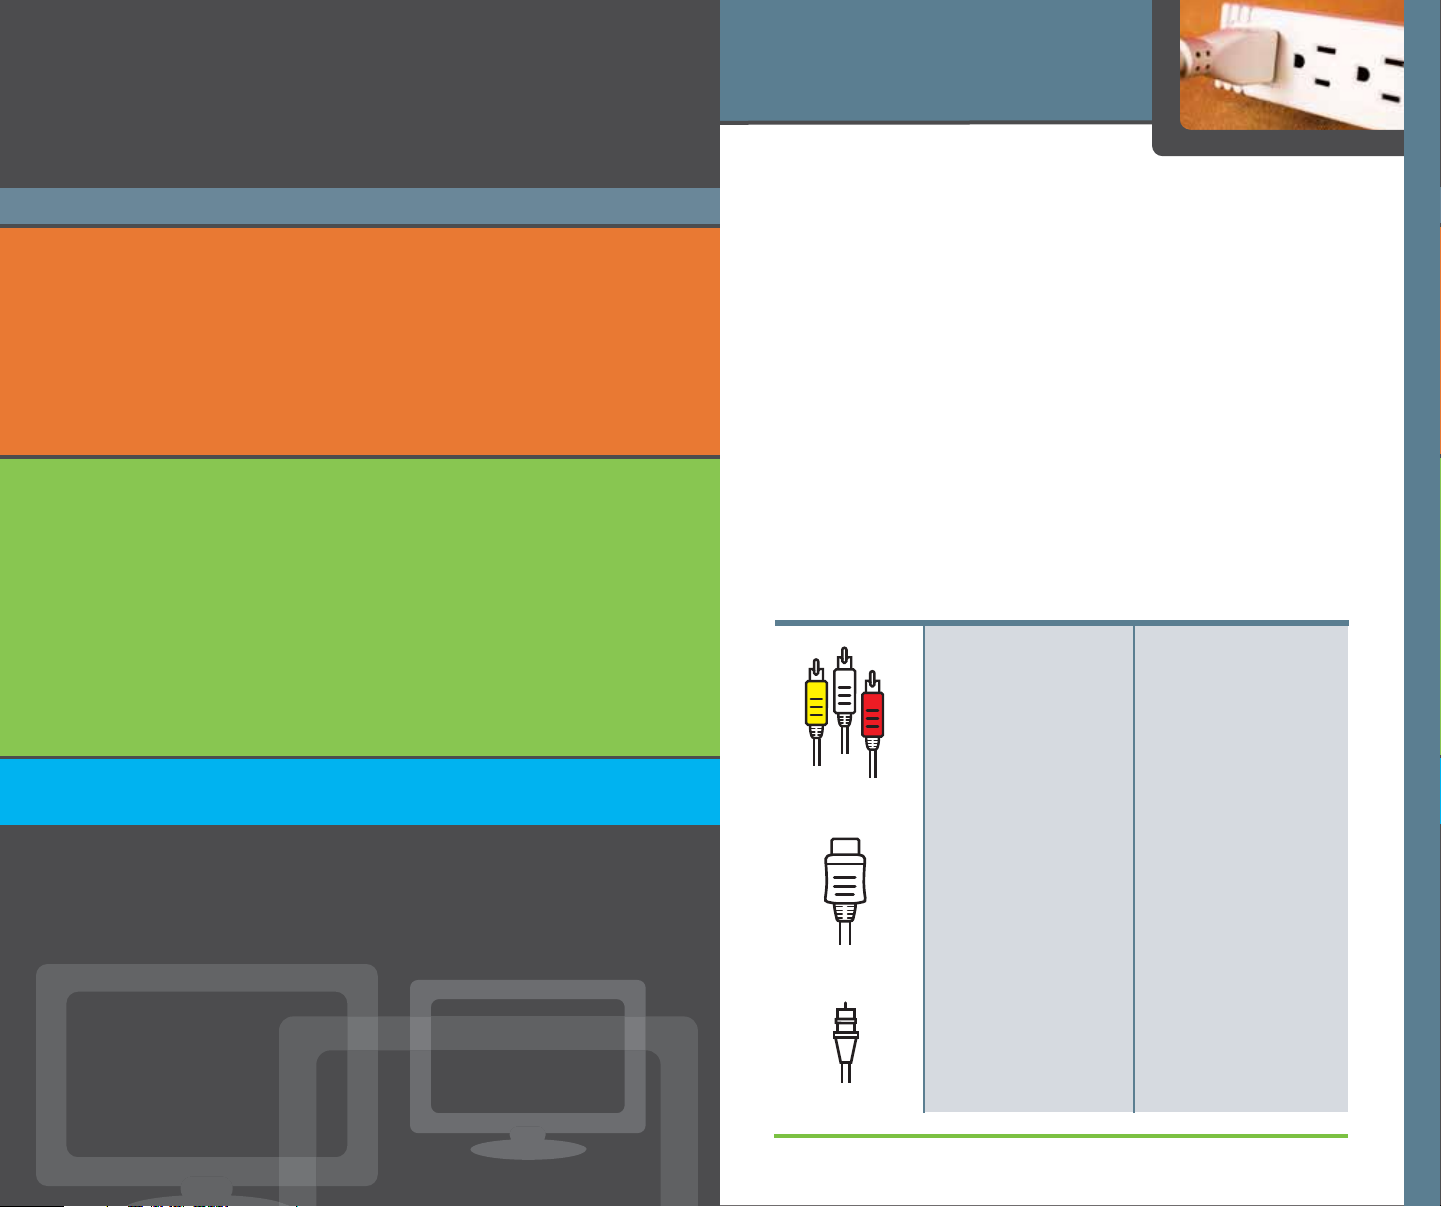
Safety and Install Tips
Safety First:
• Do not plug the receiver into an electrical outlet until AFTER you
have connected it to your Television, the cable wall outlet and
any other devices.
• Arrange the receiver with about 2 inches of space on all sides to
ensure it will properly cool while operating.
• The receiver should not be placed near an external heat source
that could potentially raise the temperature of the unit.
• Do not expose the receiver to moisture; unplug before cleaning
and avoid using liquid or aerosol cleaners.
• Use a surge protector.
Install Tips:
• Connect the receiver directly to the cable wall outlet and double
check that connections between your TV,VCR, DVD, and digital
receiver are secure.
HDMI Cable
RCA/Composite
Cables
Digital Install Kit:
Included with this kit
for easy installation
are RCA/Composite
Cables and a spare
Coaxial cable.
HD Install Kit:
For easy installation,
an HDMI Cable and a
spare Coaxial Cable
are included with this
kit; all other cables are
sold separately.
Depending on your
HDTV and HD Digital
Receiver, you can
connect them for HD
video using one of
three differenttypes
of cables; HDMI,
Component, or DVI.
Step by step directions
for common
connection methods
are included here.
Safety and Install Tips
21-888-GET CHARTER | charter.com 1-888-GET CHARTER | charter.com 3
Installing Charter
Digital Cable®
Your Digital Receiver
The back panel of your Charter Digital Receiver has a
number of different ports for connecting to the wall, your
TV and other devices.The most commonly used ports are
labeled below.
1. S-Video Out: Connects an optional S-Video cable to
send signal to your TV or VCR
2. Digital SPDIF Audio Out: Connects an RCA cable to send a
digital audio signal to a surround-sound receiver or other
digital audio device
3.Video Out: Connects to video input of TV or VCR
4.Audio Out: Connects RCA Cables to send analog audio
signals (left and right) to a stereo receiver or TV with stereo
inputs
5. Cable Out: Connects a coaxial cable to send analog
audio and video signals to a TV or VCR
6. Cable In/RF: Connects to the coaxial cable from the cable
wall outlet
7. AC Outlet: Connects the AC power cord from another
device, such as a TV
8. AC Input: Connects to the AC power cord to deliver
power to the receiver
Installing Charter Digital Cable®
123478
56Cable
Wall Outlet
CABLE
IN/RF
AUDIO
OUT VIDEO
OUT
AUDIO
IN VIDEO
IN
Digital Receiver
Stereo TV
1
23
Electrical
Wall Outlet
4
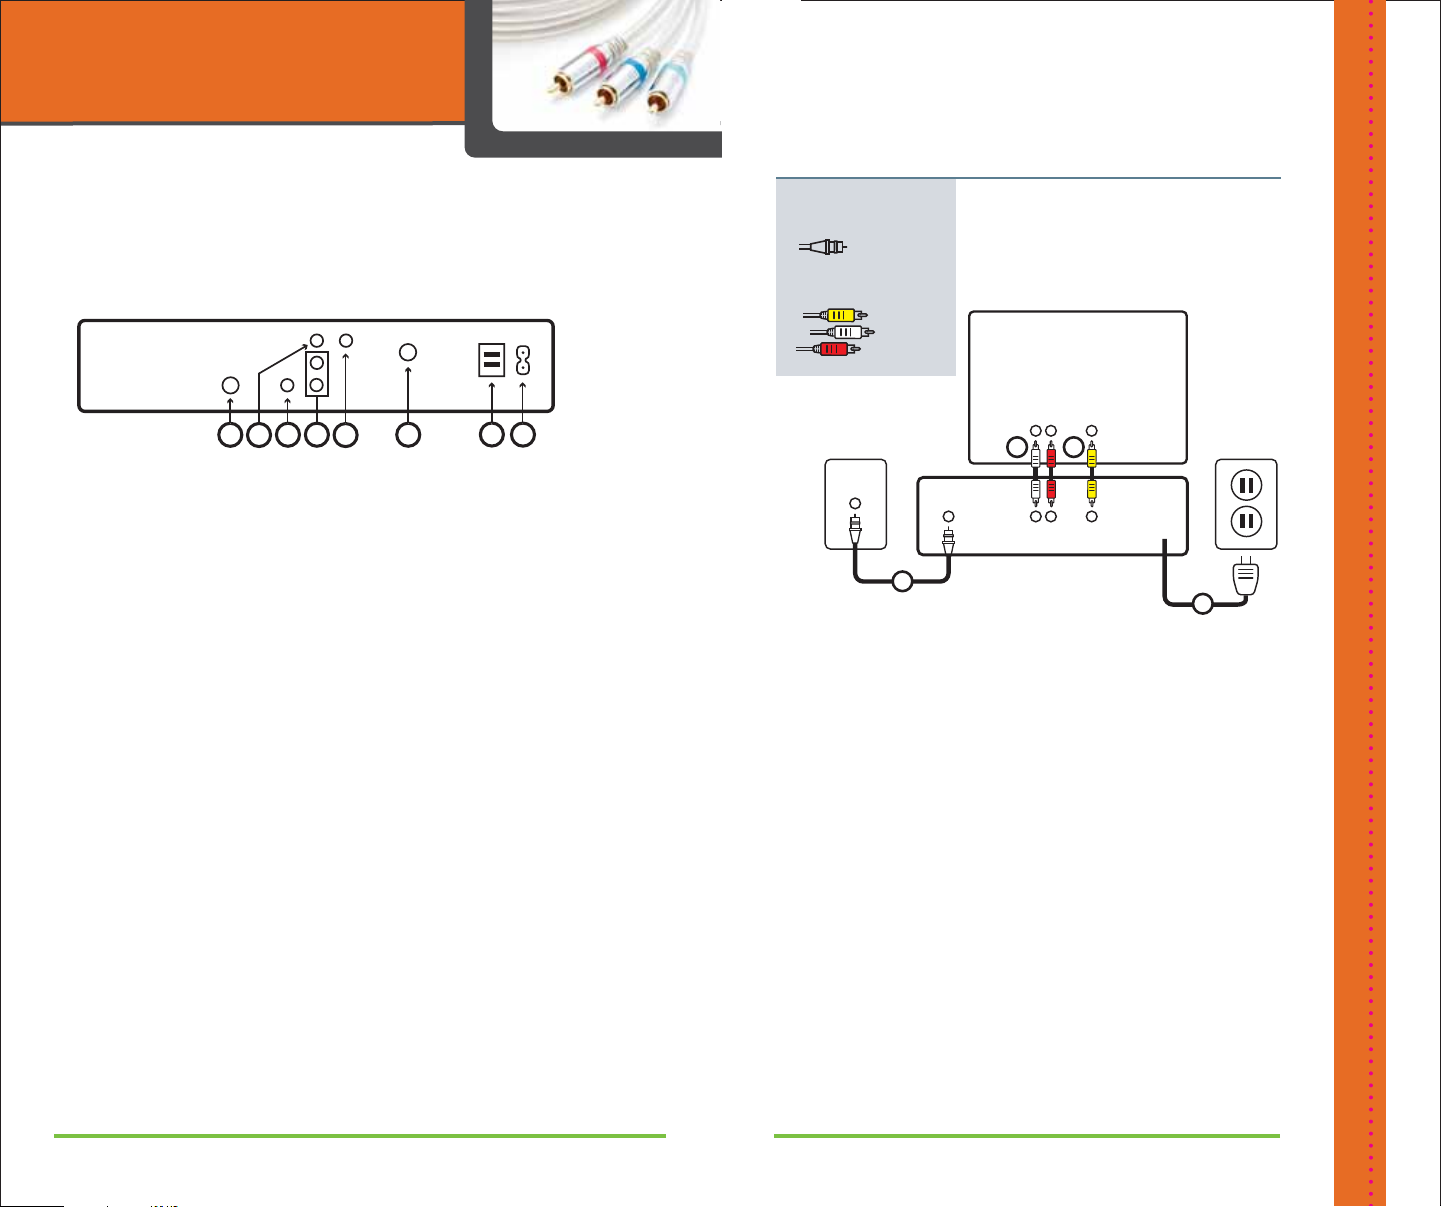
Connecting Receiver to Stereo TV
This simple, easy-to-follow configuration is for entertainment
set-ups that have a TV with built-in stereo audio capability.
You will know this if your TV has red, yellow and white color-
coded audio/video ports on the back.
What you will need:
1 Coax Cable
RCA/Composite
Cables
STEP ONE: Connect the coax cable between the cable
wall outlet and the CABLE IN port on the digital receiver.
STEP TWO: Connect the RCA cables between the AUDIO
OUT R (red) /AUDIO OUT L (white) ports on the digital
receiver with the AUDIO IN R (red)/AUDIO IN L (white)
ports on the TV. Be sure to match the color coded cable
and color-coded ports on the TV and receiver.
STEP THREE: Connect the yellow RCA composite video
cable between the VIDEO OUT (yellow) port on the digital
receiver and the VIDEO IN (yellow) port on the TV.
STEP FOUR: Plug in and turn on devices. Depending on
your TV, you may need to select the input source that
corresponds to the RCA ports you use in this installation.
STEP FIVE: Activate Digital Receiver, refer to instructions on
page 7.
TRIM THIS IS STAIR STEPPED
41-888-GET CHARTER | charter.com 1-888-GET CHARTER | charter.com 5
Connecting Receiver to Standard TV
This configuration is to connect a standard TV to a digital
receiver.
You will need to tune your TV to channel 3 or 4.
What you will need:
2 Coax Cables
STEP ONE: Connect the coax cable between the cable wall
outlet and the CABLE IN port on the digital receiver.
STEP TWO: Connect a coax cable between the CABLE/
ANTENNA IN port on the TV and the CABLE OUT port on the
digital receiver.
STEP THREE: Plug in and turn on devices. Depending on your
TV, you may need to select the input source that corresponds
to the CABLE/ANTENNA IN you use in this installation.
STEP FOUR: Activate Digital Receiver, refer to instructions on
page 7.
Cable
Wall Outlet
CABLE
IN/RF
CABLE/ANTENNA
IN
CABLE
OUT
Digital Receiver
Standard TV
1
Electrical
Wall Outlet
3
2
Note: only one coax cable is
included in kit
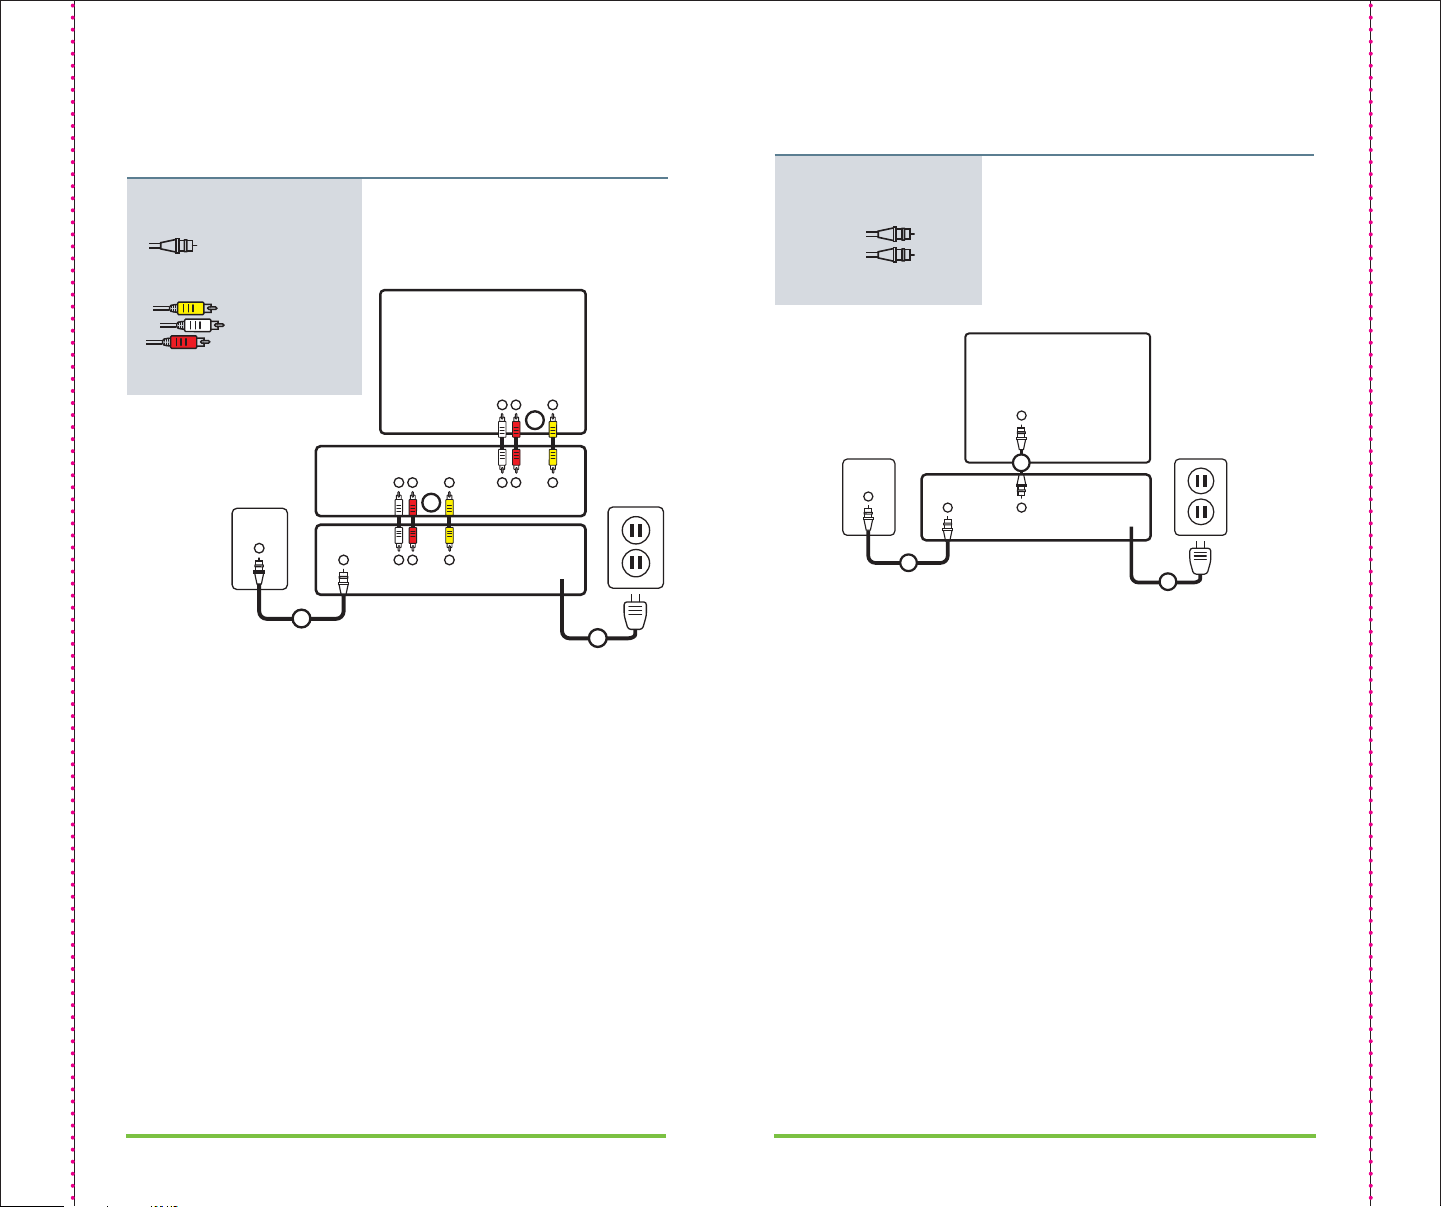
Connecting Receiver to Stereo TV and VCR
This configuration is for entertainment set-ups that have both
a TV and a VCR with built-in stereo audio capability.You will
know this if your TV and VCR have red, yellow and white color-
coded audio/video ports on the back.
What you will need:
Coax Cables
2 Sets
RCA/Composite Cables
STEP ONE: Connect the coax cable between the cable wall
outlet and the CABLE IN port on the digital receiver.
STEP TWO: Connect the RCA cables between the AUDIO OUT
R (red)/AUDIO OUT L (white) ports on the digital receiver with
the AUDIO IN R (red)/AUDIO IN L (white) ports on the VCR.
Connect the yellow RCA video cable between the VIDEO OUT
(yellow) port on the digital receiver and the VIDEO IN (yellow)
port on the VCR.
STEP THREE: Connect the RCA cables between the AUDIO OUT
R (red)/AUDIO OUT L (white) ports on the VCR with the AUDIO
IN R (red)/AUDIO IN L (white) ports on the TV. Connect the
yellow RCA video cable between the VIDEO OUT (yellow) port
on the VCR and the VIDEO IN (yellow) port on the TV.
STEP FOUR: Plug in and turn on devices. Depending on your
TV and VCR, you may need to select the input source that
corresponds to the RCA ports you use in this installation.
STEP FIVE: Activate Digital Receiver, refer to instructions on
page 7.
Cable
Wall Outlet
CABLE
IN/RF
Digital Receiver
Stereo
VCR
Stereo TV
1
Electrical
Wall Outlet
4
AUDIO
OUT VIDEO
OUT
AUDIO
IN VIDEO
IN
AUDIO
OUT VIDEO
OUT
AUDIO
IN VIDEO
IN
2
3
Note: only one RCA/Composite
cable is included in kit

61-888-GET CHARTER | charter.com 1-888-GET CHARTER | charter.com 7
Activating Digital Receiver
After you have installed your hardware, call Charter
Communications to activate your newly self-installed Digital
Receiver!
Customer Directions for IVR use:
1. Call 1-888-GET CHARTER (1-888-438-2427).
2. Enter or verify home phone number if prompted.
3. Main Menu - press 3 for Technical assistance.
4. Option Menu - press 1 to reset your cable TV converter box.
5. Listen to Converter Refresh message.
6. Exit Menu.
The converter refresh should be complete within a few
minutes.The completion process depends on the number
of requests to reset a convert box. In rare cases where a
large number of reset requests are being processed, the
completion time may take up to 30 minutes.
*Please note, you must enter the phone number that is
listed on your account for these directions to work. If you
do not know that information, please follow steps 1-3 and
you will be transferred to an agent that can assist you in
activating your
self-installed HD Digital Receiver.
Call 1-888-GET-CHARTER (1-888-438-2427) or log onto
charter.com for assistance or to schedule a professional
install (standard charges will apply).
Connecting Receiver to Standard TV and VCR
This configuration is to connect a standard TV and VCR to a
digital receiver.You will need to tune your TV to channel 3 or 4.
What you will need:
3 Coax Cables
STEP ONE: Connect the coax cable between the cable wall
outlet and the CABLE IN port on the digital receiver.
STEP TWO: Connect a coax cable between the CABLE OUT
port on the digital receiver and the CABLE/ANTENNA IN port
on the VCR.
STEP THREE: Connect a coax cable between the CABLE/
ANTENNA OUT and the CABLE/ANTENNA IN port on the TV.
STEP FOUR: Plug in and turn on devices. Depending on your
TV and VCR, you may need to select the input source that
corresponds to the CABLE/ANTENNA IN ports you use in this
installation.
STEP FIVE: Activate Digital Receiver, refer to instructions on
page 7.
Cable
Wall Outlet
CABLE
IN CABLE
OUT
CABLE/ANTENNA
IN/RF
CABLE/ANTENNA
OUT
CABLE/ANTENNA
IN
Digital Receiver
VCR
Standard TV
1
2
Electrical
Wall Outlet
4
3
Note: only one coax cable is
included in kit
81-888-GET CHARTER | charter.com 1-888-GET CHARTER | charter.com 9
Installing Charter HD
1
2
Cable
Wall Outlet
Electrical
Wall Outlet
CABLE
IN/RF HDMI
OUT
HDMI
IN
HD Digital Receiver
HDTV
3
Note: included in this kit
Installing Charter HD
Your HD Receiver Ports
The back panel of the HD digital receiver has a number of
different ports for connecting the HD digital receiver to the
wall, your TV and other devices.The HD Digital Receiver you
received may vary in port layout and labeling.
The diagram below describes the most common ports used.
1. Cable In/ RF: Connects to the coaxial cable from the cable
wall outlet.
2. Cable Out: Connects to the coaxial cable from the cable
wall outlet.
3.YPbPr: Connects the digital receiver to the component video
input (YPbPr) on the HDTV. (Green, blue, red connectors)
4. Digital SPDIF Audio Out: Connects an RCA cable to the
digital audio input on a surround sound receiver.
5.Audio Out: Connects RCA cables (left and right) to audio
inputs or to a TV with stereo outputs.
6. Optical SPDIF Audio Output: Connects an optical cable to
send a digital audio signal to a surround sound receiver or
other digital audio device. (optional)
7. S-Video Out: Connects the S-Video cable to your TV or VCR.
(optional)
8. HDMI: Connects an HDMI or DVI cable to the HDMI/DVI port
on an HDTV
9.AC Outlet : Supplies AC power to another device such as a
TV. (optional)
10.AC IN: Connects the power cord for the HD receiver to the
wall outlet.
1
234 7 8
9
10
56
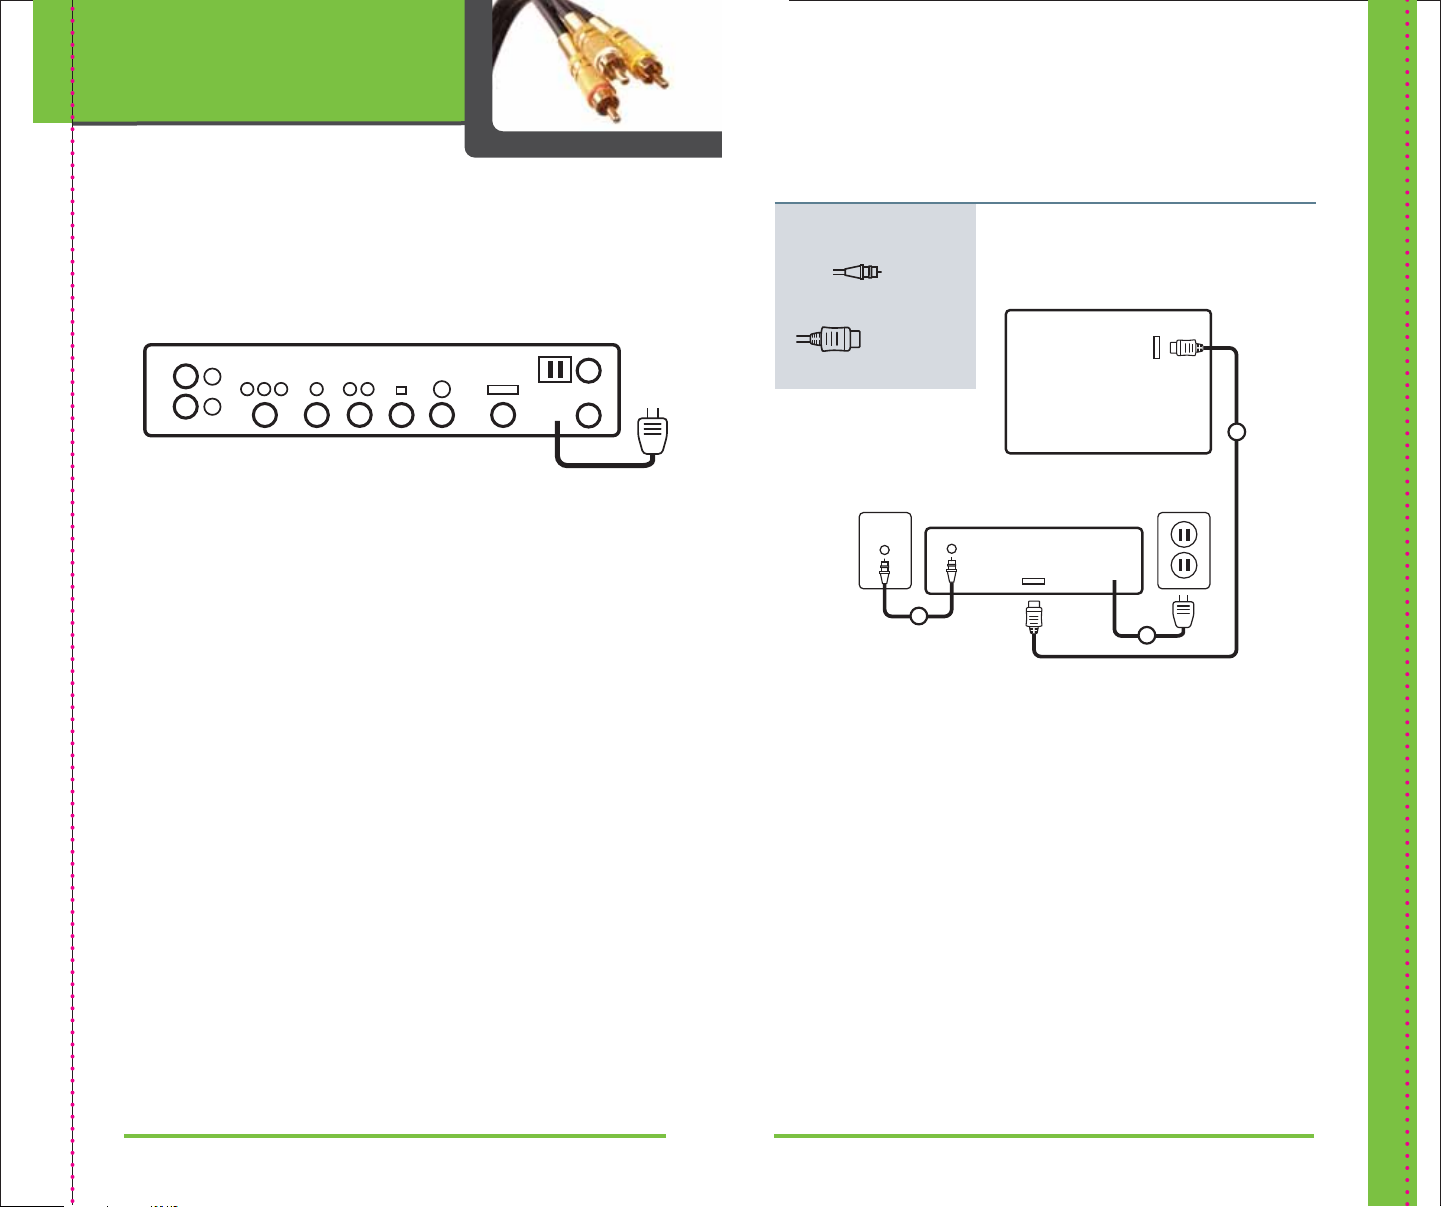
Connecting HD Receiver to HDTV
Follow the simple instructions below to connect your HD
digital receiver to your HDTV using the HDMI cable.The HDMI
cable carries both digital audio and high-definition digital
video signal. (Not all HDTV’s and not all Charter Digital
Receivers have this connection type available).
What you will need:
1 Coax Cable
1 HDMI Cable
STEP ONE: Connect the coax cable between the cable wall
outlet and the CABLE IN port on the HD digital receiver.
STEP TWO: Connect the HDMI cable between the HDMI port
on the HD digital receiver and the HDMI port on the HDTV.
STEP THREE: Plug in and turn on your devices. Select the HDMI
input source on your HDTV. See page 15 to program your HD
picture settings.
STEP FOUR: Activate HD Receiver, refer to instructions on page 14.
TRIM THIS IS STAIR STEPPED
TRIM THIS IS STA IR STEPPED

10 1-888-GET CHARTER | charter.com 1-888-GET CHARTER | charter.com 11
AUDIO
OUT
DVI
OUT
DVI/HDCP
IN
HD Digital Receiver
HDTV
3
AUDIO
IN
2
Cable
Wall Outlet
CABLE
IN/RF
1
Electrical
Wall Outlet
4
Connecting HD Receiver to HDTV Using a DVI Cable
(note: DVI cable sold separately)
This is the configuration you will use if you already have a DVI
connector for your HDTV. (Not all HDTV’s have this connection option.)
What you will need:
1 COAX cable
1 RCA cable
1 DVI cable
STEP ONE: Connect the coax cable between the cable wall outlet
and the CABLE IN/RF port on the HD digital receiver.
STEP TWO: Connect the DVI cable between the DVI port on the
HD digital receiver and the DVI/HDCP IN port on the HDTV.
STEP THREE: Connect the RCA composite cables (red, white)
between the AUDIO OUT R (red)/AUDIO OUT L (white) ports on the
HD digital receiver with the AUDIO IN R (red)/AUDIO IN L (white)
ports on the HDTV.
STEP FOUR: Plug in and turn on your devices. Select the DVI input
source on your HDTV. See page 15 to program your HD picture
settings.
STEP FIVE: Activate HD Receiver, refer to instructions on page 14.
Note: These cables are not
included in this kit
Connecting HD Receiver to HDTV Using Component Cables
(note: Cables sold separately)
This is a common configuration for HDTV’s. Use this configuration
with the component cables (red, blue, green) provided in your
Charter Install Kit
What you will need:
1 COAX cable
1 RCA cable
1 YPbPr
Componant
Cable
STEP ONE: Connect the coax cable between the cable wall outlet
and the CABLE IN/RF port on the HD digital receiver.
STEP TWO: Locate the component cable (Y, Pb, Pr) ports on
the HDTV and the component cable (Y, Pb, Pr) ports on the HD
digital receiver.(Y=green, Pb=blue, Pr=red). Connect the provided
component cable (red, blue green) to the Y, Pb, Pr OUT ports on
the HD digital receiver and the corresponding IN ports on the
HDTV.
STEP THREE: Connect the RCA composite cables (red and white
between the AUDIO OUT R (red)/AUDIO OUT L (white)ports on the
HD digital receiver with the AUDIO IN R (red)/AUDIO IN L (white)
ports on the HDTV.
STEP FOUR: Plug in and turn on your devices. Select the input
source on your HDTV that you used. See page 15 to program your
HD picture settings.
STEP FIVE: Activate HD Receiver, refer to instructions on page 14.
AUDIO
OUT
VIDEO Y/V
OUT
HD 1
IN
HD Digital Receiver
HDTV
3
AUDIO
IN
2
Cable
Wall Outlet
CABLE
IN/RF
1
Electrical
Wall Outlet
4
Note:These cables are not
included in this kit

12 1-888-GET CHARTER | charter.com 1-888-GET CHARTER | charter.com 13
Cable
Wall Outlet
CABLE
IN/RF
AUDIO
OUT VIDEO
OUT
AUDIO
IN #2 VIDEO
IN #2
HD Digital Receiver
DVD
HDTV
1
3
Electrical
Wall Outlet
HDMI
OUT
HDMI
IN
2
Connecting HD Receiver to HDTV and DVD Player
If you have a DVD player with your HDTV, connect it directly to the
HDTV as indicated below.
STEP ONE: Connect the coax cable between the cable wall
outlet and the CABLE IN/RF port on the HD digital receiver.
STEP TWO: Connect the HDMI cable between the HDMI port on
the HD digital receiver and the HDMI port on the HDTV *If your
HDTV supports a 2nd HDMI connection, and your DVD player has
an HDMI connection, then use a 2nd HDMI cable to connect the
two devices (cable not supplied by Charter).
STEP THREE: Connect RCA audio (red and white) cables
between the AUDIO OUT R (red)/ AUDIO OUT L (white) ports on
the DVD player with the AUDIO IN R (red)/AUDIO IN L (white)
ports on the HDTV.Then connect the RCA video cable (yellow)
between the VIDEO OUT (yellow) port on the DVD player and the
VIDEO IN port on the HDTV
STEP FOUR: Plug in and turn on your devices. Select the input
source on your HDTV that corresponds with the ports you used
on the back of the HDTV.
STEP FIVE: Activate HD Receiver, refer to instructions on page 14.
What you will need:
Coax Cable
RCA/Composite Cables
HDMI Cable
Note: Not all cables are
included in this kit
Cable
Wall Outlet
CABLE
IN/RF
HDMI
OUT
AUDIO
OUT VIDEO
OUT
AUDIO
IN VIDEO
IN
HD Digital Receiver
VCR
HDTV
1
3
AUDIO
OUT VIDEO
OUT
AUDIO
IN VIDEO
IN
4
Electrical
Wall Outlet
5
HDMI
IN
2
Connecting HD Receiver to HDTV and VCR
This configuration will allow you to watch both high-definition and
standard definition video on your HDTV as well as record and play
standard-definition video through your VCR. For this configuration,
your VCR may need to be turned on.
STEP ONE: Connect the coax cable between the cable wall
outlet and the CABLE IN/RF port on the HD digital receiver.
STEP TWO: Connect the HDMI cable between the HDMI port on
the HD Digital Receiver and the HDMI port on the HDTV
STEP THREE: (Connect the VCR to your HDTV) Connect a set of RCA
composite cables between the AUDIO OUT R (red)/ AUDIO OUT L
(white) ports on the VCR with the AUDIO IN R (red)/AUDIO IN L (white)
ports on the HDTV.Then use the yellow RCA composite cable to
connect the VIDEO OUT port on the VCR with the VIDEO IN (yellow)
port on the HDTV.
STEP FOUR: Take the audio left/right (output) from the Digital
Receiver and connect it to the audio left/right input of the VCR. Take
the yellow video output from the Digital Receiver to the yellow video
input of the VCR.
STEP FIVE: Plug in and turn on your devices. Select the input
source on your HDTV that corresponds with the ports you used
on the back of the HDTV.
STEP SIX: Activate HD Receiver, refer to instructions on page 14.
What you will need:
Coax Cable
2 RCA/Composite Cables
HDMI Cable
Note: only one RCA/Composite
cable is included in kit
Note: Not all cables are
included in this kit

14 1-888-GET CHARTER | charter.com 1-888-GET CHARTER | charter.com 15
Standard Screen HDTV’s
480p or 480i standard in full screen
Wide Screen HDTV’s
480p or 480i standard in full screen /
pillar box display
720p or 1080i wide in letterbox
format
720p or 1080i wide in full screen
Setting Picture Format and Size
Please refer to your TV manual to set picture format and size.
Picture formats / Picture sizes
Activating HD Receiver
After you have installed your hardware, call Charter Communications
to activate your newly self-installed HD Digital Receiver!
Customer Directions for IVR use:
1. Call 1-888-GET-CHARTER (1-888-438-2427).
2. Enter or verify home phone number if prompted.
3. Main Menu - press 3 for Technical assistance.
4. Option Menu - press 1 to reset your cable TV converter box.
5. Listen to Converter Refresh message.
6. Exit Menu.
The converter refresh should be complete within a few minutes.The
completion process depends on the number of requests to reset a
convert box. In rare cases where a large number of reset requests
are being processed, the completion time may take up to 30
minutes.
*Please note, you must enter the phone number that is listed
on your account for these directions to work. If you do not
know that information, please follow steps 1-3 and you will
be transferred to an agent that can assist you in activating
yourself installed HD Digital Receiver.
16 1-888-GET CHARTER | charter.com 1-888-GET CHARTER | charter.com 17
Using Advanced Services:
On Demand and DVR
Charter On Demand
Charter On Demand connects you to tons of great shows
whenever you’re ready to watch, In areas where On Demand
is available, Charter Digital Cable customers have automatic
access to On Demand as part of their subscription! There’s always
something good on Charter On Demand, with thousands of
movies and shows that start whenever you want — and many
available for FREE! Plus, you get the power to start, pause, rewind
and fast-forward your entertainment without a VCR or DVD player.
Just use the arrow keys on your remote to control your show.
How to use On Demand
Using Charter On Demand is easy, just grab your remote and
follow these easy steps!
1. Go to Channel 1
2. Select a category
3. Choose a movie or program
4. Confirm your choice and enjoy
Have questions about your Charter services?
Check out the Help and Services Videos On Demand!
Go to Channel 1 > Choose Help & Services
Charter DVR®
Pause, rewind and record live TV with Charter Digital Video
Recorder so you can watch what you want, when you want.
• Watch two programs while watching a third recorded show
• Record movies, themes or entire seasons of your favorite shows
• Easy to use with just a click of the remote
• No equipment to buy
• HD Ready so you can record your favorite HD programming
Bring Your Home to Life with The Charter Bundle™!
Get more, save more on great TV entertainment for the whole family,
blazing-fast Internet and unlimited local and long distance calling.
The more services you get, the more you save! Contact us today to
find out the best offer in your area for The Charter Bundle!
Services not available in all areas.
Troubleshooting
No sound
• Press MUTE on the remote control to restore the volume level.
• Check that the receiver is set to the proper input source.
• Turn your VCR on.
No picture
• Check to be sure that all cables are connected properly and
firmly secured and then hand-tighten if necessary.
• If you are watching TV using your VCR, be sure your VCR is on.
• For HD Receivers connected with composite cables, be sure your
cables are not crossed.Y goes to Y, Pb to Pb and Pr to Pr.
• Ensure that the proper video display format for your TV has been
selected (HD RECEIVER ONLY).
• For receivers connected with RCA/Composite Cables, be sure
cables are not crossed; red to red, white to white and yellow to yellow
Picture or sound is noisy on one channel
• Reconnect the cables and hand-tighten if loose.
Sound from only one stereo speaker
• Hand-tighten or reconnect the cables.
• Check to make sure wires are not frayed and plugs are not bent
or broken.
No power
• Reconnect the power cord.
• Check to make sure the receiver is plugged into an active outlet.
Remote control does not work
• Press CABLE on the remote control.
• Be sure nothing is blocking a clear line of sight between the
receiver and the remote control.
• Change the batteries in your remote control.
Poor audio quality
• Use the remote control to set the receiver volume level to
approximately 75% of maximum volume level and then adjust
the audio levels on the external devices.
Interactive Program Guide Not Available
• Allow up to an hour after connecting your digital receiver for the
Interactive Program Guide to download
For additional troubleshooting information go to charter.com/support
Using Advanced Services / Troubleshooting
TRIM THIS IS STA IR STEPPED

1-888-GET CHARTER
(1-888-438-2427)
charter.com
© 2008 Charter Communications, Inc. All rights reserved.
This manual suits for next models
1
Table of contents
Popular Cables And Connectors manuals by other brands


Tripp Lite
Tripp Lite N320-21M Specification sheet

Larson Electronics
Larson Electronics 10-50C instruction manual

Volkswagen
Volkswagen VAS 6558A operating manual

molex
molex Milli-Grid Dual row 87568 Series operating instructions

OUNEVA
OUNEVA OJL 200 installation guide

MuxLab
MuxLab 500041-WP-US Quick installation guide