Chauvet Professional Net-X User manual


Edition Notes
The Net-X User Manual Rev. 4 includes a description, safety precautions, and installation,
programming, operation, and maintenance instructions for the Net-X as of the release date of
this edition in January 2016.
Trademarks
CHAUVET, the Chauvet logo and Net-X are registered trademarks or trademarks of Chauvet
& Sons Inc. (d/b/a Chauvet and Chauvet Lighting) in the United States and other countries.
Other company and product names and logos referred to herein may be trademarks of their
respective companies.
Copyright Notice
The works of authorship contained in this manual, including, but not limited to, all design, text
and images are owned by Chauvet.
© Copyright 2016 Chauvet & Sons, Inc. All rights reserved.
Electronically published by Chauvet in the United States of America.
Manual Use
Chauvet authorizes its customers to download and print this manual for professional
information purposes only. Chauvet expressly prohibits the usage, copy, storage, distribution,
modification, or printing of this manual or its content for any other purpose without written
consent from Chauvet.
Document Printing
For better results, print this document in color, on letter size paper (8.5 x 11 in), double-sided.
If using A4 paper (210 x 297 mm), configure your printer to scale the content accordingly.
Intended Audience
Any person in charge of installing, operating, and/or maintaining this product should
completely read through this manual before installing, operating, or maintaining this product.
Disclaimer
Chauvet believes that the information contained in this manual is accurate in all respects.
However, Chauvet assumes no responsibility and specifically disclaims any and all liability to
any party for any loss, damage or disruption caused by any errors or omissions in this
document, whether such errors or omissions result from negligence, accident or any other
cause. Chauvet reserves the right to revise the content of this document without any
obligation to notify any person or company of such revision, however, Chauvet has no
obligation to make, and does not commit to make, any such revisions.
Document Revision
The Net-X User Manual Rev. 4 supersedes all previous versions of this manual. Discard any
older versions of this manual and replace with this version. Go to
www.chauvetprofessional.com for the latest version.

TABLE OF CONTENTS
Before You Begin............................................................................................................................41.What Is Included................................................................................................................................................4
Unpacking .........................................................................................................................................................4
Claims ............................................................................................................................................................................4
Conventions ......................................................................................................................................................4
Symbols.............................................................................................................................................................4
Safety Notes......................................................................................................................................................5
Introduction .....................................................................................................................................62.Product Description...........................................................................................................................................6
Product Features...............................................................................................................................................6
Additional Products ...........................................................................................................................................6
Product Overview..............................................................................................................................................6
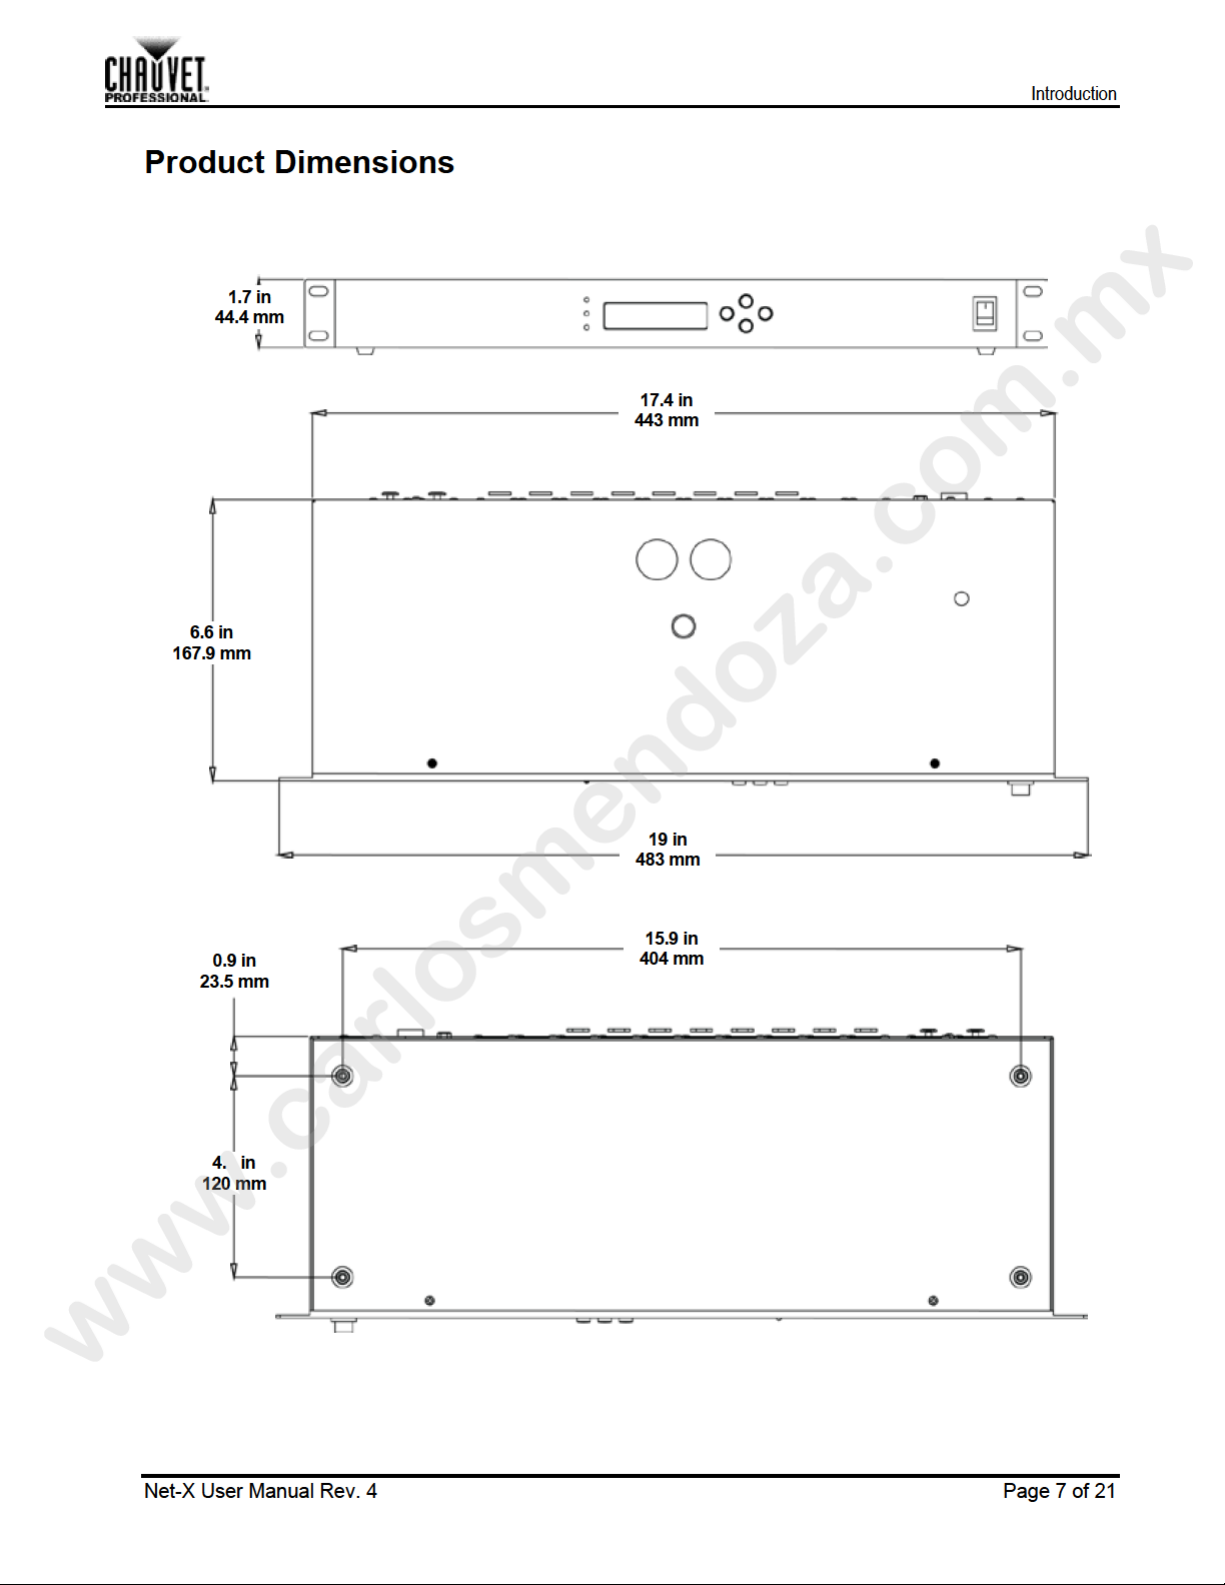
Product Dimensions..........................................................................................................................................7
Setup And Installation....................................................................................................................83.AC Power ..........................................................................................................................................................8
Fuse Replacement............................................................................................................................................8
Mounting............................................................................................................................................................9
Orientation......................................................................................................................................................................9
Mounting Diagram..........................................................................................................................................................9
Installation Guidelines.......................................................................................................................................9
Signal Connections .........................................................................................................................................10
Art-Net™ Connection ................................................................................................................................................... 10
sACN Connection......................................................................................................................................................... 10
sACN Priority.............................................................................................................................................................10
sACN Multicast..........................................................................................................................................................10
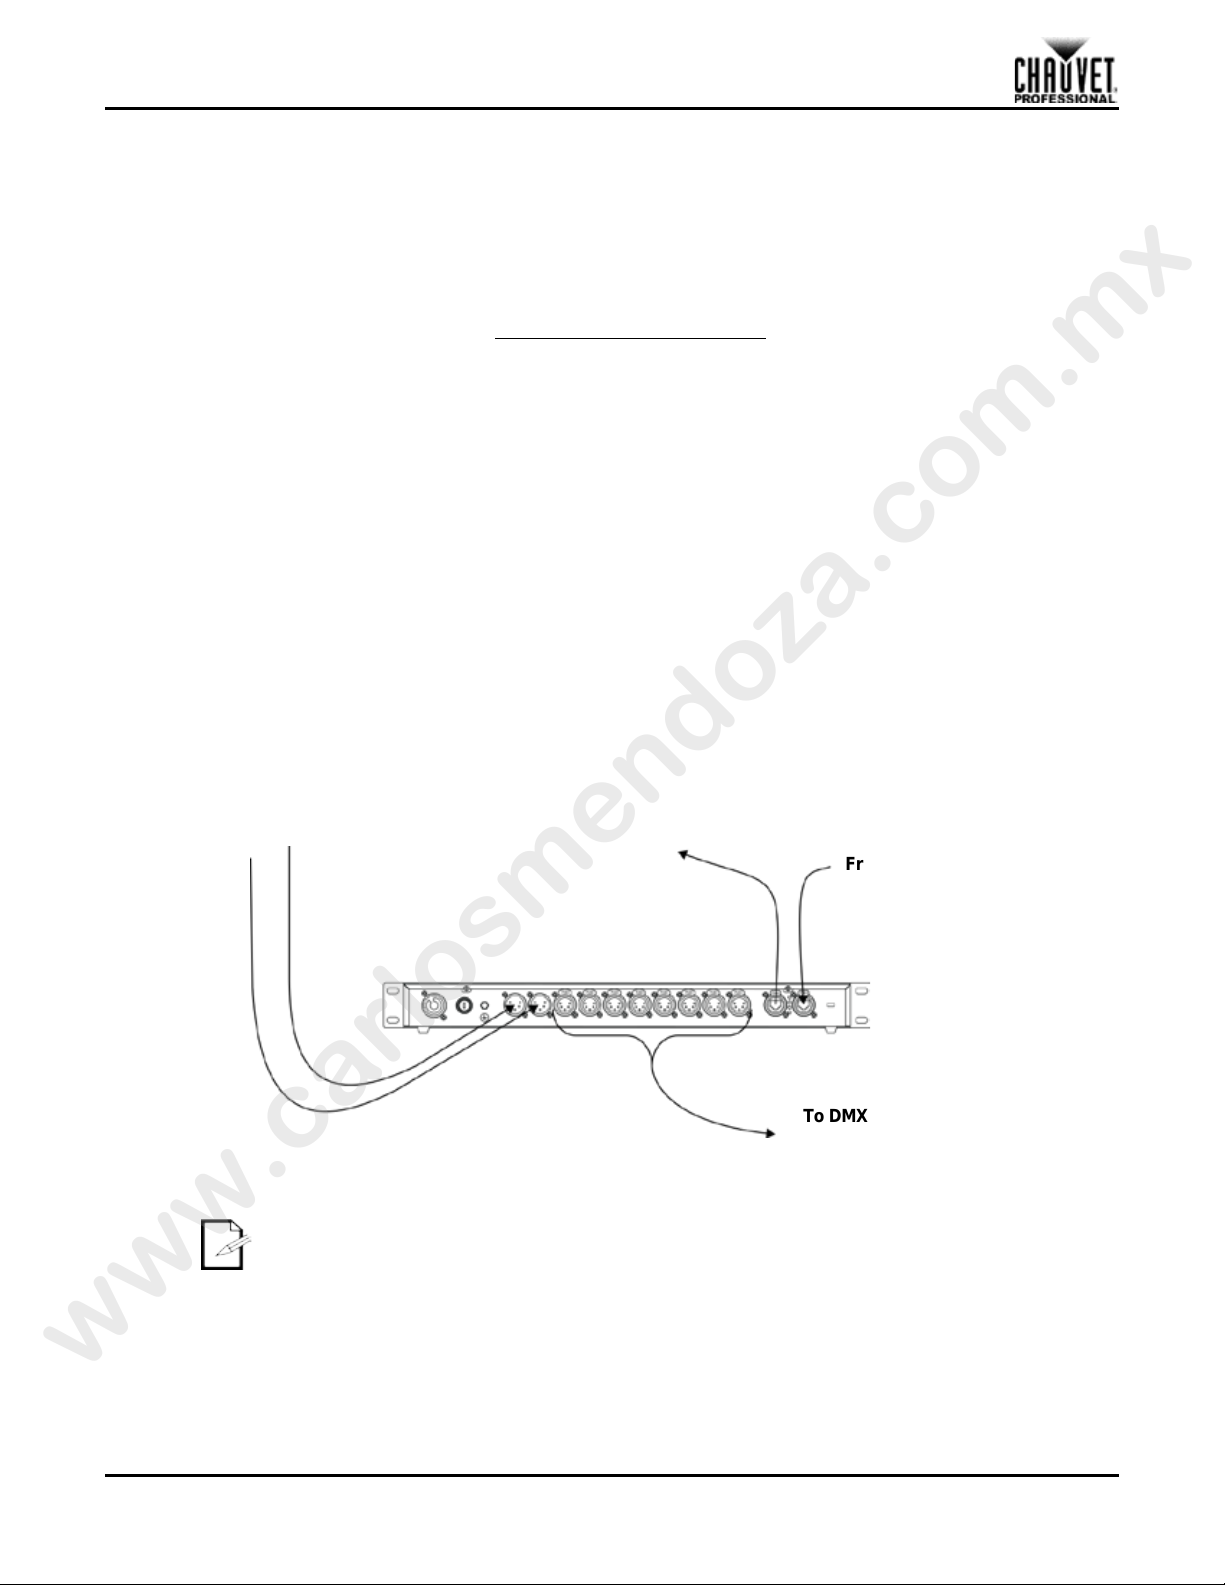
Signal Connection Diagram.......................................................................................................................................... 10
Configuration And Operation......................................................................................................114.Control Panel...................................................................................................................................................11
Menu Map .......................................................................................................................................................12
Ethernet Configuration ....................................................................................................................................13
Art-Net™ Subnet Address............................................................................................................................................13
Configuring IP Addresses................................................................................................................................13
Configuring Art-Net™ Net Setting................................................................................................................................. 13
Configuring DMX Outputs ...............................................................................................................................14
Universes .....................................................................................................................................................................14
Art-Net™ Universes ..................................................................................................................................................14
sACN Universes........................................................................................................................................................14
Signal Merging ................................................................................................................................................15
Indicators.........................................................................................................................................................15
Example Configurations..................................................................................................................................16
Example Configuration 1: Art-Net™ and DMX Sources................................................................................................16
Example 1 Diagram...................................................................................................................................................16
Example Configuration 2: sACN and DMX Sources .....................................................................................................17
Example 2 Diagram...................................................................................................................................................17
Technical Information...................................................................................................................185.Maintenance....................................................................................................................................................18
Technical Specifications..............................................................................................................196.Dimensions And Weight..................................................................................................................................19
Power..............................................................................................................................................................19
Data Connections............................................................................................................................................19
Ordering ..........................................................................................................................................................19
Returns................................................................................................................................................20
Contact Us..........................................................................................................................................21


Setup And Installation
Page 8 of 21 Net-X User Manual Rev. 4
Setup And Installation3.
AC Power
Net-X has an internal auto-ranging power supply that works with an input voltage range of
100–240 VAC, 50/60 Hz. To determine the power requirements for the Net-X refer to the
label affixed to the product or Technical Specifications.
The listed rating indicates the maximum current draw during normal operation. For more
information, download Sizing Circuit Breakers from the Chauvet website at
www.chauvetprofessional.com.
•Always connect this product to a properly grounded and protected circuit
•Never connect this product to a rheostat (variable resistor) or dimmer ci cuit,
even if the rheostat or dimmer channel serves only as a 0 to 100% swi ch.
•To eliminate unnecessary wear and improve its lifespan, during pe ods of non-
use completely disconnect the product from power via breake or by unplugging
it.
Fuse Replacement
The Net-X uses a T 250 mA, 250 V fuse accessible from the bac of the product. To change
the fuse, do the following:
1. Disconnect the product from power.
2. With a flat-head screwdriver, unscrew the fus ho der ap from the
housing.
3. Remove the blown fuse.
4. Replace with a fuse of the same type and ating.
5. Screw the fuse holder cap back in plac and reconnect power.
•Disconnect the product from powe before replacing the fuse.
•Always replace a blown fus with another of the same type and rating.
www.carlosmendoza.com.mx


Setup And Installation
Page 10 of 21 Net-X User Manual Rev. 4
Signal Connections
The Net-X receives signal though 2 DMX In ports and one of 2 Neutrik® etherCON® ports. It
sends signal out through 8 DMX Out ports and the other Neutrik® etherCON® port.
Art-Net™ Connection
Art-Net™ is an Ethernet protocol that uses TCP/IP to transfer a large amount of DMX512
data using an etherCON® RJ45 connection over a large network. An Art-Net™ protocol
document is available from www.chauvetprofessional.com. Art-Net™ designed by and
copyright Artistic Licence Holdings Ltd.
sACN Connection
Also known as ANSI E1.31, streaming ACN is an Ethernet protocol that uses the layer g and
formatting of Architecture for Control Networks to transport DMX512 data over IP o any other
ACN compatible network. ACN is maintained by the Professional Lighting and So nd
Association (PLASA).
sACN Priority
Priority is a number between 0 and 200 that is set by a controller sending an sACN signal.
The higher the number, the higher the priority. Lower priority signa will be ignored whenever
there is a higher priority signal present. If there is a lower priority signal present when a
higher priority signal halts or stops for longer than 5 secon s the next highest priority signal
will be processed. This function allows for controllers to be s t s a backup in case the main
controller fails. Signals with a priority of 0 will be ignored.
In order for the Net-X to merge two sACN signals, they must have the same priority.
sACN Multicast
The Net-X allows sACN multicasting.
Signal Connection Diagram
•
The Neutrik® etherCON® ports are through ports. Each port can be either an input or
an output port.
•
The DMX ports can only be input or output ports. There are 2 DMX In ports and 8 DMX
Out ports.
From DMX Sources
From Art-Net™ or sACN
Sources
To Ano he N t-X
Or Other Art-Net™ sACN Products
To DMX
Controlled
Products
www.carlosmendoza.com.mx


Configuration And Operation
Net-X User Manual Rev. 4 Page 13 of 21
Ethernet Configuration
To set the Net-X to receive and send either Art-Net™ or sACN, follow the instructions below:
1. Press <MENU> repeatedly until <Protocol> shows on the display.
2. Press <ENTER>.
3. Use <UP> or <DOWN> to select ArtNet or sACN.
4. Press <ENTER>.
Art-Net™ Subnet Address
There are 16 Subnet sets of 16 universes available to the Net-X, for a total of 256 universe
addresses. The Subnet address must be configured if the Net-X is being used as an Ar
Net™ node. The Net-X can only convert (to DMX) or merge Art-Net™ signals in th 6
universes within the Subnet it is assigned to.
The Universe address will always read 0–15. For Universes 0–15, assign Subne 0. For
Universes 16–31, assign Subnet 1. For Universes 32–47, assign Subnet 2, a d so on.
For example: to assign Universe 110 to a DMX Out port, set the Subnet address to 6, and the
Universe of that port to 14. To assign Universe 200 to a DMX Out port, set the Subnet to 12
and the Universe of that port to 8.
To assign the Subnet address, do the following:
1. Press <MENU> repeatedly until <Subnet> shows on the disp ay.
2. Press <ENTER>. The number in the lower right-hand cor er of the display flashes.
3. Use <UP> or <DOWN> to select the Subnet addres 0–5.
4. Press <ENTER>.
Configuring IP Addresses
The IP addresses are the addresses of the Net-X n the network. They must be configured if
the Net-X is being used as an ethernet node.
In sACN mode, the beginning number n b set to 2, 10, or 239.
In Art-Net™ mode, the beginning number s set by the Net Setting.
The other three numbers can be e from 0–255. The IP addresses cannot be identical.
To configure the IP Address do t e following:
1. Press <MENU> repeatedly until <IP Address #X>shows on the display.
2. Press <ENTER> to c cle through the sets of 3 digits in either address, until the desired
number flashes on the di play.
3. Press <UP> or DOWN> to change that set of numbers.
4. Repeat steps 2–3 ntil the IP address is configured as desired.
5. Press <MENU>
Configuring Art-Net™ Net Setting
The Ne sett ng controls the beginning of the IP addresses on the Net-X in Art-Net™ mode.
To configure the Net setting, do the following:
1. Pre s <MENU> repeatedly until <Net> shows on the display.
2. Press <ENTER>. The number in the lower right-hand corner of the display flashes.
3. Use <UP> or <DOWN> to select either:
•0, to set the beginning of the IP addresses to 2
or
•1, to set the beginning of the IP addresses to 10.
Note: 2–127 are reserved for future use.
4. Press <ENTER>.
WARNING: Do NOT set the Net to any value higher than 1. They are reserved for
future use and have no function.
www.carlosmendoza.com.mx

Configuration And Operation
Page 14 of 21 Net-X User Manual Rev. 4
Configuring DMX Outputs
The DMX Out ports must be configured to accept signal from either one of the DMX In ports,
or from the ethernet source. If the DMX port is not being used it should be turned off.
The menu structure presents each DMX Out port as <DMX Output #X>, where Xis the
number of the DMX Out port.
To configure the DMX Out ports, do the following:
1. Select the DMX Out port to configure by pressing <MENU> repeatedly until
<DMX Output #X>shows on the display.
2. Press <ENTER>. The phrase in the lower right-hand corner of the display flashes.
3. Use <UP> or <DOWN> to select DMX #1 Input, DMX #2 Input, either ArtNet Input o
sACN Input, or Without Input.
4. Press <ENTER>.
Universes
Universes are assigned to DMX Out ports when the Net-X is used as a ethernet-to-DMX
adapter. The universes are part of the process by which the Net-X takes the ethernet protocol
and converts it to DMX. The menu structure presents the universe of each DMX Out port as
<Universe #X>, where Xis the corresponding DMX Out port. Any one universe can be
assigned to more than one DMX Out port.
Art-Net™ Universes
In Art-Net™ mode, there are 256 universes (Universe 0 15 or every Subnet 0–15) that can
be assigned to the DMX Out ports. The Art-Net™ uni erses are assigned by selecting a
Subnet group and a value from 0to 15 within that g oup.
To assign an Art-Net™ universe to a DMX Out port, do the following:
1. Set the Subnet address (see Art-Net™ Sub et Address).
2. Select the DMX Out port to assign an A t Net™ universe to by pressing <MENU>
repeatedly until <Universe #X>shows on the display.
3. Press <ENTER>. The number in t e lower right-hand corner of the display flashes.
4. Use <UP> or <DOWN> to selec the desired Art-Net™ universe, 0–15.
5. Press <ENTER>.
sACN Universes
In sACN mode, there ar 255 universes (1–255) that can be assigned to the DMX Out ports.
The sACN universes a e a signed by selecting a value from 1 to 255.
To assign an sACN universe to a DMX Out port, do the following:
1. Select the DMX Out port to assign an sACN universe to by pressing <MENU> repeatedly
until <Un erse #X>shows on the display.
2. Press ENTER>. The number in the lower right-hand corner of the display flashes.
3. Use <UP or <DOWN> to select the desired sACN universe, 1–255.
4. P ess ENTER>.
www.carlosmendoza.com.mx


Technical Information
Page 18 of 21 Net-X User Manual Rev. 4
Technical Information5.
Maintenance
To maintain optimum performance and minimize wear, the user should clean this product
regularly. Usage and environment are contributing factors in determining the cleaning
frequency.
As a rule, clean this product at least twice a month. Dust build-up reduces light output
performance and can cause overheating. This can lead to reduced light source life and
increased mechanical wear.
To clean the Net-X, do the following:
1. Unplug the panel from power.
2. Wait until the unit is at room temperature.
3. Use a vacuum (or dry compressed air) and a soft brush to remove dust c llec ed on the
external vents.
4. Clean all external surfaces with a mild solution of non-ammonia cleaner isopropyl
alcohol.
5. Apply the solution directly to a soft, lint-free cotton cloth or a le s cleaning tissue.
6. Make sure all connections are thoroughly dry before reconnecting power and signal
cables.
•Keep the environment around the Net-X free of dust, dirt w ter, and extreme
temperatures.
•Insert and remove DMX and Neutrik® etherCON® cables slowly and gently.
•Put the Net-X on the top of any stacks of equipment, or rack mount it.
•Turn the Net-X off when it is not in use.
Always dry the external surfaces caref lly after cleaning them.
www.carlosmendoza.com.mx


Returns
Page 20 of 21 Net-X User Manual Rev. 4
Returns
In case you need to get support or return a product:
•If you are located in the U.S., contact Chauvet World Headquarters.
•If you are located in the UK or Ireland, contact Chauvet Europe Ltd.
•If you are located in Mexico, contact Chauvet Mexico.
•If you are located in Benelux, contact Chauvet Europe BVBA.
If you are located in any other country, DO NOT contact Chauvet. Instead, contact your local
distributor. See www.chauvetlighting.com for distributors outside the U.S., UK, Ireland
Mexico, or Benelux.
If you are located outside the U.S., UK, Ireland, Mexico, or Benelux, contact our distributor of
record and follow their instructions on how to return Chauvet products to the . Visit our
website www.chauvetlighting.com for contact details.
Call the corresponding Chauvet Technical Support office and request a R turn Merchandise
Authorization (RMA) number before shipping the product. Be prepared o pr vide the model
number, serial number, and a brief description of the cause for the return
Send the merchandise prepaid, in its original box, and with its orig al packing and
accessories. Chauvet will not issue call tags.
Clearly label the package with the RMA number. Chauvet wi refuse any product returned
without an RMA number.
Write the RMA number on a properly affixed label DO NOT write the RMA number directly on
the box.
Before sending the product, clearly write the fol wing information on a piece of paper and
place it inside the box:
•Your name
•Your address
•Your phone number
•RMA number
•A brief description of the prob em
Be sure to pack the product pr perly. Any shipping damage resulting from inadequate
packaging will be your r spo sibility. FedEx packing or double-boxing are recommended.
Chauvet reserves he r ght to use its own discretion to repair or replace returned product(s).
www.carlosmendoza.com.mx
Table of contents
Other Chauvet Professional Adapter manuals