Chinavision CVPL-TR22 User manual


GS]IVGPRS/GPS PORIABLE VEHICLE
TRACKER USER MANUAI,
Preface
Thank you for purchasing the tracker. This manual shows how
to operate tie device smoothly and correctly. Make sure to read
this manual carefully before using this product. Please note that
specification and information are subject to changes without
prior notice in this manual.
Any change will be integrated in the latest release. The
manufacturer assumes no responsibility for any erors or
omissions in this document.

3. Hardware Description. - - - - - - - - -6
7
8
4. Accessories
5. Specifications ------- -------- 9
ll. Installation and operating -------
Contents
I. Introduction-----
1. Main Features
2. Applications--
1. Production installation
2. SIM card installation--
3. Battery Charging -
III. Basic functions -------,-
1. ON/OFF Frinction'- ---
2. lnitialization-- --- - - ---
--------12
-------- t2
_______-- t2
3. Change Password
4. Add and Delete Authorization --
5. Single Locating
6. Auto track continuously
6.1 Track with limited times upon time interval: ------ ,
6.2 Track with unlimited times upon time interval: --, ,
6.3 Smart track upon time and distance interval: --------
7. Automatic update positions of vehicle tums -
8. GPS &ift suppression'---------
9. Get location in absolute street ad&ess ---
10. Location Based Service (LBS) -
l3
13
t4
15
l5
l5
l5
l6
t6
t7
t'1
llChecktheVehicleState..------- ---------,---18
13. Terminal (local) Time Setting -
14. Monitor (Voice Surveillance)
17 Forward the third parties' message ------.
18 Charges Inquiry
19. Cut offthe Oil and Power System -------
20. Resume the Oil and Power System -------
2 l. Tracker's Hardware Resetting
22. Sleep Mode -r----------'----.-----
l. Sleep by time
2. Sleep by shock sensor - -
IV. Alarm Function and settings
l. Geo-fence
2 Multi-area management
3 Movement alarm---
6. Shock SensorAlarm
7. SOS-- ------26
18
18
l8
21
22
22
22
22
1)
23
24

\T. Configure parameters by USB------
VII. GPRS Setting ------- ----
1. SettingupAPN
2. GPRS User Name and password Setup -
3. IP and Port Setup
4. Modes Switch between "SMS" and *GpRS. ----29
5. Less GPRS traffic
27
27
28
28
28
I. Introduction
This tracker is a new product based on the GSM / GpRS
network and GPS satellite positioning system, which set
multiple functions of security, positioning, monitoring
surveillance, emergency alarms and tracking in its entirety. It
can track and monitor remote target by SMS or internet.
l. Main Feafures
1.1 Waterproof shell
1.2 Builrin large capacity 6000MA battery, long standby
time of 100 days.
1.3 Powerful magnets to absorb to vehicle firmly.
I .4 Real-time nacking, retrieve of lost vehicles, cargo.
1.5 Movement alarm, Geo-fence alarm, shock sensor alarm,
remote monitoring.
1.6 Support map viewing on mobile phone screen, get
absolute address by SMS, GPRS real time tracking on
web based server.
1.7 Builtin high sensitivity GpS and GSM antenna to make it
can be used alone without installation, convenient and
quick.
1.8 Support for external GSM antenn4 GpS antenna, and
external power supply for the tracker to be installed on
the device which can provide power for long-terrn using.

2. Applications
Application: Locating and tracking service for cars, trucks,
container Eucks, special vehicles, cargo and criminal
investigation officer.
3. Hardware Description
3.1 trlontface 3.2 Rearface
fB-rr-, csM ANi-l l;**ces;]
*-
3.4 Side face
3.5 Side face
33 Side face

II. Installation and operating
1. Production installation
1.1 The product is easy to install. The built-in powerful magnet
can make it to be directjr adsorbed on the iron otjects.
1.2 Built-in GPS and GSM antenna, extemal antenna can be
optional.
1.3 The tracker is waterproof, but please still avoids the
long-term placernent in the places ofwater infiltration.
1.4 If you need an extemal power supply, cut oil & power
system and SOS feahre, please find 4PIN main wire^ wiring
diagram as follows:
\c
\I g
\o
hE
\Eg
'E
q
o
o:
6=
g€
SE
FC
o
E
o
'c

2. SIM card installation
2.1 Open the waterproof sealant, use tweezers or pointed
objects to touch the SIM card switch lightly, the SIM card slot
will pop up, and install the SIM card correctly, and then put the
SIM card slot back.
2.2 Please make sure that the SIM card is GSM network and
able to execute the function of incoming calls display, no calls
can be diverted and the PIN code is locked. The SMS format
must be TXT format, and can't recognize the pDU format.
3. Battery Charging
Please fully charge the product for the first use and charge as
following:
3.1 Home charger Find the AC adapter from the accessories
and connect 4-PIN plug into 4-PIN socket, and then connect the
other end to mains supply.
3.2 Car charge: Find the car lighter charger fiom tlle
accessories and connect to car cigarette lighter.
Note: Red LED ON means being charged, and LED OFF means
fully charged, and then charging can be stopped. If the battery
can't be fully charged once, then unplug the charger for about
l0 minutes and then charge it one more time.
III. Basic functions
Note: Please don't typs "1' for all the command in this manual,
"space" means press the space button on the cell phone
keyboard.
f. ON/OFF Function
1.1 In the OFF state, switch ON/OFF to ON position, then the
three LED will flash 1 time, which means the tracker has been
switched on.
2. Initialization
Send SMS "begin+password" to tracker, it will reply "begin
ok" and return to the default factory settings. @efault password
is: 123456). For example: Send SMS "beghl23456" to tracker,
it will reply "begin ok".
3. Change Passryord
Send SMS "password+old password+spacs+new password"
to the tracker to change the password. For example: Send SMS
"password123456 888888" to tracker, it will reply "password
OK', it meaff the password has changed successf,rlly. And
please keep the new password in mind.
Note: The new password must be 6 digits Arabic numbers, or
the tracker can't recognize.
4. Add and Delete Authorization
t2 t3

4. I Authorization phone number is the phone number you used
for tracking, controlling, receiving alarms, etc, and only 5
phone numbers to be allowed to authorized in the tracker at
most. Add authorization as following two ways:
4.2 For the first authorization, Call and track the tracker device
for l0 times from cell phone in success, it will make the cell
phone number as the authorized number automatically, and
reply "add master ok".
4.3 Authorization: Send SMS "admin+password+space*cell
phone number" to set up an authorized number, the other
authorized numbers should be set by the first authorized number,
"admin OK'will be retumed after command executed.
Ifyou need to track the target tracker device when it enters into
another country, you must add the country code before the cell
phone number, for example, send SMS" adminl23456
008613322221111" to the device. Note: t3322221ttt wltl be
set up as the authorized number.
4.4 Delete authorization: Send SMS "noadmin*password*
space+authorized number" to delete the authorized number.
5. Single Locating
Any number call the tracker device, it will reply a SMS
including the position of latitude and longitude if don,t set up
the authorized number. If authorized number has set
successfully, the device won't reply when the unauthorized
number dials up it. Dialing the tracker device from the
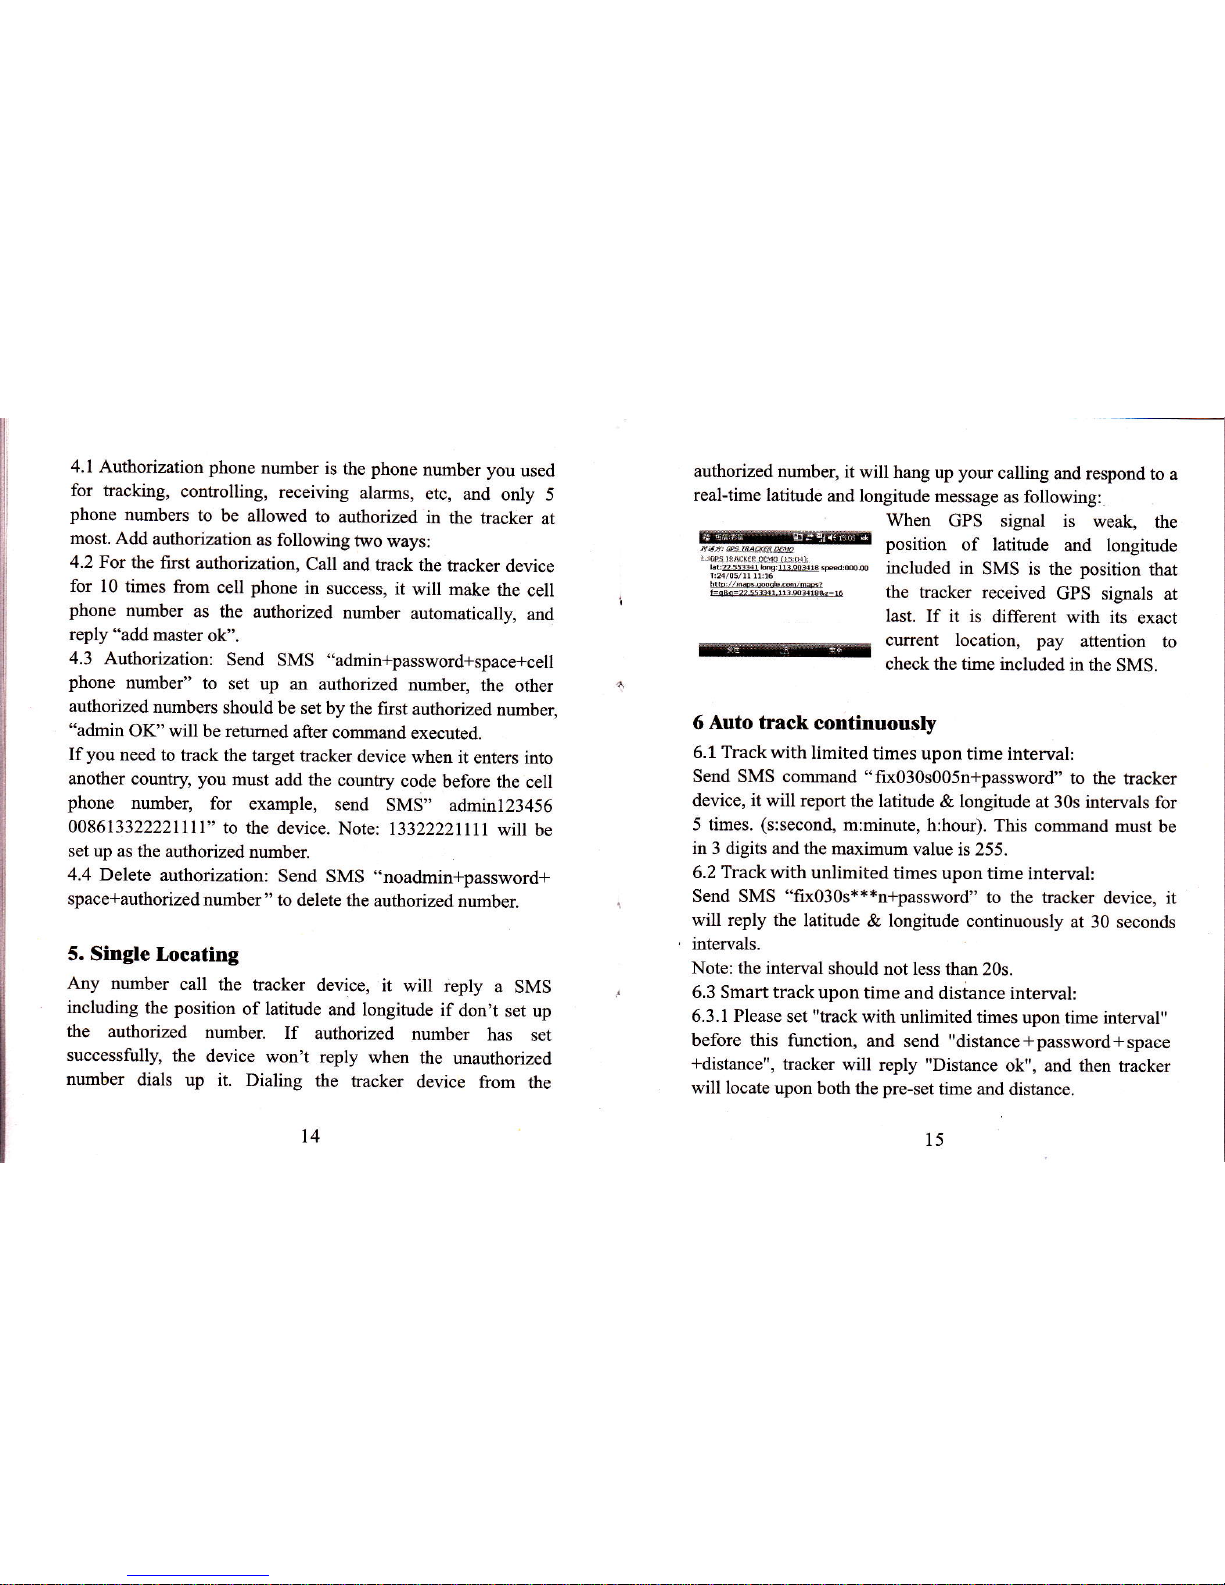
authorized number, it will hang up your calling and respond to a
real-time latitude and longitude message as following:
When GPS signal is weak, the
ffi%mrellM position of latitude and longitude
i,.:+:i{rqrj:fi;t*.a,-- included in SMS is the position that
Effi=tiffiidi.=* the ttackff received GPS signals at
last. If it is different with its exact
rc current location, pay attention to
checkthe time included in the SMS.
6 Auto track contlnuously
6.1 Trackwith limited times upon time interval:
Send SMS command "fix030s005n+password" to ttre tracker
device, it will report the latitude & longitude at 30s intervals for
5 times. (s:second, m:minute, h:hour). This command must be
in 3 digits and the maximum value is 255.
6.2 Track with unlimited times upon time interval:
Send SMS 'tfix030s***n+password" to the tracker device, it
will reply the latitude & longitude continuously at 30 seconds
intervals.
Note: the interval should not less than 20s.
6.3 Smart track upon time and distance interval:
6.3.1 Please set "track with unlimited times upon time interval"
before this function, and send "distance*password*spaoe
+distance", tracker will reply "Distance ok", and then tracker
will locate upon both the pre-set time and distance.
14 15

E.G: Send "distance123456 0050", it means distance is 50
meters; the number must be 4 digits Arabic numbers.
6.3.2 Set this function on web server: Set time interval first and
then distance interval, tracker will locate upon the time and
distance.
6.4 Cancel: Send SMS 'hofx*password" to the tracker device
to cancel the "auto track".
7. Automatic update positions of vehicle turns
7.1 The tracker will update the positions automatically to web
server once the vehicle changing dliying direction over pre set
angle value to form a smooth trajectory consistent with the
actual road, this function is only effective in GPRS mode.
7.2 Send "angle+password+space+angle" to tracker, it will
reply" angle ok".
7.3 The angle must be 3 digits Arabic numbers, default angle
value is 30 degrees.
t. GPS drift suppression
8.1 Send "suppress*password" to tracker, it will reply" suppress
drift ok". The GPS data stop updating if vehicle is not moving
and latitude and longitude always keep same, and GpS data
updates automatically when vehicle is moving.
8.2 This function is activated as default, send ,'nosuppress
*password" to tracker, it will reply" nosuppress ok ,,.
9. Get location in absolute street address
You must set up the APN of your local GSM network for the
SIM card in tracker first befoie using this firnction, if your local
GSM network need user name and password for gprs, please
setup according to the GPRS instructions in chapter VII. Send
SMS "address+password" to tracker after sehrp ApN, tracker
will reply detailed absolute address including street name.
10. Location Based Senice O.RS)
When the tracker device doesn't received valid GPS signals,
tracker will locate by LBS (location based service), the
messages includes the GPS coordinates of the last position in
SMS mode, but the LAC in message is the current new position,
the location can be seen by input the LAC code in the menu
"Manual Track" of web platform www.grstrackerxy.com, you
can also send command "addrcss+password" to tacker to get
the newest absolute address and GPS coordinates as well;
tracker will automatically switch to track by LBS in GPRS
mode, and actuallzed on the map of web server with "LBS"
mark. And there may be some inaccuracy with actual location
by LBS tracking; the bias depends on GSM reception.
Note: This feature can be used normally in most axeas
according to the signal of GSM network, but it may not be
available in some areas.
I
il
I
I
l6

1I. Check the Yehicle State.
Send SMS "sfussk*password" to tracker to check charge status,
battery status, GPS status, GSM reception status. For example,
send SMS "che.ck123456", and following information will be
retumed after execute the command:
Power: Power off /charging/charge finish
Battery: 100%
GPS: OK,AIO GPS
GSM Signal: l-32 (The higher digit it shows; the stronger
of GSM signals it receives.)
12. Check IMEI
Send SMS "imei+password" to the unit' For example, Send
SMS "imei123456" to the tracker device, an IMEI number in 15
digits will be returned.
13. Terminal (local) Time Setting
Send SMS "time+space+zonelpassword*space+time" to the
tracker unit, If succeed, It will reply 'time OK'. For example:
Send SMS "trme zonel23456 8", 8 is the time zone of China,
If your time zone is minus, send SMS like "time 2ote123456
-8".
14. Monltor (Voice Surveillance)
14.1 The command to switch between Track and Monitor are
"tracket'' and " monitor".
14.2 The default mode is "track" (Track mode).
14.3 Send SMS "monitor+password" to the unit, and it
reply "monitor ok!" and switch to "monitor" mode.
14.4 Send SMS "tracker+password" to the unit, it will
"tracker okl" and restore to "track" mode
will
reply
15. Data logging
15.1 Auto logging: When the tracker device lost GSM signals or
fall offline from GPRS, tracker will log the tracking position
and alerts automatically in the SD card on the basis of the
pre-set condition, when GSM signals get bach all the event
alerts will be auto-sent to the authorized numbers or monitoring
platform (server), but the logged tracking data should be loaded
to the monitoring platform via SMS command.
15.2 Logging upon times: Send SMS: "save030s005n +
password" to the tracker unit, it will reply "save ok', and will
log the lat, long locations every 30 secoflds for 5 times. (S:
second, m: minulg' [' 66rx').
15.3 Multi-logging : Send SMS:"save030s***n*password" to
kacker device, it will reply "save ok".
15.4 Logging Clearance: send SMS: "clear+password" to
tracker device, it will reply "clear ok".
15.5 Logging Volume: It depends on the capacity of the SD
card inserted in the tracker device.
l8 19

15.6 The logged data in SD card can be copied to computers
through card reader, and then the data route can be checked by
importing data in the menu "Data Import" of web platform
www.gpstrackerxy.com
16. Data Load
16.1 Current date Load: Send SMS: ..toad*password" to
tracker device, it will reply: "load ok" if the device is working
well under GPRS mode; if not, it will reply "load fail! Please
check gprs" tlrat means device does not work under GPRS
mode.
16.2 Specified date Load : Send SMS: "load+password+
spacclyear month date" to tracker device, it will reply: "load
ok" and load the tracking data to the monitoring platform upon
the valid time you choose. For Example: send SMS:
"loadl23456 20110425" to the tracker device, means to load
the tracking data of 25th April 20 1 1 to monitoring platform.
17. Fonvard the thlrd parties' message
1 7. I Send SMS "forward+password*space*third parties phone
number" from authorized phone number, tracker will reply
*forward ok", and supports 1 third parties phone numbers at
most.
For example, set the phone number of the service provider of
the simcard in the tracker, when charge remind message coming
in, tracker will forward it to authorized phone number.
17.2 Cancell. Send SMS command "noforward+password".
lE. Charges Inquiry
Send SMS command "balance*password+spacsfphone number
+space+content" to tracker, it will forward the content to the
specified phone number and return the content from the
specified phone number.
19. Cut ofithe Oil and Power System
Send "stop+password" to tracker, if vehicle speed is more than
2Okrnltr, the command won't be executed immediately, it will
reply" It will be executed after speed less than 20kmlh", then
tracker execute stop command when speed lss5 thm that and
reply "Stop engine succeed". And it wiu remain immobile state
until next command to resume.
20. Resume the Otl and Power System
Send "resumerpassword" to tracket it will reply "Resume
engine succeed", that means vehicle has resume the oil supply.
21. Ilacker' s Esrdryare Resetting
Send SMS "reset+password" to hacker device to reset the GSM
module and GPS module of the tracker device, it will reply
"reset ok".
2t

22. Sleep Mode
I . Sleep by time
Send "sleep+passvr'ord+space+time", tracker will reply "sleep
time ok" ifnone ofthe alarms listed under chapter IV has been
set and no operations, tracker will fall asleep in 5 minutes, LED
will be off, calling or SMS can awake the tracker. If these alaxms
have been set, fiackerwill enter sleep by detecting shock sensor.
And trackerwill sleep by time as default.
2. Sleep by shock sensor
Send "sleep+password+space+shock", tracker will reply "sleep
shock ok", it will enter sleep mode after detect no shock, and LED
will be off.
IY. Narm Funetion and seffings
A11 the alarms will be send to all the authorized phone numbers
once the alarms are triggered in SMS mode, if the tracker keep
in triggered status and alarms are not be cancelled, tracker will
keep sending alams to authorized phone numbers every 3
minutes. If tracker works in GPRS mode instead of SMS mode,
tracker will send alarms to web based seruer.
l. Geo-fence
1.1 Set up a geo-fence for the tracker device to restrict its
movements within a district. The unit will send SMS to the
authorized numbers when it goes out oftlis district.
Set up: When the unit stays immobile in a place for 3-10
minutes, the user can send SMS " stockade*password*space
+latitude, longitude;latitude,longitude " to unit to set the
restricted district. In case of breach, it will send SMS
" stockade!+geo-info " to the authorized numbers. Tracker will
stop sending alarm iftracker retums to the fence after geo-fence
triggered
Latitude and longitude format is like dd.dddddd, the decimal is
6 digits, latitude ofsouth or longitude ofwest please add"-"
before it. The first latitude & longitude is coordinate ofthe top
left comer of the Geo-fence, while the second latitude & longitude
is the coordinate ofthe bottom right corner
I .2 Catcel: Send SMS " nostockade+password " to deactivate
this function.
2. Multi-area management
2.1 SetArea
Send SMS command area * password + space + latitude,
longitude+space+areaname, distanceM" to tracker(distance
unit: M for meter, K for kilometer), it will reply "area0l ok".
Example: Send "areal23456 22.353648,113.543678 school,
800M".
Note: 5 areas at most and the distance between two points can't
be less than the total distance in the 2 commands, and different
areas can't cover each otler.
2.2 Delete areas
Send SMS command:"noarea*password*space*area name",
tracker will reply:"noarea ok".
2.3 Rename and set distance
Send SMS command "rename*password*space-Fold name'new
22 23

namedistahceM" to tracker, if name is not repeated and area doesn't
cover others, it will reply "rename ok! " for zuccessfirl configuration.
Example: Send"renme123456 area0l ;school,800M", it means
the new area name is "school", and covers area of a radius of
800 meters.
2.4 Activate multi-area management
Send SMS command "arealpassword+space+on" to tracker, it
will reply "Area on ok!", when tracker enter the pre set area, it
will send SMS "area name+latitude & longitude,' to all the
authorized phone number, and send same SMS when goes out
ofthe area.
2.5 Deactivate Multi-area management
Send SMS command "area+password+space+off' to tracket it
will reply "area offok!"
3. Movement alarm
3.1 Set up: when the rmit stays immobile in a place for 3-10
minutes with GPS signal reception, the user can send SMS
" move*password*space+0200 " to the tracker (Suppose area
of a radius of 200 meters, it supports 4 digits at most. Unit:
Meter). It will reply " move OK " In case of such a
movemelt (the default distance is 200m), it will send SMS
" Move+ latitude & longitude " to the authorized numbers at 3
minutes interval.
3 .2 Catcel: Send SMS " nomove*password " to deactivate the
movement alarm.
4. Over SpeedNarm
4.1 Over speed alarm will be triggered when kacker exceed the
speed you setup.
Setup: Send SMS "speed+password+space+speed" to tracker
device md it will reply " speed okl " , it means you have set up
over speed alarm successfully. For example: " speed123456
080 " 080 refers to 80km/h, when tracker' s speed exceed
80km,/h, tracker will send SMS "speed+080r+ Geo-info" to
authorized numbers.
4.2 Cancel: Send SMS "nospeed+password" to deactivate the
over speed alarm.
Remark: The recommended speed should be not less than
301cm,lh. For below that rate, it will be effected the accuracy by
gps signals drift etc.
5. Aecident alarm
5.1 When tracker detects accident.occurred (severe impact), it
will send " Accident! + latitude & longitude " to all authorized
phone numbers.
5.2 Cncel: Send"noaccident+password" to cancel accident
alarm.
6. Shock Sensor Alarm
6.1 Setup: Shock sensor alarm is deactivated in default settings.
If needed, please send SMS '" shock*password " to tracker
device, and it will reply " Shock is activated! " , it means
shock sensor alarm has set up successfully. When the tracker
detect vibration, it will send SMS " Sensor alarm*Gs6-i1f6 " L
authorized numbers.
24 25

Note: Shock sensor detect vibration one time for each 3 minutes,
it will start to detect the second shock sensor alarm 3 minutes
after the fust alarm.
6.2 Cancel: Send "noshock+piissword" to cancel the shoek
sensor alarm.
6.3 Shock sensor sensitivity configuration:
The sensitivity ofthe built-in shock sensor has three different
level:
First level: Alarm will be triggered after detect slight
vibration, send command" sensitivity+password*space*1 "
Second level: Alarm will be triggered after detect 8 times
vibration in 2 seconds, send command" sensitivity * password
+ space+2".
Third level: Alarm will be triggered after detect 25 times
vibration in 5 seconds, send command" sensitivity + password
+ space+3".
7. SOS
Long Press the SOS button for 3 seconds, the tracker device
will send SMS " help me!+1at./1ong. to all the authorized
numbers in 3 minutes interval. It will stop sending SMS "help
me " when received a reply from any one of the authorized
numbers.
8. Low power alarm
When the buillin battery capacity is below 15olo, tracker will send
SMS "low battery+lat./long information to the authorized numbers
for 2 times for each 20 minutes. And it will stop sending alarms if
extemal power is connected to charge.
V. TCP/UDP srvttch
Command:"gprs+password, I, l " switch to UDP mode.
Command: "gprs*password,0,0" switch back to TCp mode, this
is the default mode-
U.VI. Configure parameters by USB
Copy the Serial debugging tool to computer, connect the Aacker
with computer and open Serial debugging tool with the USB
cable (option), then choose correct COM port, baud rate is
19200, send serial port command (Tick "send new " on SSCOM
interface): $SET GT PARA, tracker will return the sample
format of the command, send appropriate commands according
to the sample format of command. Tracker will return "ok" after
succeed in configuring to indicate successful configuration.
Please check "COM PORT COMMAND USERMANUAL"
for detailed information.
VII. GPRS Setting
26 27

User must send SMS via cell phone to set up ApN, Ip and port
before starting tracking by GPRS. Please setup according to
following steps
l. Setting up APN
Send SMS " APN*password*spacet-APN " , the tracker will
reply "APNOK" is
succeeded. For example: Send SMS ' APN123456 CMNET" .
Note: CMNET is the APN of china GSM network, the ApN
varies with different GSM network operator in different
countries, please check with your local GPRS network operator
to get the correct APN.
2. GPRS User Name and password Setup
In most countries, the user name and password involving GPRS
login are not compulsorily necessary, therefore, the entry can be
skipped. For those countries requiring user name and
password, please configure as following:
Send SMS "up*password+space+user+spacetpassword", If
succeeded, tracker will reply " user, password ok! " , for
example: send SMS " up123456 jornes 666666"
Note: 123456 is password of tracker, jonnes is the user name
for GPRS login, 666666 is the password for GPRS login.
3. IP and Port Setup
Send SMS 'r adminip+password+space*IP+space*port " ,
tracker will reply "adminip ok" ifsucceed. For example: send
SMS " adminipl23456 202.104.150.j5 9000', , tracker will
reply "adminip ok" if succeed.
Note: 123456 is the password of tracker, and2o2.104.l50.jS is
the ip, 9000 is the port.
4. Modes Swltch between "SMS" and .,GPRS,'
4.1 The default mode is "SMS" .
4.2 Send SMS "GPRS+password" to the unit, and it will reply
" GPRS ok! " it means facker device has switched to
"GPRS" mode.
4.3 Send SMS " gl{g+pn55y61d,, to the tmit, it will reply
"SMSok! " andrestoreto "sMS" mode.
5. Less GPRS hafrc
5.1 Tracker will change to less GPRS traffic mode after parking
10 minutes, GPRS disconnect and cormect again when alarm
being triggered or start driving.
5.2 Activate this function: Send ',less gprsl23456 on',, tracker
will reply "less gprs on ok".
5.3 Deactivate this firnction: Send ,,less gprsl23456 off',
tracker will reply" less gprs offok,'.
Note: 123456 is the password oftrackel and replace it with the
new ifyou have changed.
28 29

6. GPRS tracking & monitoring platform
6.1 Web based platform www.gpstrackerxy.com. Configuration
IP: 202.104.150.75 Port: 9000. Please check " software
platform user manual " included in the CD for detailed
operation information.
6.2 PC based tracking software and user manual is included in
the CD in package [Platform user manual].
YIII. Cautions
1. Don't put the unit in overheated or overcooled places.
2. Handle carefully. Don't vibrate or shake it violently.
3. Clear the unit with a piece of dry cloth. Don't clean in
chemicals, detergent.
4. Don't paint the unit, this may cause some foreign materials
left in between the parts.
5. Don't disassemble or refit the unit.
6. Please read the user manual carefully before installation and
operation, leam something more about the voltage range.
Otherwise, it won't work properly or destroy the product.
30 3l
tX. Simple Faults & the Solutions
Battery power is low Connect with charger
l.GSMAntenna is not
comect well
2. SIM crd is not properly
l.Check GSM antema
coonection
2. check SMCARD installation
or chmee SMCARD.
In existence of m
number, m rmauthorized
number dials up the unit.
Pleme delete the authorized
number or initialize the mit
In existence ofm
number, an mauthorized
nmber dials up the mit.
Pleme delete the authorized
number or initializ the unit.
l. GPS reception is poor
2. GPS mtmaisnot
comected well-
l.Put GPS in m open ara
2.Check connection of GPS
mtenna
1. APN, IP address md port
may be mong.
2.No GPRS subscription
service
3. No uedit for the
SIMCARD
l.Configue APN, IP md port
again.
2. Subscribe GPRS service
3.Topped up the SIMCARD.

X. LED indicator status
LEL Indicrtor Strtus
PowerLED @ed)
Red LED flash Low power
RedLED ON Chrsins
RedLED OFF Frrllw clratoed
GSMLED (Green)
ON NO GSM reception
Quick flash for each
second GSM Mode
Slowly flash for each
3 seconds GPRS Mode
GPSLED (Blue) OFF No GPS reeotion
Quick flmh for each
second Good GPS reception
32
Table of contents
Other Chinavision GPS manuals