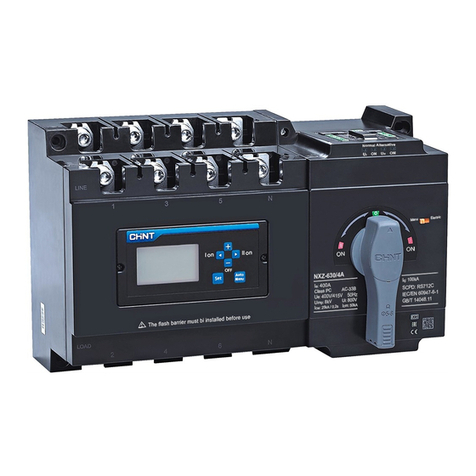
CHINT NXZM User manual

NO:2021.04
Standard: IEC/EN 60947-6-1
User Instructions
NXZM、NXZ(H)M
Automatic Transfer Switch

Safety Warning
1
2
3
4
Only professional technicians are allowed for installation and maintenance.
Installation in any damp, condensed-phase environment with inflammable
and explosive gas is forbidden.
You are prohibited from touching the conductive part when the product is
operating.
Do not install the product at places where gas medium can cause metal
corrosion and insulatin damage.
After installing the product, finishing the inspection of load side line and
splitting the fire-resistance circuit, the controller must be set to “Manual”
position and the product must be set to split position. Switch the controller
to “Auto” position after line fault is eliminated.
To avoid dangerous accidents, the products should be installed and
secured according to the instructions.
This product is applicable to environment A. The product will generate
harmful electromagnetic interference if used in environment B, in which
case, user should take proper protective measures.
5
6
7

1
2
Applicatin Information
a) The normal application temperature of the product is -5℃~+40℃;
Note: If you need to use the product under -25℃~+70℃, please consult the manufacturer.
b) If you need to use the product above 2000m altitude, please consult the manufacturer;
c) Pollution class: class 3;
d) Installation category of main circuit: Ⅲ
e) Enclosure protection class: IP20.
;
Inspection and Test
01
NXZM、NXZ(H)M Automatic Transfer Switch
Inspection
Tools required
Phillips screwdriver
Word screwdriver
Allen wrench
Hex wrench
Fig 1 Inspection
Product
model
Total
(Pcs)
Wiring screw
Flash barrier
M6 X 12 M8 X 16 M8 X 16 M10 X 30 M12 X 35 3P
4P
3P
4P
2X6
2X8
2X4
2X6
NXZM-63、125
HNXZ M-63、125
NXZM-160
HNXZ M-160
NXZM-250
HNXZ M-250
NXZM-400、630
HNXZ M-400、630
NXZM-800
HNXZ M-800
wiring
terminal
of
external
signal
(controller)
Type A
Type AT
Type B
Type BT
split wire 2m (optional)
5
6
7
1
Tabla 1 Standard accessories
1.Determine
product
technical
parameters.
2.Type AT and
BT controllers
have the
function of
communication.

NXZM、NXZ(H)M Automatic Transfer Switch
02
Manual test
Power-on test
Turn the toggle switch to
the Manual position
Off position Normal On position
Alternative
On position
Off position
Reset the handle
Turn the toggle switch to
the Automatic position
Automatic mode Manual mode Setting mode
Failure alarm
(absent for PC class)
Automatic transfer
Operating transfer
delay time
Automatic transfer
Return transfer
delay time
Generator activationStop mode
Fig 2 Manual test
Fig 3 Power-on test

03
NXZM、NXZ(H)M Automatic Transfer Switch
3
Outline and Installation Dimensions
Outline & installation dimensions
Unit: mm
Product model
NXZM-63、125
NXZHM-63、125
NXZM-160
NXZHM-160
NXZM-250
NXZHM-250
NXZM-400、630
NXZHM-400、630
NXZM-800
NXZHM-800
A B B1 B2 C D G L SHSHSHM N
H H1 H2
300
340
390
535
660
240
250
250
334
344
230
245
367
464
477
223
240
240
342
344
267
307
357
475
600
220
230
230
304
314
25
30
35
44
58
178
194
225
304
385
178
167
181
161
180
190
151
152
155
190
195
216
9
9
9
1166
1168
17
17
17
26
26
5647
50
5049
198
203
234
238
Fig 4 Outline and Installation Dimensions
Tabla 2 Outline and Installation Dimensions
A
C
LG
D
B
B1
B2
M
N
Hmax
H1
H2

NXZM、NXZ(H)M Automatic Transfer Switch
04
Dimensions of split module of controller and cabinet door
105
64 4.5
17
101
60
60≤a≤62
101≤b≤103
Thickness≤2.5
Unit: mm
4
Installation and wiring
Wire connection dimension
Unit: mm
Product model
NXZM/NXZHM-63
NXZM/NXZHM-125
NXZM/NXZHM-160
NXZM/NXZHM-250
NXZM/NXZHM-400
NXZM/NXZHM-630
NXZM/NXZHM-800
a b c Torque
8.0
7.5
10
10.5
15
17.5
16
23.5
30.5
43
6.5
8.5
8.5
11.5
14
4 N·m
10 N·m
12 N·m
30 N·m
40 N·m
Fig 5 Dimensions of split module of controller and cabinet door
Fig 6 Wire connection dimension
Tabla 3 Wire connection dimension

NXZM、NXZ(H)M Automatic Transfer Switch
05
Unit: mm
Rated current
Cross-sectional
area of copper
wire or copper bar
10 16 25 32 40 50 63 80 100 125 160 180
The number of copper
wire or copper bar
Cross-sectional
area of copper
wire or copper bar
The number of copper
wire or copper bar
Rated current 200 225 250 315 350 400 500 630 700 800
1.5 2.5 4.0 6.0 10 10 16 25 35 50 70 95
95 95 120 185 185 240 150 185 240 240
1
1 2
Product wiring diagram
4P Product wiring diagram
Normal power bus-bar Alternative power bus-bar
Load bus-bar
Normal power Alternative power
4P
3P Product wiring diagram
3P
Normal power
bus-bar
Alternative power
bus-bar
Wiring terminal of
neutral line
Load bus-bar
Normal
power
Alternative
power
Tabla 4 Sectional area, width and number of copper wire
Fig 7 Product wiring diagram
Voltage signal
sampling line
Main power
supply
1. Main power
supply and
voltage signal
sampling line
phase
sequence must
be consistent.
2. During
wiring, the
voltage signal
sampling line in
order as shown.
Wrong wiring
may lead to
burn down of
the controller.

NXZM、NXZ(H)M Automatic Transfer Switch
06
Normal
neutral line
Alternative
neutrul line
Connect to the external
terminal of controller
directly.
Any forms of electrical
connection of these terminals is
strictly forbidden.
Signal and control terminal wiring diagram
Note: Please tear off the sticker before use
and keep it for future use.
It is used under the
Grid-power generator
mode and may be omitted,
but the delay of generator
start-up default to 0s.
Note:
Active output
AC230V/0.5A
Do not connect
201 and 202.
Used for Grid-Power generator
mode only and connected to the
generator as needed, In the case
of the normal power supply fails,
terminal 601 land 603 are
connected.
To the remote power
of generator
Terminals 501 and 502 can
onlybe connected to passive
signal, optionally via a relay
contactor.
Terminals 503 and 504 are
connected after the off of fire
control. After the fire control
signal bering removed, for the
ATSE switch to“Manual”and
then press Confirm/Return in
automatic mode, or press
Comfirm/Return directly in
manual mode.
Note:
1: Dotted line is the internal structure of the controller.
2: Type A controller doesn’t have functions of generator control
(601 602 603) and feedback output of fire protection control (503, 504).
3: Type AT and BT controllers have the function of communication.
Commom
CommonCommon
Fig 8 Signal and control terminal wiring diagram
201 202
1. Any type of
electrical
connection
between
terminal 201
and teminal
202 is
prohibited,
otherwise the
controller will
be burnt!
2. Terminal 501
and 502 of
controller can
only be
connectd with
passive closing
signal to
achieve fire
cintrol linkage.
If they are
directly
connected to
any active
signal, the
controller will
be burnt.
3. Strip at least
8mm of the
insulation of
the wire before
inserting it into
the terminal.

07
NXZM、NXZ(H)M Automatic Transfer Switch
Installation of the display module (on cabinet door)
Installation of flash barrier
5
Controller setup
Indication of automatic working mode;
Indication of manual working mode;
Failure indication
When the breaker is tripped due to failure or short-
circuit of the switch, this lamp will be on; (absent for
class PC)
Display area of normal power voltage parameters
It displays normal power voltage parameters and
transfer delay time under the working condition, and
displaying symbols under the setting condition;
Indication of the on or off of breaker on the normal
power side, the light will flash if a failure of the
normal power occurs;
Indication of setting condition;
Indication of on or off of breaker on the alternative
power side, the light will flash if a failure of the
alternative power occurs;
Instructions of controller operation interface
2221
20
2
11
2
3
4
5
6
7
4
9
10
11
12
13
23
19
18
17
16
15
14
8
7
6
3
5
Fig 9 Installation of the display module
Fig 10 Installation of flash barrier
Fig 11 Controller setup
If a megameter with capacity over 500V
is used to measure the insulation
resistance of the circuit breaker, please
disconnect the secondary circuit of the
controller.

NXZM、NXZ(H)M Automatic Transfer Switch
08
Indication of the start of stop function;
Unit of voltage time and frequency of the normal power;
Phase of A, B, C;
Unit of voltage, time and frequency of the alternative power;
Display area of alternative power voltage parameters
It displays alternative power voltage parameters and transfer delay time under the working
condition, and displaying symbols under setting condition;
Indication of the start signal of generator;
Confirm/return button
Press this button to save changes and exit in setting mode;
And restore normal operation status in fire protection linkage mode;
Button for compulsorily switch to the normal power
Under manual control mode, If the normal power supply is normal,press this button, it can
compulsorily switch to normal power;
If it is setting condition, this button is the “scroll up” button of setting programs;
Button for compulsorily switch to the alternative power
Under manual control mode, if the alternative power supply is normal press this button, it can
compulsorily switch to alternative power;
If it is setting condition, this button is the “scroll down” button of setting programs;
Off button
Under manual control mode, if either line of both power lines is normal and press this button, it will
switch to the off position;
If under the setting mode, this button is the minus button for setting parameters;
Failure inquiry button
When the switch fails and malfunction lamp on the failure screen is on, press this button, the detail
malfunction code can be displayed in the screen;
Setting button
Press this button to enter into the parameter setting menu of the controller;
Indication of automatic charge and automatic recovery mode;
Indication of automatic charge and without automatic recovery mode;
Indication of generator (automatic charge and automatic recovery) mode;
Indication of communication status.
,
8
9
10
11
12
13
14
15
16
17
18
19
20
21
22
23

For setting of the switching value of normal
power supply undervoltage,press to increase
and to decrease
For setting of the switching value of normal
power supply overvoltage,press to increase
and to decrease
For setting of the switching delay time,press
to increase and to decrease
For setting of the switching valueaof alternative
power supply undervoltage,press to increase
and to decrease
For setting of the switching valueaof alternative
power supply over voltage,pr ess to increase
and to decrease
For setting of the return delay time,press
to increase and to decrease
For setting of the delay time of generator
start-up,press to increase and to decrease
For setting of the delay time of generator
stop,press to increase and to decrease
For setting of switching modes,press and
to change mode.(If the digital is 000,it refers to
grid-grid autormatic charge and automatic return;
if the digetal is 001,it refers to grid-grid automatic
chargr and without automatic return;if the figital
is 002,it refers to grid-power generator mode)
For setting of modbus communication address
in the range of 1-247,press to increase and
to decrease
For setting of modbus communication baud rate.
0:9.6kbps; 1:19.2kbps.
Remote locking:(on/off)default off.
09
NXZM、NXZ(H)M Automatic Transfer Switch
Parameter setting for controller
Note: The parameter settings for display
module and communication
default as follows:function
1 Setting of undervoltage switching
value: Default to 187V, user-settable
160V~200V.
2 Setting of overvoltage switching value:
Default to 263V, user-settable
240V~290V.
3 Setting of switching delay: Default to
5s, user-settable 0s~180s.
4 Setting of return delay: Default to 5s,
user-settable 0s~180s.
5 Setting of generator start-up delay:
Default to 5s, user-settable 0s~180s.
6 Setting of generator shutdown delay:
Default to 5s, user-settable 0s~180s.
Button instruction:
When the controller is in
operation, press the set button
to set the interface of parameter
setting menu, and press“ ”
and “ ”in the setting menu
to page up / down the setting
items. Press the comfirm/return
button to exit the setting menu;
press“ ”and“ ” to
modify parameters.
Fig 12 Parameter setting for controller

NXZM、NXZ(H)M Automatic Transfer Switch
10
Normal operation of
normal power supply
Failure of normal
power supply T1
Disconnection of
normal power supply
Disconnection of
normal power supply
Disconnection of
normal power supply
Power up of alternative
power supply
Connection of alternative
power supply
Connection of alternative
power supply
Connection of alternative
power supply
Recovery of normal
power supply T2
Normal operation of
normal power supply
Normal operation of
normal power supply
Start-up of generator
Generator output reaches
set value T1
Failure of alternative
power supply T2
Power supply of
alternative power source
Recovery of normal
power supply T2
Disconnection of
alternative power supply
Disconnection of
alternative power supply
Disconnection of
alternative power supply
Power up of normal
power supply
Power up of normal
power supply
Power up of normal
power supply
Power up of normal
power supply T4
Connection of normal
power supply
Connection of normal
power supply
Connection of normal
power supply
Generator shutdown
Flow Chart of Automatic Charge and Automatic
Recovery (Grid - Grid) of Controller
Flow Chart of Automatic Charge and No Automatic
Recovery (Grid - Grid) of Controller
Flow Chart of Automatic Charge and Automatic Recovery
(Grid - Power Generation) of Controller
Failure of normal
power supply T1
Failure of normal
power supply T3
Power up of alternative
power supply
Power up of alternative
power supply
Recovery of normal
power supply
Controller operation process
I: Normal power supply
II: Alternative power supply
T1: Switching delay time
Failure of normal power supply, time before
disconnection of I
T2: Return delay time
Recovery of normal power supply, time
before disconnection of II
T3: Generator start-up delay time: 0s~180s
adjustable
T4: Generator shutdown delay time: 0s~180s
adjustable
Fig 13 Controller operation process

NXZM、NXZ(H)M Automatic Transfer Switch
6
Product troubleshooting
11
Table 5 Non-common fault and solution
Description Causes and solutions
Controller display failure
Press Inquiry button. An indication of E-1 corresponds to
circuit breaker trip on the normal power supply side, and
that of E-2 corresponds to circuit breaker trip on the
alternative power supply side. the code (E-1/E-2) appears.
check if the main power supply has a short-circuit or a
overload failure,After elimination of the failure, switch
the product to the manual mode. Then press stop button
or rotate the handle to stop position then closing. And an
indication of E-3 corresponds to motor failure or motor
line disconnection. The code (E-3) appears, switch the
product to manual mode and press Normal or Alternative
button to confirm whether the product can be converted.
If not, repair or replace the product.
Table 6 Common failure and solution
Description
The display interface of controller is
not on after powering up
Cause Solution
Poor contact at incoming line terminal.
Controller fuse is blown.
Make sure the incoming line terminal is
firmly connected and in good contact.
Replace the fuse.
The product still shows fire control linkage after the fire
control linkage signals are removed from 501 and 502
terminals of the controller.
After the signals are removed, switch the product to
manual mode and press Confirm/Return button. It is only
after this sequence that the controller will retreat from fire
protection linkage mode to normal operation.
When a fault occurs to the normal or alternative power
supply, the product fails to switch to the faulty power
supply automatically or manually.
After the controller detects a failure of the normal or
alternative power supply, it will not switch on the faulty
power supply in manual or automatic mode, unless a
closing is forced with the handle.
The product fails to automatically transfer in automatic
mode when the main power supply has recovered from a
fault to the under (over)-voltage transfer setting value.
There is a +10V return value between undervoltage
transfer value and recovery value, and a -10V return
difference between overvoltage transfer value and
recovery value. The recovery value for power supply must
be bigger than the total of transfer value and return value.
The product is not connected to neutral
phase, especially for a 3P product.
Make sure the incoming line terminal is
firmly connected and in good contact.
Phase loss or failure. Check if the main circuit voltage is
normal.
The displayed voltage of phase A, B
and C is above 300V
One circuit of power supply of the
product is not connected to neutral
pole of the product is connected to
the live wire by mistake.
Conduct wiring correctly according to
the Instructions (main circuit). Wrong
connection will burn down the
controller.

NXZM、NXZ(H)M Automatic Transfer Switch
12
7
Environmental Protection
In order to protect the environment, the product or product parts should be disposed of according to
the industrial waste treatment process, or be sent to the recycling station for assortment, dismantling and
recycling according to local regulations.

QC PASS
Test date: Please see the packing
ZHEJIANG CHINT ELECTRICS CO., LTD.
NXZM、NXZ(H)M
Automatic Transfer Switch
IEC/EN 60947-6-1
PD1 Check 15
13
NXZM、NXZ(H)M Automatic Transfer Switch

NXZM、NXZ(H)M
Automatic Transfer Switch
User Instruction
Zhejiang Chint Electrics Co., Ltd.
Add: No.1, CHINT Road, CHINT Industrial Zone,North Baixiang,
Yueqing, Zhejiang 325603,P.R.China
E-mail: global-sales@chint.com
Website: http://en.chint.com
This manual suits for next models
1
Table of contents
Other CHINT Switch manuals
