Chip Energy 818-1630 User manual

Rev 2008.12.08
1
BIOMASS STOVE / GRILL
(MODEL 818-1630)
INSTRUCTION MANUAL
Thank you for choosing
Chip Energy’s Model 818 -1630 Biomass Stove / Grill.
Rev 2008.12.08
2
I. SAFETY FIRST: WARNING
A. This appliance is designed and manufactured for outdoor use only.
B. Always wear protective gloves or appropriate skin protection when assembling or operating
this appliance. Some parts have sharp edges, and many surfaces become extremely hot when the
appliance is operating. Safety glasses are required when operating near gasifier openings.
C. Do not store or use combustible or explosive materials (gasoline, LPG cylinders, etc.) near
this appliance. Also, do not operate this portable unit near anything that can be damaged by
radiant heat, such as vinyl, plastic, or painted walls, fencing, furniture, etc.
II. LIMITED 6-MONTH PARTS WARRANTY COVERAGE
A. Chip Energy warrants against any and all defective parts during the six-month warranty
period that begins on the date of purchase from the manufacturer or authorized distributor.
B. Chip Energy will replace or repair any defective part at its discretion.
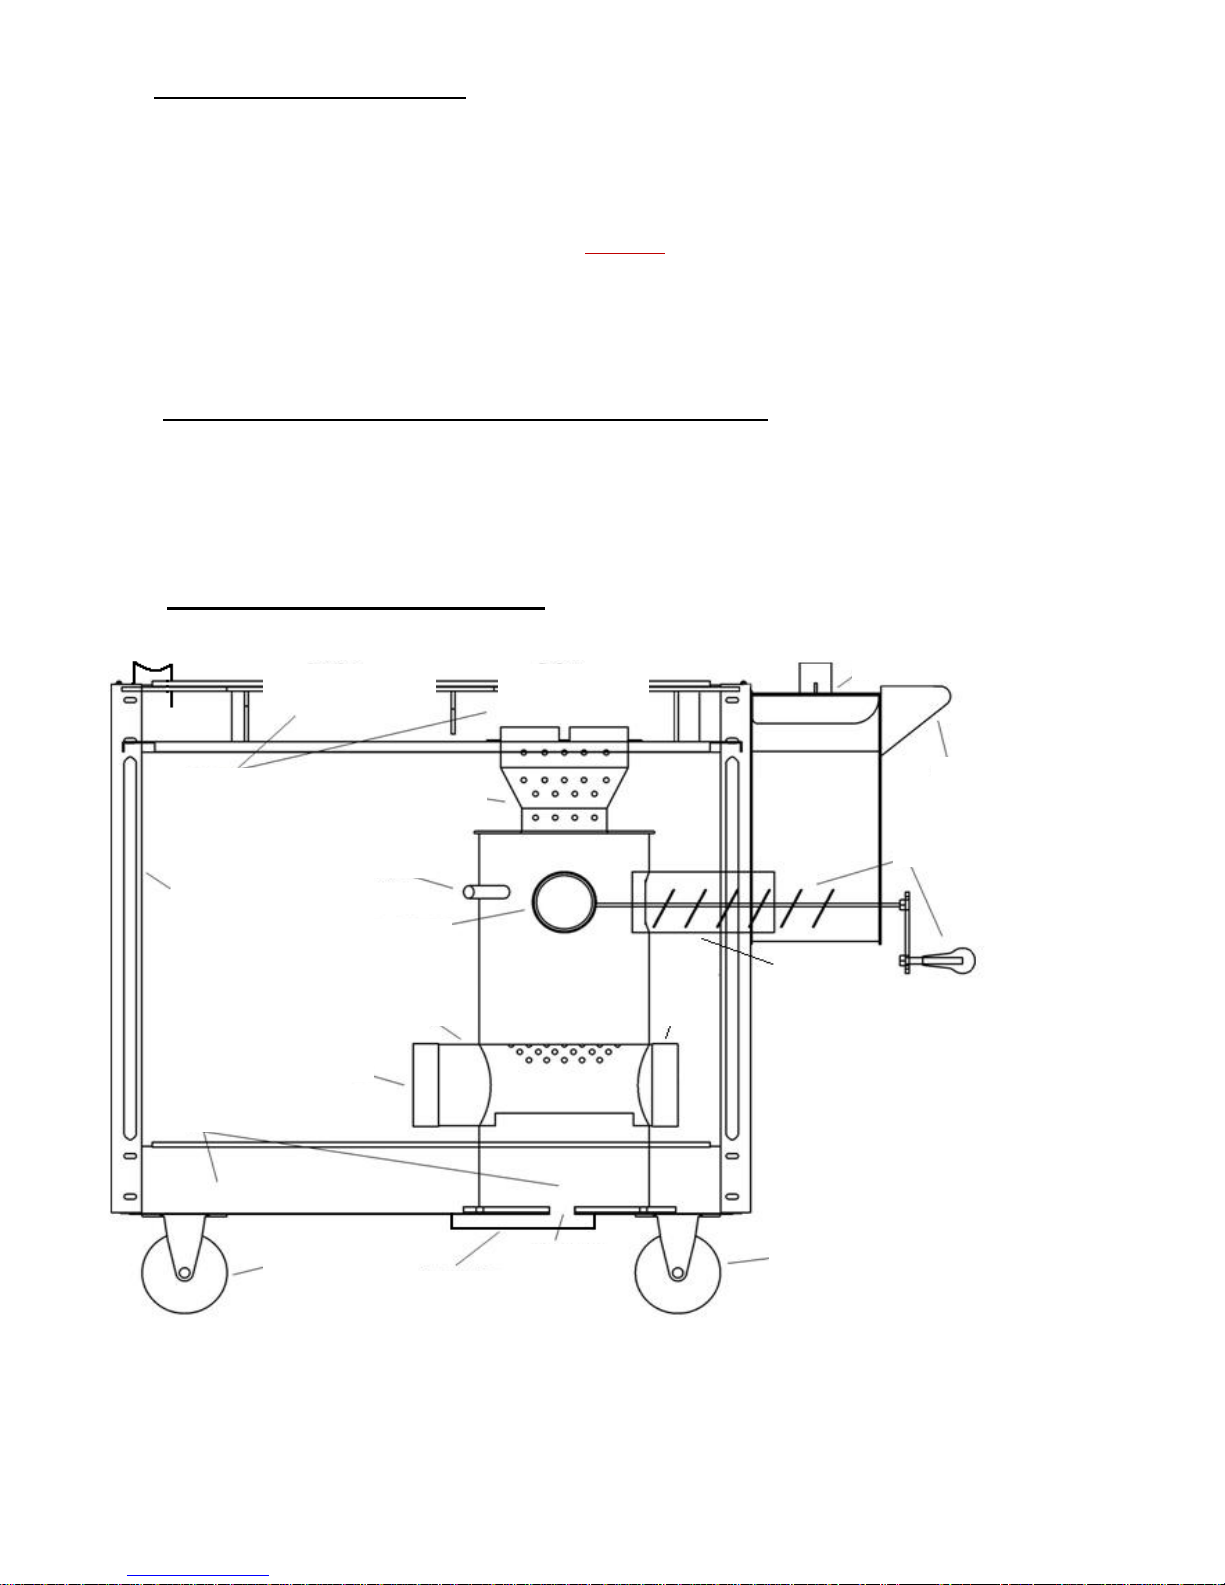
III. DIAGRAM OF ASSEMBLED UNIT
Combustion Tray
Combustor
Ignition Hole
Vertical Supports
Secondary Air Control
Grate Tube
Second Burner
First Burner
Lid
Handle
Fuel
Hopper
Gasifier
Fuel Auger
with Crank
Fuel
Feeder
Tube
Cap
Primary Air Inlet
Base Tray
Fixed
Direction
Wheels
Swivel
Wheels
Ash
Removal
Hole
Removable
Ash Tray
Chimney

Rev 2008.12.08
3
IV. ASSEMBLY INSTRUCTIONS
1. The Biomass Stove / Grill is
shipped partially assembled. Open
the box and position it so that the
cart rests upright on its wheels.
2. Remove all parts from the
shipping box.
a. Stove / Grill Cart
b. Chimney Sections (2)
c. Fuel Hopper
d. Fuel Hopper Lid
e. Secondary Air Control
f. Stove / Grill Top
3. Gather the two tools
needed for assembly.
a. Adjustable Wrench
b. Screwdriver (regular)
4. Remove the single screw
from the gasifier’s
secondary air opening
and use it to attach the
secondary air controller.

Rev 2008.12.08
4
5. Remove the top
two bolts from
each vertical
support at the end
of the cart closest
to the gasifier.
Attach the fuel
hopper using the
four bolts after
checking that the
fuel auger is
extended into the
gasifier’s fuel
tube.
6. Place the fuel hopper lid
onto the fuel hopper,
then set the stove / grill
top into the cart tray
with the smallest top
opening positioned as
shown here.
8. The Chip Energy
Biomass Stove / Grill
is now completely
assembled.
7. Install the chimney
by inserting one 2-
foot section into the
4-inch opening in
the stove / grill top,
then attaching the
second 2-foot
section as shown.

Rev 2008.12.08
5
V. PLEASE READ BEFORE FIRST USE
When the Biomass Stove / Grill is fueled and ignited for its first use, expect a small amount of smoke to
appear from exterior surfaces which have been coated with high-temperature stove paint. This is
normal, as the stove paint requires an initial (one-time) high heating to become properly cured. Do not
cook food on the stove / grill until this paint curing process has stopped and you relight the grill.
The recommended cookware includes cast iron skillets, griddles, and stainless steel pots. Do not use
house pans with Teflon®coatings, as these pans can get too hot and leach Teflon®into your food. Cast
iron will spread the cooking surface temperature more evenly. To better control the variations of surface
cooking temperatures, you may place a cookie sheet or a small pie pan (turned upside down) between
the burner and your cookware.
Your initial “experimentation” (such as using different types of fuels and adjustments of air control)
should be done when you do not have others waiting to be served. Like any appliance with a technology
new to you, expect to do a little learning to become familiar with the best usage of a modern biomass
micro-gasifier cooking device.
VI. INSTRUCTIONS FOR USE
“Practice makes perfect.” The operating procedure is easily learned and may be modified slightly to suit
your cooking style and types of fuels. Please refer to this manual’s photographs and diagram of the unit
for proper assembly and names of parts. Assembly instructions are found in Section IV, and a parts-
labeled diagram of the unit is found in Section III.
A. Verify that the appliance is properly assembled and ready for operation (refer to Section V if
this is the unit’s first use). Ensure that the bottom ash tray is closed, the lower primary air inlet is
fully open, the secondary air inlet is half open, and cookware (typically skillets, griddles, or pots)
is readily available to cover both burner (cooking) openings.
B. Place dry biomass fuel into the fuel hopper and gasifier. You can place fuel directly through
the first burner opening. Maximum fuel level is at the bottom of the secondary air inlet (note the
location of the secondary air control on the diagram in Section III). Do not overfill.
C. For ignition, use a modest amount of charcoal lighter fluid to moisten the top of the fuel in
the gasifier. (Warning: Never use an igniting accelerant in the fuel hopper, and never use
gasoline, alcohol, or diesel fuel as lighter fluid.) Insert a match or lighter-stick into the ignition
hole (note its location on the diagram in Section III). The lighter fluid can ignite with a sudden
flame, so keep clear of all openings. Do not cover the cooking openings until you have an
established flame.
D. Cover the two burner (cooking) openings with your cookware. (A small amount of water in
pots or skillets will keep them from getting too hot too soon.) You can start cooking
immediately. To see the flames, you can leave open a narrow gap between your cookware and
the edge of the first burner cooking opening. Even though you do not see flames at the second
burner cooking opening, it must be covered to ensure that all hot exhaust gases are properly
routed to the chimney.

Rev 2008.12.08
6
E. The need for additional fuel will depend on the fuel type, duration of cooking, and the
intensity of heat. This will require personal experimentation, keeping in mind the information
given in Sections VII, VIII, and IX.
VII. NOTES Customizing your cooking preferences with the Chip Energy Biomass Stove / Grill.
A. The initial burning period uses TLUD (“Top-Lit UpDraft”) pyrolytic gasification technology
for a very clean flame. Pyrolysis leaves behind hot charcoal over which you can continue to
cook slowly, or simply allow to burn to ash.
B. Cooking time during the TLUD period: One filling of standard wood pellets burns
approximately 50 to 80 minutes, whereas one filling of chipped or shredded softwood burns 25
to 40 minutes.
C. Additional fuel can be added during the TLUD period of operation. Add fuel by turning
counterclockwise the handle on the fuel auger. Do not add more fuel than the amount delivered
by two or three turns of the auger at one time. This additional raw fuel on top of the hot char
bed will also pyrolyze (give off combustible gases) and become charcoal. After adding fuel or
adjusting air flow, always allow a few minutes for the fire to stabilize.
D. Air control is the key to successful biomass gasification.
1. You can experiment by adjusting the secondary air inlet from fully open to almost
fully closed. (See the Technical Information of Section IX.)
2. You can partially cover the primary air inlet (on the lower side) to reduce the intensity
of the fire. When the primary air flow increases (whether by fan, wind, or direct
blowing), the fire intensity increases.
E. FLAME-OUT: If you reduce the air supply too much or add too much raw fuel, the flame
could extinguish and only smoke would rise from the gasifier. This situation requires you to
relight the burner. Only use a lighter-stick or match in the ignition hole to re-ignite the flame.
Make sure that the primary and secondary air inlets are fully open. (Warning: When relighting
the gasifier, a build-up of smoke can cause a sudden flame. STAY CLEAR OF ALL
OPENINGS WHEN RELIGHTING.)
F. Ash can accumulate in the bottom until it interferes with the entry of the primary air. This
accumulation could take several months depending on the use of the unit and whether low-ash
fuels are used. Clean the ash out at least once per year.
VIII. DRY BIOMASS FUELS
The following table illustrates a wide variety in types of dry biomass fuels. Keep in mind that any fuel
chosen must be dry and must pass through (by auger) the 3-inch diameter fuel feeder tube of the Chip
Energy Biomass Stove / Grill. When mixed with chipped wood or wood pellets, many of these fuels
perform very well. Note: Dry cherry pits are known as an excellent fuel for handling and combustion,
but like any “light weight” fuel, the net fuel volume needed increases as the fuel type becomes lighter.
Wood Pellets
Paper Shreds
Corn
Cardboard
Mesquite
Wood Chips
Peanut Shells
Rice Husks
Sawdust
Cherry Pits
Switch Grass
Pine Cones
Coconut Husks
Sunflower Seeds
Leaves
Miscanthus
Corncobs
Rev 2008.12.08
7
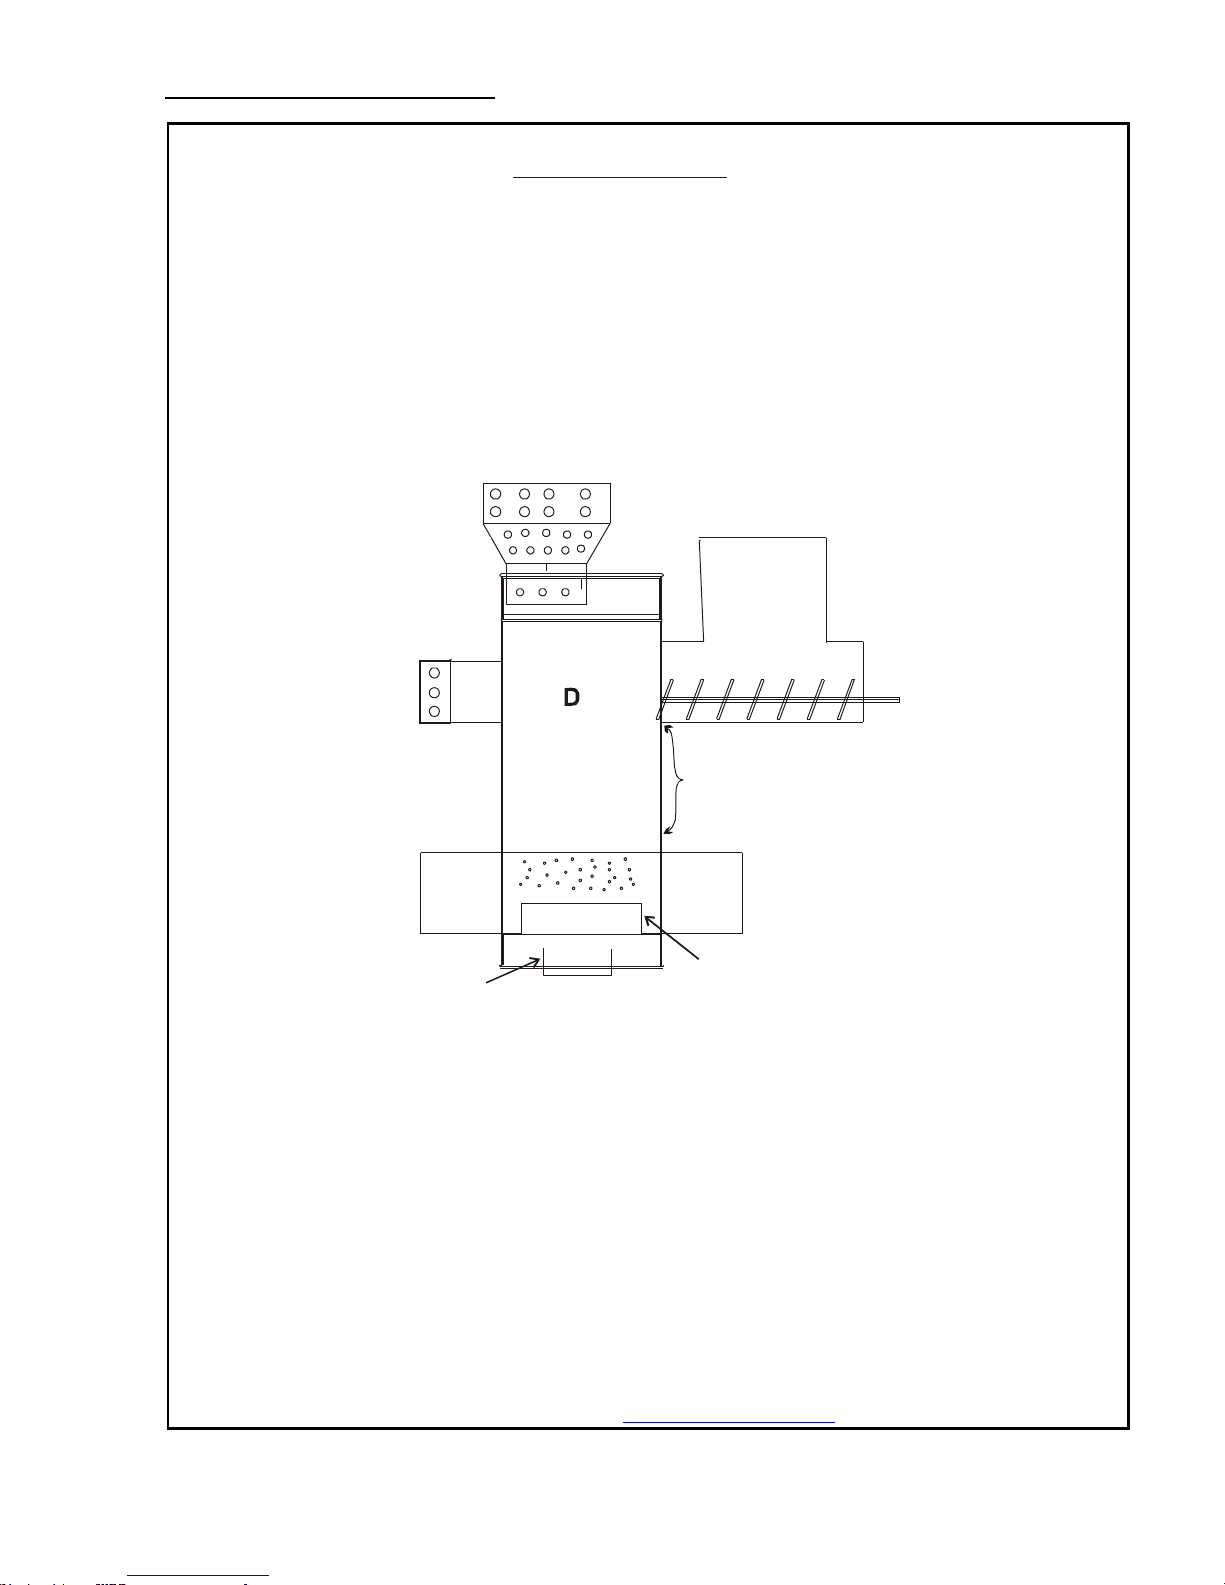
IX. TECHNICAL INFORMATION
HOW WORKS
A.
B.
C.
D.
E.
F.
G.
H.
MICRO-GASIFICATION
Fuel is added from hopper onto fuel pile above grate.
Fuel is top lit with lighter fluid.
Air enters upward through fuel.
Hot smoke fills the “smoke maker” above the fuel.
Air enters the “smoke burner” for clean combustion.
Used fuel becomes hot char and keeps the in-coming
raw fuel heated to release smoke (pyrolysis gases).
Openings for lower secondary air help control draft.
Ash and excess char are released after build up.
PRIMARY
AIR
PRIMARY
AIR
SMOKE
MAKER
CHARCOAL
SMOKEBURNER
GRATE
FUELFEEDER
CHIPFUEL
HOPPER
ASH F
A
B
C
E
G
HASHREMOVALCAP
C
1. The Chip Energy Biomass Grill literally “burns the smoke,” but smoke will not burn if it is
too cool, is deprived of sufficient air mixing, or contains excessive moisture. Because there are
so many variables (fuel types, fuel moisture content, wind, thinner air at higher elevations, over-
filling or under-filling of the fuel, air controls, etc.), you should experiment to fully learn how to
operate the gasifier and combustor. With some practice, you will master and appreciate the art of
cooking with biomass gasification.
2. During extended burning times, the Biomass Grill will change over from TLUD gasification
to AVUD technology, a variation of traditional updraft gasification that consumes existing
charcoal at the bottom and creates more charcoal from the new fuel entering at the top. With
AVUD technology, the Biomass Grill can be operated continually because only a small amount
of ash accumulates at the bottom.
3. Visit our website for further information: www.chipenergy.com

Rev 2008.12.08
8
X. CONTACTING CHIP ENERGY
Chip Energy’s website (www.chipenergy.com) is an excellent resource for our products and services,
and it provides the most up-to-date listing of our postal and electronic contact information.
To help us improve our services and expand the applications of the Biomass Grill, we encourage you to
send comments on operations and successful recipes to Chip Energy at: comments@chipenergy.com
Thank you for choosing
Chip Energy’s Model 818-1630 Biomass Stove / Grill.
Popular Stove manuals by other brands

Sylvania
Sylvania SOQC935-MBK manual

Coleman
Coleman 9944 Series Instructions for use

GABRIEL KAKELUGNAR
GABRIEL KAKELUGNAR STUDIO2 Assembly instructions

Italiana Camini
Italiana Camini MAREA Installation, use and maintenance

Napoleon
Napoleon EPA 1100 Installation and operation instructions

Jøtul
Jøtul GF 400 BV Sebago Installation and operation instructions

Valor
Valor Portrait Series installation manual

Lacunza
Lacunza Atlantic 600 Instruction book

WANDERS
WANDERS VERSAILLES II - SCHEMATICS manual

Zibro
Zibro MIRTILLA installation manual

SEVERIN
SEVERIN KP 1057 Dimensions

Harman Stove Company
Harman Stove Company Harman Stove The Harman Magnum Stoker Installation and operating manual


