Choose 2 rent Cradlepoint AER1600 Safety guide
Choose 2Rent
Phone 1 (800) 622-6484
Fax 1 (866) 937-8254
info@choose2rent.com
www.choose2rent.com
page 1 of 5
How To Connect Your Router
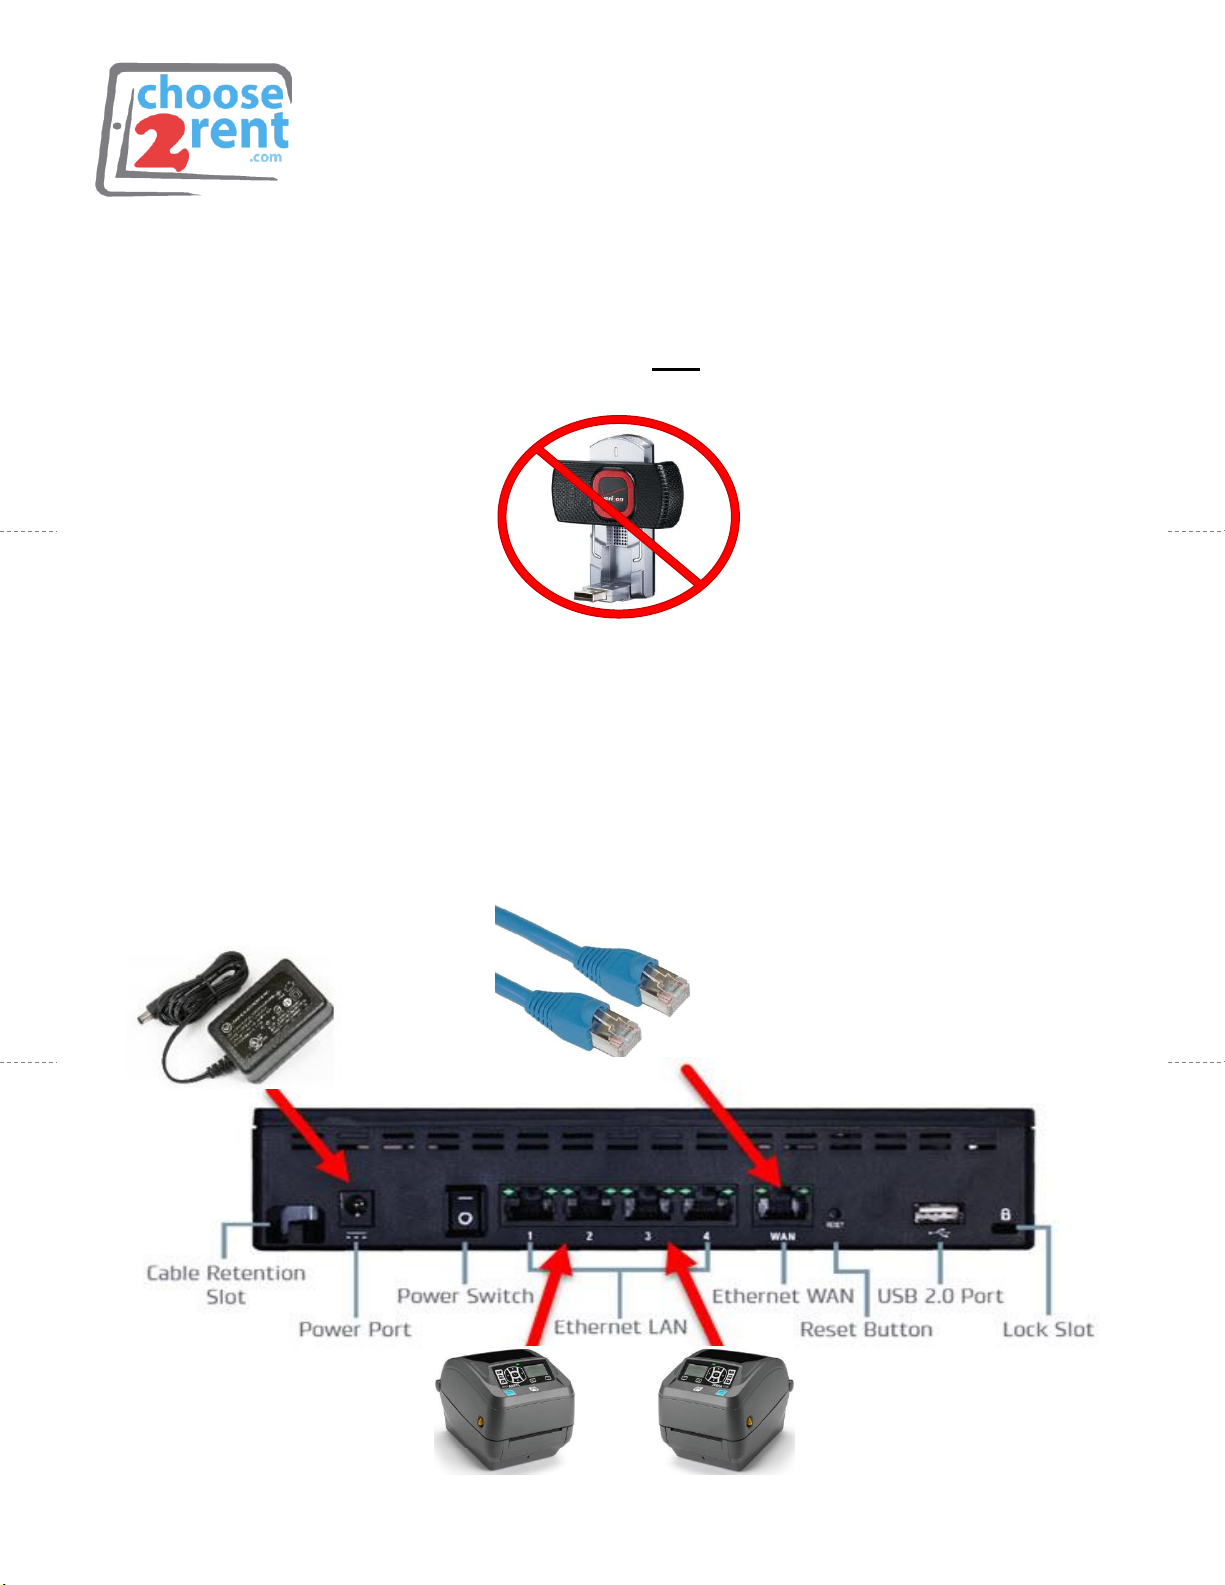
NOTICE: This booking does not include a Surf Stick
(SIM CARD BUILT INSIDE ROUTER)
Connect your Cradlepoint AER1600
Option 1:
Using LAN Internet
1. Connect the router with your
local internet using the blue
port on the back of the router.
Option 2:
Using Mobile Internet
1. The router comes with a built
in VERIZON SIM card
Please allow 3-4 minutes for the
router to boot and the modem to
establish cellular connection.
page 2 of 5
2. Connect the Power Adapter to the Power Port
3. Connect Printers with Ethernet Cables
4. Connect (Optional) hardwired Internet
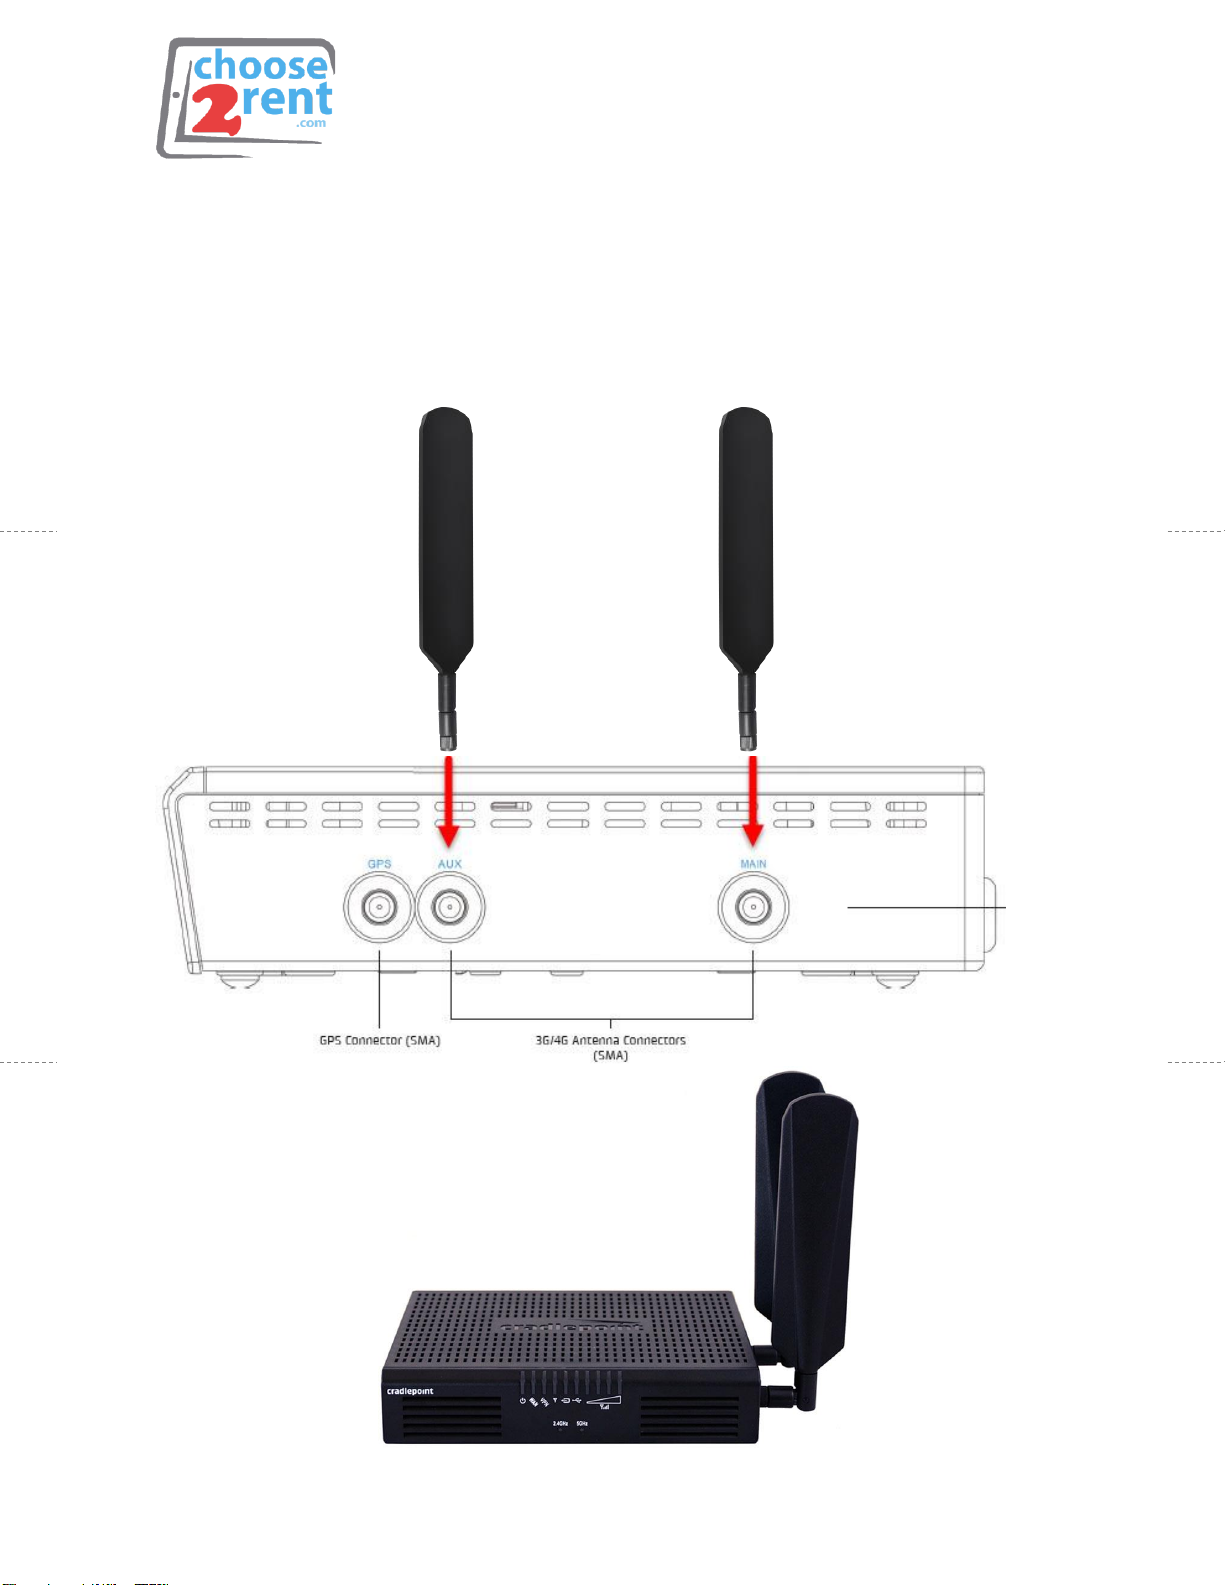
5. Connect Modem Antennas to AUX and MAIN –Finger-tighten only
page 3 of 5
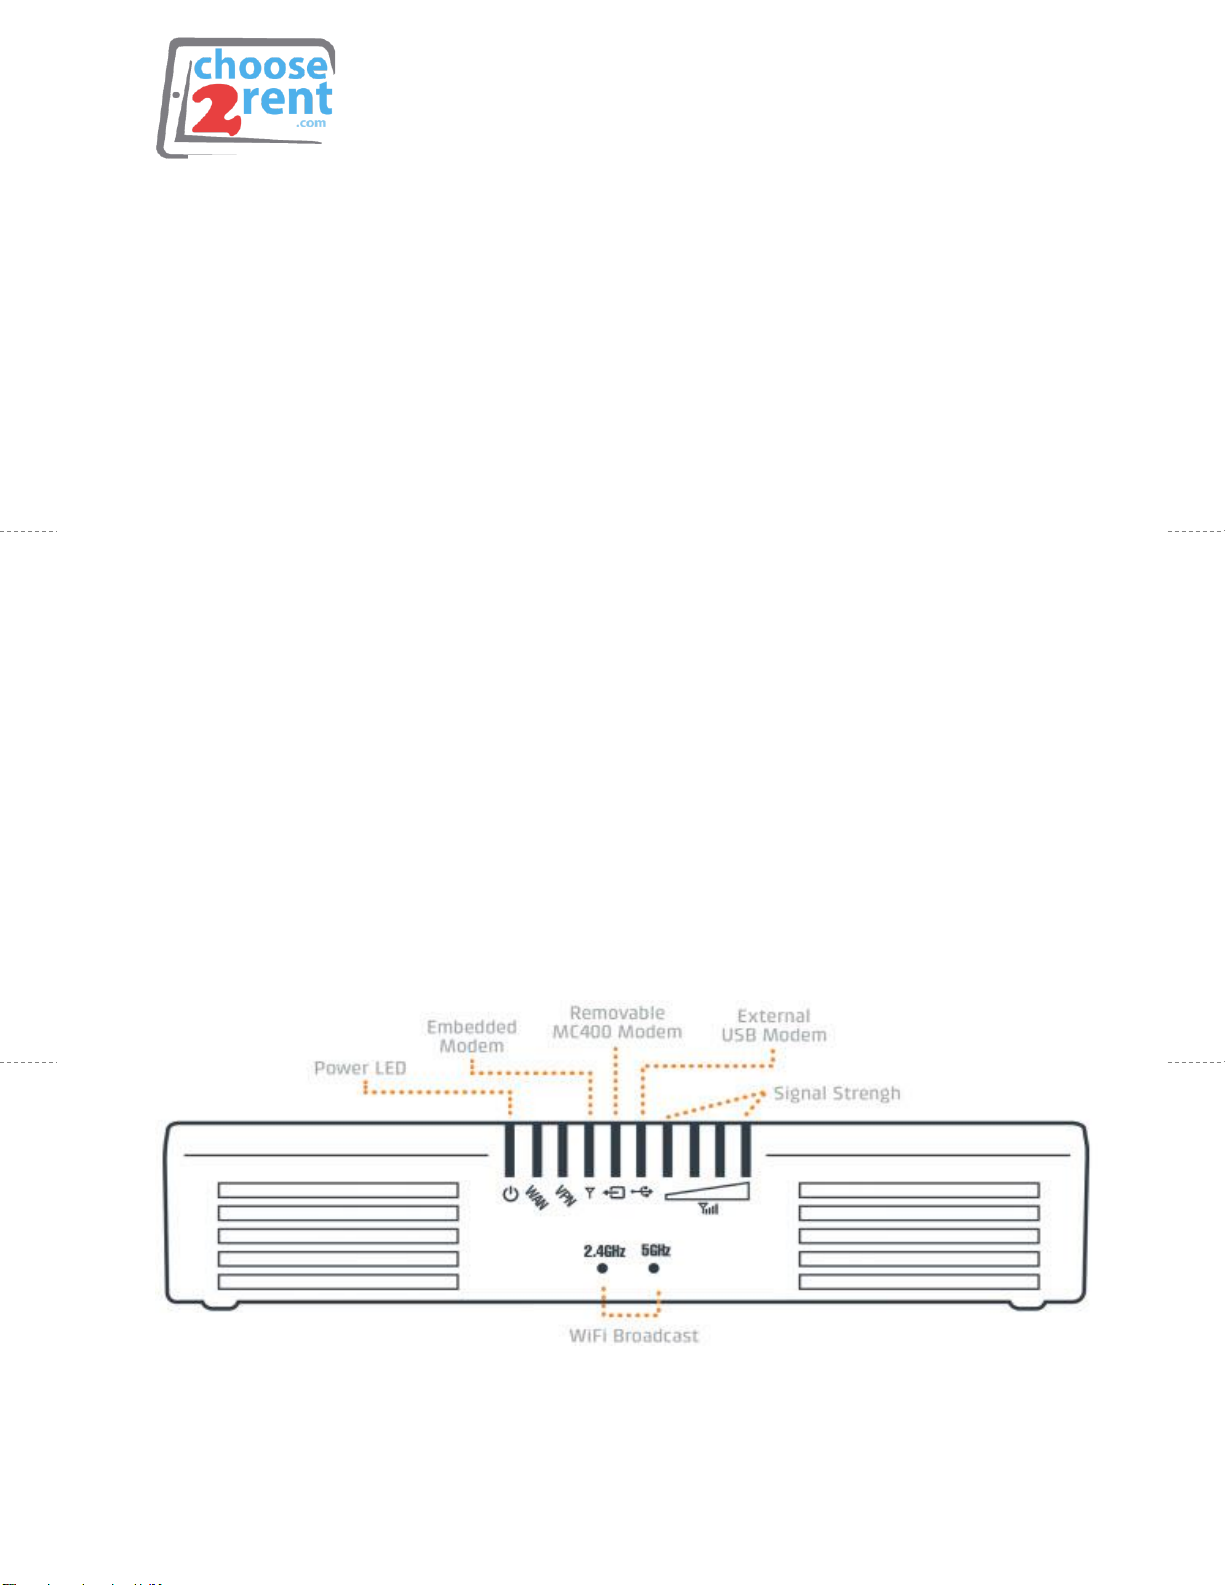
•The indicator lights turn on and your device is ready to use
•Your Rental devices are automatically connected to the Wireless
network. If you need to add additional devices, you can find the
network name and password on the top of the router.
•You can now connect printers or other devices using the additional
Ethernet Outlets in the back of the Router marked with the numbers 1
to 4.
•Depending on your requested order, if using the hard-line LAN/WAN
option as your main connection, your SIM 3G/4G Network is activated
as a failback in the event your main LAN/WAN line has been
disconnected from service. This will allow you to continue without any
interruption in your service. Please allow a few moments for the
modem to enable.
Please note: If you use Option 2 in Step 1, some public internet
providers (hotels or similar) require to login or accept their terms &
conditions. Please connect a computer or tablet PC to the router (Wi-Fi
or wired) and open an internet browser to test the connection or follow
the instructions from the internet provider.
Identifying LED’s

page 4 of 5
What You Need To Know Before You Start
Below is a step-by-step guide to help you set-up the printer on-site, and then
manually calibrate the device, a process which will prepare the printer to print your
specific event badges.
What do you need before you begin the process?
•A wireless router with multiple Local Area Network (LAN) ports, one port for
each of your printers
•A connection from the router to the internet. Usually the Wireless Area
Network (WAN) port. Consult you router’s instruction to determine how to
connect to the network, or ask your onsite audio visual representative for
assistance.
How to Set up Your Printer
1. Plug in your printer and flip the switch on the back left hand corner to ON.
2. Plug in the ethernet cable into the printer and connect the other end to the
router.
3. Click on the HOME button (looks like a house) and use the arrows to toggle
to NETWORK, click the chckermark button. ACTIVE PRINTER SERVER should
appear, settings need to read “Wired“.
4. Toggle right in Network settings to PRIMRY NETWORK –setting should be
set as “Wired“.
5. Open your printer by placing two fingers on the yellow notches on either
side of the printer. Press the notches until the hood disengages with the
base (you’ll hear a ‘pop‘ sound).
6. Place your badge stock behind the printer and slide
the badge roll through the slight opening in the rear
of the printer. Make sure that the badge static
artwork is facing upward and the stock fits between
the two yellow spacers in the center of the printer.
The stock should be aligned and snug; use the yellow
roller in the middle of the printer base to adjust
spacer width.
7. Pull the badge stock past the spacer and through the
front opening.
8. Close the printer so that exess badge stock is clearly
vissible, as shown. When closed, the light button on
the front will turn green.
9. Click on the HOME button and select the first image called Settings. Here,
you can:
a. Modify Media Type (Gap/Notch, Mark, Continuous)
b. Switch Print Mode (Tear Off, Cutter, Etc.)
c. Adjust Darkness
10.Return HOME and toggle to the “Tools“ Setting. Scroll to Manual Calibration
and press “START“.
11.You’re done! If the calibration is not completing, read through the
troubleshooting FAQ below for the most common issues.

page 5 of 5
TROUBLESHOOTING FOR PRINTERS
Q: My printer won’t calibrate: I am recieving an error that says Load
Backing Printer Paused.
A: Press the Pause button on the right side of the printer to resume.
Q: My printer won’t calibrate: I am recieving an error that reads Reload All
Continue.
A: Open the device using the two yellow notches on either side of the printer.
Make sure that the badge stock is properly aligned and snug against the yellow
spacers. Pull the badge stock through the printer’s fron opening until the badge is
clearly visibile. Close the hood of the printer and press Pase to resume.
Q: My printer is starting to calibrate, but then it stops after one or two
badges and doesn’t finnish the calibration.
A: Make sure your badge stock is inserted in the correct direction. If your badges
have a timing mark (black marks on the back of the badge), ensure that the timing
mark is at the leading edge of the badge. Gap notch badges should have the gap
notch also leading the badge.
Q: One badge prints and then there’s a printer jam and the red light
flashes.
A: The printer settings probably do not match the actual badge stock you are
using. You can control this in the printer’s settings. If you have a gap/notch
badge stock, make sure it’s on gap/notch setting and similarly timing mark badges
should be on timing mark setting.
How to Set up Your iPad
Please Note: The included iPads have already been set up for you.
1. Connect your iPad to your router’s wireless network. The name and
password will be on a label on the back of the router. If you connect to any
other network, you will not be able to print badges from the included
printer.
2. Within your Boomset Application, select Printer Setup and connect to the
specific Printer IP you would like your iPad to print to. (Printer IP will show
on the display screen)
Please contact your Boomset Representative if you are having difficulties with the Guest
List Application software.
Please call our support team if you need assistance setting
up your rental devices
1(800) 622-6484
Table of contents
Popular Network Router manuals by other brands

Lenovo
Lenovo RackSwitch G8332 installation guide

Glitel
Glitel GT-5802W Quick installation manual

TechniSat
TechniSat TechniRouter 5/1x8 G Montageanleitung

Juniper
Juniper AP45 Hardware installation guide

Four-Faith
Four-Faith F653 Series user manual

Cisco
Cisco ASR1004 - ASR 1004 Modular Expansion Base Hardware installation guide


