Chrysler C-67 User manual

386—STEERINGCHRYSLERSERVICEMANUAL
MANUALSTEERING
DATA
AND
SPECIFICATIONS
MODELS
KingPinDiameter
KingPinBushings(ManualSteering)Type
Upper
Lower
KingPinBushings(PowerSteering)Type
Upper
Lower
DimensionsofLowerBushings
InsideDiameter
OutsideDiameter
Length
ReamAfterInstallation
C-67,C-68,C-69,C-70
.7953in.
NeedleTypeBearing
Bushing
FloatingBushing
FloatingBushing
.787to.789in.
.823
to.825in.
1.195to1.205in.
.7960to.7975in.
COAXIALPOWERSTEERING
MODELS
FluidCapacityofHydraulicSystem
FluidCapacityofWormHousing
TypeofFluid
MaximumPumpPressure
MaximumFluidFlowat
3,000
R.P.M
MaximumPumpRotorClearances:
BetweenRotorLobes
BetweenOuterRotorandBushing
C-67,C-68,C-69,C-70
2qts.
lpt.
AutomaticTransmissionFluid,
TypeA
750to800psi.
2gal.(Minimum)
.008in.
.006in.

CHRYSLERSERVICEMANUAL STEERING—387
COAXIALPOWERSTEERING(Cont'd)
EndClearance(BetweenRotorsand
FaceofBody)
FlowControlValveSpring
FreeLength
WorkingLength
ForceatWorkingLength
PressureReliefValveSpring
FreeLength
WorkingLength
ForceatWorkingLength,
FrontEndAlignment
SteeringGearRatio
PistonRodSnapRingGap
(UpperandLower)...
.001
to.002in.
2.13in.
1.20in.
14lbs.± lVolbs.
1.51in.
1.18in.
30to33lbs.
16.2:1
2%4in.
SPECIALTOOLS
MANUALSTEERINGGEAR
ToolNumber
C-143
C-328
C-611
C-3428
C-619
C-630
ToolName
Puller-—SteeringArm
Bushing—KingPinRemover
Bushing—EccentricAdjusting
Puller—SteeringWheel
Bushing—EccentricAdjusting
Reamer—PilotBushing

388—STEERING
CHRYSLERSERVICEMANUAL
COAXIALPOWERSTEERINGGEAR
ToolNumberToolName
C-760Pliers—GearSnapRing—StraightType
C-3102Gauge—HydraulicPumpandGearChecking
C-3106Pliers—GearSnapRing—RightAngle
C-3107Wrench—AdjustableSpanner
C-3108Studs—(Pr.)PowerCylinder
C-
3109Spacer—AligningUnitInChassis
C-3112Puller—SteeringGearTubeCouplingAdaptersforC-293Puller(C-3145
CoversC-3112PartsandC-293PartsRequiredToPullCoupling)
C-3113Driver—SteeringGearShaftOuterBearing
C-3114Driver—SteeringGearShaftInnerBearing
C-3116Pilots—(Pr.)ReservoirInstalling
C-3117Plug—OilPumpReturnHole(Tapered)(Small)
C-3128Pliers—PumpShaftRearBearingRing
C-3129Driver—PumpOilSealandBearing
C-3130Thimble—Protector—PumpOilSeal
C-3136Sleeve—ShaftOilSealInstalling
C-3137Remover—ShaftOilSeal
C-3141Driver—ValveBlockAdjustingPinRoller
C-3142Driver—SteeringGearShaftInnerSeal
C-3143Driver—SteeringTubeOilSealInValveBodyCap
C-3189Plug—OilPumpReturnHole(Tapered)(Large)
C-485,
C-524or
C-3005..
Wrench—Foot-PoundTorque
C-612Puller—SteeringWheel
C-685orC-3380Wrench—Inch-PoundTorque
SP-2623PullerScrew—ForUseWithC-143Puller(PreviouslyReleased)
C-3185Remover—PumpShaftBushingsandSeal
C-3211Hose—HighPressureP/STest
C-3214Puller—MainBearing

CHRYSLERSERVICEMANUAL
STEERING—389
COAXIALPOWERSTEERINGGEAR(Cont'd)
ToolNumberToolName
C-3227Wrench—FlangeHolding
C-3228Thimble—ShaftOilSealProtecting
C-3229Pliers
C-3230Driver—ShaftOilSealInstalling
C-3233Driver—ShaftBushingInstalling
C-3234Adapter—ForusingC-3214Puller
C-3250Pliers—HoseClamp
C-3251Driver—MainBearingInstalling
C-3309Gauge—OilPump,pressurechecking
C-3317Driver—WormHousingOilSeal
C-3318Hose—LowPressureP/STestW/adapters
C-3319Nut—WormShaftHolding
C-3320Wrench—WormShaftBearingAdjustingNut
C-3321Wrench—WormConnectorHolding
C-3322RemoverandInstallerWormHousingBearingCups
C-3323Fixture—GearAssemblyHolding
C-3328Spanner—UpperPistonRodNut
C-3329Thimble—ValveControlSpacerSealInstalling
C-3331Driver—HousingHeadandGearHousingSeal
C-3333Driver—RemoveandInstallGearShaftBearing
C-3344—SP-2604Installer—PistonandRingAssembly
C-3350RemoverandInstaller—GearShaftOilSeal
C-3437Protector—LowerPistonRodSeal
C-3392Wedge—CouplingRemoving—(NotRequiredIfC-3112IsAvailable)
C-3398RemoverandInstaller—GearShiftRodBushings
C-3399Tool—ShifterDialBulbRemovingandInstalling
C-3401Thimble—GearshiftAdjustingScrew"0"RingInstalling
C-3469Flange—UpperHousing—UsedForPretestingforHydraulicLeaks

390—STEERINGCHRYSLERSERVICEMANUAL
TIGHTENINGREFERENCE
MANUALSTEERING
Foot-Pounds
SteeringGeartoFrameBolt50
SteeringGearArm(Pitman)LockBoltNut.80
SteeringKnuckleTieRodClampBolt15
SteeringGearMountingBracketBolts50
SteeringWheelNut40
SteeringKnuckleTieRodEndBallNut75
IntermediateSteeringArmPinNut50
POWERSTEERINGGEARASSEMBLY
Foot-Pounds
PumpBodytoCoverBolts30-35
PumpReservoirtoPumpBodyBolts12-17
PumpMountingBolts18-23
PumpReservoirMountingStud30-35
SteeringKnuckleArmNuts(BrakeAnchorNuts)55-75
SteeringGearArmtoShaftNut100-125
SteeringArmtoTransverseLinkNut50-55
SteeringGearAssemblyMountingtoFrame65-70
SteeringWheeltoSteeringShaftNut35-40
JackettoInstrumentPanelScrews15-20
TieRodClampBolts10-15

CHRYSLERSERVICEMANUAL-STEERING—391
POWERSTEERINGGEARASSEMBLY(Cont'd)
Foot-Pounds
TieRodtoSteeringKnuckleArmNuts45-75
PumpCouplingAttachingScrew15-20
PumpFlowControlandRelief
Valve
Adapter(Retaining)45-50
PumpCouplingFlangeAttachingScrew10-12
UpperPistonRodNut25-30
BallGuideClampScrews10-12
WormHousingtoGearHousingScrews25-30
GearShaftAdjustingScrewLockNut35-40
RESERVOIR
ThreadSizeFoot-Pounds
ReservoirCoverBolt%6x 248
ReliefValveAssemblyCap1x88
HoseConnectorInlet% x 1830
PUMP
ThreadSizeFoot-Pounds
PumpAssemblyBolt%6x 1820
HoseConnectorOutlet% x 1830
By-PassPlug% x 1650
ReliefValvePlug1x 1450
FlowDividerValvePlug1%x 1250
94e DrainTubeNut% x 24*y2to% Turn
or6 to10
*Thenumberofturnsspecifiedisafterinitialfingertightening.

392—STEERINGCHRYSLERSERVICEMANUAL
KNOB
COVER
SCREW
GROMMET
JACKET
INSULATOR
SWITCH
BRACKET
LEVER
GROMMET
WASHER
WASHER
OIL
SEAL
WASHER
LOCKWASHER
NUT
NUT
OILSEM'^J^\\
BUSHINGS<^T%
\ *
CUP
CAGE
AND
ROLLERS
TUBE
AND
WORM
CAGE
AND
ROLLERS
OIL
SEAL
SHIMS
NUT
54x677
A
Fig.
1—TypicalSteeringGear(ExplodedView)

CHRYSLERSERVICEMANUALSTEERING—393
Section
X
STEERING
(SEEFIG.
1)
1.
LINKAGE
Thesymmetricalidlerarmtype
of
steering,
as
shown
in
Figure2,
is
usedon
all
models.
A
cen-
terlinkrelaysthemotionfromthePitmanarm
toanidlerarmatitsoppositeend.Theidlerarm
ismounted
ona
bracketattached
tothe
frame.
Twoequallengthtierodsconnectfromthecen-
terrelaylinktothesteeringknucklearms.Both
tierods
are
threaded
for
proper
toe
aligning
adjustment.
2.
STEERINGGEAR(THREE-TOOTHROLLER
ANDWORM)(Mechanical)
Athree-toothroller
is
mounted
on
needleroller
bearingson
a
steelcross-shaftinsertedthrough
thesteeringgearshaft.
Theworm
is
integralwith
the
steeringtube
and
is
supported
at
each
endby
taperedroller
bearings.Thewormbearingpre-loadisadjusted
bymeans
of
shimsplacedbetween
the
housing
andhousingendcover.Thesteeringgearshaft
rotates
in
twobronzebushingspressedinto
the
steeringgearhousing.
The
three-toothroller
on
the
shaft
is
meshedwith
the
worm.When
thesteeringwheel
is
turned,
the
wormrotates
thesteeringgearshaft
and
roller,moving
the
Pitmanarm,which
is
splined
tothe
end
ofthe
shaftandheld
in
placewith
a nut.
Backlashbetweenthesteeringgearshaftrol-
lertoothand
the
worm
is
controlled
byanad-
justingscrewthatisthreadedthroughtheshaft
androllercover.Thebaseend
of
theadjusting
screw
is
engaged
ina
slot
intheendofthe
steeringgearshaft.Correctbacklash
canbe
TIE
ROD
ENDS-INNER
CENTERLINK
IDLER
ARM
STEERINGGEAR
STEERINGKNUCKLE
ARM-RIGHT
TIE
ROD
END-OUTER
STEERINGKNUCKLE
ARM-LEFT
STEERINGGEAR
ARM
55x5
Fig.
2—IdlerArmTypeSteeringLinkage

394—STEERINGCHRYSLERSERVICEMANUAL
obtainedbyturningtheadjustingscrewinor
out,asrequired.
ThesteeringwheelandPitmanarmare
splinedtothesteeringtubeandsteeringgear
shaft,respectively.Boththesteeringwheeland
thePitmanarmhavemasterserrationstoin-
surecorrectinstallation.
Thehighpointisthepointofleastclearance
betweenthewormandrollerandisatthemid-
pointofthewormandrollertravel.
Anoilsealisinstalledintheboreofthe
steeringgearhousingattheouterendofthe
shafttopreventoilleakageandtokeepforeign
materialfromenteringthesteeringunit.
3.
REMOVALOFSTEERINGWHEEL
ASSEMBLY
Disconnectbatteryandcenterthesteering
wheelinthestraight-aheadposition.Pressdown
onthehornblowingringornamentandturn
counter-clockwise.Liftoutornamentretaining
springandpad.Disconnecthornwirefromter-
minalontravelplateandinsulatorassembly.
Removebushing,travelplate,hornblowingcon-
tactringspring,andtriangulargroundplate.
Curlandpushhornwireintothesteeringgear
tubetomakeroomforsteeringwheelpuller
pilot.Removethesteeringwheelnut.Attach
pullerandremovesteeringwheel.
4.
REMOVALOFSTEERINGGEAR
ASSEMBLY
Itisnotnecessarytoremovethecompletesteer-
ingcolumnandmastassemblyfromthecarfor
servicingthegearchuckandwormshaft.To
removethegearchuckandwormshaftassem-
blyproceedasfollows.Disconnectthebattery,
pressdownonthehornringornamentwhilero-
tatingit,andremoveornament.Removesteer-
ingcolumnwormshaftnut.Pullsteeringwheel
withpuller.Loosenjacketbracketboltsatin-
strumentpanel.Removedustpadretaining
screws.Raisefrontofcarandremovesteering
gear(Pitman)armfromgearshaft.Loosen
jackettogearchuckclampbolt.Removegear
chucktoframeattachingboltsandworkgear
chuckandshaftassemblyoutofjacket.Remove
assemblyfromlowersideofcar.
5.
DISASSEMBLYOFSTEERINGGEAR
(UnitRemovedFromCar)
TodisassembletheManualSteeringGearAs-
sembly,proceedasfollows:
Drainlubricantfromthesteeringgearhous-
ing.Mountthegearassemblyina suitablebench
vise,
holdingtheassemblybythehousingto
chassismountingflange, withthesteeringcol-
umninthehorizontalposition.Removetheshaft
coverattachingcapscrews,cover,gasketand
steeringgearshaft,androllertoothassembly.
Loosenthecolumnjacketclampbolt,pry
openclampandremovecolumnjacketfrom
steeringhousing.Removesteeringworm,lower
oilsealhousingcoverbolts,coverandshims.
Pullsteeringtubeandwormassemblybearing
cupsandbearingcagesoutofthelowerendof
steeringhousing.
Cleanthesteeringgearhousingshaft,bear-
ingsandotherpartsthoroughlywitha suitable
cleaningsolvent.Inspectrollertoothshaft, shaft
serrations,bearings,bearingcups,oilseals,
wormandtubeforwear,nicksandflat spots.
Replacewithnewpartsasnecessary.
Removerollertoothassemblyshaftcover
adjustingscrewnutandlockingplate.Check
adjustingscrewthreadsincoverandonthe
adjustingscrew.Replaceifnecessary.
6.ASSEMBLYOFSTEERINGGEAR
(UnitRemovedFromCar)
NOTE
When the steering gear assembly is disassem-
bled,
it is always advisable to install new seals
and gaskets to insure against oil leaks.
Ifeitherofthewormthrusttaperedroller
bearingshavebecomedamaged,itisadvisable
toreplacebothbearings.Afterthoroughly
cleaningallparts,assemblethepartswithout
anylubrication.Lubricationshouldbedone
aftertheadjustmentshavebeencompleted.If
bushingsorneedlebearingshavebeenremoved,
pressnewbushingsorneedlebearingsinto
place.Usenewoilseals.
Insertthewormandtubeintothehousing
withbearingsandcupsintheproperorder,as
showninFigure2.Installtheshimsandlower
housingcover,makingsurethatbearingsare
seatedincupsbeforetightening
screws.
Tighten
thecoverscrewsevenly,turningthewormtube
atintervaletobesurenobindoccurs.Final

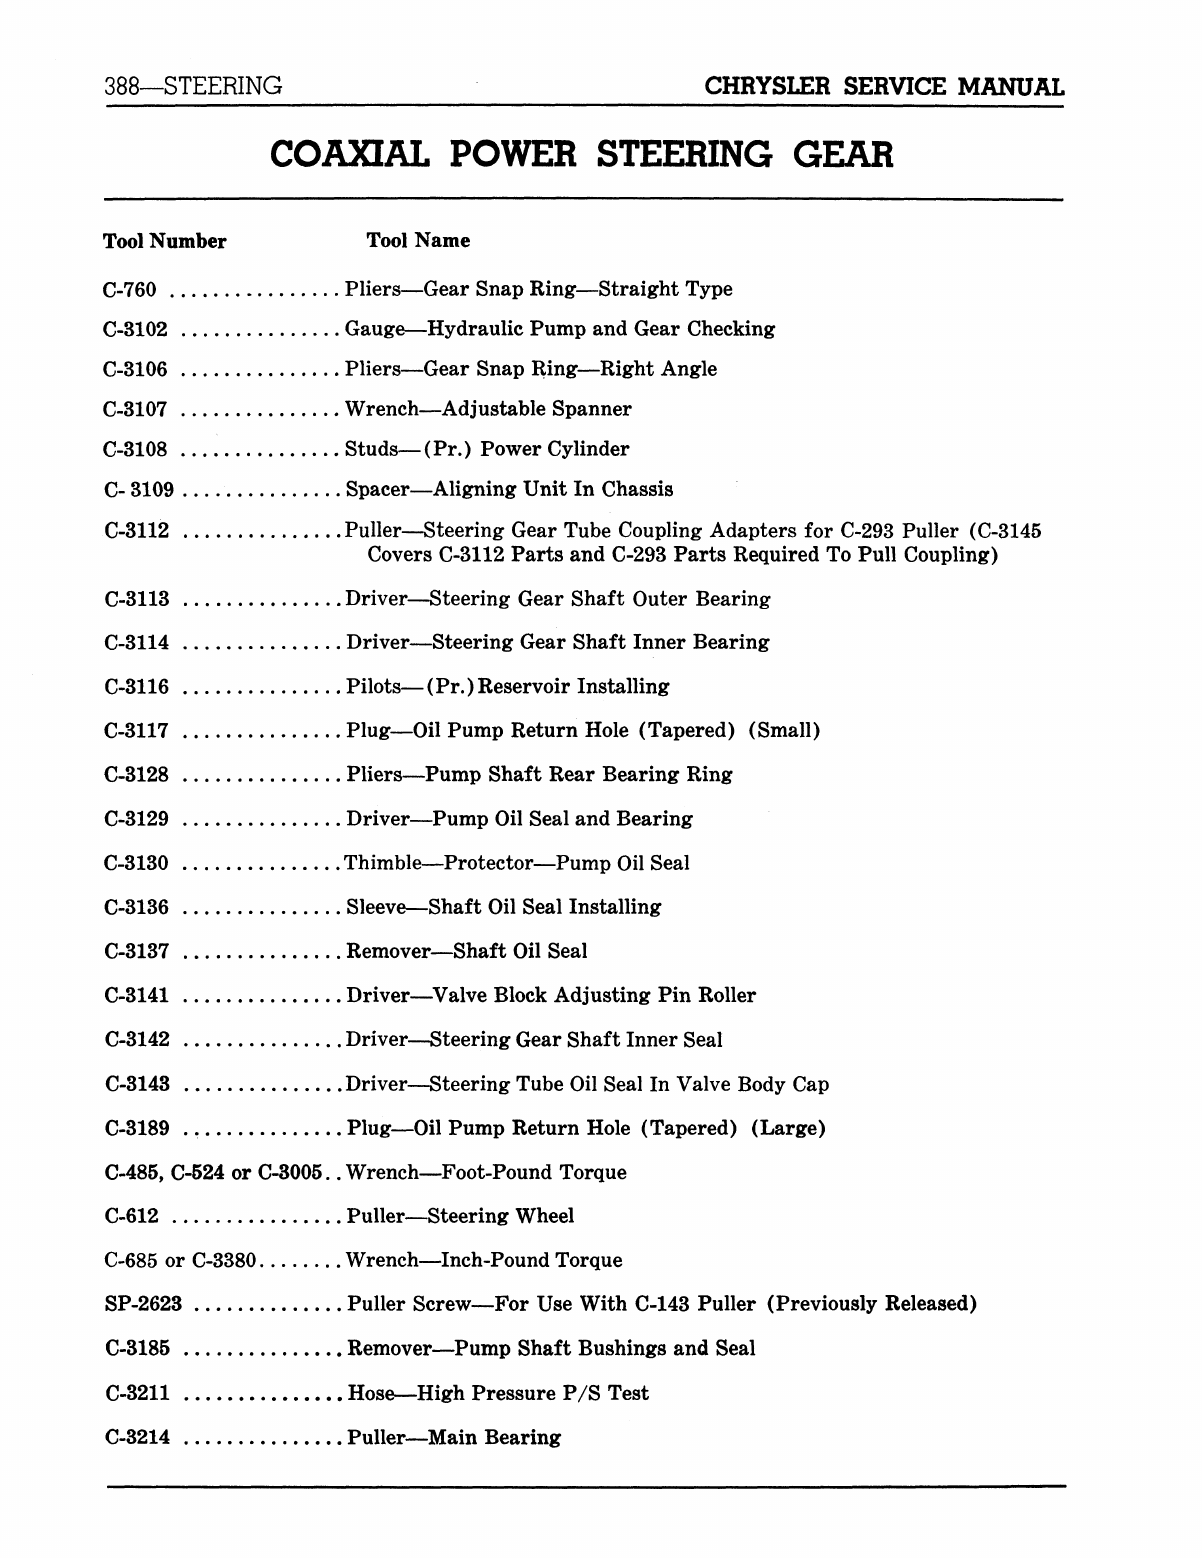
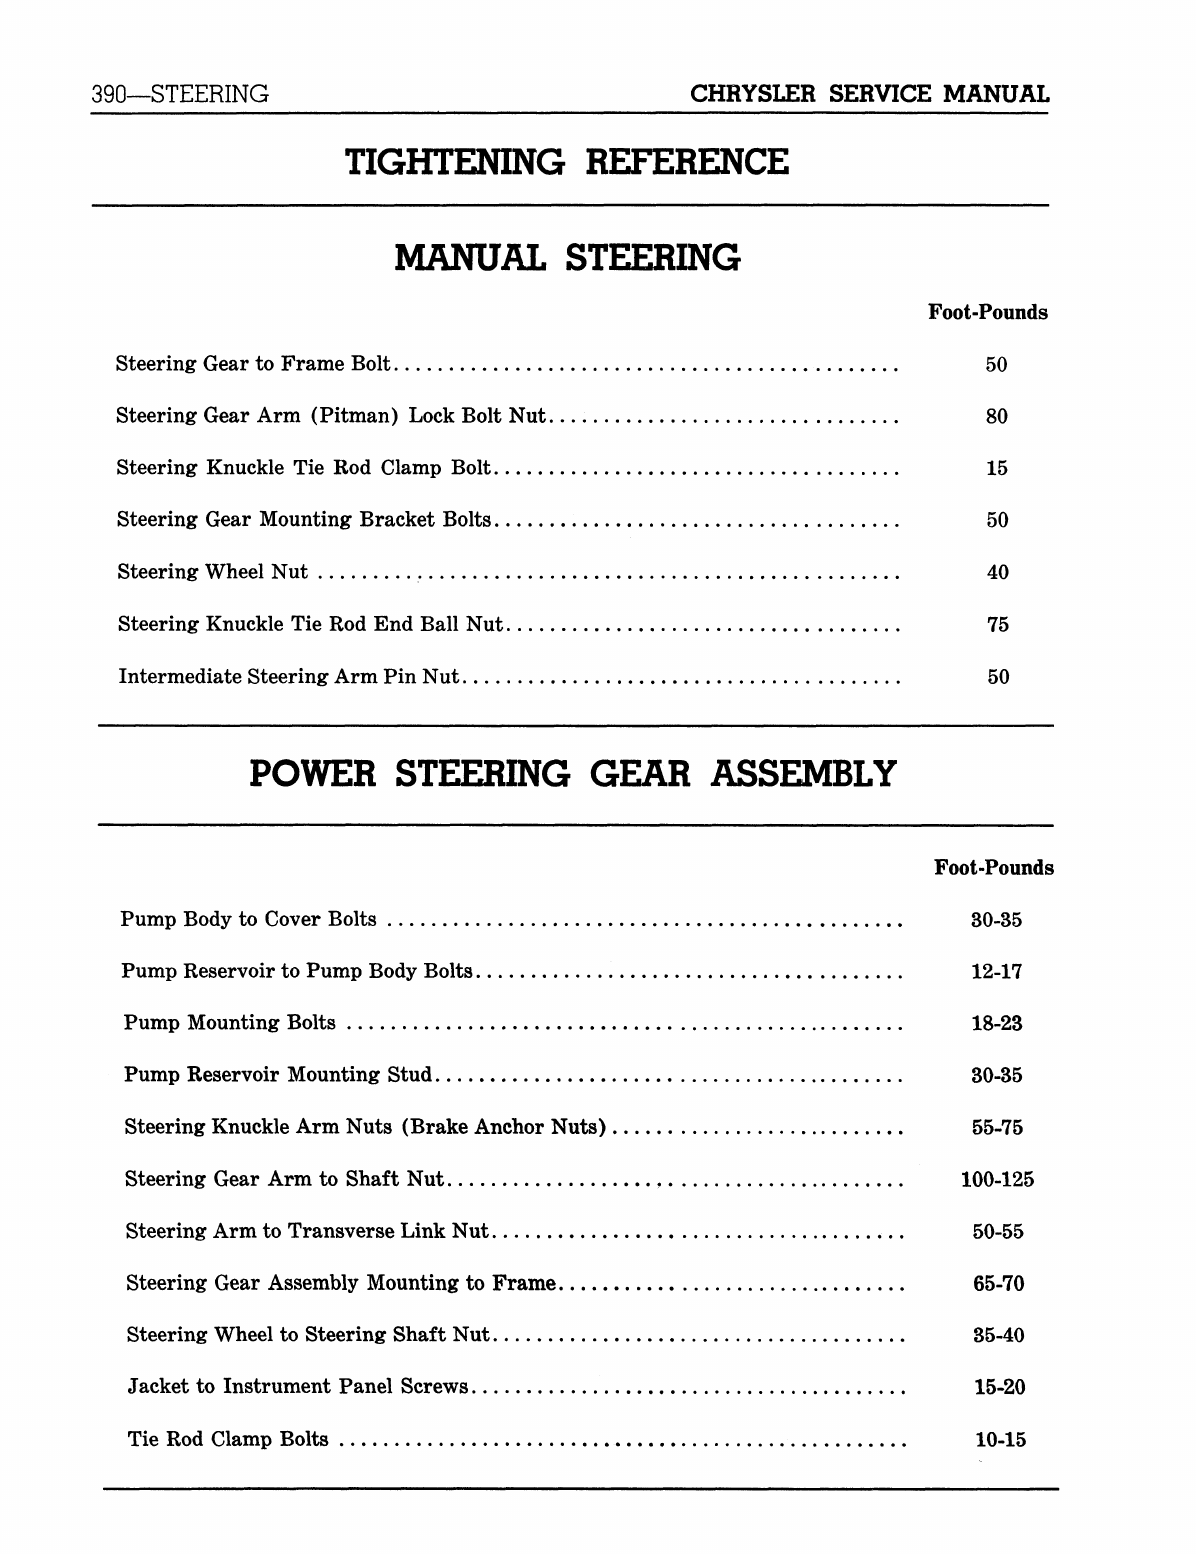
CHRYSLERSERVICEMANUALSTEERING—395
tighteningofthescrewsshouldcausetheend
playtojustdisappear withthetorquerequired
torotatethewheelfrom% to% ofa pound,
whenmeasuredwiththepullappliedatrimof
wheel.Ifa bindintherotationofthetubeoccurs
whenthecoverscrewsarefullytightened,it
willbenecessarytoaddshimthicknessuntil
bindjustdisappears.Ifendplayispresentafter
final tightening,lessshimthicknessisrequired.
Shimsareavailablein.003,.006,.011and.025
inch.Byusing a micrometertomeasureshims,#
thepropercombinationcanbechosen.
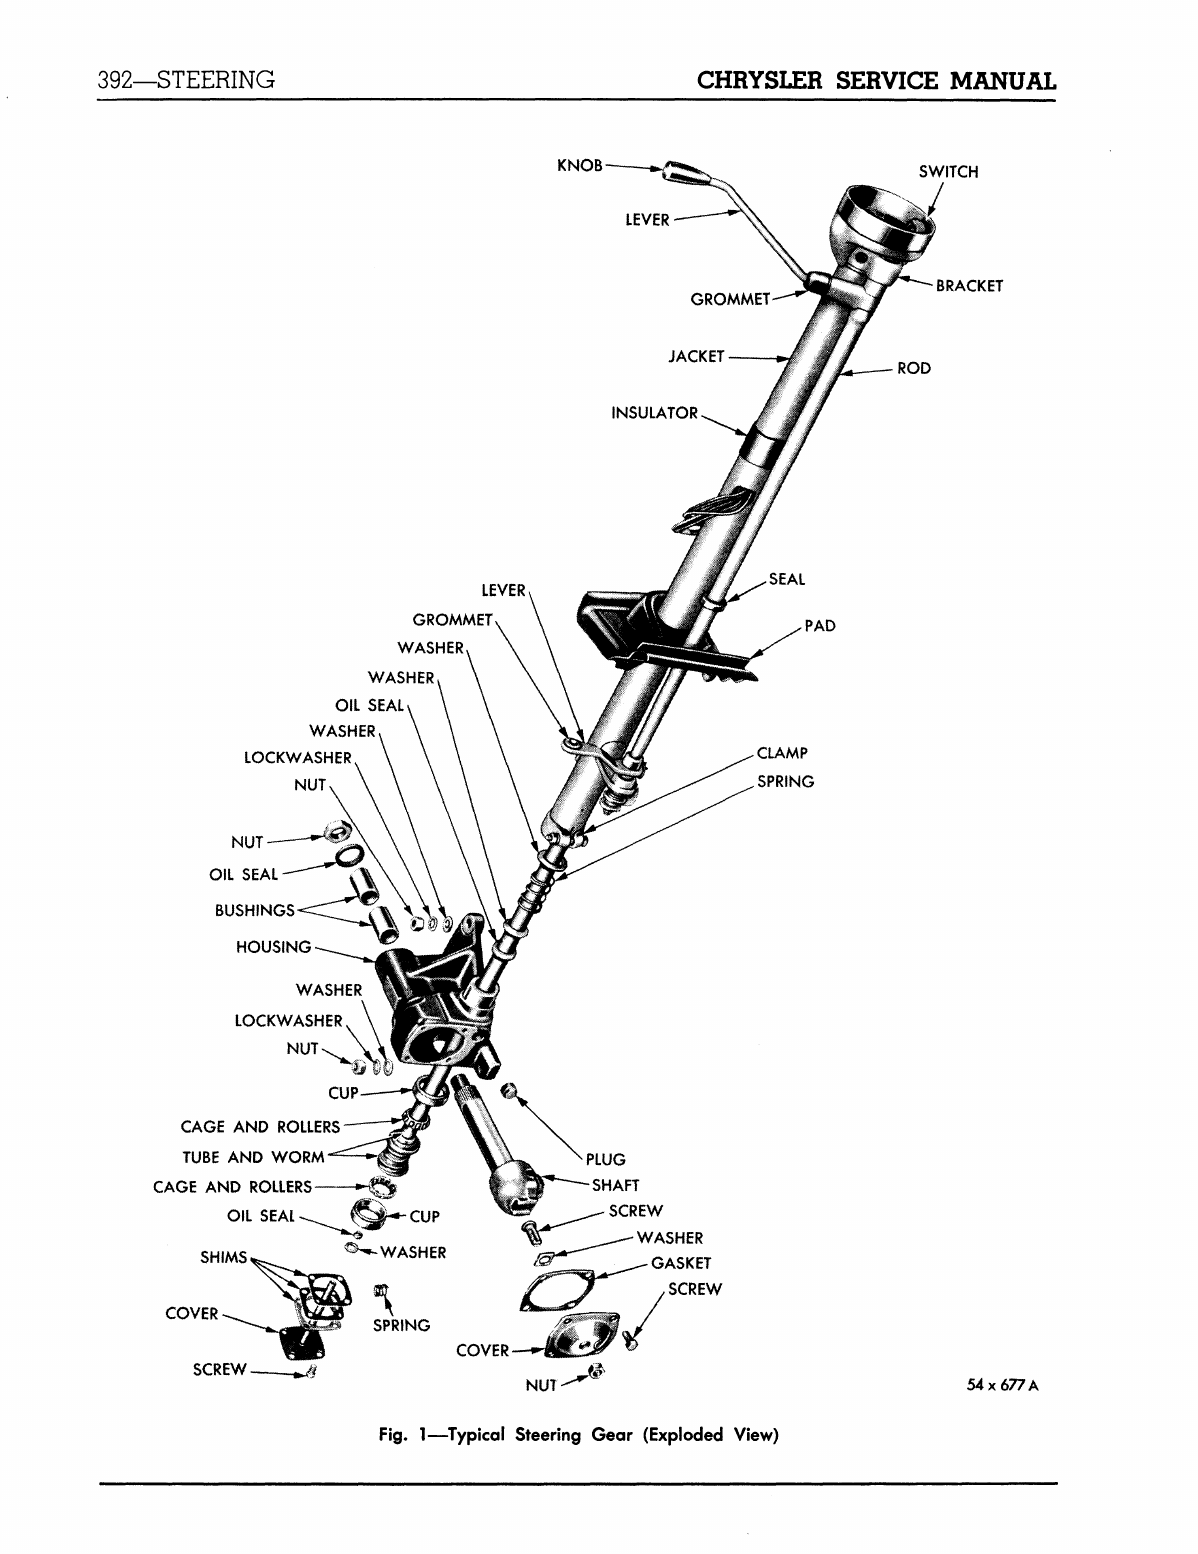
RefertoFigure2 and3.Installtheroller
shaftbearinginthehousing.Beforeinstalling
thecover,turn.theadjustingscrewalltheway
out(counter-clockwise).Whentherollershaft
assemblyiscompletelyinstalled,withtheex-
ceptionofthePitmanarm,adjustasfollows:
Placethesteeringwheelonthetubeandro-
tatethewheelineitherdirectiontotheendof
itstravel.Then,rotateintheoppositedirection
totheendoftravelwhilecountingtheturns.
Rotatethewheelback1/2thefullnumberof
turns.
Thisisthecenteroftravel(mid-travelor
highpoint).Turntheadjustingscrewin(clock-
wise)untilallendplayintherollershaftdis-
appears.Rollthewheelbackandforthseveral
times.
Thereshouldbenobind.Rotatethewheel
tooneoftheendsoftravelandapplya spring
scaleortorquewrench.Withthepullapplied
attherimofthewheel,thetensionshouldmea-
surefrom1 to2 pounds.Rotatethewheelback
tothecenterandonpastthecenterposition.
Thegreatesttensionshouldbefeltasthewheel
isrotatedthroughthecenterposition.Adjust
thebearingloadbyturningadjustingscrewin
oroutofthecover,asrequired.Installlock
plate,nut,andPitmanarm.Fillthegearhous-
ingwithSAE90FluidGearLubricant.Rotate
thewheelbackandforththroughitsfulltravel
severaltimestobesureallpartsarefullylu-
bricatedandcheckforleaks.
7.
ADJUSTINGWORMBEARINGS(InCar)
Rotatesteeringwheeltoextremerightorleft
andturnback% turn.Pressa finger atjoint
betweenbottomofsteeringwheelhubandshell.
Haveanothermechanicshakethefrontwheels
hardsideways,butnotenoughtoturnsteering
wheel.Anyendplayinwormbearingscanbe
feltatsteeringwheelhub.Thereshouldbeno
endplayatthe
hub.
Endplayshouldnotbecon-
fusedwithclearancebetweentherollerand
worm.Ifanyexcessiveendplayexists,remove
thesteeringgeararm,drainthehousing,and
disconnectthehornwireatconnectorbetween
steeringgearandhorn.
Removecap
screwswhichholdgreaseretainer
coveratbottomofsteeringgearhousing.Re-
moveshimsofsufficientthicknessbetweenthis
coverandhousingtoeliminatetheendplayin
worm,butnotenoughtocausebindingwhen
coverisboltedtightlyinplace.Turnsteering
wheelfromextremerighttoleft.Ifany
stiff-
nessexists,toomanyshimshavebeenremoved,
orthesteeringgearassemblyismisalignedon
car.
8.INSTALLATIONANDALIGNMENTOF
STEERINGGEARASSEMBLY
a.Installation
Wheregearchuckandwormshaftassemblyhas
beenremovedforservice,installasfollows.
Raisefrontofcar,insertwormshaftintojacket
andmovegearchuckassemblyupintoposition.
Itmaybenecessaryforanassistanttoguide
thetopofthewormshaftthroughtheupper
jacketalignmentbearing.Installgearchuckto
bracketattachingboltsandtightenforward
bolttoa snugfit. Lowercartofloor. Centerthe
jacketintheinstrumentpanelandtighten
bracketbolts.Installandtightendustpadre-
tainingscrews.Installsteeringwheelhornring
andornament.Raisefrontofcar.Tightenat-
tachingbolts.Installsteering(Pitman)arm
andtightennut.
b.
Alignment(AllModels)
Aslightbindofthesteeringgearissometimes
causedbyshiftingofbodyduetoloosenedbolts.
Ifthisconditionoccurs,bodyboltsshouldfirst
betightened.Then,thesteeringgearshouldbe
loosenedatframe,framebracketanddash
bracket,andallowedtoseekitsnaturalposition.
Positionthecenterofsteeringcolumnincen-
terofinstrumentcluster.Ifthiscannotbeac-
complishedbytheshiftingoftheframebracket,
asprovidedforbytheoversizeandelongated
mountingscrewholes,itwillbenecessaryto
addmetalwashershimsbetweentheframeand
framebracket.Tightendashbracketandtight-
ensteeringgeartoframe.

396—STEERINGCHRYSLERSERVICEMANUAL
NOTE
Be sure the body to frame bolts are tight and
the spacers are in place. With the body bolts
tight, loosen the gear housing mounting bolts
to allow the steering gear to move in relation
to the frame. Tighten the mounting bolts to
50 foot-pounds torque. Loosen the steering col-
umn bolts that hold column to instrument panel
to determine if the column shifts its position in
relation to the support.
9.ADJUSTMENTOFROLLERTOOTHAND
WORM(InCar)
Endplayofsteeringarmshaftandmeshof
rollertoothwithsteeringwormmaybeadjusted
asfollows:
Removesteeringgear(Pitman)armfrom
shaftandinstallanotherarmformakingad-
justments.Turnsteeringwheeltomid-position.
Thisisobtainedbyturningwheeltoextreme
rightorleft,andthenturningittooppositeex-
treme,countingnumberofturnsrequired.Turn
steeringwheelback1/2thenumberofturnsre-
quiredforturningitfromoneextremetothe
other.Withsteeringwheelinmid-position,
attempttomovesteeringgeararmbackand
forthtodeterminewhetherornotthereisany
backlash.Thereshouldbenobacklash.Butif
backlashexists,therollertoothandworm
shouldbeadjusted.
Removerollertoothshaftadjustmentscrew
locknut.Slideofflockplatefarenoughtoclear
lockbossonrollertoothshaftcover.Tighten
rollertoothshaftadjustingscrew(Fig.3)
enoughtoeliminatefreeplaybetweenroller
toothshaftandworm;but,itmustnotbind.
Slidelockplateinpositionagainstrollertooth
shaftcoverandlockit.Installandtighten
rollertoothshaftadjustmentscrewlocknut.
Checksteeringgearoperationagainforbinding
andbacklash.Correctanyinaccuraciesinad-
justments.Installsteeringgeararmwithtie
rods.
10.
SERVICINGIDLERARM
Serviceoftheidlerarmisrestrictedtoreplace-
mentandadjustment.Whenreplacingtheidler
arm,disconnecttherelayrod(centerlink)from
theidlerarm.Removethebracketattaching
screwsfromthebracketandframeandremove
WORMBEARINGADJUSTINGSHIMS
ADJUSTINGSCREW
ADJUSTINGSCREW
LOCKPLATE
-LOCKPLATE
NUT
Fig.
3—SteeringGearAdjustments54x46
theidlerassembly.Screwthenewidlerarm
intothebracketuntiltheshoulderonthearm
contactsthefaceofthebracket.Turnarmout
ofbracketonecompleteturn.Itmaybeneces-
sarytorotatethearmslightlytolineupthe
bracketforinstallingattachingbolts.
11.
REMOVALANDINSTALLATIONOF
STEERINGKNUCKLETIERODS
Removecotterpinandloosennutonupperend
oftherodball.WithToolC-3394,removetie
rodfromsteeringarm(Fig.4).Tierodballs
arenotremovablefromtierodends.Ifreplace-
mentofeitherisnecessary,thecompletetierod
endandballassemblyshouldbereplaced.Loosen
clampingboltnutonthetierodend.Unscrew
tierodendassemblyfromtierod.
Whenassemblingtierodendstotubebody,
besuretothreadtheendsevenlyontubebody
tothenominallengthlistedinDataandSpeci-
fications.Thisisnecessarytoobtainproperposi-
tioningofthesteeringwheelwithrespecttothe
straight-aheadpositionofthefrontwheels.
Caremustbetakentomakecertaintheclamp-
ingboltsarebeneaththetierodstoprevent
interferenceonturns.
12.
ADJUSTMENTOFFRONTWHEEL
BEARINGS
Afterremovingthehubcapandthegreasecap,
removethecotterpininthebearingadjusting
nutattheouterendofthesteeringknuckle

CHRYSLERSERVICEMANUALSTEERING—397
STEERINGKNUCKLE
ARM
Fig.
4—RemovingTieRodFromSteeringKnuckleArm
(ToolC-3394)
(wheelspindle).Turnbearingadjusting
nut
(Fig.
5)
handtight.Turnadjusting
nut
back
oneslot.Turn
thenut
backuntilslotnearest
cotter
pin
holecentersover hole
and
install
a
newcotterpin.
The
bearing
nut
threadsmust
be
in
goodconditionandthecotterpinproperly
installedandspread.Alwaysusenewcotterpins.
13.
RECONDITIONINGFRONTWHEELHUB
ANDDRUMASSEMBLY
Raisefront
endofcar
untilwheel
isoff
floor.
Removehubcap.Removewheelhubbolts.Bolts
onleftwheelshaveleft-handthreadsandthose
onrightwheelshaveright-handthreads.
Re-
movewheel
hub
grease
cup
(snaptype)with
specialToolC-438,
orby
pryingwith
a
screw
driver
and
tappingwith
a
lighthammer.
Re-
movethreadedtype
by
unscrewing
cap
from
hub.
Removecotter
pinand
unscrewfront
wheelbearingadjusting
nut.
Removeouter
bearingandpullhub
off
steeringknuckle.
Itis
notnecessary
to
removewheelfromhub
if
hub
is
to
beremovedfromsteeringknucklespindle.
Wheelandhubmay
be
removed
asa
complete
unit.Inspect
oil
seal
and
replace
if
necessary.
Beforeinstallingfrontwheel
huband
bear-
ingassembly,removelubricantfrom
thehub
andbearingsandmakesureparts
arein
good
condition.Installinner
and
outerbearingcups
sothere
isno
clearancebetweenthehubshoul-
ders.
PackbearingswithShortFiberWheel
BearingLubricant(Medium).Wheninstalling
the
oil
seals,makecertainthat
the
sealflange
bottomsonthebearingcup.
14.
REMOVALANDINSTALLATION
OF
STEERINGKNUCKLEKINGPINSAND
BUSHINGS
NOTE
Should servicing
of
the steering knuckle be nec-
1—Bearing
nut
2—Bearingthrustwasher
3—Outerbearingcup
4—Hub
Fig.
5—FrontWheelBearings
5—Innerbearingconeandrollers
6-Hubdustseal
7—Hubcap
8—Greasecap
°—Bearingnutcotterpin
10—Outerbearingconeandrollers
11—Steeringknuckle
12—Innerbearingcup

398—STEERINGCHRYSLERSERVICEMANUAL
Fig.
6—RemovingBrakeSupport
essary, time can
be
saved by removing the steer-
ing knuckle
arm
from
the
steering knuckle.
Remove steering knuckle and brake support
as
an
assembly.
Make necessary
repairs
on
a bench.
If
it
is
done
in
this manner, eliminate removing
support. Remove brake hose connections,
but
leave brake support
on
steering knuckle.
Re-
move unit as an assembly with steering knuckle
after king pin is
removed.
Always usenew bush-
ings,
seals,
and pins ivhen servicing the steering
knuckle and support assembly.
Removewheelandhubassembly.Blockbrake
pedal
soit
cannot
be
depressed.Removenuts
andboltsthatfastenbrakesupport
to
steering
knuckle.Removesteeringknuckle
arm
from
steeringknuckle.Removebrakehose
and
con-
nectionsandlift
off
brakesupport(Fig.6).Do
notallowbrakesupportandshoeassemblytobe
supported
by
flexible brakehose.Removeking
pinlockingpin.
Drive
a
punchintouppersteeringknuckle
welchplugand
pryitoutof
steeringknuckle.
Driveking
pin
downward,forcing
out
lower
welchplug.
A
softbrassdriftshould
be
used
whendrivingagainsttop
of
kingpin.Remove
steeringknuckleupperneedlebearing
or
bush-
ing
by
pulling
it
towardcenterknuckle,using
special
tool,
asshowninFigure
7.
Removesteer-
ingknucklelowerbushing.
If
bushing
isof
the
stationarytype,usespecialtooltoremove
it.
Theupperneedlebearingmust
be
installed
from
topof
steeringknuckle,withtrademark
Fig.
7—RemovingKingPinBushingorBearing
1—King
pinbushing
or
bearing2—ToolC-328
attopandoilhole
in
bearinglined
up
with
oil
hole
in
steeringknuckle.Stationarytypebush-
ings(Fig.
8)
should
be
line-reamed.First
re-
move
the
upperneedlebearing.Installreamer
pilotbushingToolC-631andreamerToolC-379.
Wheninstallinglower
and
upperfloating type
bushing(Fig.
9),
placeopenend
ofoil
groove
tothetop.Bothtypes
of
lowerbushingsshould
49x607
Fig.
8—BearingandStationaryTypeBushing
Installed
1—Bearingidentificationmark3—Lubricantholes
2—Bushingidentificationline
or
notchA—3/32inch
B-l/16inch

CHRYSLERSERVICEMANUALSTEERING—399
Fig.
9—BearingandFloatingTypeBushingInstalled
1—Bearingidentificationmark
2—Lubricantholes3—Floatingtypebushing
A-3/16inch
beinstalledwithoilholeinbearinglinedup
withoilholeinsteeringknuckle.Oncars
equippedwithPowerSteering,thekingpin
bushingsshouldbeinstalledwiththeopenend
oftheoilgrooveleadingtowardsthe"O"seal
rings.
Afterinstallingthesteeringknuckle,make
sureitisfreeinthesupport.Bindingatthis
pointmaycausesensitivesteeringandcarwan-
der.Thereshouldbe.006to.008inchclearance
betweenthesteeringknuckleandtheknuckle
support.Thisclearancecanbeadjustedbythe
STAKEINPLACE
ASSHOWN
STAKESECURELY
4PLACESAS
SHOWNBOTH
ENDS
49x701
Fig.
10—WelchPlugandKingPinLockPinInstalled
useofshimsbetweenthesteeringknuckleand
thethrustbearings.
Wheninstallinga welchplug,itisnecessary
tostakeitafteritisproperlyinplace,asshown
inFigure10.
Beforeinstallinghubanddrumassembly,
performMajorBrakeAdjustment,described
inSectionIII,Brakes,asappliedtocars
equippedwithManualSteering.Afterinstall-
inghub,drumandwheelassembly,checkking
pininclination,caster,camber,andtoe-inor
toe-out,asoutlinedinFrontWheelAlignment
inthisSection.Adjustbrakes.
COAXIALPOWERSTEERING
15.
DESCRIPTION(Fig.11)
TheCoaxialPowerSteeringUnitincorpo-
ratestwobasicgearmechanisms,a wormand
wormconnectoranda rackandsectorgear.
Thewormandwormconnectoractina man-
nersimilartoa boltandnutassembly,rotation
ofthewormcauseslinear(axial)motionofthe
wormconnector.Fastenedtothewormcon-
nector,insuccession,areanupperpistonrod,a
piston,anda lowerpistonrod,allconcentricto
thesteeringcolumnaxis.(Thisarrangement
providesa meansforaddingpowerassistance
tothesystem.)

400—STEERINGCHRYSLERSERVICEMANUAL

CHRYSLERSERVICEMANUALSTEERING—401
FLOWCONTROLVALVE(CLOSED)
PRESSURERELIEF
VALVE
HIGHPRESSURE- LOWFLOW
FLOWCONTROLVALVE(OPEN)
PRESSURERELIEF
VALVE(CLOSED)
LOWPRESSURE- HIGHFLOW
•FLOWCONTROLVALVE(OPEN)
PRESSURERELIEF
VALVE(OPEN)
HIGHPRESSURE- HIGHFLOW
53x632
Fig.
12—PumpPressure
and
Flow
Arack,machined
in
thelowerportion
of
the
lowerpiston
rod,
mesheswith
a
sectorgear.
Thiscombinationproducesrotationofthesteer-
inggeararmandtherebyactuatesthesteering
linkage.
ThehydraulicsystemoftheCoaxialgearcon-
sists
ofa
double-actingpiston,
a
valve(which
fitsinsidethepiston),and
a
hydraulicreaction
chamber(whichgives
the
driver
the
"feel"
of
theroad).Axialpositioning
of
thevalvedirects
highpressureoil
to
oneside
or
theother
of
the
double-actingpiston.
At
the
sametime,valve
movementopensanoilreturnlinewhichcarries
oilfrom
the
lowpressureside
of
the
piston
to
theoilreservoir.Thedirection
of
oil
flow
(which
dependsupon
the
direction
of
steeringwheel
rotation)issuchthathydraulicforceisaddedto
thedriver'seffortand
is
transmittedthroughthe
rackandsectorgear
tothe
steeringgear
arm.
Othercomponents
of
the
hydraulicsystem
are,
a
generator-drivenoilpumpwithpressure
reliefvalve
and
flow controlvalve,
and
a
filter
with
theoil
reservoir.
The
flow controlvalve
limitstheoil
flow
toa
predeterminedmaximu^n
(IV2gallons
per
minute)
and
thusholds
tHe
horsepowerrequired
to
drivethe
oil
pump
to
a
minimum.
a.PowerSteering
Oil
Pump,Reservoir
and
Assembly
The
oil
pump
and
reservoirassembly
is
mounted
at
the
rear
end
of
the
generator.
A
cartridge-typefilter element
is
located
inthe
reservoir.Oilfrom
the
steeringgearassembly
flows through
an
internalpassage
inthe
pump
body,through
the
full-flow
oil
filter,
and
into
thereservoirchamber.From
the
reservoir,
oil
enterstheoilpumpintake(Fig.12).Theposi-
tion
of
theoilpump
is
adjustable
to
helpmain-
tainlevelfluid
in
reservoirwhendrivebelt
is
adjusted.
Asmalldiaphragmventvalve
in
the
reser-
voircoverisforcedopentoprovide
a
passageto
theatmosphere,
if
excessivepressureoccurs
in
thereservoir.
Withcold
oil,
insufficient
oil
wouldpass
through
the
filter
to
the
reservoir,
andtheoil
pressurewouldbuild-up
in
the
linefrom
the
steeringgearassembly.Therefore,
a
spring-

402—STEERINGCHRYSLERSERVICEMANUAL
OUT
(LOW
PRESSURE
OIL)
INNEUTRALPOSITION,
THE
OPENINGSBETWEEN
THE
VALVE
ANDVALVEBODYOFFERLITTLEFLOWRESTRICTION
SOOIL
PRESSURE
ISLOW.
EQUALPRESSURE
ON
BOTHPISTONFACES
HOLDSPISTONSTATIONARY.
(N
(LOW
PRESSURE
OIL)
SPOOLVALVE
PISTON
53x859
Fig.
13—OilFlow—NeutralValvePosition
OUT(LOWPRESSURE
OIL)
tWHEN
THE
VALVE
IS
PULLED
UP,IT
OFFERSFLOWRESTRICTION
AT
"A"
AND"BM.OIL
PRESSUREINCREASESGREATLY,CREATING
A
HYDRAU-
LICFORCE
ON
PISTON.
AS
PISTONMOVES,
OIL
ENTERS
THE
HIGH
PRESSURECYLINDER,
ANDOILINTHELOW
PRESSURECYLINDER
IS
FORCED
OUT
RETURNPASSAGES.
IN(HIGHPRESSURE
OIL)
SPOOLVALVE
PISTON
53x860
Fig.
14—OilFlow—RightTurn—ValvePulled
Up

CHRYSLERSERVICEMANUALSTEERING—403
loadedreliefvalveisprovidedatthetopofthe
filterelement.Whenoilpressureinthefilter
buildsuptoabout5 to7 psi.,thisvalveopens
andpermitsoiltopassdirectlyintothereser-
voirchamber.
Therotaryoilpumpisdrivenfromtherear
endofthegeneratorarmatureshaftthrougha
flexible coupling.Thesinglerotorinthepump
drawsoilfromthereservoir,anddischargesit
throughthebuilt-incombinationflow control
valveandpressurereliefvalvetothevalvein
thepowerunitassembly.
Inthepowersteeringpump,theflow control
valveandpressurereliefvalvearecombinedin
asingleassembly,asshowninFigure12.The
spring-loadedpressurereliefvalveisconcentric
withandfits insidethespring-loadedflow con-
trolvalve.Whenthepressurereliefvalveis
closed,itseatsagainsta snapringintheflow
controlvalve.Anorificeinthepressurerelief
valveprovidestheoilpressuredropthatcon-
trolstheoperationoftheflow controlvalve.
Whentheoilflow fromthepumptendstorise
abovel1/^gallonsperminute,thedifferencein
pressureacrosstheorificeovercomesthespring
load,andtheflow controlvalvemovestoun-
covera passagetotheintakesideofthepump.
Bypreventingexcessiveoilflow, theflow con-
trolvalvelimitsthepressuredropthroughthe
hydraulicsystemandthuslimitsthehorse-
powerrequiredtodrivethepump.Oilflow of
thepumpwhentheengineisidlingisabout1%
gallonsperminute.
Oilpressureinthehydraulicsystembuildsup
tothatrequiredtoovercometheresistanceto
turningoftheroadwheels.Inotherwords,
straight-aheadhighwaysteeringrequiresa rel-
ativelylowoilpressure,whilea higheroilpres-
sureisrequiredwhenturninga corner.A rapid
build-upofoilpressuretendstooccurwhenthe
roadwheelsareturnedagainsta curborwhen
thesteeringwheelisturnedallthewayinone
directionsothatthepistonreachestheendof
thestroke.Topreventexcessiveoilpressure,
thepressurereliefvalveinthepumplimitsthe
oilpressurefrom750to800psi.
Theentirehydraulicoilsystemforpower
steeringhasa capacityof2 quartsofSAE
10W engine,ortype"A"oil.Thewormhous-
ingcapacityisonepintwhichisseparatefrom
thepressuresystem.
b.
HowtheCoaxialPowerSteeringOperates
TheheartoftheCoaxialPowerSteeringUnit
hastwoparts;thevalveandthevalvebody
(actuallya partofthehydraulicpiston,as
showninFigure13).Together,thesetwopieces
controltheoperationoftheentirepowersys-
tem.
Whenthedriverturnsthesteeringwheel,
thevalvemoveswithrespecttothehydraulic
piston,andpowerasistanceinstantlyresponds.
Therelativemovementbetweenthevalveand
pistonisveryslight(itseldomexceeIs.0025
inch)andmustnotbeconfusedwiththegen-
eralmovementofthewholestep'ingsystem
asthefrontwheelsturn.Thedrivercontrolsthe
powersteeringunitbygoverningtherelative
movementbetweenthevalveandhydrailicpis-
ton.
Controlmovementsarebasedo.feelof
theroadthatcomesthroughthesteeringwheel
froma hydraulicreactionchamberinsidethe
powerunit.Relativemovementofthevalveand
pistonaffectshydraulicactionasfollows:
Asthevalvemovesrelativetothepiston,it
regulatesoilpressureanddirectsoilflow
throughthehydrauliccircuit.Considerthecase
wherethesteeringwheel isnotturnedandthe
valveisinneutralposition,asshowninFigure
13.
Inthisposition,thevalveleavesopenings
betweenitandthevalvebodysooilflows
throughtheunitquiteeasilywithverylittle
flow restriction.Therefore,theoilpumphas
onlya slightresistancetoovercome,andtheoil
enteringthepowersteeringunitisunderlow
pressure.
Insidetheunit,theoilreachesthevalve
throughholesdrilledinthepiston.Atthevalve
theflow divides,andoiltravelstowardboth
endsofthevalve.Itflows throughsucceeding
openingsbetweenthevalveandadjacentvalve
bodyuntilitreachesthemainreturnpassage
drilledthroughthelowerpistonrod.Itthen
returnstothereservoirandfilter. Intheneutral
position,oilpressureonbothsidesofthepower
pistonisthesame.Consequently,thepiston
remainsstationary.
Whenthedriverturnsthesteeringwheel,the
valvemoveseitherupordown,dependingon
whichdirectionheturns.Supposethathemoves
thevalveupslightly,relativetothepiston.By
movingthevalvethissmallamount,thedriver

404—STEERINGCHRYSLERSERVICEMANUAL
putsthepowersystemintooperation,asshown
inFigure14.
Theinstantthevalveismoved,twoimpor-
tantthingshappen:(1)theinletoilpressure
increasesbecauseofrestrictedopeningsber
tweenthevalveandvalvebody,and(2)the
increasedpressureisdirectedtoonesideofthe
powerpiston.Therestrictionscausing thepres-
surerisearemarked"AandB"inFigure14.
Thesenarrowspaces"dam up"theoilthatis
beingforcedthroughthesystembytheoil
pump.Becausethepumpisa positive-displace-
menttype,theoilmustkeepmoving.Astheoil
"piles-up"behindtherestrictions,itspressure
increasestremendously,squeezingoilthrough
thenarrowspacesata veryfastrate.Often
therestrictionsmayclosecompletely,giving
operatingpressureatthefastestpossiblerate.
Themaximumpressurebuild-upislimitedto
800psibya pressurereliefvalveinthepump
assembly.
Thehighoilpressureisdirectedtothelower
endofthecylinder(forthiscasethroughthe
passagesindicatedinFigure14).However,the
oppositeendofthecylinderisopentothe
returnline.Therefore,a differenceinpressure
existsineachendofthecylinderandthepiston
moves.Oiltrappedinthelowerpressurecylin-
derisforcedthroughthereturnpassagesas
thepistonmovesup.
Bycarefuldesign,alloftheseelementshave
beencombinedintotwocompactunitswhich
areconnectedbya pairofflexiblehoses.The
powerunitcontainsthepowerpiston,spool
valve,andhydraulicreaction chamber.Tne
supplyunitincorporatesthereservoirandthe
oilpumpwithitsvalves.
Ifthedriverstopsturningthesteeringwheel
andholdsitina fixedposition,thefrontwheels
immediatelystopturning.Thisishowithap-
pens:
withthesteeringwheelheld,thevalve
remainsinitspulleduppositionbecausethe
valveismechanicallyconnectedtothesteering
wheel.Thepiston,ontheotherhand,ismoving
upundertheactionofthepressureinthelower
endofthecylinder,andcontinuestomoveup
forthebriefestinstantuntiltherelativemotion
betweenpistonandvalvehasreturnedthemto
theneutralposition.Inneutralposition,there
is
verylittle
flow
restriction,asexplainedbefore,
UPPERPISTONRODCONNECTORNUTADJUSTINGDISCRETAINER
VALVEADJUSTINGDISC
VALVE
OPERATING
ROD
VALVECONTROL
SPACERSEAL
ADJUSTING
TANG
WORM
CONNECTOR
PISTONRODNUTANDLOCKCUP
-SEALRETAINERS53x861
Fig.
15—HydraulicReactionAssembly

CHRYSLERSERVICEMANUALSTEERING—405
OILISSUPPLIEDFROMMAINLINEATOPERATINGPRESSURE.DRIVER'SSTEERINGFORCEPASSES
FROMWORMCONNECTORTOREACTIONRINGTOTHEOIL-FILLEDSEALWHICHRESISTSBEING
SQUEEZEDBECAUSEOFTHEPRESSUREWITHINIT.THISRESISTANCEGIVESDRIVERTHE"FEEL"
OFSTEERINGBECAUSEOPERATINGPRESSUREISPROPORTIONALTOTURNINGLOAD.
UPPERPISTON
ROD
OILFROM
MAINLINE
WORMSEAL
CONNECTORRETAINERSVALVECONTROL
SPACERSEAL
VALVE
SPOOL•-VALVE
OPERATINGRODOPERATINGCLEARANCES
53x862
Fig.
16—HydraulicReactionChamber
sooilpressuredropstoitslowestpoint.Power
assistanceceasesandthefrontwheelsremain
wherethesteeringwheelindicates.Theentire
actionisinstantaneousbecausetherelative
movementbetweenvalveandpistonissoslight.
Whatcausestherelativemovementbetween
thesepartsandhowdoesthedrivergethis
"feel"oftheroad?
Thefirstimportantfacttorememberisthat
thevalveismechanicallyconnectedtothesteer-
ingwheel,asshowninFigure15.Thevalve
solidlyconnectstothewormconnectorthrough
thevalve-operatingrod.Thewormconnectoris
attachedtothesteeringwheelthrougha worm
shaft,asshowninFigure11.Hence,theslight-
eststeeringwheel movementistransferred
throughthewormconnectortothevalve.
Anotherimportantfact,isthattheupperpis-
tonrodishydraulicallyattachedtotheworm
connectorthroughtwosealretainersanda rub-
berreactionsealwheneverthepowersystemis
operating(Fig.16).Theconnection iscalledhy-
draulicbecausetherubberseal,oneofthecon-
nectinglinksbetweenthewormconnectorand
pistonrod,isfilledwithoil.Oilfromthemain
oillineissuppliedtothesealthrougha hole
drilledinthepistonandanotherdrilleddown
thelongaxisoftheupperpistonrod.Theoilin
thereactionsealis,therefore,atfulloperating
pressure.
Supposethesteeringwheel isturnedinsuch
adirectionsothatthewormconnector(and
valve)triestomoveup(rightturn).Intrying
tomoveup,thewormconnectorpushesonthe
lowersealretainersandsqueezestheoil-filled
seal.Becausethevalvehasbeeninneutral
positionuntilthisinstant,thepressureinside
thereactionsealislowandthesealcompresses,
allowingthewormconnector— andvalve— to
movewithoutmovingthepistonrod.Inother
words,thereisrelativemotionbetweenthe
valveandpistonwhichisfastenedtothepiston
rod.
Therefore,oilpressurerisesinthesystem
becauseoftherestrictionsbetweenthevalve
andvalvebody,andthepistonbeginstomove
thesteeringpartsthatconnecttothefront
wheels.Atthesametime,thehigheroilpres-
sureisfeltinsidetheoil-filledreactionseal.
Thegreaterpressureinsidethereactionseal
attemptstoforcethesealandthewormcon-
nectorbacktotheiroriginal(neutral)positions.
Therefore,thedriverfeelsa resistancetoturn-
ingthesteeringwheel(aresistanceproportional
This manual suits for next models
3
Table of contents
Popular Automobile Part manuals by other brands

Edelbrock
Edelbrock 6567 installation instructions

Edelbrock
Edelbrock 2166 installation instructions

HURST
HURST 373 8607 installation instructions

Briggs & Stratton
Briggs & Stratton 1694923 installation instructions

AEM
AEM 21-5003 installation instructions

Edelbrock
Edelbrock 68832 (Ceramic-Coated) installation instructions

Fabtech
Fabtech FTS92011 instructions

Edelbrock
Edelbrock Russell 641530 installation instructions

Edelbrock
Edelbrock Cat-Back Exhaust System 5714 installation instructions

Volkswagen
Volkswagen Multivan manual

Edelbrock
Edelbrock 78001 installation instructions

Edelbrock
Edelbrock 71883 installation instructions