Churchill ION User manual

www.ChurchillNavigation.com
ION
Operator
Manual
Rev.1.5

Churchill Navigation ●Support Phone: 720.744.3300 ●E-mail: support@churchillnavigation.com 2
Document Revision History
Rev
Number
Description
Page/
Section
Date
1.0
1.1
1.2
1.3
1.4
1.5
Original document release
Weather radar added
Video playback functionality enhancements/additions
Added audio setup recommendations and change tracking
Formatting and graphics revisions and updates, text updates, and
added features.
Updated screenshots and text to reflect UI enhancements, etc.
--
Sec 4
Sec 3
--
--
--
JAN 2016
JAN 2016
FEB 2016
JUN 2016
JAN 2017
JUN 2017

Churchill Navigation ●Support Phone: 720.744.3300 ●E-mail: support@churchillnavigation.com 3
Table of Contents
Introduction ........................................................................................................................ 5
Section 1: Characteristics & Specifications............................................................................ 5
Section 2: Operation ............................................................................................................ 8
Section 3 Playback ............................................................................................................. 14
Section 4 Weather Radar Display ....................................................................................... 16
Section 5 Camera Link ........................................................................................................ 18
Section 6 Setup Menu ........................................................................................................ 20
Section 7 Troubleshooting.................................................................................................. 37
Churchill Navigation ●Support Phone: 720.744.3300 ●E-mail: support@churchillnavigation.com 4
Notice:
The information contained in this document is considered confidential and proprietary to Churchill
Navigation. Neither the document nor the information contained therein should be disclosed or
reproduced in whole or in part, without express written consent of Churchill Navigation.
Changes or modifications not expressly approved by Churchill Navigation could void the operator’s
authority to operate the equipment.
Non-Churchill Navigation part numbers referenced in this manual are not maintained by Churchill
Navigation and may be subject to change without notice.
All information depicted in this manual, including hardware and software names, versions, and part
numbers, is subject to change and may not be up to date.
About this Manual
This manual describes the physical, mechanical, and electrical components, as well as instructions for
the installation of the Churchill Navigation ION. Every effort has been made to make this document as
complete and accurate as possible.
The following symbols for warnings, cautions, and notes are used to throughout this manual.
Warning
A warning symbol denotes an item where a potential hazard capable of
producing injury to personnel or destruction of equipment exists if the
approved procedure is not followed.
Caution
A caution symbol denotes an item where, if not followed, damage to
equipment or degradation of mission capability can occur.
Note
The note symbol is used to identify information for installers and operators.
While not directly related to safety or protection of equipment from damage,
the note symbol identifies information to which attention should be paid during
the installation and/or operation of the equipment.
Product Guarantee & Warranty Information
For details about the Churchill Navigation ION warranty, please see the Terms and Conditions page
available at www.churchillnavigation.com/agreement
This document contains information that was current as of the printing of this manual. To obtain
always up-to-date installation drawings, ICDs, and much more, visit:
www.churchillnavigation.com/specifications
!
!
Churchill Navigation ●Support Phone: 720.744.3300 ●E-mail: support@churchillnavigation.com 5
Introduction
Thank you for purchasing the Churchill Navigation ION video recorder. With a flexible configuration and
assortment of pre-programmed modules (plus the ability to develop your own), coupled with an easy-
to-use operator interface, the ION is ready to solve any video-related challenge you may have. This
manual provides detailed information on the technical specifications and characteristics as well as the
operation of your ION video recorder.
Section 1: Characteristics & Specifications
1.0 Description
This section contains information concerning the physical characteristics and technical specifications of
the Churchill Navigation ION video recorder.
1.1 Design Characteristics
ION is a compact, solid-state DZUS mounted video recorder. ION offers simultaneous recording of two
channels of HD-SDI video, one channel of analog video, audio, and metadata. Video is saved to
removable USB or SD media for easy transport and hand-off. A full-color, backlit LCD display allows
operators to review recorded clips on the go and even perform playback while recording.
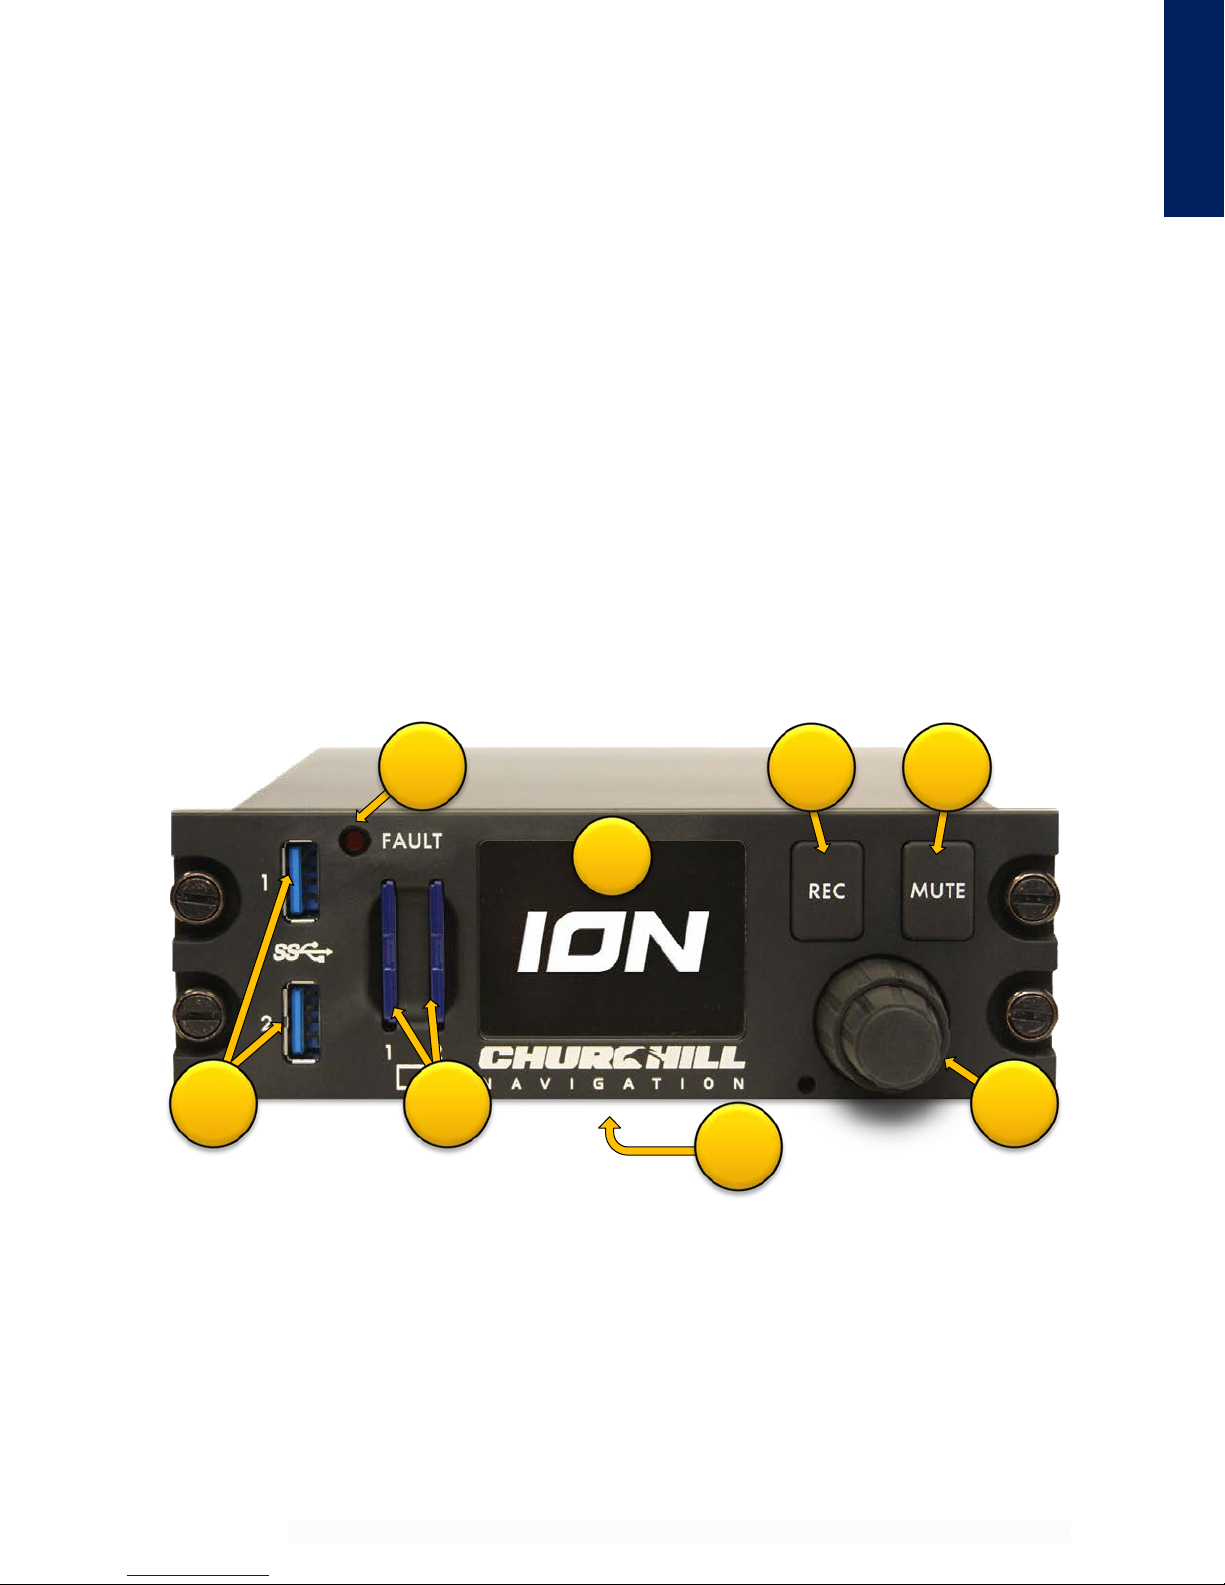
1) Backlit, full-color, 2.15 in [54.61 mm] diagonal LCD screen
2) Backlit REC button
3) Backlit Mute button
4) Control knob (inner knob, outer knob, and push-button operation)
5) SD media (2x)
6) USB 3.0 (2x)
7) Fault light
8) CMOS Battery access tray (located on the bottom of the enclosure) *
8
Specifications
1
7
2
3
4
6
5
* CMOS battery access tray included on ION hardware revision 2.8 and higher.

Churchill Navigation ●Support Phone: 720.744.3300 ●E-mail: support@churchillnavigation.com 6
1.2 Specifications
Specification
Characteristic
Product Designation/Description
ION Video Recorder
Physical Dimensions
Height at bezel: 1.875 in [47.63 mm]
Width at bezel: 5.75 in [146.05 mm]
Length (Enclosure depth): 7.0 in [177.8 mm]
Overall depth, front knob to back of enclosure, excluding
connectors: 8.32 in [211.33 mm]
Weight
2.6 lbs ± .05 lbs [1.18 kg ± .02 kg]
Display type / dimensions /
resolution
Backlit LCD, 2.15 in [54.61 mm] diagonal
Native 320 x 240 pixel resolution
NVIS Class A compliant / NVIS class B compatible
Environmental Qualifications
DO-160 Qualified
Operating Temperature Range
-20°C to +70°C
Maximum Operating Altitude
+45,000 feet [+13,716m]
Power:
Input Voltage
Input Current
Power consumption
28VDC
4A on 28VDC (normal operating range)
112W (maximum)
Circuit Breaker Requirement
Minimum 7.5 amp rated
Connection Types, Protocols, and
Standards
LEMO (1x) J1 – Power/GPIO
LEMO (1x) J2 – Ethernet
LEMO (1x) J3 – Misc. (USB, ARINC 429, Audio)
LEMO (1x) J4 – Serial port (RS232, RS422)
BNC J5, J6, J7 – HD-SDI 1 & HD-SDI 2 video in /
HD-SDI video out
BNC J8, J9, J10 – Analog in
Wi-Fi compatibility – 802.11ac
Video-in Support
2x HD-SDI inputs
-Single channel, 3G-SDI (1080p60) input supported
1x Analog video input (CVBS, Y/C, YPbPr, & RGB)
Video-out Support
1x HD-SDI output
-3G-SDI (1080p60) output supported
Video-out Supported Resolutions
720p (50 fps), 720p (60 fps), 1080p (25 fps), 1080p (30 fps)
1080p (60 fps), 1080i (50 fps), 1080i (60 fps)
Specifications

Churchill Navigation ●Support Phone: 720.744.3300 ●E-mail: support@churchillnavigation.com 7
Metadata Standard
KLV MISB/STANAG 4609 compliant
Video Recording Codec
H.265 (HEVC) – Skylake processor models only
H.264 (MPEG-4)
H.262 (MPEG-2)
Audio-in Support
L/R channel in
Audio-out Support
L/R channel out
Specifications
Churchill Navigation ●Support Phone: 720.744.3300 ●E-mail: support@churchillnavigation.com 8
Section 2: Operation
2.0 Description
This section contains instructions for the operation of the Churchill Navigation ION video recorder.
2.1 Powering the Unit On
In most aircraft installations, the ION will be wired to a 28-volt DC aircraft power source and/or via a
dedicated mission bus. In these cases, the ION will automatically start-up once power has been provided
to the unit. Running the ION solely using aircraft battery power is not advised.
For non-aircraft installations, use the provided power cable connected to a standard 120 VAC outlet. The
ION will start-up immediately once power is applied.
If at any point in time the ION fails to properly boot or encounters a hardware error during the boot
sequence, the fault light will illuminate. In this case, cycle power to the ION and attempt another restart.
If, at that point in time, the ION still does not power-up and the fault light is still illuminated, please refer
to the troubleshooting section of this manual.
2.2 Hardware
The ION’s hardware interface is streamlined for easy and intuitive operation. This eliminates navigating
complex menus to perform basic tasks during time-critical missions. The ION features two hardware-
based buttons for quick access to recording and muting. Additionally, the dual concentric rotary encoder
knob (referred to as “control knob” in this manual) provides access to all other internal menus,
navigation within menus, and a center push-button for selection.
Operation
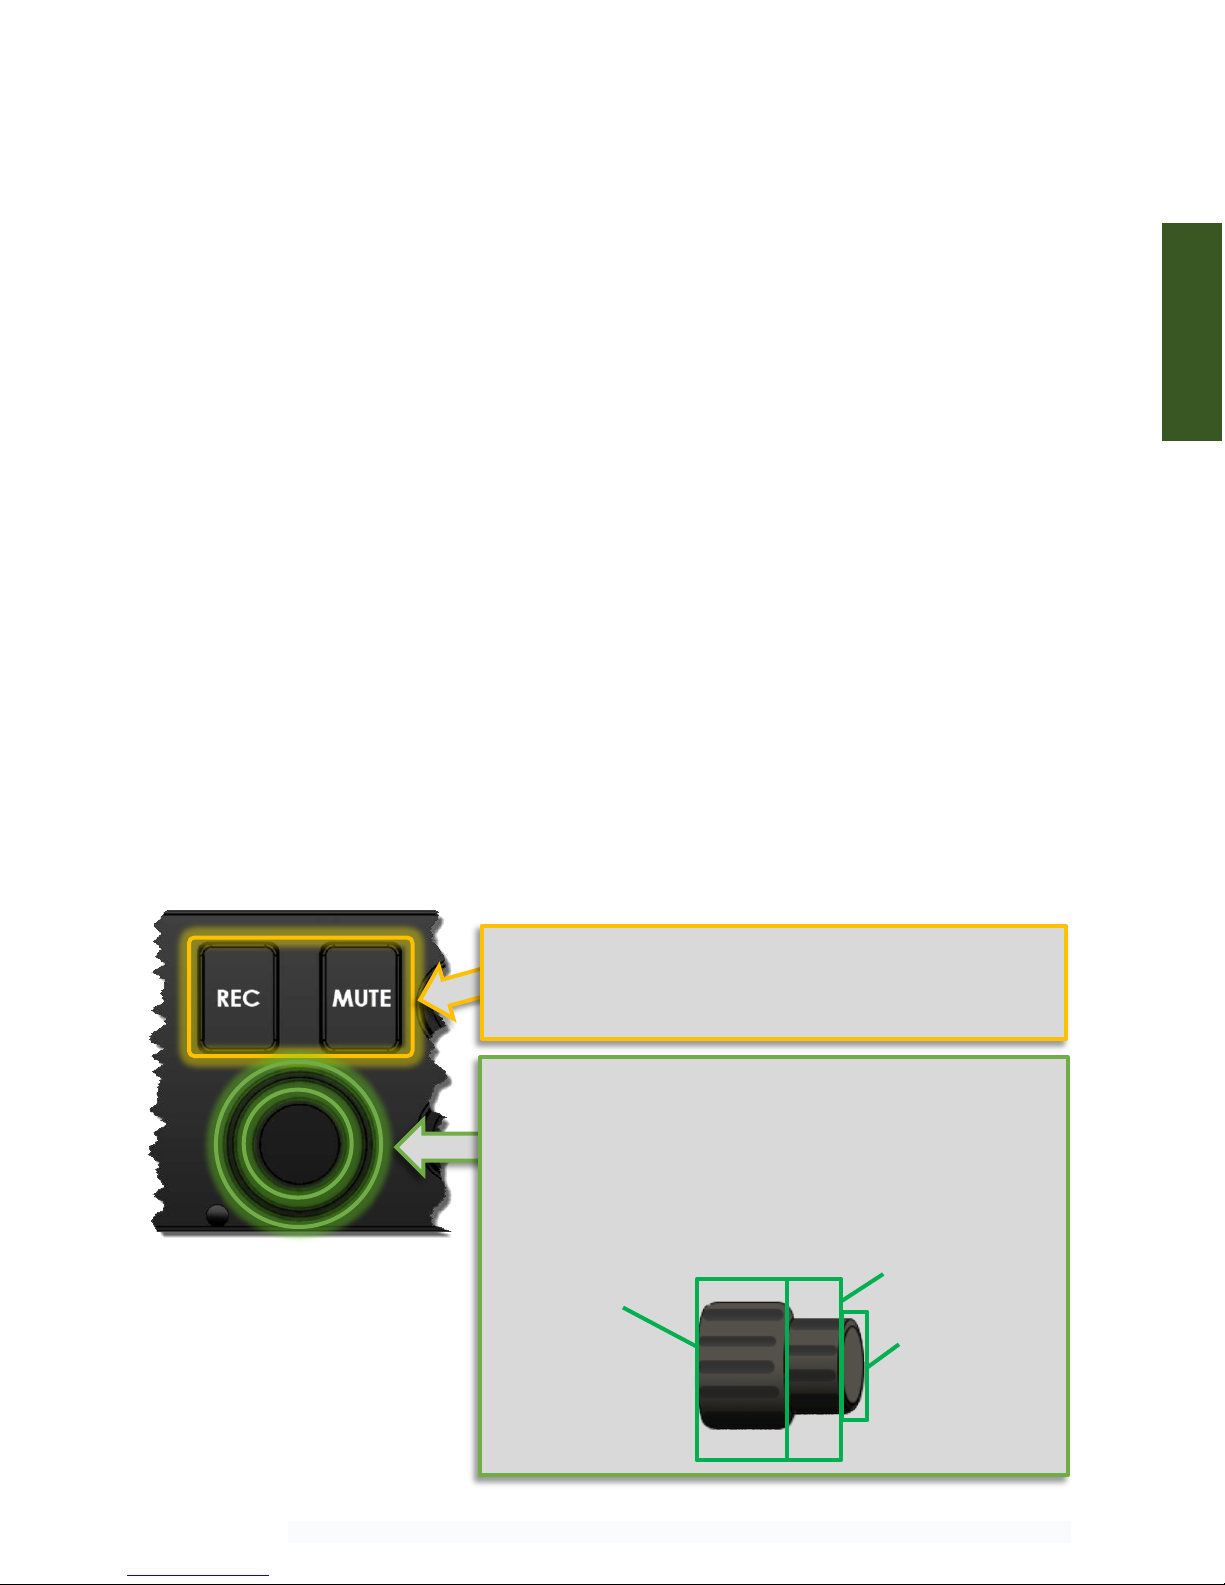
Two hardware-based buttons provide the operator with
quick access to enable and disable recording (REC) and mute
and un-mute audio (MUTE) during the recording.
The control knob features an inner and outer section as well
as a center push-button end. Typical operation uses the outer
knob for “coarse” selection and navigation between major
sections of the menu and the inner knob for “fine” selection
within menus. To select an item, the operator can press the
push-button end of the knob as the “enter” command.
Outer knob
Inner knob
Center push-
button
[FIG 2.1]ION’s hardware-based buttons:
REC and MUTE buttons (top) and control
knob with center push-button (bottom).
Churchill Navigation ●Support Phone: 720.744.3300 ●E-mail: support@churchillnavigation.com 9
2.3 Basic Operation
During basic operation, the outer control knob is used to select the desired recorder(s) from which video
will be captured. By pressing the REC button, the operator starts and stops the recording as desired.
2.4 Recorders
In the ION, the term recorder is given to the recordable output made up of several different input
parameters for any given video source. Recorders combine the video signal itself (analog or digital) with
preferences for the type of encoder, video scaling, and metadata, plus global parameters like audio, into
a single entity. These settings and sources combine to become the HD-SDI-1, HD-SDI-2, and Analog
recorders as shown below.
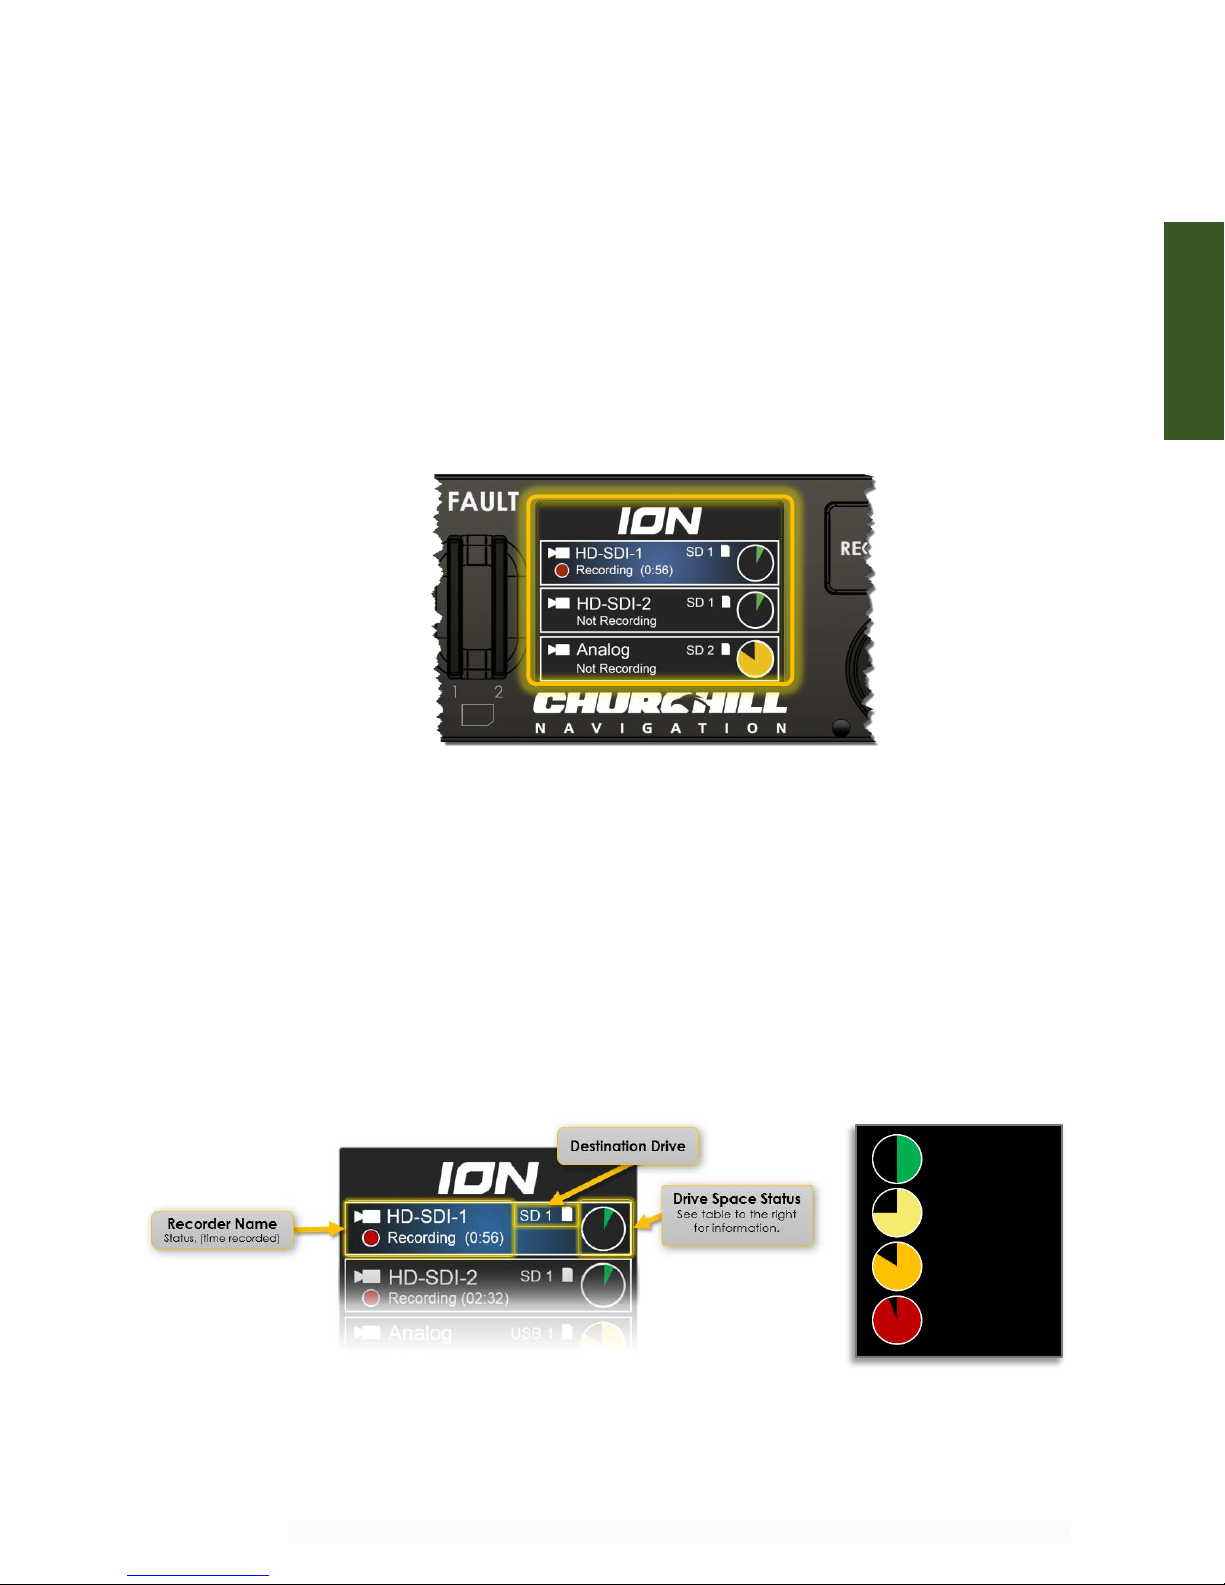
In addition to the name, the recorder selection screen contains information about each recorder source.
This includes the status (recording / not recording), the recorder’s assigned primary removable media
location (SD 1, SD 2, USB 1, USB 2), and the amount of time remaining on the removable media.
2.4.1 Recorder Selection Screen
The recorder selection screen displays an overview of the status of the recorders that have been setup
in the ION. This screen is useful to get a general overview of the status of the recorder (either recording
or not recording) and information about the removable media that has been assigned to each recorder.
The options available in the recorder selection screen will vary by customer and application.
[FIG 2.2] Recorder selection screen
Operation
[FIG 2.3] Recorder selection screen detail
0 - 50%
50 - 75%
75 - 85%
85 - 100%
Churchill Navigation ●Support Phone: 720.744.3300 ●E-mail: support@churchillnavigation.com 10
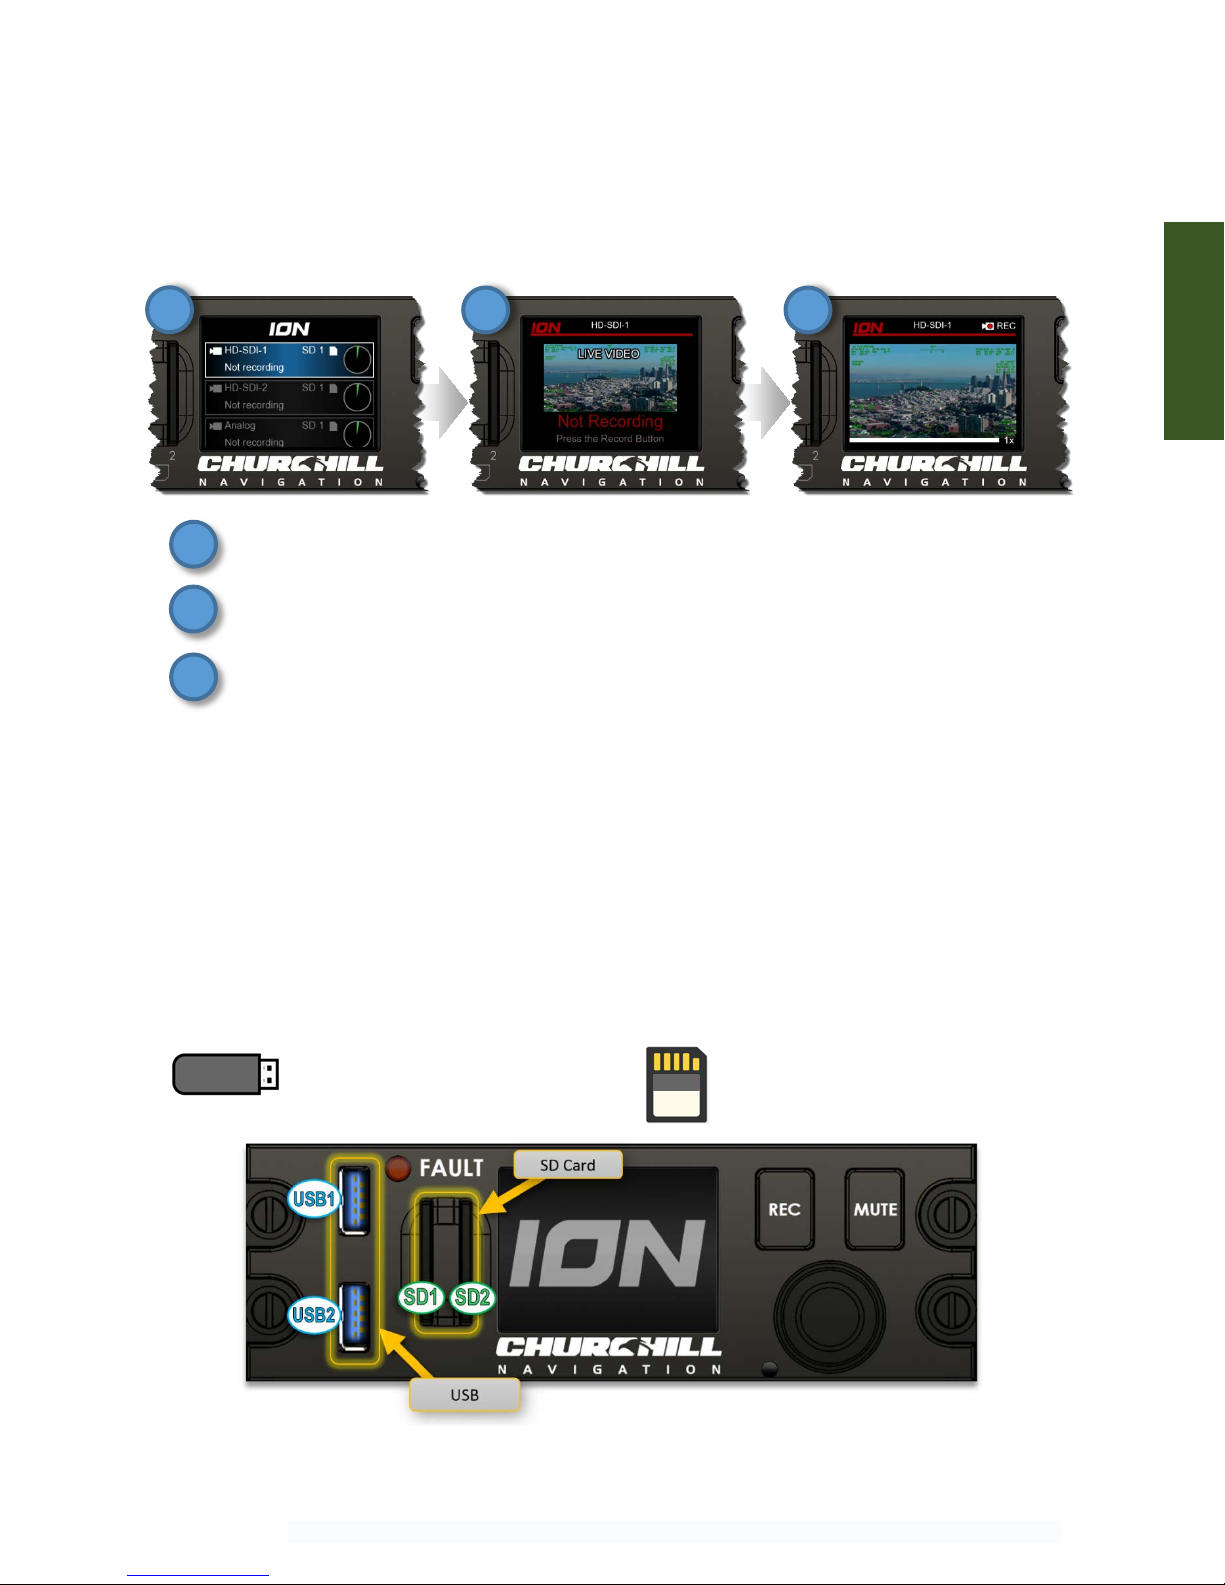
2.4.2 Recorder Display Page
The video available to each recorder can be monitored using the individual recorder display pages for
HD-SDI 1, HD-SDI 2, and Analog. These pages allow the operator to monitor the video associated with
the recorder as well as the basic status of the recorder: Recording, Not recording, No video, etc.
1) HD-SDI 1 is selected from the Recorder Selection Screen.
2) Turning the outer control knob to the right while HD-SDI 1 is selected shows the live video
from the camera with an indication of “Not Recording”.
3) Pressing the REC button, the recorder page for HD-SDI 1 indicates it is now being recorded.
2.5 Recording Video
2.5.1 Removable Media
Prior to recording, ensure that the ION has at least one available removable media device installed.
Two USB and two SD ports are available for recording. Operators can set the recording order
preference for each recorder available in the ION. This option will also allow the ION to “rollover” to
the next available drive when the current one becomes full.
Removable Media Recommendations:
USB
−Format as exFAT or NTFS
−USB 2.0 (or better)
−Expect to consume roughly 4GB
per hour of recorded video
SD
−Format as exFAT or NTFS
−Class 4 (or better)
−Expect to consume roughly 4GB
per hour of recorded video
Operation
1
2
3
1
2
3
[FIG 2.4] Removable media interfaces
Churchill Navigation ●Support Phone: 720.744.3300 ●E-mail: support@churchillnavigation.com 11
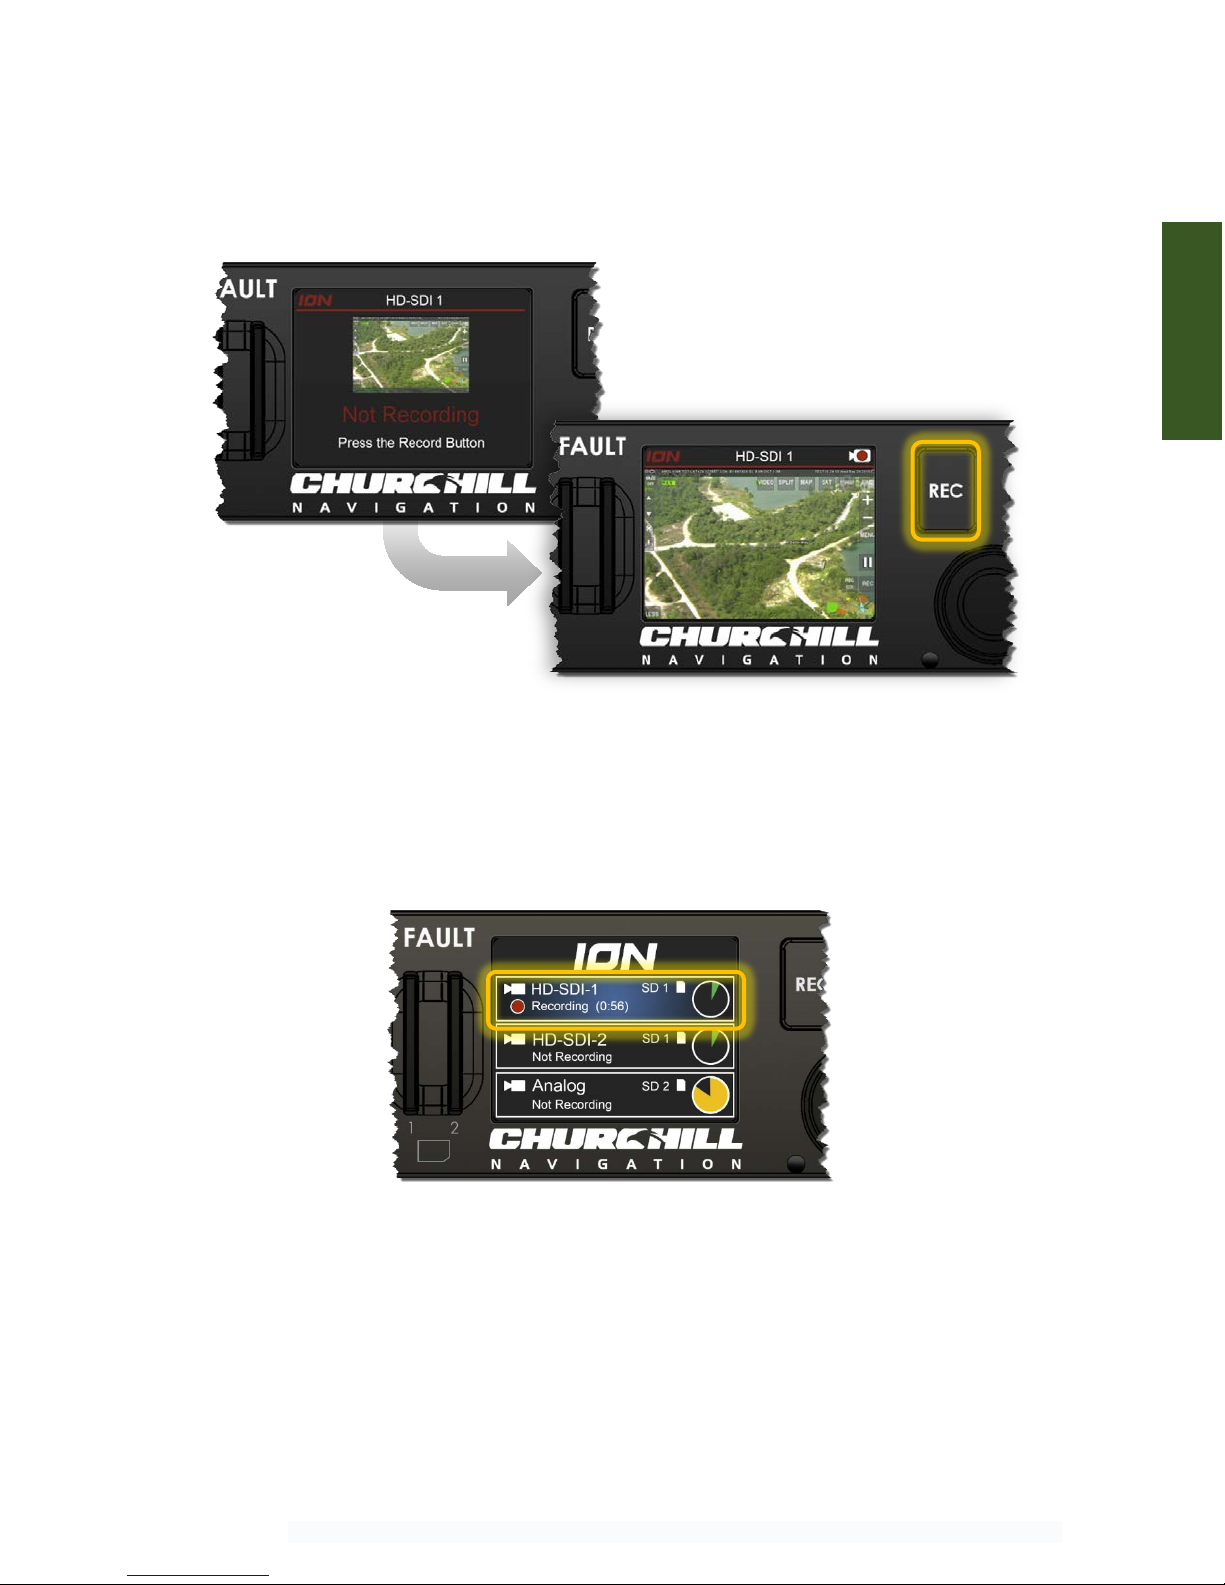
2.5.2 Recording HD-SDI Video
When the ION is receiving one or both HD-SDI recorder channels, use the outer control knob to select
the desired recorder and press the REC button to start recording.
Press the REC button once again to end the recording. Video files will be automatically saved to the
recorder’s preferred removable media location.
The recorder selection screen will also provide an overview of any active recordings as well as the
length of video that has been recorded.
2.5.3 Recording Analog Video
The ION’s analog video recorder can be selected and recorded in an identical manner to the HD-SDI
recorders’ operation. Use the outer knob to select the analog channel and press the REC button to start
and stop the recording.
Select the desired recorder with outer
knob: HD-SDI 1 in this case.
Operation
[FIG 2.6] HD-SDI 1 recording in progress as viewed from the
Recorder Selection Screen
Press the REC button to
start/stop the recording.
[FIG 2.5] Recording operation

Churchill Navigation ●Support Phone: 720.744.3300 ●E-mail: support@churchillnavigation.com 12
Note: Because the ION can accept several types of analog video, setup is required for first-time
installation of analog video on an ION. If you have connected analog video and still see a “no signal”
screen or no analog channel is available, please refer to section 6.4.1(c) – Analog video inputs and 7.2 –
Troubleshooting Analog Video.
2.6 Audio
2.6.1 Audio Setup
For best audio quality, Churchill Navigation recommends that the ION audio input be connected to a
balanced (chassis ground independent) output, with -15 dBV signal levels. It is also recommended to
connect the ION audio input to a COM port, rather than a headset output. Please see the ION
installation manual for addition setup detail.
ION can be configured to record stereo audio as two separate channels; ICS as channel 1
and RX/TX (radio comms) as channel 2, for example. See the installation manual for details.
The recommended ION audio setup has been tested on common aircraft audio control systems
including the Eagle Copters USA (Geneva Aviation) G13000 Digital Audio Router and Technisonic A711
and A711X. If you have questions regarding the best audio setup for your installation, please contact
Churchill Navigation.
2.6.2 Muting and Unmuting Audio
The ION features a hardware-based mute button to allow operators to quickly mute and un-mute the
audio being recorded. When recording audio is muted, an icon will display in the upper right of the
ION’s screen, as shown below. The mute button mutes the captured audio for all recorders.
[FIG 2.7] Hoist camera recording using analog video
[FIG 2.8] Audio recording is muted
Operation

Churchill Navigation ●Support Phone: 720.744.3300 ●E-mail: support@churchillnavigation.com 13
When the hardware-based mute button is activated, audio recording is muted for ALL
recorders.
2.7 Software Updates
ION software is updated frequently to add new features and improve functionality. The current version
of the ION software, as well as an archive of previously released versions, can be found by visiting the
Software Release Notes webpage at: http://churchillnavigation.com/releasenotes/
2.7.1 Downloading & Installing Updates
To update the software for your ION, simply download the update from the Release Notes webpage
(http://churchillnavigation.com/releasenotes/) and save the file to an SD card or USB drive. Next,
insert the SD or USB drive with the saved update file into the ION and restart the device. The software
will then be automatically loaded and the operator will be prompted by the ION to install the latest
version.
Once the update process is successful, the fault light will blink once and the unit will reboot.
Operation
Operation
Churchill Navigation ●Support Phone: 720.744.3300 ●E-mail: support@churchillnavigation.com 14
Section 3 Playback
3.0 Description
This section contains information for playing back the video captured by the Churchill Navigation ION
video recorder.
3.1 File Format
The ION’s video files will be saved in .TS (Transport Stream) file format. Transport Stream is a standard
format specified in MPEG-2 for the transmission and storage of audio, video, and metadata. Recorded
video files will be saved to the removable media (either USB or SD) based on operator preferences.
File names will generally be in the format of: [RecorderName]-yyyy-mm-dd-HHMMSS.TS
Because a .TS video file also captures metadata, video files can contain additional information including
GPS lat/long position, aircraft heading/pitch/roll, etc.
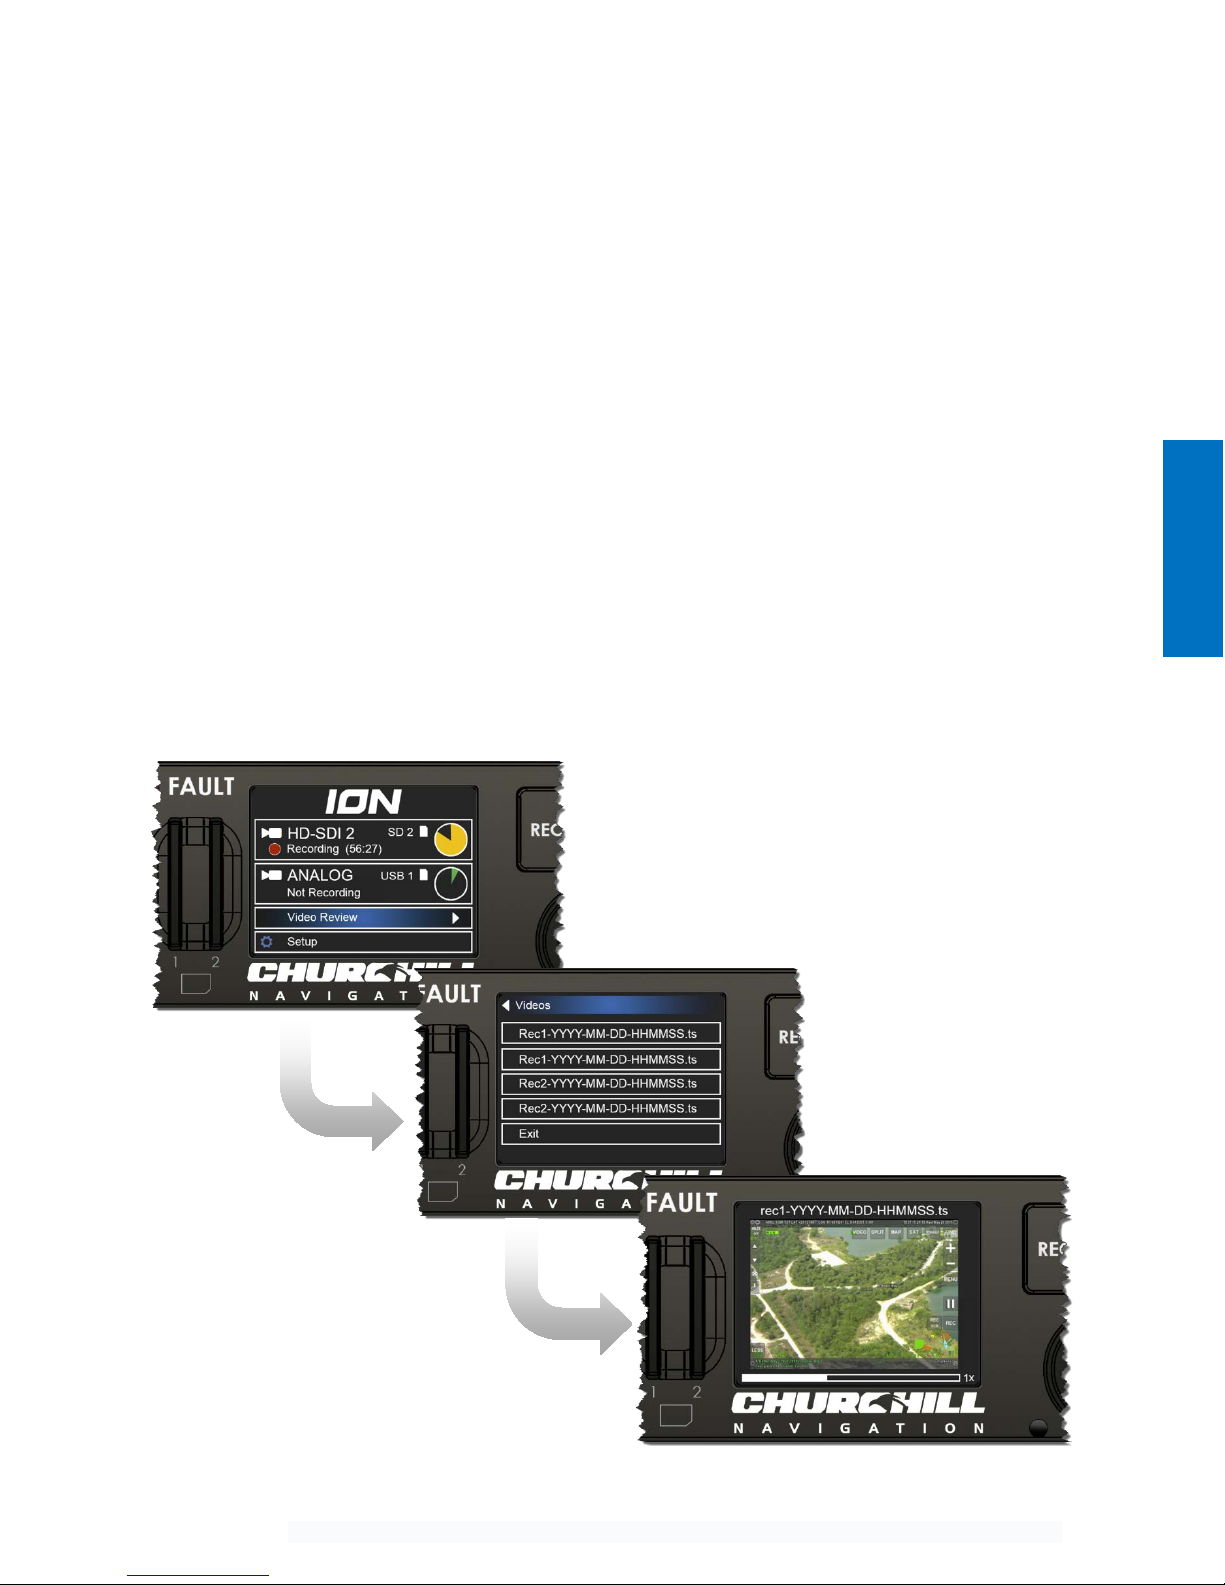
3.2 On-Device Playback
Use the ION’s on-screen menu to access the playback option and select the video file you wish to play.
Playback
Select “Video Review”
from the menu.
[FIG 3.1] On-device playback operation
Select the desired video
and press the center push
button

Churchill Navigation ●Support Phone: 720.744.3300 ●E-mail: support@churchillnavigation.com 15
3.2.1 Playback controls:
Select the desired video clip using the outer knob and press the center push button to select and to
start/pause playback. The on-screen progress indicator at the bottom of the screen will show where
you are in the clip.
Turn the inner knob left or right to incrementally skip forward and backward. Alternatively, you can
advance the clip one frame at a time by first pausing the playback, then pressing and turning the inner
control knob.
By default, on-device playback will take place at normal speed (1x). Playback speed can be adjusted
while reviewing any clip downward to 1/8x normal speed or upward to 4x normal speed. To adjust
playback speed, turn the inner control knob left or right while pressing the knob in. The playback
speed will be indicated in the lower, right corner of the screen.
To exit playback mode, rotate the outer knob to the left.
3.3 Windows PC Playback
For Microsoft Windows users, Churchill Navigation recommends using the free VLC Player available from
videolan.org. Please note that the Movies and TV App and Windows Media Player are not supported at
this time.
3.4 Macintosh Playback
While some versions of Apple QuickTime Player can handle playback of .TS files, it is recommended that
Macintosh users install the free VLC Player to view the .TS video files recorded by the ION.
3.5 Editing Recorded Video Files
.TS files can be edited using the most current versions of Windows Movie Maker, Apple Final Cut, Adobe
Premier, and others. Some software packages like Apple iMovie may require transcoding from .TS file
format into .MP4 (or another compatible format). Free products such as HandBrake (www.handbrake.fr)
or other video transcoding software will generally work well to perform this conversion.
Users are encouraged to refer to the editing product’s documentation or online references as a
complete discussion on how to edit recorded video files is outside of the scope of this manual.
Playback
Churchill Navigation ●Support Phone: 720.744.3300 ●E-mail: support@churchillnavigation.com 16
Section 4 Weather Radar Display
4.0 Description
This section contains information for displaying weather radar on the Churchill Navigation ION video
recorder.
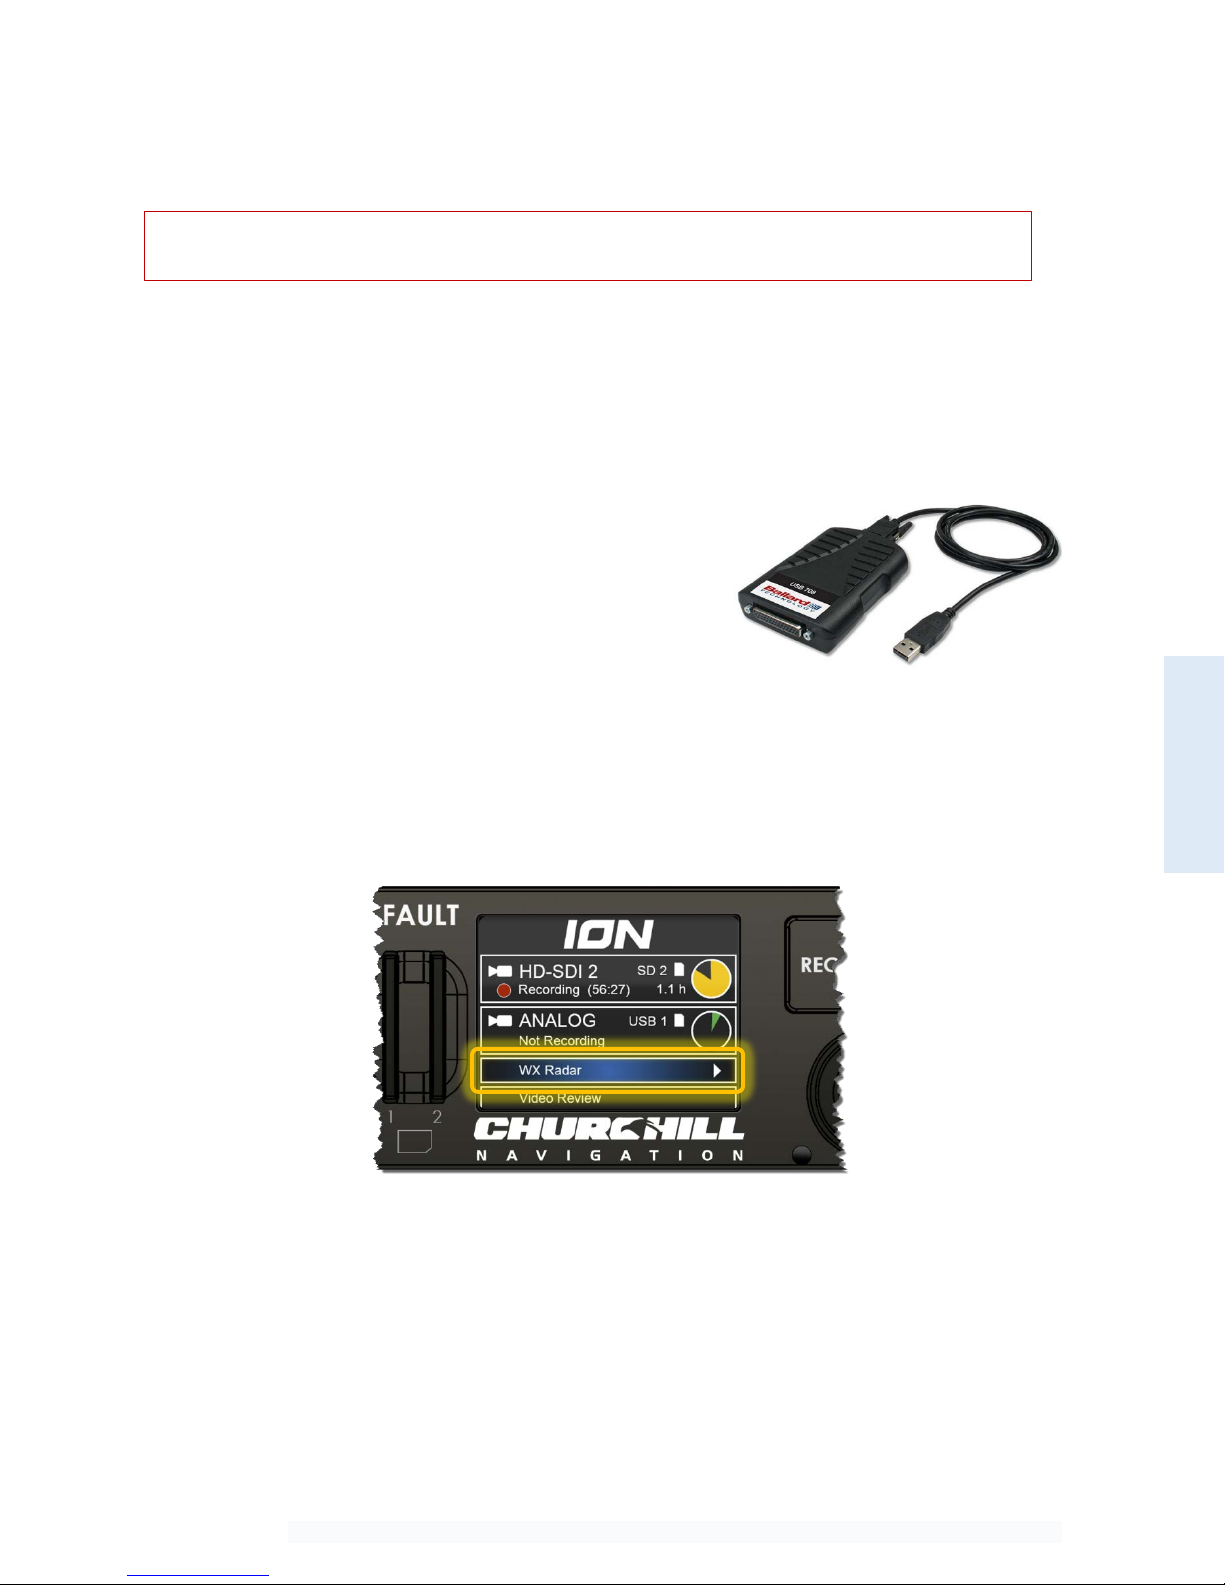
4.1 Requirements
The weather radar function of the ION takes ARINC 708-
formatted data via USB and displays it on the ION screen
as well as overlaid on a map via HD-SDI video out.
Depending on installation, an ARINC 708 databus output
to USB converter may be required. Churchill Navigation
recommends the USB 708 Avionics Interface for Weather
Radar from Ballard Technologies. (www.ballardtech.com)
4.2 Accessing the Weather Radar Display Feature
The weather radar function is available from the ION’s Recorders Menu. Simply select the option for
“WX Radar” or select the WX Radar recorder by rotating the outer control knob until the option for “WX
Radar” is on-screen.
4.3 Weather Radar Operation
The ION’s weather radar display receives data from the aircraft’s on-board weather radar system and
displays it via the on-screen display as well as the HD-SDI out channel. When position data is supplied via
RS232A serial connection (using NMEA 0183 standards), the aircraft’s position will also be displayed on a
moving map via HD-SDI out. If no position data is received, the moving map is disabled and the HD-SDI
out channel will mirror the ION’s on-screen weather radar display.
[FIG 4.1] Ballard ARINC 708 to USB Converter
[FIG 4.2] Weather radar option in the recorder selection screen
Weather Radar
Weather Radar connectivity requires additional software functionality that is offered for an
additional fee. Please contact Churchill Navigation for more information.

Churchill Navigation ●Support Phone: 720.744.3300 ●E-mail: support@churchillnavigation.com 17
The ION does not send control commands to the onboard weather radar. Radar operation, i.e.
range, gain, tilt, etc. are still controlled by the aircraft’s on-board radar control unit.
The following control knob functions are available:
Outer control knob
Cycle recorder (HD-SDI 1/HD-SDI 2/Analog/WX Radar)
Inner control knob Toggle background map type on HD-SDI out display only
Push and hold inner control knob Zoom in/out moving map on HD-SDI out display only
Center push button
Toggle radar echo transparency (Off/50% transparent/opaque)
on HD-SDI out display only
Push center button while turning
inner control knob
Change zoom level on the moving map display. Note: This feature
is only available when position data is being provided to the ION.
4.4 On-screen Display
Radar echoes will display on the ION’s on-screen display as shown below. Note that the ION’s on-screen
display does not feature a moving map.
4.5 HD-SDI Out Display
Radar echoes will be shown on the HD-SDI
channel overlaid on a zoom-able moving map*.
Echo transparency can be toggled using the
center push button. Background imagery for the
map can be toggled by rotating the inner
control knob. Available imagery types are 1)
Street map 2) Topographical Map 3) FAA
Sectional**. Note: FAA sectional charts are not
available in all areas.
[FIG 4.3] WX Radar displayed on-screen on the ION.
[FIG 4.4] WX Radar displayed on a secondary monitor via HD-SDI out.
Weather Radar
* Moving map functionality requires NMEA position data supplied via RS232A serial connection.
** FAA sectional chart should not be used for navigation.

Churchill Navigation ●Support Phone: 720.744.3300 ●E-mail: support@churchillnavigation.com 18
Section 5 Camera Link
5.0 Description
ION features full support for a wide range of Camera Link interface cameras. This allows operators to
record SWIR, MWIR, LWIR, high-resolution, or high-frame rate video through the ION’s Camera Link
Interface Adapter, shown here mounted on top of an ION.
5.1 Requirements
The Camera Link Adapter Board is a dedicated piece of hardware developed by Churchill Navigation
specifically for use with the ION and Camera Link camera. As such, this hardware is required to interface
a Camera Link camera with the ION.
The front USB connector on the Camera Link Interface Adapter (FIG 5.1 “A”) must be connected to one
of the USB connections on the front of the ION (FIG 5.1 “B”) using the supplied USB cable.
Connect the Camera Link camera to the rear of the Camera Link Adapter Board. For most installations,
you’ll want to use the connection labeled “J1: BASE”.
[FIG 5.1] ION with Camera Link Interface Adapter
[FIG 5.2] Rear of Camera Link Interface Adapter
Camera Link
B
A
Camera Link requires additional hardware and software functionality that is offered for an
additional fee. Please contact Churchill Navigation for more information.

Churchill Navigation ●Support Phone: 720.744.3300 ●E-mail: support@churchillnavigation.com 19
5.2 Camera Link Operation
When a Camera Link camera has been connected to the system, the operator should load the Camera
Link graph file supplied by Churchill Navigation. After doing this, menu options for configuring the
Camera Link input will be enabled in the Recorders and Video Inputs menus, as well as elsewhere in the
ION menu structure.
Camera Link
Churchill Navigation ●Support Phone: 720.744.3300 ●E-mail: support@churchillnavigation.com 20
Section 6 Setup Menu
6.0 Description
The ION is fully configurable to support most installation and setup scenarios. This section details the
advanced setup options that are available to users.
6.1.1 Accessing the Setup Menu
The setup menu is accessed via the recorder selection screen. Use the inner control knob to select
“Setup” and then press the control knob’s center push button.
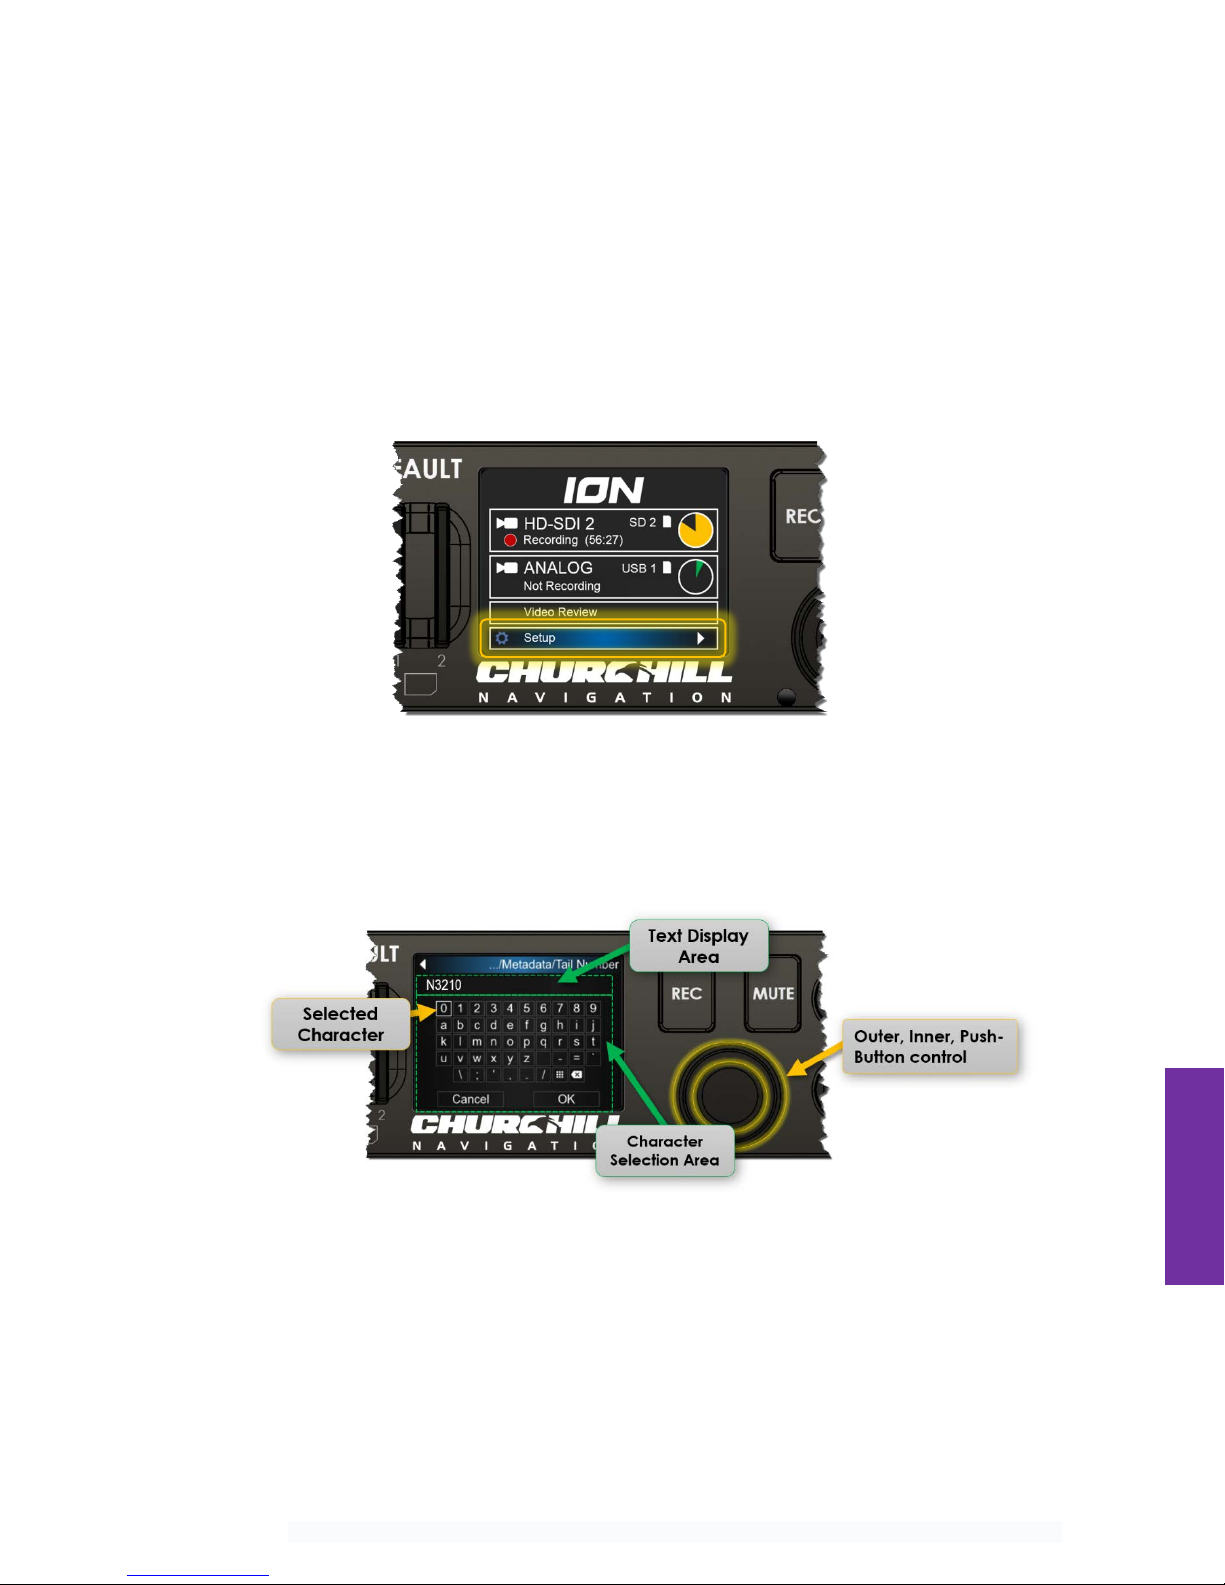
6.1.2 Using the On-Screen Keyboard
The on-screen keyboard allows users to change text entries using only the functions of the control
knob and push button, eliminating the need for an external keyboard. The on-screen keyboard allows
for entry of upper and lower-case letters, numbers, and a predefined set of special characters.
On-screen Keyboard Usage:
1) Use the inner control knob to select the desired character. The selected character space is shown
surrounded by a bolded box. Scrolling between characters and lines is accomplished by turning the
inner control knob left and right.
2) Once the desired character is selected in the character selection area, press the center push-button
to enter that character in the text display area.
[FIG 6.1] Accessing the Setup menu.
[FIG 6.2] On-screen keyboard functional areas.
Setup
Other manuals for ION
1
Table of contents
Other Churchill GPS manuals


