Alfapilot M16 User manual

1

2
Content index
1. INTRODUCTION ......................................................................................................................5
2. GENERAL BUTTONS ................................................................................................................5
2.1 POWER BUTTON .......................................................................................................................................... 5
2.2 MENU BUTTON............................................................................................................................................ 5
2.3 BACK BUTTON ............................................................................................................................................. 5
2.4 LATERAL BUTTONS........................................................................................................................................ 5
3. MAIN SCREEN.........................................................................................................................6
3.1 ENABLE/DISABLE SHARE GPS......................................................................................................................... 6
4. SERI FLY APP...........................................................................................................................7
5. MAIN MENU...........................................................................................................................7
5.1 FLIGHT MODES ............................................................................................................................................ 7
5.2 FLIGHT BOOK............................................................................................................................................... 8
5.2.1 ADD/MERGE Track ............................................................................................................................................ 8
5.2.2 Import .............................................................................................................................................................. 8
5.2.3 Export ............................................................................................................................................................... 9
5.2.4 Show Info/Track ................................................................................................................................................ 9
5.2.5 IGC Play ............................................................................................................................................................ 9
5.2.6 Delete............................................................................................................................................................... 9
5.3 GNSS STATUS ......................................................................................................................................... 10
5.3.1 Status Bar ........................................................................................................................................................ 10
5.3.2 GNSS Fix Status ............................................................................................................................................... 10
5.3.3 In View ............................................................................................................................................................ 10
5.3.4 In Used ........................................................................................................................................................... 10
5.3.5 Accuracy .......................................................................................................................................................... 10
5.3.6 Satellites.......................................................................................................................................................... 10
6. GLOBAL SETTINGS ................................................................................................................11
6.1 PILOT DATA............................................................................................................................................... 11
6.2 GLIDER DATA............................................................................................................................................. 12
6.3 SYSTEM .................................................................................................................................................... 12
6.3.1 Export configuration ....................................................................................................................................... 13
6.3.2 Import Configuration ...................................................................................................................................... 13
6.3.3 Use External SD (Class 10)............................................................................................................................... 13
6.3.4 Update SeRi Fly APP ........................................................................................................................................ 13
6.3.5 TEST BETA VERSION SeRi Fly APP.................................................................................................................... 13
6.3.6 System Units ................................................................................................................................................... 13
6.3.7 Kalman Filter Settings ..................................................................................................................................... 14
6.3.8 Send Logs ........................................................................................................................................................ 14
6.4 AUDIO SETTINGS ........................................................................................................................................ 14
6.4.1 Vario Settings .................................................................................................................................................. 15
6.4.2 Alerts Settings ................................................................................................................................................. 19
6.4.3 Set Max Volume at Start SeRi FLY ................................................................................................................... 19
6.4.4 Mute Vario when not fly ................................................................................................................................. 19
6.5DISPLAY SETTINGS ...................................................................................................................................... 19
6.5.1 Minimum size Widget ..................................................................................................................................... 19
6.5.2 Number of screens in flight............................................................................................................................. 20
6.5.3 Orientation Screen .......................................................................................................................................... 20
6.5.4 Enable Two Refresh of Map per Second ......................................................................................................... 20
6.5.5 Automatic window change in competition ..................................................................................................... 20

3
6.6 LIVE TRACK &TEAM. .................................................................................................................................. 20
6.6.1 Server Live Track 24 ........................................................................................................................................ 20
6.6.2 Server LocTome............................................................................................................................................... 20
6.6.3 Fly Team .......................................................................................................................................................... 21
6.7 MANAGERS [MAPS -WAYPOINTS -THERMALS -AIR SPACES]............................................................................ 21
6.7.1 Send or Receive............................................................................................................................................... 21
6.7.2 Manage WayPoints ......................................................................................................................................... 23
6.7.3 Manage Thermals ........................................................................................................................................... 24
6.7.4 Manage Air Spaces.......................................................................................................................................... 25
6.7.5 Map Manager.................................................................................................................................................. 26
6.7.6 Map Settings ................................................................................................................................................... 26
6.7.7 Download Maps .............................................................................................................................................. 26
6.8 FLIGHT VALUES .......................................................................................................................................... 27
6.8.1 Altitude limit for Air Spaces ............................................................................................................................ 27
6.8.2 Config Thermals Values................................................................................................................................... 28
6.8.3 Takeoff Detection............................................................................................................................................ 28
6.8.4 Landing Detection ........................................................................................................................................... 28
6.8.5 Order WayPoints by Distance in Flight XC ...................................................................................................... 28
6.8.6 Show Track Duration on Map - Minutes ......................................................................................................... 28
6.8.7 Select Type of Ellipsoid - Distance Calculations .............................................................................................. 29
6.9 ASIGNING KEYS .......................................................................................................................................... 29
6.10 ABOUT US .............................................................................................................................................. 29
7. FLIGHT MODES .....................................................................................................................29
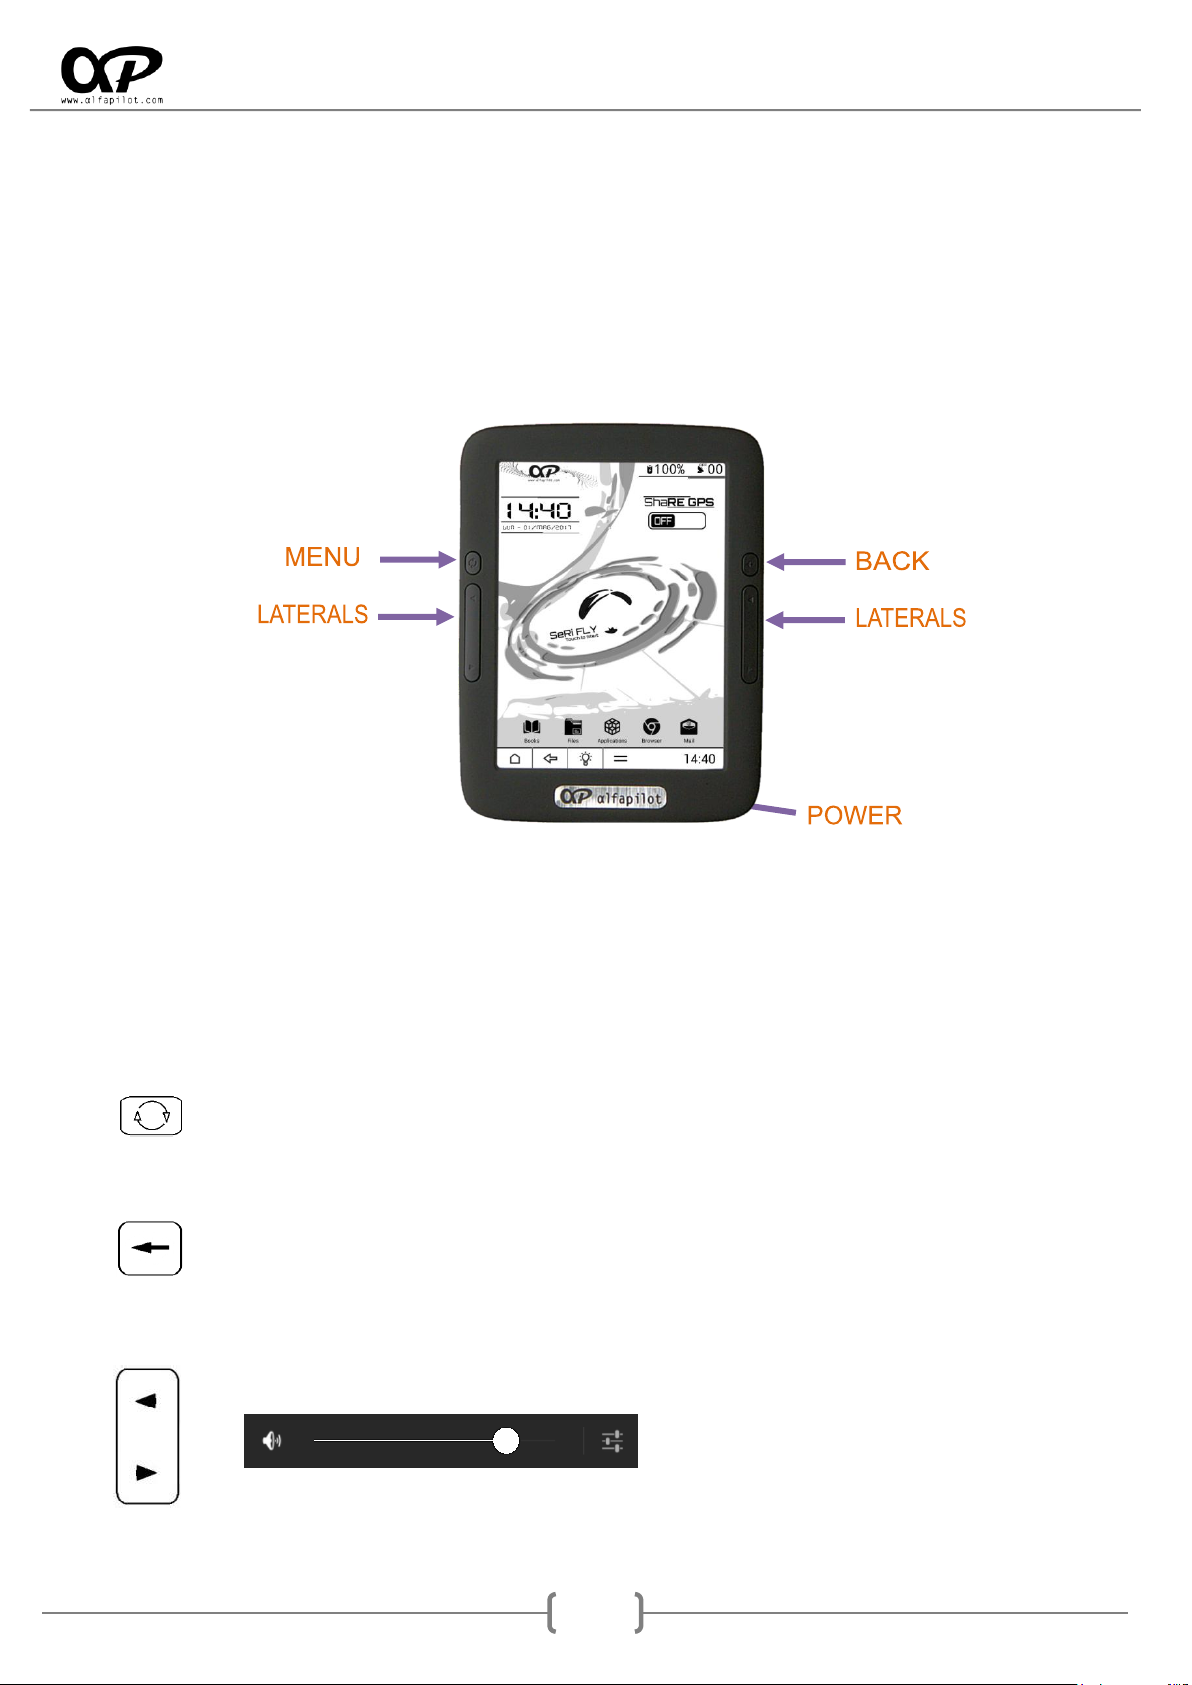
7.1 BUTTONS IN FLIGHT MODE .......................................................................................................................... 29
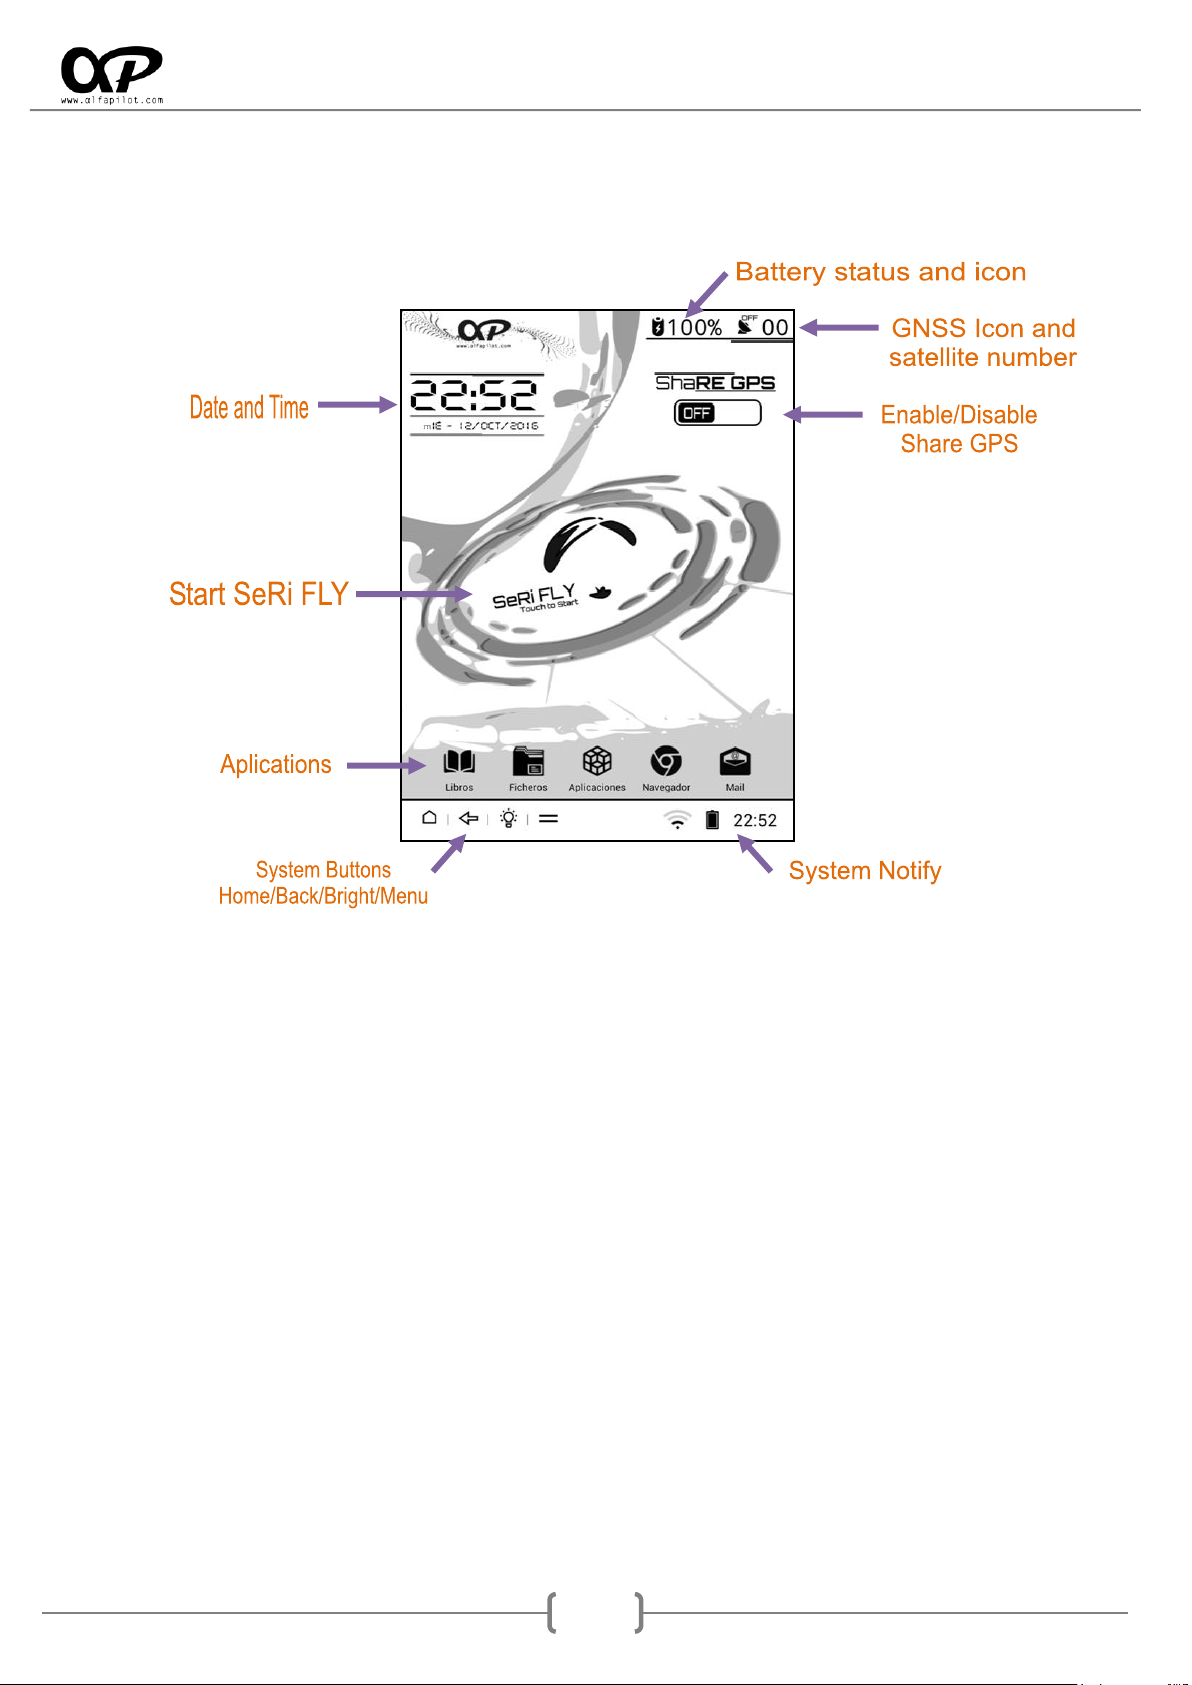
7.2 FLIGHT SCREEN .......................................................................................................................................... 31
7.3 WIDGETS .................................................................................................................................................. 31
7.4 MENU OPTIONS -COMMON ELEMENTS......................................................................................................... 32
7.4.1 SetQNH............................................................................................................................................................ 32
7.4.2 Add WayPoint ................................................................................................................................................. 32
7.4.5 Back................................................................................................................................................................. 33
7.5 MENU OPTIONS -SPECIFIC ELEMENTS ........................................................................................................... 33
7.5.1 Route Management ....................................................................................................................................... 33
7.5.2 Task Management.......................................................................................................................................... 34
7.5.3 Add - Edit WayPoint ....................................................................................................................................... 35
7.6 MENU OPTIONS -EDIT SCREEN .................................................................................................................... 36
7.6.1 Add/Remove Widgets ..................................................................................................................................... 37
7.6.2 Basic Configuration of Widgets ....................................................................................................................... 37
7.6.3 Configuration and Specifics of Widgets .......................................................................................................... 38
8. FLIGHT MANAGER ................................................................................................................43
8.1 BUTTONS IN FLIGHT MANAGER .................................................................................................................... 43
8.2XC MODALITY ........................................................................................................................................... 44
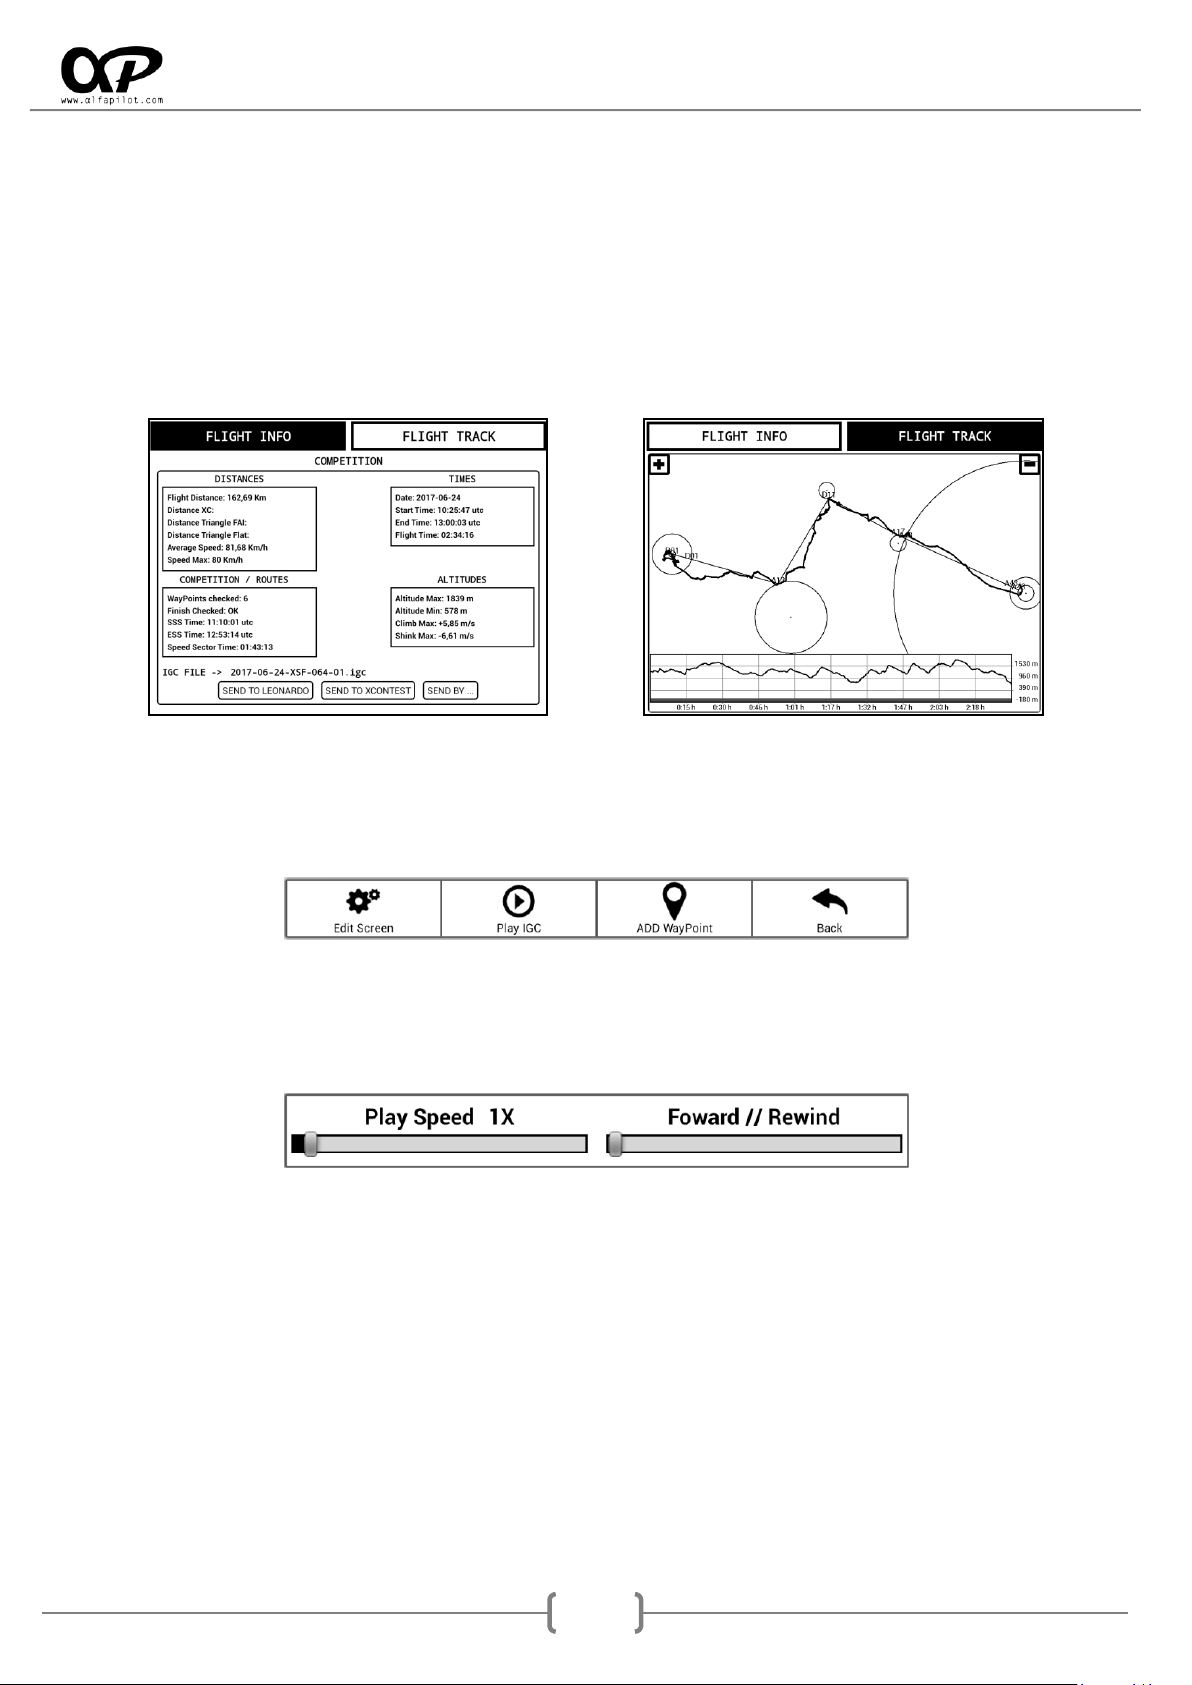
8.3 ROUTE OR COMPETITION MODALITY ............................................................................................................. 45
9. WIDGETS LIST.......................................................................................................................45
9.1 SYSTEM .................................................................................................................................................... 45
9.2 XI+WIDGETS ............................................................................................................................................ 45
9.3 FLIGHT...................................................................................................................................................... 45
9.4 WEATHER CONDITIONS ............................................................................................................................... 46
9.5 NAVIGATION ............................................................................................................................................. 46
10. FOLDER STRUCTURE SERI FLY..............................................................................................48
11. USE TIPS .............................................................................................................................49

4
12. SECURITY ADVICE ...............................................................................................................49
13. GLOSSARY ..........................................................................................................................50
14. CORRECT DISPOSAL OF THIS PRODUCT................................................................................50
15. EUROPEAN REGULATION CE ...............................................................................................51

5
1. Introduction
Thank you for using Alfapilot device. This is a navigation device, which has a Android system by extending
its functionality, and allowing install third party applications. If you have any questions or comments about
using our device, you can visit our website www.alfapilot.com or contact by mail with the Support
2. General Buttons
The physical buttons can acquire different functions depending on the application (see sections 7.1 y 8.1),
for a general use their functions are:
2.1 Power Button
We will use it for the turn on/off the device, as well as toggle the mode Stand By.
To power on, press for 3 seconds this button.
To switch off press this button until it shows the dialog "Turn off" (4 seconds).
With a short while on press enters Stand By mode, and with another short press exits this mode.
By long press (around 10 seconds), we'll force the full shutdown.
2.2 Menu Button
Displays a menu if it exists on the screen in which we find ourselves.
2.3 Back Button
It allows to go back to a State or previous screen.
It allows to hide the keyboard on some screens.
2.4 Lateral Buttons
They serve to increase or decrease the volume of the system, it will display the volume bar.

6
3. Main Screen
When you start the device screen is displayed (also known as Launcher), at this screen will have the
following:
3.1 Enable/Disable share GPS
This option allows you to activate the GPS to make it available in third-applications*, the GPS status icon
will change to search and indicate the number of satellites in use, also will activate the internall Vario. It has
a few settings (Menu button) that allow us to:
Use barometric altitude - Compensated, allows us to indicate that we want to use the (more
accurate) barometric altitude instead of the GPS altitude, this facilitates applications that
incorporate vario and glide ratio based on altitude calculations are also more precise.
Vario settings, see section 6.4.1.
Update Launcher, allows updating the system launcher.
Update system, allows updating the Android system (more information on our website).
About us, information about the developers.
* third-applications: GPS sharing allows us to provide GPS location to applications such as gaggle, xcsoar, xctrack, google earth, oruxmaps, etc. IT IS
NOT NECESSARY TO USE THIS FUNCTION WITH SeRi FLY.

7
4. SeRi FLY APP
This is the application that we have developed for the flight in paragliding, it has different flight modes,
multiple options, being these totally configurable by the user, to adapt the application to your needs, both
in functions, assistants, and in the configuration of the data fields can be resized, moved, etc.
All this will be described in the following sections.
5. Main Menu
When you start the application, the Main Menu screen is displayed, in this screen you can choose the flight
modes, access the flight book, enter the settings of the application and see the status of the GNSS and
other sensors.
In the lower part it shows the information of the developers as well as the current version, also if we touch
on this zone it shows a dialogue with the "List of Changes" of the different versions.
We also have information on the status and percentage of the battery, this information is the most reliable
and may differ from the battery percentage indicated by the system, because it is based on the voltage and
temperature of the battery.
To exit the application from the Main Menu screen, by pressing the Menu Button, it shows the "Exit"
option.
5.1 Flight Modes
Through these buttons we will initiate the different flight modalities, we have XC Flight, Routes and
Competition. The characteristics of each modalities are described in section 7.

8
5.2 Flight Book
In the flight book we will find a list of the flights we have made, ordered by date, and indicating the type of
flight we have made (flight mode), also shows us several options:
5.2.1 ADD/MERGE Track
With the Add Track option we can select an IGC file and add it to our flight book, choosing the modality in
which it was made, as well as if we have a task or route stored for that flight.
Merge Tracks, in some cases the recording of a flight can be interrupted momentarily due to a bug, in these
cases the recording will be stored in two separate track files, through this option we can merge them.
5.2.2 Import
It allows us to recover a flight book file previously exported (Backup), when clicking on this option it will
show us a dialog to select the file.
1
2
3
4
5
6

9
5.2.3 Export
Clicking on this option will start the export of the flight book, it will be stored in the folder
"SeRiFLY\FLYBOOK" with the extension ".ser". It is interesting to export our flight book periodically, as a
Backup copy. Once exported we can also copy these files to our PC for greater security.
5.2.4 Show Info/Track
It will open a new screen in which we will be able to see the information of the flight, as well as its Track. It
will also allow us to send our IGC flight file directly to a Leonardo server, XContest or send by... (Gmail,
Drive...)
5.2.5 IGC Play
It allows us to directly reproduce the flight, in the same modality in which it was recorded. When the IGC is
played we can press the physical "Menu" button and select IGC Play. This allows us to see 2 options:
1. Play Speed, we can accelerate from 1X up to 25X times the normal speed.
2. Foward // Rewind, It allows us to advance or go back the reproduction of the flight, the left
being the beginning of the flight and the right the end of the flight.
5.2.6 Delete
It will show us a dialog to confirm if we want to eliminate the flight from our flight book. When accepting,
the data will be deleted from the flight book, but the IGC file will continue to remain in the "Tracks" folder.

10
5.3 GNSS STATUS
It will show us a screen to visualize the GNSS status, as well as satellites seen, in use, etc. The information of
the Pressure and Humidity sensors will also be shown.
5.3.1 Status Bar
It shows information and icons related to the status of sensors, battery charge, numbers of satellites in use,
etc.
5.3.2 GNSS Fix Status
The current state can be No Fix (without positioning), 2D Fix (Positioned without altitudes), 3D Fix
(Positioned with altitudes).
5.3.3 In View
It is the total number of satellites that the GNSS module is scanning or using.
5.3.4 In Used
It is the number of satellites currently used to obtain the positioning.
5.3.5 Accuracy
It indicates the current accuracy of our position, the value H is the Horizontal precision and the value V is
the Vertical precision, both expressed in meters.
5.3.6 Satellites
They are separated into two blocks, GPS satellite network (USA) and satellite network GLONASS (Russian) &
GALIELO (European). It will show us information of each satellite, in the lower part we see its identifier, G
for GPS, R for GLONASS, and E for GALIELO, in the upper part it indicates the SNR of each satellite (Signal
strength).
Next we indicate the meaning of the SNR values:
Less than 22: it is a low signal and this satellite will hardly be used for positioning.
22 a 29: is an acceptable signal, and will be used for positioning.
30 a 35: it is a good signal, and will be used for positioning.
36 o más: it is an excellent signal, and will be used for positioning.
1
6
2
3
4
5

11
6. Global Settings
The Global Settings screen allows us to define values and options common to the entire application and
flight modes. Its structure is as shown in the following image and is described below.
6.1 Pilot Data
We can fill in the fields to write the personal information of the pilot, this information consists of:
Pilot Name: We use this information when we record a flight in IGC format.
Pilot Number: We use this information when we record a flight in IGC format.
XC Servers: we can configure our username and password for the following web servers XContest,
Paragliding forum Leonardo, DHV XC Leonardo, or enter data from a Leonardo server Manually.

12
6.2 Glider Data
In the Wing Data option we can write the wing information that the pilot uses, this information is stored in
the IGC flight file, and in some options when sending reports or flights to XC servers, it consists of:
Manufacturer: List of Manufacturers.
Model: this allow us to insert the model of glider.
FAI Class: FAI-3, FAI-1, FAI-5, FAI-2, FAI-11, FAI-12.
Certification: LTF 1, LTF 1/2, LTF 2, LTF 2/3, LTF3, EN A, ENB, EN C, EN D, CCC, Proto.
Category: Sport, Open, Tándem.
Wing Speed (Km/h)*: Esta speed is indicated by the manufacturer at Hands Free.
Wing glide Ratio*: The glide ratio indicated by the manufacturer at Hands Free.
Maximum Wing Speed *: It is the indicated by the manufacturer when we accelerate to the maximum.
Glide Ratio at Maximum Speed*: The glide ratio of our wing at maximum speed.
* Important to correctly define these values since they are used to perform calculations in the assistants. If you do not know them, you can check
with the manufacturer, or indicate the approximate values.
6.3 System

13
6.3.1 Export configuration
Exports the current configuration of the entire application to a file ".cfg" (global configuration and
configuration of screens), this file is located in the folder "../SeRiFLY/Config/name.cfg" and its name will be
defined by the Export date.
6.3.2 Import Configuration
Displays a dialog to import the configuration from a ".cfg" file.
6.3.3 Use External SD (Class 10)
It allows to have the maps and elevation files on an SD card, it is essential that it is of class 10. To use the
Micro SD card we must follow these steps:
oFormat the card in NTFS or FAT32 on our computer (preferably NTFS).
oWith the card in our alfapilot we activate this option.
oWe leave SeRiFLY and re-enter so that the folders are created on our card.
oIf we connect our alfapilot to a PC, we should see a new memory unit, in it we will have created
the "SeRiFLY" folder that contains only the folders "Maps" and "Elevations".
oWe can copy the maps and elevations files to their respective folders from our PC.
oWe can also download the maps from our map manager (See section 6.7.6), these will be stored
in our Micro SD card.
6.3.4 Update SeRi Fly APP
Update the application to the latest stable version.
6.3.5 TEST BETA VERSION SeRi Fly APP
Update the application to the latest BETA version. The beta versions include new features that are in the
testing period, and may be more susceptible to contain an error or bug.
6.3.6 System Units
It allows to change the units shown in the widgets, between metric and imperial units.

14
6.3.7 Kalman Filter Settings
Start the adjustment screen of the Kalman filter to establish its values, it will help us find a value so that the
vario reacts in the most appropriate way to our tastes. A low value will define a more reactive vario, a high
value a vario less reactive but more stable. The most appropriate value is 5.0VH.
6.3.8 Send Logs
Sometimes an error can occur in SeRi Fly, normally the application automatically restarts to continue with
the flight, while keeping an error report (Log). This option allows us to send these Logs to the support
service, in order to identify and correct the causes of the failure or error. For a correct sending it is
necessary to have an internet connection and have our Gmail account configured.
6.4 Audio Settings
In Audio settings we have the Audio configuration of the application.

15
6.4.1 Vario Settings
Through this configuration screen we can adapt the sound of the vario to our tastes, as well as perform
tests.
Volume of the Vario
1. Sound icon, can be activated or deactivated.
2. Volume, current value of the Vario.
3. Control Bar, of the Vario volume.
General adjustments
1. Tone type of Vario, we can select the type of tone we want for the Vario Sound. We have 3
options, TONE A, TONE B and TONE C. It is preferable to test the three options to listen to their
differences.
2
3
4
1
2
3
1

16
2. Climb threshold m/s, the Vario will start to sound from this value when we climb. The value is
expressed in m/s.
3. Sink threshold m/s, the Vario will start to sound from this value when we sink. The value is
expressed in m/s.
4. Activate ZeroBand, activating this option, when the value of the vario is close to the Climb
Threshold, special tones will be emitted. For example, if our Climb Threshold is 0.1 m/s, when the
Vario is between -0.5 to 0.0 the Vario will use the special tones of ZeroBand.
Change to CLIMB or DRIFT configuration
Pressing these buttons, we will change to the configuration in ascent or descent.
CLIMB DRIFT
Beeps per Second
* note: the beeps configuration is only available in Climb, since in drift the tone is continuous and there are no beeps.
1. Beeps Bar, by moving this bar we will increment (to the right) or decrease (to the left) the number
of beeps per second according to the vertical speed.
2. Beeps values, we visualize the number of beeps that will be reproduced per second at the m/s that
correspond. Following the example image, at 1.0m/s is 1.9 beeps per second, at 2m/s is 2.1 beeps
per second, etc.
1
2

17
Frequency Bars
1. Start Frequency Bar, moving this bar allows us to set the frequency of sound at which the sound of
the vario begins (the vario starts sounding at the value defined in "Climb Threshold" or "Drift
Threshold ").
2. End Frequency Bar, moving this bar allows us to set the frequency of sound at which the sound of
the various ends. The vario has a maximum range of +10m/s or -10m/s, once in flight if we reach
this value, the Vario will continue to sound but at the frequency it will not increase or decrease, in
climb the beeps continue to increase.
3. Frequency scale, is expressed in kHz.
4. Climb or Sink scale, is expressed in meters per second (m/s).
Frequency Curve
1. Frequency Curve Bar, through an exclusive algorithm, we have the option to further customize the
sound of our vario to adapt it to our tastes. By moving the bar from right to left we modify the way
in which the frequency of the sound of the vario increases or decreases.
1
3
4
2
1

18
Graph of Vario
When modifying the bars or values of configuration, in the graph we will see the changes dynamically.
1. Start Frequency, indicates the frequency at which our Vario begins to sound. Horizontally
corresponds to the Hz scale, and Vertically corresponds to the scale in m/s.
2. End Frequency, indicates the frequency at which our Vario ending to sound. Horizontally
corresponds to the Hz scale, and Vertically corresponds to the scale in m/s.
3. Actual value, this point is defined by the value of the Test Bar, and serves as a reference.
4. Frequency graph, when modifying the values and bars, we will see in a visual way how the
frequency is increase or decreased will be.
Vario Test
1. Test icon, pressing it will start or stop sounding our vario. It helps us to simulate the vario as if we
were flying, and it will help us to choose better the values and adjustments that we like. When it is
sounding, the sound of the vario will be updated dynamically as we change the values and settings.
2. Vario Value, the current value in m/s at which our Vario is playing.
3. Control Bar, when moving this bar, we will simulate the vertical speed of our Vario, we will see the
current value in both the "Vario Value", and in the graph of the various "Actual Value".
1
3
2
4
1
2
3

19
6.4.2 Alerts Settings
It allows us to establish different types of sound alerts for events. The format of the audio files must be
".ogg”
oBasic Alerts, different sounds can be assigned for takeoff, waypoints, Start Point, End Speed Section
and Landing.
oAltitude Alerts, You can activate or deactivate the alert, set the limit altitude and its respective
sound. In flight once reached this altitude the alert sounds, once we descend 100m below the
altitude limit the alert will be activated again.
oOther Alerts, You can activate or deactivate the "Glide to Final" alert, its sound and the glide ratio
required for the alert (see section 7.5). In flight once the necessary glide ratio to reach the final is
less than the configured value, the alert will sound.
6.4.3 Set Max Volume at Start SeRi FLY
Activating this option, will set the global volume of the system to the maximum every time we start SeRi
Fly. If it can show a warning message of high volume (To avoid this message we advise to update the
firmware to the latest version, check our web page for support the steps to update).
6.4.4 Mute Vario when not fly
Activating this option, the sound of the vario will be silenced whenever we are not in flight. This prevents
that in case of having activated ZeroBand the vario is sounding continuously on takeoff or after landing.
6.5 Display Settings
6.5.1 Minimum size Widget
It allows to establish the minimum size of the Widget*, it is possible to set the "Minimum height" in
number of rows as well as the "Minimum width" in number of columns. We advise that these values are
not inferior to "2 rows x 3 columns", since when adding a Widget for the first time this will be the preset
size, and if the size is very small it will be difficult to resize it.
* Data fields on the flight screens.

20
6.5.2 Number of screens in flight
Allows you to set the number of screens up to a maximum of 5 for each flight mode. Each screen can have
different widgets and sizes (see section 7.6).
6.5.3 Orientation Screen
We can choose the Orientation of the screen, between Horizontal, Horizontal Inverted, and Vertical, to
adapt it to our cockpit in the most appropriate way.
6.5.4 Enable Two Refresh of Map per Second
This will make the map smoother more fluid (twice per second), but it also increases battery consumption.
6.5.5 Automatic window change in competition
Activating this option, in the Competition mode, the screen change will be automatic, following this order:
oScreen 1: It will remain active until we reach the Start Point.
oScreen 2: It will remain active until we reach the necessary glide to GOAL or until the next
WayPoint is the ESS (End Speed Section).
oScreen 3: It will remain active until reaching the GOAL.
6.6 Live Track & Team.
6.6.1 Server Live Track 24
Url for Send Data: The default value is "http://t2.livetrack24.com" it should not be changed unless
you want to send the information to another server compatible with LiveTrack24.
User: Our user name for LiveTrack24 server.
Password: Our password for LiveTrack24 server.
Time Interval (Sec.): It allows us to indicate how often the positions are sent..
Enable Live Track 24: It allows us to activate or deactivate the Live Track function.
6.6.2 Server LocTome
Url for Send Data: The default value is "Http://ts.loctome.com" it should not be changed unless you
want to send the information to another server compatible with Loctome.
User: Our user name for LiveTrack24 server.
Password: Our password for LiveTrack24 server.
Time Interval (Sec.): It allows us to indicate how often the positions are sent..
Enable Loctome: It allows us to activate or deactivate the Live Track function.
This manual suits for next models
2
Table of contents
Popular GPS manuals by other brands

PZRacing
PZRacing Start Next ST400 user manual

r2p Tracking
r2p Tracking ProBox 3100 Installation

TomTom
TomTom GO 500 quick start guide

Nextar
Nextar ME instruction manual

Garmin
Garmin echomap chirp 50 series installation instructions

Alpine
Alpine PMD-B100 - Blackbird - Automotive GPS... Quick reference guide