Cincinnati KS-70 User manual

KS-70 RACK WASHER
Version 1.04
October, 2014

4600 N. Mason Montgomery Road · Mason, OH 45040
800-677-0076 · Fax: 513-923-5694
A Subsidiary of The Armor Group, Inc.
Version 1.04
October 2014
This ALVEY WASHING EQUIPMENT machine was installed by
(lead installer)
on the day of
(month / day / year).
Serial #:
Customer PO #:
Manufacturer SO #:
For parts and services, call
ARMOR AFTERMARKET
at
1-800-725-9957
or email partsandservice@armoraftermarket.com
KS-70 RACK WASHER

4600 N. Mason Montgomery Road · Mason, OH 45040
800-677-0076 · Fax: 513-923-5694
A Subsidiary of The Armor Group, Inc.
Version 1.04
October 2014
Dear Valued Customer,
Thank you for your trust in, and relationship with CINCINNATI INDUSTRIAL MACHINERY. We hope you have many
years of uninterrupted service from our Alvey Brand product.
If you need parts, service, or support, contact ARMOR AFTERMARKET at 1-800-725-9957, or email
partsandservice@armoraftermarket.com. Some advantages of requesting ARMOR AFTERMARKET to fill your
replacement parts orders are:
1. Being the original manufacturer of this equipment offers simplicity in order replacement.
2. We are entitled to original equipment manufacturer discounts, which are passed on to our customers.
3. It is our primary responsibility to serve you in a timely and professional manner.
A suggested spare parts list for your machine is included in the CD we are providing your company. This CD
has been created to assist you in learning about and using your new machine. The program will help you quickly
find documentation and instructions regarding common usage and parts. Adobe Acrobat Reader will be
required to view the manual; a download is available from the CD.
If the CD does not start automatically, run “CD_Start.exe” on your CD drive. Should you have problems reading
any files, please contact us.
Sincerely,
Cincinnati Industrial Machinery
Documentation and Manual Team and The Parts and Service Department
KS-70 RACK WASHER

4600 N. Mason Montgomery Road · Mason, OH 45040
800-677-0076 · Fax: 513-923-5694
A Subsidiary of The Armor Group, Inc.
Version 1.04
October 2014
Section Title Page
I. Warranty and Notice 1
II. General Description 3
III. Assembly of Washer and Auxiliary Equipment 6
IV. Service Connections 8
V. Start-Up 9
VI. Sequence of Operations 10
VII. Shut Down 11
VIII. Service and Maintenance 12
IX. Trouble-Shooting Guide 13
X. Recommended Spare Parts 16
XI. Illustrations (See Attached)
KS-70 RACK WASHER
TABLE OF CONTENTS

4600 N. Mason Montgomery Road · Mason, OH 45040
800-677-0076 · Fax: 513-923-5694
A Subsidiary of The Armor Group, Inc.
Version 1.04
October 2014
All licenses and permits, including without limitation,
any building or erection licenses and permits, if
necessary, shall likewise be paid by Purchaser; and
should Manufacturer be required to furnish any Bond or
Bonds on the within contract, the cost thereof shall also
be added to the quoted price.
ADDITIONAL MATERIAL AND LABOR - Any material
added to, or labor performed on or in connection with
the Equipment or installation thereof, shall be at
Purchaser's own expense, unless otherwise agreed to
in writing by Manufacturer.
SAFETY DEVICES - Manufacturer will supply such
safety devices or fire protection equipment as is
specified in writing in its proposals. If Purchaser
desires or requests through local, State or Insurance
Underwriter's Specifications or regulations, other
additional safety devices or equipment, Manufacturer
will undertake, without being obligated therefore, to
furnish same at Purchaser's cost. Manufacturer
assumes no liability for loss or damage to persons or
property occasioned by any accident or casualty
resulting from the use of fuel gas, fuel oil, oven or
immersion tube atmosphere gas in connection with the
Equipment.
USE OF SPECIFICATIONS AND DRAWINGS - The
drawings, designs, specifications and data
accompanying any proposal are Manufacturer's
property and are subject to recall by Manufacturer at
any time. Such drawings, designs, specifications and
data, or any part of them, shall not be used by
Purchaser for competitive bidding or similar purposes
without Manufacturer's prior written approval.
TITLE AND OWNERSHIP - It is the intention that the
Equipment be sold to Purchaser and that title to the
same shall be acquired by Purchaser upon shipment
from Manufacturer’s premises. Manufacturer shall
retain a purchase money security interest lien on each
piece of Equipment, including without limitation, any
accessories to such Equipment, proceeds from the
sale thereof and any insurance proceeds related to
such Equipment, until final payment thereof is made as
per the agreed terms. If Manufacturer gives Purchaser
possession before final payment is made, it is hereby
mutually agreed that:
a) The title and the right of possession of the
Equipment shall transfer to the Purchaser upon
shipment; provided however, Manufacturer shall retain
a purchase money security interest lien on each piece
of Equipment, including without limitation, any
accessories to such Equipment, proceeds from the
sale thereof and any insurance proceeds related to
such Equipment until full and final payment therefore
(including payment of any promissory notes and/or
other security taken in lieu of or in accordance with the
terms hereof) shall have been made. Purchaser also
authorizes Manufacturer to act as its agent and
attorney-in-fact (where permitted by law) for the limited
purpose of preparing, executing in Purchaser’s name,
and filing on its behalf, a financing statement (for
example, a UCC-1) to perfect Manufacturer’s purchase
money security interest in each piece of Equipment.
Until title or license has passed to Purchaser and full
and final payment has been received by Manufacturer,
Purchaser shall not cause nor permit any piece of the
Equipment to be sold, leased, or subject to a lien or
other encumbrance other than Manufacturer’s security
interest;
b) In the event of default or breach of any of the Terms
and Conditions of the contract, Manufacturer may, at
its option, repossess the Equipment and all additions
thereto, wherever found, free from all claims
whatsoever;
c) Any risk of loss during shipment shall be borne by
Purchaser and any loss or damage to the Equipment
during shipment shall not relieve Purchaser of its
obligations hereunder, including but not limited to
making full and final payment to Manufacturer.
The Equipment, or any part thereof, shall not be
considered a fixture or be incorporated into realty by
reason of its attachment thereto, and may be
separated from realty, as well as personality, for the
purpose of repossession. Manufacturer shall not be
liable to Purchaser, nor shall Manufacturer be subject
to any legal proceedings, criminal or civil, for
Manufacturer's acts in such repossession, nor for the
repayment of any money paid before such
repossession as part payment for the Equipment,
which shall be retained by Manufacturer as or on
account of liquidating damages.
Page 01
KS-70 RACK WASHER
WARRANTY AND NOTICE

4600 N. Mason Montgomery Road · Mason, OH 45040
800-677-0076 · Fax: 513-923-5694
A Subsidiary of The Armor Group, Inc.
Version 1.04
October 2014
In addition to the purchase money security interest lien
described above, Manufacturer shall have the right to
elect or assert Manufacturer's claim of a mechanics
lien against the property upon which the Equipment
may erected and to waive Manufacturer's right to
repossess under section (b) above at any time before
the expiration of the time fixed by law for filing such
lien.
CLAIMS/LIABILITY -
a) Manufacturer shall not be liable for loss, damage,
detention, or delay resulting from causes beyond its
control or by acts of God, including floods, and acts of
foreign nations, or caused by fire, strike, civil or military
authority insurrection or riot, embargoes, car shortages,
wrecks or delay in transportation.
b) Manufacturer shall have no responsibility for loss or
damage to the Equipment after delivery to the carrier.
c) Manufacturer's liability arising out of the supplying of
the Equipment or its use shall not under any
circumstances exceed a credit of the purchase price,
F.O.B. Manufacturer's factory, of the Equipment.
d) IN NO EVENT SHALL MANUFACTURER BE
LIABLE FOR LIQUIDATED DAMAGES, OR
INDIRECT, OR CONSEQUENTIAL DAMAGE OF ANY
NATURE.
WARRANTIES -
a) Manufacturer warrants to Purchaser that the material
and workmanship of the Equipment is of good quality
and free of defects and the Equipment of its own
manufacture and design delivered hereunder shall be
of the kind and quality described in the specifications,
and that it shall be suitable for performing the work
therein described; provided, however, that the work for
which it is intended shall have been fully and
adequately presented, shown and described to
Manufacturer. The warranty period will start upon
shipment from a facility of Manufacturer and conclude
based upon a separate prearranged warranty period
agreed to in writing by Manufacturer.
b) EXCEPT AS SPECIFICALLY PROVIDED IN (a)
ABOVE, MANUFACTURER MAKES NO WARRANTY,
EXPRESS OR IMPLIED, RELATING TO THE
EQUIPMENT, ITS MERCHANTABILITY OR FITNESS
FOR ANY PARTICULAR PURPOSE.
c) Manufacture does not provide a separate warranty
for parts or components not manufactured by
Manufacturer. Equipment, parts and accessories made
by other manufacturers are warranted only to the
extent of the original manufacturer's warranty to
Manufacturer, which if extendable, Manufacturer will
extend to Purchaser.
d) In the event of Manufacturer's breach of its warranty
as provided in (a) above, Manufacturer’s total liability
shall be to repair or replace the Equipment and in no
event shall Manufacturer have any liability for any
consequential, incidental or other special damages,
including but not limited to damages or loss of profits
resulting from failure of the Equipment or delay caused
by its repair.
e) All transportation costs of returning defective goods
shall be borne by Purchaser. All transportation costs of
returning repaired or replaced products to Purchaser
shall be borne by Purchaser.
f) This warranty shall not be in force and effect unless:
Purchaser is current with all payments due to
Manufacturer; Purchaser gives Manufacturer
immediate notice of defective part or parts; Purchaser
affords the Manufacturer the opportunity to inspect
defective part or parts; material is still property of the
original owner; material is still part of the original
installation operating under normal usage (eight hours
per day and five days per week constitutes normal
usage); and material is properly maintained and
lubricated per factory instructions.
g) THE ABOVE WARRANTY DOES NOT COVER
PARTS WHICH UPON INSPECTION ARE
DETERMINED BY MANUFACTURER TO HAVE BEEN
SUBJECTED TO MISUSE, NEGLECT,
ALTERATIONS, ACCIDENT, ABUSE, DAMAGE BY
FIRE, FLOOD OR OTHER SIMILAR CASUALTY.
PATENTS - Manufacturer shall hold Purchaser
harmless from any and all costs and damages which
shall be recovered against Purchaser in any suit at law
or in equity for any infringement of any Letters Patent
by reason of the use by Purchaser of the Equipment.
Page 02
KS-70 RACK WASHER
WARRANTY AND NOTICE

4600 N. Mason Montgomery Road · Mason, OH 45040
800-677-0076 · Fax: 513-923-5694
A Subsidiary of The Armor Group, Inc.
Version 1.04
October 2014
In addition to the purchase money security interest lien
described above, Manufacturer shall have the right to
elect or assert Manufacturer's claim of a mechanics
lien against the property upon which the Equipment
may erected and to waive Manufacturer's right to
repossess under section (b) above at any time before
the expiration of the time fixed by law for filing such
lien.
CLAIMS/LIABILITY -
a) Manufacturer shall not be liable for loss, damage,
detention, or delay resulting from causes beyond its
control or by acts of God, including floods, and acts of
foreign nations, or caused by fire, strike, civil or military
authority insurrection or riot, embargoes, car
shortages, wrecks or delay in transportation.
b) Manufacturer shall have no responsibility for loss or
damage to the Equipment after delivery to the carrier.
c) Manufacturer's liability arising out of the supplying of
the Equipment or its use shall not under any
circumstances exceed a credit of the purchase price,
F.O.B. Manufacturer's factory, of the Equipment.
d) IN NO EVENT SHALL MANUFACTURER BE
LIABLE FOR LIQUIDATED DAMAGES, OR
INDIRECT, OR CONSEQUENTIAL DAMAGE OF ANY
NATURE.
WARRANTIES -
a) Manufacturer warrants to Purchaser that the
material and workmanship of the Equipment is of good
quality and free of defects and the Equipment of its
own manufacture and design delivered hereunder shall
be of the kind and quality described in the
specifications, and that it shall be suitable for
performing the work therein described; provided,
however, that the work for which it is intended shall
have been fully and adequately presented, shown and
described to Manufacturer. The warranty period will
start upon shipment from a facility of Manufacturer and
conclude based upon a separate prearranged warranty
period agreed to in writing by Manufacturer.
b) EXCEPT AS SPECIFICALLY PROVIDED IN (a)
ABOVE, MANUFACTURER MAKES NO WARRANTY,
EXPRESS OR IMPLIED, RELATING TO THE
EQUIPMENT, ITS MERCHANTABILITY OR FITNESS
FOR ANY PARTICULAR PURPOSE.
c) Manufacture does not provide a separate warranty
for parts or components not manufactured by
Manufacturer. Equipment, parts and accessories
made by other manufacturers are warranted only to the
extent of the original manufacturer's warranty to
Manufacturer, which if extendable, Manufacturer will
extend to Purchaser.
d) In the event of Manufacturer's breach of its warranty
as provided in (a) above, Manufacturer’s total liability
shall be to repair or replace the Equipment and in no
event shall Manufacturer have any liability for any
consequential, incidental or other special damages,
including but not limited to damages or loss of profits
resulting from failure of the Equipment or delay caused
by its repair.
e) All transportation costs of returning defective goods
shall be borne by Purchaser. All transportation costs of
returning repaired or replaced products to Purchaser
shall be borne by Purchaser.
f) This warranty shall not be in force and effect unless:
Purchaser is current with all payments due to
Manufacturer; Purchaser gives Manufacturer
immediate notice of defective part or parts; Purchaser
affords the Manufacturer the opportunity to inspect
defective part or parts; material is still property of the
original owner; material is still part of the original
installation operating under normal usage (eight hours
per day and five days per week constitutes normal
usage); and material is properly maintained and
lubricated per factory instructions.
g) THE ABOVE WARRANTY DOES NOT COVER
PARTS WHICH UPON INSPECTION ARE
DETERMINED BY MANUFACTURER TO HAVE
BEEN SUBJECTED TO MISUSE, NEGLECT,
ALTERATIONS, ACCIDENT, ABUSE, DAMAGE BY
FIRE, FLOOD OR OTHER SIMILAR CASUALTY.
PATENTS - Manufacturer shall hold Purchaser
harmless from any and all costs and damages which
shall be recovered against Purchaser in any suit at law
or in equity for any infringement of any Letters Patent
by reason of the use by Purchaser of the Equipment.
Page 03
KS-70 RACK WASHER
WARRANTY AND NOTICE

4600 N. Mason Montgomery Road · Mason, OH 45040
800-677-0076 · Fax: 513-923-5694
A Subsidiary of The Armor Group, Inc.
Version 1.04
October 2014
herein specified; provided and upon the express
condition that the Equipment is used in the manner
directed and exclusively for the purpose for which it is
sold without any changes and installed or used in
compliance with Manufacturer's plans and instructions,
and upon further express condition that Purchaser shall
immediately after service of the writ in any such suit at
law or in equity notify Manufacturer in writing of the
commencement of such suit, giving the names of the
parties and the title of the court, and shall permit
Manufacturer to defend same by its own counsel and at
its own expense and to have exclusive control and
management of the defense, and that Purchaser shall
give Manufacturer all needed information, assistance
and authority to enable Manufacturer to defend such
suit.
INDEMNIFICATION - Purchaser agrees to indemnify
Manufacturer, and hold Manufacturer harmless from,
all costs and expenses incurred by Manufacturer,
including, without limitation, costs of investigation,
attorneys' fees, and amounts paid in settlement or
satisfaction of claims, proceedings, or judgments, in
connection with all claims and proceedings against
Manufacturer based upon claimed defects in design in
any item or items manufactured for Purchaser by
Manufacturer to Purchaser's design and/or
specifications.
CANCELLATIONS - In the event Purchaser should
request cancellation of this contract, or part of it,
Purchaser agrees to pay Manufacturer the contract
price on any articles which are delivered and ready for
delivery on the date when such cancellation becomes
effective. As to all such articles not so delivered,
Purchaser shall have the option:
1) To require completion and to pay the contract
price thereof; or
2) To reimburse Manufacturer for actual
expenditures made with respect to the articles which
are uncompleted; to reimburse Manufacturer for
commitments incurred with respect to the uncompleted
articles of the contract; and to pay Manufacturer for the
anticipated profit of the entire contract.
Manufacturer may, by written notice to Purchaser and
without any liability, cancel Purchaser’s contract if
Purchaser (i) fails to perform any of the terms and
conditions hereof and does not cure such failure within
a period of 10 days after receipt of written notice from
Manufacturer specifying such failure: (ii) in
Manufacturer’s opinion has not established or
maintained credit to meet promptly the payment terms
imposed by Manufacturer: (iii) becomes insolvent,
makes an assignment in favor of creditors, or becomes
subject to any bankruptcy, dissolution, or similar
proceedings; or (iv) is merged into, or all or a
substantial part of its assets are sold to, another
company.
FORCE MAJEURE - Delays by Manufacturer or by
Purchaser in the performance of this contract shall be
excused whenever Manufacturer or the supplying
manufacturer is prevented from producing of delivering,
or Purchaser from receiving or using the above
material, by strikes, differences with workmen, fires,
accidents, delays or difficulties in transportation acts of
God or the public enemy, or other causes beyond the
reasonable control of Purchaser or of Manufacturer or
of the supplying manufacturer, as well as acts or
demands of the government in times of war or national
emergency. Any such delayed performance, however,
shall not in any way invalidate this contract or any part
thereof.
JURISDICTION - Purchaser irrevocably consents and
voluntarily submits to personal jurisdiction of the courts
located in Warren County and the United States District
Court for the Southern District of Ohio, Western
Division in any proceeding arising out of or relating to
the contract and agrees that all claims raised in such
proceeding may be heard and determined in such
court.
GOVERNING LAW – The contract shall be governed
by and construed in accordance with the internal laws
of the State of Ohio, United States of America, without
regard for its choice and or conflict of laws provisions
and without regard to the United Nations Convention
on Contracts for the International Sale of Goods.
Purchase Orders and/or contracts may only be
accepted in writing by an authorized representative of
Manufacturer from the Mason Office of Armor Metal
Group.
Page 04
KS-70 RACK WASHER
WARRANTY AND NOTICE

4600 N. Mason Montgomery Road · Mason, OH 45040
800-677-0076 · Fax: 513-923-5694
A Subsidiary of The Armor Group, Inc.
Version 1.04
October 2014
OVERVIEW
The model KS-70 is a walk-in type compact stainless
steel cabinet washer designed to clean racks, carts,
and delivery cabinets. The washer is fully assembled
and tested at the factory, then knocked down and
crated for shipment and re-assembly at the job site.
The machine is designed for installation in a shallow
pit. When constructing a pit is not desired, a floor-
mounted option with load ramp or a side-mounted tank
can be ordered.
The machine subjects work to a recirculating high-
pressure spray wash through two rotating spray arms
followed by a fresh water rinse. The wash tank is
manually filled with cold or hot water which is heated
by one of the optional systems: a steam injector,
steam heated coils, electric immersion heaters, or a
natural gas or propane burner. The wash water
temperature is thermostatically controlled.
AVAILABLE OPTIONS
Rinse water booster heater - electric, gas or steam
Exhaust fan with controls - factory wired
Draft inducer for gas burner exhaust - factory wired
Higher capacity pump
Second door for pass through operation
Double capacity with two additional wash arms
Insulated housing
Automatic water fill
Carts, racks, and baskets
Floor-mounted tank and load ramp
Side-mounted tank
Page 05
Pit-Mounted Option Shown
KS-70 RACK WASHER
GENERAL OVERVIEW

4600 N. Mason Montgomery Road · Mason, OH 45040
800-677-0076 · Fax: 513-923-5694
A Subsidiary of The Armor Group, Inc.
Version 1.04
October 2014
Selecting a Location
When selecting the location to install your Alvey KS-
70 Rack washer, review the dimension sheets and
consider access to the utility requirements.
Determine the minimum distance from outside wall or
roof to optimize ventilation. Ensure there is ample
floor space for maintenance and for storage of
cleaned and soiled work. Finally, confirm whether
the machine is pit or floor mounted. If pit mounted,
ensure that the pit for the tank has been constructed.
If floor mounted, confirm that there is sufficient space
for the machine loading ramp.
Receiving the Machine
The machine will be received disassembled. The
wash chamber and attached equipment have been
removed from the tank in preparation for shipment.
Panel flanges and tank is match marked before
disassembly of wash chamber. Wiring is
disconnected at junction boxes with leads marked;
piping is disconnected at unions. Solenoid coils are
slipped off valves and remain attached to conduit
assemblies. Mounting hardware is left attached to
studs on cabinet panels. An assembly kit contains an
adequate length of sealing strip, tubes of silicone
caulk, and sufficient hardware to secure chamber
panels.
Examine equipment for agreement with packing slip
and dimension sheet. Notify factory immediately
concerning any shortages or shipping damage.
Page 06
KS-70 RACK WASHER
SETUP

4600 N. Mason Montgomery Road · Mason, OH 45040
800-677-0076 · Fax: 513-923-5694
A Subsidiary of The Armor Group, Inc.
Version 1.04
October 2014
Preparation for Assembly
Inspect pit to assure agreement with drawing and
dimension print. Examine panels; determine
assembled location of each panel by noting match
marks and equipment mounting stud locations. Note
that flange shape determines order of assembly of
panels. Clean flange faces of tank and chamber
panels after removing protective paper.
Tank Assembly
Locate tank assembly in desired positions and levels.
If unit is suspended on edge of pit by a boundary
angle, leveling is not required.
Sealing Strip
Place sealing strip on tank and chamber panel
flanges. One strip is required per joint. Avoid door
area. Strip is tacky and will remain in place. Applying
a liquid soap solution to exposed surface of strip will
allow panels to be more easily shifted during bolting.
Use silicon caulk at corners where sealing strips join
and other areas where leaks might occur.
Chamber Panels
Install chamber panels.
1. After removing door, locate front panel assembly
in position on tank.
2. Locate right and left rear corner panels in position
on tank. (If washer has pass through option,
repeat steps 1 for second door.)
3. Temporarily position rinse manifolds in chamber,
before continuing, as they will not easily fit
through door.
4. Continue setting the remaining vertical panels in
position and loosely bolt.
5. Now place front and rear top panels in position
before installing center top panel. Be certain to
apply caulk at corners as before. Loosely bolt.
6. Reinstall door into front panel assembly. Align
assembly so that door will latch and seal
properly; tighten only those bolts holding front
assembly to the tank.
7. Align next adjacent panels and tighten bolts
attaching them to the front panel assembly. Start
at the bottom. Repeat for each successive
Interior Piping
1. Attach interior rinse piping to rinse manifolds at
unions and extend threaded nipple through
chamber wall. Secure with pipe nuts and rubber
and metal washers. Bolt rinse manifold brackets
to chamber panel flanges.
2. Screw vertical wash pipes tightly into wash
manifold and then bolt spray elbows to wash
pipes and chamber flanges.
3. Install wash arms assemblies and align with
chamber wall to avoid interference with rinse
manifolds and guard rails. Be sure all pipe joints
are tight.
4. Install guard rails and verify that they do not
interfere with wash arms.
Control Panel
Install control panel and conduit assemblies and
attach related wiring.
1. Attach control panel and conduit assemblies to
housing with studs and nuts provided. Connect
wires at appropriate locations on terminal strip.
See wiring diagram.
2. Attach proximity switch 1PROX to bracket by
door and associated magnet and bracket to studs
provided on door. With pass through option,
repeat with second door.
3. Connect flexible conduit to motor (leads IT1, IT2,
IT3) and to gas burner (leads 14, 16, 17, 2) (Gas
heated tank only.)
4. Attach flexible conduit from float switches to
fittings on conduit assembly; connect tagged
wires (3, 12). Only washers with electric and gas
tank heat have a low-level float. Only washers
with automatic water fill have a high level float.
5. Assemble STEAM HEAT solenoid coil (2, 15)
onto steam solenoid valve. (Steam heated tank
only.)
Page 07
vertical panel until all are secure. If washer has
second door, repeat step 6 for rear panel
assembly.
8. Now tighten the remaining bolts holding the
vertical panels to tank and to top.
9. Tighten bolts securing top panels to each other.
KS-70 RACK WASHER
ASSEMBLY OF WASHER AND AUXILIARY EQUIPMENT

4600 N. Mason Montgomery Road · Mason, OH 45040
800-677-0076 · Fax: 513-923-5694
A Subsidiary of The Armor Group, Inc.
Version 1.04
October 2014
Gauge Panels
Install gauge panel and related temperature and
pressure probes.
1. Attach panel to chamber on studs provided.
2. Install probe from wash temperature gauge into
bracket provided in tank.
3. Install probe from rinse temperature gauge into
fitting on external rinse manifold.
4. Install fitting on wash pressure gauge tubing into
tapped hole on wash pump.
5. Install capillary tube from temperature control into
bracket next to wash temperature probe.
Exterior Piping
Install exterior rinse piping assembly (and booster
heater when provided).
1. Place booster heater, when provided, in required
position.
2. Attach external rinse piping assembly to nipple
extending through chamber wall. Attach rinse
solenoid coil to valve on piping assembly with
clips provided.
3. Steam booster heater option - Attach water inlet,
steam inlet and condensate piping assemblies to
booster heater. Attach rinse booster solenoid coil
to steam valve. Attach piping assembly between
booster and external rinse manifold.
4. Electric and gas booster heater option - Attach
piping assembly between booster and external
rinse manifold.
5. Verify that all rinse water and steam connections
are tight.
Exhaust Fan
Install exhaust fan and draft inducer. Position fan
assembly and attach with gasket and hardware
provided. Draft inducer must be installed in exhaust
stack above draft hood by customer. Connect the
flexible conduit provided to each motor and attach
leads.
Caulk
Caulk cabinet and trim sealing strip. Caulk around
base of machine between tank and floor and between
tank and cabinet. After initial start up, caulk as
required, to eliminate leaks. The sealing strip used at
housing seams will tend to extrude out during the first
few weeks of service. This can be trimmed back with
a utility knife.
Page 08
KS-70 RACK WASHER
ASSEMBLY OF WASHER AND AUXILIARY EQUIPMENT
4600 N. Mason Montgomery Road · Mason, OH 45040
800-677-0076 · Fax: 513-923-5694
A Subsidiary of The Armor Group, Inc.
Version 1.04
October 2014
Service Connections
TANK WATER FILL
Connect cold water line to 1" ball valve on side of
washer.
FRESH WATER RINSE
Connect 3/4" hot water line to strainer on rinse water
manifold. The rinse flow rate is controlled by the
quantity and size of rinse nozzles. See dimension
sheet for rated flow. Recommended rinse
temperature: 180 – 195° F.
When optional booster heater is provided, connect hot
water line directly to booster. Consult dimension prints
for size and location of connection. Both the electric
and gas boosters come complete with pressure
regulators.
DRAIN
Provide pit with a 2" minimum drain located to allow
access when washer is in position. Tank drain and
overflow empty into pit.
With floor mounted machine, a common 2" outlet for
tank and overflow is provided for direct connection to
customers drain line. Use union or flanged connection
to allow washer to be easily disconnected.
STEAM SERVICE—STEAM HEATED TANK
Connect service to steam inlet valve. Minimum
operating pressure is 10 PSI. When steam plate coil
heat is supplied, a 3/4" condensate return line is
required.
STEAM SERVICE—BOOSTER HEATER
Connect 1 1/2" line with 10-15 PSI pressure to the
valve on booster inlet. A 3/4" condensate return line is
required; see Sec. V D note.
GAS SERVICE
Connect 3/4" gas line with manual shut off valve and
drip leg to burner inlet of gas heated washers. Make a
similar connection to gas booster heater when
provided. Consult dimension prints for line size.
FIRE TUBE EXHAUST—GAS HEATED TANK
Connect 8" dia. stack and draft hood to 6 5/8" outside
diameter burner exhaust tube. The stack should have
no horizontal run; stack sections should be lapped in
the direction of flow. It may be advisable to install
damper in exhaust stack to control draft. See sketch.
When optional draft inducer is furnished, enough
flexible conduit is included to allow inducer
to be mounted in stack within 3' from top of
washer.
VENTILATION
Use 7 9/16” inside diameter watertight duct with inside
lapping of joints in direction of flow. Use gasket
between fan and washer housing to prevent
condensate from seeping. See sketch.
ELECTRICAL—WASHER
Connect outside power line to L-1, L-2 and L-3 on the
terminal block in the control panel. A fused disconnect
shall be provided within sight of the washer to prevent
danger of shock. See dimension sheet for power
requirements.
ELECTRICAL—GAS AND ELECTRICAL BOOSTER
HEATERS
A separate power line with a fused safety switch must
be provided for gas and electric booster heaters. See
dimension sheet for power requirements. See booster
heater installation and operating manual enclosed.
Page 09
KS-70 RACK WASHER
SERVICE CONNECTIONS
Note: To maintain a consistent rise flow rate,
install pressure regulator and adjust for 20 PSI.
Note: If there is backpressure in the condensate return
line, install a check valve after steam trap for
satisfactory performance of the steam coil.
Note: High booster steam pressure will cause an
excessive amount of rinse water to flash into steam.
Install a steam pressure regulator to control the rinse
temperature.
Note: A draft inducer will be required under any of the
following conditions:
Building is under negative pressure
Outside air currents produce down drafts
Exhaust stack design causes excessive restriction
Required by local codes
Note: Stack temperature can exceed 600° F.
Selection of proper material is the customer’s
responsibility.
Note: Do not obstruct loading area with service
connections.

4600 N. Mason Montgomery Road · Mason, OH 45040
800-677-0076 · Fax: 513-923-5694
A Subsidiary of The Armor Group, Inc.
Version 1.04
October 2014
Note: During first week of operation, closely inspect
spray nozzles and hub assemblies for debris which
may have collected. Clean as per IX.B.
Caution: Shut off power at the disconnect
before opening the control panel.
Note: Gas burner delay timer (1TR) in control panel
prevents buildup of fumes in burner prior to ignition.
Timer is preset at five seconds.
Note: We recommend adjustments to the burner be
made by your local gas company or a reputable
service company.
Important: For satisfactory cleaning the proper
detergent must be used.
Local sales or factory representative will assist in
initial start up unless otherwise stated in order.
1. Remove grip strut walkway from inside of
machine. Open drain valve. Remove filter and
pump protection screens.
2. Flush out tank and inside walls, preferably with
high-pressure hose, to remove contaminants,
which may remain from fabrication, shipment, or
installation. With subsequent cleaning, after
washer operation, care must be taken to clean
float switches, heating elements, tank corners, and
pump compartment.
3. When cleaning is completed, close drain and
replace screens and walkway.
4. To fill tank open manual valve and allow water to
rise to the overflow level. If option included on
washer, press AUTOMATIC WATER FILL button on
the control panel.
1. Verify that tank is filled. Low level cutoff float,
provided with gas and electric heat, will prevent
tank heat from being activated when water is low.
2. Set desired wash temperature (140°-160° F).
3. Turn on power to washer at disconnect switch.
4. Steam Heat - Open manual steam valve; turn
control panel heat switch to ON.
5. Electric Heat-Turn control panel HEAT switch to
on.
Tank Preparation
On initial start-up, check rotation of all motors.
Rotation of Motors
Activating Tank Heat Assembly
When hot water is supplied directly to the washer
rinse manifold, customer's heater must be adjusted to
provide the desired temperature on the rinse
temperature gauge in the control panel.
The electric and gas booster heaters are
thermostatically controlled and preset at time of
manufacture to provide a (180-195 deg. F) rinse.
Consult the respective operating manual enclosed.
The steam booster heater is sized to provide a (180-
195 deg. F) rinse at rated flow and pressure when
supplied with 10-15 PSI. of steam. See dimension
print. Further temperature adjustment can be made
by use of a steam pressure regulator.
Rinse Water Temperature Control
6. Gas Heat
a. Open manual gas valve and turn combination
gas valve to ON.
b. Turn control panel heat switch to ON.
c. Burner is automatically lit. The draft inducer,
when furnished, will be energized.
d. A damper in exhaust stack should be used to
control the amount of draft.
When the wash water reaches operating
temperature, add desired amount of cleaning
compound. Consult chemical supplier for
recommendations.
(Cont.)
Detergent
Page 10
KS-70 RACK WASHER
STARTUP

4600 N. Mason Montgomery Road · Mason, OH 45040
800-677-0076 · Fax: 513-923-5694
A Subsidiary of The Armor Group, Inc.
Version 1.04
October 2014
Important: Cleaning compound should be the non-
foaming type, and not contain substances that will
react with copper or aluminum.
Use of an automatic detergent dispenser is
recommended. To insure economical use of the
compounds, sensing probes must be kept clean of
any foreign matter. If in powder form, pour detergent
into wash tank, close door, and run wash cycle until
compound has been dissolved. Avoid rinse cycle to
prevent unnecessary dilution. Consult chemical
supplier for equipment recommendations.
Detergent (Cont.)
Note: See note on electrical diagram for soap
dispenser hookup
Page 11
KS-70 RACK WASHER
STARTUP

4600 N. Mason Montgomery Road · Mason, OH 45040
800-677-0076 · Fax: 513-923-5694
A Subsidiary of The Armor Group, Inc.
Version 1.04
October 2014 Page 12
Daily Start-Up
1. Turn on power at customer-provided Disconnect Switch. Electric or gas
booster will be connected to a disconnect separate from washer
2. Turn on washer’s Main Power Switch. The white “Power On” indicator will
light.
3. Ensure that the drain valve is in the closed position.
4. Close door to begin automatically filling the tank. The unit will stop filling
the tank when the proper level is reached.
5. Turn on the Wash Heat Switch to activate the steam heat coil in the wash
tank.
Note: When washer is connected to central exhaust
system, means must be provided to prevent the
exhaust of moist air during the operation of the washer.
Sequence of Operation
1. Set the wash temperature controller, located on the front of the main control
panel, to 160°F / 71.1°C (See temperature controller manual for setting
instructions).
2. When the temperature for the wash tank reaches the 160°F/71.1°C set
point, the washer door can be opened and the racks can be loaded.
3. Adjust the Cycle Time Switch to the light, medium or heavy soil position
depending soil conditions.
4. Push the green Cycle Start Button to begin wash cycle. The red In Cycle
Indicator will light, and stay lit until the cycle is complete.
5. Unload washer after In Cycle indicator goes off and wash cycle ends.
Detergent
When the solution reaches operating temperature, add the proper amount of
cleaning compound at the rate recommended by your chemical supplier. If the
detergent is in a powder form, pour the powder in the filter baskets, then close
the door and run the pump until all compounds have been dissolved. If the
compound has been broken up or partially dissolved, this operation will go
faster.
Notes: Use of an automatic detergent dispenser is
recommended. To insure economical use of the
compounds, be sure that the sensing probes are kept
clean of any foreign matter. Consult your cleaning
compound supplier for recommendations. To obtain
satisfactory cleaning, we cannot stress enough the
importance of the proper detergent. The temperature
controller is located in the control panel.
Caution: The cleaning compound should be the non-
foaming type and should not contain a chemical
substance that will damage copper or aluminum.
WASH TEMPERATURE
RINSE LINE TEMPERATURE
160°
POWER
OFF ON
CYCLE
STOP
CYCLE
START
IN
CYCLE
CYCLE TIME
LT MED HVY
WASH HEAT
OFF ON
160°
POWER
ON
KS-70 RACK WASHER
SEQUENCE OF OPERATIONS

4600 N. Mason Montgomery Road · Mason, OH 45040
800-677-0076 · Fax: 513-923-5694
A Subsidiary of The Armor Group, Inc.
Version 1.04
October 2014
Shut-Down
1. Turn heat switch to off.
2. Drain machine completely.
3. Remove the filter and pump protection screens; flush tank and inside walls with water. Clean sludge and
scale from the heating system and float switches.
4. Prepare for next start up. Fill wash tank and add detergent. Run wash pump through 2-minute cycle to flush
out piping and moving parts. The door should be left partially open to help eliminate odors.
5. Turn off power at disconnect switch.
Page 13
KS-70 RACK WASHER
SHUTDOWN

4600 N. Mason Montgomery Road · Mason, OH 45040
800-677-0076 · Fax: 513-923-5694
A Subsidiary of The Armor Group, Inc.
Version 1.04
October 2014
Service & Maintenance
PUMP
Your Alvey Pan Washer is equipped with a vertical
immersion pump without seals. Pump discharge
pressure is 35 to 45 PSI. To help prevent pump
damage periodically check pump casing for any
foreign matter. Grease pump motor every six months.
Check direction of rotation after electrical
maintenance.
NOZZLE CLEANING AND ADJUSTMENT
1. Poke debris clogging the nozzles back into the
spray arm.
2. Remove nozzle at end of spray arm.
3. Close door and run pump for 5 seconds. Debris
will be flushed out.
4. Replace nozzle.
CLEANING OF HUB ASSEMBLIES
Remove spray arm assembly and flush out bearing
with clean water. Rotate by hand until hub moves
freely.
OPTIONAL EXHAUST FAN
The exhaust fan removes steam vapors from cabinet
when door is open. Two types of fans can be
furnished, a squirrel cage and a tube axial type. The
squirrel cage fan is equipped with sealed bearings,
which will not need grease. The tube axial fan
bearings should be greased at regular intervals. See
fan operating and maintenance instructions included
with this manual.
OPTIONAL RINSE WATER BOOSTER HEATERS
The booster heater raises the water temperature to
meet sanitation requirements for rinsing (180° - 195°
F). See Sec. V for required services. Each booster
has been designed and selected to operate on
specific pressures, temperatures and volumes.
Operating conditions must be known at time of order
to assure a booster is selected that will give
satisfactory performance.
PERIODIC SERVICE AND MAINTENANCE
1. Check filter screens twice daily. More frequently
with heavy cleaning load.
2. Check wash nozzles for clogging twice daily.
This can done at noon break and after shut down.
3. Check twice daily to see that spray hubs turn
freely.
4. Drain solution from the tank and flush at least
once daily. (See Sec. IV A).
5. Keep washer exterior free from an accumulation
of items, which may block air circulation to pump.
The exterior appearance may be maintained by
wiping with a damp cloth. Stainless steel wax or
polish may be applied if desired.
Note: When nozzles are removed, care must be taken
to adjust them to their original position when replacing.
See Figure 1.
Figure 1: Positioning of Nozzles on Spray Arm
Page 14
KS-70 RACK WASHER
SERVICE AND MAINTENANCE

4600 N. Mason Montgomery Road · Mason, OH 45040
800-677-0076 · Fax: 513-923-5694
A Subsidiary of The Armor Group, Inc.
Version 1.04
October 2014
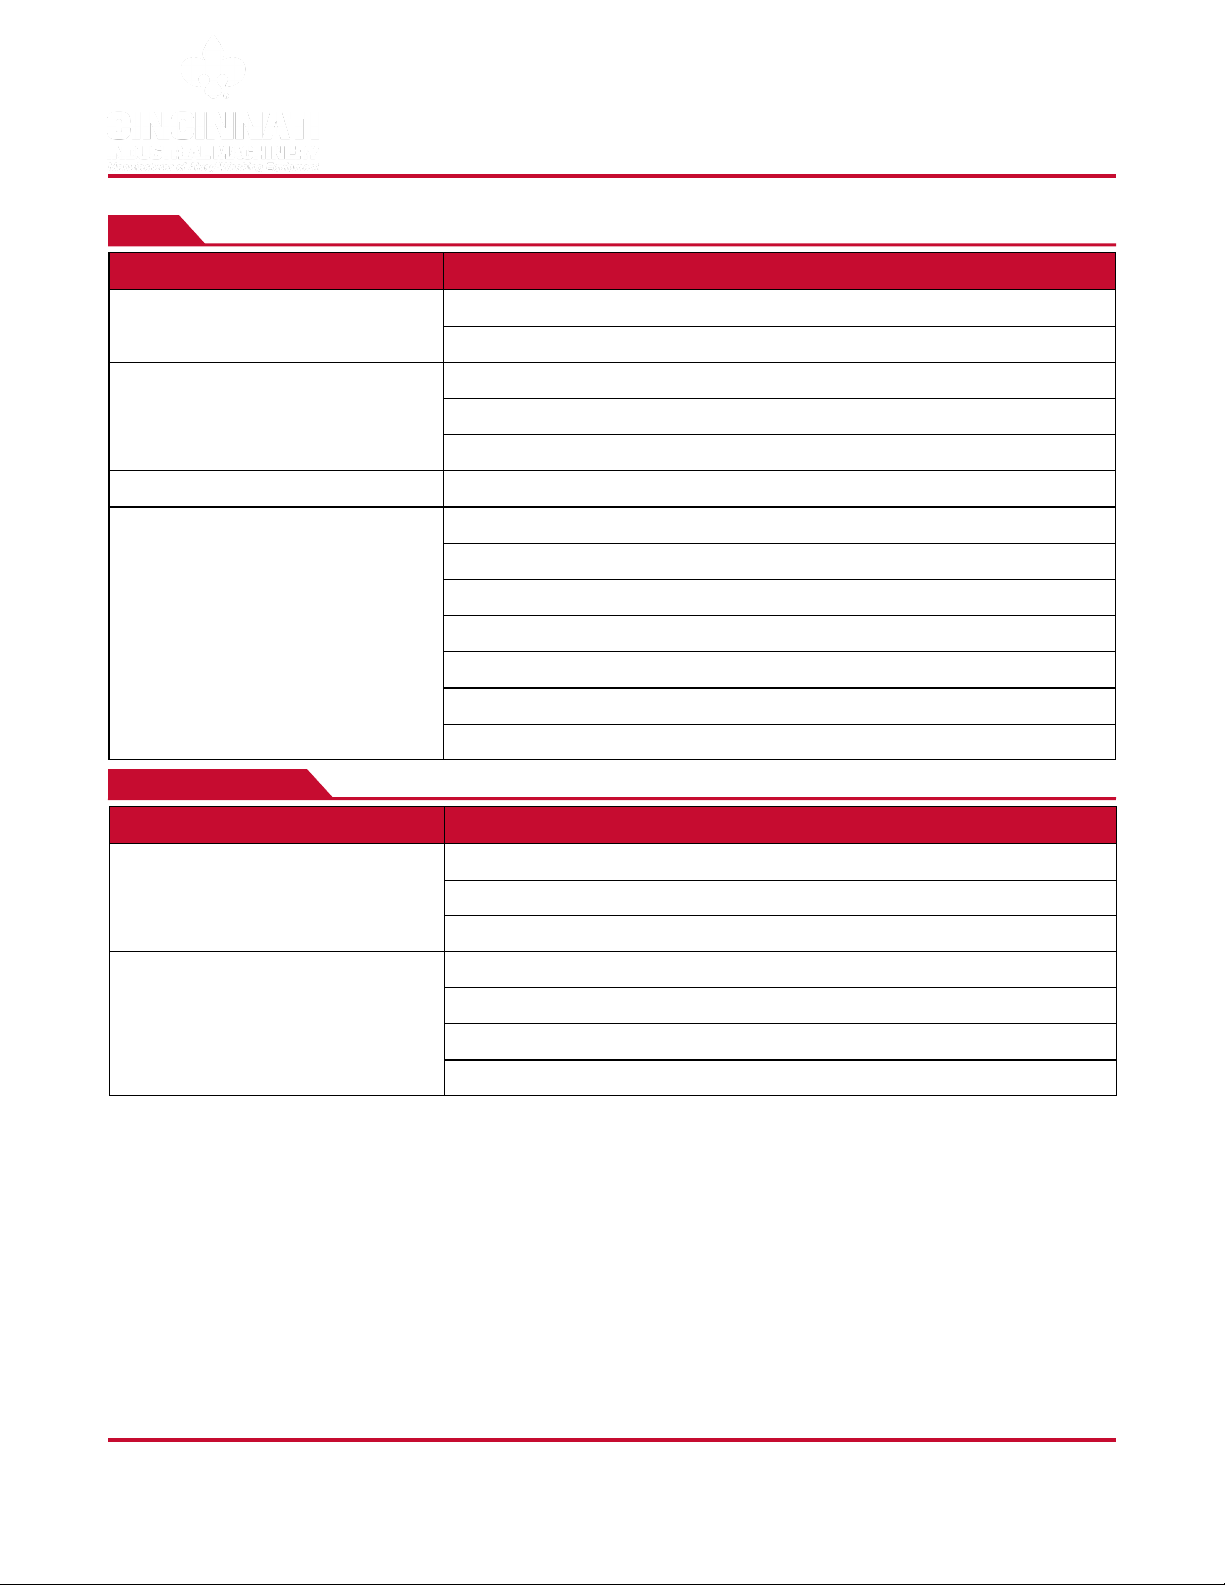
Wash Pump
PROBLEM DIAGNOSIS
Pump is running backwards.Low Pressure
Nozzles missing.
Leak in discharge piping.
Faulty pressure gauge.
Excessive soap suds.
Pump suction clogged.
High Pressure Clogged nozzles or discharge piping.
Faulty pressure gauge.
Pump Vibration Worn impeller.
Worn wear ring.
Bent shaft.
Clogged impeller.
PROBLEM DIAGNOSIS
Motor overheating. Low voltage.
High current draw - missing spray nozzles.
Faulty motor or motor cooling fan.
Motor running backwards.
Motor vibration. Bent shaft.
Worn bearings.
Blown fuse on transformer secondary.Motor will not start.
Overload has dropped out.
Faulty door switch—door not fully closed.
Faulty programmable relay.
Wash Pump
Page 15
Spinning Arm Assembly
PROBLEM DIAGNOSIS
Foreign materials in hub assembly.Arms will not turn.
Interference with guard rails.
Excessive play in arm. Worn bushing in hub assembly.
KS-70 RACK WASHER
TROUBLESHOOTING GUIDE
4600 N. Mason Montgomery Road · Mason, OH 45040
800-677-0076 · Fax: 513-923-5694
A Subsidiary of The Armor Group, Inc.
Version 1.04
October 2014
PROBLEM DIAGNOSIS
Will not shut off. Faulty programmable relay.
Dirty rinse valve (piston sticking open).
Will not turn on. Faulty programmable relay.
Dirty rinse valve (piston sticking closed).
Faulty valve coil.
Excessive water vapor. Water temperature too high.
Water pressure/flow too high.Rinse temperature too low.
Inlet water temperature too low—does not match design conditions.
Gas/Electric booster—temperature controller improperly adjusted.
Steam Booster—low steam pressure.
Steam Booster—clogged strainer.
Steam Booster—back pressure in condensate line.
Steam Booster—faulty steam trap.
Rinse
Exhaust Fan / Motor
PROBLEM DIAGNOSIS
Fan/motor vibration. Worn bearings.
Wheel out of balance.
Bent shaft.
Low voltage.Motor overheating.
Bent shaft.
Worn bearing.
Running backwards.
Page 16
KS-70 RACK WASHER
TROUBLESHOOTING GUIDE
Table of contents


