Clann LEUCOS JJ GREAT FLOOR User manual
www.leucos.com
via delle lavoro 22 - 30030 Salzano (VE) - Italy
A brand of Clann srl
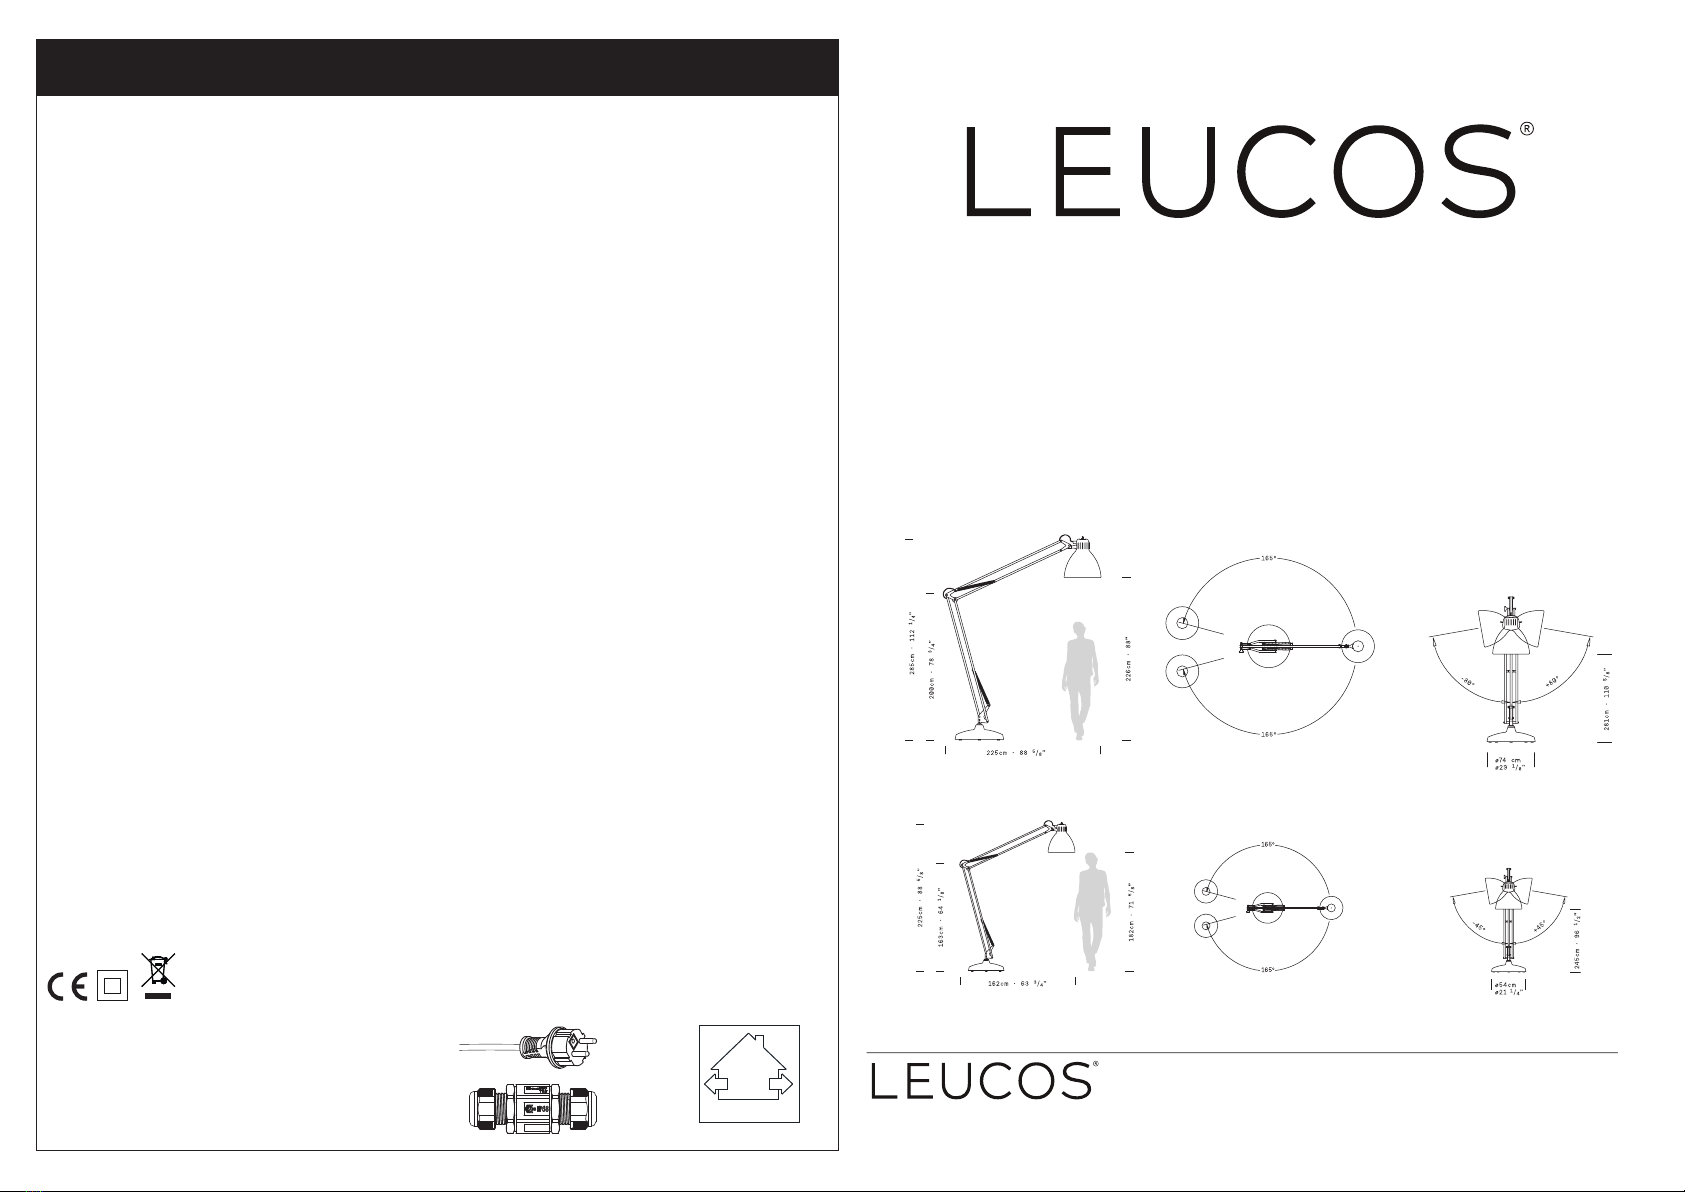
JJ GREAT FLOOR
JJ BIG FLOOR
FLOOR OUTDOOR LED
DATI TECNICI - TECHNICAL DATA
JJ GREAT - JJ BIG FLOOR OUTDOOR
45W LED 220-240V 50/60Hz POTENZA ASSORBITA TOTALE 49W
6691 lm CRI≥90
148 lm/W
Dimmerabile CASAMBI
JJ GREAT - JJ BIG FLOOR OUTDOOR
for US market only
38HHW LED 120V 50/60Hz TOTAL POWER 42W
5623 lm CRI ≥ 90
151 lm/W
Dimmerabile CASAMBI
OUTDOOR
LOCATION
La dimmerazione è gestita tramite applicazione casambi scaricabile per smartphone.
ISTRUZIONI DI MONTAGGIO - INSTALLATION INSTRUCTIONS
ITALIANO
ATTENZIONE: la sicurezza dell’apparecchio è garantita con l’uso appropriato delle seguenti istruzioni, pertanto è necessario conservarle.
Togliere la tensione di rete prima di agire sull’apparecchio.
L’installazione di questo apparecchio deve essere eseguita da personale specializzato.
L’apparecchio non deve essere installato in posizioni diverse da quelle indicate nelle istruzioni di montaggio.
Le operazioni di montaggio e manutenzione dell’apparecchio devono essere eseguite con la massima attenzione per non danneggiare i componenti.
Le parti in metallo, vetro o altro di questa lampada devono essere pulite con un panno morbido e un detergente neutro.
LEUCOS a Brand of Clann srl non potrà procedere alla sostituzione dei prodotti per difetti di fabbricazione se non verranno restituiti tramite rivenditore e
comunque so non dopo aver accertato la natura del problema o difetto.
Il prodotto non può essere in alcun modo modificato o manomesso, ogni modifica ne può compromettyere la sicurezza rendendo lo stesso pericoloso.
Leucos a brand of Clann srl declina ogni responsabilità per i prodotti modificati.
I materiali utilizzati in questo prodotto , se esposti direttamente ai raggio solari, potrebbero subire una naturale varizazione cromatica.
Il LED (gruppo luce) può essere sostituito dall’utente finale. Vedi istruzioni di montaggio fornite con il modulo.
WARNING: the safety of this fixture is only guaranteed if the following instructions have been observed.
Always disconnect power before working on fixture.
The installation on this fixtures should be undertaken only by a professional electrician.
Fixture must not be installed in any position other than that shown in instructions.
Assembly and maintenance of fixture must be performed carefully so as not to damage components.
Metal surfaces, glass or other parts of fixture may be cleaned with a soft damp cloth and mild detergent.
LEUCOS a Brand of Clann srl will replace merchandise with manufacturing defects only if it is returned to the retailer from which it was purchased.
The appliance may in no way be modified or tampered with, any modification may compromise safety causing the appliance to become dangerous.
Leucos a brand of Clann srl declines all responsibility for products that are modified.
If exposed to direct sunlight, the materials used in this product may show a natural chromatic variation.
The LED (Lighting group) can be replaceable by final user. See separate instructions.
ENGLISH
IP44 Con spina - With plug
Apparecchio in gruppo di rischio fotobiologico RG1 Illimitato: il dispositivo ha un rischio fotobiologico molto basso
Risk group 1 unlimited: very low dangerous risk of photobiological emissions.
IP65 Con connettore - With connector

ESEGUIRE LE OPERAZIONI DI MONTAGGIO SEGUENDO L’ORDINE NUMERICO PROGRESSIVO.
FOLLOW THE ASSEMBLY INSTRUCTIONS BY READING THE NUMERICAL PROGRESSION
EXÉCUTER LES OPERATIONS DE MONTAGE, EN SUIVANT L’ORDRE DE NUMÉRATION PROGRESSIF.
BITTE FOLGEN SIEN DEN EINZELENEN SCHRITTEN DER MONTAGEANLEITUNG ENTSPRECHEND DER AUFSTEIGEN-
DEN NUMMERIERUNG.
EJACUTAR LAS OPERACIONES DEMONTAJE SIGUIENDO EL ORDEN NUMERICO PROGRESSIVO
CONFIGURAZIONE IMBALLO - PACKAGING CONFIGURATION
Tagliare i cavi lunghi solo se spostando il braccio lo stesso resta in posizione (cavi non tesi), altrimenti stringere le viti (*)
Cut the long cable only if when moving the armit remains in position (cable not taut) otherwise tighten the screws (*)
Couper le long cable seulement si le bras revient en position, sinin , verifier le serrage des vis (*)
Cortar los cables largos solo si moviendo el brazo permanence en posicion (cbles no tensos) caso contrario apretar los tornillos (*)
Sschneiden sie die restlichen langen drähte erst ab, wenn sich der arm-ohne gewalt - in die gewünschten richtungen bewegen
lässt, andernfalls müssen die schrauben festgezogen werden (*)
Per cambiare la posizione della lampada agire sul braccio. Per piccoli spostamenti sollevare il
copribase sino a poter agire sul disco di base. Se la campana non resta in posizione inclinata
stringere il grano presente sul supporto della testata.
Adjust the arm to change its position and to direct the light. For small positional changes leave the
base cover untill it is possible to old the disc of the base (As shown). If the shade does not stay in an
inclined position tighten the allen screw on the shade’s support.
Pour orienter la lampe agir sur le bras. Pour des petits mouvements, soulever le couvercle au
dessus de la base. Si le coup de tête ne reste pas en position inclinée serrer les grains presénts sur
le support du coup de tête.
Ajustar el brazo para cambiar su posicion y dirigir la luz. Para pqeueños cambios de posicion
levantar la cubierta de la base hasta que sea posible agarrar el disco de la base (según dibujo).
Si el cabezal no permanence en posicion inclinada apretar los tornillos allen del soporte de la
cabeza.
Eine änderung der leuchtenposition sollte immer vom vorderen teil des armes aus gesteuert
werden. Um die leuchte zu verschieben sollte die fussabdeckung angehoben werden. Falls der kopf
nicht in der gewünschten schräglage bleiben sollte, können die beiden schrauben am kopfgelenk
festgezogen werden.
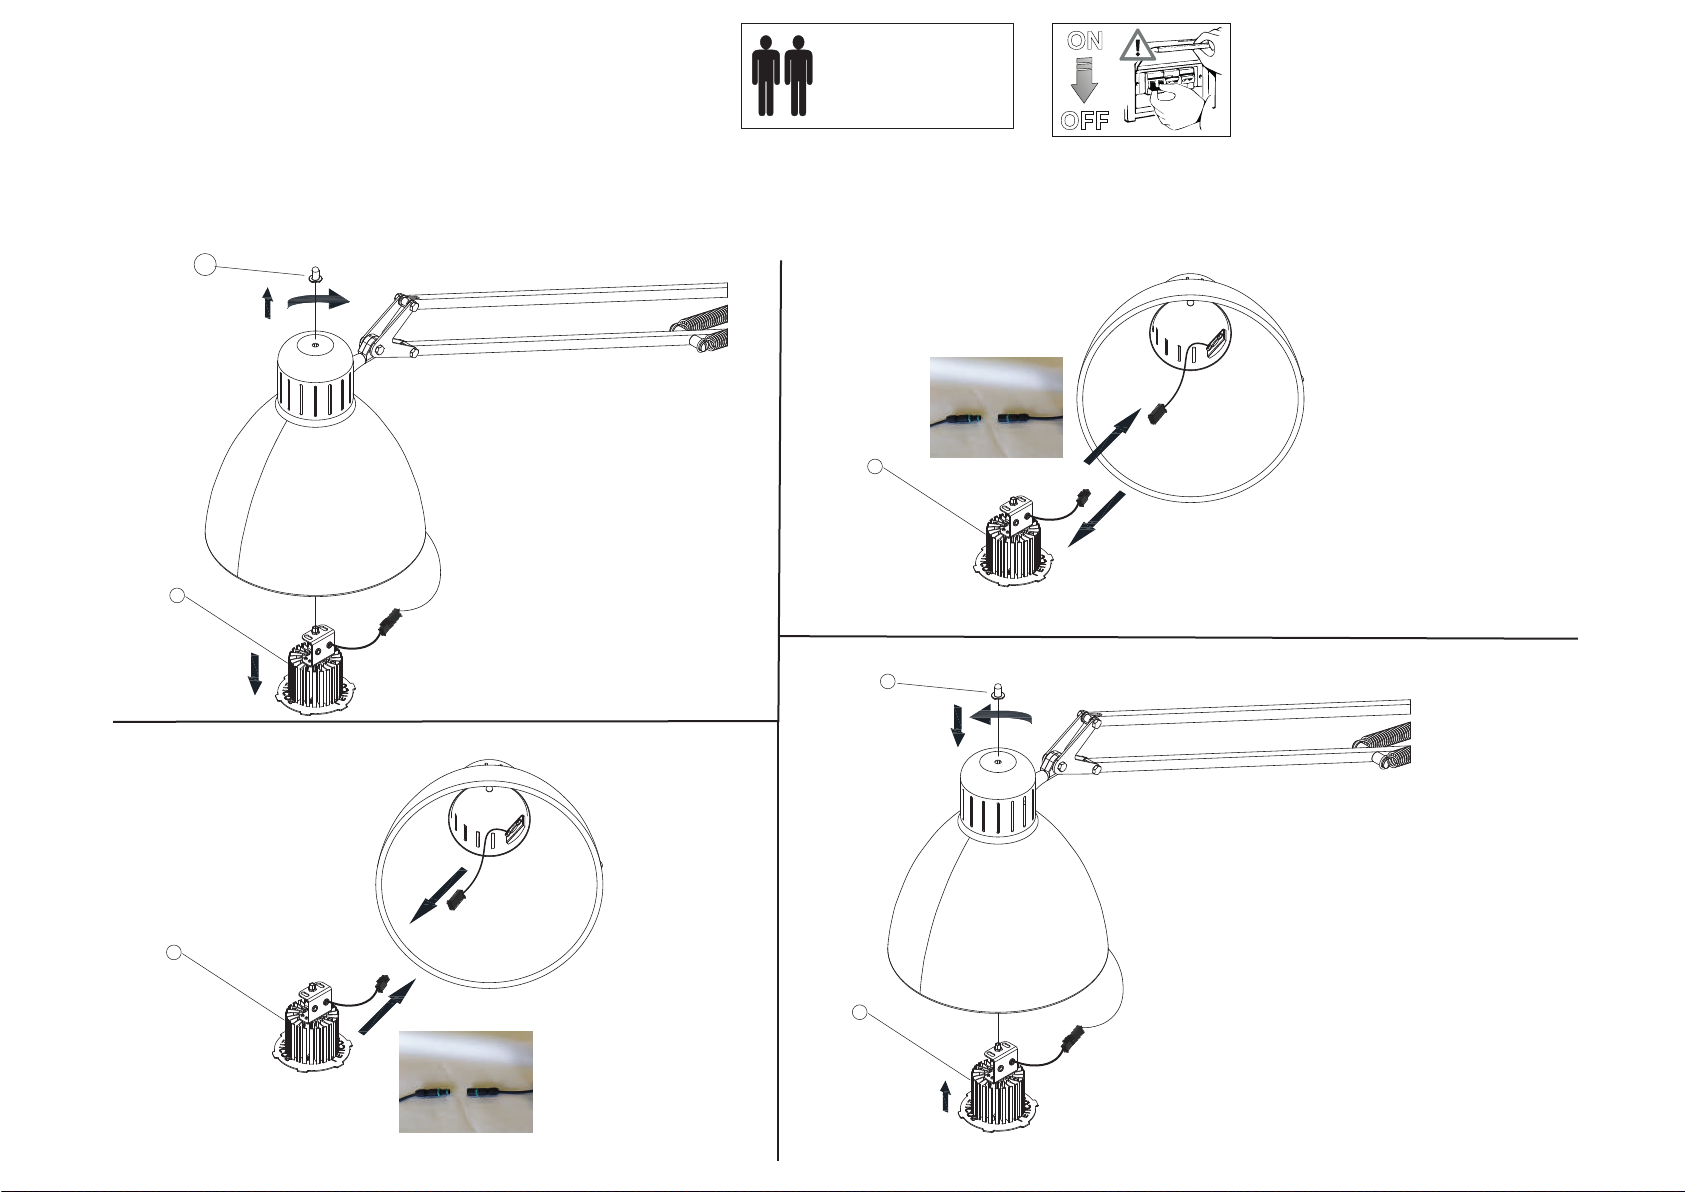
Dos instaladores
Deux installateurs
Two installers
ON
OFF
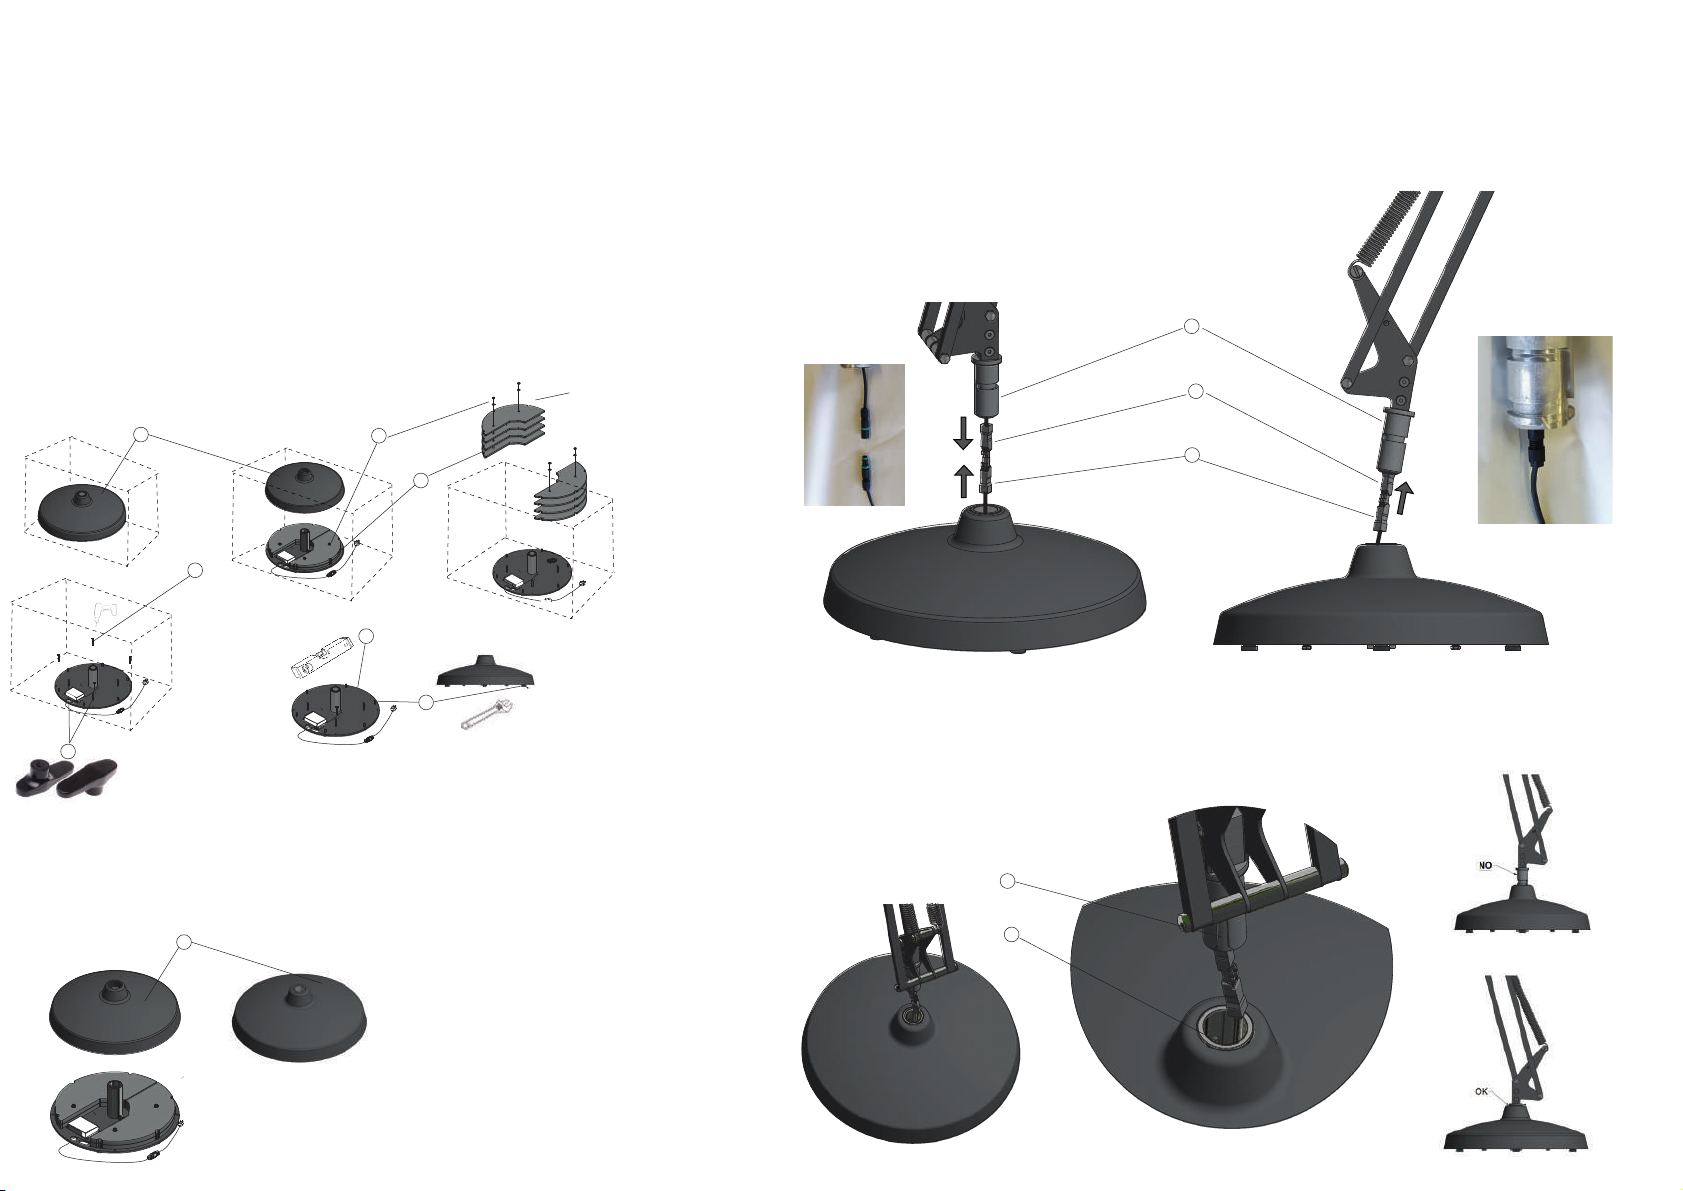
1 - Aprire la scatola della base e togliere il copribase (A)
2 - Svitare e rimuovere i 4 dadi (B) e le relative rondelle, quindi rimuovere le 6 zavorre in metallo (C), le viti e le rondelle NON
DEVONO ESSERE ELIMINATE.
3 - Svitare le 4 viti (D) perimetrali che fissano la base al bancale.
4 - Utilizzare le maniglie in dotazione (E) ed estrarre la base dalla scatola (le maniglie vanno avvitate a 2 perni filettati indicati.
5 - Dopo aver posizionato la base (F) nella posizione desiderata regolare la planarità della stessa agendo sui piedini regolabili
(G)
POSIZIONARE LA BASE CON IL FRONTE DELLA LAMPADA VERSO LA DIREZIONE PRINCIPALE DI UTILIZZO DELLA
LAMPADA
AB
C
D
E
6 - Riposizionare e inserire nei 4 perni filettati (E) le zavorre, e fissarle mediante le 4 viti e le relative rondelle.
7 - Posizionare e reinserire il copribase (A)
F
G
A
8 -Prendere il braccio (NECESSARIE 2 PERSONE) e, avvicinandolo al foro centrale della base, agganciare i connettori Maschio (H)-Femmina (I) assicuran-
dosi che siano ben bloccati l’uno all’altro quindi posizionarli il più possibile all’interno del codolo (L).
H
I
L
9 - Posizionare il codolo (L) allineando l’apertura (M) sul codolo al perno interno (N) quindi inserire fino in fondo il braccio nella base. Il braccio deve inserirsi
fino in fondo.
M
N
x 8 JJ BIG
x 12 JJ GREAT
1 - Open the boxe of the base and remove the element (A)
2 - Unscerw and remove 4 nuts (B) and the relative bushings, then remove the 6 metal parts (C), don’t eliminate the screws and
the bushings.
3 - Unscerw the 4 screws (D) that fix the base to the wood basement.
4 - Use the handles insidez (E) ed estrarre la base dalla scatola (le maniglie vanno avvitate a 2 perni filettati indicati.
5 - Dopo aver posizionato la base (F) nella posizione desiderata regolare la planarità della stessa agendo sui piedini regolabili (G)
POSIZIONARE LA BASE CON IL FRONTE DELLA LAMPADA VERSO LA DIREZIONE PRINCIPALE DI UTILIZZO DELLA
LAMPADA
6 - Reposition and insert the weights in the 4 threaded pins (E), and fix them using the 4 screws and the relative washers.
7 - Position and reinsert the base cover (A)
9 - Position the tang (L) aligning the opening (M) on the tang with the internal pin (N) then insert the arm fully into the base. The arm must go all the way in.
8 -Take the arm (2 PEOPLE REQUIRED) and, approaching it to the central hole of the base, hook the Male (H) -Female (I) connectors making sure they
are securely locked to each other then place them as much as possible inside the tang (L).
.

P
O
10 - Tagliare i cavi corti (O) accompagnando il braccio fino all’estensione dei cavi lunghi (P) quindi procedere rimuovendo in sequenza dadi (Q)
rondelle dentellate (R) piastra (S) e distanziale plastico nero (T). ATTENZIONE ALLE MOLLE IN TENSIONE.
T
S
R
Q
U
11 - Posizionare la calotta (V) in corrispondenza dei perni filettati (U). Far passare attraverso il foro centrale il cavo con il connettore (Z) e fissare il tutto
seguendo la sequenza (T) - (S) Solo per JJ BIG - (R) - (Q).
V
Z
12 - Posizionare la calotta (V) in corrispondenza dei perni filettati (U). Far passare attraverso il foro centrale il cavo con il connettore (Z) e fissare
il tutto seguendo la sequenza (T) - (S) - (R) - (Q).
11 - Position the cap (V) in correspondence with the threaded pins (U). Pass through the hole the cable with the connector (Z) in the center and fix everything
following the sequence (T) - (S) Only for JJ BIG - (R) - (Q).
10 - Cut the short cables (O) accompanying the arm up to the extension of the long cables (P) then proceed by removing in sequence the nuts (Q)
toothed washers (R) plate (S) and plastic spacer black (T). ATTENTION TO SPRINGS.
12 - Position the cap (V) in correspondence with the threaded pins (U). Pass through the hole the cable with the connector (Z) in the middle
and fasten everything following the sequence (T) - (S) - (R) - (Q).
T
R
Q
JJ GREAT
T
S
R
Q
Z
X
J
Y
Solo per JJ BIG
JJ BIG only

ATTENZIONE: Se il cavo viene danneggiato deve essere sostituito esclusivamente dal costruttore o da personale qualificato.
La lampada ha i seguenti gradi di protezione:
IP44 se utilizzata con spina (Plug)
IP65 se utilizzata con connettore in dotazione e collegata utilizzando un cavo di alimentazione in doppio isolamento da esterni tipo H05RN-F 2x1 mmq
di diametro esterno indicativo di 7 mm .
13 - Nel caso di forte vento è obbligatorio richiudere la lampada con l’apposito gancio presente sul braccio
14 - Svitare i pressacavi (K)
15 - Estrarre la morsettiera (X) e scollegare i due cavi.
16 - Rimuovere il cavo con spina (J)
17 - Collegare il cavo del tipo indicato sopra alla morsettiera (X) e successivamente serrare tutti i pressacavi (K)
14 - Unscrew the cable glands (K)
15 - Extract the terminal block (X) and disconnect the two cables.
16 - Remove the cable with plug (J)
17 - Connect the cable of the type indicated above to the terminal block (X) and then tighten all the cable glands (K)
ATTENTION: If the cable is damaged it must only be replaced by the manufacturer or qualified personnel. The lamp has the following degrees of
protection:
IP44 if used with plug (Plug)
IP65 if used with the connector supplied and connected using a double insulated outdoor power cable type H05RN-F 2x1 mmq of indicative external
diameter of 7 mm.
13 - In case of strong wind it is mandatory to close the lamp with the special hook on the arm. IP44 IP65
K
K
X
J
Smaltimento dell’apparecchio
Una volta giunto a fine vita, l’apparecchio di illuminazione è considerato un rifiuto
rientrante nella categoria RAEE (Rifiuti di Apparecchiature Elettriche ed Elettroniche),
pertanto non deve essere smaltito come un rifiuto domestico, si deve invece provvedere
al suo corretto smaltimento per evitare danni all’ambiente, alle persone e agli animali, ed
evitare lo spreco di materiali riciclabili. È possibile consegnare il vecchio apparecchio al
venditore nel momento in cui si acquista un nuovo apparecchio di illuminazione, oppure
portarlo nei centri di raccolta differenziata predisposti dalle amministrazioni comunali, o
depositarlo negli appositi contenitori.
Disposal of the luminaire.
At the end of its working life, this luminaire is considered WEEE (Waste Electrical and
Electronic Equipment) and therefore must not be disposed of as household waste.
Rather, it must be disposed of correctly to prevent harming the environment, people and
animals, and avoid wasting recyclable materials. The old luminaire can be taken back to
the reseller when purchasing a new one, or alternatively it can be taken to a council waste
recycling centre or placed in the special containers provided.
Entsorgung des Gerätes
Wenn ein Beleuchtungsgerät ausgedient hat, fällt es unter die Kategorie der Elektround
Elektronikaltgeräte (WEEE) und gehört daher nicht in den Hausmüll, sondern muss
vorschriftsmäßig entsorgt werden, um Umwelt, Personen und Tiere nicht zu schädigen
sowie Wertstoffe nicht zu vergeuden. Beim Kauf eines neuen Beleuchtungsgerätes kann
das alte Gerät dem Händler übergegeben oder den von den Gemeindeverwaltungen
eingerichteten getrennten Sammlungen zugeführt bzw. in den entsprechenden.
Containern abgelegt werden.
Elimination de l’appareil En fin de vie l’appareil d’éclairage est considéré comme un
DEEE (Déchet d’équipements électriques et électroniques) et ne doit pas être éliminé
avec les déchets ménagers. Il doit être éliminé de manière appropriée afin de préserver
l’environnement et ne pas mettre en danger la santé humaine et animale, et de valoriser
au mieux les matériaux recyclables. Il est possible de rapporter l’ancien appareil en
magasin lors de l’achat d’un nouvel appareil d’éclairage, ou de le confier à un point de
collecte mis en place par les collectivités territoriales ou de le déposer dans les
conteneurs prévus à cet effet.
Eliminación del aparato
Al final de su ciclo de vida, el aparato de iluminación ha de considerarse un residuo de la
categoría RAEE (Residuos de Aparatos Eléctricos y Electrónicos) y, por consiguiente, no
se ha de eliminar como un residuo doméstico y se ha de eliminar correctamente para no
causar daños al medio ambiente, a las personas y a los animales, y evitar el derroche de
materiales reciclables. El aparato viejo puede entregarse al vendedor al comprar un
aparato nuevo de iluminación o llevarlo a un centro de recogida selectiva, predispuesto
por las administraciones municipales, o depositarlo en los contenedores específicos.
La marcatura indica che il prodotto ha superato positivamente tutte le prove previste
dalle normative per la sicurezza elettrica, richieste dalla Comunità Europea. Normative
EN 60598-1 corrispondenti alle norme Italiane per la sicurezza elettrica CEI 34-21
This mark guarantees that the product has passed all the tests established for electrical
safety standards by the European Community
Die CE-Kennzeichnung bestätigt, dass das Produkt alle von den Vorschriften für die
elektrische Sicherheit vorgegebenen Tests erfolgreich bestanden hat, die von der
Europäischen Gemeinschaft verlangt werden
Ce marquage indique que le produit a passé htous les essais prévus par les normes
pour la sécurité électrique prescrits par la Communauté Européenne
La marca indica que el producto ha superado con éxito todas las pruebas previstas por
las normativas de seguridad eléctrica de la Comunidad Europeaz
Apparecchio di classe I
La sicurezza viene garantita con la messa a terra.
Class I luminaire
Safety is guaranteed when earthed.
Gerät der Schutzklasse I
Die Sicherheit wird durch Erdung garantiert.
Appareil de classe I
La sécurité est garantie par la mise à la terre.
Aparato de clase I
La seguridad se garantiza con la puesta a tierra.
Apparecchio in classe Il
Apparecchio nel quale la protezione contro la scossa elettrica non si basa unicamente
sull’isolamento principale, ma anche sulle misure supplementari di sicurezza costituite
dal doppio isolamento o dall’isolamento rinforzato.
Fixture class Il
A fixture where protection against electric shock does not rely only on the main
insulation but also further safety measures involving double insulation or reinforced
insulation.
Leuchten der Schutzklasse Il
Gerät, bei dem der Schutz gegen Stromschläge nicht nur auf der Hauptisolierung
beruht, sondern auch auf zusätzlichen Sicherheitsmassnahmen, die in einer doppelten
Isolierung oder einer verstärkten Isolierung bestehen.
Luminaire classe ll
Luminaire dans lequel la protection contre le choc électrique ne se base pas
uniquement sur l’isolation principale, mais également sur les mesures de sécurité
supplémentaires constituées d’une double isolation ou d’une isolation renforcée.
Aparado de clase Il
Aparato en el que la protección contra la sacudida eléctrica no se basa únicamente en
el aislamiento principal sino también en las medidas adicionales de seguridad
constituidas por el aislamiento doble y el aislamiento reforzado.
PULIZIA/CLEANING
PULIZIA METALLO
Pulizia della lampada: per non rovinare il metallo, utilizzare un panno morbido
leggermente inumidito; non usare materiali abrasivi o solventi.
CLEANING THE METAL
Cleaning the lamp: to avoid damaging the metal, use a soft and slightly dampened
cloth; do not use abrasive materials or solvents.
METALLREINIGUNG
Reinigung der Lampe: um das Glas nicht zu beschädigen, einen weichen, leicht
angefeuchteten Lappen benutzen; keine scheuernden Materialien oder Lösungsmittel
verwenden.
NETTOYAGE DU MÉTAL
Nettoyage de la lampe: pour ne pas abîmer le métal, utiliser un chiffon doux
légèrement humide ; ne pas utiliser de produits abrasifs ou de solvants.
LIMPIEZA DEL METAL
Limpieza de la lámpara: para no dañar el metal, utilizar un paño suave ligeramente
húmedo; no utilizar materiales abrasivos o disolventes.
PULIZIA VETRO
Pulizia della lampada: per non rovinare il vetro utilizzare un panno morbido
leggermente inumidito; non usare materiali abrasivi o solventi.
CLEANING THE GLASS
Cleaning the lamp: to avoid damaging the glass, use a soft and slightly dampened
cloth; do not use abrasive materials or solvents.
GLASREINIGUNG
Reinigung der Lampe: um das Glas nicht zu beschädigen, einen weichen, leicht
angefeuchteten Lappen benutzen; keine scheuernden Materialien oder Lösungsmittel
verwenden.
NETTOYAGE DU VERRE
Nettoyage de la lampe : pour ne pas abîmer le verre utiliser un chiffon doux légèrement
humide ; ne pas utiliser de produits abrasifs ou de solvants.
LIMPIEZA DEL VIDRIO
Limpieza de la lámpara: para no estropear el vidrio, usar un paño suave ligeramente
húmedo; no usar materiales abrasivos o disolventes.
etl (electrical testing laboratories)
il marchio etl identifica un prodotto in possesso dei
requisiti necessari per poter essere venduto e
distribuito nel territorio nordamericano poiché testato
e certificato in conformità agli standard applicabili
(standard ul, standard csa, ).
The etl mark identifies a product that meets the
necessary requirements to be sold and distributed in
North America because it has been tested and
certified in accordance with applicable standards (ul
standard, csa standard, ).
ESEGUIRE LE OPERAZIONI DI MONTAGGIO SEGUENDO L’ORDINE NUMERICO PROGRESSIVO.
FOLLOW THE ASSEMBLY INSTRUCTIONS BY READING THE NUMERICAL PROGRESSION
EXÉCUTER LES OPERATIONS DE MONTAGE, EN SUIVANT L’ORDRE DE NUMÉRATION PROGRESSIF.
BITTE FOLGEN SIEN DEN EINZELENEN SCHRITTEN DER MONTAGEANLEITUNG ENTSPRECHEND DER AUFSTEIGENDEN NUMMERIERUNG.
EJACUTAR LAS OPERACIONES DEMONTAJE SIGUIENDO EL ORDEN NUMERICO PROGRESSIVO
ISTRUZIONI PER LA SOSTITUZIONE DEL LED
INSTRUCTIONS FOR LED REPLACEMENT
Dos instaladores
Deux installateurs
Two installers
1
2
3
4
NEW
6
5
NEW
OLD
OLD
ON
OFF
This manual suits for next models
1
Popular Outdoor Light manuals by other brands

Heath Zenith
Heath Zenith DualBrite 4030 Installation and operating instructions

Delta Light
Delta Light KIX M1 93033 instruction manual

HAMPTON BAY
HAMPTON BAY LBM1501LX-02 Use and care guide

Delta Light
Delta Light MONTUR S P 65 LED Installation instruction

HAMPTON BAY
HAMPTON BAY HD33677 Use and care guide

easymaxx
easymaxx YT2021 instructions


AFX
AFX ODEW0709LAJEN Series installation instructions

Herman Miller
Herman Miller Nelson H763SCWALBNS How to assemble

OR STEEL light
OR STEEL light PYRO Technical manual

Inlite
Inlite ACE DOWN installation manual

West Elm
West Elm Sculptural Glass Floor Lamp Assembly instructions

LIVARNO LUX
LIVARNO LUX 307505 Operation and safety notes