Clas Ohlson FS-500-MI User manual

EnglishSvenskaNorskSuomi
Film and slide scanner
Dia-/negativ-scanner
Dias-/negativskanner
Dia-/negatiiviskanneri
Art.no Model
38-4441 FS-500-MI Ver. 201104

2

3
English
Film and slide scanner
Art.no 38-4441 Model FS-500-MI
Read through the entire user guide before using the product and save the guide for
future reference. We cannot accept responsibility for any errors in the text or pictures
and reserve the right to make changes to technical data. If you have technical
problems or questions, contact our customer service (see addresses on the last page).
1. Description of the product
• Film scanner for 35 mm negatives and slides
• Automatic exposure
• Compatible with Windows XP (with SP2), Windows Vista and Windows 7
(not compatible with Mac or other operating systems)
• USB 2.0
• Five megapixels
• Software supplied
2. Installation
Note! Do not connect the scanner until you have installed the drivers and the software.
When you have done this, connect the scanner to a USB port. The product is designed
only for Windows XP, Windows Vista and Windows 7.
1. Start the computer.
2. Place the CD supplied in the CD drive of the computer.
3. The CD starts automatically.
5. Click Next to start installation.
4. Click Arcsoft Software

4
English
6. Read the licensing agreement, then click Yes to accept the agreement and
continue installation.
7. Click Next on the next three screens.
8. A window appears in which you can choose which file formats you want
the program to open. Click Clear All to remove all file formats, so that the program
does not take over and open all file formats.

5
English
9. When installation is complete, click Finish.
10. Before using the software for the first time, remove the CD and restart the
computer.
11. Connect the film scanner to a free USB port on the computer.*
12. The computer will find the scanner and after a few seconds the scanner will be
ready to use. There is no need to install extra drivers.
*Note! If a ”Code 10 error” message appears when you start the program, leave the
scanner’s USB lead connected and restart the computer.
3. Use
1. Double-click the Media Impression 2 icon to start the program.
2. Click Pictures.
3. Click Acquire.

6
English
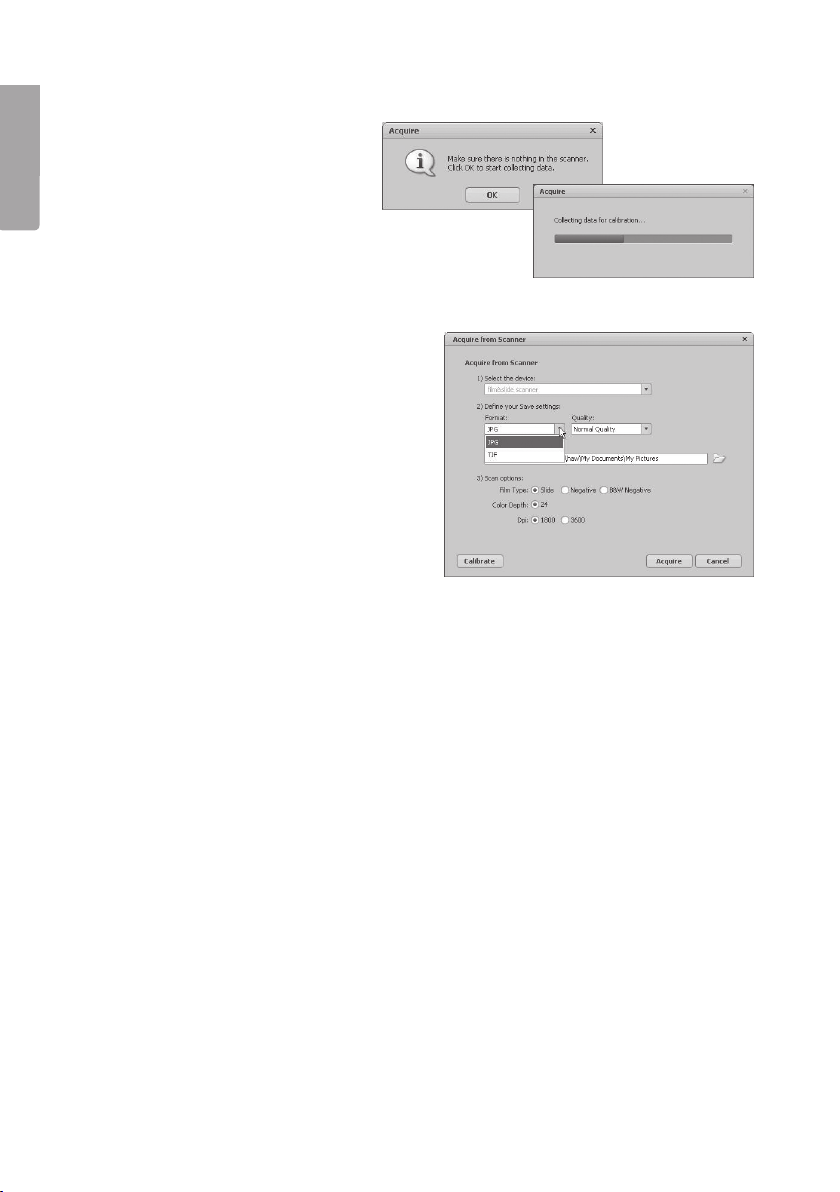
4. Click OK to perform a calibration (check first that there are no slides in
the scanner during calibration).
5. The Acquire from Scanner window
appears. Choose settings:
Format - choose JPG or TIF (JPG is
more widely used. TIF gives higher
quality but the files are much larger).
Quality - choose Low, Normal, High or
Highest.
Save to this location - click the folder
icon and specify the folder where you
want to store the images.
Film Type - choose the relevant film
type, Slide, Negative (colour),
B&W Negative (black and white).
Color Depth - choose the colour depth you want, 24 or 48 bits.
Dpi - resolution (dots per inch), 1800 or 3600.
Calibrate - click to calibrate the scanner, the click OK. Note! During calibration
the scanner must be empty, ie there must not be a slide in the scanner.
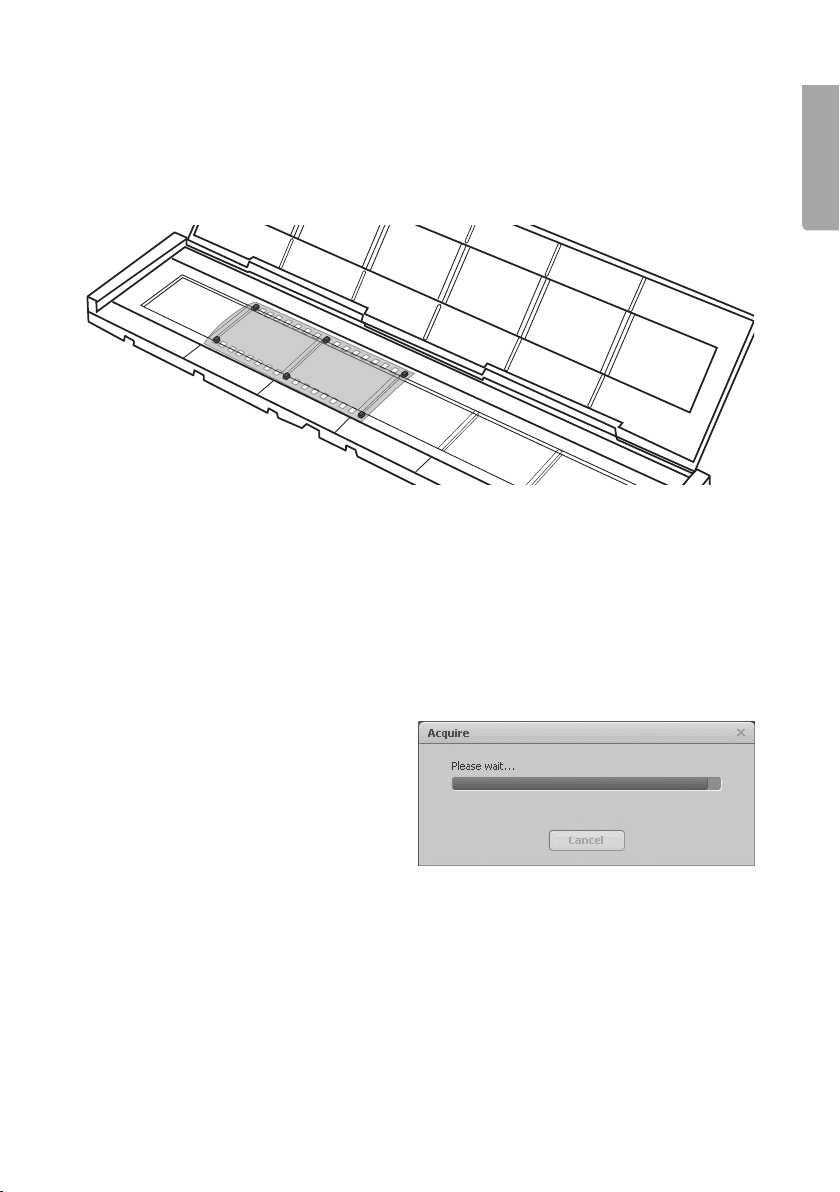
Acquire - click to scan an image.
Bear in mind that the file size varies depending on the settings:
Example settings: JPG and 1800 Dpi
Quality: Low, about 0.4 MB
Normal, about 0.6 MB
High, about 1 MB
Highest, about 6 MB
6. When you have chosen the settings, the scanner is ready to be used.

7
English
7. Place a slide or negative in the holder and close it.
Instructions: Push up the tab with the white arrow on the side of the film holder,
open the film holder and position the film so that the perforations line up with the
guides in the film holder. Close the film holder all round. Make sure you mount the
pictures the right way round. Although the software lets you rotate images, it does
not let you create a mirror image of a back-to-front slide.
8. Insert the holder into the scanner from the right. The side with a forward arrow and
a cut-off corner must be inserted first.
9. Now you can start scanning the pictures in the film holder.
10. Click Acquire in the bottom right-hand corner of the Acquire from Scanner window.
11. A preview image appears in the large window, Check that the image is the right
way round and looks good. Click Capture or press the [COPY] button on the
scanner. (COPY only works when the image is displayed in this mode.) A progress
indicator is shown while the image is being saved. Allow saving of the image to
complete before you move the film holder.
12. The image will be saved to the folder you specified at Save to this location.
The image is saved with the file name: today’s date and a serial number,
eg 2011-02-06_42.JPG.
13. Move the film holder to display the next image and continue scanning.
14. To stop scanning and edit saved images, click Close.

8
English
4. Editing images
1. Select an image.
2. Choose Photo Editing Tools (if you know what needs changing) or Easy Fix
(quick guide).
4.1 Photo Editing Tools.
The program has three tabs: Adjust – Retouch – Clipboard.
4.1.1 Adjust
Enhance (improve the image)
1. Click Auto Enhance to enhance the image
automatically, or adjust manually with
the +/- controls.
2. Save the changes by clicking Save as or
click Close to go back without saving
the changes.
Colour (adjust colour)
1. Adjust the colour manually with the controls.
2. Save the changes by clicking Save as or
click Close to go back without saving
the changes.

9
English
Red-Eye (remove red eyes)
1. Click Fix Red-Eye to automatically remove
“red eyes” from the image, or remove them
manually by positioning the pointer on the
red eyes.
1. Save the changes by clicking Save as or
click Close to go back without saving
the changes.
Crop
1. Choose the format you want format or select the format you want with the pointer.
Click Crop to confirm.
2. Save the changes by clicking Save as or click Close to go back without saving
the changes.
Straighten
1. Adjust the image using the grid.
2. Save the changes by clicking Save as or click Close to go back
without saving the changes.

10
English
Blur Background
1. Draw a line with the pointer. The area outside the selection can be blurred with
the controls. Click Apply to confirm.
2. Save the changes by clicking Save as or click Close to go back
without saving the changes.
4.1.2 Retouch
The most frequently used image retouching tools can be found here.
4.1.3 Clipboard
Here there are various tools for cutting out or copying entire or partial images.
4.2 Easy Fix
1. Click Easy Fix.
2. Select the changes you want to make:
• Make all fixes
• Straighten it
• Crop it
• Fix Red-Eye
• Add Brightness and Contrast
• Sharpen it
• Adjust the colour
• Make the Subject Stand Out
3. Click Next to go
the next step.

11
English
4. Click Done to finish.
5. Click Save As to save the image.
6. Choose file name, file format and quality, then click Save to save the image.
5. Care and maintenance
• Do not expose the scanner to extreme temperatures.
• Clean the scanner with the soft, dry cloth. Avoid strong cleaning agents as they
may damage the case.
6. Troubleshooting
Poor image quality
1. For optimum image quality you should wait
for five seconds after clicking Capture to let
the scanner set the white balance correctly.
2. The Adjust function lets you manually adjust
the contrast, brightness, colour saturation,
etc of the scanned image to give the best
possible result from the scanned image.
Click the colour symbol to open the settings
and adjust the result directly on the image.
3. When you have finished making changes,
click OK to save the image.

12
English
The computer can’t find the scanner.
If the scanner does not work with the software supplied, this may be for the following
reason: The scanner has not been installed correctly and appears in Device Manager
as an Unknown Device. Note! Check first that the software on the CD has actually
been installed.
1. Go to Start > Control panel > System > Hardware > Device Manager, right-click
Unknown device and choose Update Driver...
2. Choose: Search for driver automatically.
The scanner should now be added under Imaging devices as USB Video Device.
If the scanner still does not work even though it appears as a USB Video Device
under “Imaging Devices”, there may be another imaging device installed,
causing a conflict in the program.
3. Check under “Imaging Devices” in the “Device Manager” for other installed imaging
devices such as webcams, digital cameras, etc.
4. Right-click that device and choose Disable (you may need to restart Windows).

13
English
7. Waste management
When the time comes to dispose of the product, do so in accordance with
local regulations. If you are not sure what to do, ask your local authority.
8. Specifications
Interface USB 2.0
Image sensor Five megapixel CMOS sensor (5,174,400 pixels).
Lens F = 6.0, four glass elements, image angle = 15º
Focus Fixed focus
Exposure control Automatic
Colour balance Automatic
Image formats JPG, TIF
Scan in high resolution 5 MP (3600 dpi)
Data conversion 10 bits per colour channel
Scanning method Single pass
Light source Backlight (three white LEDs)
Power supply From the USB port
Dimensions 90 x 90 x 165 mm
Software Arcsoft Photoimpression 2
Program languages English, French, German, Italian, Spanish,
Traditional Chinese, Simplified Chinese, Japanese,
Korean, Portuguese and Russian
Operating systems Windows XP (SP2), Windows 7 and Windows Vista

14
Svenska
Dia-/negativskanner
Art. nr 38-4441 Modell FS-500-MI
Läs igenom hela bruksanvisningen före användning och spara den sedan för framtida
bruk. Vireserverar oss för ev. text- och bildfel samt ändringar av tekniska data.
Vid tekniska problem eller andra frågor, kontakta vår kundtjänst (se adressuppgifter
på baksidan).
1. Produktbeskrivning
• Filmskanner för dia och negativ i135-format
• Automatisk exponering
• Kompatibel med Windows XP (SP2), Windows Vista och Windows 7
(ej kompatibelt med Mac eller andra operativsystem)
• USB 2.0
• 5 megapixlar
• Programvara medföljer
2. Installation
Obs! Installeradrivrutiner och programvara först. Anslutsedan skannern till en USB-port.
Produktenär endast avsedd för Windows XP, Windows Vista och Windows 7.
1. Starta datorn.
2. Lägg iden bifogade cd-skivan idatorns cd-läsare.
3. Cd-skivan startar automatiskt.
5. Klicka på Next för att
starta installationen.
4. Klicka på Arcsoft Software

15
Svenska
6. Läs licenstexten och klicka på Yes för att godkänna licensavtalet och
fortsätta installationen.
7. Klicka på Next ide tre följande rutorna.
8. Ett fönster visas där du kan bestämma vilka filformat som ska öppnas
iprogrammet. Klickapå Clear All för att avaktivera alla filformat så att inte
programmet tar över och öppnar alla format.

16
Svenska
9. Klickapå Finish när installationen är klar.
10. Tabort cd-skivan och starta om datorn innan programvaran används för
första gången.
11. Anslutskannern till enledig USB-port på datorn.*
12. Datornhittar skannern och efter några sekunder är den klar för användning.
Ingaextra drivrutiner behöver installeras.
*Obs! Omfelmeddelandet ”Code 10 error” visas när programmet öppnas:
Låt skannerns USB-kabel vara ansluten och starta om datorn.
3. Användning
1. Dubbelklickapå ikonen Media Impression 2 för att öppna programmet.
2. Klickapå Pictures.
3. Klickapå Acquire.

17
Svenska
4. Klickapå OK för att göra enkalibrering (kontrollera först att inga bilder finns
iskannern under kalibreringen).
5. FönstretAcquire from Scanner visas.
Görönskade inställningar:
Format - välj JPG eller TIF:
(JPG används oftast men TIF ger högre
kvalitet och därmed mycket större
filstorlek).
Quality - välj kvalitet: Low (låg),
Normal (normal), High (hög) eller
Highest (högsta).
Save to this location - klicka på
mappikonen och ange ivilken mapp
som bilderna ska sparas.
Film Type - välj aktuell filmtyp: Slide (diapositiv), Negative (färgnegativ),
B&W Negative (svartvit negativ).
Color Depth - välj önskat färgdjup: 24 eller 48 bitar.
Dpi - upplösning (punkter per tum): 1800 eller 3600.
Calibrate - klicka för att kalibrera skannern, klicka sedan på OK. Obs! Vidkalibrering
ska skannern vara tom, d.v.s. ingen bild ska vara placerad i skannern.
Acquire - klicka för att läsa in enbild.
Tänk på att filstorleken varierar med inställningen.
T.ex. inställning JPG och 1800 Dpi
Kvalitet: Låg ca 0,4 MB
Normal ca 0,6 MB
Hög ca 1 MB
Högsta ca 6 MB
6. Närinställningen är klar är skannern färdig för användning.

18
Svenska
7. Monteranegativ eller dia ien hållare och stäng den.
Görså här:
Tryck upp fliken med den vita pilen på sidan av filmhållaren, öppna filmhållaren och
montera filmen så att perforeringen passar på styrningarna ifilmhållaren. Tryckihop
filmhållaren runt om. Tänkpå att montera bilderna rättvända. Attrotera bilden går bra
iprogrammet men det går inte att vända enspegelvänd bild så att den visas rätt.
8. Tryckin hållaren iskannern från höger. Sidansom har enpil framåt och
etthörn borttaget ska tryckas in först.
9. Nuär det klart att börja skanna in bilderna ifilmhållaren.
10. Klickapå Acquire längst ner ihögra hörnet ifönstret Acquire from Scanner.
11. Bilden förhandsvisas istora rutan. Kontrollera att bilden är rättvänd och ser bra ut.
Klickapå Capture eller tryck på skannerns [COPY] (COPY fungerar endast när
bilden visas idet här läget). Enförloppsindikator visas under tiden som bilden
sparas, låt bilden sparas färdigt innan du flyttar filmhållaren.
12. Bildensparas iden mapp som du har angett iSave to this location.
Bildensparas med ett filnamn: dagens datum och ettlöpnummer,
t.ex. 2011-02-06_42.jpg.
13. Flyttafilmhållaren så att nästa bild visas och forsätt att skanna in bilderna.
14. Omdu vill avbryta skanningen och redigera sparade bilder, tryck på Close.

19
Svenska
4. Redigerabilderna
1. Markerabilden.
2. Välj PhotoEditing Tools (om du vet vad som ska ändras) eller EasyFix
(snabbredigering).
4.1 Photo Editing Tools
Programmet har tre flikar: Adjust – Retouch – Clipboard.
4.1.1 Adjust
Enhance (förbättra bild)
1. Klicka på Auto Enhance för att förbättra
bilden automatiskt eller justera manuellt med
+/-reglagen.
2. Spara ändringarna genom att klicka på
Save as eller gå tillbaka utan att ändra
genom att klicka på Close.
Color (justera färg)
1. Justera färgen manuellt med reglagen.
2. Spara ändringarna genom att klicka på
Save as eller gå tillbaka utan att ändra
genom att klicka på Close.

20
Svenska
Red-Eye (tabort röda ögon)
1. Klicka på Fix Red-Eye för att ta bort
röda ögon på bilden automatiskt eller ta bort
manuellt genom att placera pekaren på de
röda ögonen.
2. Spara ändringarna genom att klicka på
Save as eller gå tillbaka utan att ändra
genom att klicka på Close.
Crop (beskär)
1. Välj önskat format eller markera önskad storlek med pekaren.
Klickapå Crop för att bekräfta.
2. Spara ändringarna genom att klicka på Save as eller gå tillbaka utan att ändra
genom att klicka på Close.
Straighten (räta upp)
1. Justera bilden med hjälp av rutnätet.
2. Spara ändringarna genom att klicka på Save as eller gå tillbaka utan att ändra
genom att klicka på Close.
Table of contents
Languages:
Other Clas Ohlson Scanner manuals