Clavia Nord Electro 6 User manual

USER MANUAL
Nord Electro 6
English
OS version: 1.1x
Edition: C
Part number: 50482 Copyright Clavia DMI AB
Edition: C

CAUTION - ATTENTION
RISK OF ELECTRIC SHOCK
DO NOT OPEN
RISQUE DE SHOCK ELECTRIQUE
NE PAS OUVRIR
CAUTION: TO REDUCE THE RISK OF ELECTRIC SHOCK
DO NOT REMOVE COVER (OR BACK).
NO USER SERVICEABLE PARTS INSIDE.
REFER SERVICING TO QUALIFIED PERSONNEL.
ATTENTION:POUR EVITER LES RISQUES DE CHOC ELECTRIQUE, NE
PAS ENLEVER LE COUVERCLE.
AUCUN ENTRETIEN DE PIECES INTERIEURES PAR L´USAGER.
CONFIER L´ENTRETIEN AU PERSONNEL QUALIFE.
AVIS: POUR EVITER LES RISQUES D´INCIDENTE OU D´ELECTROCUTION,
N´EXPOSEZ PAS CET ARTICLE A LA PLUIE OU L´HUMIDITET.
1) Read these instructions.
2) Keep these instructions.
3) Heed all warnings.
4) Follow all instructions.
5) Do not use this apparatus near water.
6) Clean only with dry cloth.
7) Do not block any ventilation openings. Install in accordance
with the manufacturer’s instructions.
8) Do not install near any heat sources such as radiators, heat
registers, stoves, or other apparatus (including ampliers) that
produce heat.
9) Do not defeat the safety purpose of the polarized or
grounding-type plug. A polarized plug has two blades with one
wider than the other. A grounding type plug has two blades
and a third grounding prong. The wide blade or the third prong
are provided for your safety. If the provided plug does not t
into your outlet, consult an electrician for replacement of the
obsolete outlet.
10) Protect the power cord from being walked on or pinched
particularly at plugs, convenience receptacles, and the point
where they exit from the apparatus.
11) Only use attachments/accessories specied by the manu-
facturer.
12) Use only with the cart, stand,
tripod, bracket, or table specied by the
manufacturer, or sold with the apparatus.
When a cart is used, use caution when
moving the cart/apparatus combination to
avoid injury from tip-over.
13) Unplug this apparatus during lightning
storms or when unused for long periods of time.
14) Refer all servicing to qualied service personnel. Servicing
is required when the apparatus has been damaged in any way,
such as power-supply cord or plug is damaged, liquid has been
spilled or objects have fallen into the apparatus, the apparatus
has been exposed to rain or moisture, does not operate nor-
mally, or has been dropped.
The lightning ash with the arrowhead symbol within
an equilateral triangle is intended to alert the user to the
presence of uninsulated voltage within the products en-
closure that may be of sufcient magnitude to constitute
a risk of electric shock to persons.
Le symbole éclair avec le point de èche à l´intérieur d´un triangle
équilatéral est utilisé pour alerter l´utilisateur de la presence à
l´intérieur du coffret de ”voltage dangereux” non isolé d´ampleur
sufsante pour constituer un risque d`éléctrocution.
The exclamation mark within an equilateral triangle is
intended to alert the user to the presence of important
operating and maintenance (servicing) instructions in the
literature accompanying the product.
Le point d´exclamation à l´intérieur d´un triangle équilatéral est
employé pour alerter l´utilisateur de la présence d´instructions
importantes pour le fonctionnement et l´entretien (service) dans le
livret d´instructions accompagnant l´appareil.
Instructions pertaining to a risk of re, electric shock or injury to persons.
IMPORTANT SAFETY INSTRUCTIONS
SAVE THESE INSTRUCTIONS
Trademarks: The Nord logo is a trademark of Clavia DMI AB. All other trademarks
mentioned in this publication are the properties of their respective holders.
Specications and appearances are subject to change without notice.
Copyright © Clavia DMI AB
No naked ame sources, such as lighted candles, should be placed on
the apparatus;
Do not use the apparatus in tropical climates.
WARNING: To reduce the risk of re or electric shock, do not expose
this apparatus to rain or moisture.
The apparatus shall not be exposed to dripping or splashing and that
no objects lled with liquids, such as vases, shall be placed on the
apparatus.
The maims plug is used as the disconnect device and shall remain
readily operable.
Il convient de ne pas placer sur l´appareil de sources de ammes nues,
telles que des bougies allumées;
L´appareil n’est pas destiné á étre utilisé sous un climat tropical.
L´appareil ne doit pas étre exposé á des égouttements d´eau ou des
éclaboussures et de plus qu´aucun objet rempli de liquide tel que des
vases ne doit étre placé sur l´appareil.
Lorsque la prise du résau d’alimentation est utilisée comme dispositif
de déconnexion, ce dispositif doit demeuré aisément accessible.
Warning - When using electric products, basic precautions should always be followed, including the following:
Additional Safety Information

1. INTRODUCTION | 3
TABLE OF CONTENTS
1INTRODUCTION .......................................................................... 5
Thank you! ........................................................................................................5
Features .............................................................................................................5
Nord Online ......................................................................................................5
About the User Manual ..............................................................................5
Reading the manual in PDF Format ...................................................................5
Restoring the factory presets.............................................................................5
OS upgrades.....................................................................................................5
Free sounds ......................................................................................................5
Disclaimer..........................................................................................................5
2OVERVIEW......................................................................................... 6
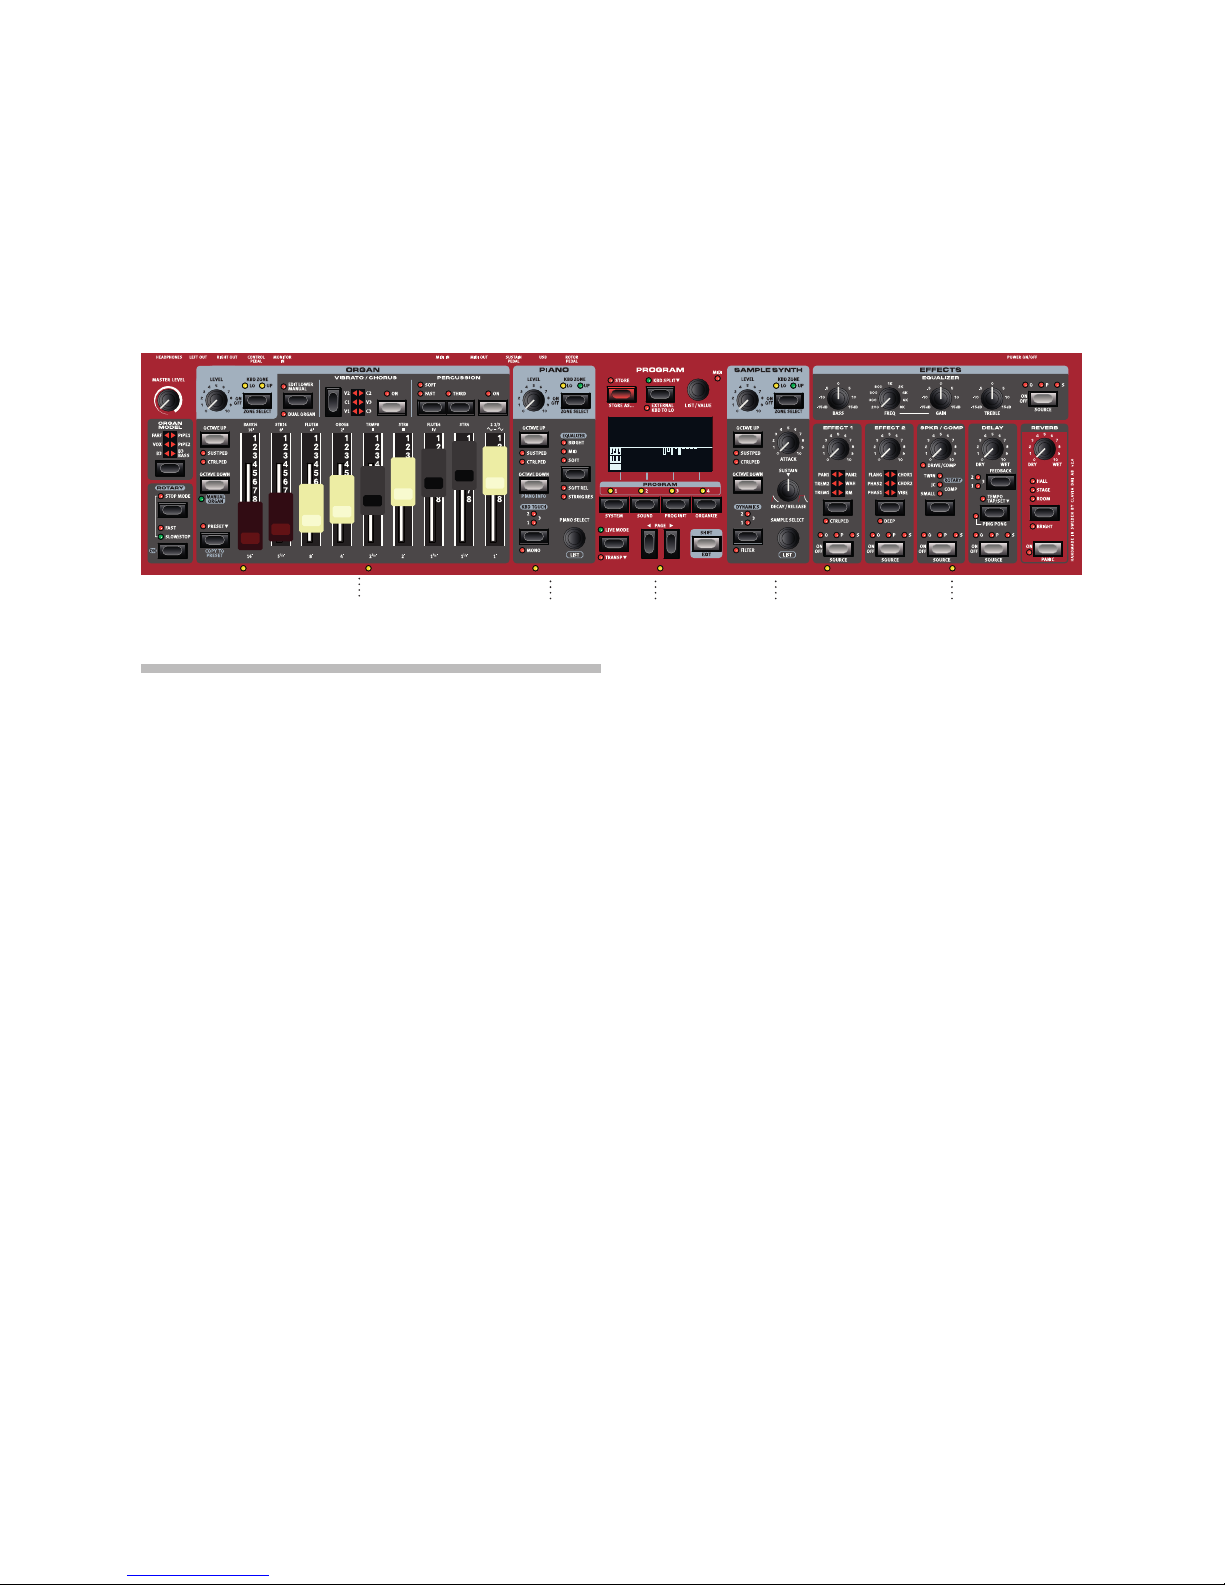
The Electro 6 panel ......................................................................................6
Organ section – page 10 ...................................................................................6
Piano section – page 14 ....................................................................................6
Program section – page 16 ...............................................................................6
Sample Synth section – page 19 .......................................................................6
Effects section – page 20 ..................................................................................6
3GETTING STARTED................................................................. 7
Hooking it up...................................................................................................7
Panel controls .................................................................................................7
Dials and knobs ................................................................................................7
Buttons .............................................................................................................7
The Shift button ................................................................................................7
Soft buttons ......................................................................................................7
Programs...........................................................................................................7
Select a program...............................................................................................7
List view .............................................................................................................8
Edit a program................................................................................................8
Select a new piano sound .................................................................................8
Turn off Memory Protection ....................................................................8
Store a program.............................................................................................8
Live Mode .........................................................................................................8
Activate effects ..............................................................................................9
Activating the Rotary Speaker............................................................................9
Create a split ..................................................................................................9
Assign the Piano to the upper zone ..................................................................9
Set the Sample Synth to the lower zone ............................................................9
Load a Sample ...............................................................................................9
Set up a Split cross-fade (Split Width)...........................................................9
Create a two manual B3............................................................................9
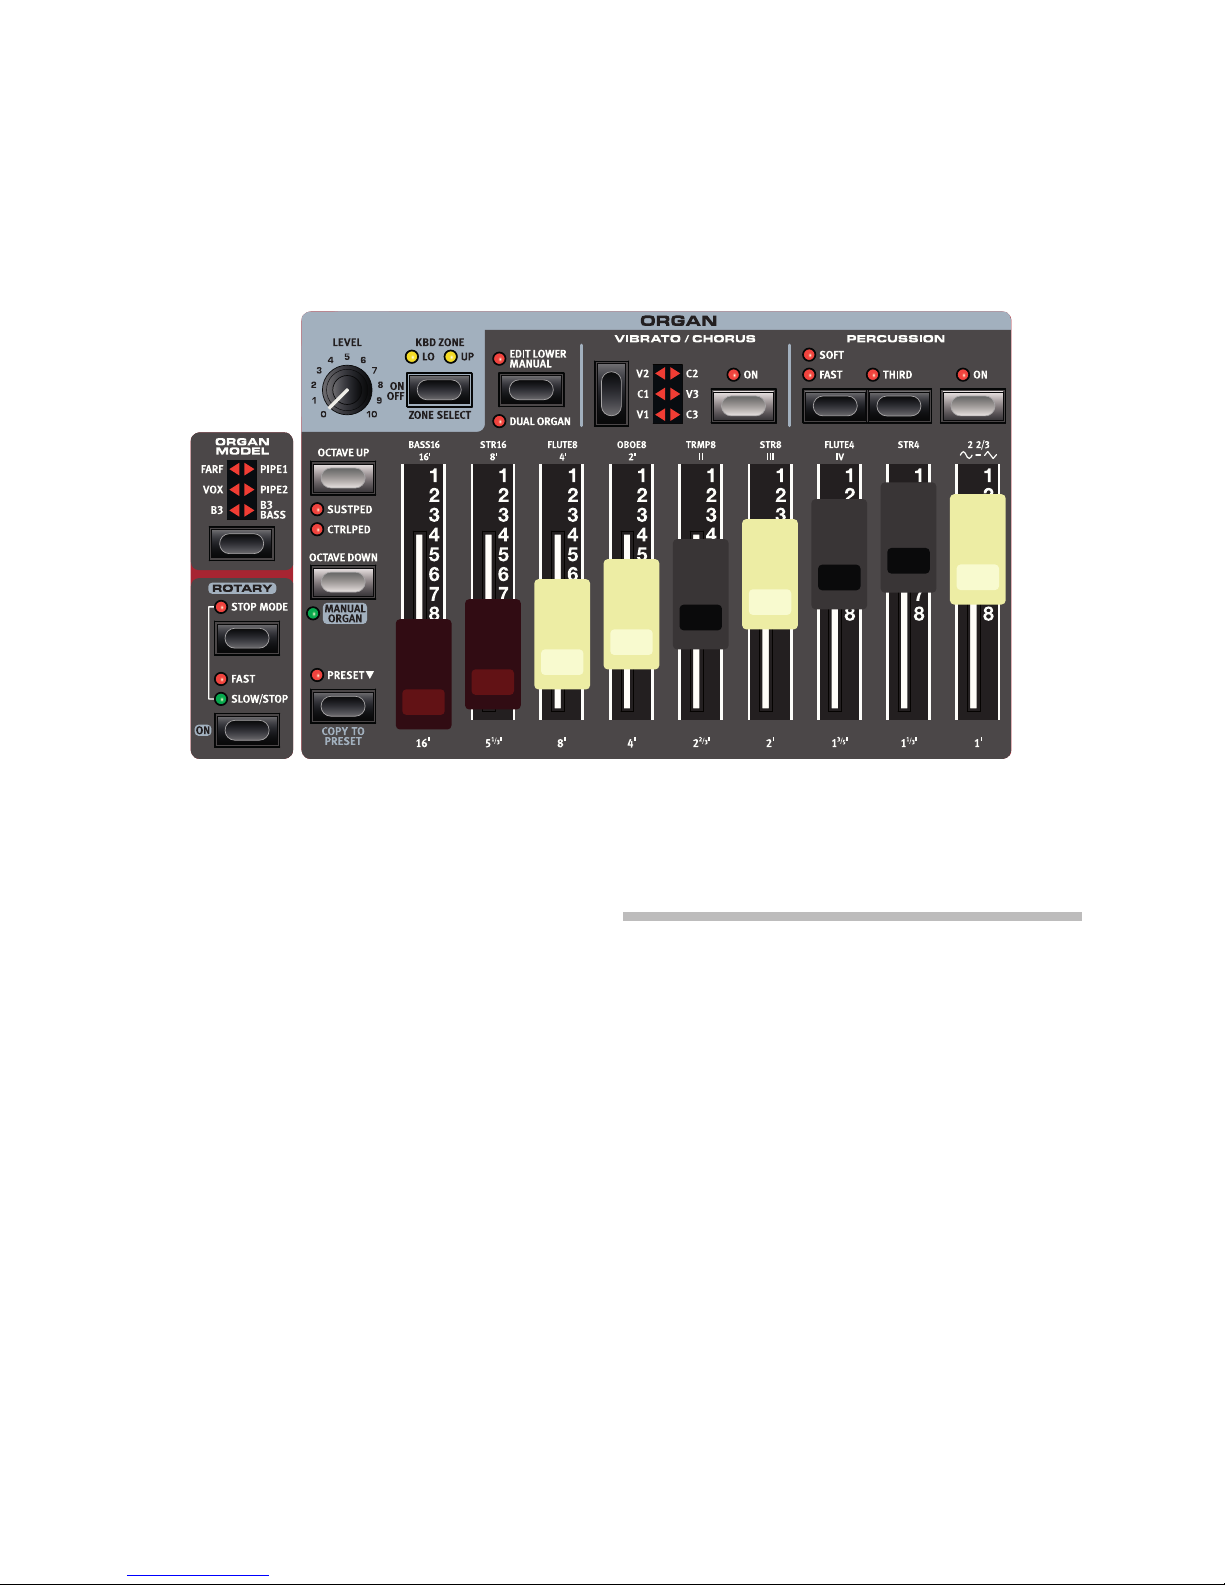
4ORGAN.................................................................................................10
On/Off, Level and Zone Select.........................................................................10
Octave Up/Down.............................................................................................10
Sustped And Ctrlped.......................................................................................10
Drawbars and buttons..............................................................................10
Selecting an Organ model ..............................................................................11
The B3 model ..............................................................................................11
B3 drawbars ...................................................................................................11
Percussion ......................................................................................................11
Key click control ..............................................................................................11
The Vox model..............................................................................................12
Vox drawbars ..................................................................................................12
Vibrato ............................................................................................................12
The Farf model..............................................................................................12
Farf registers ...................................................................................................12
Vibrato ............................................................................................................13
Pipe Organs...................................................................................................13
Pipe 1..............................................................................................................13
Pipe 2..............................................................................................................13
Pipe 1&2 Chorus .............................................................................................13
Pipe 1&2 registers ...........................................................................................13
Preset................................................................................................................13
Manual Organ ...............................................................................................13
Dual Organ .....................................................................................................13
Edit Lower Manual...........................................................................................13
Rotary Speaker ............................................................................................13
5PIANO ...................................................................................................14
On/Off, Level and Zone Select.........................................................................14
Octave Up/Down.............................................................................................14
Sustped and CtrlPed.......................................................................................14
About the Piano sounds..........................................................................14
About Piano size .............................................................................................14
Piano Select...................................................................................................14
Category and model........................................................................................14
List view ..........................................................................................................15
KBD Touch .....................................................................................................15
Piano Info ...................................................................................................15
Mono...............................................................................................................15
String Res and Soft Release ................................................................15
String Resonance............................................................................................15
Soft Release....................................................................................................15
Equalizer .........................................................................................................15
Piano EQ Settings ...........................................................................................15
6 PROGRAM........................................................................................16
Store ..................................................................................................................16
Storing a program ...........................................................................................16
Naming a program (Store As...) .......................................................................16
KBD split..........................................................................................................16
Keyboard Split settings ..................................................................................16
Choosing a split position.............................................................................17
Split Width settings.....................................................................................17
External KBD to Lo..........................................................................................17
Shift / Exit button.........................................................................................17
Live programs ...............................................................................................17
Transpose On/Set.......................................................................................17
Program Buttons.........................................................................................17
What is a program?.........................................................................................17
Prog Init...........................................................................................................17
Program dial .................................................................................................17
Program List, Abc and Cat ..............................................................................18
Numeric Pad Navigation mode ........................................................................18
MIDI LED indicator......................................................................................18
Page buttons.................................................................................................18
Organize...........................................................................................................18
Enter the Organize view...................................................................................18
Swap programs or pages................................................................................18
Move a program or page ................................................................................18
7SAMPLE SYNTH.........................................................................19
On/Off, Level and Zone Select.........................................................................19
Octave Up/Down.............................................................................................19
Sustped and Ctrlped .......................................................................................19
About the Sample Synth .........................................................................19
Selecting a Sample..........................................................................................19

4 | NORD ELECTRO 6 USER MANUAL OS V1.1X
List view .....................................................................................................19
Shaping the sound .....................................................................................19
Dynamics ........................................................................................................19
Filter ................................................................................................................19
Attack, Sustain and Decay/Release.................................................................19
8EFFECTS.............................................................................................20
Activating effects ........................................................................................20
Effect 1 ............................................................................................................20
Trem (Tremolo).................................................................................................20
Pan (Auto Pan) ................................................................................................20
RM (Ring Modulation) ......................................................................................20
Ctrlped ............................................................................................................20
Effect 2 ............................................................................................................21
Phaser 1 & 2 ...................................................................................................21
Flanger ............................................................................................................21
Chorus 1 & 2...................................................................................................21
Vibe.................................................................................................................21
Deep ...............................................................................................................21
Delay .................................................................................................................21
Tempo Tap ......................................................................................................21
Spkr/Comp ...................................................................................................21
Drive/Comp.....................................................................................................21
Amp model......................................................................................................21
Rotary ............................................................................................................21
Rotary menu settings.......................................................................................22
Comp..............................................................................................................22
Equalizer ..........................................................................................................22
Reverb ..............................................................................................................22
Panic...............................................................................................................22
9MIDI...........................................................................................................23
MIDI functions...............................................................................................23
Global MIDI ....................................................................................................23
Recording an Electro 6 performance to a MIDI sequencer or DAW..................23
External keyboard to Lo...................................................................................23
MIDI Messages.............................................................................................23
Note On/Off ................................................................................................23
Controllers ..................................................................................................23
Keyboard Velocity .......................................................................................24
Program Change.........................................................................................24
Local Control On/Off..................................................................................24
Panic..................................................................................................................24
10 NORD SOUND MANAGER..........................................25
About Nord Sound Manager.................................................................25
System requirements ................................................................................25
11 MENUS ..............................................................................................26
System Menu ................................................................................................26
1 - Memory Protect .........................................................................................26
2 - NumPad Program Select............................................................................26
3 - Seamless Program load .............................................................................26
4 - Global Transpose .......................................................................................26
5 - Fine Tune ...................................................................................................26
6 - Output Routing mode ................................................................................26
7 - Sustain Pedal ............................................................................................26
Type............................................................................................................26
Func (Function) ...........................................................................................26
8 - Rotor Pedal................................................................................................26
Type............................................................................................................26
Func (Function) ...........................................................................................26
9 - Control Pedal .............................................................................................26
Type............................................................................................................26
Gain............................................................................................................27
10 - Local Control ...........................................................................................27
11 - Channel ...................................................................................................27
Global ........................................................................................................27
External KBD ..............................................................................................27
12 - Control/Program Change Mode ...............................................................27
CC (Control Change) ..................................................................................27
PC (Program Change).................................................................................27
13 - Transpose MIDI At....................................................................................27
Sound Menu..................................................................................................27
1 - Piano String Res Level ...............................................................................27
2 - B3 Organ Tonewheel Mode........................................................................27
3 - B3 Organ Click Level..................................................................................27
4 - B3 Organ Keyboard Trigger Point...............................................................27
5 - Rotary Speaker ..........................................................................................27
6 - Rotary balance...........................................................................................27
7 - Rotary Rotor ..............................................................................................27
Spd (Speed) ...............................................................................................27
Acc (Acceleration).......................................................................................27
8 - Rotary Horn ...............................................................................................27
Spd (Speed) ..............................................................................................27
Acc (Acceleration).......................................................................................27
12 CONNECTIONS........................................................................28
Audio connections......................................................................................28
Headphones ...................................................................................................28
Left & Right Out...............................................................................................28
Monitor In........................................................................................................28
MIDI connections ........................................................................................28
MIDI In ............................................................................................................28
MIDI Out .........................................................................................................28
USB connection...........................................................................................28
Pedal connections......................................................................................28
Sustain Pedal ..................................................................................................28
Control Pedal ..................................................................................................28
Rotor Pedal .....................................................................................................28
II APPENDIX: MIDI CONTROLLER LIST.................29
III INDEX ................................................................................................... 30

1. INTRODUCTION | 5
1
INTRODUCTION
THANK YOU!
Thank you for choosing the Nord Electro 6!
The Nord Electro 6 combines our award-winning emulations of vintage
electro mechanical and acoustic instruments in one ultra-portable
package. With three independent sound sections, a new streamlined
user interface and the addition of seamless transitions, we’re proud to
present the most powerful and flexible Electro ever.
FEATURES
The Nord Electro 6 has the following main features:
Organ section with faithful reproductions of three classic organ mod-
els, B3, Vox and Farf, as found in our acclaimed C2D combo organ.
There are also two Pipe organ models, each with its own distinct
character.
Physical drawbars on the 61 and 73 key D models. Digital LED draw-
bars on the 73 key HP model.
Piano section with acoustic Grand and Upright pianos, tine and
reed based Electric pianos, Digital piano sounds, Clavinet and
Harpsichord sounds and a Layer category with rich sounding piano
combinations. The memory capacity for the Piano section in the
Electro 6 is 1 GB.
Sample Synth section with 512 MB of sample memory and intuitive
envelope and dynamics controls.
Comprehensive Effects section.
Seamless Transitions: Sustaining notes will not be cut off when
changing programs.
Keyboard split functionality with dual manual organ mode and
optional split widths, allowing sounds to smoothly cross-fade over
split point.
Three models: Nord Electro 6D 73 and 6D 61 with semi weighted
“waterfall” keybeds and physical drawbars, and Nord Electro 6 HP
73 witha lightweighthammer actionkeybed and digital LED draw-
bars.
NORD ONLINE
On the website nordkeyboards.com you will find:
»Information about the Nord Electro 6 and other Nord instruments
»Latest Operating Systems for download
»Free software: Nord Sound Manager, Nord Sample Editor and
drivers
»Nord Piano Library sounds for free download
»Nord Sample Library sounds for free download
»Nord World: Nord releated news stories and videos
»User Manuals for download
»Tutorials can be found at nordkeyboards.com/tutorials
Follow Nord Keyboards on Facebook, Instagram, Twitter and YouTube.
Feel free to tag your content with our official hashtag #iseenord.
ABOUT THE USER MANUAL
The manual is arranged mainly as a reference manual. In many cases
you’ll also get tips on how to practically use the various features in a
musical context.
READING THE MANUAL IN PDF FORMAT
This manual is available as a digital PDF file. It can be downloaded, free
of charge, from the Nord Electro 6 section on our website.
RESTORING THE FACTORY PRESETS
The factory programs, samples and pianos are available as individual
Nord Sound Manager backup files for download from our website.
There is also a complete backup of the entire instrument and its factory
content, in case it needs to be restored to its original state at some
point.
OS UPGRADES
The latest OS (Operating System) version for the Nord Electro 6 is al-
ways available for download from our website. Please visit our website
from time to time, to make sure you have the latest version in your unit.
FREE SOUNDS
Since the Nord Electro 6 is designed as an open system, each and
every piano and sample in the Nord Electro 6 can be replaced. This is
done using the Nord Sound Manager application which is available as
a free download from our website.
The Nord Electro 6 is compatible with the continuously expanding
Nord Piano Library and the Nord Sample Library. When new sounds
become available, these can be download for free from the Sound
Libraries section of our website.
DISCLAIMER
Any trademarks and brand names mentioned in this manual are the
property of their respective owners and are not affiliated or associated
with Clavia. These trademarks and brand names are only mentioned to
describe certain sound qualities reproduced by the Nord Electro 6.

6 | NORD ELECTRO 6 USER MANUAL OS V1.1X
2 OVERVIEW
THE ELECTRO 6 PANEL
The Nord Electro 6 is designed to be a musically inspiring yet easy-to-
use instrument. Let’s have a quick look at all its panel sections:
ORGAN SECTION – PAGE 10
The dedicated Organ section, with its nine drawbars for real-time ad-
justments to the Organ sound, uses our latest B3 tonewheel Organ
model, as found in the acclaimed Nord C2D Combo Organ.
The B3 model is based on the analysis of the signals generated by
each of the 91 spinning discs inside several original instruments, and
its virtual circuitry reacts not only to the panel settings but also to the
real time performance, simulating important foldback, compression
and energy robbing characteristics. The Rotary Speaker simulation is
derived from the Nord C2D which brings the Electro 6’s organs to life
with remarkable realism.
Two carefully modelled emulations of famous transistor organs from
the 1960’s – the Vox and the Farf – are also included. Finally, there are
two distinct Pipe Organ models including a “Principal” Pipe model with
two variations that deliver a wide range of versatile pipe/church organ
sounds.
Any Organ model can be used in a single or dual manual configuration,
each manual having an additional preset for quick switching between
two distinct sounds.
PIANO SECTION – PAGE 14
The Nord Electro 6 benefits from the ever-growing Nord Piano Library
and includes a wide range of piano and keyboard sounds including
Grand, Upright and Electric pianos as well as Digital piano and Layer
sounds right out of the box. New sounds are regularly made available
free of charge on the www.nordkeyboards.com website.
Among the Piano section’s panel controls are buttons for activating the
Advanced String Resonance feature (for acoustic pianos), adjusting
the keyboard velocity response or quickly altering the sound character
using the Piano and Clavinet Equalizer settings.
PROGRAM SECTION – PAGE 16
A program on the Nord Electro 6 contains settings for all sound en-
gines and effects. The center area of the instrument – the Program
section – is where programs are navigated and stored, and various
performance features and settings menus are accessed. All this is
aided by the large OLED display, which also shows Organ drawbar
settings and the name of any selected Piano and/or Sample sound.
SAMPLE SYNTH SECTION – PAGE 19
The Nord Sample Library gives Electro 6 owners access to a huge free
library of world-class sounds, including the famous vintage Mellotron
and Chamberlin sounds. A large selection of samples are includ-
ed from the start and the Sample Synth section is where these are
browsed and loaded. A number of functions for adjusting the character
and response of the sample are accessed directly via the panel.
EFFECTS SECTION – PAGE 20
The Effects section puts a wide selection of classic effects at your
fingertips:
The Effects 1 and 2 units provide essential modulation effects such as
Tremolo, Chorus and Phaser – modelled after legendary stomp boxes
and effects units. The Delay effect can be used for anything from sub-
tle ambience or slap-back effects to almost endless soundscapes.
Classic amplifier simulations, the Rotary Speaker and a punchy Com-
pressor effect are found in the Amp/Spkr section. A versatile EQ with
sweepable Mid range frequency can be applied to any of the Electro 6
sound engines.
Finally, the lush Reverb – with an optional Bright mode – provides an
array of small and large room simulations for instant atmosphere.
OFFSET PRINT CMYK VERSION
ORGAN PIANO PROGRAM SAMPLE SYNTH EFFECTS
260
Ballad EP1 Sml
B3
Synth Bass 5
A:14
EightyNine

3. GETTING STARTED | 7
3 GETTING STARTED
Let’s spend a few minutes getting acquainted with the most funda-
mental features of the Nord Electro 6. In this chapter some of the most
common tasks and scenarios will be described in a stepwise fashion.
HOOKING IT UP
1 Connect the Nord Electro 6 power cord to the unit and a mains
power supply, connect the sustain pedal and a set of headphones
or a sound system.
2 Make sure to turn on the Nord Electro 6 first, before the sound
system. Please be careful with the output volume!
For more information on all the connections of the Electro 6, see the
Connections section on page 28.
PANEL CONTROLS
DIALS AND KNOBS
The dials on the Nord Electro 6 are knobs without fixed
start and stop positions, used for navigating parameters
and settings. The PROGRAM dial is one such example.
In this manual, dials are sometimes also referred to as
encoders.
Potentiometer-type knobs are used for many parameters
on the Nord Electro 6. When a program is loaded the
physical positions of these knobs will in most cases not
correspond to the actual parameter values. As soon as a
knob is turned however, its associated parameter value
will “snap” to the knob’s position.
Hold the SHIFT button and turn a knob to view the stored setting of
a parameter without changing it.
BUTTONS
Selector buttons are used to select one setting in an
array. They have a set of round or triangular LEDs to
indicate its current setting. Press the button several
times to cycle through the possible options.
ON/OFF buttons are used for activating a function
or a group of functions such as effects and have a
LED close to them to indicate the on/off status and
sometimes also the source or zone.
MThe On/Off buttons of the Effects shown here also have a selector
functionality. Press once to turn the Effect on, and press immedi-
ately again to select the “next” source.
THE SHIFT BUTTON
Many panel controls on the Nord Electro 6 have a second-
ary function, which is printed immediately below it. These
additional functions are accessed by pressing and holding
SHIFT while operating the control.
The Shift button is also used to EXIT a menu or to cancel an ongoing
Store operation.
SOFT BUTTONS
One menu or settings page, or the Program Init window (shown below)
may contain several related options in which case “soft buttons” are
used for focusing a setting or performing a task. Soft buttons are placed
at the bottom of the display and are controlled with the PROGRAM 1-4
buttons. As an example; in the scenario below, pressing the Program 3
button will initialize the panel to a Piano program.
PROGRAMS
The Program area is located at the center of the panel with an OLED
display in the middle. One program contains complete settings of every
parameter on the panel and is stored in the program memory of the
Electro 6, with enough room for 416 programs.
Programs are organized into 26 banks, labeled A-Z. All programs can be
edited and replaced as you wish.
MA complete set of the factory programs is available on the www.
nordkeyboards.com website. This means that the program memory
can always be restored to its original state.
SELECT A PROGRAM
1 Programs are selected by pressing any of the four PROGRAM but-
tons, located below the display. The PAGE 3/4buttons are used
to navigate program pages – a page being a group of 4 programs.
A Program bank on the Nord Electro 6 can contain 16 programs
divided into 4 program pages.
2 Programs can also be navigated by turning the PROGRAM dial.
OFFSET PRINT CMYK VERSION
PROGRAM INIT
Select section to initialize
Org Dual Org Piano Synth
OFFSET PRINT CMYK VERSION

8 | NORD ELECTRO 6 USER MANUAL OS V1.1X
LIST VIEW
Any dial that has LIST written below it - such as the Program dial - can
be used to access a useful list view.
1 Press SHIFT and turn the PROGRAM dial to enter a list view of all the
Programs.
2 Browse to any program, using the PROGRAM dial. All 26 program
banks can be accessed when in List mode.
3 Try out the Abc and Cat soft buttons respectively. Note that in Abc
mode, all programs are shown in a list sorted by name and in Cat
mode as a list sorted by Category.
4 Press SHIFT again to EXIT the List view.
List views for the Piano and Sample dials work in a similar way.
EDIT A PROGRAM
Editing a program is as easy as turning a knob or pressing a button to
change an existing setting. Let’s give it a quick try:
1 Dial up the first program (A:11, a piano based program) for this
exercise.
The controls for the Piano instrument are located immediately to
the left of the Program area on the panel. Notice that the Piano
section of the Program area display shows the name of the select-
ed piano sound.
SELECT A NEW PIANO SOUND
2 Turn the PIANO SELECT dial to browse the piano sounds. Sounds
are organized according to their type (for instance Grand and
Upright).
3 Try selecting a piano sound from the LIST view, accessed by
pressing SHIFT and turning the PIANO SELECT dial. Use Shift again
to EXIT the list view.
Note that changing any parameter on the panel causes an “E” to
appear next to the program number in the display. This is to show that
the program has been edited but not yet saved. If another program is
loaded before a Store operation is performed, any edits are lost and the
program will have its original settings the next time it is loaded.
TURN OFF MEMORY PROTECTION
When the Nord Electro 6 is shipped from factory its memory is protected
to prevent accidental overwriting of original programs. Memory protec-
tion can be turned off by toggling a setting located in the System menu.
1 Hold SHIFT and press the SYSTEM (Program 1) button below the
display.
2 Memory Protect is the first setting of the System menu. If the dis-
play shows a different setting, use the Page3button to navigate to
the Memory Protect setting.
3 Change this setting to Off by turning the PROGRAM dial.
4 Press EXIT (Shift button) to exit the System menu.
MThis setting, like most other System settings, will be permanently
stored until it is changed again.
Read more about menu settings on page 26.
STORE A PROGRAM
1 Press the STORE button to the left of the display once, to begin the
process of storing the current program.
2 The STORE LED will begin to flash and the display will ask you for
the location to where you want to store the program.
3 If you want to store the edited version to the current location,
replacing the original, simply press STORE again. If not, use the dial,
PROGRAM and/or PAGE 3/4buttons to select a different location.
The program in the selected location becomes active on the
keyboard, allowing it to be auditioned before it is replaced by the
program being stored.
4 When you have found a suitable location for your program, press
STORE again to confirm the store operation.
MPress Shift/Exit once to abort an ongoing Store process if you
change your mind.
Read more about Store and how to name a program in the Program
chapter, on page 16.
LIVE MODE
The eight LIVE programs, divided into two pages – A:1-4 and B:1-4 –
differ from other programs in that all edits made to them are instantly
stored, without the need for a manual Store operation.
1 Press LIVE MODE and use the PROGRAM and PAGE buttons to
navigate the eight Live programs.
2 Make an edit, such as activating one of the effects sections, to one
of the programs.
3 Select a different Live program and then return to the one that was
edited. Note that the edit was automatically stored.
Press the Live Mode button again to exit Live Mode and return to the
Program banks.
If Live Mode is active and you wish to store the settings permanently
as a program in one of the Program banks, you can do so using the
standard Store methods (see above). Conversely, programs can also
be stored into any of the eight Live Mode memory locations by pressing
LIVE MODE and selecting one of the Live program locations.
STORE PROGRAM TO
A:11
Royal Grand 3D
Program EPiano1
G:31 Lullaby Upright
G:32 Ballad Reeds
G:33 B3 Silk
G:34 Graceful Duo
Num Abc Cat

3. GETTING STARTED | 9
ACTIVATE EFFECTS
1 Activate the reverb by pressing the Reverb ON button.
2 Adjust the DRY/WET balance with the knob above the reverb
selector.
3 Activate the delay effect by pressing the Delay ON/OFF button once.
4 The LEDs above the button indicate which sound engine is routed
to the effect (O= Organ, P= Piano and S= Sample Synth). Press
SHIFT and the Delay SOURCE button until the PLED is lit, if it is not
already.
Double-clicking the On Off / Source button is a shortcut for quickly
changing the source for any effects unit.
5 Try the RATE, FEEDBACK and DRY/WET controls, to alter the charac-
ter and intensity of the Delay effect.
ACTIVATING THE ROTARY SPEAKER
The Rotary Speaker – being most commonly used with the Organ – has
its speed controls located next to that section. The effect itself is located
in the SPKR/COMP unit however, and is activated and assigned just as
the Delay effect described above.
Pressing the Rotary Speed control when the effect is Off will auto-
matically turn on the Rotary Speaker and assign it to the left-most
of the currently active sound engines.
CREATE A SPLIT
1 Make sure that the Piano section is turned on.
2 To activate Split mode, press the KBD SPLIT button, located in the
top row above the Program area display.
3 To adjust the position of the Split point, press and hold the KBD
SPLIT button.
MThe “6“ symbol indicates that this button has functions which are
accessed by keeping the button pressed down.
4 There are two settings for the split point; position and width. Make
sure that the Position setting is focused (by pressing the Pos soft
button) and set the split point to C4 using the dial.
The keyboard is now divided into two zones, the split point being indi-
cated with a green LED above the keyboard.
ASSIGN THE PIANO TO THE UPPER ZONE
5 Hold SHIFT and press the Piano ZONE SELECT button so that only
the UP LED is lit.
This assigns the Piano to the upper zone of the keyboard. Feel free
to use the OCTAVE SHIFT buttons in the Piano section for accessing a
different range of the piano sound.
SET THE SAMPLE SYNTH TO THE LOWER ZONE
6 Turn ON the Sample Synth section. Hold SHIFT and press Sample
Synth ZONE SELECT so that the LO LED is lit. This will assign the
Sample Synth to the lower half of the keyboard.
LOAD A SAMPLE
1 Turn the SAMPLE SELECT dial and select a sample from the Sample
bank, perhaps a bass sound. The location and name of the sample
are shown at the bottom of the display.
When a sample is selected, preset settings for the Sample Synth
envelope, Dynamics and Filter settings are also loaded. These parame-
ters can subsequently be adjusted manually as desired. Descriptions of
these controls are found in the Sample Synth reference chapter, starting
on page 19.
SET UP A SPLIT CROSS-FADE (SPLIT WIDTH)
As a final step, let’s adjust the split point so that the split Sample Synth
and Piano sounds will transition gradually between one another:
2 Again, press and hold the KBD SPLIT button, located in the top row
above the Program area display.
3 Press the Width soft button. The Split width for each split point can
now be adjusted.
4 Set the width value to “Lrg” (large) by turning the dial. Let go of the
KBD SPLIT button.
Playing across the Split point will now “cross-fade” between the lower
and the upper sound. Note that the split LED above the keyboard is lit
with a red light, indicating that a large split width is being used. With a
small width the LED will be yellow, and with width set to “off” the LED
will be green.
CREATE A TWO MANUAL B3
Setting up an Organ split, with two independent manuals, can be done
very quickly. Let’s try out the Program Init feature which will configure the
Organ section correctly, and turn off other active sound engines:
1 Press PROG INIT (Shift + Program 3 button). The display now pres-
ents four initialize options to choose from.
2 Press the Dual Org soft button (Program 2 button).
3 Make sure the ORGAN MODEL selector is set to B3 and press the
ROTARY Slow/Fast control to automatically turn on the Rotary
Speaker effect.
A keyboard split has now been created, providing one Organ manual to
the left of the split point – referred to as the Lower manual – and another
to the right which is referred to as Upper. Both Organ KB Zone LEDs are
now lit with a yellow color, meaning that the Organ is active across the
whole keyboard, in a Dual Organ split configuration.
4 Set the drawbars, Percussion, and other Organ settings for the
Upper manual as desired.
5 Press the EDIT LOWER button to focus the Lower manual for editing
and adjust the drawbars. Note that the display shows drawbar set-
tings for both manuals, but that the non-focused ones are “grayed
out”.
MA two manual B3 using an external keyboard for one of the man-
uals can also be easily set up, by using the External KBD to Lo
function. Read more about this on page 17.
KEYBOARD SPLIT
Split Position
C4 Off
WidthPos

10 | NORD ELECTRO 6 USER MANUAL OS V1.1X
4 ORGAN
The Nord Electro 6 features five organ models, all digitally modeled: A
B3 tonewheel organ with a dedicated B3 Bass mode, two transistor
organs and two Pipe organ models, including a “principal pipe” section.
ON/OFF, LEVEL AND ZONE SELECT
The Organ section is turned On or Off by pressing its ON/OFF button.
The LEVEL knob controls the output volume of the Organ.
Press ZONE SELECT (Shift + On/Off) to assign the Organ to either or both
of the two keyboard zones. The KBD ZONE LEDs show which zones the
Organ section is assigned to.
OCTAVE UP/DOWN
Use OCTAVE UP/DOWN to transpose the Organ section up or down by
octaves (+/- 12 semitones). When assigned to the entire keyboard it
can be transposed one octave up or down. When assigned to a smaller
zone the available transpose values will vary, but always give access to
the entire range of the Organ.
MTo use Octave Up/Dn for the lower manual, in Dual Organ mode,
Edit Lower mode needs to be active.
SUSTPED AND CTRLPED
SUSTPED (Shift + Octave Shift Up) activates an attached sustain pedal
for the Organ section.
CTRLPED (Shift + Octave Shift Up) assigns an attached control pedal as
volume control for the Organ section. With the B3/B3 Bass models it
functions as a traditional Swell pedal which also changes the character
of the sound when the Rotary Speaker Drive is used.
Read more about how to configure pedals on page 26.
DRAWBARS AND BUTTONS
The drawbars on the Nord Electro 6HP model are represented by but-
tons and LED chain graphs. The Nord Electro 6D models use “real”
mechanical drawbars.
When a program is loaded, the physical drawbars will in most cases
not correspond to their stored settings. As soon as a drawbar is moved
however, its setting will be the same as that of the physical position.
MThere is one exception to the behaviour described above: Any
program stored with Manual Organ activated will use the actual
drawbar positions when it is loaded.
The digital drawbars behave similarly to their mechanical counterparts.
On the B3, B3 Bass, Vox and Pipe models you “pull out” and “push in”
the drawbars using the drawbar buttons. With the Farf model, drawbar
buttons act as rocker switches, toggling each register on or off.
The buttons are special in the way that they auto-increment/decrement
the drawbar value when they are held down. If you hold a drawbar
button the corresponding drawbar setting will continue to increment or
decrement (within its range) until you release the button.
MThe Program section display always shows the current drawbar
settings for the Organ section.
OFFSET PRINT CMYK VERSION

4. ORGAN | 11
SELECTING AN ORGAN MODEL
Use the ORGAN MODEL selector button to select your
preferred Organ model: B3, VOX, FARF, PIPE1, PIPE2
or B3 BASS.
With the B3 Bass setting, its drawbars are placed on
the “upper” manual in non-Dual Organ mode, mak-
ing it possible to create B3 Bass and Piano/Sample
Synth splits. In Dual Organ mode the bass drawbars
are found on the lower manual, with a standard set of B3 drawbars on
the upper manual, as expected.
THE B3 MODEL
The B3 model is based on a digital model of the classic electro-mechan-
ical tonewheel organ. This simulation utilizes innovative and advanced
methods to capture every nuance of the original sound. Here are some
examples:
• An extremely accurate digital model of the original chorus and vibrato
scanner.
• Modeling of the individual random contact bounces for each
harmonic.
• Modeling of the unique frequency characteristics of the built-in
pre-amplifier, which forms the “body” of the sound.
• Simulation of the energy robbing on the tone wheels that results in the
typical “compressed” sound.
• Authentic tuning of the tonewheels according to the original design.
• Extremely fast keyboard response.
• Full polyphony.
B3 DRAWBARS
The harmonic intervals for the B3 tonewheel organ are printed on the
panel below the drawbars.
For basic drawbar operation, please refer to “Drawbars and Buttons”
on the previous page. Each drawbar represents a partial with a fixed
harmonic interval in relationship with the played note.
The illustration below shows the pitch interval among the nine drawbars
when the key of C3 is played. Note that the 5 ⅓’ drawbar is a 5th above
the fundamental harmonic (8’) but in many situations is perceived as
sounding below it.
VIBRATO & CHORUS
The original vibrato and chorus scanner in a tonewheel organ consists
of a modulated delay line in combination with a rotating scanner. For the
Vibrato effect, phase shift is applied to the signal. For the Chorus effect,
the phase-modulated signal is added to the original signal.
Three different types of choruses (C1 - C3) and three different types of
vibratos (V1 - V3) are available. Select one of these types by pressing
the Vibrato/Chorus selector button.
PERCUSSION
Press the PERCUSSION ON button to add an extra attack to the B3
sound by having a single envelope generator controlling either the 2nd
or 3rd harmonic.
The envelope “opens up” for a short moment in the beginning of the
sound when you press the key(s).
The percussion is a single-triggered non-legato effect. By “single-trig-
gered” we mean that the percussion is only present when you hit the
keys when no other note is sounding. In other words, if you play a note
or a chord and then add more notes without releasing the previously
pressed keys, there will be no percussion effect in the new notes. You
have to release all keys to be able to play new notes with the percussion
effect.
The SOFT button toggles between Normal and Soft percussion level.
The FAST button toggles between Slow and Fast decay times.
The THIRD button toggles between using the 2nd or 3rd partial as the
source for the percussion effect.
MThe Percussion effect is only available for the B3 organ model.
KEY CLICK CONTROL
The key click produced by the random contact bounces is an impor-
tant audio artifact in the original B3 instrument and quickly became a
desirable effect among musicians. The click level can be adjusted in the
Sound menu, read more about this on page 27.
Do not forget to try out the three tonewheel modes that are also
available in the Sound menu. These will dramatically change the
sound of the B3 model from a squeaky clean unit to a battered, old
workhorse.
OFFSET PRINT CMYK VERSION
C3
16 5⅓ ⅔ ⅗
8 4 2 1 ⅓
1 1
2
OFFSET PRINT CMYK VERSION

12 | NORD ELECTRO 6 USER MANUAL OS V1.1X
THE VOX MODEL
The original Vox organ is probably the most famous of all the transis-
tor based combo organs that emerged in the early 60’s. Transistor
technology made it possible to manufacture compact and portable
organ instruments. Compared to the mighty sound of tonewheel based
organs, transistor organs generally sounded reedier and weaker, but
this one had a distinctive sound character which together with the port-
ability and cool design (inverse colored keyboard and chrome “Z-frame”
stand) made the instrument massively popular at the time. The sound is
timeless and recreated faithfully by the Nord Electro 6.
VOX DRAWBARS
The labels used for the Vox drawbars are printed on the row directly
above the drawbar LEDs.
For basic drawbar operation, please refer to “Drawbars and buttons”
on page 10.
The seven drawbars to the left control the level of each partial. Each
partial has a fixed harmonic interval relating to the played note. The
illustration below shows the pitch interval of the drawbars when the key
of C3 is played. The intervals vary for the upper and lower manual on
the original instrument, and the Nord Electro 6 implements a combina-
tion of the two for both manuals.
The rightmost drawbar controls the mix between a filtered signal
sounding soft and dark, and an unfiltered signal sounding bright and
intense.
VIBRATO
There are several types of vibrato and choruses available for the Vox
model, which is activated using the ON button in the Vibrato section.
The V3 setting is the one that is modeled after the original instrument.
THE FARF MODEL
The typical “buzzy” sound of this vintage instrument is one of the most
distinct and easily recognizable organ sounds ever created; yet it is
actually possible to get quite a wide range of sounds out of the instru-
ment. Note that the voices aren’t supposed to replicate the instruments
they are named after, but rather to describe the basic tonal characteris-
tic of the voice: Flute = soft, Oboe = reedy, Trumpet = brassy etc.
FARF REGISTERS
The labels used for the FARF drawbars/registers are printed on the
upper row, above the drawbar LEDs or drawbars.
The drawbars act as on/off switches, or “register selectors” when the
Farf model is selected. Instead of drawbars, the original instrument
used rocker switches for selecting instrument voices (in reality different
filter settings) in various footage (octave) ranges. On the Electro 6 HP
model, drawbar LEDs 5-8 are lit up for an activated voice, and LEDs
1-4 are for a deactivated voice. On the Electro 6 D models, pulling
the drawbars more than half way out will activate the corresponding
register.
As usual, the Program section display will show current drawbar set-
tings for the Organ section. The table below shows the original register
name.
Drawbar Voice Panel Name
1 Bass 16 BASS16
2 Strings 16 STR16
3 Flute 8 FLUTE8
4 Oboe 8 OBOE8
5 Trumpet 8 TRMP8
6 Strings 8 STR8
7 Flute 4 FLUTE4
8 Strings 4 STR4
9 A bright voice, an octave
and a fifth above the
fundamental
2 2/3
The illustration below shows the pitch interval between each voice
when the key of C3 is played. Though some voices have the same
pitch, they differ in tonal character.
Vox Upper
Vox Lower
C3
C3

4. ORGAN | 13
VIBRATO
The original instrument has two basic vibrato modes; “Light” and
“Heavy”, with different rates for each mode. There are several types of
vibrato and choruses available for the Farf model on the Nord Electro 6,
which are activated using the ON button in the Vibrato section.
The V1, V2 and the V3 settings are the ones that are modeled after the
original instrument’s.
PIPE ORGANS
PIPE 1
The PIPE1 organ model is not designed to imitate any existing instru-
ment, but rather to be a useful and appealing “all-purpose” organ, which
works equally well with or without Rotary speaker. In some ways its
sound is similar to that of the B3 organ – but without any of its electro-
mechanical behaviors and artifacts.
PIPE 2
The PIPE2 organ model faithfully recreates a principal pipe section - the
sets of metal pipes, or ranks, that commonly make up the backbone of
a pipe or church organ. While other ranks may attempt to recreate the
sounds of other instruments (flutes, trumpets, strings etc.) the principal
sound is non-imitative and unique to the pipe organ.
PIPE 1&2 CHORUS
Activating VIBRATO/CHORUS for the Pipe 1 or 2 model will switch to a
variation which is tuned with less precision. This produces chorus-like
effects, slight dissonances and arguably more realism when combining
registers.
PIPE 1&2 REGISTERS
The pipe lengths available for both Pipe models correspond to those of
the B3 model, ranging from 16 feet to 1 foot.
PRESET
There are two sets of drawbars available for each Organ
manual – the default drawbar set (Preset LED not lit)
and the Preset. This provides a quick way of changing
between two organ sound variations, without having to
change programs.
To switch between the two drawbar settings press the PRESET button.
The Preset LED being lit indicates that the Preset is active.
In order to modify the Preset, press down on the button – as indicated
by the ”6” symbol – while adjusting the drawbars and other settings.
When in the non-Preset mode, the current drawbar positions can be
stored to the Preset by pressing COPY TO PRESET (Shift + Preset).
MANUAL ORGAN
The MANUAL ORGAN (Shift + Octave Down) can be
thought of as a separate – program independent – organ,
the settings of which are in always sync regardless of
which program it is loaded from. Additionally the actual
positions of the drawbars are always used when Manual
Organ is activated or loaded from a program.
By using Manual Organ and the External KBD to Lo feature (see
page 17), a separate keyboard could be used to control the or-
gan on a per-program basis in a manner where the current drawbar
positions are always used, and all other organ settings remain the
same, regardless of which program is loaded.
DUAL ORGAN
Press DUAL ORGAN (Shift + Edit Lower Manual) to
instantly create a double manual organ setup, with the
keyboard split into two zones. The lower (LO) manual
will be on the left side of the split point and the upper
(UP) manual to the right.
To adjust the keyboard split position, press down on the KBD SPLIT
button in the Program area and use the dial. See page 16 for more
information on this.
EDIT LOWER MANUAL
Press the EDIT LOWER MANUAL button to focus the lower manual for
editing and drawbar interaction. To return to the upper manual, simply
press the button again. In Dual Organ mode the drawbar representa-
tions in the display will show which manual is currently focused by “gray-
ing out” the other one. The example below shows a Live program set up
as a Dual Organ split in B3 Bass mode, with the upper manual focused
for editing.
MThe Edit Lower Manual control is only available in Dual Organ
mode.
ROTARY SPEAKER
The Rotary Speaker controls are logically placed next to the Organ
section. Its settings are described in detail in the Effects chapter on
page 21.
OFFSET PRINT CMYK VERSION
260
Live A:3
OFFSET PRINT CMYK VERSION

14 | NORD ELECTRO 6 USER MANUAL OS V1.1X
5 PIANO
ON/OFF, LEVEL AND ZONE SELECT
The Piano section is turned On or Off by pressing its ON/OFF button. The
LEVEL knob controls the volume of the Piano sound.
Press ZONE SELECT (Shift + On/Off), to assign the Piano to one or both
of the two keyboard zones. The KBD ZONE LEDs indicate which of the
zones the Piano section is assigned to. Read more about Split set-ups
on page 16.
OCTAVE UP/DOWN
Use OCTAVE UP/DOWN to transpose the Piano section up or down by
octaves (+/- 12 semitones). When assigned to the entire keyboard it can
be transposed one octave up or down. When assigned to only one zone
the available transpose values will vary, but always provide access to the
entire range of the Piano.
SUSTPED AND CTRLPED
SUSTPED (Shift + Octave Up) activates any attached sustain pedal for
the Piano section. Read more on how to configure an attached pedal in
the Menus chapter, on page 26.
CTRLPED (Shift + Octave Up) assigns an attached control pedal as vol-
ume control for the Piano section.
Both the sustain and control pedal can be active at the same time,
indicated by both LEDs being lit.
ABOUT THE PIANO SOUNDS
The Pianos in the Nord Electro 6 are organized into six categories. Each
category can contain several instrument models. New piano sounds can
be downloaded from the www.nordkeyboards.com website and added
to the Nord Electro 6 by using the Nord Sound Manager.
Right out of the box, the Nord Electro 6 features a fine collection of
carefully selected acoustic and electric pianos, digital piano sounds and
piano layers. A lot of effort was made to ensure a nuanced response
and sound, matching the original models as closely as possible.
The available memory size for piano sounds is 1 Gigabyte.
MWhen you download piano instruments with the Nord Sound
Manager, these will always automatically be placed into their corre-
sponding category.
A program “knows” which piano to use by referencing to the category
and the model number. If a program references a piano that isn’t cur-
rently downloaded onto the Nord Electro 6, the display will read “Piano
not found”. If this happens; either navigate to another instrument model
from the same or another category (using the Piano Select dial) and
select to use this piano instead, or use the Nord Sound Manager appli-
cation to download the missing instrument to the Electro 6.
ABOUT PIANO SIZE
Nord Piano Library sounds come in up to four different sizes. Below is
an overview of how they differ in functionality:
Sml Med Lrg XL
Stereo sampled 3 3 3 3
Detailed velocity mapping 3 3 3 3
String resonance for middle range 3
String resonance for entire range 3 3
Fully mapped keyboard 3
Small (Sml) piano files use the least amount of space in the piano mem-
ory as they do not contain any pedal-down String Resonance samples
at all.
The Medium (Med) versions include pedal-down String Resonance
samples for the important middle region of the range.
The Large (Lrg) versions have the pedal-down String Resonance sam-
ples all across the keyboard.
Many pianos are also available in an Extra Large (XL) version. These are
“fully mapped” across the keyboard, meaning that each key on the Nord
now matches its exact equivalent on the original instrument. This natu-
rally imposes a substantial increase in size.
PIANO SELECT
CATEGORY AND MODEL
Use the PIANO SELECT dial to choose which piano sound you want to
use. These are the six categories into which all piano sounds are placed:
OFFSET PRINT CMYK VERSION

5. PIANO | 15
CATEGORY DESCRIPTION
Grand Acoustic and electric grand pianos
Upright Upright pianos
Electric Electric Pianos (tine and reed based)
Clav/Hps Clavinets and Harpsichords
Digital Digital piano sounds
Layer Layered piano sounds
MPianos can not be moved from one category to another.
The name of the selected model is shown at the bottom of the Program
section display, indicated by a keyboard icon.
ABOUT THE CLAVINET
On the original Clavinet D6, different pick-up combinations were select-
ed by pressing a number of rocker switches. This functionality is faithfully
simulated by the Nord Electro 6, which means that all original Clavinet
D6 pickup selections are available.
PICK-UP TYPE DESCRIPTION
Clav Model A: Only the “neck” pick-up; a warmer, less bright sound.
Clav Model B: Only the “bridge” pick-up; a bright sound.
Clav Model C: Both pick-ups on and in phase; a very full sound.
Clav Model D: Both pick-ups 180 degrees out of phase; the fundamen-
tal is almost cancelled out and the sound becomes thin.
LIST VIEW
Pressing SHIFT and turning the PIANO SELECT dial activates the LIST
view for piano sounds.
The Piano list top row displays the current category name (“Grand” in
this case), the number of models of that type (5), and the index of the
currently selected model (2). The default sort order is numerical, but
pianos can also be browsed alphabetically or by category, by pressing
the Abc or Cat soft button respectively.
KBD TOUCH
Pianos from the Nord Piano Libary typically have a very
wide dynamic range, and their dynamic response can be
adjusted according to what fits your personal style or the
context of your performance.
The default KBD TOUCH setting (all LEDs being off) facil-
itates playing softly yet expressively. With each increment of the Kbd
Touch setting (1, 2and 3) less effort is required to play loudly.
PIANO INFO
Pressing PIANO INFO (Shift + Octave Down) will display some additional
info about the currently selected model, such as its version number and
its exact size.
MONO
In MONO mode (Shift + KBD Touch) all stereo sampled pianos will be
played back in mono. The mono versions of our piano sounds are spe-
cially designed to provide optimal sound, even in mono.
STRING RES AND SOFT RELEASE
STRING RESONANCE
String Resonance refers to the acoustic phenomenon that occurs when
strings, or parts of strings, resonate at their fundamental or harmonic
frequencies when other strings are played.
When STRING RES is turned on, all notes you play will affect each other
to reproduce the wonderful acoustics that occurs inside an acoustic
grand or upright piano.
Also, when the sustain pedal is pressed down the fact that all dampers
are being lifted will further add to the resonance effect.
The sound level of the string resonance effect can be set in the Sound
menu, see page 27.
MIf a piano is selected that isn’t compatible with the String Reso-
nance feature, this function will be disabled. This applies to e.g.
small (Sml) versions of the grand pianos and uprights, and the
electric, digital and layer pianos.
SOFT RELEASE
Activating SOFT RELEASE will add a slightly longer and less pronounced
release to the piano sound. This is equivalent to what happens when
you adjust the damper tension in an acoustic or an electromechanical
instrument. The added release is individual for every note and responds
dynamically to the force with which you play.
MSome Piano types, such as Clavinets and Harpsichords do not
support the Soft Release feature. In these cases the button will be
disabled.
EQUALIZER
PIANO EQ SETTINGS
The EQUALIZER is used for instantly altering the frequency
content and character of the selected piano sound:
The SOFT setting filters out much of the high frequencies
and emphasizes the lower range, resulting in a subdued
and mellow sound.
The MID mode de-emphasizes both high and low frequen-
cy ranges, making for a focused and cutting sound with a prominent
mid-range.
The BRIGHT mode emphasizes the high frequency range, producing a
bright, brilliant sound which is also useful for bringing out the “ping” in
electric pianos.
CLAV EQ SETTINGS
An original Clavinet is equipped with 4 additional rocker switches,
which control the onboard EQ. Most of these settings combinations are
available on the Nord Electro 6. Use the EQUALIZER button to select your
preferred combination of the filter settings.
Piano Grand 2/5
1 Royal Grand 3D Med
2 Velvet Grand Med
3 Grand Imperial Med
4 Studio Grand 2 Med
AllNum Abc Cat
The list itself shows the currently selected model,
indicated by a rectangle, as well as the preceding
and following models.
OFFSET PRINT CMYK VERSION

16 | NORD ELECTRO 6 USER MANUAL OS V1.1X
6 PROGRAM
The PROGRAM section provides access to performance functions such
as loading and storing programs, access to Live programs, keyboard
split functionality and more. This is also where menus containing System
and Sound settings are found. The menus and their settings are covered
in a separate chapter, starting on page 26.
STORE
The STORE button is used for storing an edited program
to any location in the program banks. Storing a program
will overwrite the existing data in the selected memory
location.
MWhen the Nord Electro 6 is shipped from factory its memory is
protected, to avoid accidental overwriting of programs. To be able
to store Programs, the Memory Protect parameter needs to be set
to “Off” in the System menu. Read more about this on page 26.
STORING A PROGRAM
Here is how to store a program without changing its name:
1 Press the STORE button once. The Store LED will start blinking, and
the display will show the name of the program and its location.
2 To select a different store location use the dial and/or PROGRAM
1-4 and PAGE 3/4buttons. A program can also be stored to one
of the Live program locations by pressing the LIVE MODE button
and then selecting the desired Live program. The program at
the selected destination can always be auditioned by playing the
keyboard.
MTo cancel an ongoing Store operation, press EXIT.
3 When a suitable location has been selected, press STORE again to
confirm the operation.
NAMING A PROGRAM (STORE AS...)
1 To store and name your program press STORE AS... (Shift + Store).
2 The ABC soft button brings up a row of alphanumeric characters.
Use the dial to set the character for the current position. Let go of
the ABC button to move the cursor ahead. The dial or PAGE
3/4buttons can be used to move the cursor freely. The Ins soft
button is used for inserting a blank space at the cursor position and
the Del soft button is used for deleting the selected character.
3 To assign your program a category hold down the Cat soft button
and select any of the 20 categories from the list.
4 Press STORE to bring up the Store Program To screen. Use the dial
and/or PAGE 3/4and Program buttons to select a location.
5 When a suitable location has been selected, press STORE again.
Naming programs can also be done with the Nord Sound Manager.
KBD SPLIT
The Nord Electro 6 keyboard can be split into two
zones, referred to as LO (Lower) and UP (Upper), sep-
arated by the split point. Each sound engine (Organ,
Piano or Sample Synth) can be assigned to either or
both of these zones.
A single press on the KBD SPLIT button will simply turn the split on or
off. After a split has been activated, use the ZONE SELECT buttons (Shift
+ KBD Zone) in each instrument section to assign it to one or more
zones. The LO and UP Zone LEDs above the Zone Select button indi-
cates the current assignment.
KEYBOARD SPLIT SETTINGS
Pressing down on the KBD SPLIT button, as indicated by the “6“sym-
bol, will open up the Keyboard Split settings page in the display.
OFFSET PRINT CMYK VERSION
STORE PROGRAM TO
A:14
EightyNine
E
uvxyzABCDEFGHIJKLMNO
STORE PROGRAM AS
ABC DelCat Ins
ightyNine
OFFSET PRINT CMYK VERSION
260
Ballad EP1 Sml
B3
Synth Bass 5
A:14
EightyNine

6. PROGRAM | 17
CHOOSING A SPLIT POSITION
Use the dial to choose one of the 6 keyboard split positions, C3-F5, on
the Keyboard Split position page. LEDs are provided above the key-
board, indicating which split position is active.
SPLIT WIDTH SETTINGS
Normally the transition between two keyboard zones is immediate, with
no overlap between the sounds selected for each zone. By setting a
Width, sounds can instead be mixed or “cross-faded” across the split
point, creating a smoother transition between the sounds.
To adjust split Width, keep the KBD SPLIT button held down and press
the Width soft button, corresponding to the PROGRAM 2 button. There
are three different settings, selectable by turning the dial:
Off: With the Off setting there is no cross-fade between sounds.
Sml: The Sml setting represents a total width of 12 semitones. The
sound below the split point fades out across 6 notes above it and
sounds above the split point will similarily reach 6 notes below it.
Lrg: The Lrg setting provides a width of 24 semitones, 12 below the
split point and 12 above it.
EXTERNAL KBD TO LO
The EXTERNAL KBD TO LO feature allows for playing and controlling
the Electro 6 sound engines from an external keyboard connected to
its MIDI input. This can be handy in live situations where a secondary
keyboard can be used as a controller for parts of the Nord Electro 6, on
a per-program basis.
MWhen a sound engine is in External KBD to Lo mode its KB Zone
LEDs will be lit with a red light - indicating that it is not controlled
from the internal keyboard.
In External KBD to Lo mode the UP keyboard zone corresponds to the
entire Nord Electro 6 keyboard.
All parameter controls for externally controlled sound engines are still
accessible from the Nord Electro 6. This means that Organ drawbars,
Piano settings etc. can be adjusted as usual. The External KBD to Lo
setting is stored with a Program, along with all other panel settings.
MThe MIDI Channel for the External Keyboard feature is set in the
System menu. Read more on page 27.
SHIFT / EXIT BUTTON
Many controls have a secondary function which is
accessed by holding SHIFT and pressing the button or
turning the dial. Shift functions are always printed below
the corresponding control. For example, holding Shift and
pressing the Program 2 button will open up the Sound Menu. The Shift
button is also used to EXIT menus, or for cancelling Store operations.
LIVE PROGRAMS
The Nord Electro 6 has eight easy-to-access Live pro-
grams. These programs are special in that edits to them
are automatically stored. When exiting a Live Program or
powering off the machine all edits are saved, without the
need for a manual Store operation. To select a Live Pro-
gram, press LIVE MODE and then any of the 1-4 buttons in the Program
area. Use the PAGE buttons to navigate between the two Live pages.
A Live program can be stored to a location in the program banks using
the standard methods. Conversely, a regular program can also be stored
into a Live program location.
TRANSPOSE ON/SET
The Nord Electro 6 can be transposed in +6/-6 semitone steps on a
per-program basis. Hold down TRANSP (Shift + Live Mode) and set the
value by turning the dial. Pressing TRANSP turns off or on a transposi-
tion. Transpose settings are saved and recalled as part of a program.
To set up a transpose that affects all programs, use the Global
Transpose parameter in the System Menu.
PROGRAM BUTTONS
The PROGRAM 1-4buttons give you immediate access to a range of four
programs – a Page – within the current program bank. They are also
used as soft buttons when operating menu settings. Read more about
soft button functionality on page 7.
WHAT IS A PROGRAM?
A Program contains references to the selected piano and/or sample
sounds, and all settings made on the panel except for Master Level. A
program does not store settings made in the System or Sound menus.
SYSTEM AND SOUND MENUS
Press SYSTEM (Shift + Program 1) or SOUND (Shift + Program 2) to enter
the System or Sound menu. The System menu is also home to all MIDI
settings. To read more all available menu settings, turn to page 26.
PROG INIT
The PROG INIT (Shift + Program 3 button) functions can be used to
quickly initialize the panel to one of four basic configurations:
Org/Piano/Synth: Activates the selected sound engine, and sets it as
Source for all effects. Other sound engines are deactivated.
Dual Org (Organ Split): Activates the Organ section and KBD Split, and
turns on the Dual Organ function. It also sets Source to O(Organ) for all
effects. All other sound engines are deactivated.
PROGRAM DIAL
The PROGRAM dial to the right of the Display is used to
select programs, to set parameter values and to enter
characters in program names. Pressing SHIFT while turning
the dial activates the LIST function, which will display all
programs in a list.
KEYBOARD SPLIT
Split Width
C4 Lrg
WidthPos
OFFSET PRINT CMYK VERSION

18 | NORD ELECTRO 6 USER MANUAL OS V1.1X
PROGRAM LIST, ABC AND CAT
The LIST (Shift + Program dial) view provides great overview when
browsing programs linearly (Num selected in the display) but also pre-
sents two additional sort modes: Abc (Program 2) and Cat (Program 3).
Abc sorts the list alphabetically while Cat will display all programs of the
selected category. To select a specific character or category, hold down
the Abc or Cat soft button respectively (as indicated by the “6“ symbol)
and use the dial.
MThe List sort mode is remembered until List view is entered again.
NUMERIC PAD NAVIGATION MODE
There are two distinct options for how programs and banks are navigat-
ed: The default "Page based" mode and the Numeric Pad mode. Which
mode is used is determined in the System Menu (see page 26).
In Numeric Pad mode the Program 1-4 buttons are used for entering
any program number (11-44) within the current bank, rather than directly
switching between the 4 programs on a page. As an example, to select
program 12 within the current bank, first press Program button 1 (to
select page 1) and then Program button 2 (to select program 2 within
that page). Here are some additional points to keep in mind:
• In Numeric Pad mode the PAGE buttons switch between banks.
• The Program dial can be used for switching programs incrementally,
just as in Page Based mode.
• A “num” symbol in the top right corner of the display indicates that
Numeric Pad navigation is active.
MIDI LED INDICATOR
The MIDI LED, located in the top right corner of the Program
section, blinks as incoming MIDI messages are received by the
MIDI In port, or over USB.
PAGE BUTTONS
Program pages – or banks, when in Numeric Pad
navigation mode – are navigated with the PAGE 3/4
buttons. Each bank (A-Z) holds 4 pages, with 4 pro-
grams in each page. They are also used for navigating
menu settings, and for moving between categories/
characters when browsing lists in Cat or Abc mode.
ORGANIZE
The ORGANIZE (Shift + Program 4) view allows for moving or "swap-
ping" programs within the program banks. This can be done either on a
per-program basis when the Prog view is focused, or an a page basis –
handling sets of 4 programs at a time – when Page view is selected.
Page operations are especially useful when preparing a set list or similar,
as groups of programs that are used within the same song can then be
arranged in a specific order.
ENTER THE ORGANIZE VIEW
1 Press ORGANIZE (Shift + Program 4) and then press either Prog
(Program 1) or Page (Program 2), depending on what sort of
operation should be performed.
SWAP PROGRAMS OR PAGES
A Swap operation interchanges the positions of two programs or pages.
2 Use the dial to select the program or page location which should
be swapped with another and press Swap.
MIn Page view, the program range, i.e. "G:31-34", is displayed but
only the name of the first program is shown for each page.
3 Use the dial to select the destination and press Ok to complete the
Swap operation. Pressing Undo will instead cancel the operation.
MOVE A PROGRAM OR PAGE
4 Use the dial to select a program or page which should be moved to
another location and press Move
5 Select the destination location for the operation, using the dial and
press Ok. Pressing Undo will instead cancel the operation.
ENote that programs between the source and destination locations
are shifted one step up or down, changing which programs are
part of each page within the affected range.
MPrograms can also be organized using the Nord Sound Manager.
Program EPiano1
G:31 Lullaby Upright
G:32 Ballad Reeds
G:33 B3 Silk
G:34 Graceful Duo
Num Abc Cat
260
Ballad EP1 Sml
B3
Synth Bass 5
A:1-
EightyNine
num
OFFSET PRINT CMYK VERSION
Program Organize
G:31 Lullaby Upright
G:32 Ballad Reeds
G:33 B3 Silk
G:34 Graceful Duo
Prog Page Swap Move
Program G:32
G:33 B3 Silk
G:34 Ballad Reeds
G:41 Velvet Bop
G:42 Clock Tines
Undo Ok
Program G:32
G:33 Graceful Duo
G:34 Ballad Reeds
G:41 Velvet Bop
G:42 Clock Tines
Undo Ok
In this example, the Program 1 button has been pressed. The dash (-)
indicates that another digit can be entered, to select program 11-14.

7. SAMPLE SYNTH | 19
7 SAMPLE SYNTH
ON/OFF, LEVEL AND ZONE SELECT
The Sample Synth section is turned On or Off by pressing its ON/OFF
button. The LEVEL dial controls the volume of the Sample Synth section.
Press ZONE SELECT (Shift + On/Off) to assign the Sample Synth to any
of the active keyboard zones. The KBD ZONE LEDs indicate which zones
the Sample Synth is assigned to. Read more about this on page 16.
OCTAVE UP/DOWN
Use OCTAVE UP/DOWN to transpose the Synth section up or down by
octaves (+/- 12 semitones). When assigned to the entire keyboard it can
be transposed one octave up or down. When assigned to only one zone
the available transpose values will vary, but always provide access to the
entire range of the synthesizer.
SUSTPED AND CTRLPED
SUSTPED (Shift + Octave Up) activates any attached sustain pedal for
the Synth section.
CTRLPED (Shift + Octave Up) assigns any attached control pedal as a
volume control for the Synth section.
Read more on how to configure attached pedals on page 26.
ABOUT THE SAMPLE SYNTH
The versatile Sample Synth section can hold up to 512 MB of samples
and comes with a large selection right out of the box. Additional sam-
ples can be found in the Nord Sample Library section of the www.nor-
dkeyboards.com website, and are downloaded to the instrument using
the Nord Sound Manager software. To further the possibilities, custom
samples can be created from any sound source using the Nord Sample
Editor application, also found on the Nord website.
SELECTING A SAMPLE
Use the SAMPLE SELECT dial to scroll through the available samples. The
position and name of the selected sample is shown in the Program area
display. Which sample is selected is stored in the program, when a Store
operation is performed.
LIST VIEW
Pressing SHIFT while turning the SAMPLE SELECT dial allows for brows-
ing all samples in a list. The Abc and Cat soft buttons can be used for
displaying samples based on name or category. To filter out only the
samples from a certain category, press down on the Cat soft button and
select the desired category using the PROGRAM dial.
SHAPING THE SOUND
There are several ways to fine-tune the sound and behaviour of a loaded
sample, in order to make it more or less dynamic and responsive. Each
sample comes with preset values for the parameters below, which are
automatically loaded when a sample is selected. Of course, all controls
can still be adjusted manually as desired.
DYNAMICS
With the DYNAMICS control four different levels of velocity response can
be selected. If this funcion is turned off (no LED being lit) samples will
always play back at full velocity. When active, the 1, 2and 3 settings
provide increasing degrees of dynamic range.
FILTER
Press FILTER (Shift + Dynamics) to apply a velocity sensitive low pass
filter to the Sample Synth. The filter reacts to how hard the key is being
played and gives the sound a more dampened quality when played
softly and a brighter character when more force is applied to the key.
ATTACK, SUSTAIN AND DECAY/RELEASE
These controls allow for setting the contour, or envelope, of the Sample
Synth sound:
ATTACK controls the time it takes for the sample to reach its full level
while DECAY/RELEASE determines how quickly the sample fades after
having been triggered. At 12 o’clock the sound is in SUSTAIN mode,
meaning that a sample will sound as long as the key is being pressed.
Settings past 12 o’clock give samples an increasingly long tail after the
key has been released.
OrchStrings Marc HiVib
OrchStrings Leg HiVib
OrchStrings Tremolo
OrchStrings Pizzicato
5
4
3
2
Sample Ens Strings
Num Abc Cat
OFFSET PRINT CMYK VERSION

20 | NORD ELECTRO 6 USER MANUAL OS V1.1X
8 EFFECTS
ACTIVATING EFFECTS
To enable an effect, press its ON/OFF button. The LEDs above the button
indicate which sound engine the effect is assigned to; O= Organ, P=
Piano and S= Sample Synth. Press SOURCE (Shift + On/Off) to change
the sound engine assignment.
Source can also be changed by double-clicking the Source button.
EFFECT 1
The EFFECT 1 unit offers six different types of modulation effects. Use its
Selector button to switch between the available settings.
TREM (TREMOLO)
TREM (Tremolo) provides a volume modulation that
continuously varies the volume of the output signal.
Tremolo is a very common effect to use with electric
pianos.
There are three intensities, TREM 1, 2and 3(1+2) to
choose from.
PAN (AUTO PAN)
PAN is an automatic panning modulation that
smoothly moves the signal between the left and
right sides of the stereo panorama.
There are three different intesities, PAN 1, 2and 3
(1+2) to choose from.
WAH
The WAH (Wah-Wah) effect gives the sound a characteristic, “Quack”-
like character and can be extremely useful on electric pianos and
Clavinets. The Wah-Wah modulation is a lowpass type of filter that can
be swept across the frequency range using the Effect 1 knob. During
the sweep, the filter’s characteristics also changes.
The Wah effect uses the signal’s amplitude to control the filter sweep
range, making the effect “velocity sensitive” (technically referred to as an
“envelope follower”).
This effect can also be used as a traditional Pedal Wah with an ex-
pression pedal connected to the Control Pedal jack, if the CTRLPED
mode for Effect 1 is engaged.
RM (RING MODULATION)
Ring Modulation (RM) is a type of modulation where two signals are mul-
tiplied with each other, resulting in an in-harmonic “bell like” sound. On
the Nord Electro 6 the instrument signal is multiplied with a sine wave.
The Ring Modulation amount is fixed, and its rate is controlled by the
Effect 1 knob.
CTRLPED
All effects in the Effect 1 section can be controlled by a pedal connected
to the Ctrl Ped input jack, achieved by pressing CTRLPED (Shift + Effect
1 selector). For the Tremolo and Pan effects, the pedal controls the
effect amount – something which can not be done from the panel.
For Wah and RM, the pedal mirrors the Effect 1 knob which in case of
the Wah makes it behave as a traditional Pedal Wah, and with the RM
effect provides pedal control of the modulation rate.
OFFSET PRINT CMYK VERSION
Table of contents
Popular Keyboard manuals by other brands

Real-El
Real-El STANDARD 503 Kit user manual

CTX Virtual Technologies
CTX Virtual Technologies VK200 KEYFOB user guide

Zagg
Zagg Slim Book instructions

SHENZHEN CTECH SCIENCE & TECHNOLOGY
SHENZHEN CTECH SCIENCE & TECHNOLOGY X323 user manual

Canyon
Canyon Velvet Tread HKB-W20 quick guide

BTC
BTC 5100C user manual