Clean MATE 365 QQ-1 User manual

Clean MATE 365Clean MATE 365
Clean Mate 365
Clean MATE 365Clean MATE 365
Vacuum Cleaner
Intelligent Automatic Vacuum Cleaner
Intelligent Automatic
Model No. QQ-1Model No. QQ-1
USER MANUALUSER MANUAL
Model No. QQ-1Model No. QQ-1

!
!
!
!
!
!Safety Precautions
Safety Instructions
Battery and Recharging
Special Features
Cautions
Main Unit and Accessories
Parts of Main Unit
Control Panel
Remote Control Functions
Battery Installation and Removal
Recharging the Battery
Installing Basic Accessories
SweepingBrushInstallationandRemoval
General Operation
Preparationforuse
StartingOperation
Cleaning and Maintenance
QQ-1 Useful Tips
RollingBrushInstallationandRemoval
FragranceInstallationandRemoval
StoppingOperation
Maintenance
CleaningtheDustHamper
CleaningtheVacuumEntry
CleaningtheUndersideRollingBrush
Safety Precautions
Safety Instructions
Battery and Recharging
Special Features
Cautions
Main Unit and Accessories
Parts of Main Unit
Control Panel
Remote Control Functions
Battery Installation and Removal
Recharging the Battery
Installing Basic Accessories
General Operation
Cleaning and Maintenance
QQ-1 Useful Tips
SweepingBrushInstallationandRemoval
Preparationforuse
StartingOperation
Beforeusingthisproductpleasereadthefollowingsafetyinstructions
andkeepthisoperationmanualforfuturereference.
Beforeusingthisproductpleasefollowallnormalsafetyprecautionsto
avoidtheoccurrenceofsituationssuchasfire,short-circuit,andinjury.
Pleasemakesurethatyouobserveallthefollowingsafetyprecautions:
1,Readthisusermanualthoroughlybeforeusingthisproduct.
2,Thisproductisnotforuseoutdoors.
3,Thisproductisanelectronicdevice.Nevergetitwetorletitcomein
contactwithwater.Donotuseitinamoistspace,suchasa
bathroomorapantry.Thisistopreventdamagetotheelectronics.
4,Beforeusingthisproduct,pleasetidyupthingsonthefloor.Youmust
tidyorremoveallobjectsleftonthefloorthatcouldstopthe
device,likescatteredclothing,paper,powercords, telephone cords,
andextensioncords.Ifthereareblindsorcurtainsthatreachthe
floorintheroom,youmustrollthemuptopreventadangerous
situation.Duringoperations,objectslikepaperorpowercords
mightgetsuckedintotheproduct.Asthevacuumisdraggingalong
thepowercord,itcouldtipoveratable,achair,acabinet,ora
bookcase,causingadangeroussituation!
5,Pleasedonotstandorsquatontopofthisproduct.Payspecial
attentiontotoddlers,children,orpetsinthehousetopreventa
dangeroussituation.
6,Pleasedonotusethisproducttocleanastill-burningcigarette,alit
matchorembers.
7,Pleasedonotusethisproducttocleanflammableorhighlyvolatile
liquidssuchasgasolineorwhitegasoline.
8,Ifthereisabalconywheretheproductiscleaning,pleaseclosethe
doortothebalconysothattheproductdoesnotoperateoutofthe
balcony,causingadangeroussituation.
9,Topreventtheproductfrombeingdamaged,nothingshouldbe
blockingtheairventwhilethemachineisinoperation.
10,Fornomatterwhatreason,iftheunitisdroppedandisdamagedor
unabletofunction,thentheunitcannotbeused.
11,Whennotinuseforlongperiodsoftime,thepowerswitchmustbe
turnedoff.
1,Whenusingrechargeablebatteries,please use the correct voltage and
currentlistedontheproduct.Ifyouarenotsureaboutthestandard
voltage,pleaseaskyourdistributororquerythelocalelectricity
Safety Instructions
Battery and Recharging
11 22
2
2
2
3
4
5
6
7
8~9
10
11
12
12
12
13
14
14
14
15
15
15
16
17
18
19~20
2
2
2
3
4
5
6
7
8~9
10
11
12
12
12
13
14
14
14
15
15
15
16
17
18
19~20
Clean Mate 365
QQ-1
Table of ContentsTable of Contents
Clean Mate 365
QQ-1
Safety PrecautionsSafety Precautions
company.
2,Usethefactory-providedbatteries.
3,Whenthebatteriesneedtoberecharged,usethefactory-providedcharger.
4,Onlyusethebatterychargerindoors.
5,Whenyourhandsaremoist,donottouchthebatterychargerortheplug
andpowercord.
6,Whenyouneedtocleanthisproduct,stopcharging,andremovethe
battery.
1,Thisproductisagroundbreaking,revolutionaryautomaticvacuum
cleaner.Besidestherollingbrushesonthebottomandthestrongvacuum
entry,italsohasultravioletlightprovidingdisinfectionsandafragrance
forremovingodors.Italsocomeswithaspecializedbuilt-inremote
control,allowingyoutofreelyandeasilycommandittocleananypartof
theroom.Suitableforuseonanynormalhouseholdorofficefloors,
whetherifitisonabasicfloor,anartificialplasticfloor,awaterproof
carpet,ceramictiles,orathincarpet.AslongasyouhavetheQQ-1
IntelligentAutomaticVacuumCleaner,youhavethemosthelpful
housecleaningmate.
2,Compactshapeenablesittocleancompletelyunderbeds,tables and other
furniturewheredust,pethairandallergenscanbeeasilyaccumulated,
whichstandardsuprightvacuumscannotdo.
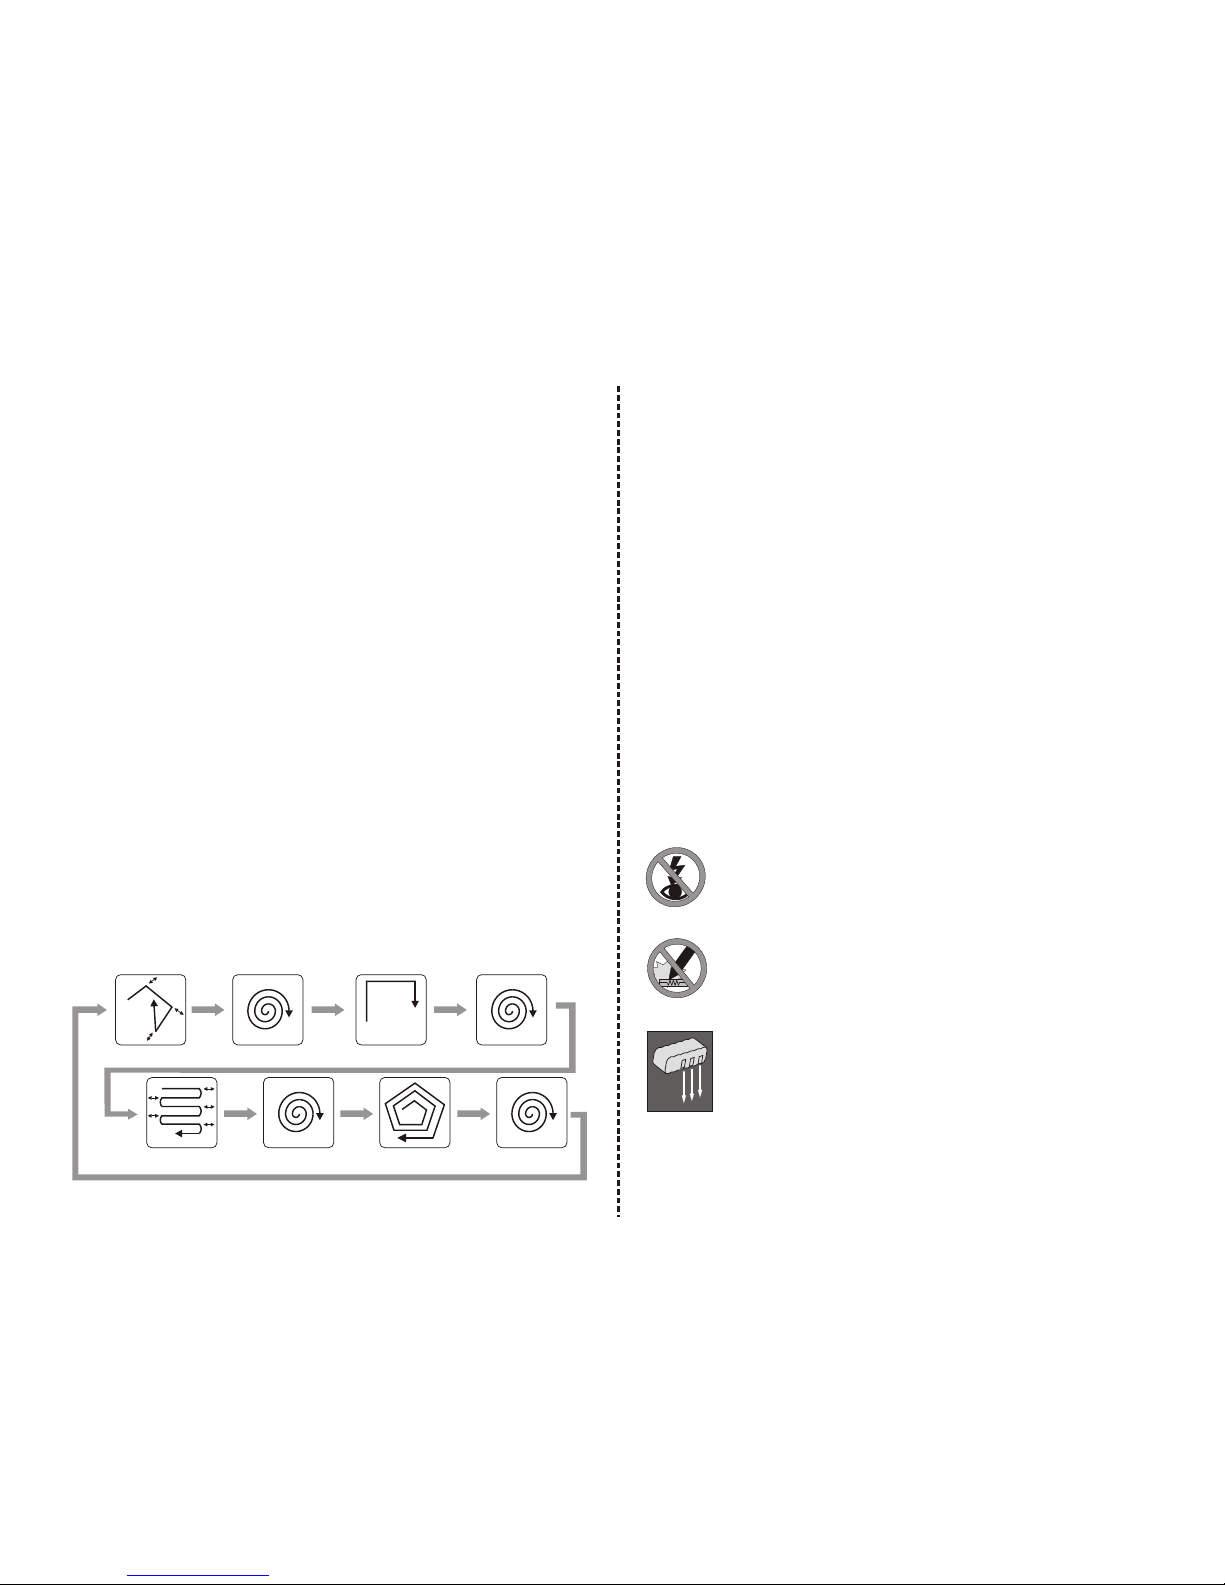
3,AftertheQQ-1IntelligentAutomaticVacuumhasbeenturnedon,it
willfollowafivesteprepetitiverotationmovement:thespecialbounce,
thespiral,thealongwallside,theAS@curve,thepolygonalspiral,and
againthespecialbounce,tocovereveryspacewithitswide-ranging
rotatingmovements.Assoonasitbumpsintoawall,apieceoffurniture
oranyotherlargeobstacle,theQQ-1willmoveforwardalongsidethe
wallortheedgeofthefurniture,sweepingdirtordusttowardsits
vacuumentrywiththebrushesontheedgesofthedevicetobevacuumed
in. Bythisbackandforthrotatingmotion,itcaneffectivelycoverallof
yourroom.
Special Features
4,Furthermore,theQQ-1isequippedwithanautomaticlight-sensing
device.Whenthebatteryislowandthecleaningjobiscompleted,it
willautomaticallymoveawayfromdarkareasunderthebedortables,
andstopatabrighterspot,allowingyoutofinditeasily.Ifitcannot
findabrightspot,itwillautomaticallystopaftersevenminutes.
Otherwiseyoucanalsopressthestopbuttonontheremotecontrolto
maketheQQ-1emitalongsound,allowingyoutoconvenientlylook
fortheQQ-1.
5,ThereisatransparentwindowontopofthemainmoduleoftheQQ-1
thatgivesaviewtoseeifthedusthamperisfull,italsohasahandle
aperturethatallowsyoutoeasilypickupandcarrythemachine.
6,Withphotosensorstodetectstairstand,QQ-1canturnaway
immediatelytokeepitfromfallingdown.
7,Byseparatemode,youcanchoosetouseonlyonekindofthefive
movementstocleanyourhouse.Itwillmakethecleaningjobmore
easilyandflexible.Forexample,youcanchoosetouse"spiral"
movementtocleanthespotareaor"alongwallside"tocleanallofthe
wallsideinyourroom.
Cautions:
Don't directly expose your eyes to the UV
Light
Don't use any objects to pick up the UV light
Tube
Please make sure the battery is installed in
The correct orientation
3344
""
Sha e
Sp
Special Bounce Spiral Along Wall Side Spiral
Spiral Polygonal Spiral Spiral

1,QQ-1MainUnit X1
2,RemoteControl X1
3,Filter X2
4,RechargeableBattery X1
5,Charger X1
6,UserManual X1
7,LittleCleaningBrush X1
8,Fragrance(SoldSeparately)
After opening the box please make sure that all the
parts are included.
Ultraviolet Light
Battery Cover
Fast Recharge socket
Auxiliary Wheel
Rolling Wheel
Vacuum Entry
Sweeping Brush
Foot Wheel
Handle Aperture
Dust Hamper
Discharge Button
Air Vent
Remote Control
Time set Button
Remote Control
Sensor Start/Stop Button
Bumper
Control Panel
Side Light
Dust Hamper
Power Switch
Battery Charging
Socket
1
2
3
4
5
6
8
5566
Clean Mate 365
QQ-1
Parts of Main UnitParts of Main Unit
Main Unit and AccessoriesMain Unit and Accessories
Clean Mate 365
QQ-1
7
Clean MATE 365
Intelligent Automatic
Vacuum Cleaner
Model No. QQ-1Model No. QQ-1
USER MANUALUSER MANUAL
Clean Mate 365
QQ-1
6
Function of each Button:
1,Start Button: Press the Start Button to begin the
activity of the QQ-1.
2,Stop Button: Press the Stop Button to stop the
activity, and it will emit a long sound to make it
easier to find the device.
3,Forward Button: Press the Forward Button and the QQ-
1 will automatically move forwards in a straight
line until it bumps into an object or when the Stop
Button is pressed.
4,Reverse, Right, Left Buttons: Pressing and holding
down these buttons will make the QQ-1 move forward,
in reverse, to the right, and to the left
respectively until the button is released. This is
helpful in moving the QQ-1.
5,Time Set Button: Use this button to set the activity
time of the QQ-1.
6,Separate Mode: When the QQ-1 is in automatic
cleaning mode, pressing this button and the QQ-1
will enter the separate mode. According to the
number of your pressing this button, it will
Function of each Button:
Forward
Left
Reverse
Time Set Button
Ultraviolet Light
Side Light
Right
Start
Stop
Separate Mode
Vacuum Motor Off
Drop Sensor
1,Turn on the power switch, and the power light will light
up green.
2,Press the Time Set Button to set the length of operation
time. The numerical panel will display the operation
time. When power is first turned on, the default
setting is 30 minutes. The setting parameters are from
10 to 80 minutes in 10-minute increments.
3,Try to set the operation time by the size of the area to
be cleaned in order to prevent overuse of the battery
and shortening its lifespan.
4,When the battery is low the power light will blink red.
5,In the following situations the error light will light
up: High battery temperature, overloaded motor, and
no traction for more than three consecutive seconds.
1,When the power is turned on, the light will be green.
When not in use, please remember to turn off the
power.
2,When recharging, power must be turned off.
3,Please see the chart below for the meaning of other
lights.
The Meaning of Power Indicating Lights
Color of Power Lights Meaning
Green Light Battery has power
Blinking Green Light Charging
Blinking Red Light Battery is low
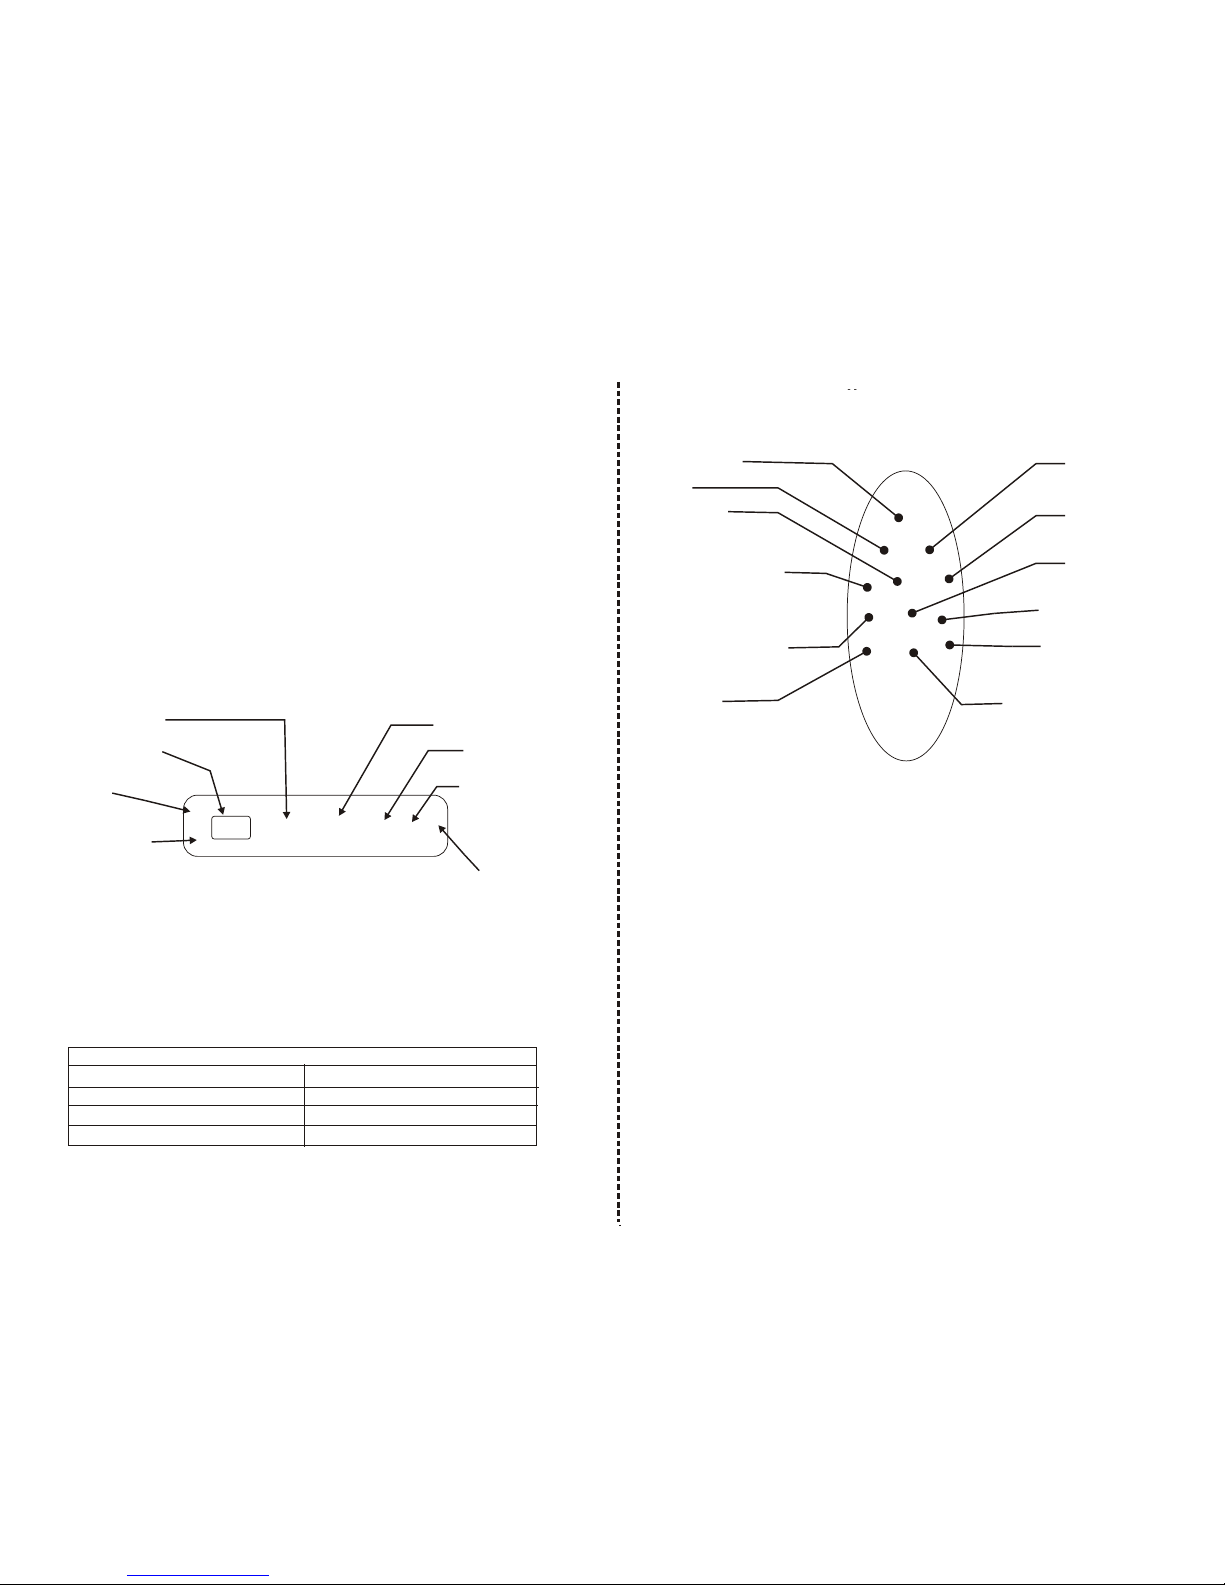
Power Indicating LightPower Indicating Light
Operational Time Display
Time Set Button Start/Stop Sensor
Error Indicator
Vacuum Motor
Off Indicator
Ultraviolet On
Indicator
Power Indicating
Light
Drop Sensor
On Indicator
7788
Control PanelControl Panel
Remote Control FunctionsRemote Control Functions
Clean Mate 365
QQ-1
Clean Mate 365
QQ-1
1.Make sure that the power of the unit is turned 'OFF'.
2.Use your fingers, depressing the tabs on the front of
the battery cover, and open the battery cover, as
shown in Illustration 1.
3.Make sure the battery is inserted in the correct
orientation by aligning the silver strips on the
battery with the metal tabs on the inside of the
battery compartment. See Illustration 2.
4.Replace the battery cover by first inserting the
tabs into the slots at the back of the unit, and
then pressing down on the front side of the battery
cover until the plastic tabs click in place. Please
see Illustration 3.
Illustration 1 Illustration 2
Illustration 3
practice the five exercises independently, that is,
spiral, special bounce, the along wall side,
the"S"shape, the polygonal spiral and finally back to
the automatic mode.
7,Ultraviolet light Button: When the QQ-1 is in automatic
cleaning mode, this button will control the
ultraviolet light power switch.
8,Side Light Button: Press the button to turn on the LED
side light.
9,Vacuum Motor Off Button: Press this button to control
the On/Off of the vacuum motor.
10,Drop Sensor Button: When QQ-1 is being used with dark
color carpet, it will move backward as soon as the
power is turned on. You can press this button to avoid
the occurrence of this situation. However, please make
sure there are not any stairs to let QQ-1 to fall down
to cause any damage owing to the disabling of this
sensor.
1010
99
Battery Installation and RemovalBattery Installation and Removal
Clean Mate 365
QQ-1
1
2
Clean Mate 365
QQ-1
1,The battery needs 7 hours to recharge(around 2.5 hours
for fast charger) . The first time, it should be
charged for a full 12 hours to achieve peak
performance of the battery.
2,If the power indicating light on the control panel
blinks red, the battery must be immediately charged.
3,First make sure that the power is Off, and the battery
is properly installed.
4,Place one end of the charger into the battery recharge
socket on the machine, and place the other end into a
conventional household wall socket, see Illustration
1. At this time the power indicating light on the
control panel will be flashing green.
5,After the battery has been fully charged, the power
indicating light will stop flashing and replaced by a
steady green light.
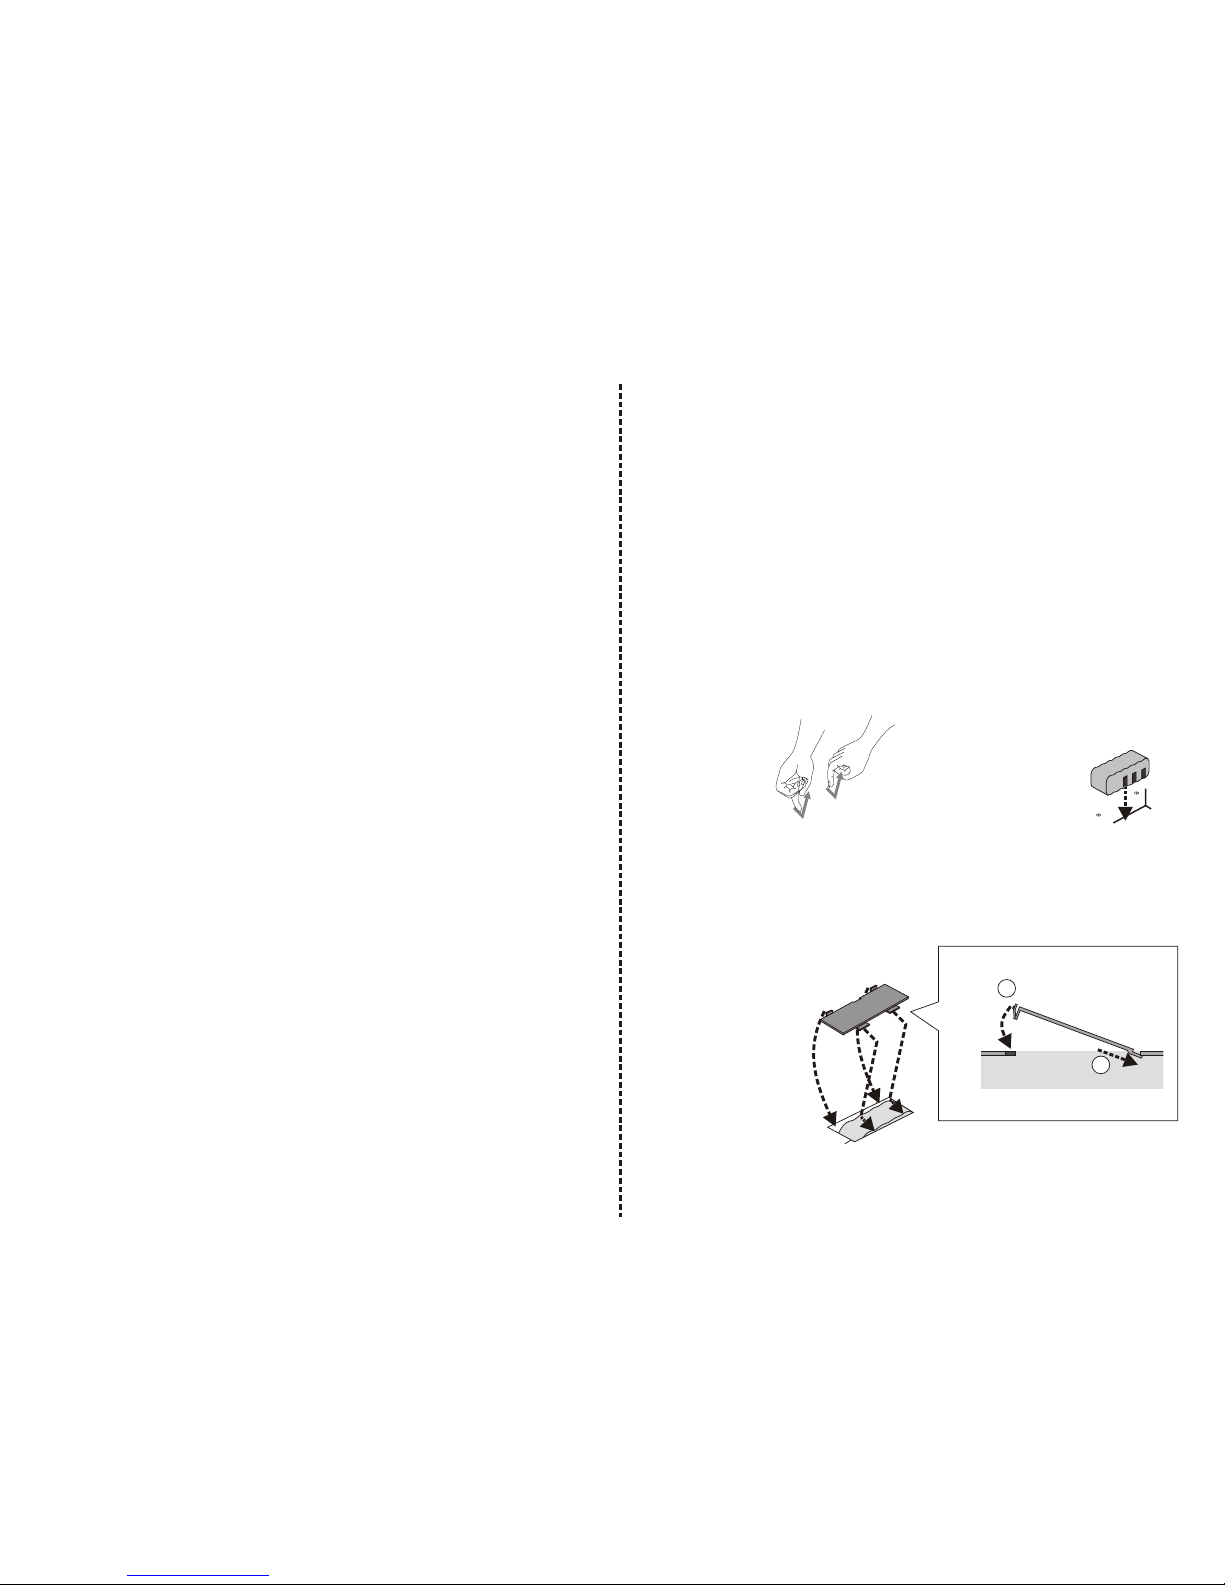
Sweeping Brush Installation and Removal
Rolling Brush Installation and Removal
Install the sweeping brush in the correct
orientation in its special slot on the bottom of the
main unit. Twist it in clockwise as shown below. If
you want to uninstall it, twist it out in a
counterclockwise motion.
Install and uninstall the rolling brush according to
the following illustrations:
Rolling Brush Installation
Sweeping Brush Installation and Removal
Rolling Brush Installation and Removal
1.Insert the rolling brush into
the flexible slot 2.Press the rolling brush into
the rolling brush slot.
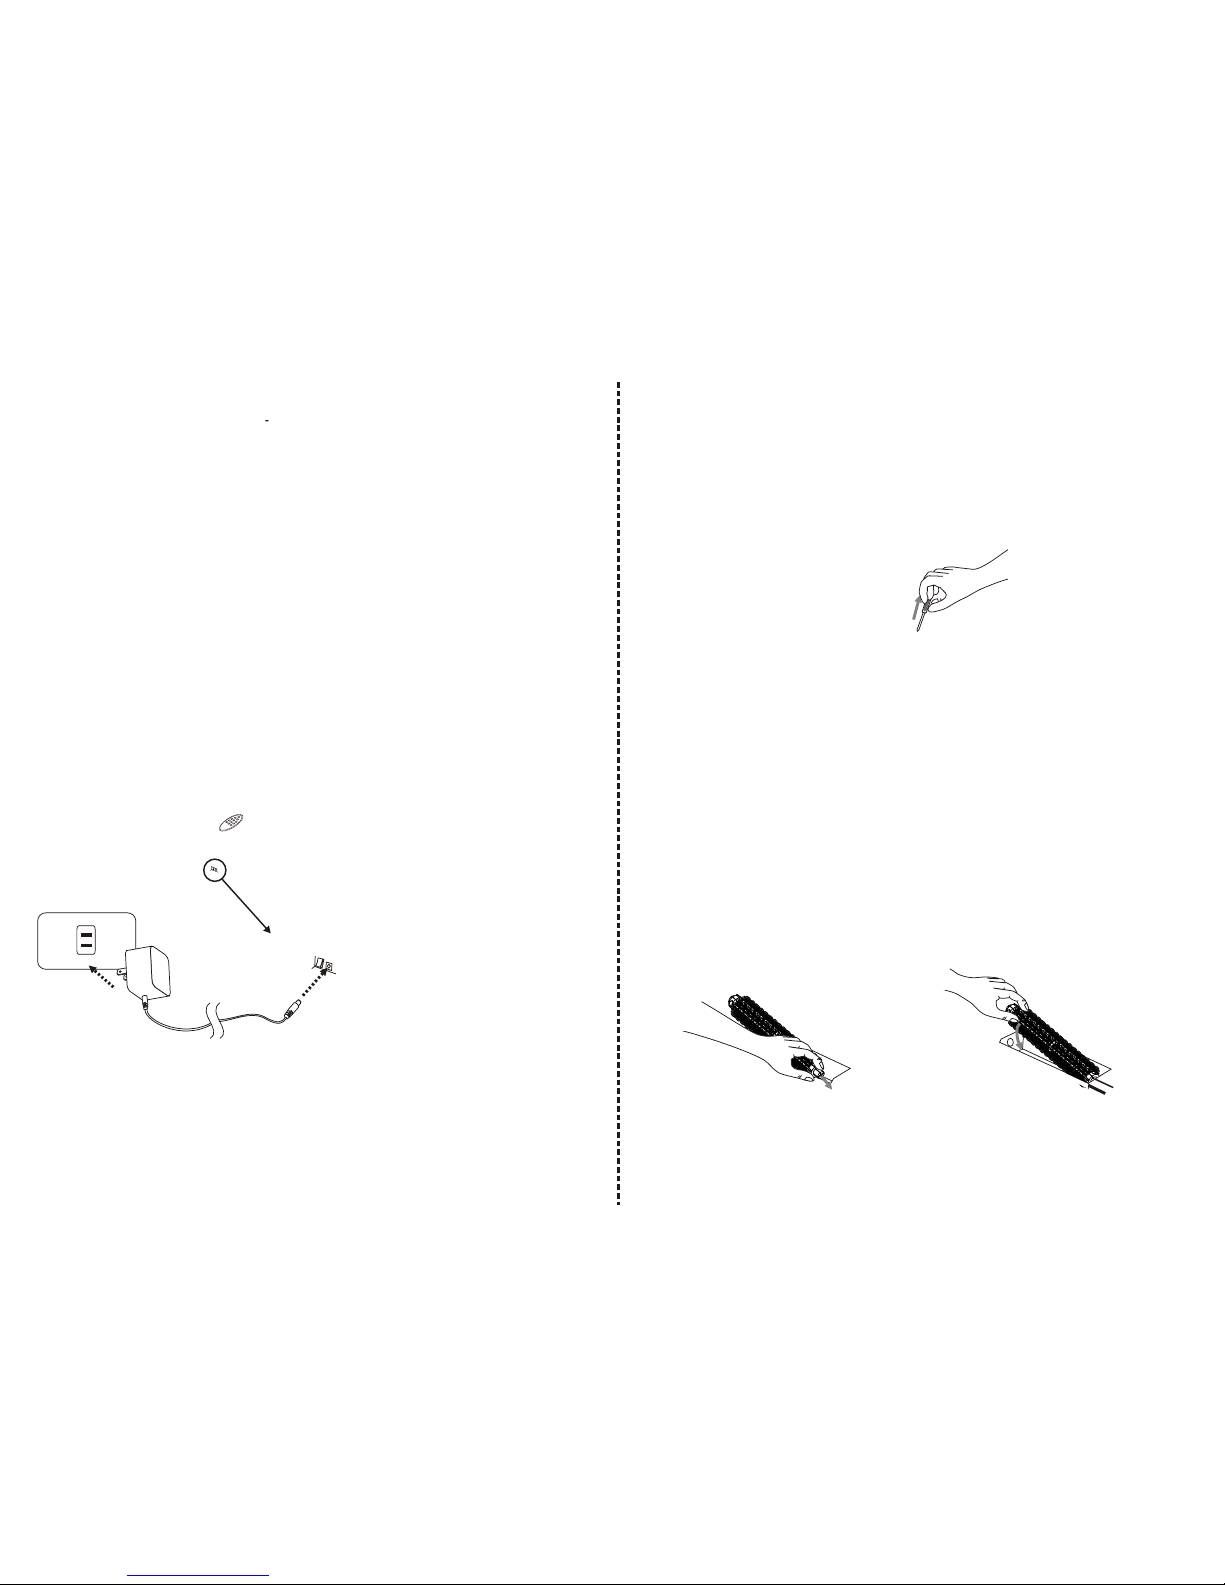
Illustration 1 When power is off, plug
the adapter into the
battery recharge socket
on the QQ-1 first, then,
plug the other end into
the wall socket
Caution! Please make sure the power is off when you
recharge the power
Please make sure the power is off when you
recharge the power
1111 1212
Installing Basic AccessoriesInstalling Basic Accessories
Clean Mate 365
QQ-1
Recharging the BatteryRecharging the Battery
Clean Mate 365
QQ-1

Preparing for use
In order for QQ-1 to provide the best vacuuming
performance, please first tidy up and remove all the
obstruction on the floor. You must pick up items that
have been left on the floor, such as clothing, power
cords, extension cords, and other fragile items. QQ-1
will sweep alongside the walls and edges of furniture,
so please remove all easily tipped over objects and
unstable furniture.
* Please do not use on plush rugs or long fur rugs.
When using QQ-1 for the first time, please carefully
watch how the QQ-1 performs its cleaning activity to
make sure it doesn't stop its sweeping activity due to
the fact that the floor is not even, or gets stuck in
between or under furniture. If the QQ-1 should get
stuck, it will turn its power off after 10 seconds to
ensure safety.
Starting Operation
1,Please clean out the dust hamper before use.
2,Place the QQ-1 in a relatively open space in the
room.
3,Turn on the power switch on the right side.
4,Set the timer according to your desired cleaning
time, adjust the cleaning time with the Time Set
Button. As reference, use 10 minutes of cleaning
time per 54 to 72 square feet of floor space,
though there may be differences in cleaning time
between different kinds of floors.
5,Press the start button, after 2 seconds, the QQ-1
will begin to automatically sweep the floor.
6,After automatic sweeping, the QQ-1 will emit a long
signal and automatically stop. A green light
indicates that it still has enough power, and can
be used again. A red flashing light indicates that
the battery needs recharging.
7,If the battery is low, it will emit two beeps every
minute to remind you to recharge in order to
lengthen the lifespan of the battery.
Preparing for use
In order for QQ-1 to provide the best vacuuming
performance, please first tidy up and remove all the
obstruction on the floor. You must pick up items that
have been left on the floor, such as clothing, power
cords, extension cords, and other fragile items. QQ-1
will sweep alongside the walls and edges of furniture,
so please remove all easily tipped over objects and
unstable furniture.
Starting Operation
1,Please clean out the dust hamper before use.
* Please do not use on plush rugs or long fur rugs.
When using QQ-1 for the first time, please carefully
watch how the QQ-1 performs its cleaning activity to
make sure it doesn't stop its sweeping activity due to
the fact that the floor is not even, or gets stuck in
between or under furniture. If the QQ-1 should get
stuck, it will turn its power off after 10 seconds to
ensure safety.
1414
1313
General OperationGeneral Operation
Clean Mate 365
QQ-1
Fragrance Installation and Removal (Fragrance sold
separately)
This Intelligent Automatic Vacuum has a slot to put a
fragrance. The installation method is as follows.
2,Place your finger in the aperture on the dust hamper
cover, and lift up the cover as shown in Illustration 2.
3,Take out the dust hamper as shown in Illustration 3.
Illustration 1 Illustration 2 Illustration 3
4,Open the fragrance packaging. Place the fragrance into
the small slot as shown in Illustration 4. (You can also
put in your favorite scented oil.)
Illustration 4 Illustration 5
Illustration 6
5,Replace the dust hamper as shown in Illustration 5.
6,Put the dust hamper cover back in its place as in
Illustration 6.
1,Press the Dust Hamper Discharge button. See the arrow in
Illustration 1.
1,Press the Dust Hamper Discharge button. See the arrow in
Illustration 1.

1,If you want to immediately stop the machine's motion,
you can press the Start/Stop Button, or pick up from
the ground.
2,Use the remote control and just press the Stop
Button.
If you want to continue vacuuming, just put the QQ-1
back on the floor, and press the Start/Stop Button
or use the remote control to press the Start Button.
The QQ-1 is designed with a series of safety measures.
When it has been picked up off the floor or when its
movement is unusual, it will stop and start beeping.
Notice: Please do not change the ultraviolet light tube
yourself.
Maintenance
The operation and maintenance of the QQ-1 is
completely simple. Just remember to clean out the
dirt from the dust hamper after each vacuuming, as
well as the dust stuck to the filter. There is no
need to clean the vacuum entry or the sweeping brush
each time.
Sweeping brush
(No need to clean each time)
Vacuum entry
(No need to clean each time)
Cleaning and Maintenance
Maintenance
1,Press the Dust Hamper Discharging button. See the
arrow in Illustration 1.
2,Place your finger in the aperture on the dust
hamper cover, and lift up the cover as shown in
Illustration 2.
Illustration 1 Illustration 2
3,Remove the dust hamper cover (Illustration 3.)
4,Take the filter out by lifting it upwards
(Illustration 4.)
5,Clean out the contents of the dust hamper
(Illustration 5.)
Illustration 3 Illustration 4 Illustration 5
6,Wash the dust hamper with water. (Illustration 6.)
Please do not put it inside a clothes washing
machine, dishwashing machine or any other kind of
1515 1616
Cleaning the Dust HamperCleaning the Dust Hamper
Clean Mate 365
QQ-1
Stopping OperationStopping Operation
Clean Mate 365
QQ-1

After operating the machine for a period of time,
dust and dirt will accumulate on the vacuum entry
on the bottom of the QQ-1, which is why you must
clean it regularly to allow the air to flow in
smoothly, and to prevent an influence on the
effectiveness of the vacuuming performance.
1,First make sure the power of the QQ-1 is turned off.
2,Shake out the dust and dirt that has accumulated
inside the vacuum entry as shown below.
Sweeping brush
Vacuum entry
1,Place the QQ-1 on a flat surface and turn it upside-
down.
2,Take out the rolling brush and manually pick out the
hair and other objects from the brush as shown
below.
3,Clean out the rolling brush slot, and check inside
for any hair or objects.
4,Reinstall the rolling brush to complete the cleaning
of the underside rolling brush.
Take out the rolling brush Clean out the rolling
brush slot
Manually pick out the hair and other objects from the
brush
Cleaning the Underside Rolling BrushCleaning the Underside Rolling Brush
automatic washing machine.
7,Use a brush to clean the surface of the filter as shown
in Illustration 7
Illustration 6 Illustration 7
8,After drying, install the filter and the dust hamper
back to its original position
9,Close the dust hamper cover and make sure that it is
properly inserted into its slot.
Illustration 8 Illustration 9
1818
1717
Cleaning the Vacuum EntryCleaning the Vacuum Entry
Clean Mate 365
QQ-1

1st item
Remove easily knocked over items from the area where
the QQ-1 moves around.
Clear the area where the QQ-1moves around.
In the area where the QQ-1 moves around,
the QQ-1might knock over items such as
vases, glasses, or lamps.
2nd item
63 c m
3rd item
FA
D
R
W
R
O
FA
D
R
W
R
O
LEFT
LEFTIRHT
G
IRHT
G
AK
C
B
AK
C
B
RI TMERI TMET
AR
STT
AR
ST
UV
UVOP
STOP
STP
SIRAL
P
SIRAL
MI
C&HT
U LISG
MI
C&HT
U LISGTM U E TM U E
CM
n t 3
lea a 6
e5
Sensor
Adjust the distance between furniture.
The width of the QQ-1is 36cm. Move the furniture so that the space
Between the furniture are greater than 36cm.
Clean Mate 365
4th item
5th item
6th item
FR
RAD
OW
FR
RAD
OW
FLET FLETRGHT
I
RGHT
I
KBACKBAC
ME
TR
IME
TR
ITR
T
A
S
TR
T
A
S
VUVUPSTOPSTOSI L
A
PR
SI L
A
PR
&
SUH
LT
I
I
CG
M&
SUH
LT
I
I
CG
MMUE
T
MUE
T
ea3
e5
CM
a
lnt6
When something is
jammed inside the QQ-1,
It will emit a beeping
sound
In order to provide the QQ-1 a space
for fast and safe cleaning, please
remove small items from the area
before operating.
Do not let the edges of tassels of rugs to curl into the QQ-1. Fold
Under the edges of rugs and remove easily curled objects before
Operating the QQ-1
When the QQ-1 is cleaning rugs,
first fold under the edges of the
rug
First remove plastic bags and leftover long-
shaped garbage
Tips for fixing jams in the QQ-1.
1, Stop QQ-1 immediately. 2, Remove the objects.
3, Clear vacuum entry and restart.
Turn off the QQ-1
manually or by remote.
Turn the QQ-1 upside-
down, and remove the
objects.
Clean the vacuum
entry.
Block areas where the QQ-1 might get stuck. Some chairs and
tables are not high enough, and they will cause the QQ-1 to get
stuck. Use something to block the QQ-1.
The space beneath some furniture is
just high enough for the QQ-1 to get
stuck underneath Use a pot plant to block the QQ-1 and
do not let it enter this kind ao space.
Aim the remote control at the sensor on the QQ-1. Anything
blocking the signal will affect the performance of the remote
control.
1919 2020
QQ-1 Useful tipsQQ-1 Useful tips
Clean Mate 365
QQ-1
Table of contents


